I tried running NeMo Agent Toolkit with a local configuration of DGX Spark + vLLM

This page has been translated by machine translation. View original
Introduction
Hello, I'm Morishige from Classmethod's Manufacturing Business Technology Department.
NVIDIA NeMo Agent Toolkit (package name nvidia-nat, formerly AIQ Toolkit / Agent Intelligence Toolkit) is a meta-layer toolkit that wraps existing agent frameworks such as LangChain and CrewAI horizontally for observation, evaluation, and optimization. It is designed with integration with NIM, NeMo Guardrails, and NemoClaw in mind.
Many official tutorials are written with the assumption of a NIM API key, and introductory Japanese articles similarly focus on using cloud inference. This article documents the steps to run agent execution, OpenTelemetry observation, and MCP server deployment on DGX Spark with an NGC vLLM container + Nemotron 3 Nano 30B-A3B-FP8 as the backend — all completed "without cloud NIM API."
NeMo Agent Toolkit
The first thing to understand is that NeMo Agent Toolkit is not "yet another agent framework." It incorporates LangChain, LangGraph, CrewAI, Semantic Kernel, Google ADK, and others via optional extras, and overlays a meta-layer of observation, evaluation, and optimization on top of them.
Developers basically only write workflow.yml, declaring what to attach in the 4 sections: functions / llms / embedders / workflow. It's a straightforward DSL where you switch implementations using the _type field, so switching from NIM to vLLM only requires changing a few lines.
The official rebrand from the former name (Agent Intelligence Toolkit / AIQ Toolkit) took place in June 2025, with the core technology and roadmap carried over. The backward-compatible packages aiqtoolkit / agentiq remain, but are scheduled for future removal, so use nvidia-nat for new installations.
Main Feature Overview
In keeping with the spirit of this first-steps article, here is a table of what's included.
| Category | Feature | Overview |
|---|---|---|
| Workflow Definition | YAML Declarative | Switch functions, LLMs, and workflows with _type |
| Agents | react_agent and others |
ReAct / ReWOO / Tool-Calling / Router |
| LLM Providers | _type: nim / openai / bedrock / litellm / huggingface and others |
OpenAI-compatible local inference servers connect the same way |
| Existing Framework Integration | LangChain / LangGraph / CrewAI / Semantic Kernel / Google ADK / Strands / AutoGen | Incorporated via optional extras |
| Observation | OpenTelemetry native | Send directly to LangSmith / Phoenix / Langfuse / OTel Collector |
| Evaluation | nat eval |
Batch evaluation with JSONL / CSV / Parquet datasets |
| Optimization | Automatic prompt and hyperparameter tuning | Genetic algorithm-based Optimizer |
| Protocols | MCP (client / server) / A2A | Publish your own workflow as an MCP server |
| Acceleration | Agent Performance Primitives / Dynamo Runtime | Parallel and speculative execution of LangGraph and CrewAI graphs |
| Security | PII protection and prompt injection countermeasure middleware | Red Teaming functionality also included |
Meta-layer use cases are envisioned, such as "delegating only the observation of an agent written in LangChain to NAT" or "optimizing a CrewAI flow in an evaluation-driven manner."
Considerations for Running on DGX Spark
The official tutorials start with an example that calls _type: nim with model_name: meta/llama-3.1-70b-instruct via the NIM API. This is the shortest path for verification, but when considering real-world use, there are situations where you want to complete everything with local inference.
From the NeMo Agent Toolkit side, whether it's NIM, vLLM, or Ollama, as long as it can ultimately be called as an OpenAI-compatible API, you can connect in the same way using _type: openai + base_url. The fact that swapping the backend is just one config line is also one reason to choose NAT as an agent infrastructure.
Verification Environment
| Item | Value |
|---|---|
| Hardware | NVIDIA DGX Spark (GB10, ARM64, 128GB UMA) |
| OS | Ubuntu 24.04 ARM64 |
| CUDA Toolkit | 13.0 |
| Container | NGC nvcr.io/nvidia/vllm:26.01-py3 / arizephoenix/phoenix:14.8.0 |
| Python | 3.12.12 (uv venv) |
| Package | nvidia-nat==1.6.0 (extras: langchain, mcp) |
| LLM | nvidia/NVIDIA-Nemotron-3-Nano-30B-A3B-FP8 |
Installation and Pitfalls
The nvidia-nat package itself is distributed as a pure Python wheel, so it installs without additional compilation even on ARM64. The smoothest approach is to create a venv with uv and then install.
mkdir -p ~/works/nemo-agent-toolkit && cd ~/works/nemo-agent-toolkit
uv venv --python 3.12
source .venv/bin/activate
uv pip install 'nvidia-nat[langchain,mcp]'
nat --version
# nat, version 1.6.0
Available extras include langchain / crewai / mcp / eval / opentelemetry / langsmith / phoenix, and others. Since I'm aiming for "local LLM with ReAct + MCP + observation," I only specified langchain and mcp. Looking at nat info components after installation, nvidia-nat-eval and nvidia-nat-opentelemetry are also included as part of dependency resolution. For introductory purposes, you can probably proceed without specifying them additionally.
Hello World with vLLM Local Inference
Starting the vLLM Container
The startup command for this time is based on the DGX Spark Playbook procedure with one line added: --trust-remote-code. Nemotron 3 Nano uses the nemotron_h (hybrid of Mamba and Transformer) architecture, which requires custom code bundled in the repository rather than the standard HF transformers implementation, so without this flag it crashes with a pydantic ValidationError before the API Server starts.
docker run -d \
  --name vllm-nat \
  --gpus all \
  --shm-size=16g \
  -p 8000:8000 \
  -v "$HOME/.cache/huggingface:/root/.cache/huggingface" \
  nvcr.io/nvidia/vllm:26.01-py3 \
  vllm serve nvidia/NVIDIA-Nemotron-3-Nano-30B-A3B-FP8 \
    --trust-remote-code \
    --max-model-len 8192 \
    --gpu-memory-utilization 0.85
Model loading took 30.5 GiB / approximately 4 minutes, torch.compile took approximately 2 minutes, after which a KV cache of 34.79 GiB was allocated, resulting in a configuration capable of handling up to 362x parallel requests with an 8K context.
Check that /v1/models responds.
curl -s http://localhost:8000/v1/models | python3 -m json.tool
Generating a Template with nat workflow create
NAT includes the nat workflow create command for generating project templates. Starting from here is the official flow.
mkdir -p workflows
nat workflow create --no-install --workflow-dir ./workflows hello_local \
  --description "Hello world workflow"
The generated output takes the form of a Python package, with custom functions and registration code under src/hello_local/, and the NAT declarative workflow definition in configs/config.yml.
workflows/hello_local/
├── pyproject.toml
└── src/hello_local/
    ├── hello_local.py      # Sample custom tool implementation
    ├── register.py         # Registration to NAT Type Registry
    └── configs/config.yml  # Workflow definition
The default config.yml is configured to call Llama 3.1 70B Instruct via NIM.
functions:
  current_datetime:
    _type: current_datetime
  hello_local:
    _type: hello_local
    prefix: 'Hello:'

llms:
  nim_llm:
    _type: nim
    model_name: meta/llama-3.1-70b-instruct
    temperature: 0.0

workflow:
  _type: react_agent
  llm_name: nim_llm
  tool_names: [current_datetime, hello_local]
Rewriting for Local vLLM
Since I want to run this on DGX Spark's vLLM, I replace _type: nim in the llms section with _type: openai + base_url. To focus on Hello World as an introduction, I simplified the configuration to use only the built-in current_datetime without the custom tool (hello_local). I also replaced the file with workflow.yml directly in the project root for easier handling.
functions:
  current_datetime:
    _type: current_datetime

llms:
  local_vllm:
    _type: openai
    base_url: http://localhost:8000/v1
    api_key: EMPTY
    model_name: nvidia/NVIDIA-Nemotron-3-Nano-30B-A3B-FP8
    temperature: 0.0

workflow:
  _type: react_agent
  llm_name: local_vllm
  tool_names: [current_datetime]
  verbose: true
The api_key is not required on the vLLM side, so a dummy string is fine. Omitting the field entirely will fail validation, so put in a string like EMPTY.
Running with nat run
nat run --config_file workflow.yml --input "今の日時を教えてください。日本語で回答してください。"
When executed, the ReAct Agent runs one cycle of think → tool call → final answer.
[AGENT]
Agent's thoughts:
Question: 今の日時を教えてください。日本語で回答してください。
Thought: I need to obtain the current date and time and then present it in Japanese.
Action: current_datetime
Action Input: None
------------------------------
Calling tools: current_datetime
Tool's response:
The current time of day is 2026-04-19 07:01:43 +0000
------------------------------
Agent's thoughts:
Thought: I now know the final answer
Final Answer: 現在の日時は 2026年4月19日 07:01:43(UTC)です。
The ReAct template is in English, so the thought process is in English, but when the user instruction is in Japanese, the final answer is returned in Japanese. The inference latency per query was around 13 seconds in practice for ReAct + 1 tool call, which is acceptable for local inference.
Using nat serve allows you to publish the same workflow.yml directly as a FastAPI server, so there's almost no rewriting needed when you want to bridge "from command line to API" in an in-house PoC.
Observing Existing Frameworks (Phoenix Integration)
One of the benefits of NeMo Agent Toolkit is that you can add an OpenTelemetry-based observation layer with just one config block. By declaring an exporter under general.telemetry.tracing, each step of the ReAct Agent, LLM calls, and tool executions are emitted as spans.
This time, I'll set up Arize Phoenix locally as an easy option for viewing data.
docker run -d --name phoenix-nat \
  -p 6006:6006 -p 4317:4317 \
  arizephoenix/phoenix:latest
Using NAT's standard general-purpose OTLP exporter (_type: otelcollector), I point it to Phoenix's OTLP HTTP endpoint /v1/traces.
general:
  telemetry:
    tracing:
      phoenix:
        _type: otelcollector
        endpoint: http://localhost:6006/v1/traces
        project: nat-hello-local

functions:
  current_datetime:
    _type: current_datetime

llms:
  local_vllm:
    _type: openai
    base_url: http://localhost:8000/v1
    api_key: EMPTY
    model_name: nvidia/NVIDIA-Nemotron-3-Nano-30B-A3B-FP8
    temperature: 0.0

workflow:
  _type: react_agent
  llm_name: local_vllm
  tool_names: [current_datetime]
  verbose: true
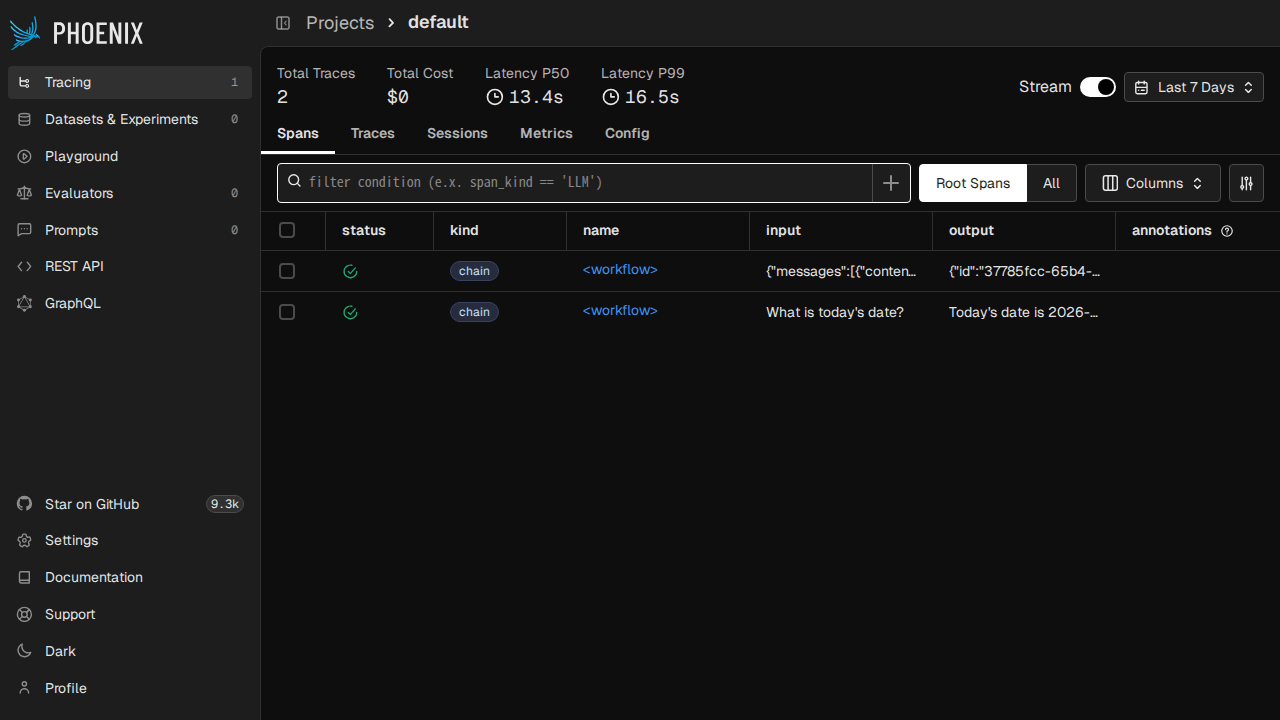
Running nat run again in this state and checking Phoenix's /v1/projects/<id>/spans API, I confirmed that a CHAIN span named <workflow> was recorded, capturing the input text, final answer, and elapsed time.
{
  "name": "<workflow>",
  "span_kind": "CHAIN",
  "attributes": {
    "input.value": "What is today's date?",
    "output.value": "Today's date is 2026-04-19."
  },
  "status_code": "OK"
}
Accessing Phoenix's Web UI (http://localhost:6006) makes it possible to see the trace tree view, elapsed time for each span, and even the LLM's prompt/completion token counts.
Opening one trace row lets you see at a glance the nested structure of the ReAct Agent (the inner <workflow> runs inside the outer <workflow>, with the current_datetime tool being called within it), along with input/output text, elapsed time, and the status of each span.
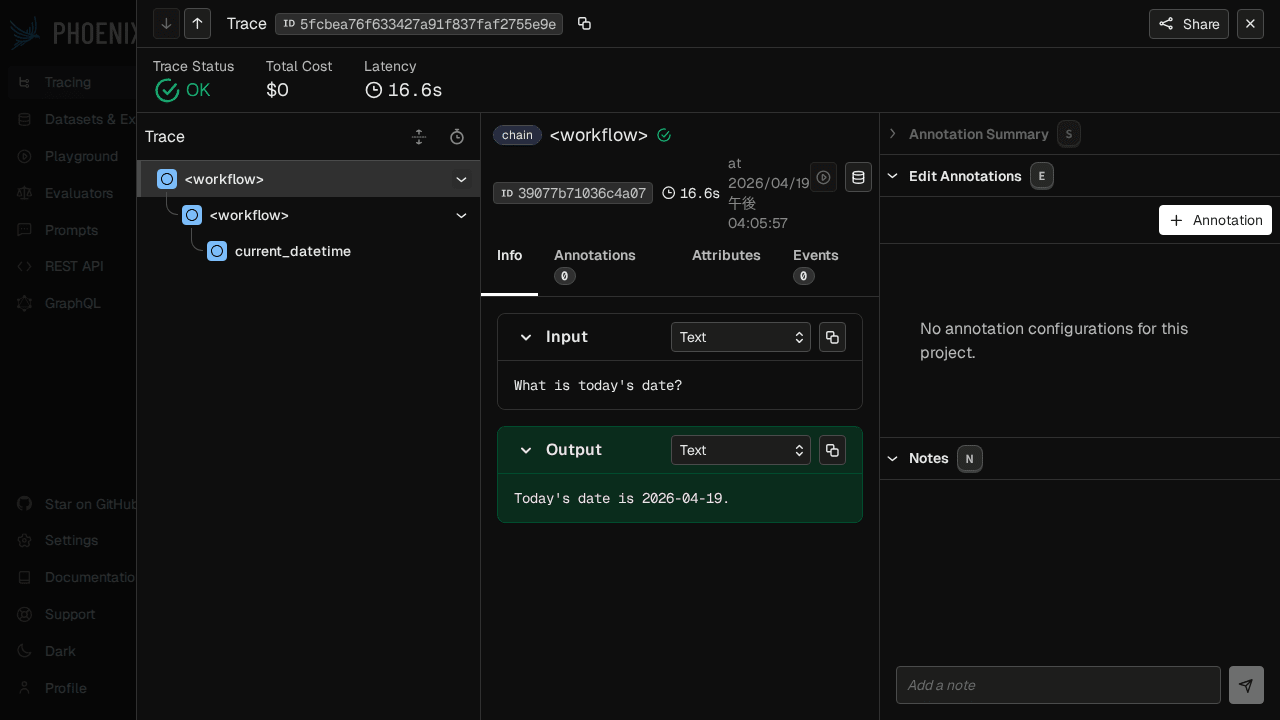
Sufficient tooling to observe agent behavior is now ready with just one Docker command line and one config block.
One caveat: even when specifying project: nat-hello-local, traces are consolidated into the default project in Phoenix. NAT sends it as the service.name resource attribute, but Phoenix's project routing requires a different header, so setting this up properly becomes the next task for production use. At the introductory stage, being able to "see that it's working" is sufficient, so I'll defer the deep dive to a separate article.
Publishing as an MCP Server
NeMo Agent Toolkit can publish the written workflow.yml directly as an MCP (Model Context Protocol) server. With a single nat mcp serve command, it transforms into a tool that can be called from Claude Code, Claude Desktop, and other MCP clients.
nat mcp serve --config_file workflow.yml \
  --name "NAT Hello Local" \
  --host 0.0.0.0 \
  --port 9901
The default transport is streamable-http, with protocol version 2025-11-25. You can verify connectivity using the NAT built-in MCP client.
nat mcp client tool list --url http://localhost:9901/mcp --direct
# current_datetime
# react_agent
The key point is that not only the built-in current_datetime, but the workflow itself (react_agent) is also automatically exposed as a single tool. The argument schema can be inspected with the --detail option.
nat mcp client tool list --url http://localhost:9901/mcp --direct --detail
# Tool: react_agent
# Description: ReAct Agent Workflow
# Input Schema: { "properties": { "query": { "type": "string" } }, ... }
By simply passing a query, the entire ReAct loop can be treated as a single tool call. Let's try calling it directly.
nat mcp client tool call react_agent \
  --url http://localhost:9901/mcp --direct \
  --json-args '{"query": "What is the current time?"}'
The returned response is an OpenAI ChatCompletion-compatible object, with content: "2026-04-19 07:08:21 +0000" and token usage of prompt 5 / completion 3 / total 8 captured as well.
At this point, a route becomes visible for calling your own agent running on DGX Spark as an MCP tool from an agent inside a NemoClaw sandbox or from Claude Code / Claude Desktop. It looks like it could be the lightest entry point for a hybrid configuration that uses a local LLM in the backend while having Claude on the front. I'd like to dive deeper into the MCP client side configuration and how to expose multiple workflows from a single server in a separate article.
What I Learned About What It's Suited For and Not
Here are my impressions from touching it as a first step.
The cases where it's well-suited are fairly clear: when you want to "observe," "improve in an evaluation-driven manner," or "turn into an MCP server" an agent already built with LangChain or CrewAI. Even without writing any NAT-specific code, being able to use OpenTelemetry, MCP, and A2A with just one config block felt like a design that's easy to incorporate as a meta-layer.
Conversely, for "just running a single agent + a single tool call," plain LangChain or directly calling the OpenAI SDK would be faster. NAT is a type of infrastructure that shows its true value when you want to span multiple frameworks or standardize observation and evaluation layers, so as a starting point, it's more practical to think about "how to layer it on top of existing assets."
Summary
I ran through the first steps of NeMo Agent Toolkit on a purely local configuration with DGX Spark + NGC vLLM.
nvidia-nat==1.6.0installs cleanly on ARM64 as a pure Python wheel- With the NGC vLLM container from DGX Spark Playbook as the backend, switching to local inference only requires two lines:
_type: openai+base_url - Adding just one block to
general.telemetry.tracingsends traces to Arize Phoenix - A single
nat mcp serveturns a workflow into an MCP server, transforming it into a tool callable from Claude Code and others
I found that the combination of local LLM × agent infrastructure × observation × MCP takes shape with less code than I expected, so please start by writing one workflow.yml on your local DGX Spark.
I'd also like to revisit running evaluation-driven agent development with nat eval and expanding to multi-agent setups with the A2A protocol.