
First time with ESP32. (Doing Hello World, blinking LEDs, making a mirror ball blink, and measuring soil moisture)
This page has been translated by machine translation. View original
Introduction
Hello everyone, I'm Akaike.
Have you ever done electronics projects with a microcontroller? I haven't.
That's because I usually work with cloud-related stuff, and I've had almost zero experience physically moving "tangible things" with my own hands.
That said, there was a time in the past when I wanted to try electronics projects with a Raspberry Pi, but it was too expensive when I went to buy one, so I got an ESP32 instead.
And then I realized last week that it had been sitting in the corner of my room for about half a year.
So this time, I'll write up a record of what happened after a complete beginner started playing with an ESP32 — going through the classic "Hello World" and "LED blinking," all the way to "mirror ball blinking" and "soil moisture measurement."
What I Use in This Blog
I bought most of the microcontroller-related items on Amazon.
- PC
- macOS 26.2
- Arduino IDE 2.3.10
- Microcontroller
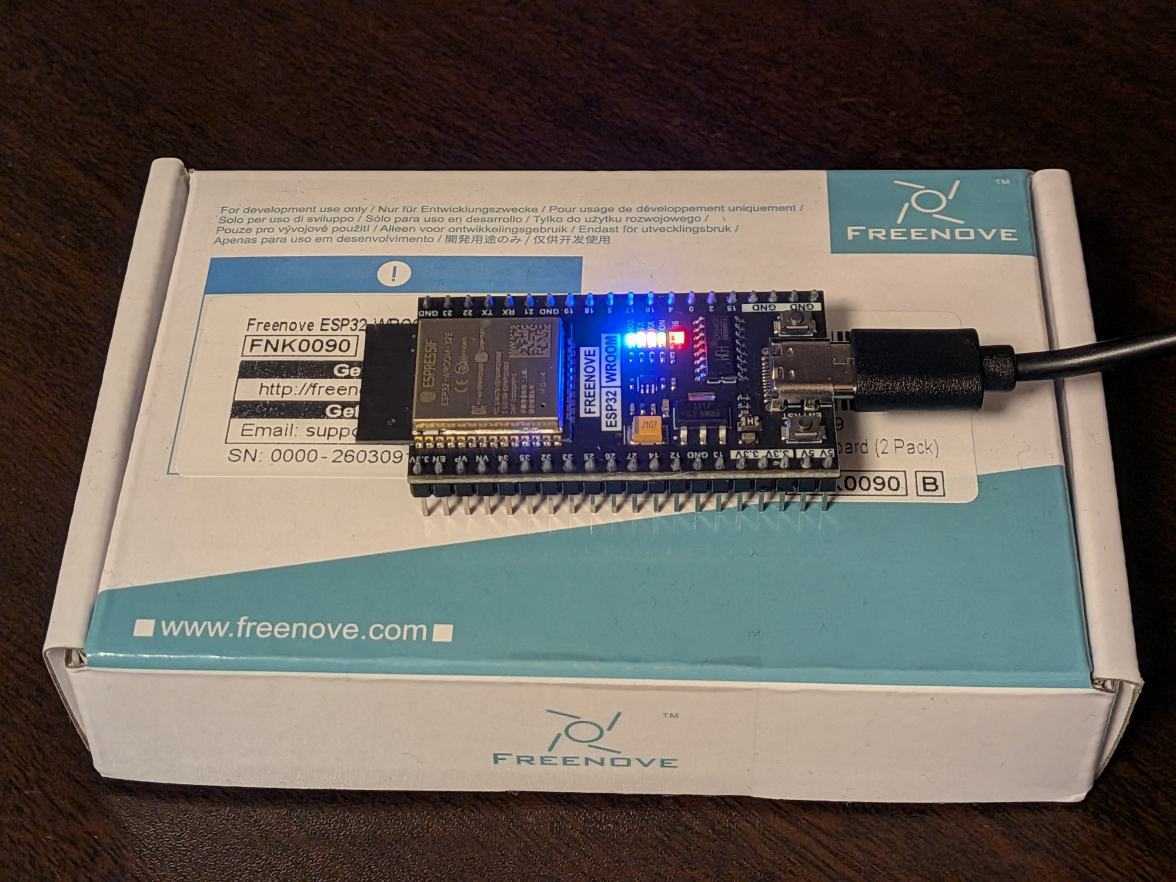
- ESP32 (FNK0090B)
- USB cable (the one that came with the ESP32)
- Breadboard (ESP32 breakout board)
- Jumper wire set (arduino wire gauge 28AWG)
- Capacitive soil moisture sensor (3.3~5.5V for Arduino)
- Other
- Mirror ball
About the ESP32
The ESP32 is an inexpensive microcontroller that comes standard with Wi-Fi and Bluetooth.
Since it can handle wireless communication on its own, it is widely used as a go-to choice for IoT projects.
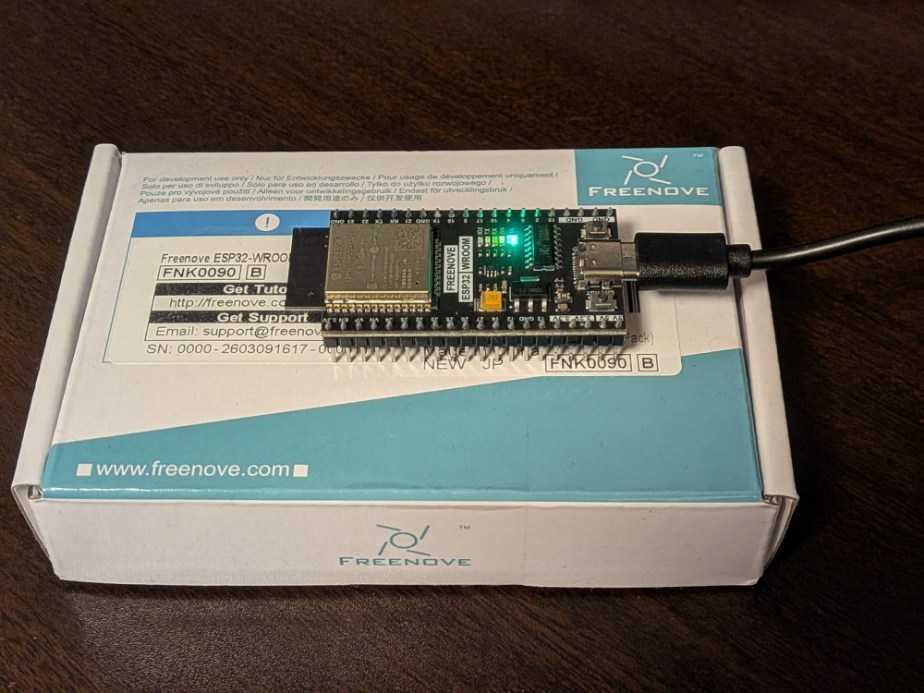
I purchased a Freenove board.
The official tutorials and documentation are comprehensive, so it's a good idea to refer to them when you get stuck.
Arduino IDE
First, I need to set up a development environment.
It seems the ESP32 can be used with Arduino IDE, so I'll go with that.
Arduino IDE is an integrated development environment for writing code and uploading it to microcontrollers, and it's free to use.
Download
Download the installer from the official website below and install it.
Language Settings
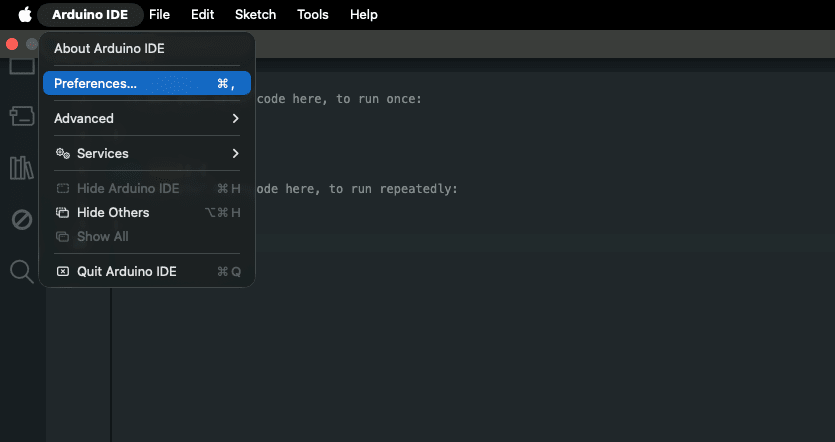
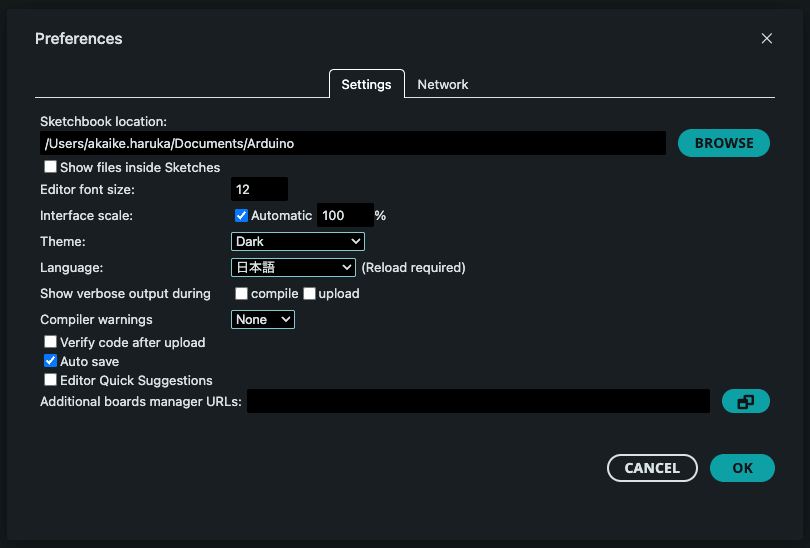
By default, the display is in English, so if you prefer Japanese, change the language in the settings.
You can switch the language to "Japanese" from Preferences.
Board Manager
Right after installation, Arduino IDE cannot recognize the ESP32.
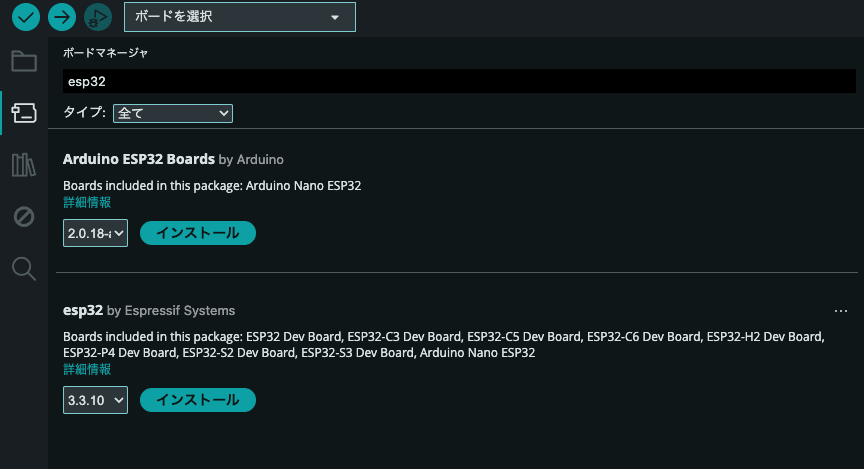
To enable development for the ESP32, add the ESP32 board definition from the Board Manager.
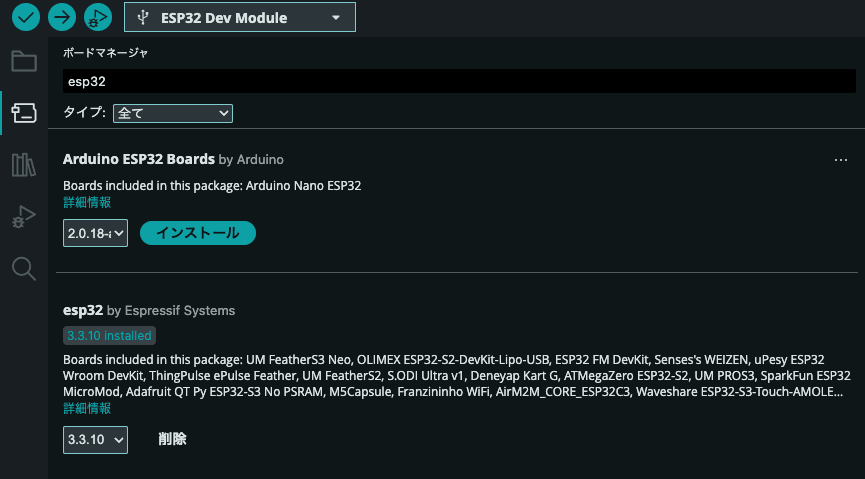
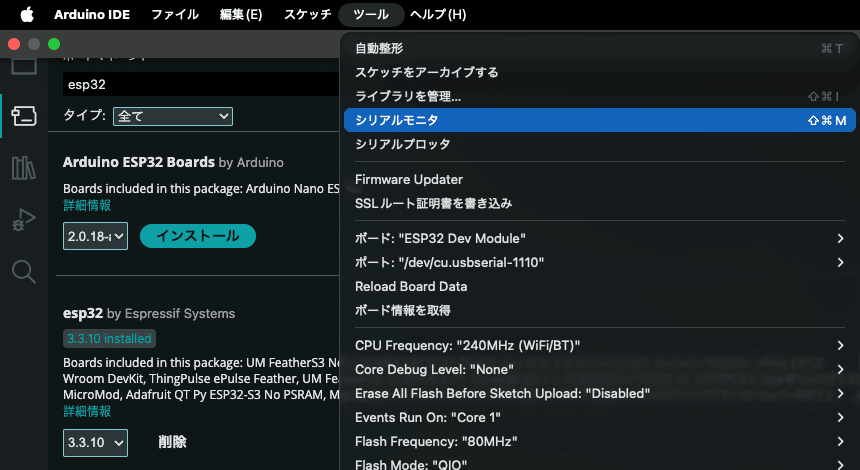
Search for "esp32" in the Board Manager and install "esp32 by Espressif Systems."
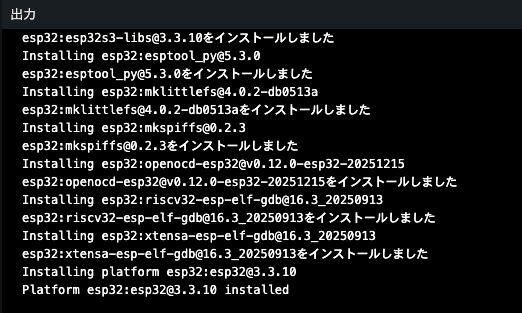
Installation is complete when the following is displayed.
Platform esp32:esp32@3.3.10 installed
Board Selection
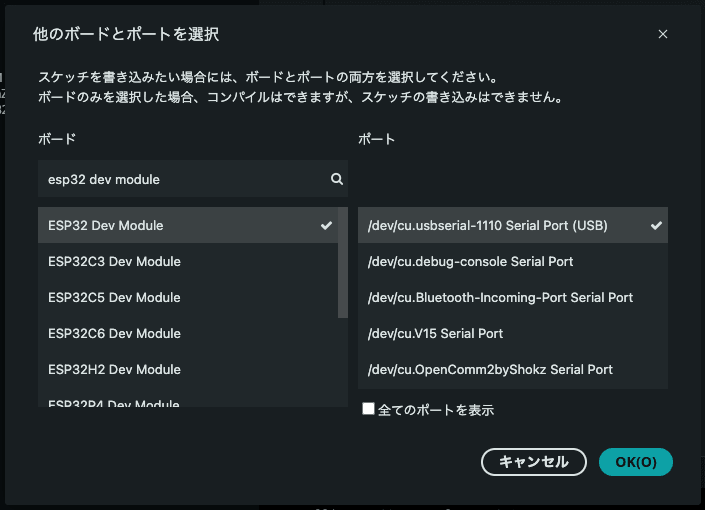
Once installation is complete, select the actual board to use and the destination port.
First connect the ESP32 to your PC via USB cable, then specify the board type and serial port.
If you're not sure which serial port belongs to the ESP32, you can check it with a command.
In my environment, /dev/cu.usbserial-1110 was the ESP32 (the name usbserial is the clue).
% ls -l /dev/tty.* /dev/cu.*

crw-rw-rw-  1 root  wheel  0x9000003  6月 30 10:03 /dev/cu.Bluetooth-Incoming-Port
crw-rw-rw-  1 root  wheel  0x9000001  6月 30 10:03 /dev/cu.debug-console
crw-rw-rw-  1 root  wheel  0x9000007  6月 30 10:03 /dev/cu.OpenComm2byShokz
crw-rw-rw-  1 root  wheel  0x9000009  7月  5 16:49 /dev/cu.usbserial-1110
crw-rw-rw-  1 root  wheel  0x9000005  6月 30 10:03 /dev/cu.V15
crw-rw-rw-  1 root  wheel  0x9000002  6月 30 10:03 /dev/tty.Bluetooth-Incoming-Port
crw-rw-rw-  1 root  wheel  0x9000000  6月 30 10:03 /dev/tty.debug-console
crw-rw-rw-  1 root  wheel  0x9000006  6月 30 10:03 /dev/tty.OpenComm2byShokz
crw-rw-rw-  1 root  wheel  0x9000008  7月  5 16:49 /dev/tty.usbserial-1110
crw-rw-rw-  1 root  wheel  0x9000004  6月 30 10:03 /dev/tty.V15
Then click "Select Board" from the IDE side,
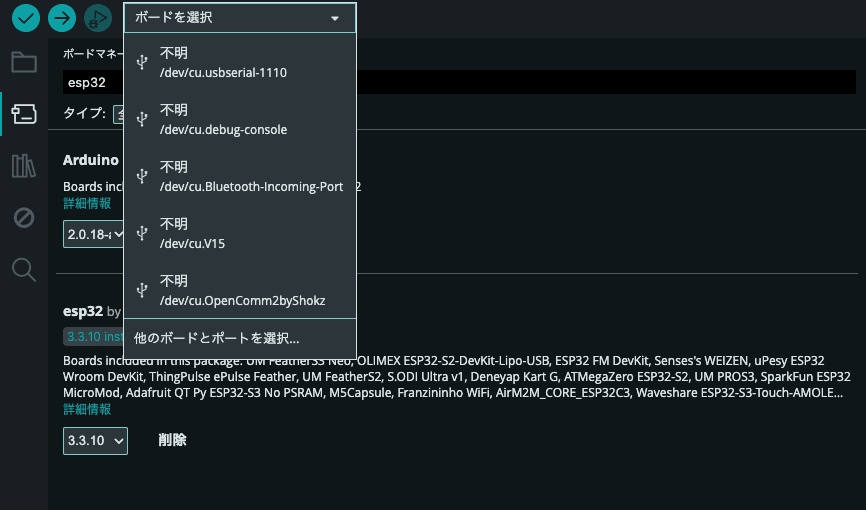
and select the target board (ESP32 Dev Module) and the serial port you confirmed earlier.
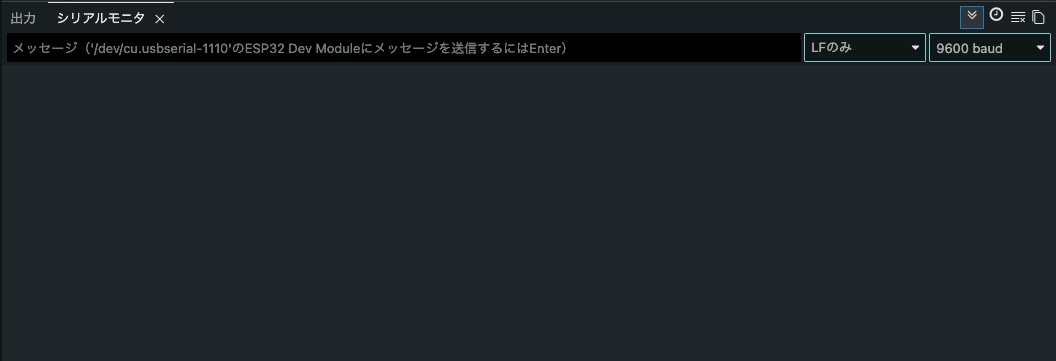
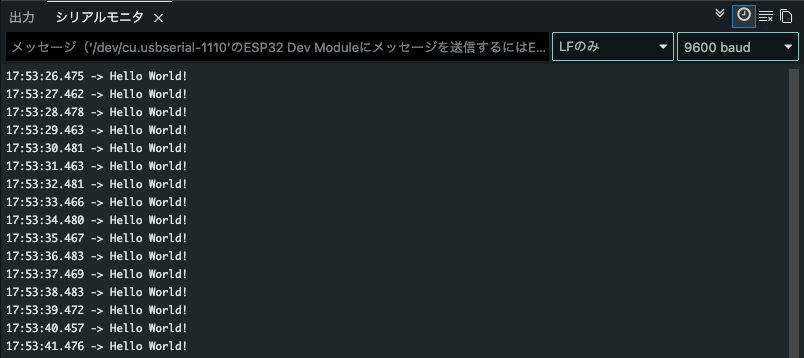
Serial Monitor
The "Serial Monitor" is the display screen for sending text (logs) from the ESP32 to the PC.
Content output with Serial.println() is displayed here.
Hello World
Now that the environment is ready, let's start with the classic "Hello World."
First, let's review the basic syntax of an Arduino (ESP32) program.
About the Syntax
An Arduino program is made up of two main functions.
setup() is the initialization process that runs only once at startup, and loop() is the process that keeps running repeatedly after that.
void setup() {
  // put your setup code here, to run once:

}

void loop() {
  // put your main code here, to run repeatedly:

}
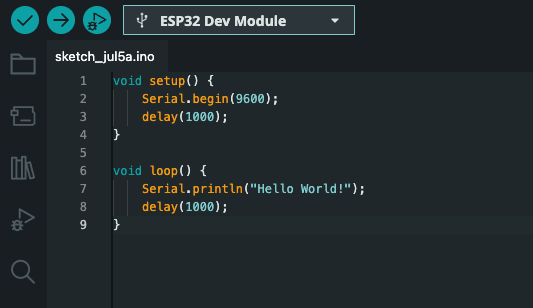
With that in mind, let's write code that outputs "Hello World!" to the serial monitor every second.
The flow is: start serial communication in setup(), then keep outputting text inside loop().
void setup() {
    Serial.begin(9600);
    delay(1000);
}

void loop() {
    Serial.println("Hello World!");
    delay(1000);
}
Once written, upload it to the ESP32 using the upload button at the top left of the screen.
…but an error occurred and the upload failed.
A fatal error occurred: The chip stopped responding.
Stub flasher running.
Changing baud rate to 921600...
Changed.

Hard resetting via RTS pin...
Failed uploading: uploading error: exit status 2
It seems the communication speed during upload is too fast for the ESP32 to keep up with.
So let's try lowering the upload communication speed to 115200.
The communication speed can be changed from "Upload Speed" in the Tools menu.
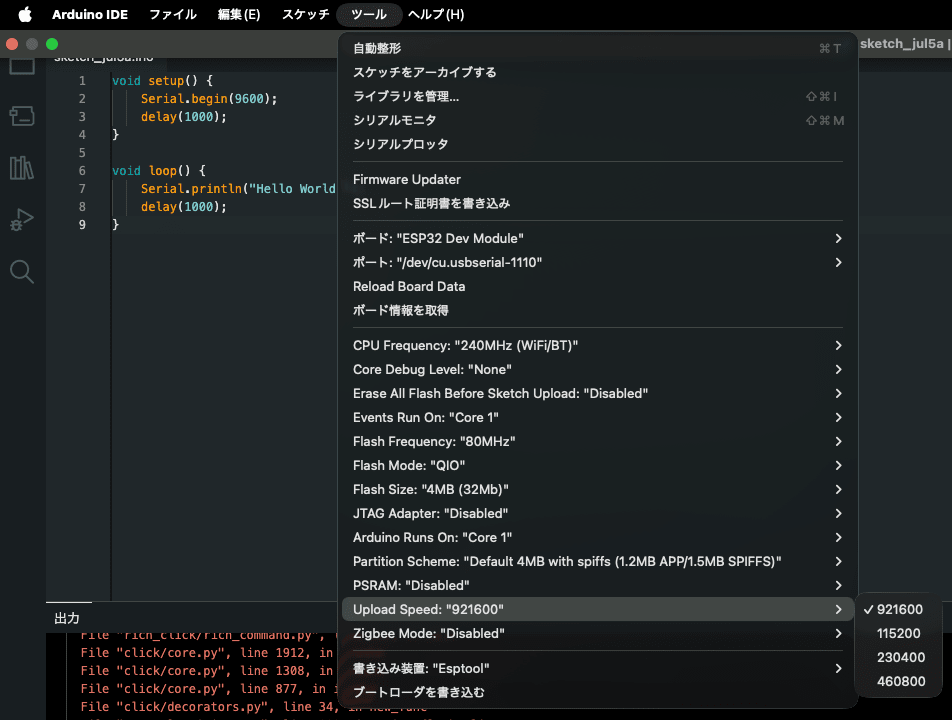
Running it again after that, the upload succeeded.
Hello World is also displayed in the Serial Monitor, so it looks good.
Also, when the upload completes successfully, the way the board's LED lights up changed.
(This LED changes its lighting pattern depending on timing, such as during upload vs. standby.)
LED Blinking
Now that we can output text, let's try the electronics classic: "LED blinking."
Ideally, I'd buy a separate external LED, connect it, and make it light up, but I forgot to buy one, so I'll use the LEDs built into the ESP32 board itself.
The Freenove board I'm using has a full-color LED and a single-color blue LED on board, so I'll blink those.
You can check which GPIO each LED is connected to using the board's pin layout diagram (pinout).
This diagram was included in the official documentation.
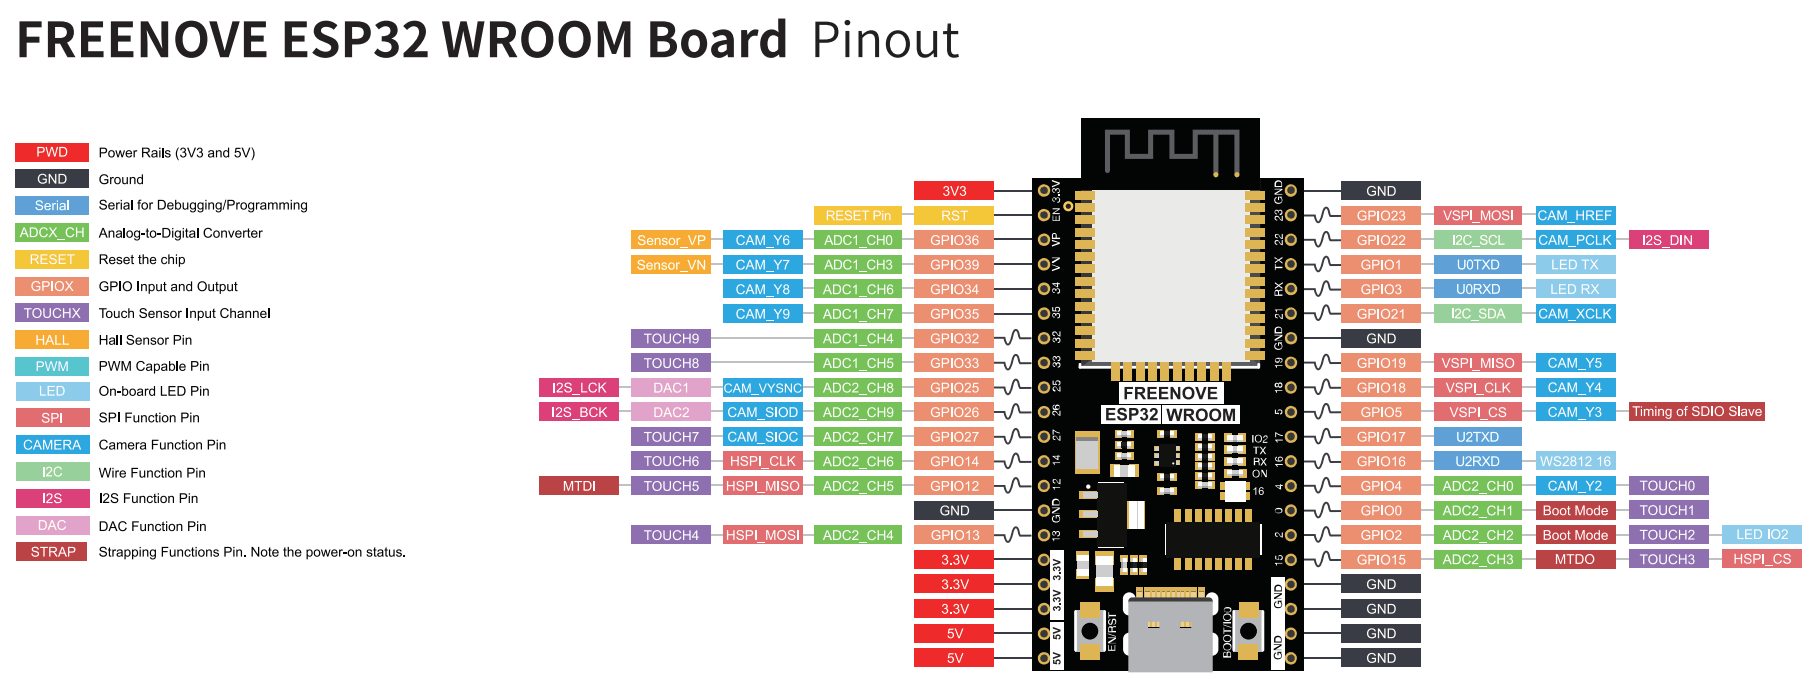
The two LEDs I'll be lighting up are connected to the following GPIOs respectively.
| LED | GPIO |
|---|---|
| Full-color LED (WS2812) | GPIO16 |
| Single-color blue LED | GPIO2 |
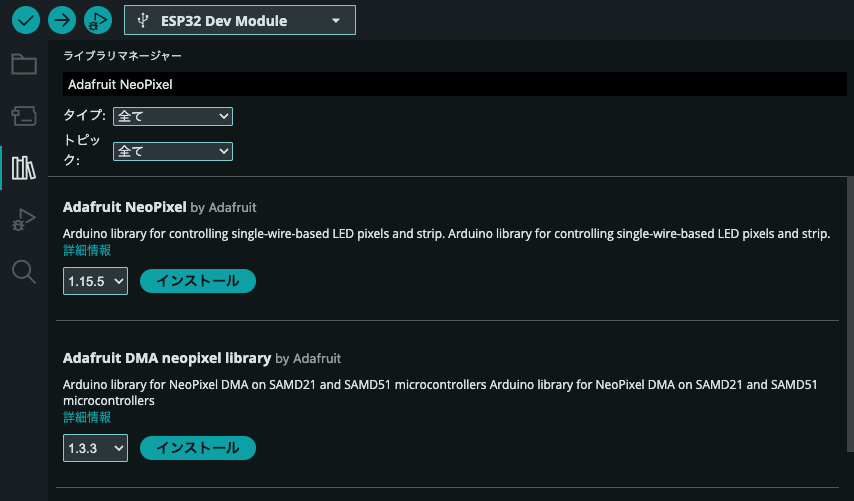
There's also a library for making things light up nicely, so I'll install and use that.
(I used Adafruit Neopixel by Adafruit this time.)
As for the code, just blinking feels a bit plain, so let me make the two LEDs glow gently.
(The idea is for the full-color one to slowly shift colors, while the blue one softly pulses up and down in brightness.)
// Freenove ESP32-WROOM 内蔵の2つのLEDを両方ゆったり光らせる
// ・フルカラーLED(WS2812 / NeoPixel)… GPIO16
// ・単色の青LED                      … GPIO2
//
// 必要ライブラリ: Adafruit NeoPixel

#include <Adafruit_NeoPixel.h>

#define RGB_PIN   16   // 内蔵WS2812(フルカラー)
#define BLUE_PIN  2    // 内蔵の単色青LED
#define NUM_LEDS  1

Adafruit_NeoPixel pixel(NUM_LEDS, RGB_PIN, NEO_GRB + NEO_KHZ800);

void setup() {
  pixel.begin();
  pixel.setBrightness(80);         // フルカラーの明るさ(0〜255)
  pixel.show();

  ledcAttach(BLUE_PIN, 5000, 8);   // 青LEDをPWM(明るさ調整)で使う
}

void loop() {
  // 経過時間から、ゆっくり動く波(0.0〜1.0)を2つ作る
  float t = millis() / 1000.0;

  // --- フルカラーLED:色相をゆっくり巡らせる ---
  // 色相:約20秒で一周(数字を大きくすると一周が速くなる)
  uint16_t hue = (uint16_t)(millis() * 65536UL / 20000UL);
  // 明るさ:周期 約6秒
  float rgbWave = (sin(t * 2.0 * PI / 6.0) + 1.0) / 2.0;   // 0.0〜1.0
  uint8_t rgbVal = 40 + rgbWave * 215;                     // 40〜255の範囲で揺らす
  pixel.setPixelColor(0, pixel.gamma32(pixel.ColorHSV(hue, 255, rgbVal)));
  pixel.show();

  // --- 青LED:フルカラーとは少しずらしたゆっくりした周期 ---
  float blueWave = (sin(t * 2.0 * PI / 8.0) + 1.0) / 2.0;  // 周期 約8秒
  uint8_t blueVal = blueWave * 255;
  ledcWrite(BLUE_PIN, blueVal);

  delay(20);   // 更新スピード(大きくするとカクカク、小さくすると滑らか)
}
After uploading, the colors softly shift and glow like this.
(In real life it looks even better, but it's hard to tell from the GIF…)
Mirror Ball Blinking
The LED blinking turned out more subdued than I expected, so I wanted to make something flash more dramatically.
So I decided to blink my trusty mirror ball. I'll also try using Wi-Fi communication at the same time.
As preparation, I've set up the mirror ball so it can be turned ON/OFF via a SwitchBot smart plug, so if I have the ESP32 call the SwitchBot API to toggle ON/OFF repeatedly, I can get mirror ball blinking.
For details on the SwitchBot smart plug and API configuration, I covered them in past blog posts about the mirror ball, so please refer to those.
The code is as follows.
Here's a rough breakdown of what it does:
- Connect to Wi-Fi
- Sync time with NTP (because accurate current time is needed for the signature described below)
- Generate an HMAC-SHA256 signature from the token, timestamp, and nonce
- Call the SwitchBot API with the signature attached to the header
- Send
turnOnandturnOffalternately every 3 seconds
Since the SwitchBot API can't be called without a signature, implementing the signature generation on the ESP32 side was a bit of a hassle.
#include <WiFi.h>
#include <WiFiClientSecure.h>
#include <HTTPClient.h>
#include "mbedtls/md.h"
#include "mbedtls/base64.h"
#include <time.h>
#include <sys/time.h>

// ==== 設定:実際の値に置き換える ====
const char* WIFI_SSID     = "your_wifi_ssid";
const char* WIFI_PASSWORD = "your_wifi_password";

const char* SWITCHBOT_TOKEN  = "your_token";
const char* SWITCHBOT_SECRET = "your_secret";
const char* DEVICE_ID        = "XXXXXXXXXXXX";
// =========================================

const char* API_HOST = "https://api.switch-bot.com/v1.1";

// ---- HMAC-SHA256 → Base64 で署名を作る ----
String makeSign(const String& payload) {
  byte hmacResult[32];
  mbedtls_md_context_t ctx;
  mbedtls_md_init(&ctx);
  mbedtls_md_setup(&ctx, mbedtls_md_info_from_type(MBEDTLS_MD_SHA256), 1);
  mbedtls_md_hmac_starts(&ctx,
    (const unsigned char*)SWITCHBOT_SECRET, strlen(SWITCHBOT_SECRET));
  mbedtls_md_hmac_update(&ctx,
    (const unsigned char*)payload.c_str(), payload.length());
  mbedtls_md_hmac_finish(&ctx, hmacResult);
  mbedtls_md_free(&ctx);

  unsigned char b64[64];
  size_t olen = 0;
  mbedtls_base64_encode(b64, sizeof(b64), &olen, hmacResult, 32);
  b64[olen] = '\0';
  return String((char*)b64);
}

// ---- 13桁のミリ秒タイムスタンプ ----
String makeTimestamp() {
  struct timeval tv;
  gettimeofday(&tv, nullptr);
  uint64_t ms = (uint64_t)tv.tv_sec * 1000ULL + tv.tv_usec / 1000ULL;
  char buf[21];
  snprintf(buf, sizeof(buf), "%llu", (unsigned long long)ms);
  return String(buf);
}

// ---- nonce ----
String makeNonce() {
  const char* hex = "0123456789abcdef";
  char buf[17];
  for (int i = 0; i < 16; i++) buf[i] = hex[esp_random() & 0x0F];
  buf[16] = '\0';
  return String(buf);
}

// ---- デバイスにコマンド送信 ----
void sendCommand(const char* command) {
  String t     = makeTimestamp();
  String nonce = makeNonce();
  String sign  = makeSign(String(SWITCHBOT_TOKEN) + t + nonce);

  WiFiClientSecure client;
  client.setInsecure();  // 証明書検証をスキップ

  HTTPClient https;
  String url = String(API_HOST) + "/devices/" + DEVICE_ID + "/commands";
  https.begin(client, url);
  https.addHeader("Content-Type", "application/json; charset=utf8");
  https.addHeader("Authorization", SWITCHBOT_TOKEN);
  https.addHeader("sign", sign);
  https.addHeader("t", t);
  https.addHeader("nonce", nonce);

  String body = String("{\"command\":\"") + command +
                "\",\"parameter\":\"default\",\"commandType\":\"command\"}";

  int code = https.POST(body);
  Serial.printf("HTTP status: %d\n", code);
  Serial.println(https.getString());  // APIのレスポンス(statusCode:100なら成功)
  https.end();
}

void setup() {
  Serial.begin(115200);
  delay(1000);

  // ① WiFi接続
  Serial.printf("Connecting to %s", WIFI_SSID);
  WiFi.begin(WIFI_SSID, WIFI_PASSWORD);
  while (WiFi.status() != WL_CONNECTED) {
    delay(500);
    Serial.print(".");
  }
  Serial.println(" connected");
  Serial.print("IP: ");
  Serial.println(WiFi.localIP());

  // ② NTPで時刻同期(タイムスタンプ生成に利用)
  configTime(0, 0, "pool.ntp.org", "time.nist.gov");
  Serial.print("Syncing time");
  time_t now = time(nullptr);
  while (now < 1700000000) {  // 妥当な現在時刻になるまで待機
    delay(500);
    Serial.print(".");
    now = time(nullptr);
  }
  Serial.println(" done");
}

void loop() {
  // 3秒ごとにON/OFFを交互に送信
  static bool on = true;

  if (on) {
    Serial.println(">> turnOn");
    sendCommand("turnOn");
  } else {
    Serial.println(">> turnOff");
    sendCommand("turnOff");
  }

  on = !on;   // 次回は逆にする
  delay(3000);
}
After uploading, the mirror ball toggles ON/OFF every 3 seconds, and I successfully achieved mirror ball blinking.
Beautiful…

Soil Moisture Measurement
Finally, as a slightly more practical project, I'll take on sensor input.
If you grow plants, have you ever wanted to know numerically "how dry is the soil?" I have.
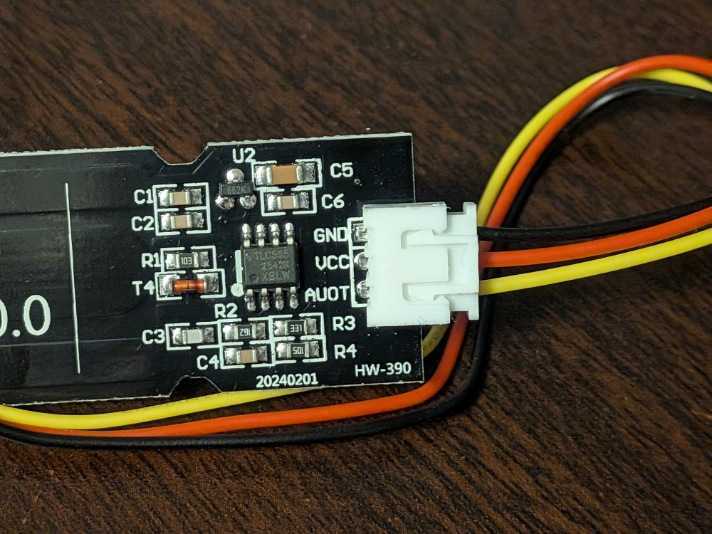
So I'll connect a capacitive soil moisture sensor to the ESP32 and measure the soil's moisture level.
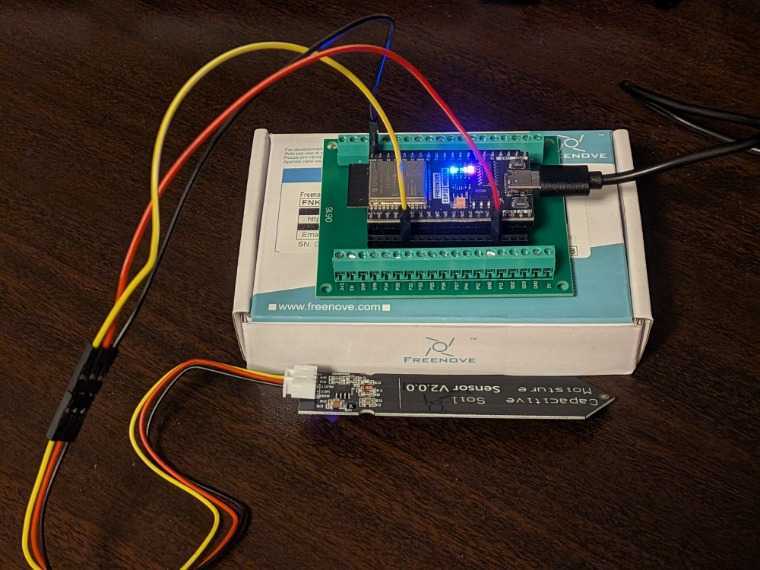
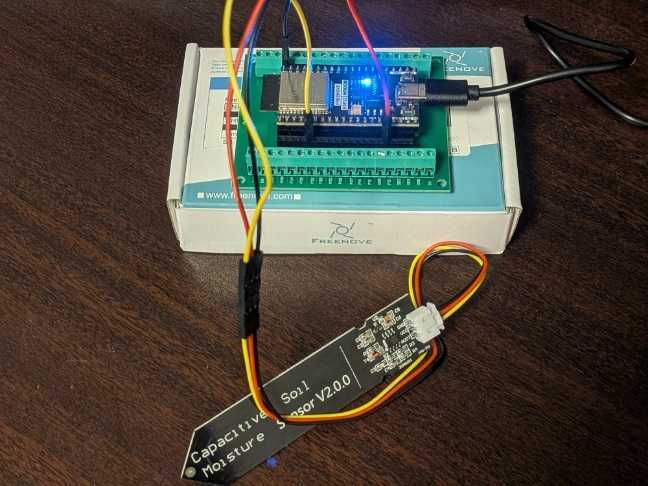
Wiring
First, let's wire the sensor to the ESP32.
Since this sensor has analog output, in addition to the power supply (VCC and GND), I'll connect the output pin (AOUT) to an analog input pin on the ESP32.
ESP32's GPIO34 is an input-only pin that supports ADC (analog-to-digital conversion), so I'll connect it there.
| Sensor side | ESP32 side |
|---|---|
| GND | GND |
| VCC | 3V3 |
| AOUT | GPIO34 |
- Sensor side
Then connect everything properly using a breadboard and jumper wires according to the wiring above.
Next, here is the code.
Here's a rough breakdown of what it does:
- Read the analog value from the sensor (ESP32's ADC is 12-bit, 0~4095)
- Read multiple times and average them to reduce noise
- Convert to 0~100% based on reference values for dry (DRY) and wet (WET) states
- Output to the serial monitor every second
DRY and WET vary by sensor and individual unit, so first enter placeholder values and replace them with actual measured values later.
// Freenove ESP32-WROOM + 静電容量式 土壌水分センサー(Hailege, アナログ出力)
//
// 配線:
//   センサー VCC  → ESP32 3V3
//   センサー GND  → ESP32 GND
//   センサー AOUT → ESP32 GPIO34 (ADC1_CH6, 入力専用)

#define SOIL_PIN 34   // 土壌センサーのアナログ出力を繋いだピン

// ▼▼▼ キャリブレーション値(まずは仮。あとで実測して書き換える)▼▼▼
// DRY  = 空気中(乾いた状態)で表示された値
// WET  = 水に挿した(濡れた状態)で表示された値
// 静電容量式は「乾くと値が大きく/濡れると値が小さく」なるのが一般的
int DRY = 3000;   // 乾いているときの生の値
int WET = 1200;   // 濡れているときの生の値
// ▲▲▲ ここを実測値に合わせると % 表示が正確になる ▲▲▲

void setup() {
  Serial.begin(115200);
  delay(1000);
  analogReadResolution(12);   // ESP32のADCは12bit(0〜4095)
}

void loop() {
  // 数回読んで平均を取りノイズを減らす
  long sum = 0;
  const int N = 20;
  for (int i = 0; i < N; i++) {
    sum += analogRead(SOIL_PIN);
    delay(5);
  }
  int raw = sum / N;

  // 生の値を DRY〜WET の範囲で 0〜100% に変換
  int percent = map(raw, DRY, WET, 0, 100);
  percent = constrain(percent, 0, 100);   // 0未満/100超えを丸める

  Serial.print("raw: ");
  Serial.print(raw);
  Serial.print("   moisture: ");
  Serial.print(percent);
  Serial.println("%");

  delay(1000);   // 1秒ごとに測定
}
Now let's perform calibration (measuring reference values) to get accurate percentage readings.
First, to get the reference value for "completely dry state = 0%," let's read the values while leaving the sensor in the air.
Measurement in Air
With the sensor in the air, the values stabilized at around 3186.
I'll use this as the reference value for "when dry (0%)."
Dry (in air)
Average 3186.6 / Median 3186 / Range 3160~3217
100 measurements of data
raw: 3188   moisture: 0%
raw: 3194   moisture: 0%
raw: 3183   moisture: 0%
raw: 3188   moisture: 0%
raw: 3183   moisture: 0%
raw: 3182   moisture: 0%
raw: 3184   moisture: 0%
raw: 3201   moisture: 0%
raw: 3188   moisture: 0%
raw: 3182   moisture: 0%
raw: 3186   moisture: 0%
raw: 3179   moisture: 0%
raw: 3185   moisture: 0%
raw: 3199   moisture: 0%
raw: 3185   moisture: 0%
raw: 3195   moisture: 0%
raw: 3189   moisture: 0%
raw: 3182   moisture: 0%
raw: 3186   moisture: 0%
raw: 3188   moisture: 0%
raw: 3192   moisture: 0%
raw: 3186   moisture: 0%
raw: 3186   moisture: 0%
raw: 3187   moisture: 0%
raw: 3194   moisture: 0%
raw: 3184   moisture: 0%
raw: 3160   moisture: 0%
raw: 3186   moisture: 0%
raw: 3178   moisture: 0%
raw: 3179   moisture: 0%
raw: 3188   moisture: 0%
raw: 3203   moisture: 0%
raw: 3186   moisture: 0%
raw: 3178   moisture: 0%
raw: 3181   moisture: 0%
raw: 3185   moisture: 0%
raw: 3171   moisture: 0%
raw: 3189   moisture: 0%
raw: 3186   moisture: 0%
raw: 3186   moisture: 0%
raw: 3169   moisture: 0%
raw: 3192   moisture: 0%
raw: 3186   moisture: 0%
raw: 3184   moisture: 0%
raw: 3189   moisture: 0%
raw: 3186   moisture: 0%
raw: 3191   moisture: 0%
raw: 3187   moisture: 0%
raw: 3186   moisture: 0%
raw: 3185   moisture: 0%
raw: 3185   moisture: 0%
raw: 3195   moisture: 0%
raw: 3192   moisture: 0%
raw: 3191   moisture: 0%
raw: 3191   moisture: 0%
raw: 3200   moisture: 0%
raw: 3190   moisture: 0%
raw: 3193   moisture: 0%
raw: 3186   moisture: 0%
raw: 3185   moisture: 0%
raw: 3182   moisture: 0%
raw: 3186   moisture: 0%
raw: 3187   moisture: 0%
raw: 3186   moisture: 0%
raw: 3187   moisture: 0%
raw: 3186   moisture: 0%
raw: 3186   moisture: 0%
raw: 3187   moisture: 0%
raw: 3187   moisture: 0%
raw: 3187   moisture: 0%
raw: 3192   moisture: 0%
raw: 3185   moisture: 0%
raw: 3187   moisture: 0%
raw: 3185   moisture: 0%
raw: 3189   moisture: 0%
raw: 3191   moisture: 0%
raw: 3186   moisture: 0%
raw: 3178   moisture: 0%
raw: 3189   moisture: 0%
raw: 3190   moisture: 0%
raw: 3196   moisture: 0%
raw: 3184   moisture: 0%
raw: 3182   moisture: 0%
raw: 3190   moisture: 0%
raw: 3193   moisture: 0%
raw: 3180   moisture: 0%
raw: 3178   moisture: 0%
raw: 3172   moisture: 0%
raw: 3191   moisture: 0%
raw: 3184   moisture: 0%
raw: 3179   moisture: 0%
raw: 3180   moisture: 0%
raw: 3201   moisture: 0%
raw: 3185   moisture: 0%
raw: 3184   moisture: 0%
raw: 3177   moisture: 0%
raw: 3183   moisture: 0%
raw: 3190   moisture: 0%
raw: 3183   moisture: 0%
raw: 3217   moisture: 0%
Next, let's take the reference value for "completely wet state = 100%" on the opposite end.
Let's insert the sensor into water and read the values.
Measurement in Water
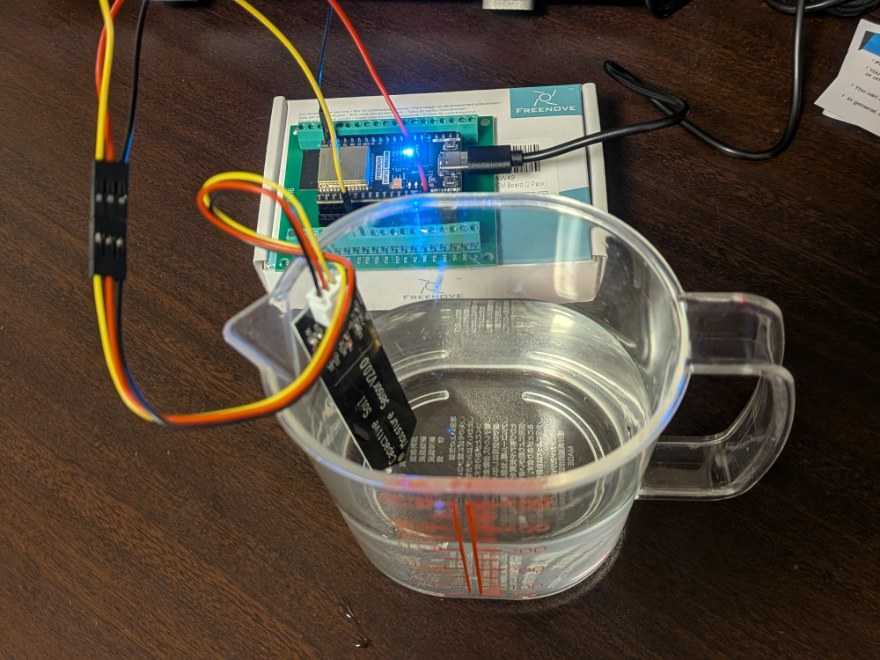
In the water, the values dropped to around 1089.
As noted in the comments, capacitive sensors generally show "larger values when dry / smaller values when wet," so this is the expected behavior. This will be the reference value for "when wet (100%)."
Wet (submerged in water)
Average 1089.4 / Median 1089 / Range 1074–1112
100 measurements data
raw: 1110   moisture: 100%
raw: 1088   moisture: 100%
raw: 1096   moisture: 100%
raw: 1089   moisture: 100%
raw: 1089   moisture: 100%
raw: 1089   moisture: 100%
raw: 1091   moisture: 100%
raw: 1089   moisture: 100%
raw: 1089   moisture: 100%
raw: 1089   moisture: 100%
raw: 1090   moisture: 100%
raw: 1090   moisture: 100%
raw: 1089   moisture: 100%
raw: 1086   moisture: 100%
raw: 1089   moisture: 100%
raw: 1094   moisture: 100%
raw: 1093   moisture: 100%
raw: 1095   moisture: 100%
raw: 1098   moisture: 100%
raw: 1080   moisture: 100%
raw: 1082   moisture: 100%
raw: 1086   moisture: 100%
raw: 1104   moisture: 100%
raw: 1091   moisture: 100%
raw: 1087   moisture: 100%
raw: 1077   moisture: 100%
raw: 1080   moisture: 100%
raw: 1076   moisture: 100%
raw: 1087   moisture: 100%
raw: 1089   moisture: 100%
raw: 1091   moisture: 100%
raw: 1087   moisture: 100%
raw: 1093   moisture: 100%
raw: 1082   moisture: 100%
raw: 1080   moisture: 100%
raw: 1088   moisture: 100%
raw: 1092   moisture: 100%
raw: 1093   moisture: 100%
raw: 1089   moisture: 100%
raw: 1095   moisture: 100%
raw: 1089   moisture: 100%
raw: 1089   moisture: 100%
raw: 1085   moisture: 100%
raw: 1099   moisture: 100%
raw: 1094   moisture: 100%
raw: 1091   moisture: 100%
raw: 1089   moisture: 100%
raw: 1081   moisture: 100%
raw: 1098   moisture: 100%
raw: 1074   moisture: 100%
raw: 1086   moisture: 100%
raw: 1097   moisture: 100%
raw: 1084   moisture: 100%
raw: 1088   moisture: 100%
raw: 1086   moisture: 100%
raw: 1082   moisture: 100%
raw: 1112   moisture: 100%
raw: 1092   moisture: 100%
raw: 1091   moisture: 100%
raw: 1078   moisture: 100%
raw: 1100   moisture: 100%
raw: 1084   moisture: 100%
raw: 1088   moisture: 100%
raw: 1092   moisture: 100%
raw: 1085   moisture: 100%
raw: 1095   moisture: 100%
raw: 1092   moisture: 100%
raw: 1088   moisture: 100%
raw: 1090   moisture: 100%
raw: 1082   moisture: 100%
raw: 1093   moisture: 100%
raw: 1075   moisture: 100%
raw: 1089   moisture: 100%
raw: 1095   moisture: 100%
raw: 1100   moisture: 100%
raw: 1089   moisture: 100%
raw: 1080   moisture: 100%
raw: 1090   moisture: 100%
raw: 1089   moisture: 100%
raw: 1095   moisture: 100%
raw: 1099   moisture: 100%
raw: 1088   moisture: 100%
raw: 1088   moisture: 100%
raw: 1088   moisture: 100%
raw: 1088   moisture: 100%
raw: 1088   moisture: 100%
raw: 1096   moisture: 100%
raw: 1090   moisture: 100%
raw: 1084   moisture: 100%
raw: 1092   moisture: 100%
raw: 1087   moisture: 100%
raw: 1090   moisture: 100%
raw: 1088   moisture: 100%
raw: 1083   moisture: 100%
raw: 1100   moisture: 100%
raw: 1086   moisture: 100%
raw: 1083   moisture: 100%
raw: 1092   moisture: 100%
raw: 1091   moisture: 100%
raw: 1089   moisture: 100%
Now that we have the reference values for the dry and wet states, let's rewrite the DRY and WET values in the code with the actual measured values.
Let's try entering the median values mentioned above.
// ▼▼▼ Calibration values (tentative for now; to be replaced with actual measurements later) ▼▼▼
// DRY  = value displayed in air (dry state)
// WET  = value displayed when inserted in water (wet state)
// Capacitive type: it is common for values to be "higher when dry / lower when wet"
int DRY = 3186;   // raw value when dry
int WET = 1089;   // raw value when wet
// ▲▲▲ Adjusting this to the actual measured values will make the % display accurate ▲▲▲
Trying an actual measurement
Now that calibration is done, let's insert it into actual soil and take a measurement.
First, let's try inserting it into soil that was watered yesterday and is moderately moist.
(This is a Haworthia passed on to me by ひめの)
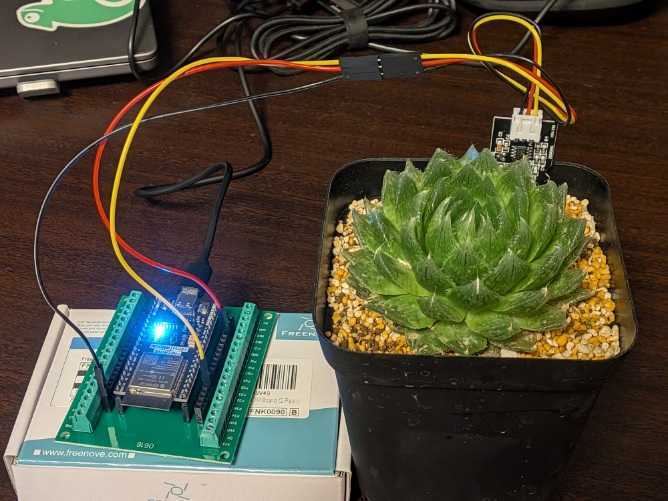
19:25:18.054 -> raw: 2159   moisture: 48%
19:25:19.137 -> raw: 2157   moisture: 49%
19:25:20.250 -> raw: 2156   moisture: 49%
19:25:21.364 -> raw: 2154   moisture: 49%
19:25:22.450 -> raw: 2149   moisture: 49%
19:25:23.564 -> raw: 2153   moisture: 49%
19:25:24.646 -> raw: 2156   moisture: 49%
19:25:25.768 -> raw: 2149   moisture: 49%
19:25:26.855 -> raw: 2147   moisture: 49%
The moist soil displayed approximately 49%.
This matches the intuitive sense of "fairly moist" soil, which feels just right.
Next, let's try it with dry soil as well.
(This is a pineapple currently being regrown from scraps)
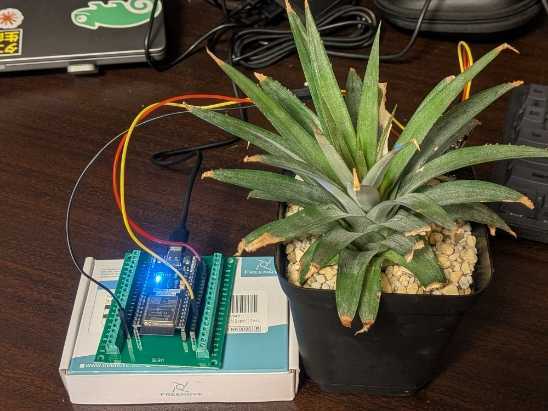
19:27:00.337 -> raw: 3089   moisture: 4%
19:27:01.452 -> raw: 3080   moisture: 5%
19:27:02.538 -> raw: 3118   moisture: 3%
19:27:03.655 -> raw: 3095   moisture: 4%
19:27:04.737 -> raw: 3083   moisture: 4%
19:27:05.853 -> raw: 3098   moisture: 4%
19:27:06.936 -> raw: 3091   moisture: 4%
19:27:08.050 -> raw: 3089   moisture: 4%
The dry soil showed about 4%, which is also a properly low value.
Since the readings change according to moisture level, we confirmed that it is functioning correctly as a soil moisture sensor.
(I properly watered it afterwards, so rest assured the pineapple is doing fine)
By applying these techniques, it seems possible to create something like a watering reminder for potted plants, such as "send a notification when moisture drops below a certain level" or "send a notification if moisture has been below X% for several days."
Conclusion
That wraps up my first experience with the ESP32.
The ESP32 had been sitting untouched for about half a year, but once I actually started playing with it, I ended up doing quite a lot — from Hello World to blinking LEDs, making a mirror ball blink, and measuring soil moisture.
Having something actually light up or move based on code you wrote yourself is more fun than I expected!
Soil moisture measurement in particular, when combined with Wi-Fi communication, seems like it could enable things like "send a notification when the soil gets dry," so I'm thinking of saving the office plants at some point.
I hope this blog post can serve as a helpful first step for anyone who is "a little curious about electronics projects."