Automating Okta MFA (TOTP) Login with Playwright — From OAuth Flow to SSH Tunnel

This page has been translated by machine translation. View original
Introduction
When building business automation scripts, situations where you want to automate login to services that require MFA keep coming up repeatedly. Manually entering an MFA code every time to obtain tokens through an OAuth authorization flow or to pass SSH tunnel authentication is simply not practical.
This article introduces an implementation of automating Okta MFA (TOTP method) login with Playwright, along with application patterns for two use cases (OAuth token acquisition and Pomerium SSH tunnel authentication).
How TOTP Auto-Generation Works
The one-time password displayed in the Okta Verify app is based on a standard called TOTP (Time-based One-Time Password). Since it is deterministically calculated from a secret key and the current time, you can generate it yourself if you have the same secret key.
import { TOTP } from "totp-generator";

class Okta {
  private lastOTPCallTime: number = 0;
  private readonly OTP_LIFESPAN_SECONDS = 30; // TOTP validity period

  private async waitForNextOTP(lastCallTime: number): Promise<void> {
    const now = Date.now();
    const timeSinceLastCall = (now - lastCallTime) / 1000;

    if (timeSinceLastCall < this.OTP_LIFESPAN_SECONDS) {
      // Wait if 30 seconds have not passed since the last generation
      const timeToWait = this.OTP_LIFESPAN_SECONDS - timeSinceLastCall;
      await new Promise((resolve) => setTimeout(resolve, timeToWait * 1000));
    }
  }

  public async generateOTP(): Promise<string> {
    await this.waitForNextOTP(this.lastOTPCallTime);
    const { otp } = TOTP.generate(process.env.TOTP_SECRET_KEY!);
    this.lastOTPCallTime = Date.now();
    return otp;
  }
}

export default new Okta();
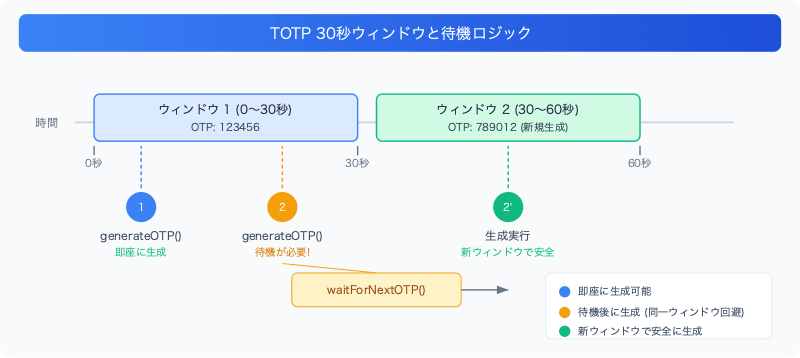
Why is waitForNextOTP necessary?
TOTP is updated every 30 seconds, but an OTP generated within the same 30-second window can normally only be used once (to prevent replay attacks). In scenarios where OTPs are generated and used consecutively, you need to confirm that 30 seconds have passed since the previous generation before generating a new one.
Importance of NTP time synchronization: TOTP is a time-based one-time password. If the server's clock is out of sync, the generated code will be invalid. Make sure you are operating in an environment where time is synchronized with NTP.
Automating the Okta Login Flow
Once TOTP can be generated, the login flow is automated with Playwright.
public async handleOktaLogin(url: string) {
  await this.checkContext(); // Lazy initialization of browser context

  const page = await this.context.newPage();

  try {
    await page.goto(url);

    // Enter username
    const usernameInput = page.getByLabel("Username");
    await usernameInput.waitFor({ state: "visible", timeout: 10000 });
    await usernameInput.fill(process.env.USERNAME!);

    // Enter password
    const passwordInput = page.getByLabel("Password");
    await passwordInput.waitFor({ state: "visible", timeout: 10000 });
    await passwordInput.fill(process.env.PASSWORD!);

    await page.getByRole("button", { name: "Sign in" }).click();

    // Select MFA method: "Enter a code from Okta Verify"
    const mfaLink = page.getByRole("link", {
      name: "Select to enter a code from",
    });
    await mfaLink.waitFor({ state: "visible", timeout: 10000 });
    await mfaLink.click();

    // Generate and enter OTP
    const otpInput = page.getByRole("textbox", {
      name: "Enter code from Okta Verify",
    });
    await otpInput.waitFor({ state: "visible", timeout: 10000 });
    const mfaOtp = await Okta.generateOTP();
    await otpInput.fill(mfaOtp);

    await page.getByRole("button", { name: "Verify" }).click();

    // Confirm login completion
    await page
      .getByText("login complete, you may close this page")
      .waitFor({ timeout: 100000 });

    Logger.success("Okta login complete");
  } catch (error) {
    await this.handleException(page, "Okta login failed.", error);
  } finally {
    await this.handleVideo(page);
  }
}
Implementation notes:
- If you do not specify
locale: "en-US", Okta's UI will be displayed in Japanese and thegetByLabelselectors will not match - Use
waitFor({ state: "visible" })to wait for the MFA input field to appear, as page transitions after login can take time - Okta's UI is updated periodically. It is reassuring to run periodic tests in CI or set up a mechanism to send screenshot notifications on failure
Use Case 1: Handling OAuth UI Branching with Promise.race
The tricky part of login flows is that the next screen displayed varies depending on the service.
For example, in an OAuth flow after logging into another service, the next screen shown might be "first login → password input screen" or "session still active → already logged in screen." Which one appears can change depending on the timing of execution.
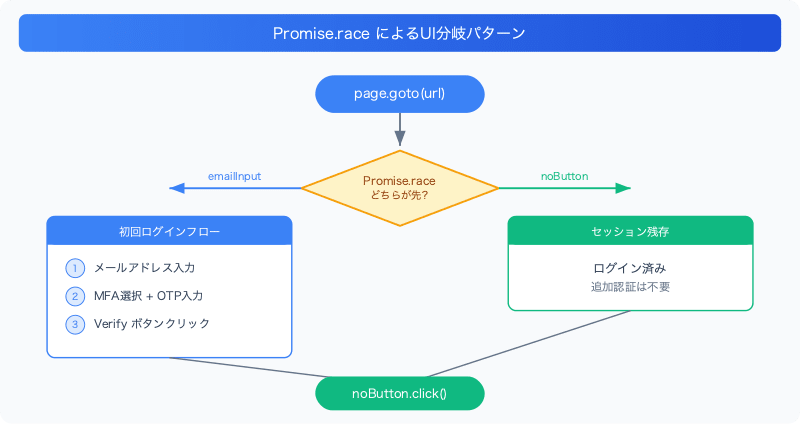
To branch with if/else, you need to know "which one will appear first." Using Promise.race, you can branch based on whichever element appears first.
public async getAzureCode(callback: string): Promise<string> {
  const page = await this.context.newPage();
  await page.goto(callback);

  const emailInput = page.getByLabel("Type your email address here");
  const noButton = page.getByRole("button", { name: "No" }); // Displayed when an existing session exists

  // Proceed based on whichever appears first
  await Promise.race([
    this.waitForLocator(emailInput),
    this.waitForLocator(noButton),
  ]);

  if (await emailInput.isVisible()) {
    // First login: enter email address and OTP
    await emailInput.fill(process.env.EMAIL!);
    await page.getByRole("button", { name: "Next" }).click();

    await page.getByRole("link", {
      name: "Select to enter a code from",
    }).click();

    const otpInput = page.getByLabel("Enter code from Okta Verify");
    const otp = await Okta.generateOTP();
    await otpInput.fill(otp);
    await page.getByRole("button", { name: "Verify" }).click();
  }

  // Both paths ultimately reach the "No" button
  await noButton.click();

  // Retrieve the authorization code from the URL
  await page.getByText("Your call is authenticated").waitFor();
  const currentUrl = page.url();
  return currentUrl.split("code=")[1].split("&")[0];
}

private waitForLocator = (locator: Locator): Promise<Locator> => {
  return locator.waitFor().then(() => locator);
};
For other services, there were even more screen patterns after login, and sometimes three or more were passed to Promise.race.
// Box case: monitoring 3 patterns simultaneously
await Promise.race([
  this.waitForLocator(boxMailInput), // Box's own email input
  this.waitForLocator(oktaMailInput),    // Okta authentication screen
  this.waitForLocator(grantButton),      // Already authenticated, showing access permission screen
]);
Use Case 2: Automating Pomerium SSH Tunnel Authentication Unattended
In cases where an automated system needs to access a Kubernetes cluster via an SSH tunnel, it is necessary to pass Okta SSO + TOTP MFA authentication through Pomerium (a zero-trust proxy).
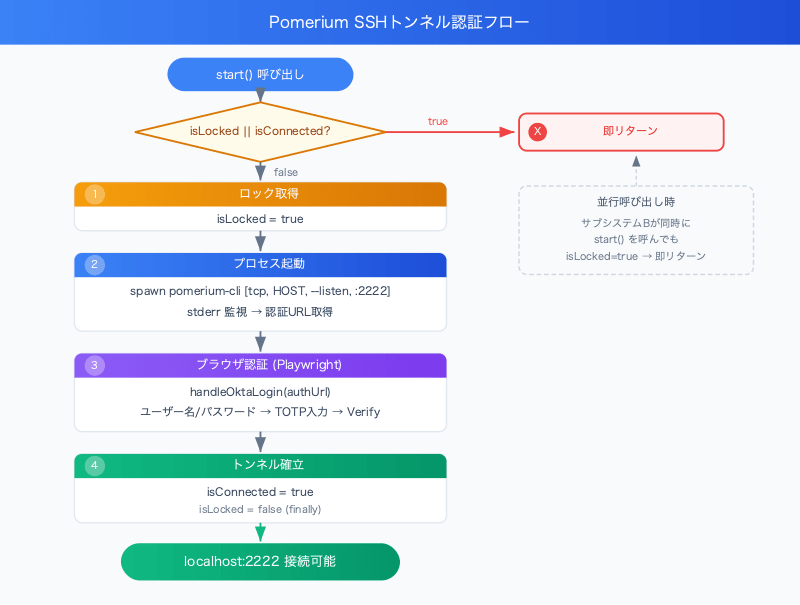
Starting the Pomerium Process and Obtaining the Authentication URL
When Pomerium CLI is launched as a child process, it outputs a URL to standard error when authentication is required.
import { spawn, ChildProcess } from "child_process";

class PomeriumController {
  private isConnected = false;
  private isLocked = false;
  private pomeriumProcess: ChildProcess | null = null;

  private getAuthUrl(): Promise<string> {
    return new Promise((resolve, reject) => {
      this.pomeriumProcess = spawn("pomerium-cli", [
        "tcp",
        "YOUR_TARGET_HOST",
        "--listen",
        ":2222",
      ]);

      // The authentication URL is output to stderr
      this.pomeriumProcess.stderr?.on("data", (chunk) => {
        const message = chunk.toString();
        const match = message.match(/https?:\/\/[^\s]+/g);
        if (match && match[0]) {
          resolve(match[0]);
        }
      });

      this.pomeriumProcess.on("error", (err) =>
        reject(new Error(`Failed to spawn Pomerium: ${err.message}`))
      );
    });
  }
}
Lock Mechanism to Prevent Double Authentication
In an automated system, multiple subsystems may request tunnel connections simultaneously. Two flags are used to prevent double authentication.
public async start(): Promise<void> {
  // Return immediately if locked or already connected
  if (this.isLocked || this.isConnected) {
    console.log("Process is locked or already connected.");
    return;
  }

  try {
    this.isLocked = true;

    const authUrl = await this.getAuthUrl();
    await this.handleOktaLogin(authUrl);

    this.isConnected = true;
  } catch (error) {
    console.error("Failed to establish tunnel:", error);
    this.isConnected = false;
  } finally {
    this.isLocked = false; // Always release the lock
  }
}

public stop(): void {
  if (this.pomeriumProcess) {
    this.pomeriumProcess.kill();
    this.pomeriumProcess = null;
    this.isConnected = false;
    this.isLocked = false;
  }
}
How isLocked and isConnected differ in purpose:
| Flag | Purpose | When it becomes true |
|---|---|---|
isLocked |
Prevents re-entry during authentication processing | At the start of start() → released in finally |
isConnected |
Prevents re-execution after authentication | On successful authentication → released by stop() |
isLocked alone is not sufficient. If another subsystem calls start() after authentication is complete, it would launch the browser again. If isConnected is true, the tunnel is already established, so it returns immediately.
Recording Video and Screenshots for Debugging
Browser automation is difficult to debug. When an error occurs, if you cannot tell "at which screen which element was not found," it takes time to trace the cause.
Screenshot on error:
private async handleException(page: Page, message: string, error: any) {
  const screenshotPath = `output/screenshots/error-${dayjs().format("YYYYMMDDHHmmss")}.png`;
  await page.screenshot({ path: screenshotPath, fullPage: true });
  Logger.error(message);
  throw new Error();
}
Video recording of the entire session:
private async checkContext() {
  if (this.context) return;

  const dir = `output/videos/${dayjs().format("YYYY-MM-DD")}`;
  const screenSize = await PowerShell.getScreenSize();

  this.context = await this.browser.newContext({
    recordVideo: {
      dir,
      size: { width: screenSize.width, height: screenSize.height },
    },
  });
}

private async handleVideo(page: Page) {
  await page.close();
  await this.context.close(); // The video is saved when the context is closed
  this.context = null;
}
The video is not saved with page.close() alone. By calling context.close(), the video recorded in that context is written to a file.
Retry Implementation
Browser automation can become unstable (network delays, element rendering timing, etc.). A maximum of 3 retries was implemented for critical flows.
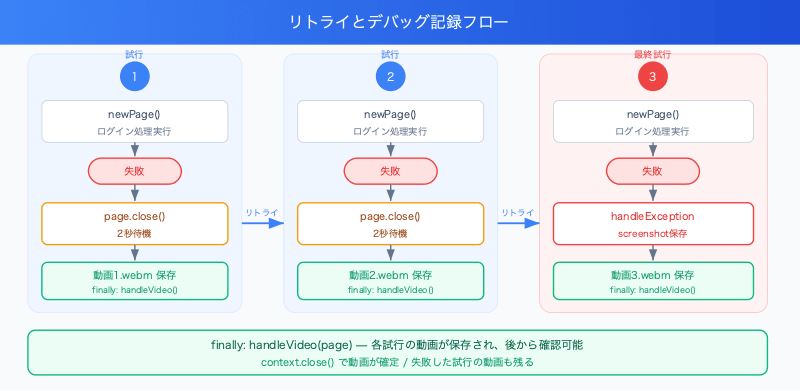
public async getAzureCode(callback: string): Promise<string> {
  const maxRetries = 3;

  for (let attempt = 1; attempt <= maxRetries; attempt++) {
    Logger.task(`Attempt ${attempt}/${maxRetries}`);
    let page: Page | null = null;

    try {
      page = await this.context.newPage();
      // ... login process ...
      return code; // Return immediately on success
    } catch (error) {
      if (attempt < maxRetries) {
        Logger.warn(`Failed. Retrying in 2 seconds...`);
        if (page) await page.close();
        await new Promise((resolve) => setTimeout(resolve, 2000));
      } else {
        // Final attempt also failed
        await this.handleException(page!, "All retries failed.", error);
        throw error;
      }
    } finally {
      if (page) await this.handleVideo(page); // Save video for each attempt
    }
  }
  throw new Error("unreachable"); // For TypeScript type checking
}
The video for each attempt is saved in the finally block. Since videos from failed attempts are also retained, you can later check "at which retry attempt and at which screen it got stuck."
Summary
TOTP window management: An OTP from the same 30-second window can only be used once. Record lastCallTime and wait if necessary before generating the next one.
Handle UI branching with Promise.race: When you don't know "which screen will appear next," monitor multiple elements simultaneously and branch based on whichever appears first.
Ensure observability with video and screenshots: The video is finalized with context.close(). Combined with error screenshots, this makes headless browser debugging practical.
Pomerium SSH tunnel: Obtain the authentication URL from stderr and use a two-stage flag of isLocked + isConnected to prevent double authentication.
Login flows involving MFA are complex, but by combining automatic TOTP generation, UI branch handling with Promise.race, and an appropriate lock mechanism, it was possible to achieve stable automation at a practically usable level, from OAuth flows to SSH tunnel authentication.