Using Strands Agents to block unintended requests by integrating with Amazon Bedrock Guardrails
This page has been translated by machine translation. View original
Introduction
Hello, I'm Kanno from the Consulting Department, a big fan of La Mu.
The New Year's holidays are already over. I'm shocked at how quickly my time off ended while testing AgentCore and Strands Agents and writing blogs.
Changing the subject, I've recently been creating an AI agent for knowledge collection personally.
It's a system that structures and categorizes knowledge written in Slack and automatically commits it to GitHub.
The challenge here is that I want to filter out irrelevant posts.
You'd want to block questions like "How's the weather today?" or "Tell me about recommended movies" that are unrelated to knowledge collection, right?
Initially, I simply instructed "Please don't answer unrelated questions" in the system prompt, and prepared a sub-agent as a tool to block such queries.
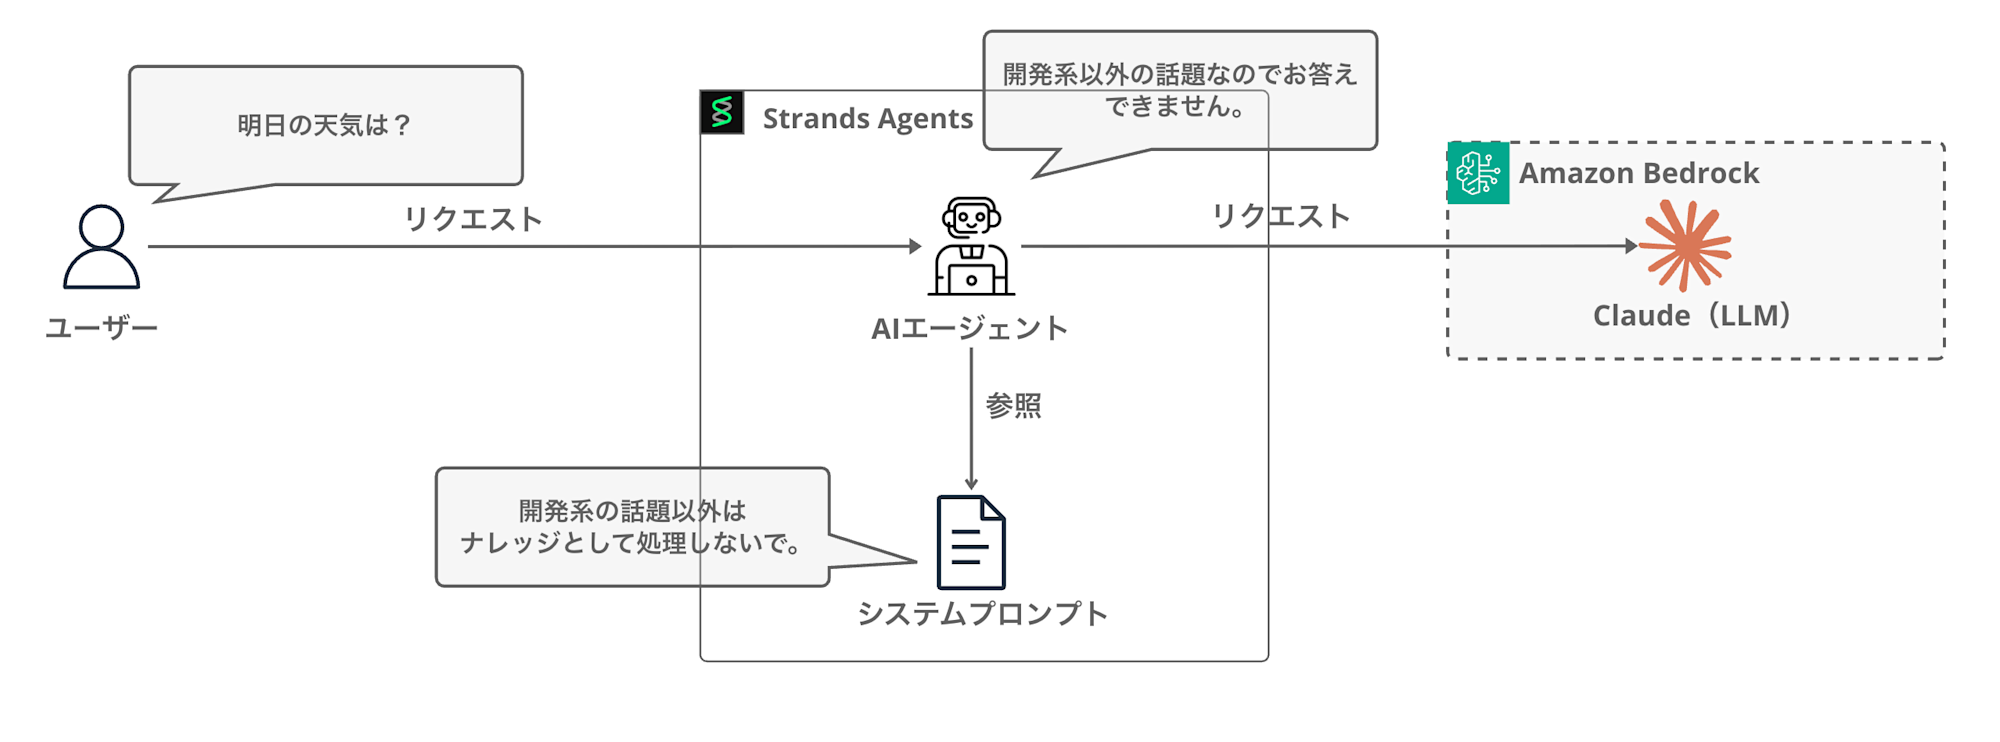
However, I didn't like the system prompt becoming complex and increasing the agent's workload. When I was wondering if there were any built-in features available, I thought of using Bedrock Guardrails as shown below. (There are other features like steering, but I wanted to filter upfront and separate concerns.)
In this article, I'll explore how to connect Strands Agents with Bedrock Guardrails to block requests outside the required domain.
What is Bedrock Guardrails?
Bedrock Guardrails is a safeguard feature available in Amazon Bedrock.
It allows you to set up filtering for inappropriate content and blocking of specific topics in LLM applications.
There's an article that explains it clearly, so please refer to this for details.
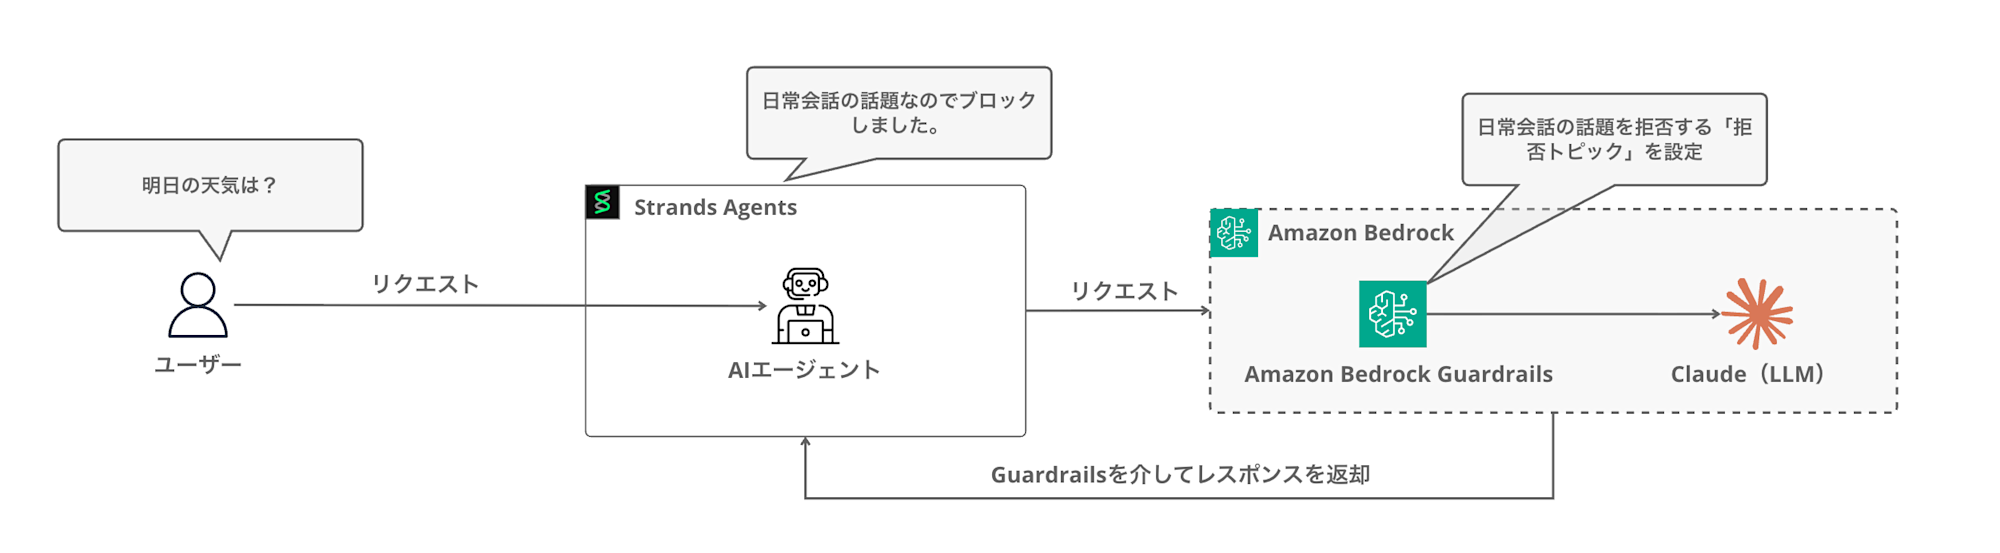
Guardrails allows you to set a wide range of policies, but in this case, we'll utilize the denied topics policy.
Using a denied topics policy enables blocking conversations about specific topics.
Since the main purpose of this AI agent is knowledge collection, I want to block everyday conversations and other irrelevant topics.
I'll try to implement this using Bedrock Guardrails' denied topics policy.
Integration with Strands Agents
Strands Agents has built-in support for integration with Bedrock Guardrails.
Let's look at the official documentation on how to do this.
import json
from strands import Agent
from strands.models import BedrockModel

# Create a Bedrock model with guardrail configuration
bedrock_model = BedrockModel(
    model_id="global.anthropic.claude-sonnet-4-5-20250929-v1:0",
    guardrail_id="your-guardrail-id",         # Your Bedrock guardrail ID
    guardrail_version="1",                    # Guardrail version
    guardrail_trace="enabled",                # Enable trace info for debugging
)

# Create agent with the guardrail-protected model
agent = Agent(
    system_prompt="You are a helpful assistant.",
    model=bedrock_model,
)

# Use the protected agent for conversations
response = agent("Tell me about financial planning.")

# Handle potential guardrail interventions
if response.stop_reason == "guardrail_intervened":
    print("Content was blocked by guardrails, conversation context overwritten!")

print(f"Conversation: {json.dumps(agent.messages, indent=4)}")
Guardrails is applied simply by setting guardrail_id with the ID of the Guardrails created in the console, guardrail_version with the version number, and guardrail_trace to enable/disable trace information when initializing the BedrockModel.
It's really simple to implement, which is great.
Prerequisites
The versions I used are as follows:
| Item | Version |
|---|---|
| Python | 3.12 |
| strands-agents | 1.21.0 |
I created the Guardrails in the us-west-2 (Oregon) region.
Implementation
Now let's implement it.
Creating Guardrails (Console)
First, let's create Bedrock Guardrails in the AWS console.
This time, we'll only set up denied topics, but let's check what other setting items are available as we proceed.
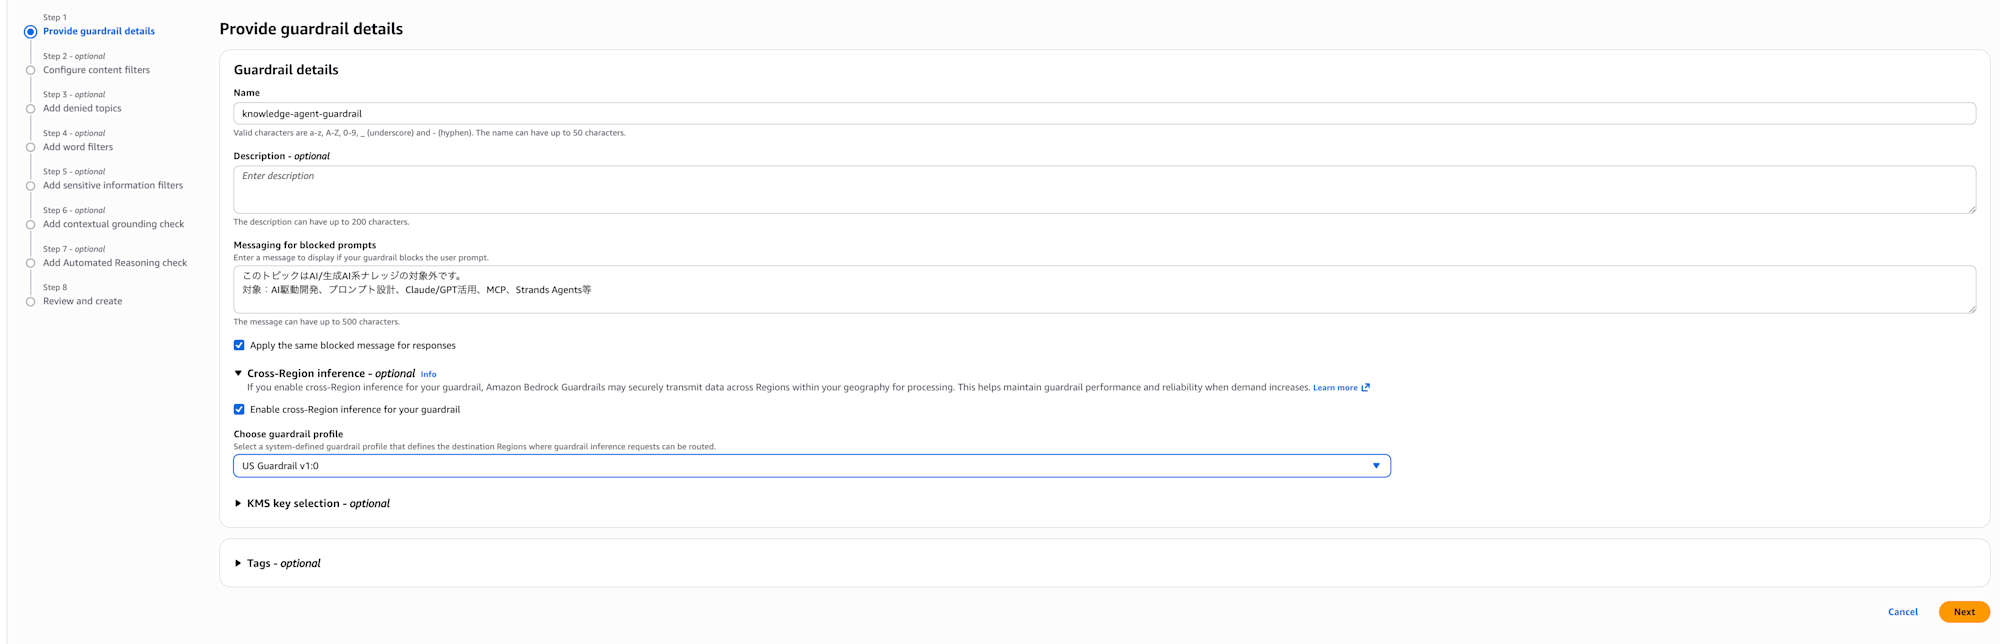
Guardrail details
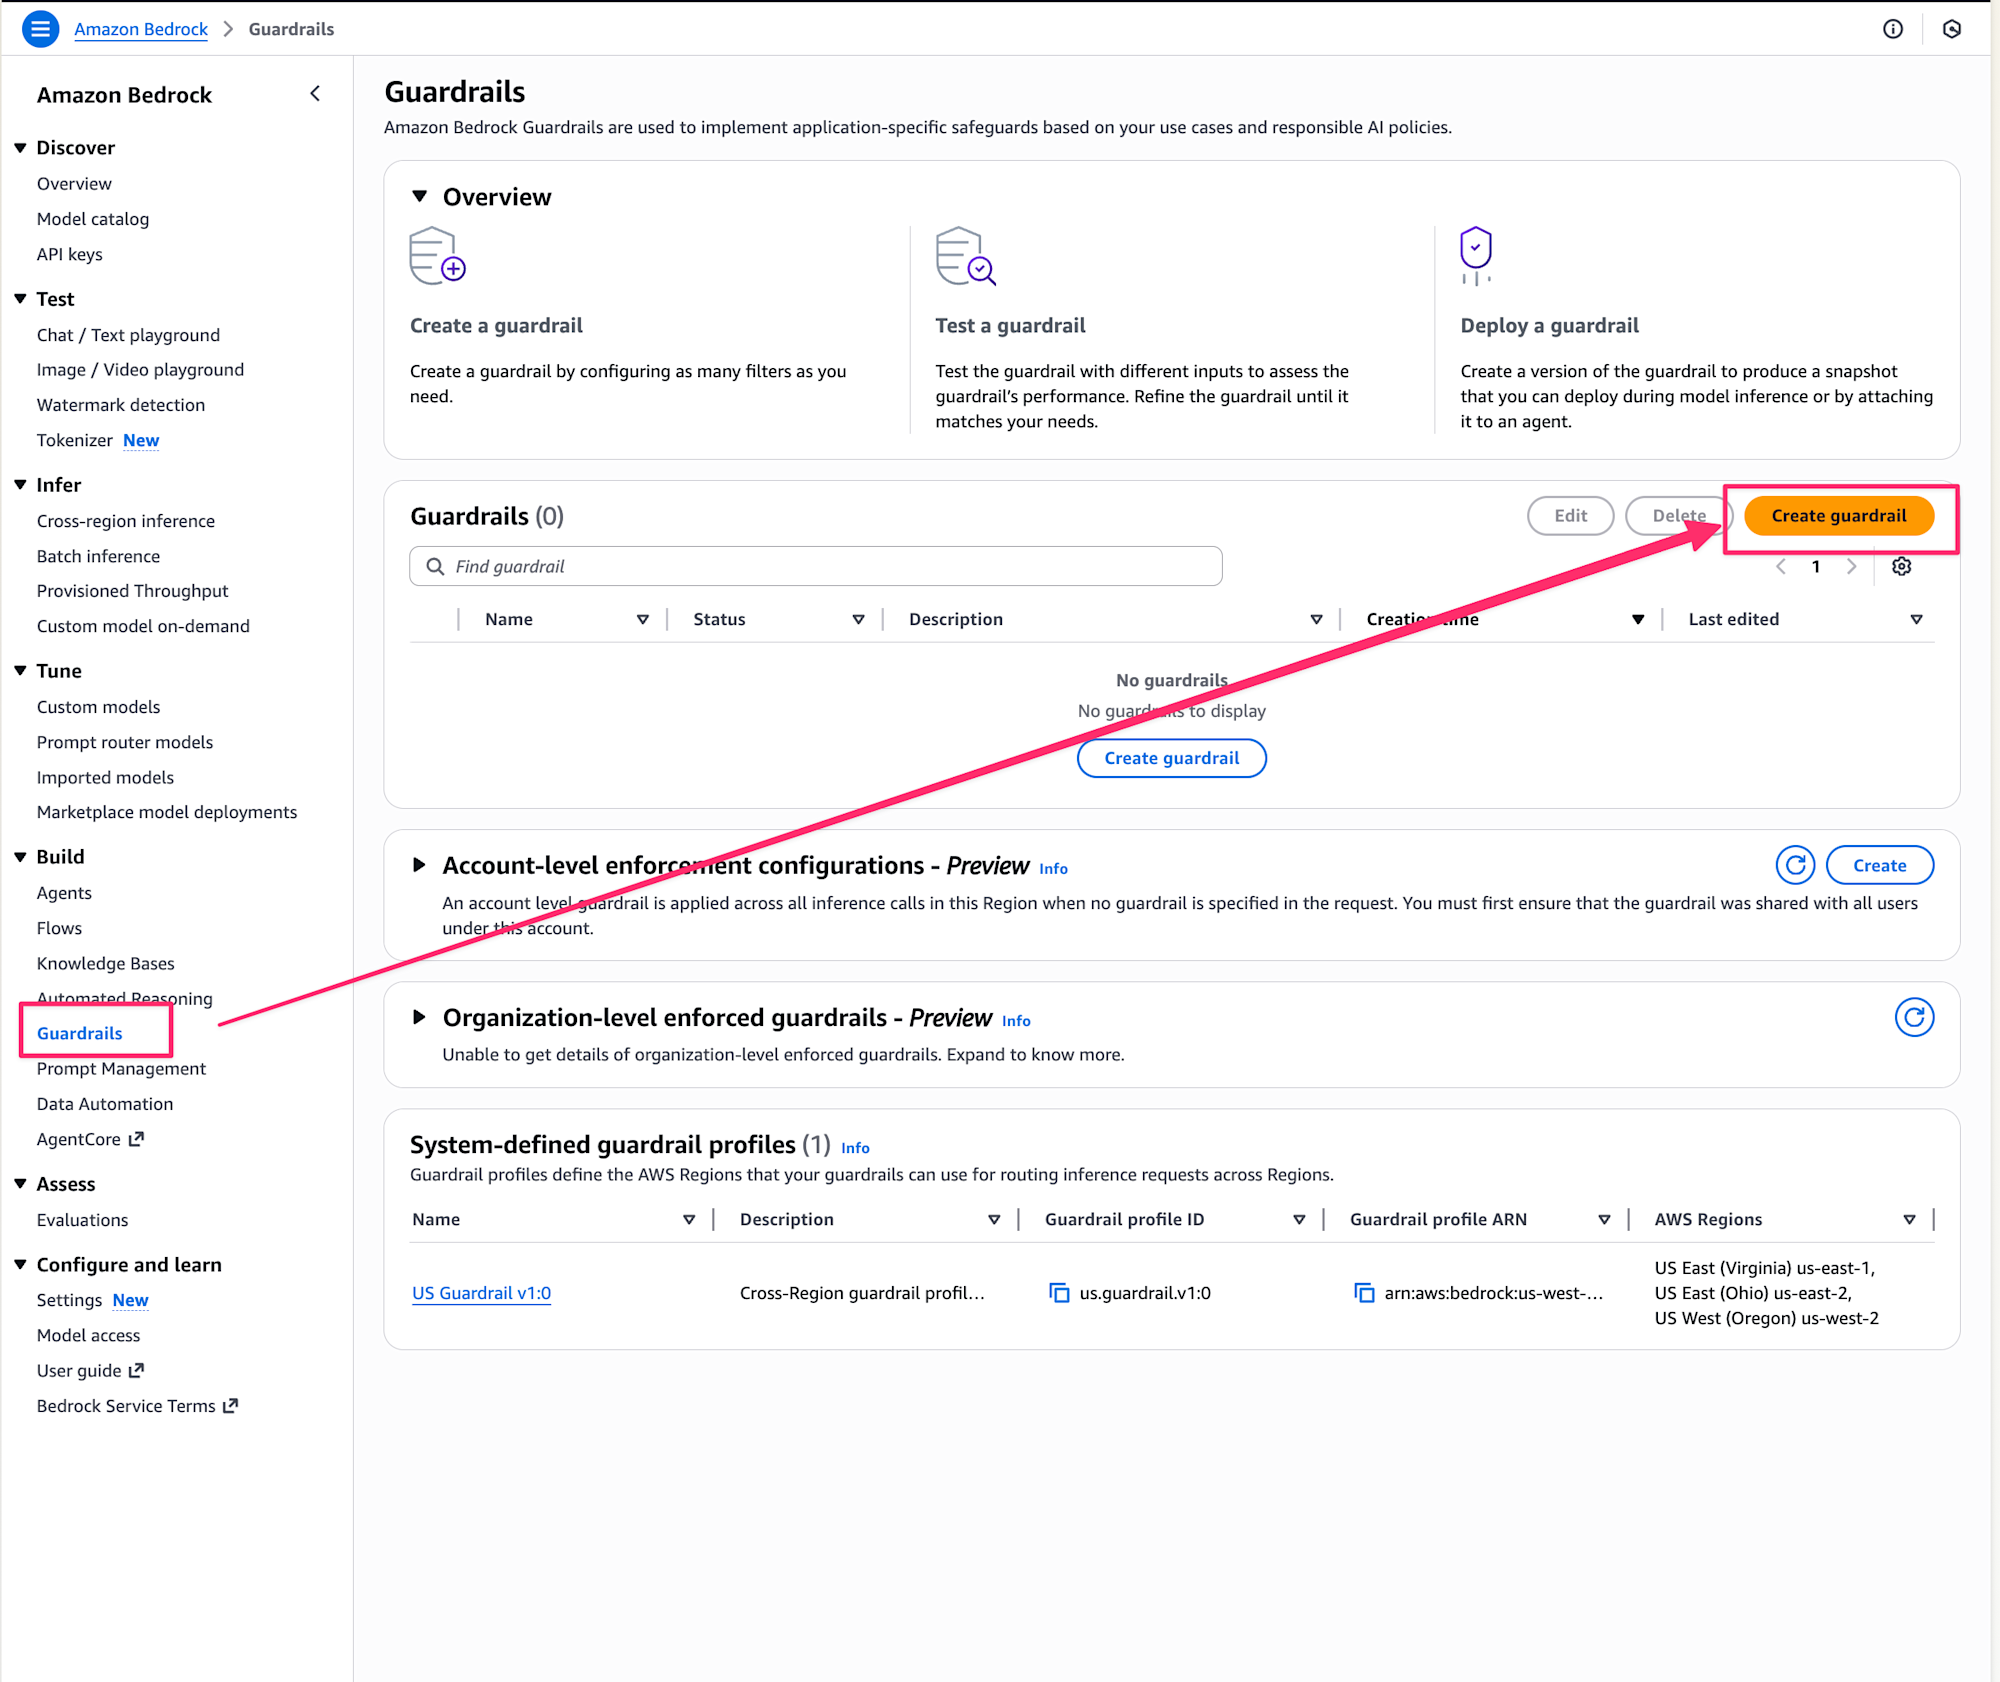
From the Bedrock console, select Guardrails and click Create guardrail.
Enter a name and description, then proceed.
I named it knowledge-agent-guardrail. When a denied topic is entered, it will return the following:
This topic is outside the scope of AI/generative AI knowledge.
Covered topics: AI-driven development, prompt design, Claude/GPT utilization, MCP, Strands Agents, etc.
I'll also enable the cross-region inference option.
Content filter settings
Next, the content filter settings screen is displayed.
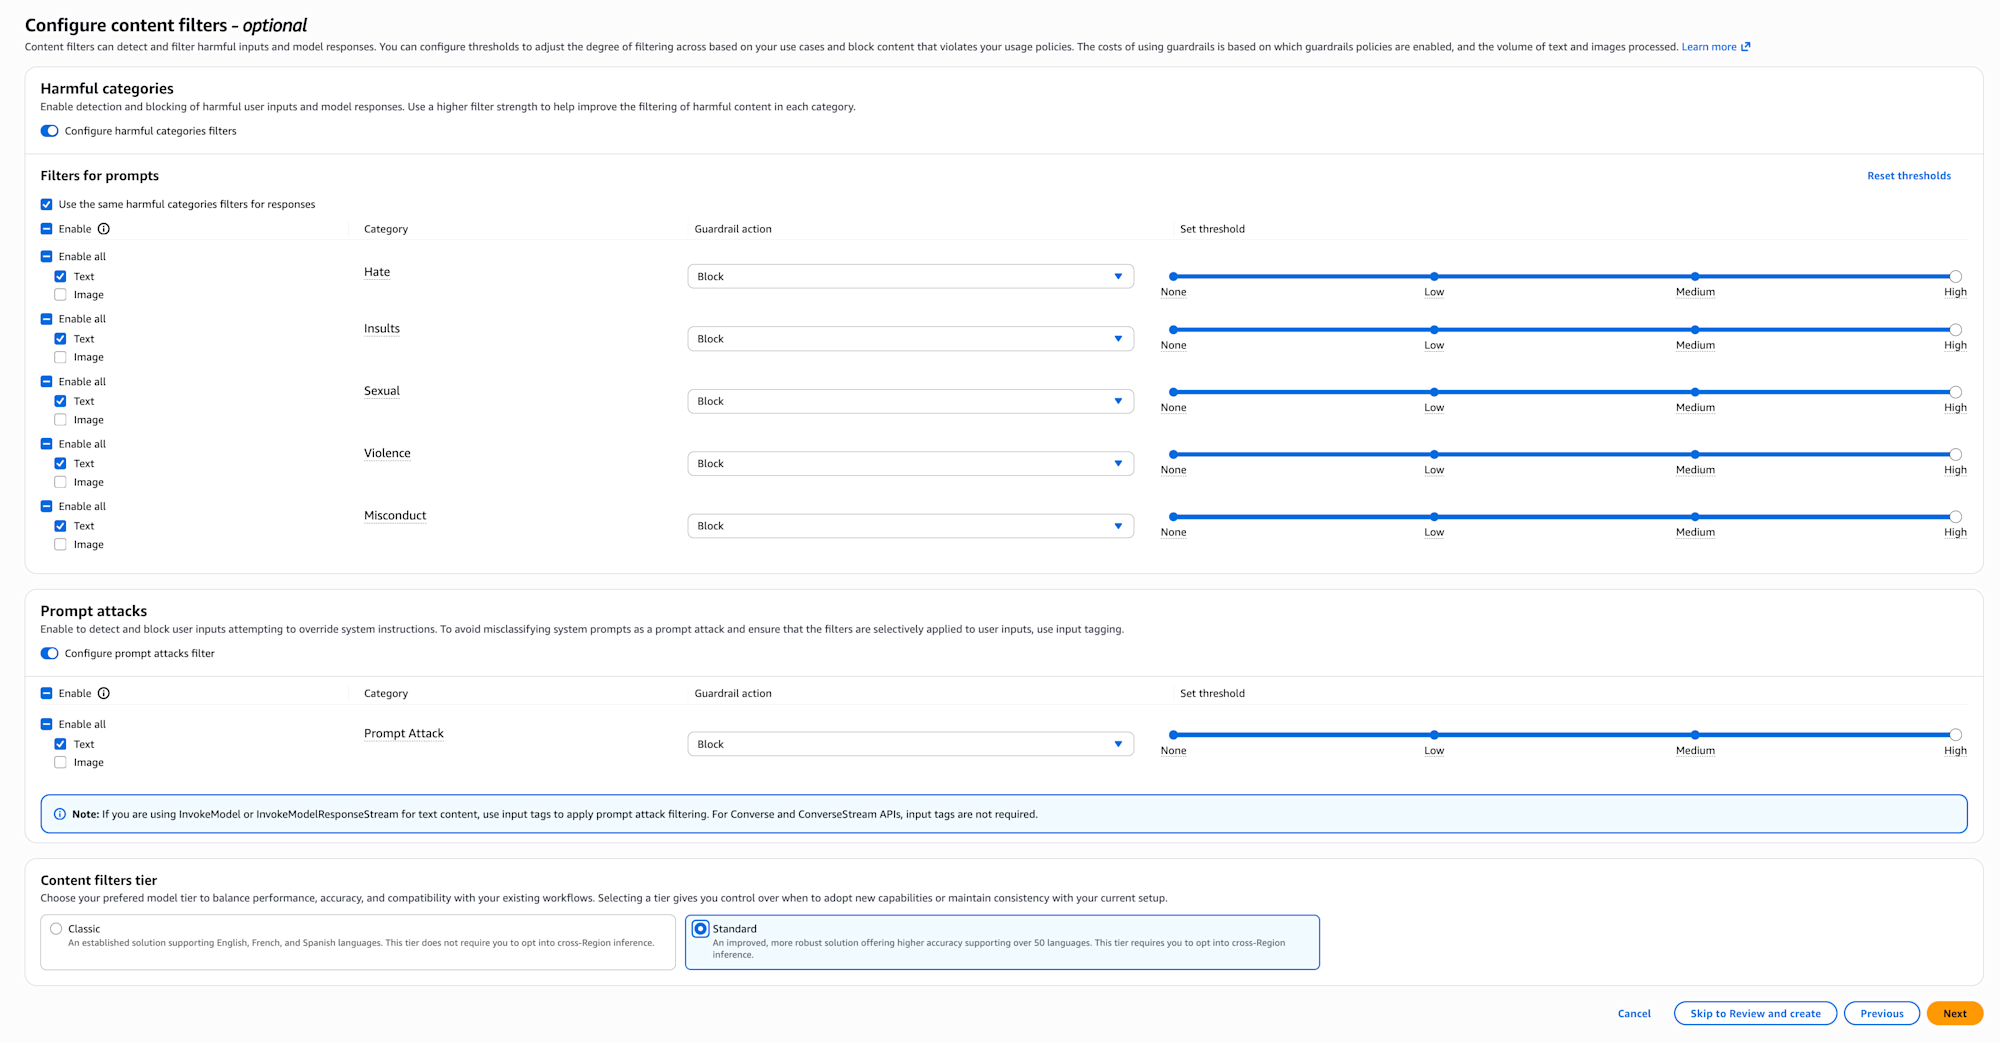
In content filters, you can set the intensity for filtering harmful content (violence, sexual expression, defamation, etc.).
For publicly available applications, it's reassuring to set this appropriately.
Denied topic settings
Next, set up denied topics. Here we define the "topics we want to deny."
This is the main setting area for today! Select Add denied topic.

I set up the following content as blocked targets.
The name is non-development-topic and the tier is Standard.
Enter the topics to deny. There's advice for topics which I'll follow to specify everyday conversation:
- "Topic definition" describes the topic, so don't use negative expressions like "don't talk about ◯◯"
- Don't include "examples" or "procedures" in the "topic definition"
Initially, I made specifications that didn't comply with the above (including specific examples or using negative expressions), so I need to be careful in the future. Since we can't use negative expressions, it's better to include conceivable denied topics. This is a bit difficult to think of everything... so it seems better to use this method when there are specific topics you want to explicitly deny.
General topics related to daily conversation, small talk, entertainment, lifestyle, and personal consultation.
I set the following examples as sample phrases.
You can set up to 5, so it's good to include phrases that are likely to be used frequently when actually applying this. I'm just entering samples for now.
- It's hot today
- Good work
- What are your plans for the weekend?
- Did you watch the soccer game yesterday?
- Tell me about recommended movies
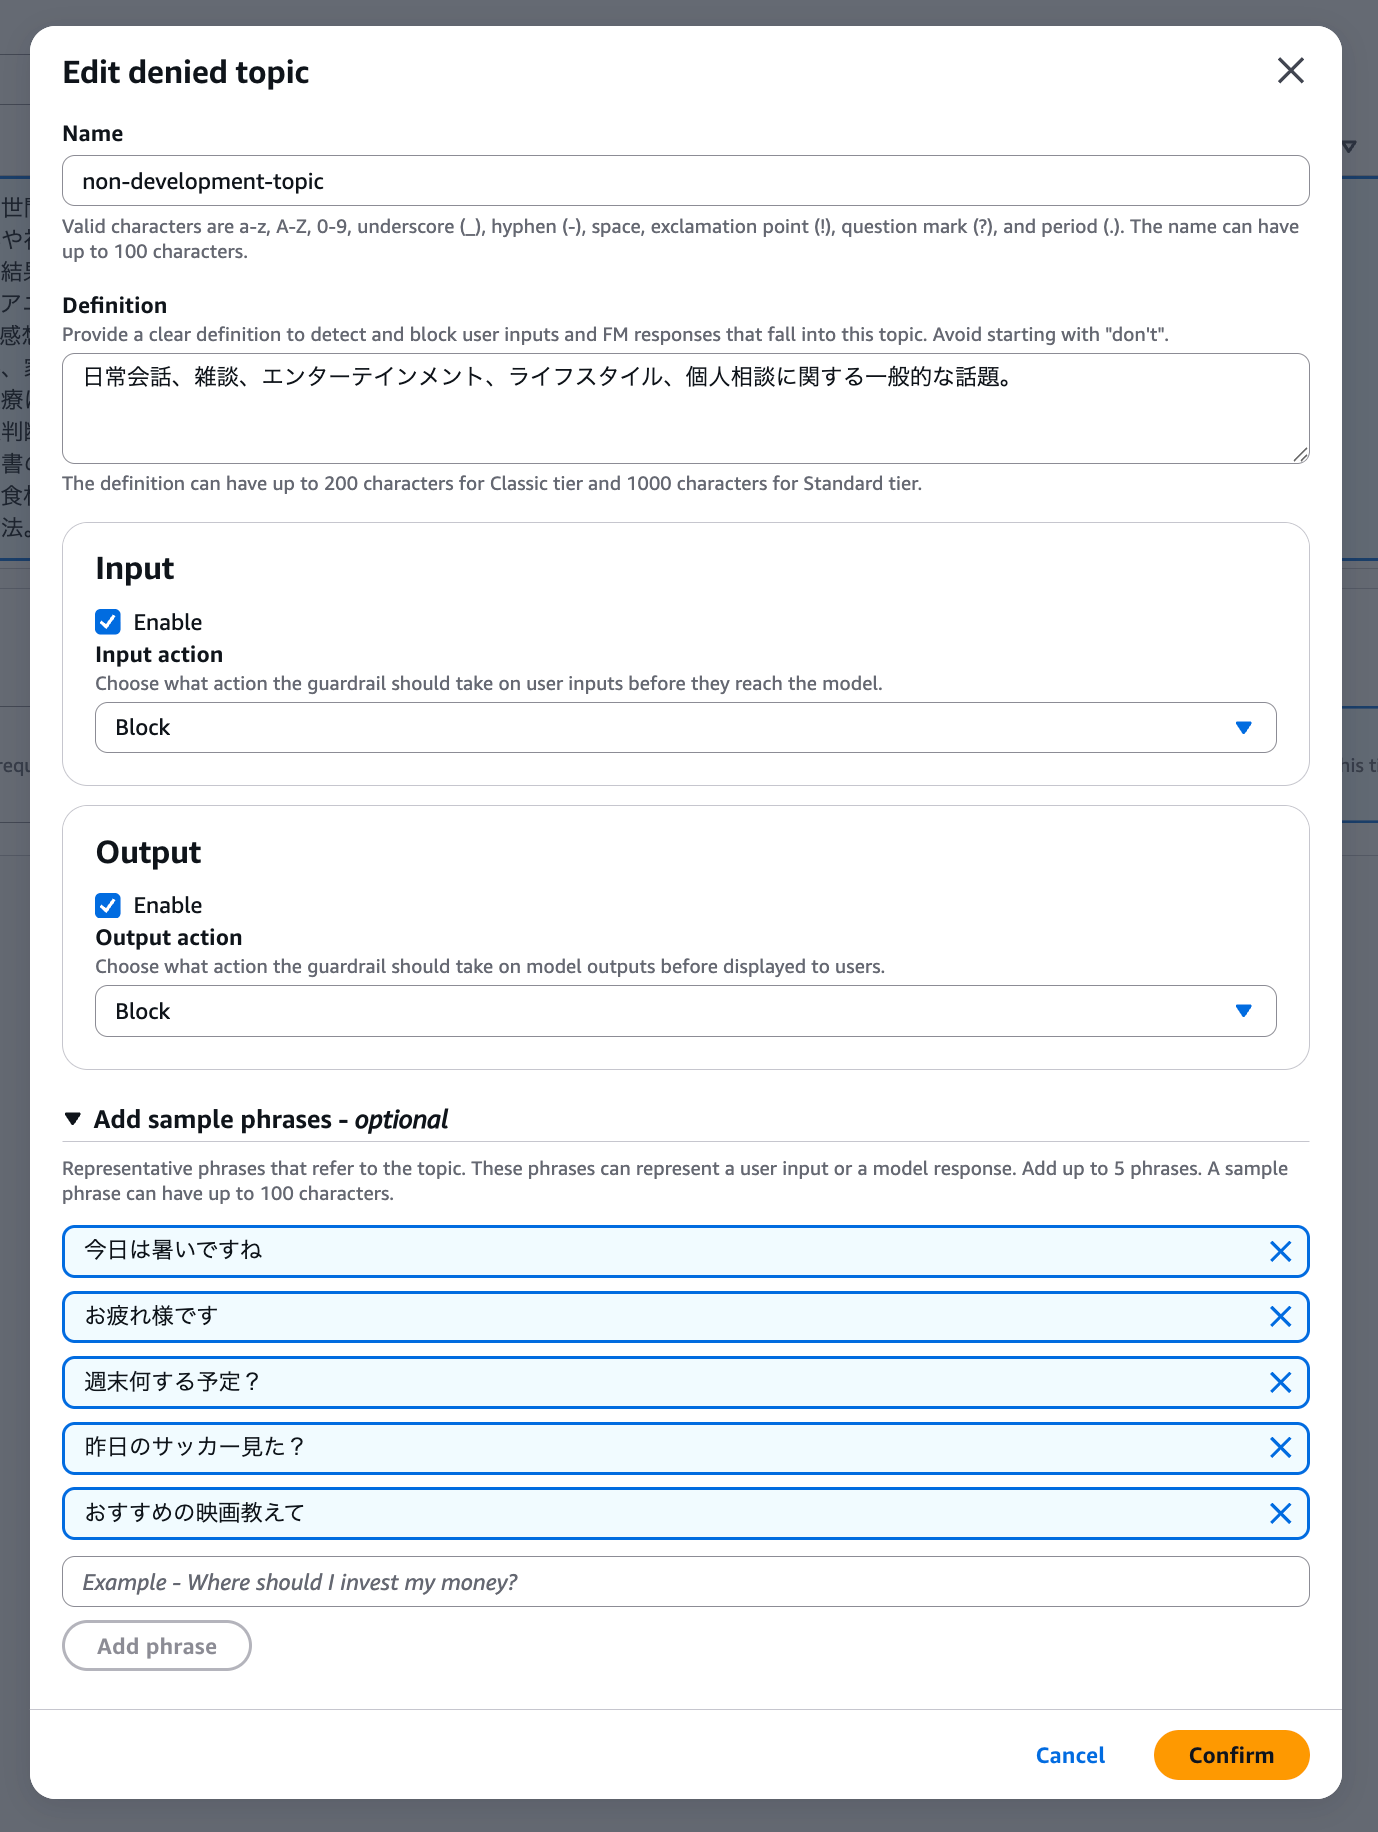
By the way, the action can be selected for both Input/Output, and Detect can also be selected, which means there's a mode that detects but doesn't block. This is good for cases where you first want to see the evaluation without blocking.
Word filter settings
Next, the word filter settings screen is displayed.
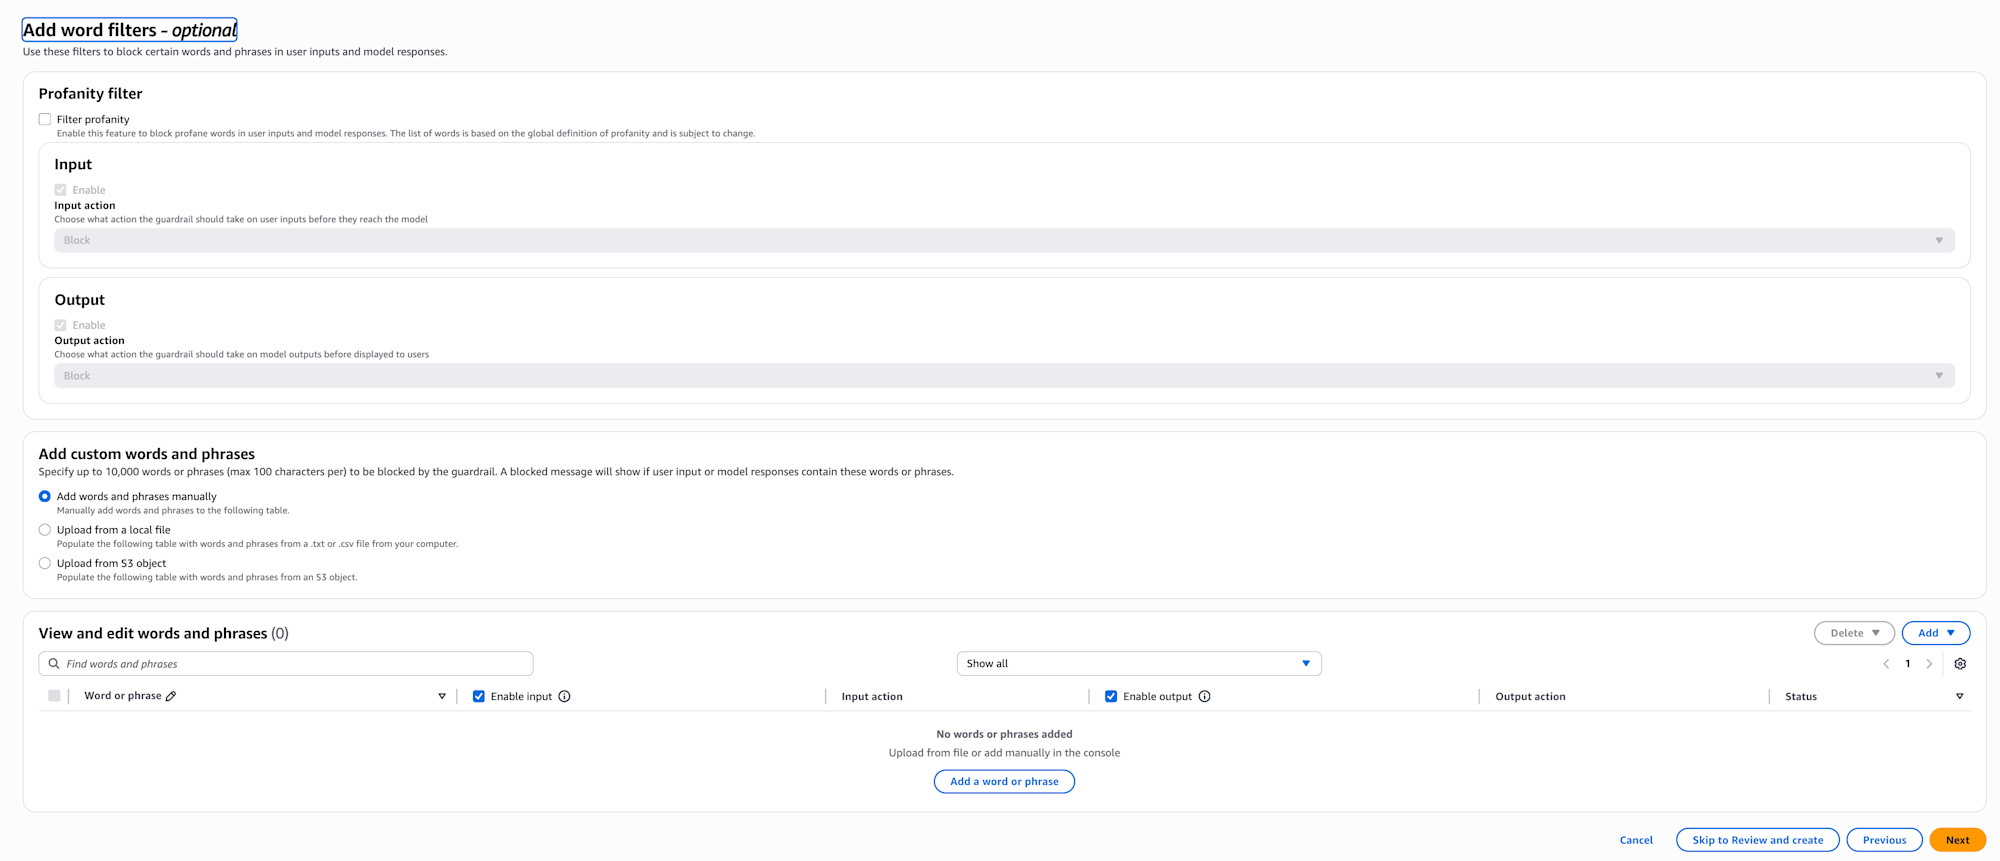
With word filters, you can directly block specific words or phrases. This can be used to prevent inappropriate expressions or leakage of internal company terms.
You can use word filters provided by AWS or register words yourself.
Sensitive information filter settings
Next, the sensitive information filter settings screen is displayed.
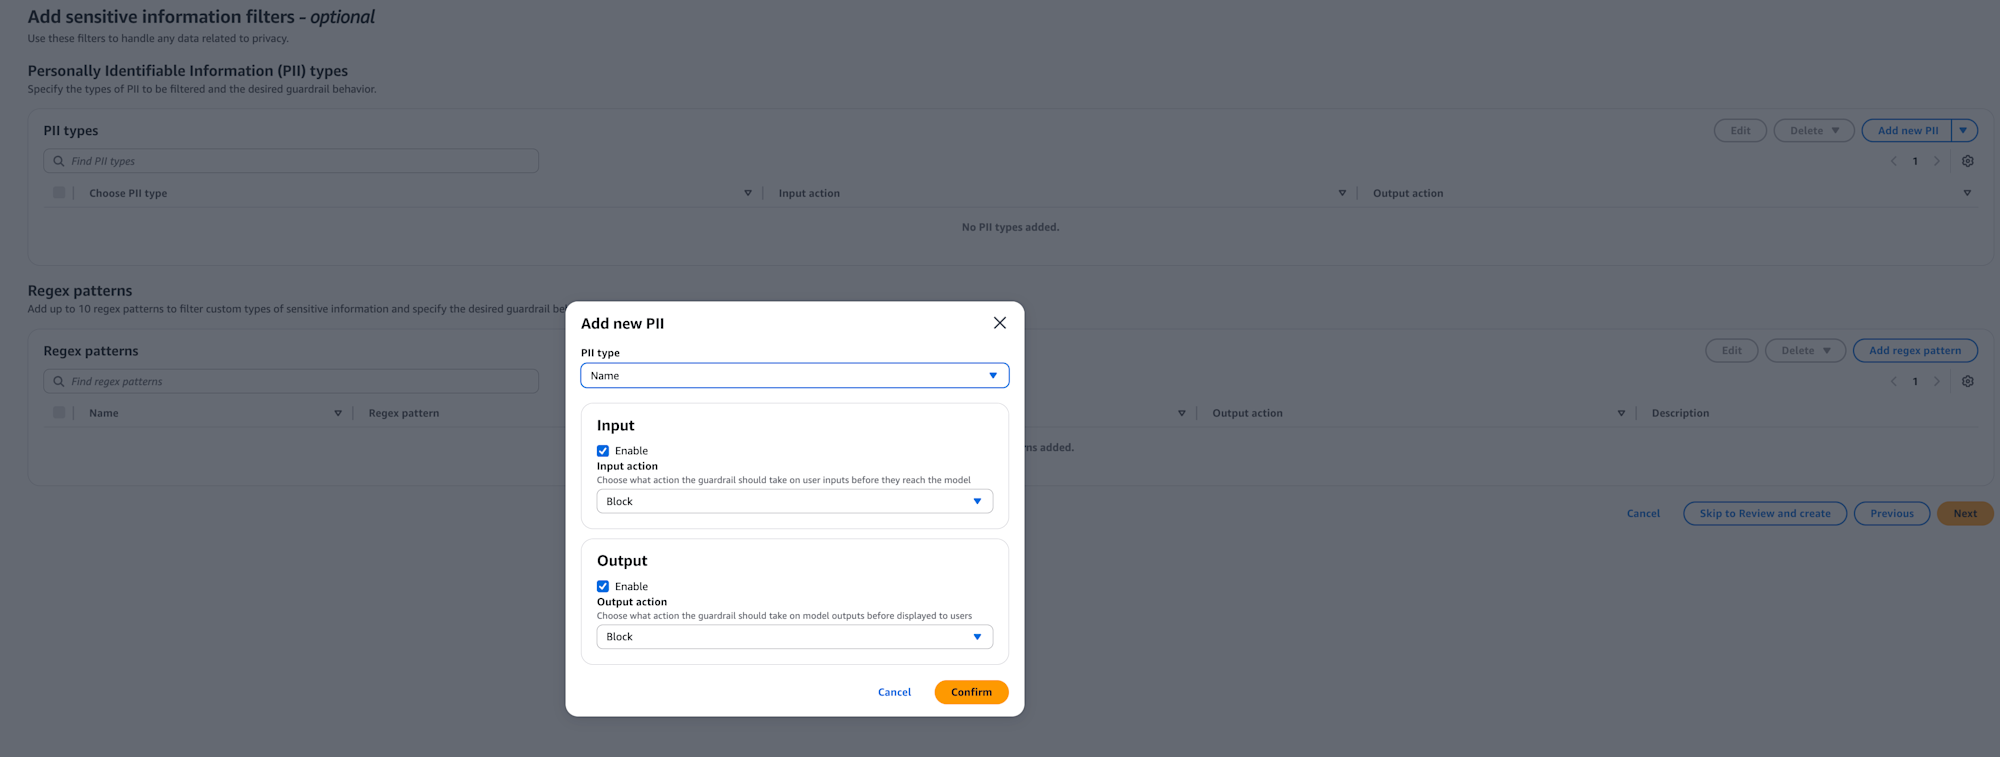
With sensitive information filters, you can mask or block personal information (PII) or custom-defined sensitive information.
It's helpful that it automatically detects email addresses and credit card numbers.
You can also check using regular expressions to detect specific format IDs.
Context grounding check settings
Next, the context grounding check settings screen is displayed.
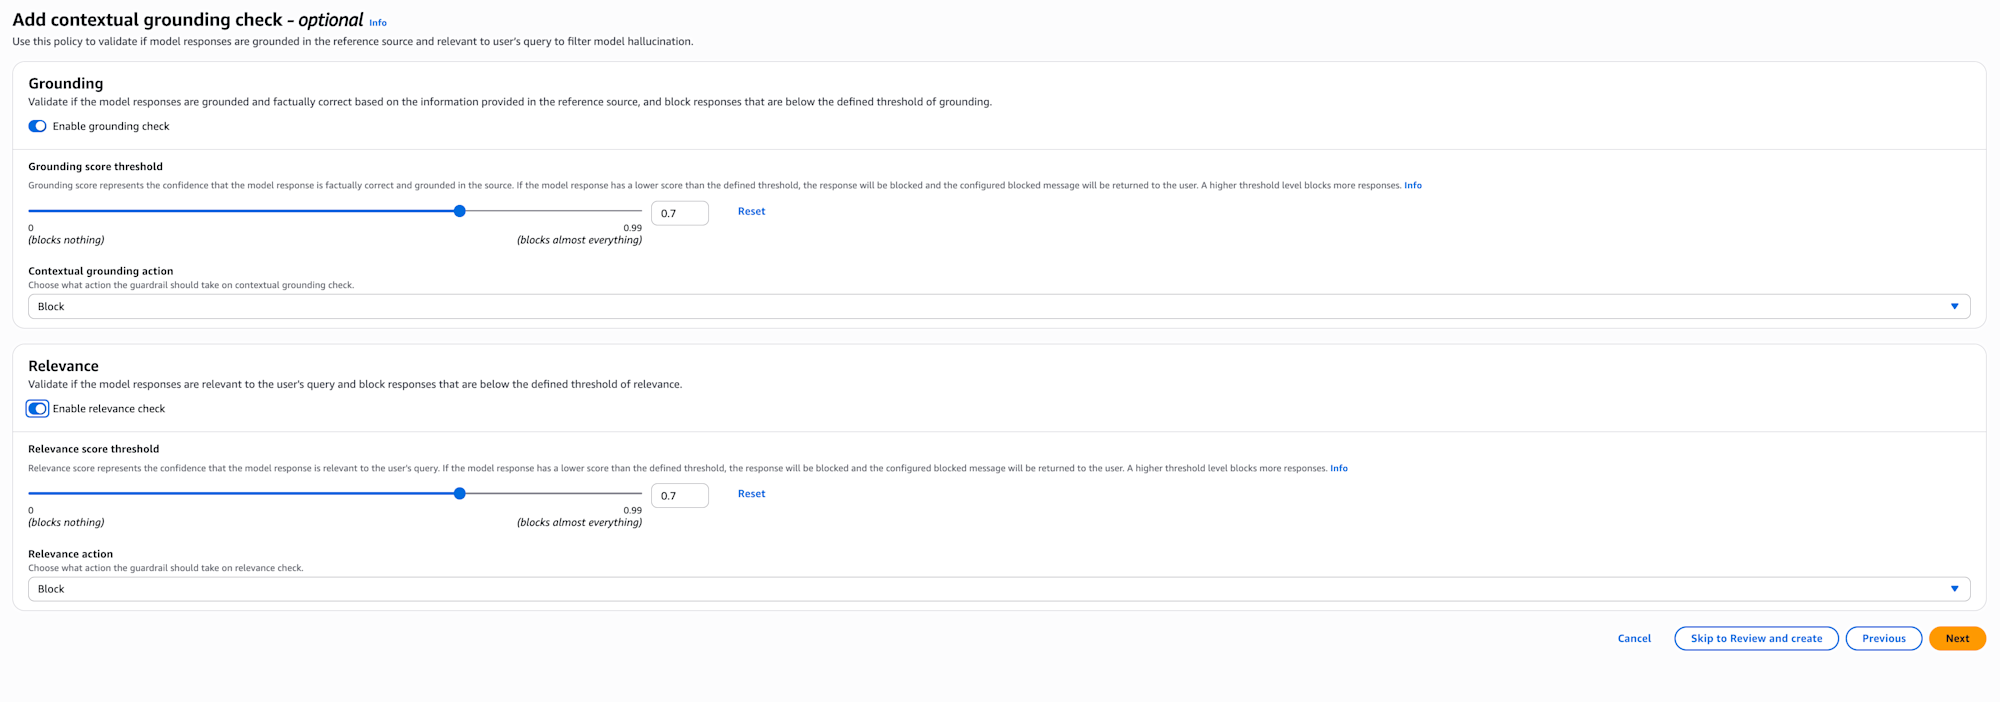
With context grounding checks, when there are reference sources like in RAG, you can check if the answer is based on the source (Grounding) and if it's relevant (Relevance).
This is useful for cases where you want to adopt information that exceeds a certain threshold.
There's an article on our company blog about this that you can refer to as needed.
Automated reasoning check settings
Next, the automated reasoning check settings screen is displayed.
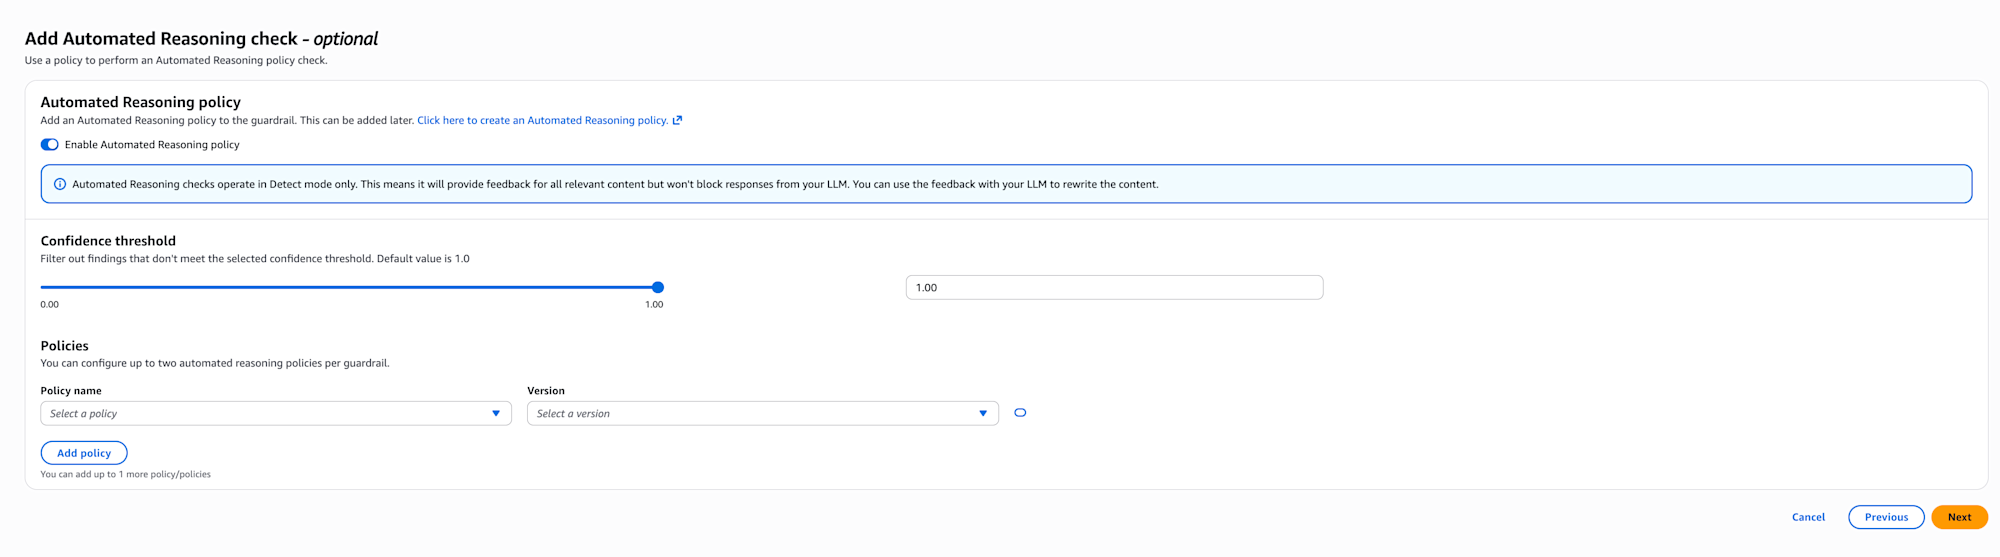
With automated reasoning checks, you can validate LLM output using Automated Reasoning policies.
Policies need to be created separately from this screen, defining source documents with business rules and extracting rules. On this screen, you select pre-created policies.
Currently, it only operates in detect mode, providing feedback without blocking.
You can also set the confidence threshold.
According to the official documentation, there are the following limitations:
- Available regions: US (N. Virginia, Oregon, Ohio) and EU (Frankfurt, Paris, Ireland) only
- Language support: English (US) only
- Streaming API: Not supported
It's particularly valuable in highly regulated industries (healthcare, HR) and applications handling complex rules (mortgage approval, etc.).
I won't set it up this time, but consider using it when more strict output validation is needed.
I'd like to verify this policy and write a blog about it in the future.
Review and create
Review the settings and click Create guardrail. This completes the creation of Guardrails!
Testing in the console
Once created, let's test it in the console. I select Haiku4.5 and try saying "Cheese naan is delicious, isn't it?"
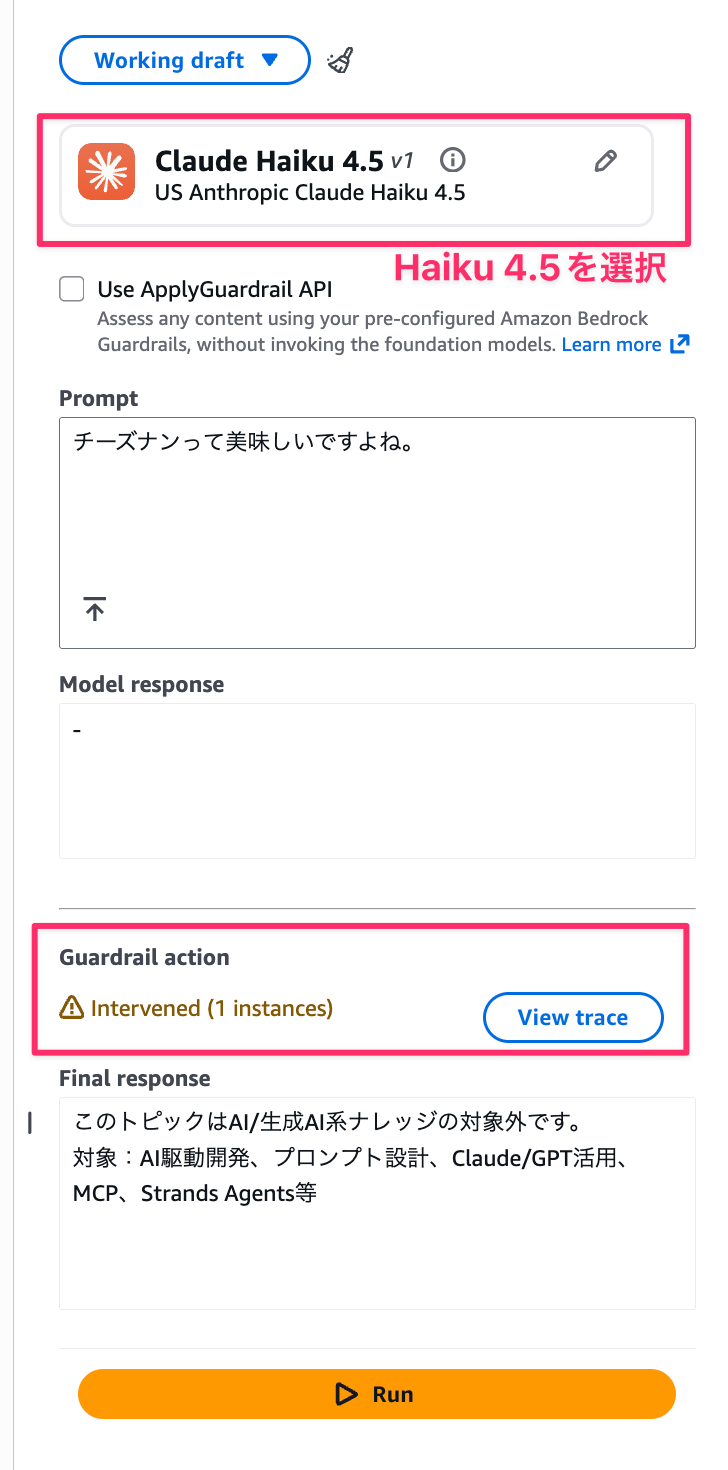
It was blocked as expected!!
Now let's try entering something development-related: "Using Claude Code's custom slash commands improves the speed of routine tasks and leads to operational efficiency."
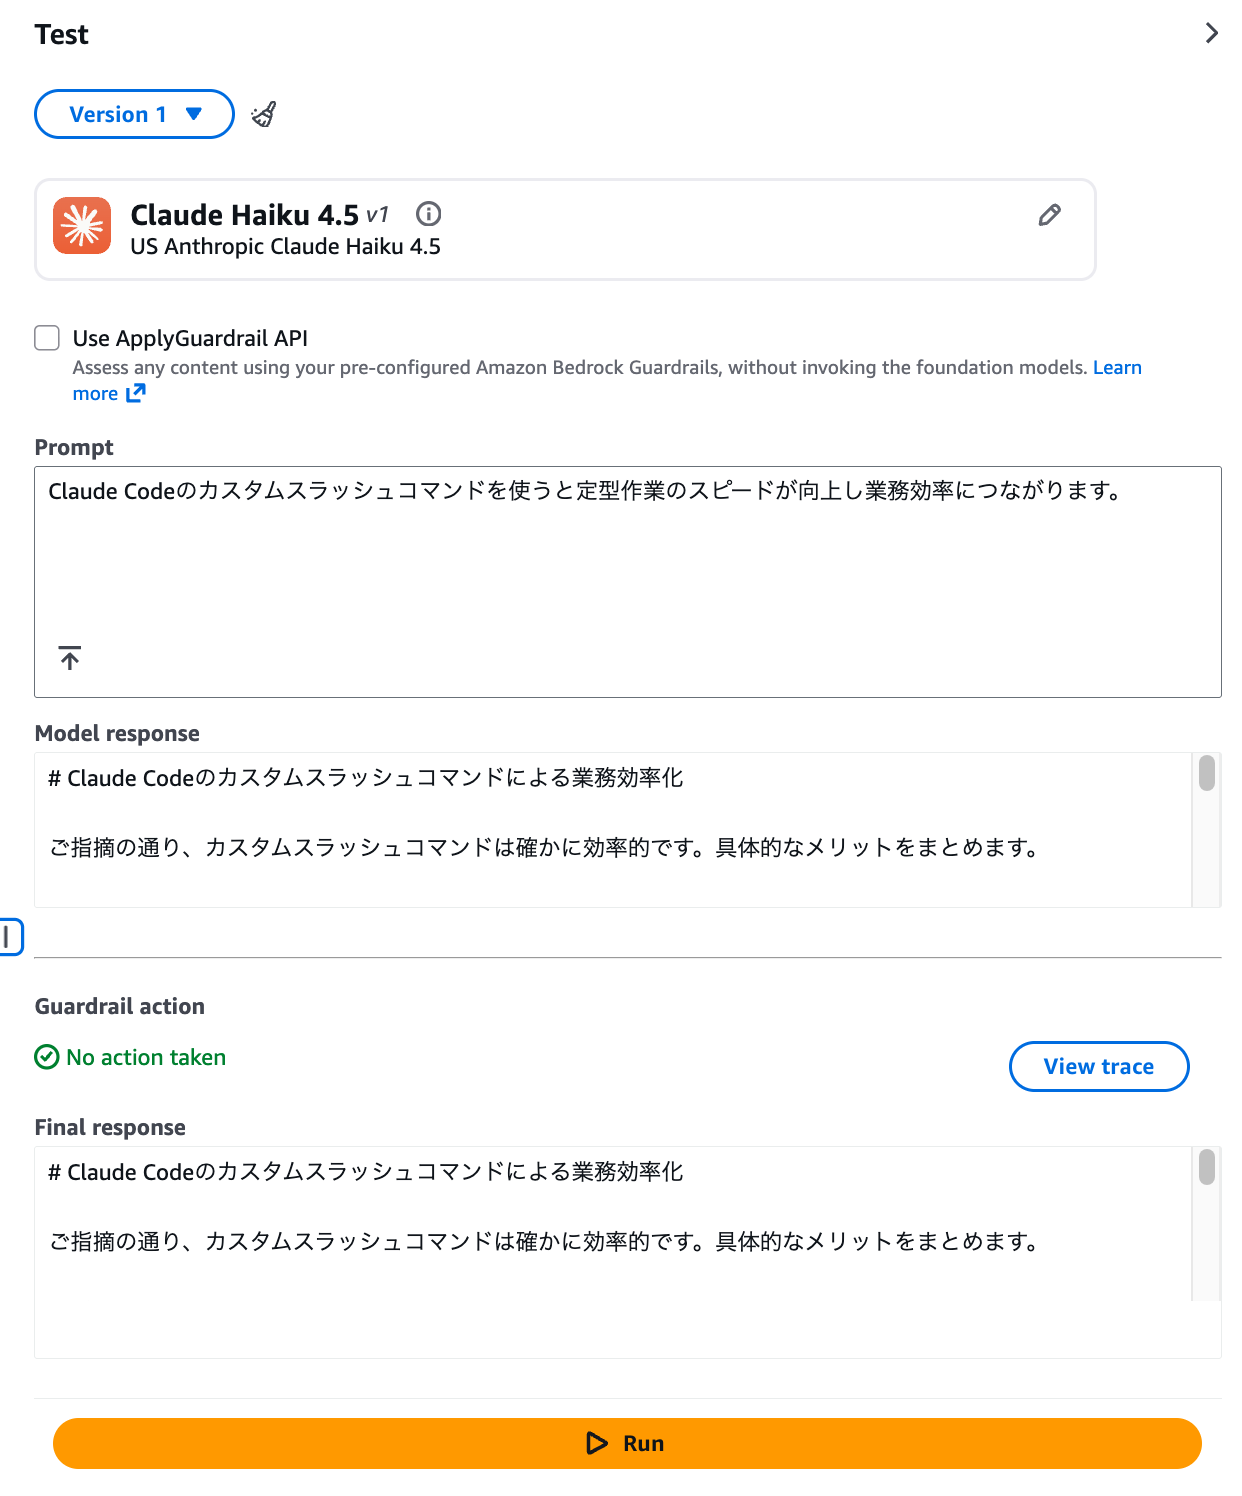
This passed through without problems! We've confirmed that Guardrails is working correctly!
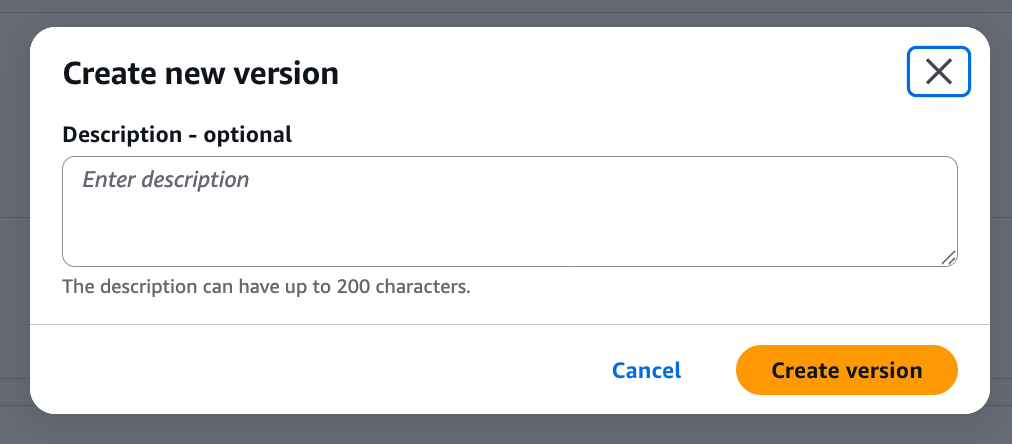
Creating a version
After testing is complete, create a version. From Create version, deploy it as version 1.

This completes the Guardrails setup. Now let's use it from Strands Agents!
I'll note down the ID as we'll need it.

Setting up Strands Agents
First, let's create an environment with uv.
uv init
Install the libraries as well.
uv add strands-agents
Now that we're prepared, let's write the code and try it out!
from strands import Agent
from strands.models import BedrockModel

# Specify the Guardrails created in the console
bedrock_model = BedrockModel(
    model_id="us.anthropic.claude-haiku-4-5-20251001-v1:0",
    guardrail_id="<insert your actual guardrail ID here>",
    guardrail_version="1",
    guardrail_trace="enabled",
    region_name="us-west-2"
)

agent = Agent(
    model=bedrock_model
)

response = agent("Cheese naan is delicious, isn't it?")
We specify the model to use (Haiku 4.5 in this case) with model_id, and set the Guardrails ID and version number created in the console with guardrail_id and guardrail_version. guardrail_trace is the setting for trace information output, which is useful to enable during debugging.
Operation check
Now let's run it. I'll ask the same question as when testing in the console.
uv run main.py
This topic is outside the scope of AI/generative AI knowledge.
Covered topics: AI-driven development, prompt design, Claude/GPT utilization, MCP, Strands Agents, etc.
It worked without any issues! The block message set in Guardrails is returned as is!
By the way, with guardrail_trace="enabled", detailed information about which policy blocked it is output to the log.
You can check this by setting the Python log level to DEBUG.
import logging
logging.basicConfig(level=logging.DEBUG)
{
  "trace": {
    "guardrail": {
      "actionReason": "Guardrail blocked.",
      "inputAssessment": {
        "topicPolicy": {
          "topics": [{
            "action": "BLOCKED",
            "name": "non-development-topic",
            "type": "DENY"
          }]
        }
      }
    }
  }
}
This shows which topic blocked it, which is convenient for debugging.
Incidentally, if you change the denied topic's action to Detect, the trace information also changes.
| Item | Blocked | Detected |
|---|---|---|
actionReason |
"Guardrail blocked." | "No action." |
action |
"BLOCKED" | "NONE" |
detected |
true | true |
{
  "trace": {
    "guardrail": {
      "actionReason": "No action.",
      "inputAssessment": {
        "topicPolicy": {
          "topics": [{
            "action": "NONE",
            "detected": true,
            "name": "non-development-topic",
            "type": "DENY"
          }]
        }
      }
    }
  }
}
In Detect mode, the model's response is generated while still detecting, so it can be used for evaluation before production deployment.
Let's also try shadow mode
You might be afraid to block requests right away and want to first check what requests would be blocked.
Of course, you can use Detect mode on the Guardrails side, but you can also operate in shadow mode using Hooks.
This doesn't actually block but only outputs logs when violations occur, allowing you to gradually introduce Guardrails while confirming its behavior.
Let's try it out.
import boto3
from strands import Agent
from strands.hooks import HookProvider, HookRegistry, MessageAddedEvent, AfterInvocationEvent

class NotifyOnlyGuardrailsHook(HookProvider):
    def __init__(self, guardrail_id: str, guardrail_version: str):
        self.guardrail_id = guardrail_id
        self.guardrail_version = guardrail_version
        self.bedrock_client = boto3.client("bedrock-runtime", "us-west-2")

    def register_hooks(self, registry: HookRegistry) -> None:
        registry.add_callback(MessageAddedEvent, self.check_user_input)
        registry.add_callback(AfterInvocationEvent, self.check_assistant_response)

    def evaluate_content(self, content: str, source: str = "INPUT"):
        """Evaluate content with ApplyGuardrail API (shadow mode)"""
        try:
            response = self.bedrock_client.apply_guardrail(
                guardrailIdentifier=self.guardrail_id,
                guardrailVersion=self.guardrail_version,
                source=source,
                content=[{"text": {"text": content}}]
            )

            if response.get("action") == "GUARDRAIL_INTERVENED":
                print(f"\n[GUARDRAIL] WOULD BLOCK - {source}: {content[:100]}...")
                for assessment in response.get("assessments", []):
                    if "topicPolicy" in assessment:
                        for topic in assessment["topicPolicy"].get("topics", []):
                            print(f"[GUARDRAIL] Topic Policy: {topic['name']} - {topic['action']}")

        except Exception as e:
            print(f"[GUARDRAIL] Evaluation failed: {e}")

    def check_user_input(self, event: MessageAddedEvent) -> None:
        """Check user input"""
        if event.message.get("role") == "user":
            content = "".join(block.get("text", "") for block in event.message.get("content", []))
            if content:
                self.evaluate_content(content, "INPUT")

    def check_assistant_response(self, event: AfterInvocationEvent) -> None:
        """Check assistant response"""
        if event.agent.messages and event.agent.messages[-1].get("role") == "assistant":
            assistant_message = event.agent.messages[-1]
            content = "".join(block.get("text", "") for block in assistant_message.get("content", []))
            if content:
                self.evaluate_content(content, "OUTPUT")

# Creating an agent using Hooks
agent = Agent(
    system_prompt="You are a helpful assistant.",
    hooks=[NotifyOnlyGuardrailsHook("<insert your actual guardrail ID here>", "1")]
)

# Use as normal (only log output for violations without blocking)
agent("Cheese naan is delicious, isn't it?")
In the code above, we directly call the ApplyGuardrail API (an API that allows you to use Amazon Bedrock Guardrails functionality without going through an LLM) to perform evaluation.
Even if GUARDRAIL_INTERVENED is returned, it doesn't actually block but only outputs logs.
When executed, the result shows that blocking was logged, allowing you to check if the design is working as intended.
Consider using this when you want to evaluate first before applying Guardrails right away.
uv run hooks_guardrail.py

[GUARDRAIL] WOULD BLOCK - INPUT: Cheese naan is delicious, isn't it?...
[GUARDRAIL] Topic Policy: non_ai_topics - BLOCKED
Yes, cheese naan is really delicious! It has melting cheese inside fluffy naan bread, making it one of the most popular items in Indian cuisine.

When eaten with curry, the combination of spicy curry and mild cheese goes very well together. The sight of the cheese stretching is visually appealing, and it's also quite filling.

What kind of curry do you prefer to eat it with? It's said to pair especially well with butter chicken curry or spinach curry.
[GUARDRAIL] WOULD BLOCK - OUTPUT: Yes, cheese naan is really delicious! It has melting cheese inside fluffy naan bread, making it one of the most popular items in Indian cuisine.

When eaten with curry, the combination of spicy curry and mild cheese goes very well together. The sight of...
[GUARDRAIL] Topic Policy: non_ai_topics - BLOCKED
This suggests a gradual implementation approach - first evaluate in shadow mode, then switch to the built-in method when stable!
For details on the ApplyGuardrail API, please refer to the blog below.
I'd like to verify and consider specific operations separately in the future.
Conclusion
It's great that Guardrails can be easily used with Strands Agents' built-in functionality.
This time I only used the denied topics policy, but Bedrock Guardrails has other useful features like content filters and masking sensitive information.
I'd like to actively utilize these when operating agents in production environments! It seems like there's a lot to explore in terms of what settings work best, so I'd like to conduct a thorough verification someday...
I hope this article has been helpful. Thank you for reading to the end!