
I Built ServiceNow Voice with Amazon Connect in a PDI Environment and Tried Out Everything Up to Call Recording and Transcript Integration

This page has been translated by machine translation. View original
Introduction
ServiceNow Voice with Amazon Connect is a standard integration feature that lets you use Amazon Connect as the telephony platform while handling inbound and outbound calls, creating Interactions (call handling records), and viewing recordings and transcripts, all within ServiceNow.
This time, I built this standard integration from scratch using a ServiceNow Personal Developer Instance (hereafter PDI) and a newly created Amazon Connect instance for testing.
This article summarizes the whole flow, from installing the related applications and going through each step of the setup guide, to actually making and receiving calls and confirming that recordings and transcripts are linked to the Interaction.
The official procedure for introducing ServiceNow Voice with Amazon Connect is available on the following page.
Prerequisites
The test environment for this verification is configured as follows.
- ServiceNow: a PDI (Personal Developer Instance)
- Amazon Connect: a Connect instance in the Tokyo region, newly created specifically for this verification
The official documentation lists the following prerequisites before starting the setup.
- Prepare an AWS account with administrator privileges
- Review the pricing of the resources created during setup
- Because some AWS services are not available in all regions, confirm that you can deploy the resources together in a single region
- A service account must be created on the ServiceNow side to allow communication from the AWS account to the ServiceNow instance
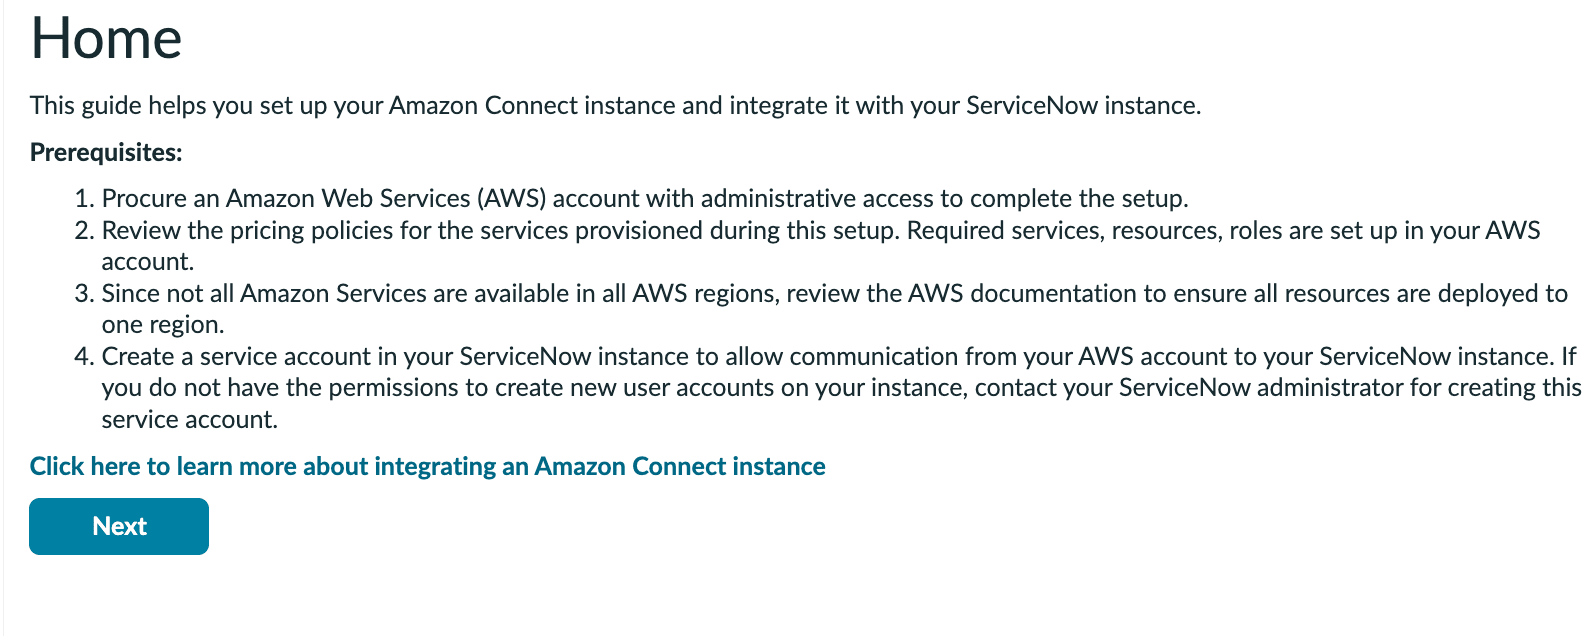
List of Prerequisites shown on the Home screen of the Setup Guide
Overall Flow
The setup guide for ServiceNow Voice with Amazon Connect proceeds in the following order.
- Home (check prerequisites)
- Setup S3 Bucket
- Deploy Stack
- Deploy Lex Bot
- Connect Setup
- Import Contact Flows
- Setup Real Time Transcription (skipped this time because real-time transcription is not used)
- Call Recording Events
- Setup Authentication
- Additional Configuration
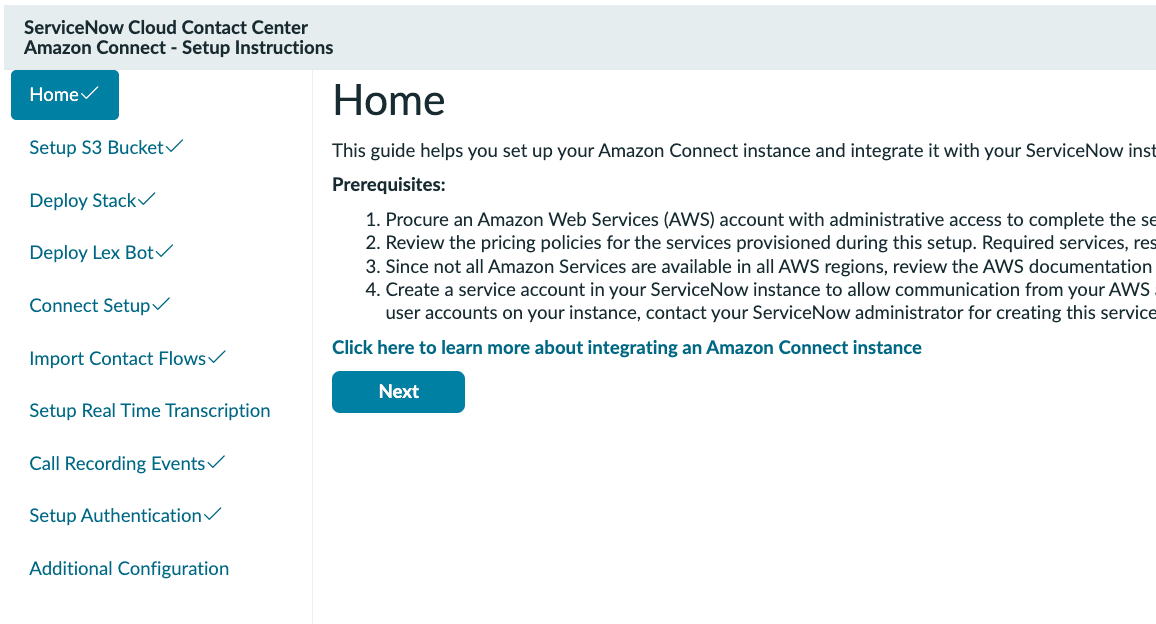
In addition, as a preliminary step before entering the guide, you need to install the related applications and register the Amazon Connect instance in ServiceNow. Let's go through them in order.
Installing the Related Applications
When you search for "ServiceNow Voice" in Application Manager on the ServiceNow side, the related applications are listed.
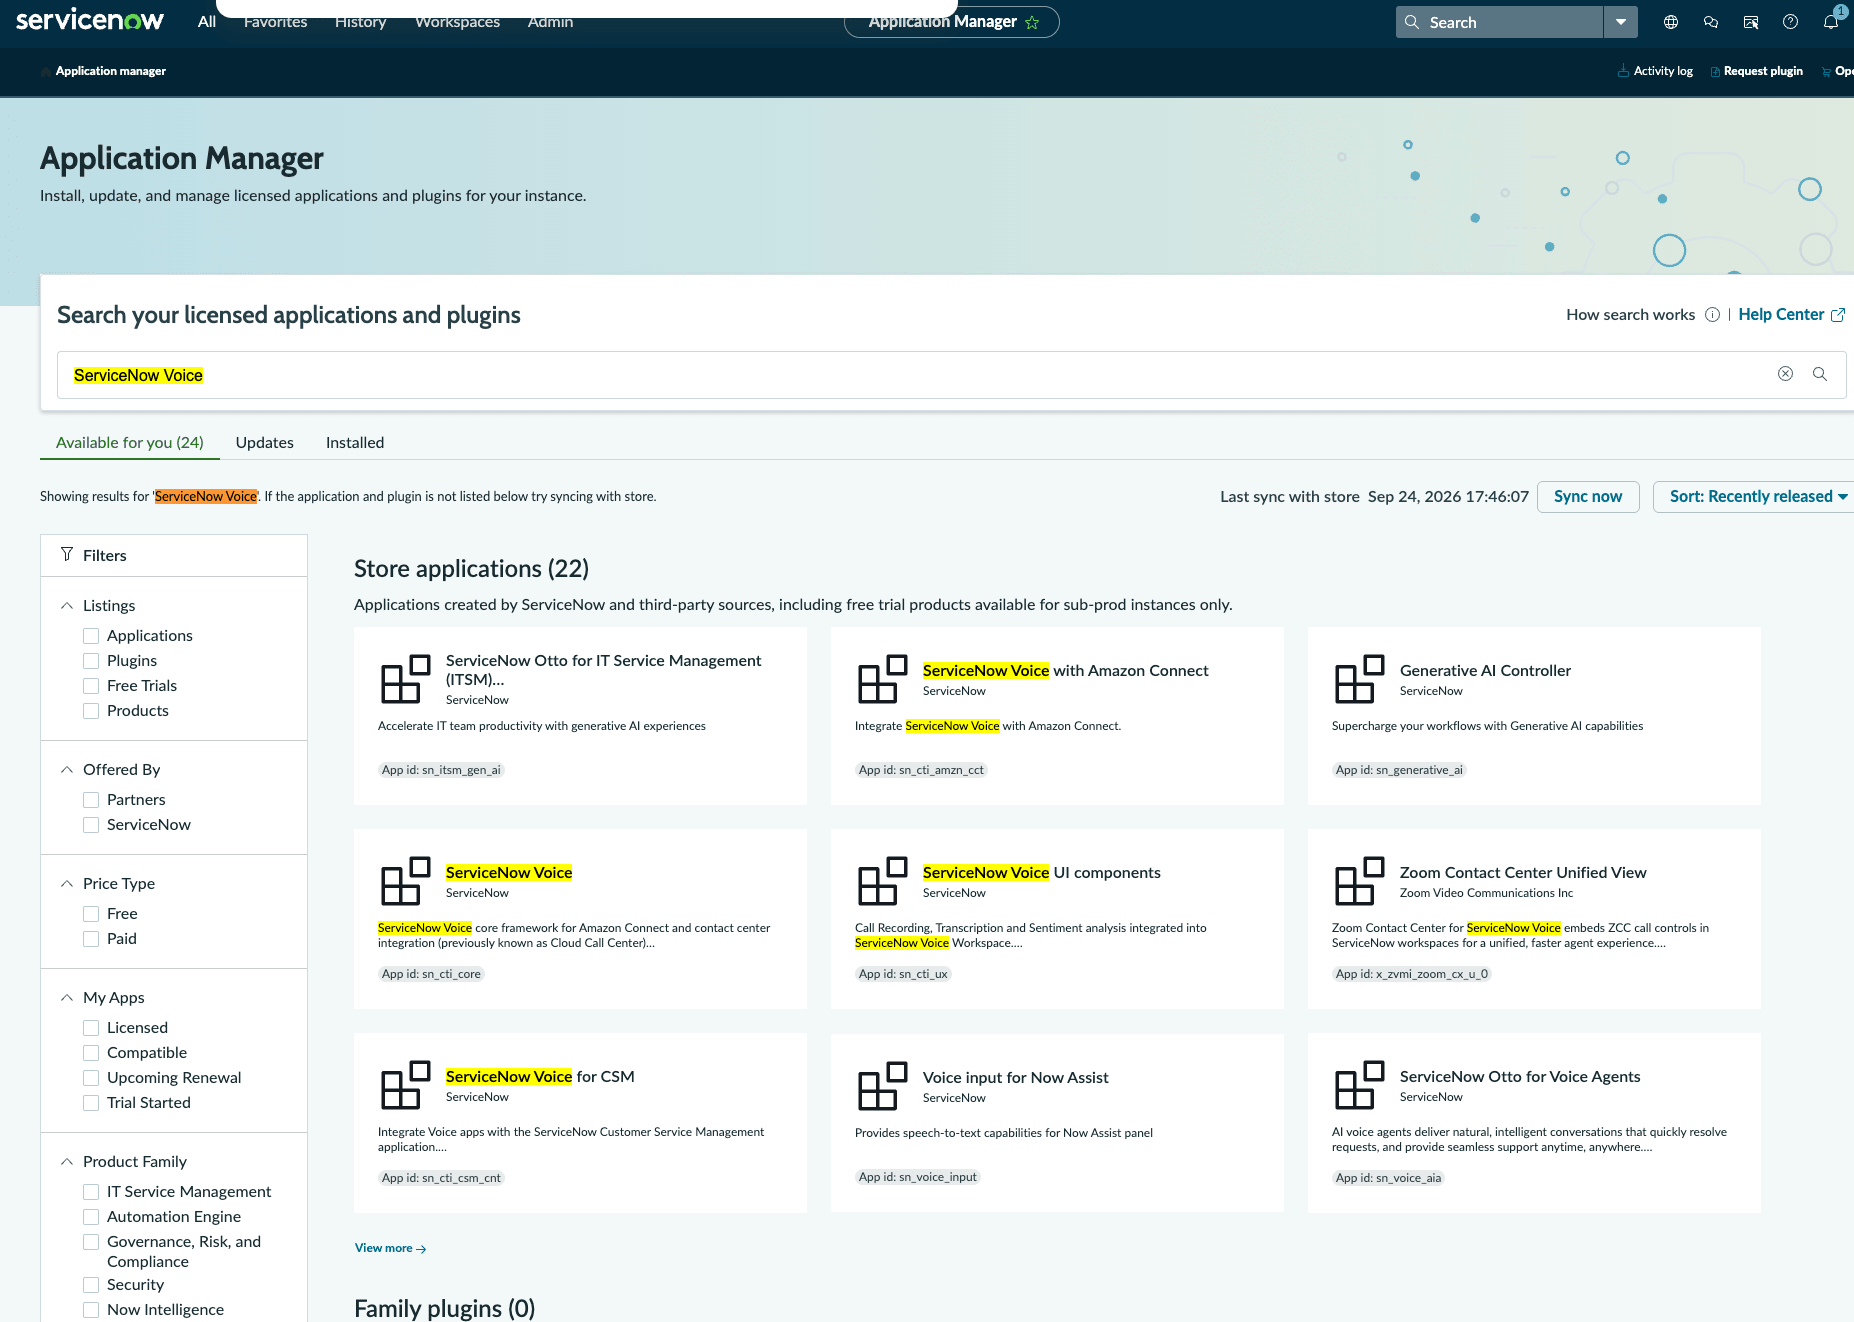
Result of searching "ServiceNow Voice" in Application Manager. You can see that, besides the core functionality, applications for Amazon Connect integration, CSM integration, and so on are provided separately
The following three were installed this time.
- ServiceNow Voice (App id: sn_cti_core): the foundation application for integrating telephony platforms such as Amazon Connect with ServiceNow
- ServiceNow Voice with Amazon Connect (App id: sn_cti_amzn_cct): the main integration with Amazon Connect
- ServiceNow Voice for CSM (App id: sn_cti_csm_cnt): an extension for linking calls to CSM Interactions and Cases
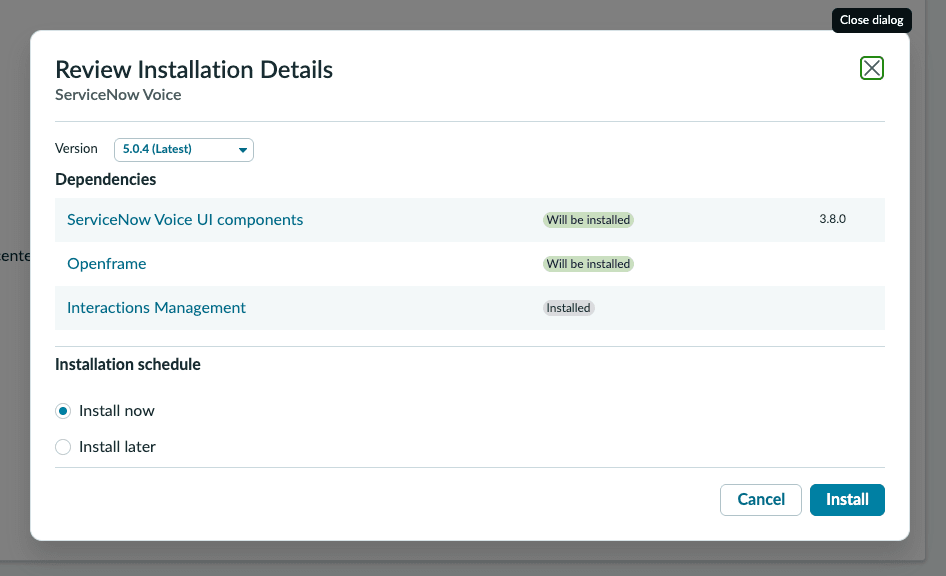
First, install ServiceNow Voice.
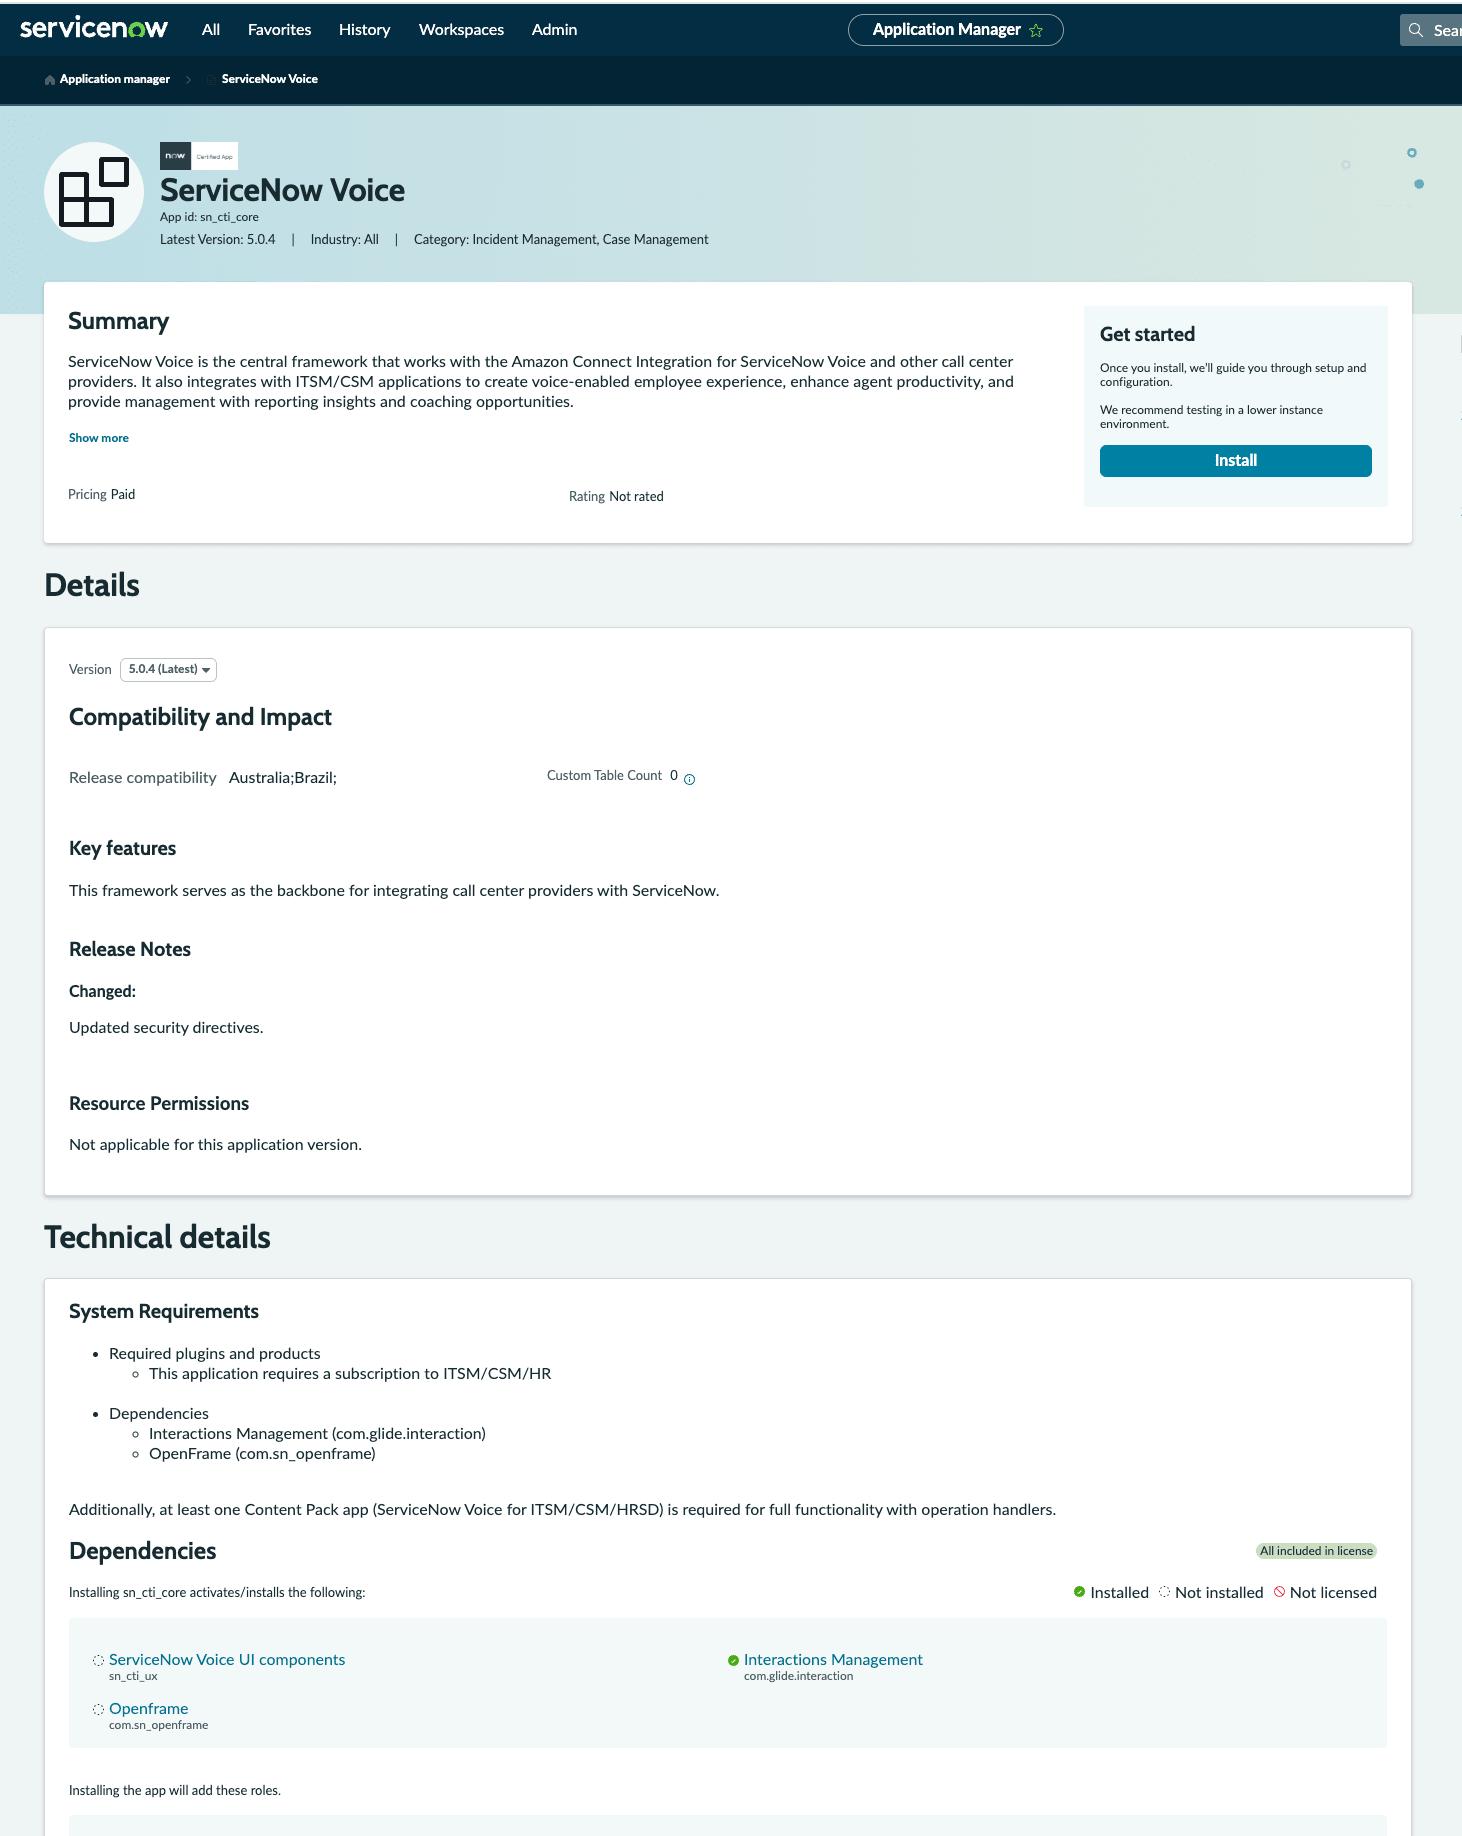
Installation confirmation screen for ServiceNow Voice. You can see that ServiceNow Voice UI components and Openframe are automatically added as dependent applications
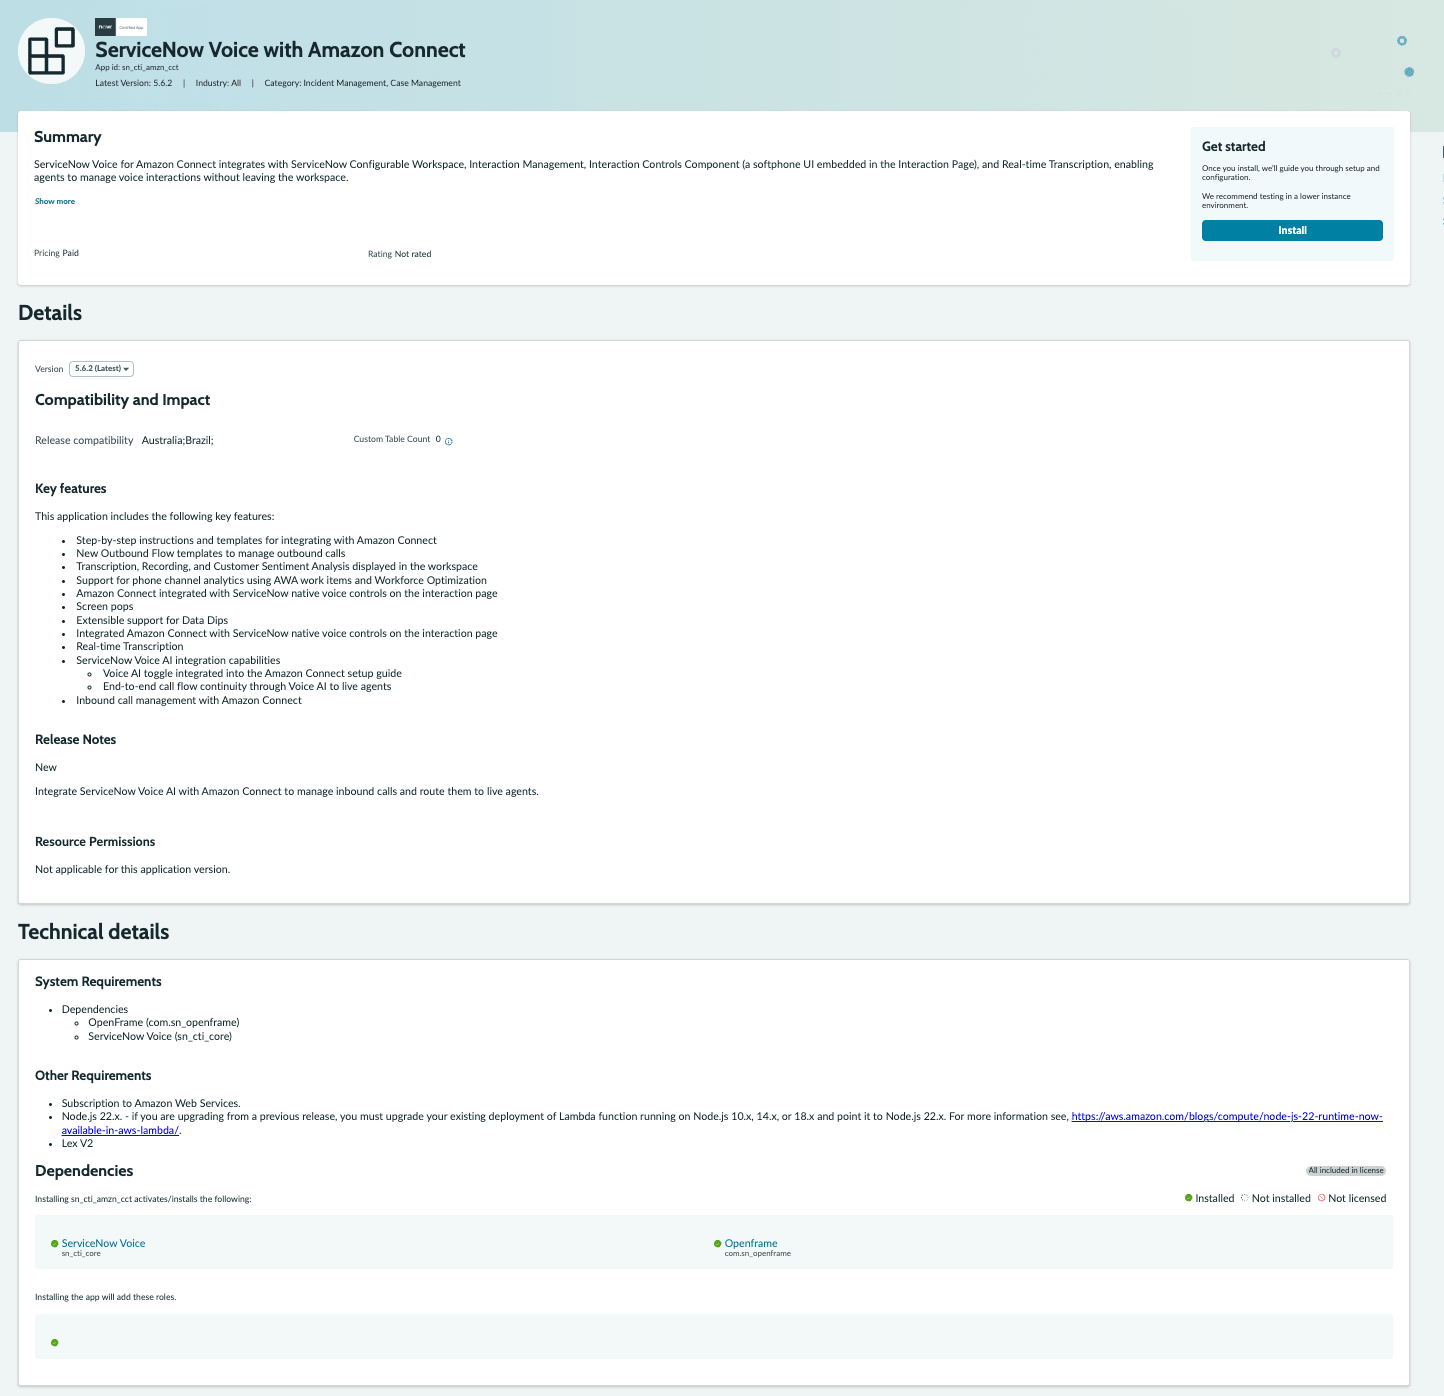
Application detail page of ServiceNow Voice. Interactions Management, ServiceNow Voice UI components, and Openframe are shown in the Dependencies section
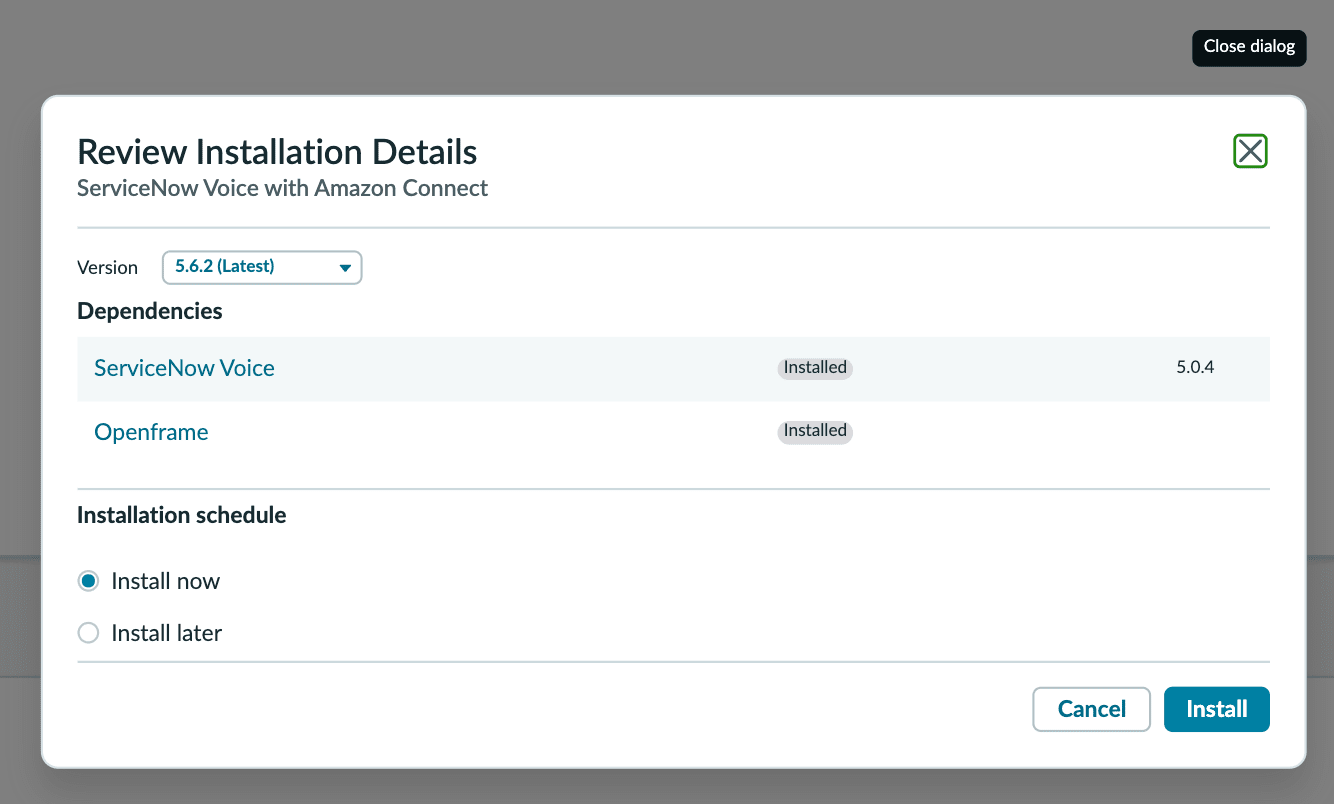
Next, install ServiceNow Voice with Amazon Connect.
Installation confirmation screen for ServiceNow Voice with Amazon Connect. ServiceNow Voice (installed earlier) and Openframe are shown as dependent applications
Installation execution screen for ServiceNow Voice with Amazon Connect
Finally, install ServiceNow Voice for CSM.
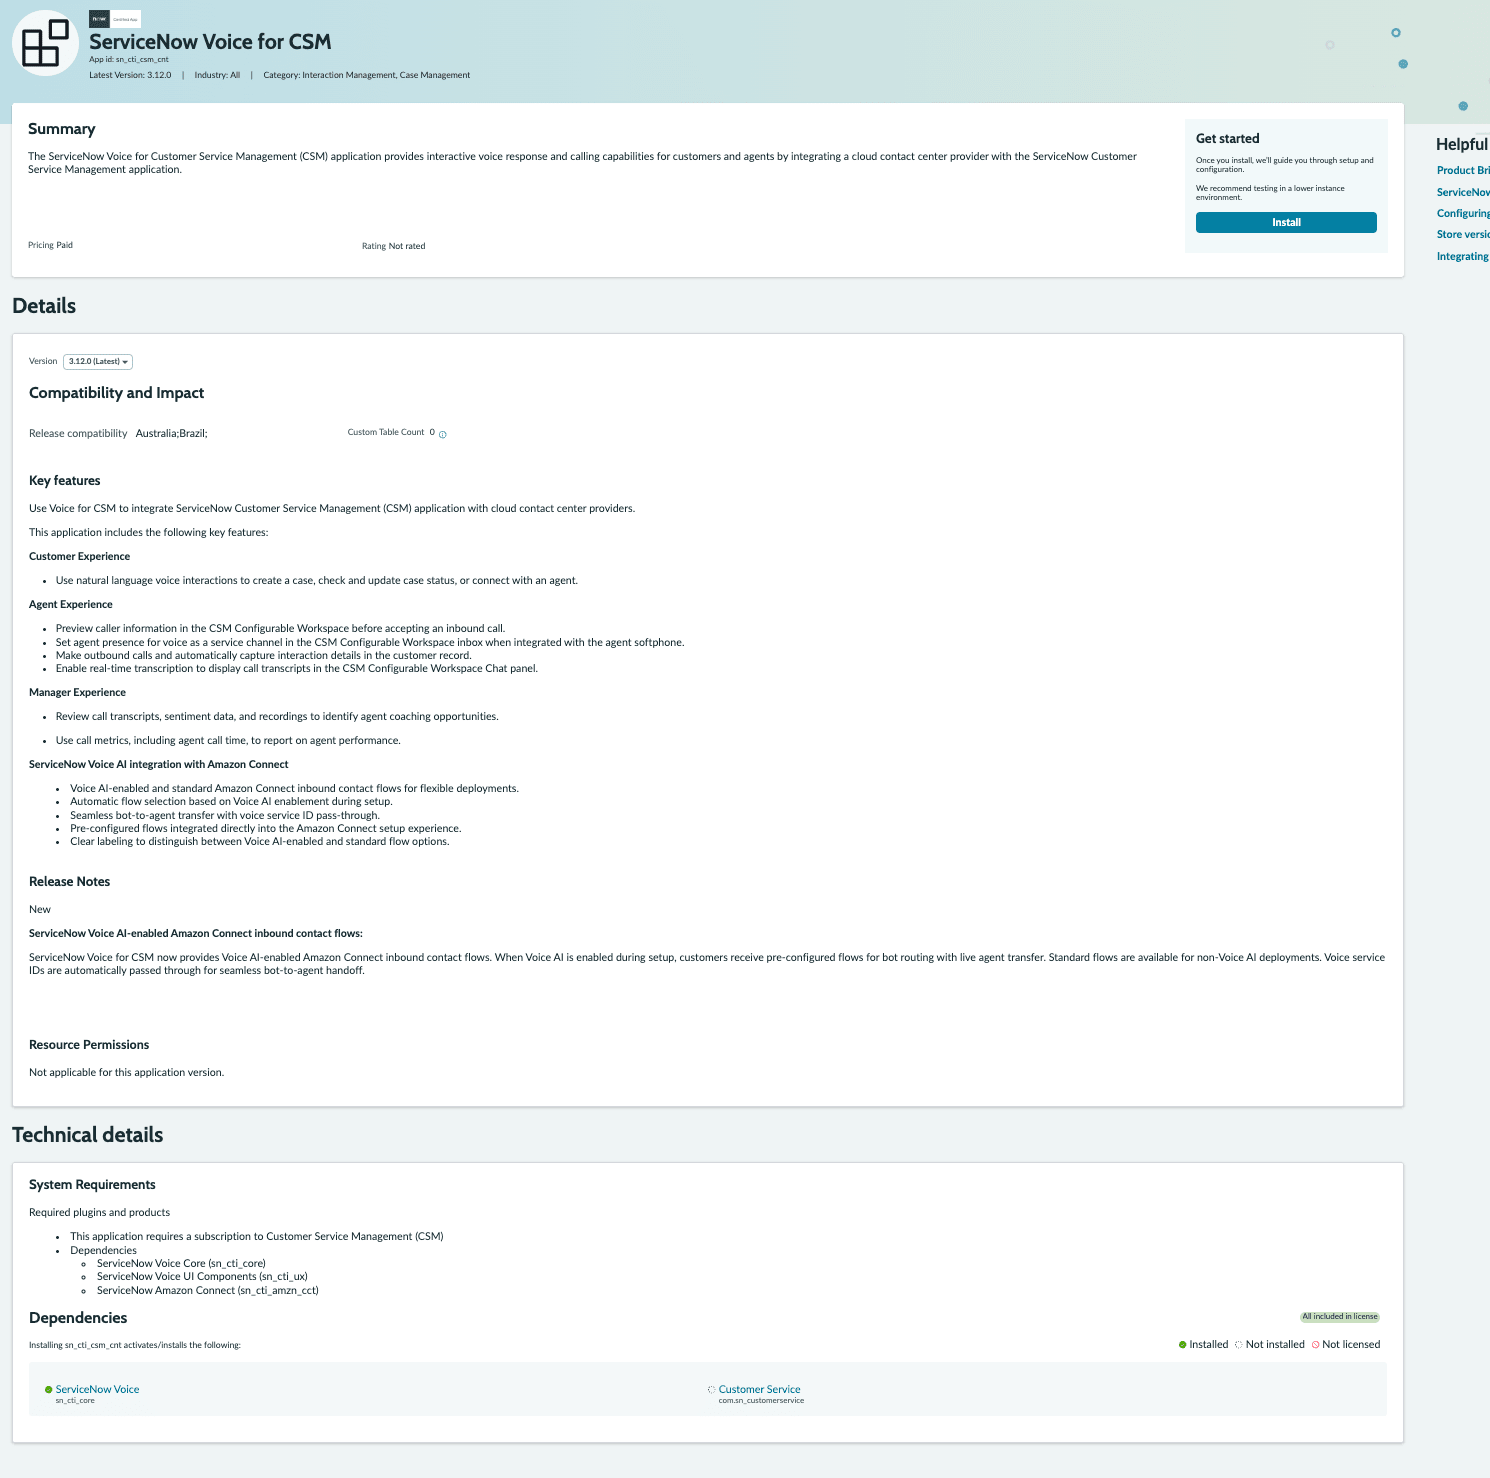
Installation confirmation screen for ServiceNow Voice for CSM. Customer Service (the CSM core) and ServiceNow Voice are shown as dependent applications
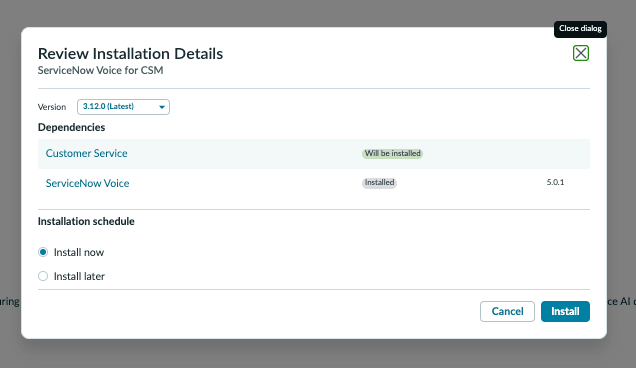
Installation execution screen for ServiceNow Voice for CSM
Note that when you install ServiceNow Voice for CSM, Customer Service (the base application of CSM) is also installed as a dependency.
Registering the Amazon Connect Instance
Once the application installation is complete, search for "Amazon Connect Integration" in the Filter Navigator and go to the Setup Instance screen.
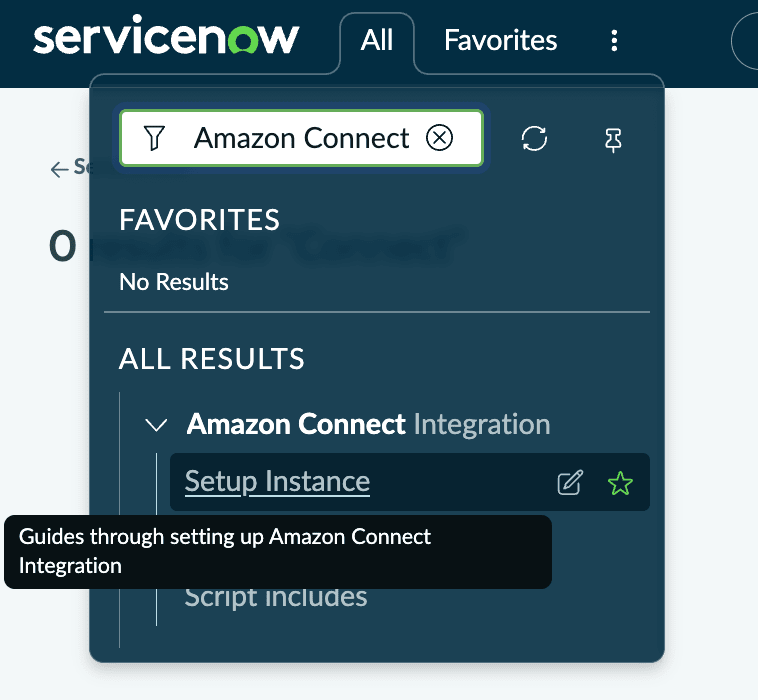
Setup Instance screen of Amazon Connect Integration. The fields Name, AWS ARN, Active, Override Params, and Instance Params are listed
After that, you will go to the registration screen for the Connect instance to be integrated.
In Name, enter the name of the Amazon Connect instance (the subdomain part of the instance URL), and in AWS ARN, enter the Instance ARN shown on the Amazon Connect instance overview page in the AWS console as is.
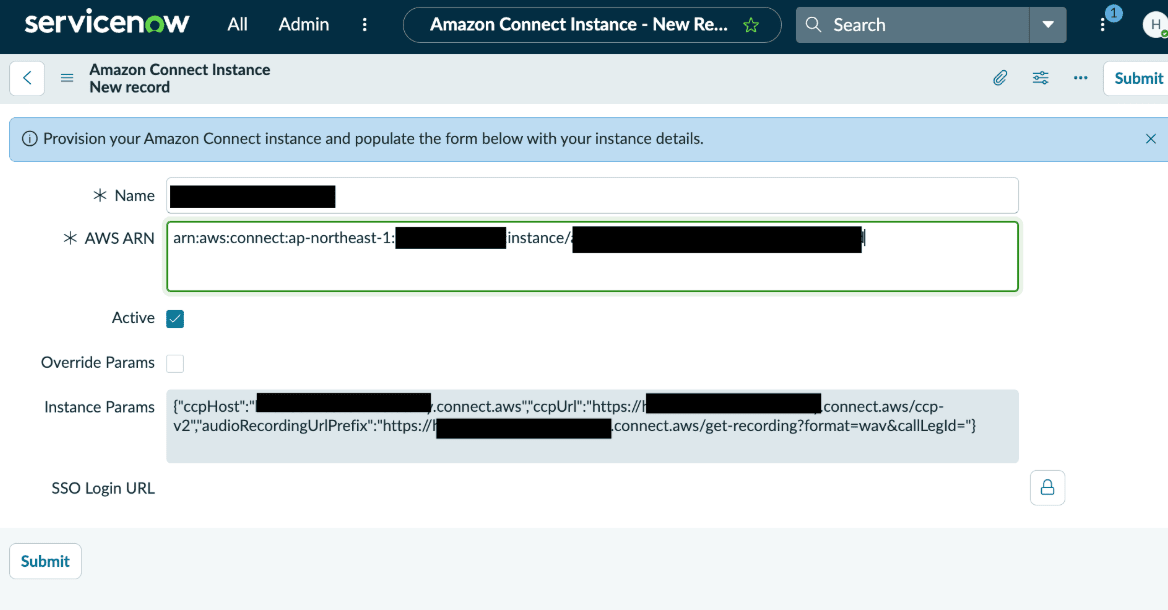
Record with the instance name and AWS ARN entered. In Instance Params, items such as the CCP (Contact Control Panel) URL are automatically generated based on the Name value
Override Params is an option for using an instance with the old domain format from before my.connect.aws was introduced. For an instance with the new domain format like this one, there is no need to check it.
Once you save the record, "Setup Guide" appears in the related links, so click it.
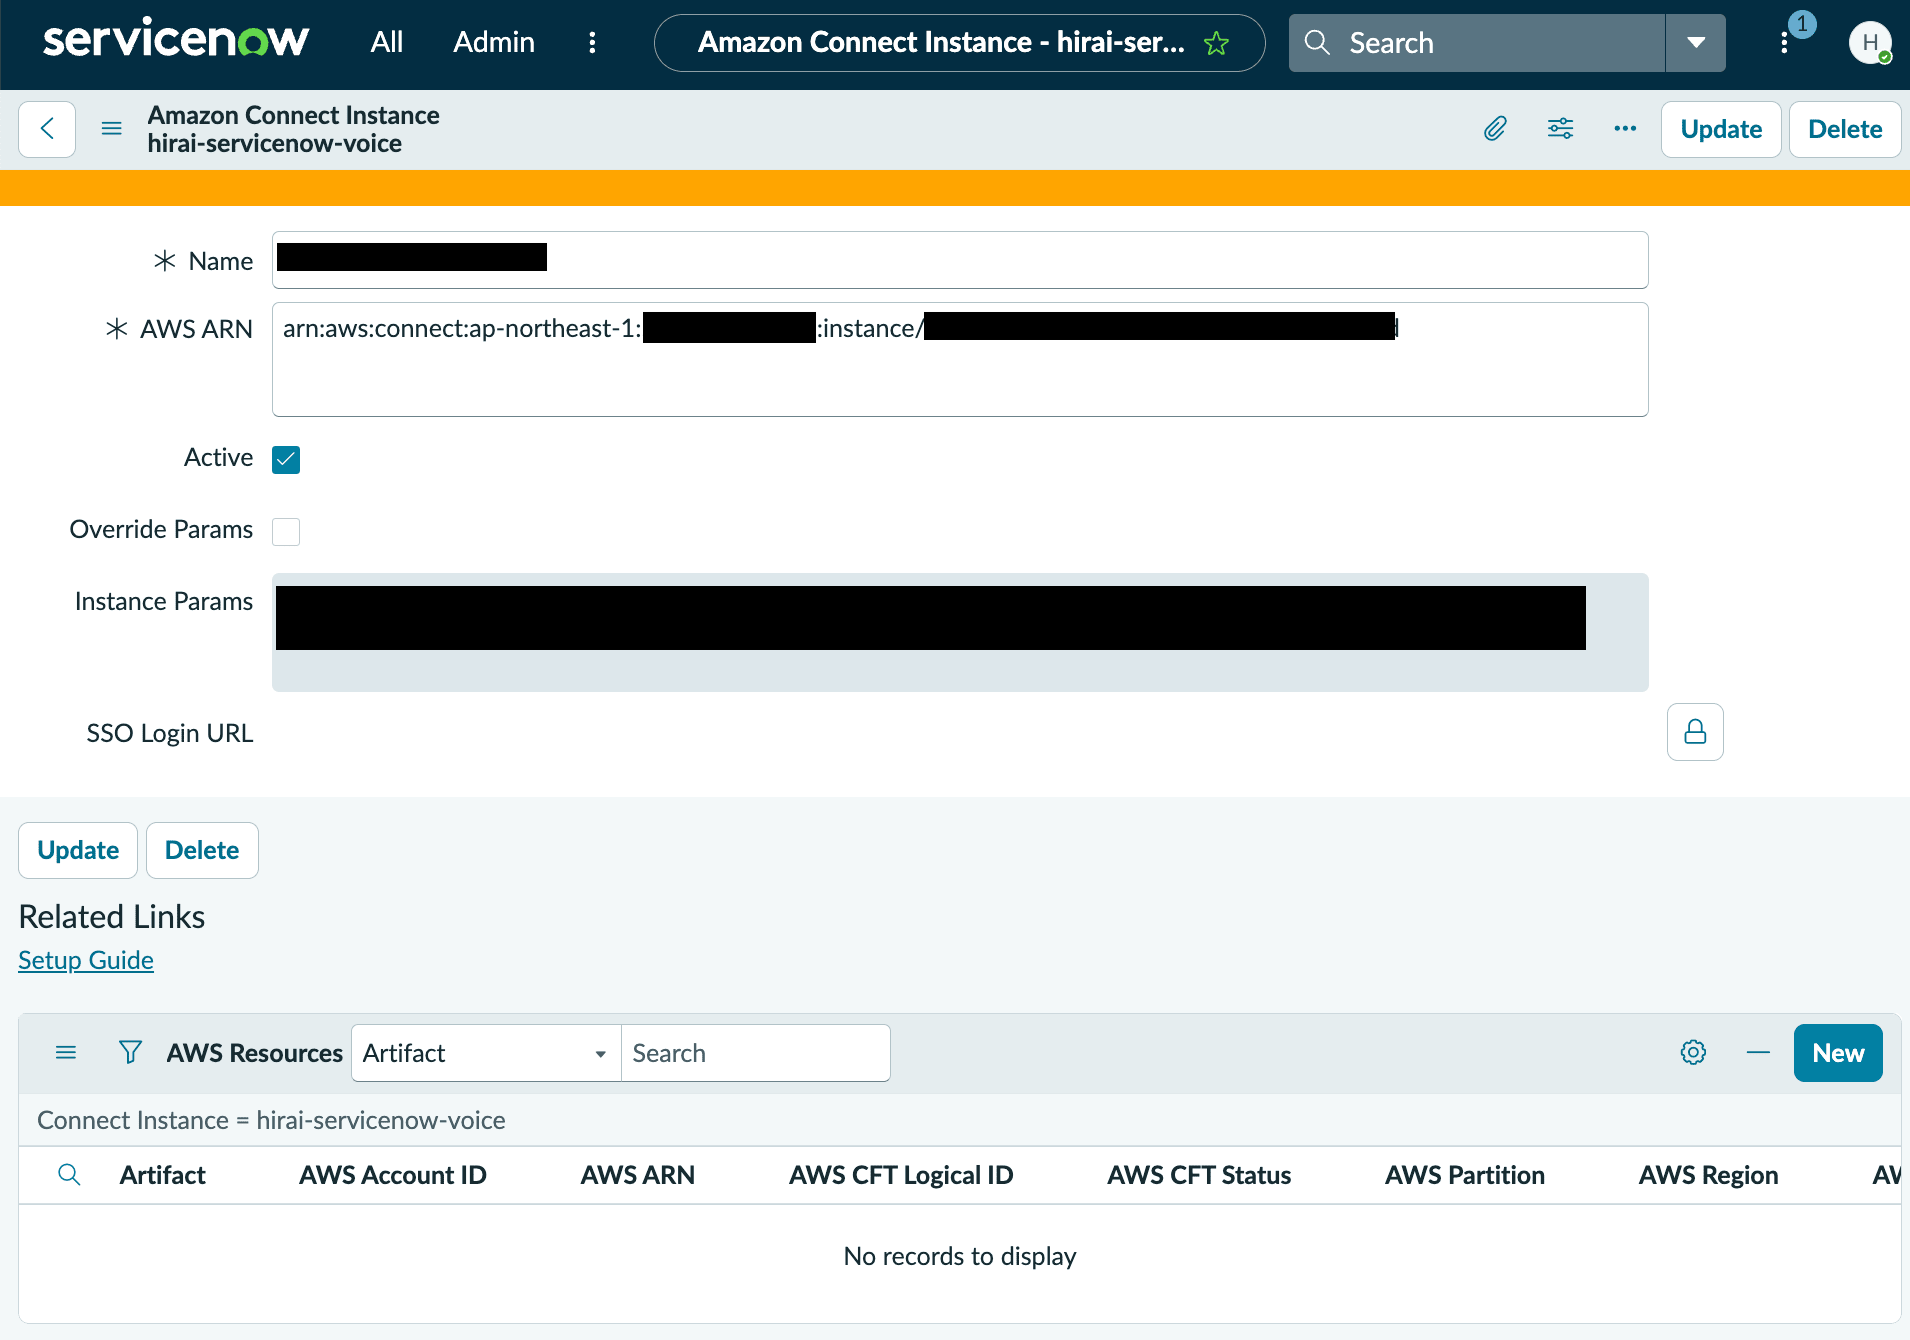
Record screen of Setup Instance. Setup Guide is shown in Related Links
Clicking it takes you to the guide introduced at the beginning.
Setup S3 Bucket
The Setup S3 Bucket description screen instructs you to download the Lambda package (lambda.zip), create a new S3 bucket, upload the package to it, and note down the bucket name and file key. Following the instructions, I downloaded lambda.zip from the "here" link, created a new S3 bucket, and uploaded it. The S3 bucket name created this time is cm-hirai-servicenow-voice-for-lambda.
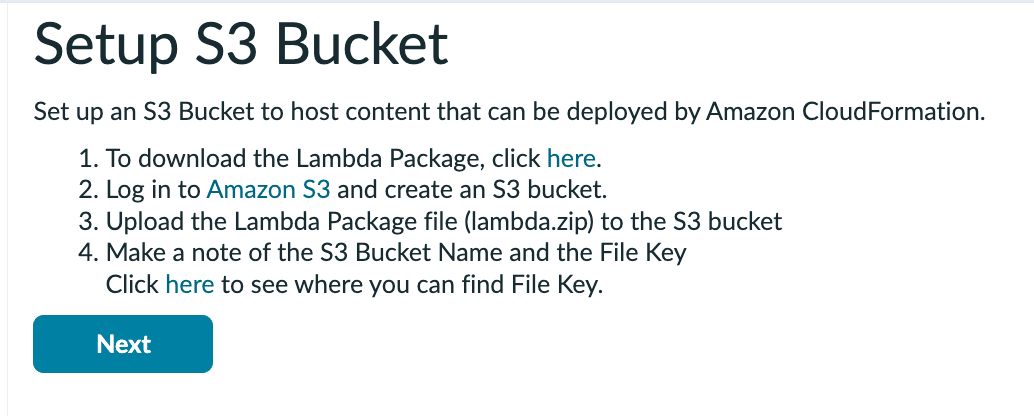
Description screen of Setup S3 Bucket. It shows how to download lambda.zip and how to create and upload to an S3 bucket
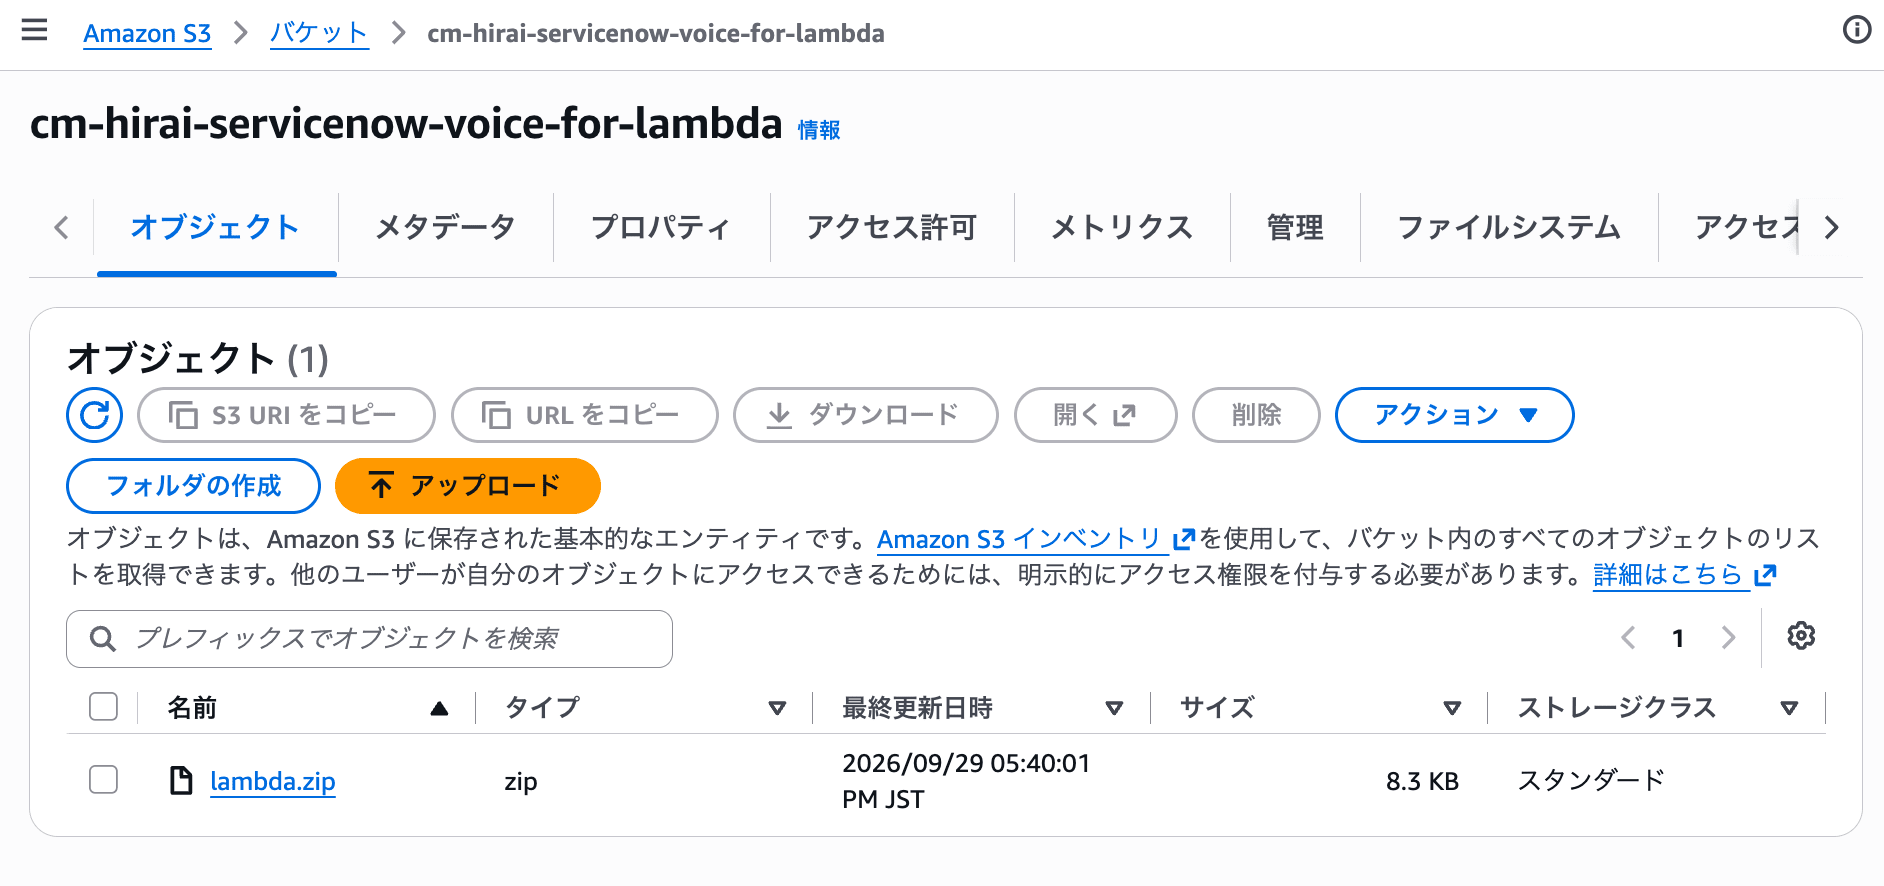
Screen after uploading lambda.zip to the S3 bucket
Deploy Stack
Following the instructions on the Deploy Stack description screen, download the CloudFormation template from the "here" link and create a stack using this template.
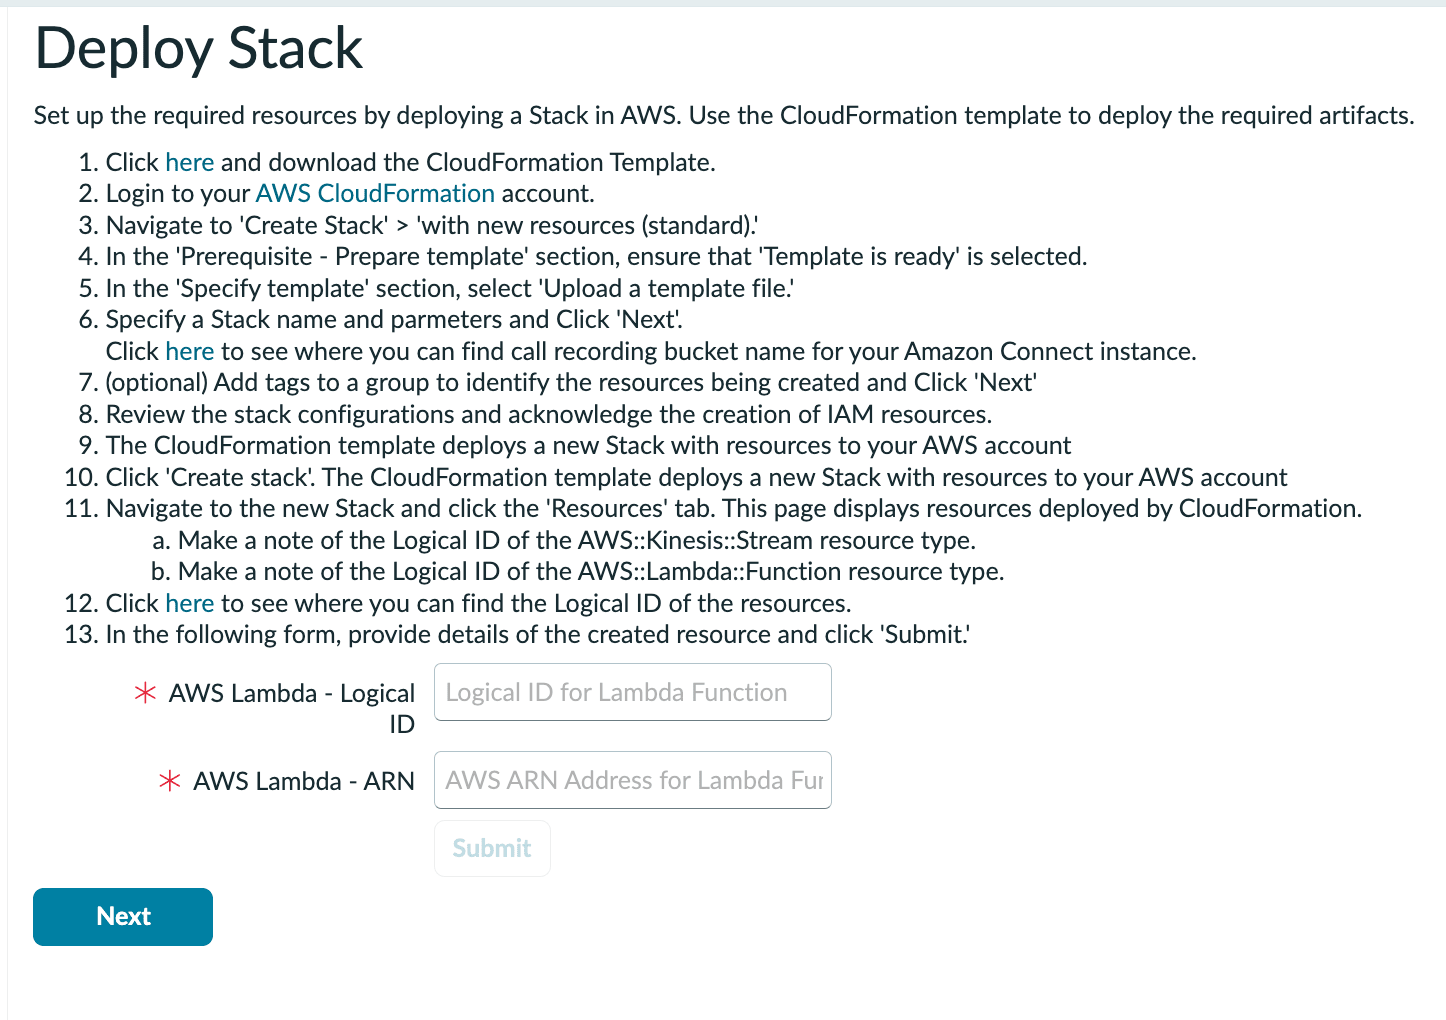
Description screen of Deploy Stack. After creating the stack, you are instructed to check the Logical IDs of the Kinesis Stream and Lambda Function on the Resources tab and enter them in the form at the bottom of the screen
When creating the CloudFormation stack, the following three parameters had to be entered.
- CallRecordingBucketName: the name of the call recording bucket of the Amazon Connect instance
- LambdaFileKey: the object key within the Lambda package bucket (just
lambda.zipif you uploaded it directly without creating a folder) - LambdaS3BucketName: the name of the bucket where the Lambda package was uploaded
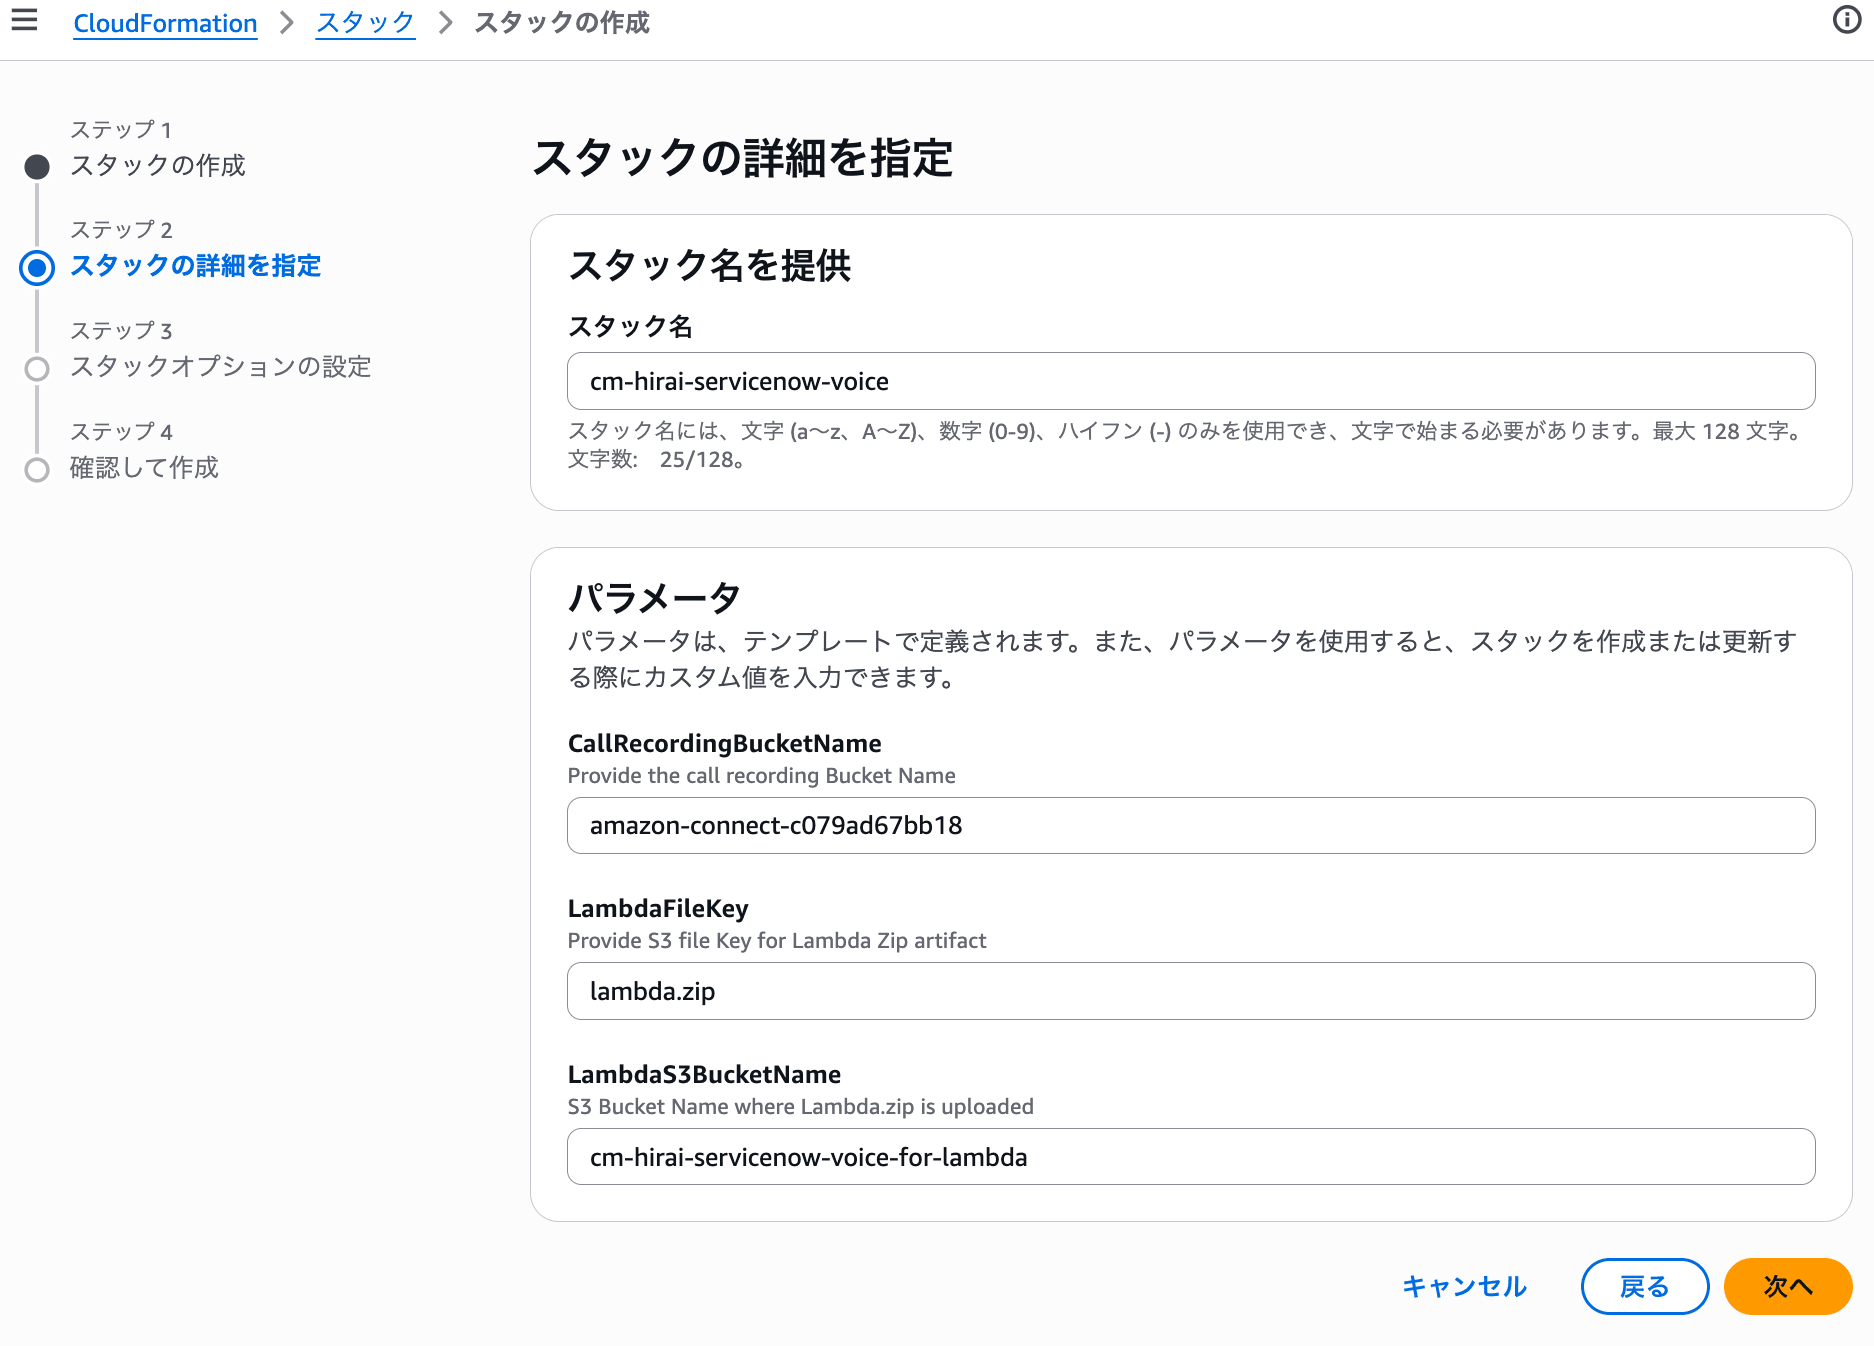
Parameter input screen when creating the stack. Note that CallRecordingBucketName and LambdaS3BucketName point to different S3 buckets
Once the stack deployment is complete, check the Logical ID and ARN of the Lambda Function on the stack's Resources tab, and enter them in the form on the ServiceNow Deploy Stack screen.
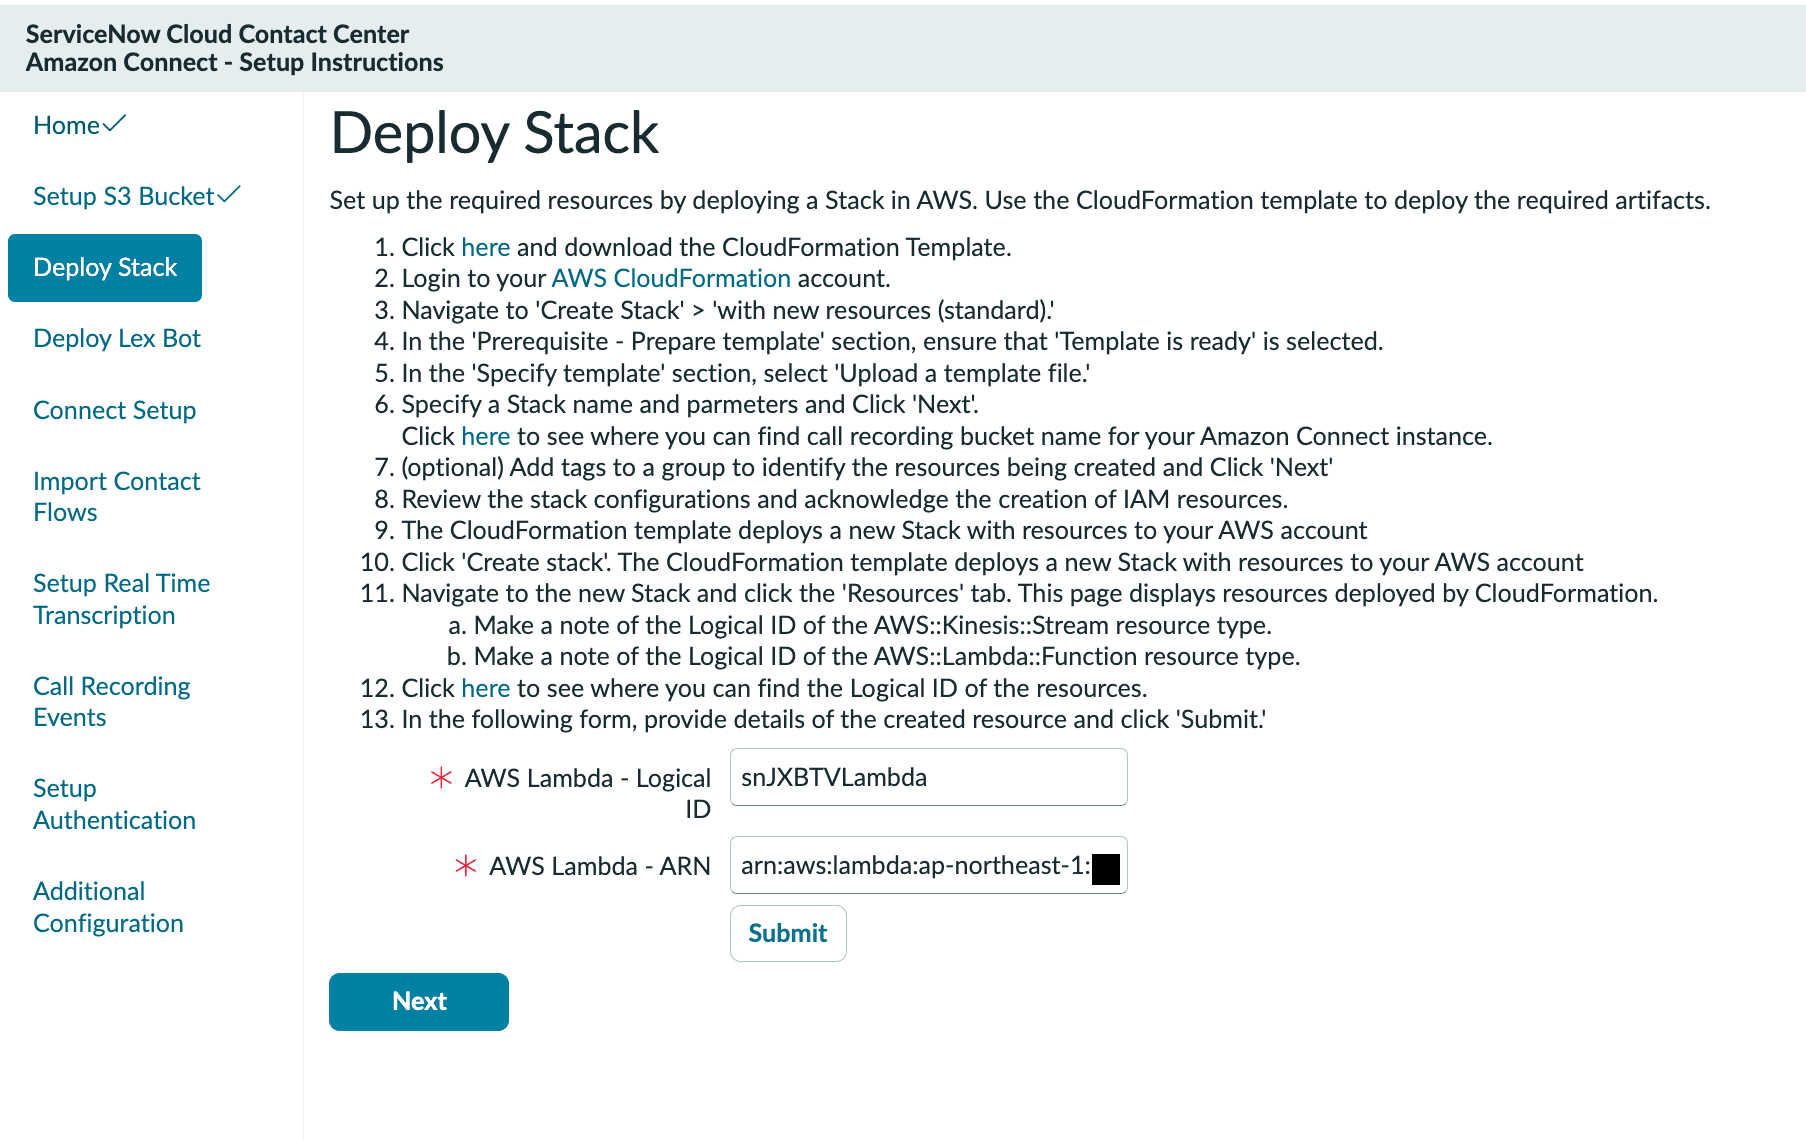
Screen on the Deploy Stack page where the Logical ID and ARN of the AWS Lambda are entered and submitted
Deploy Lex Bot
The next step is Deploy Lex Bot.
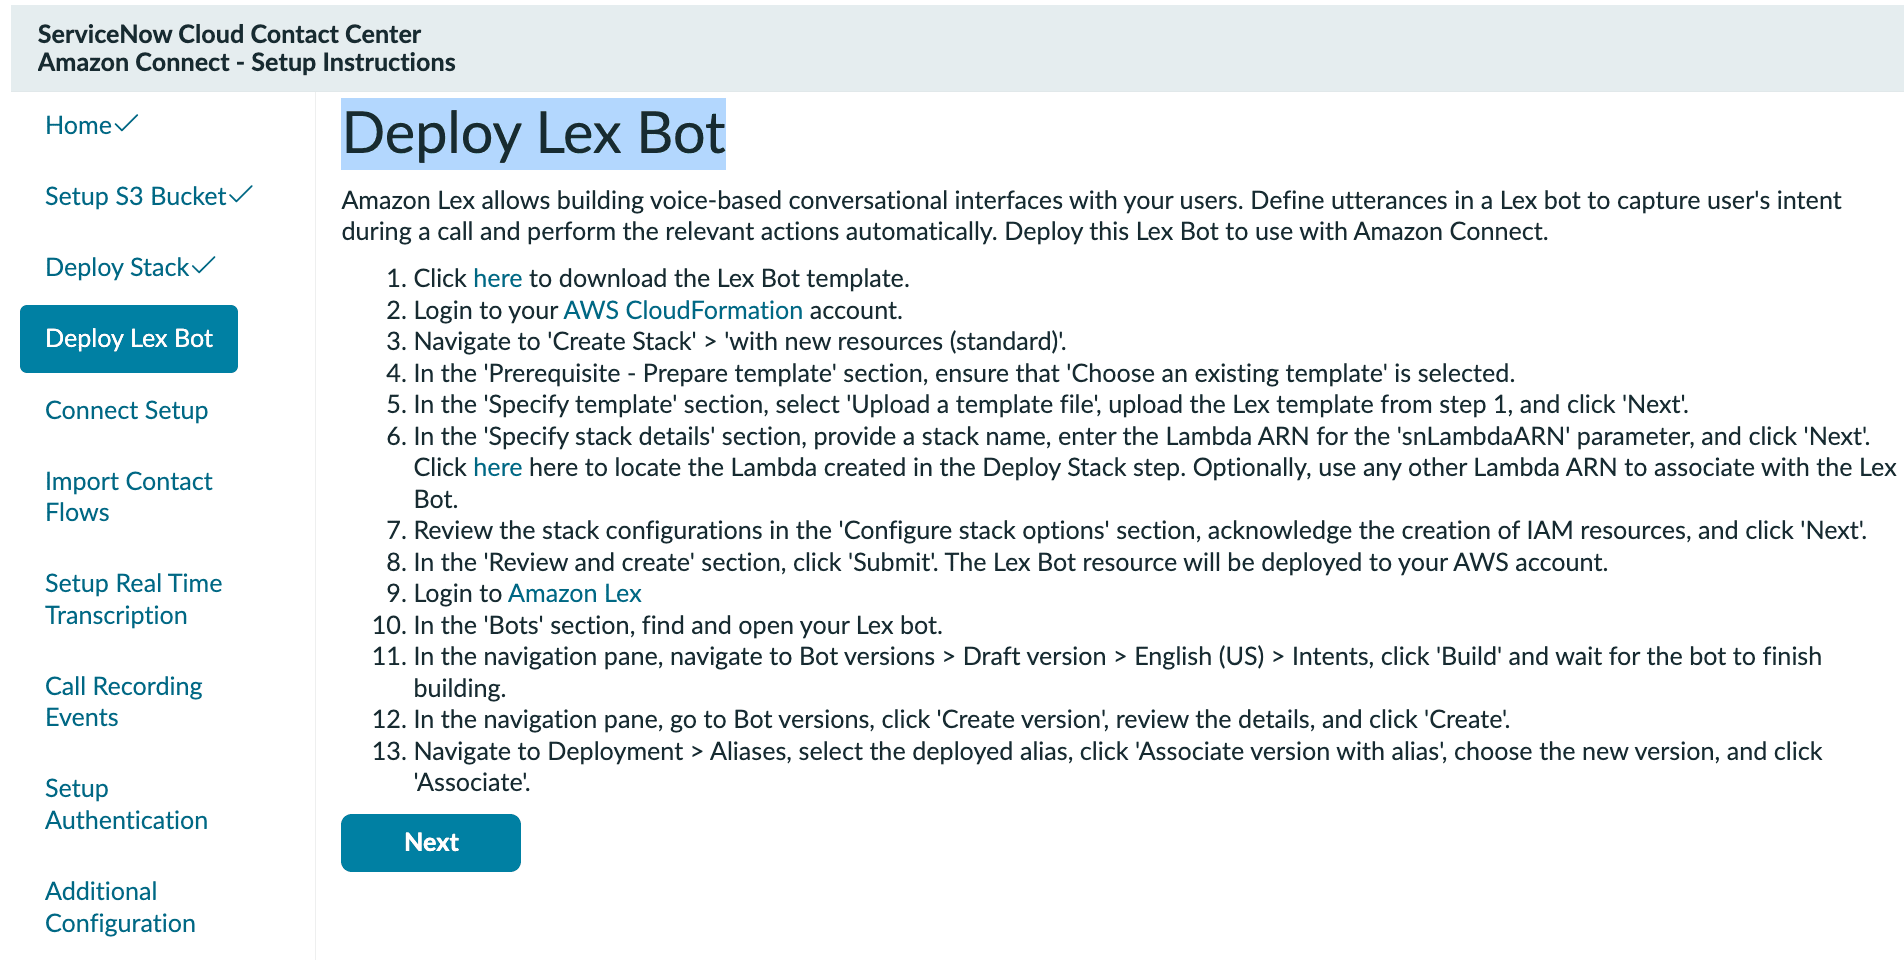
Description screen of Deploy Lex Bot. It shows the procedure of deploying the CloudFormation template for the Lex Bot and then building, creating a version, and associating it with an alias in the Lex console
This is a step in the Setup Guide that cannot be skipped. This is because the sample contact flows imported in the later Import Contact Flows step assume the existence of this Lex Bot.
Since I did not plan to use an automated response (IVR) this time, I did not build out the Lex Bot's conversation logic; I followed the guide's steps, deployed the default template, and only went as far as getting the build to pass.
When creating the CloudFormation stack, enter the Lambda ARN that you checked in the Deploy Stack step into the snLambdaARN parameter.
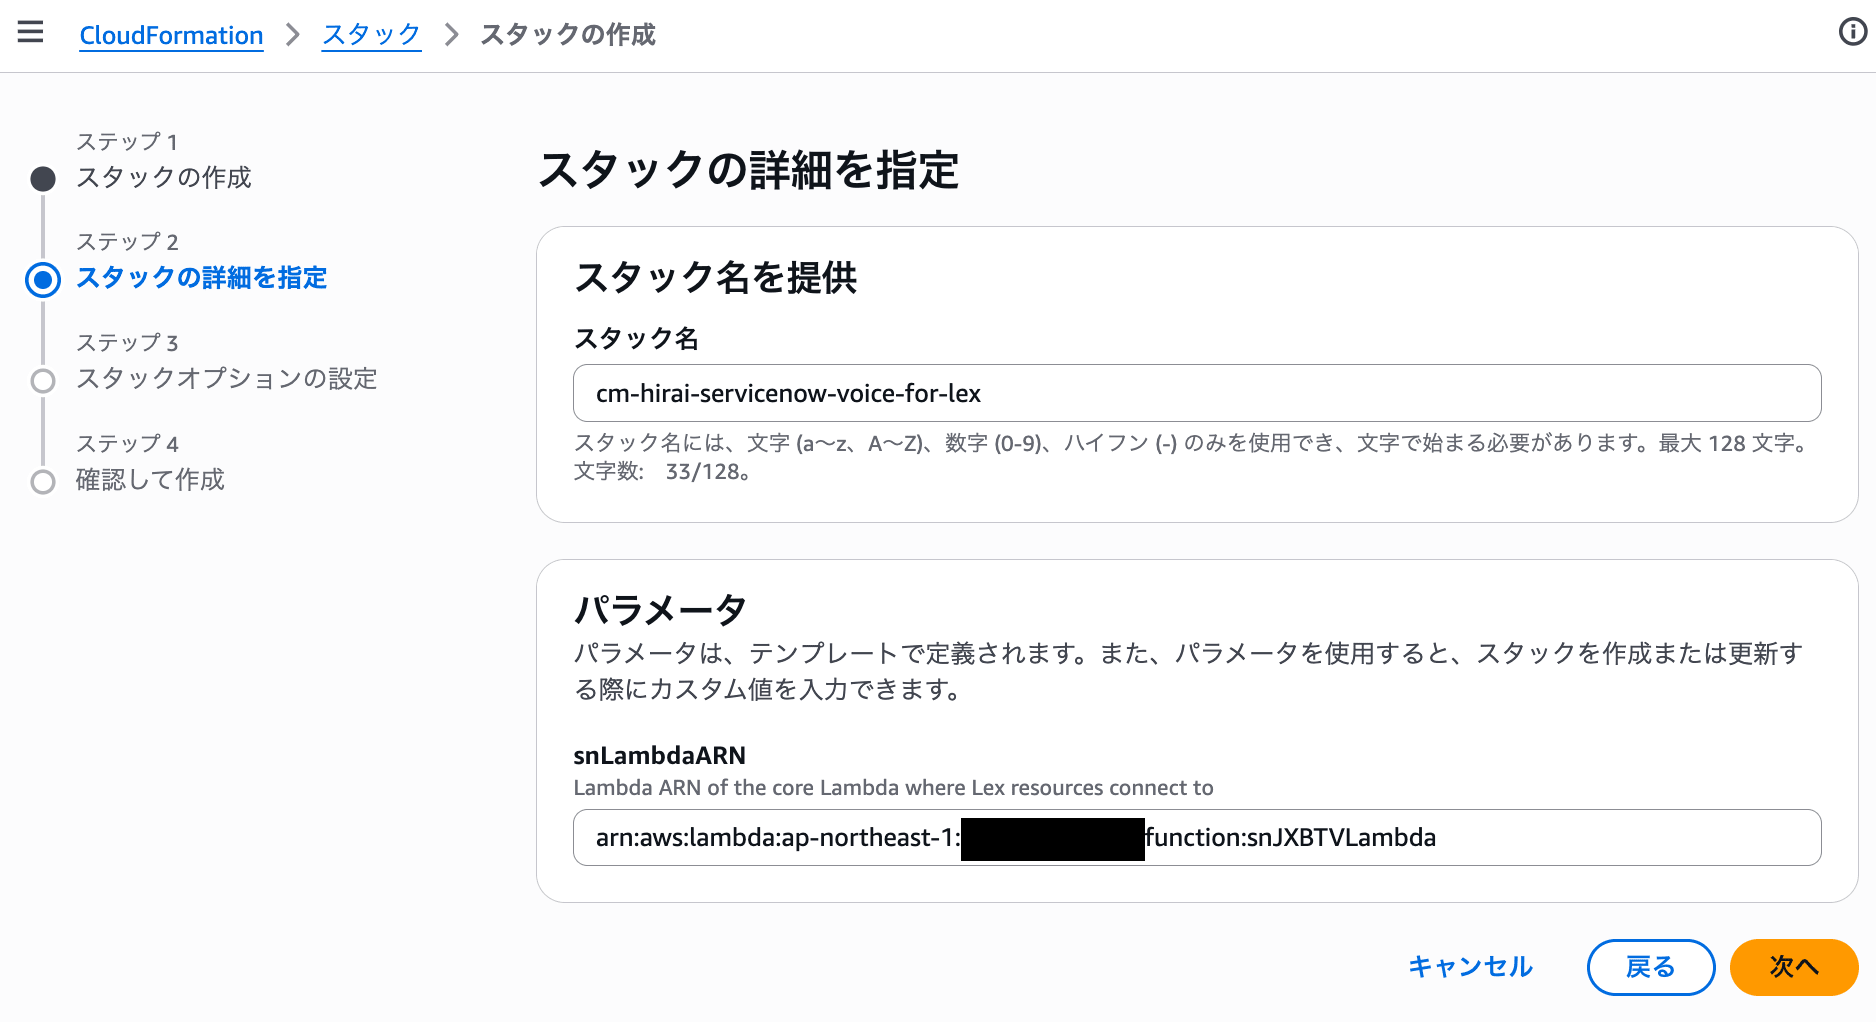
Parameter input screen for the Lex Bot stack. The Lambda ARN confirmed in Deploy Stack is specified for snLambdaARN
After the stack is deployed, switch to the Lex console and build the Intents of the Draft version.
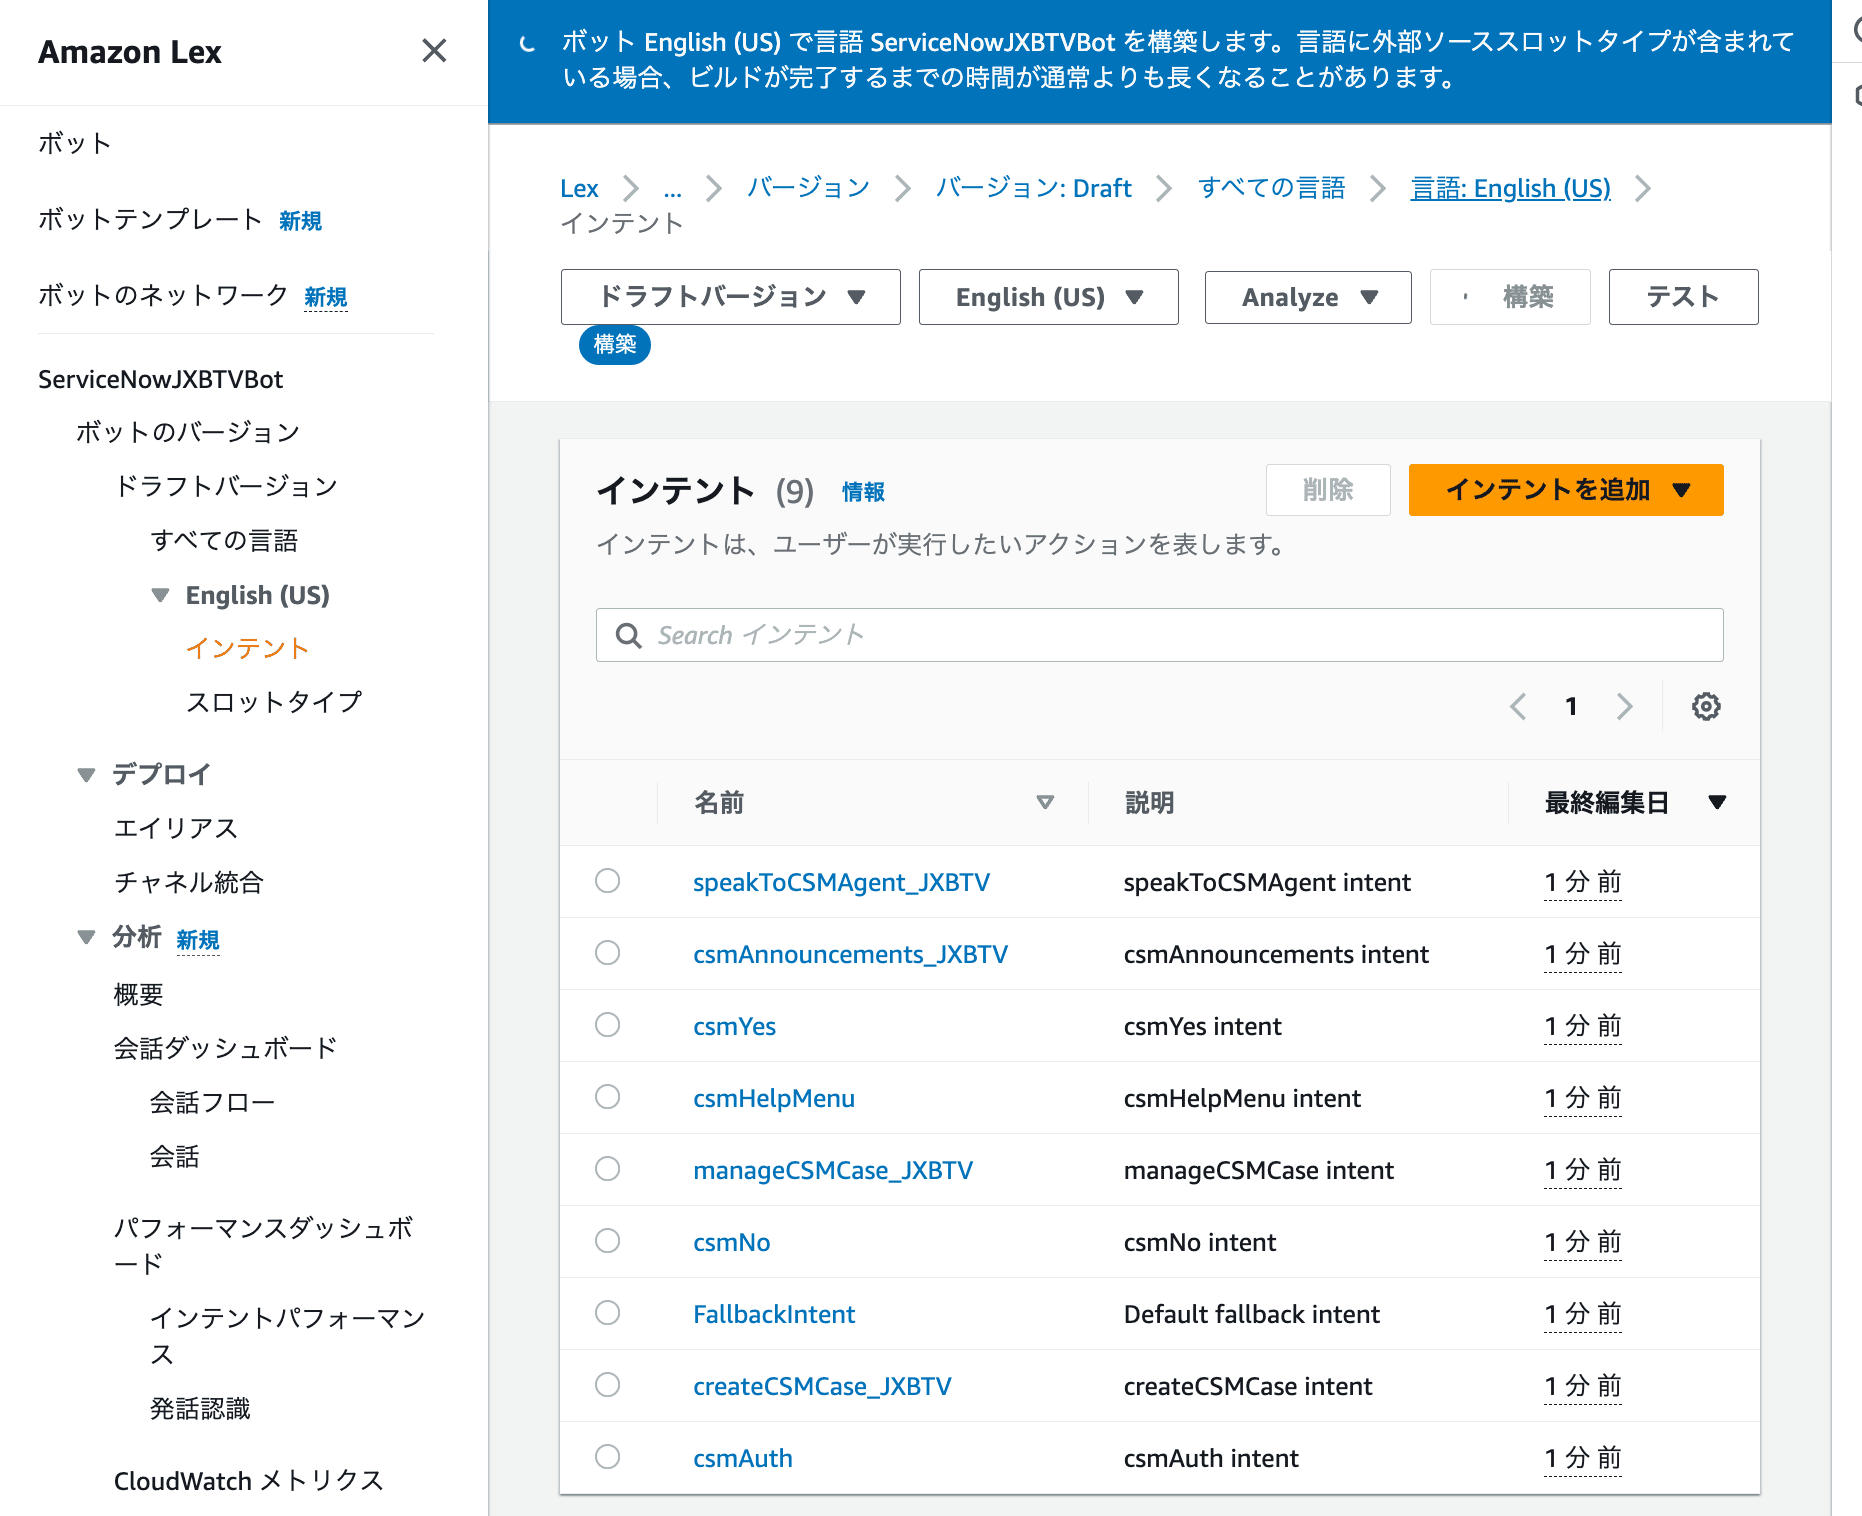
Screen running Build for the Draft version in the Lex console
Once the build is complete, create a version and associate it with an alias.
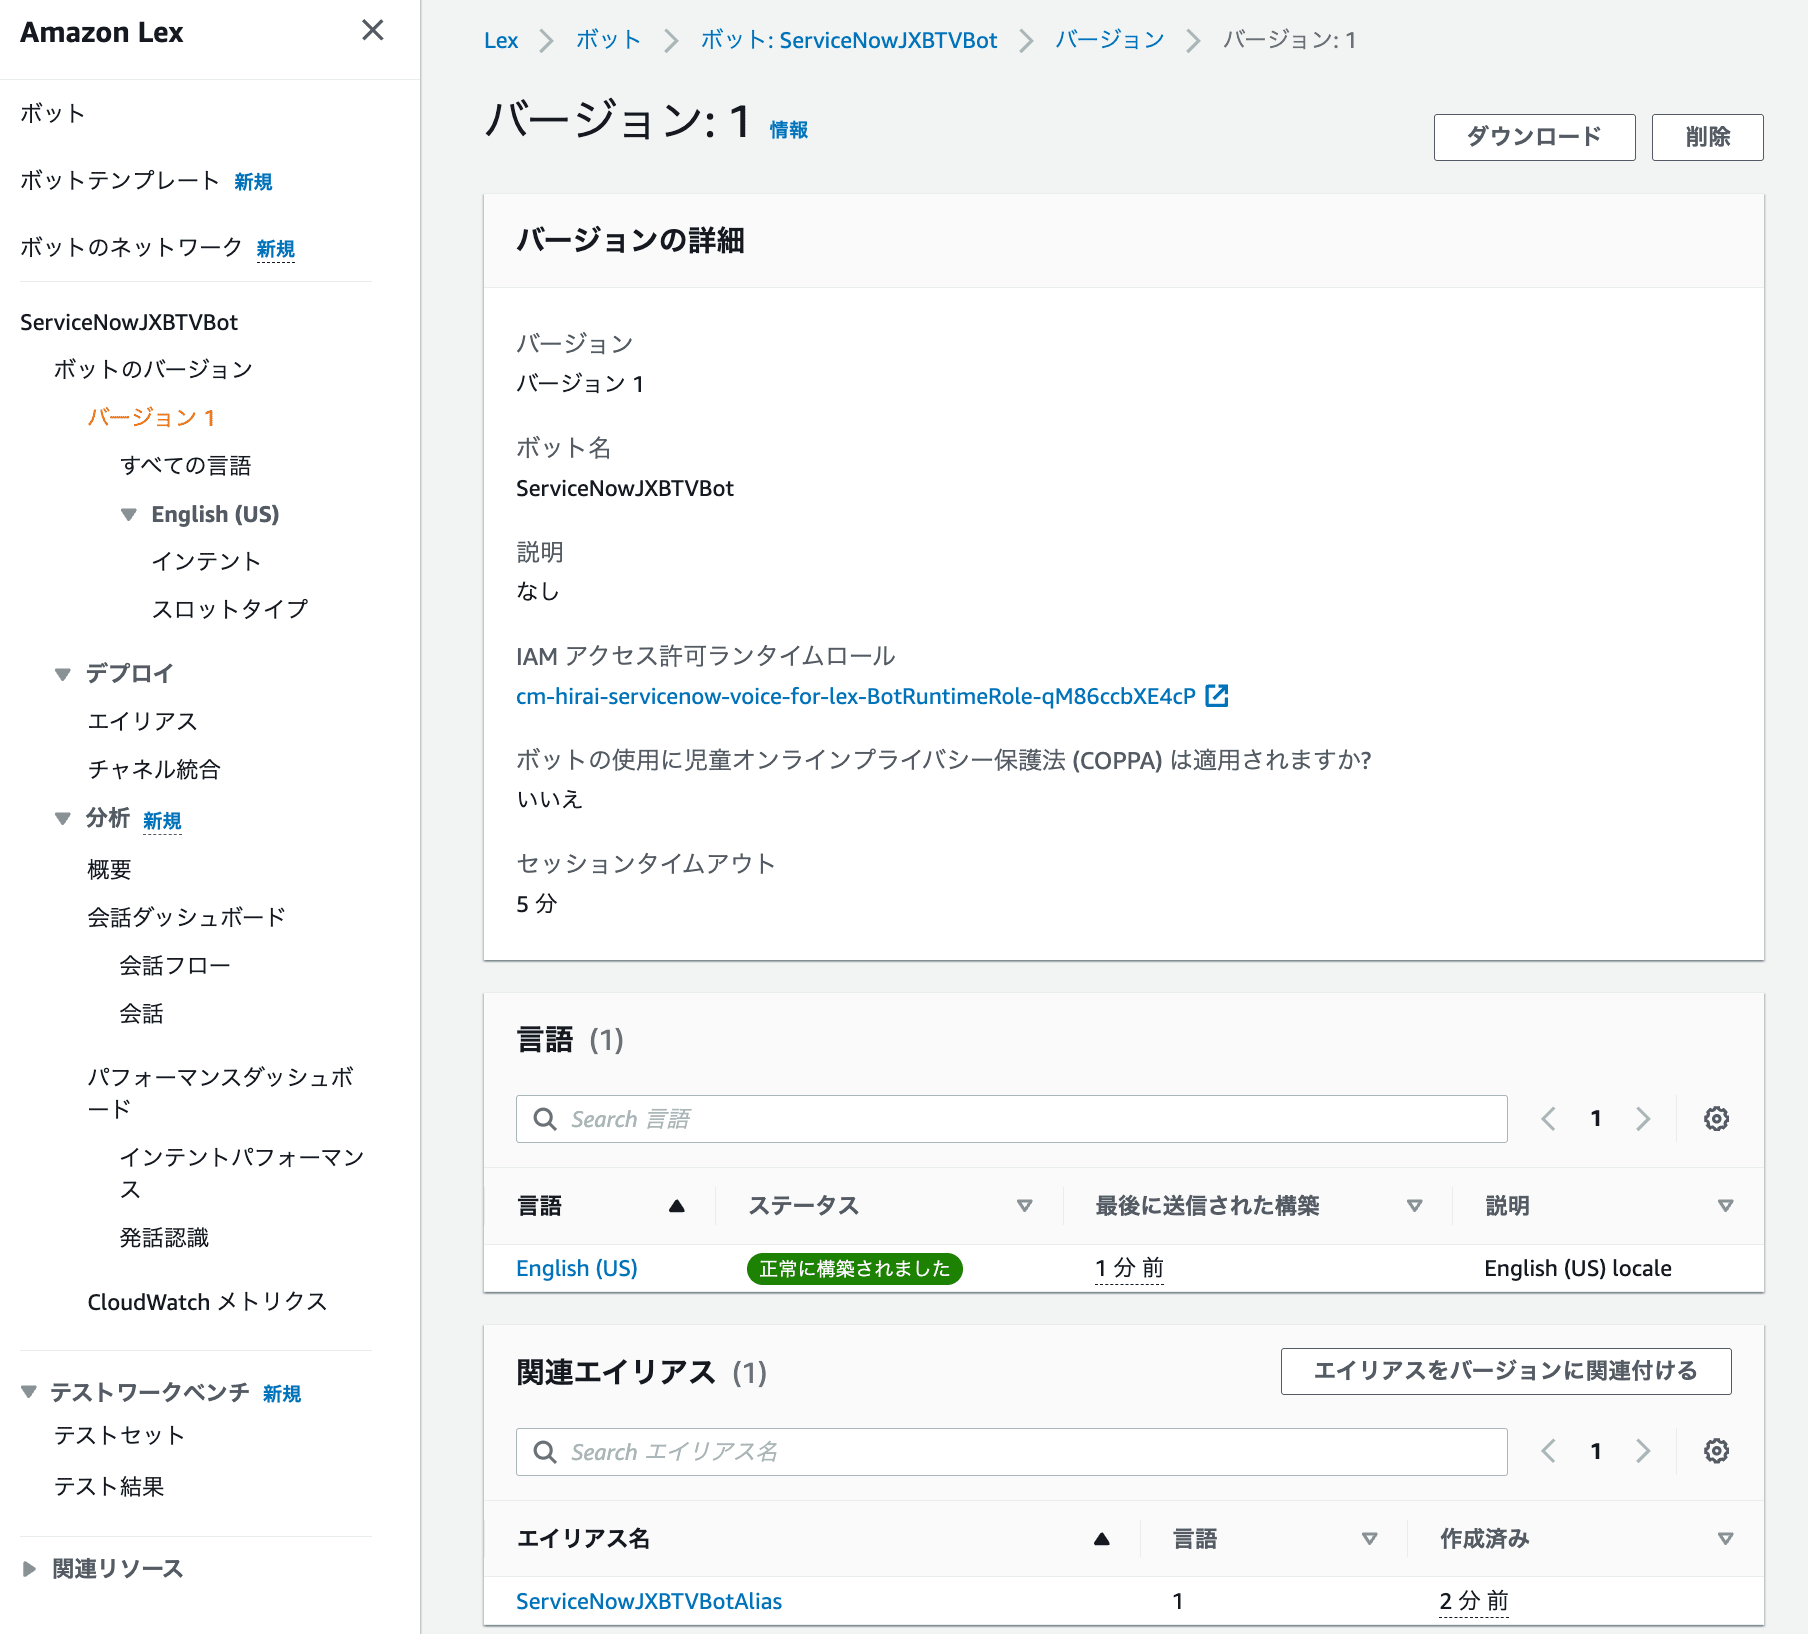
Screen associating the created version with the alias
If you forget to associate it with the alias, the contact flows on the Amazon Connect side will not be able to call this Bot correctly, and errors will occur in later steps.
Connect Setup
In the Connect Setup step, you configure the integration settings with ServiceNow, Lex, and Lambda in the Amazon Connect admin console.
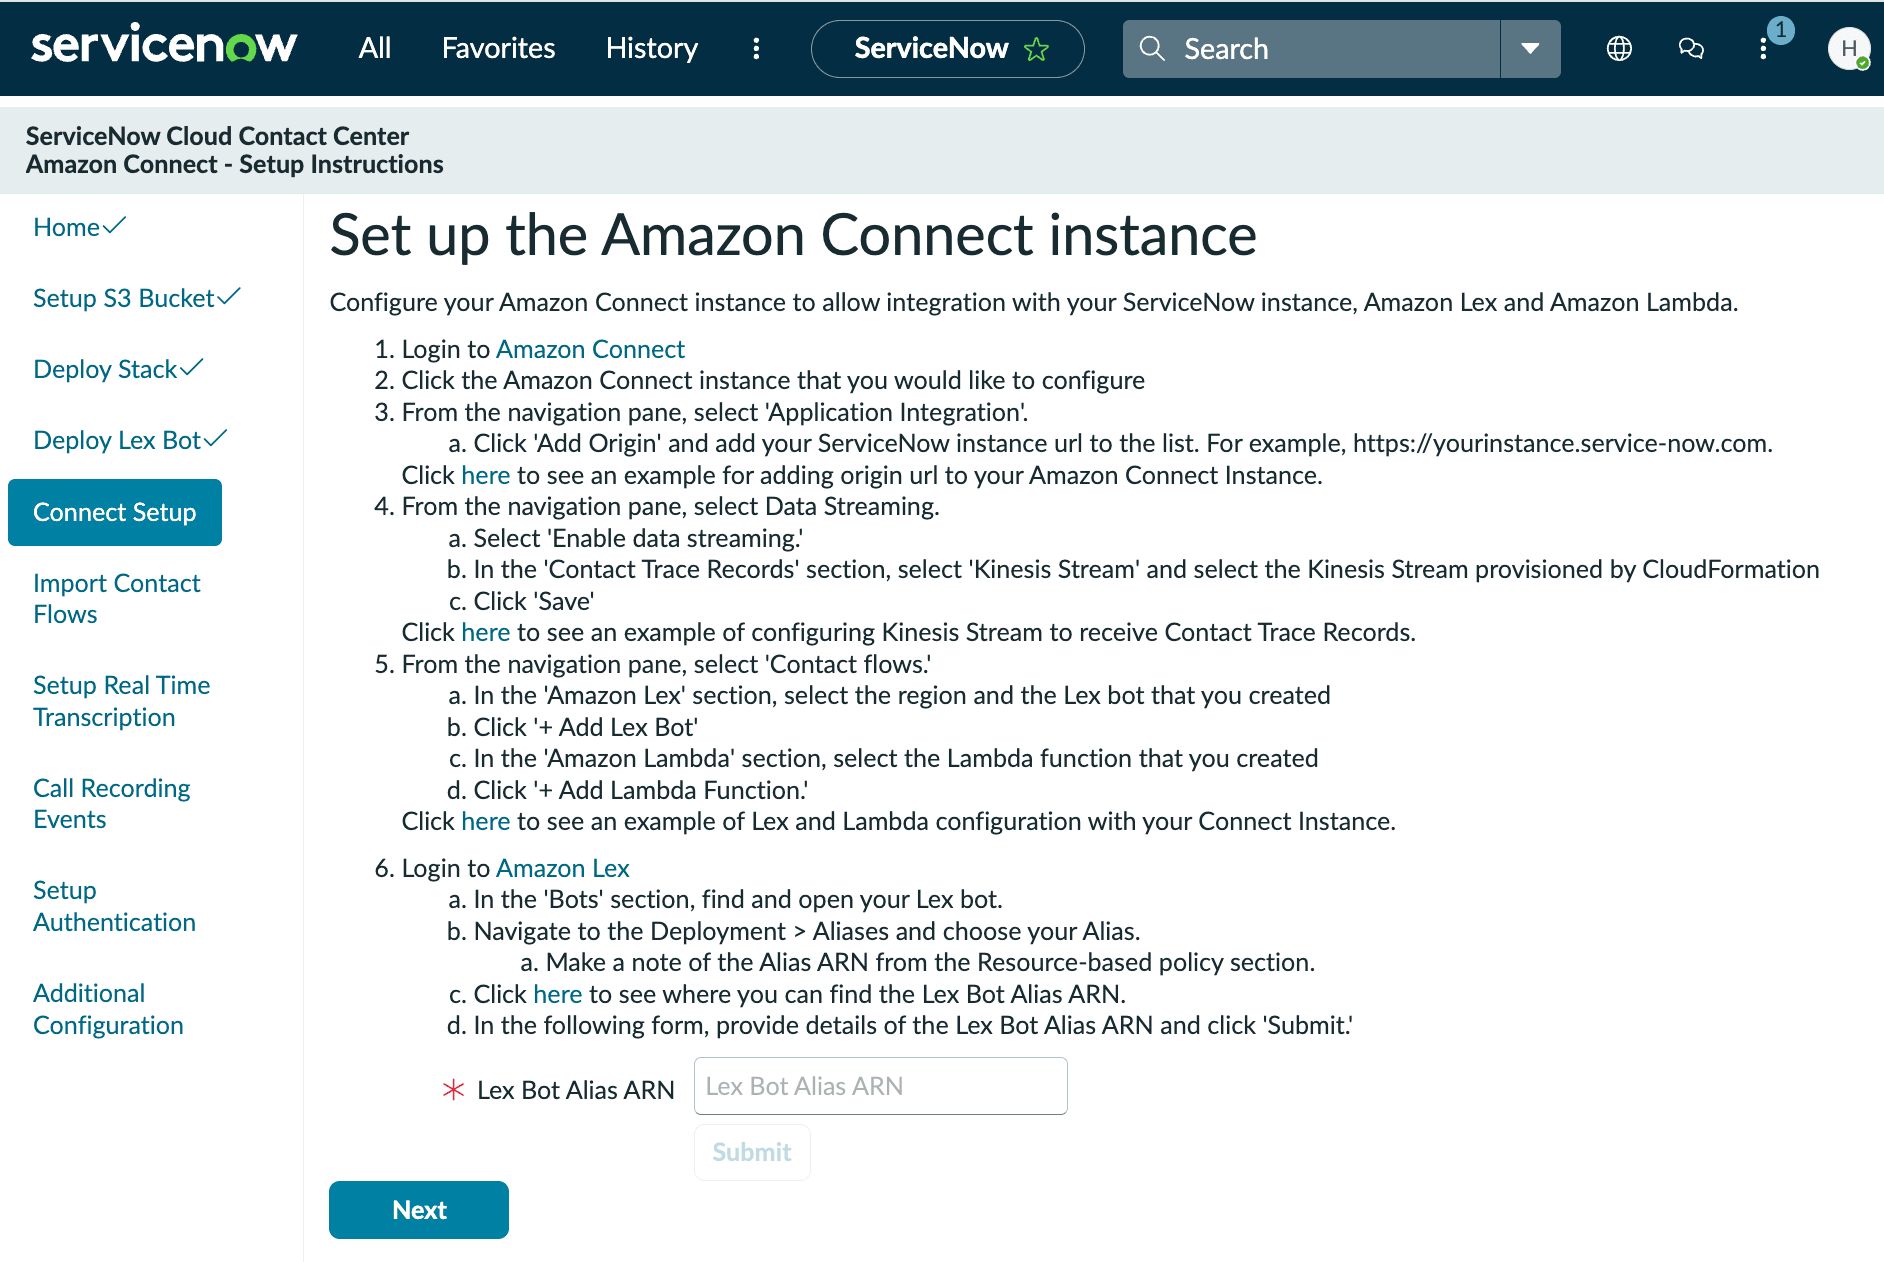
Description screen of Connect Setup. It instructs you to configure three places: Application Integration, Data Streaming, and Contact flows
First, add the URL of the ServiceNow instance to Approved origins under Application Integration.
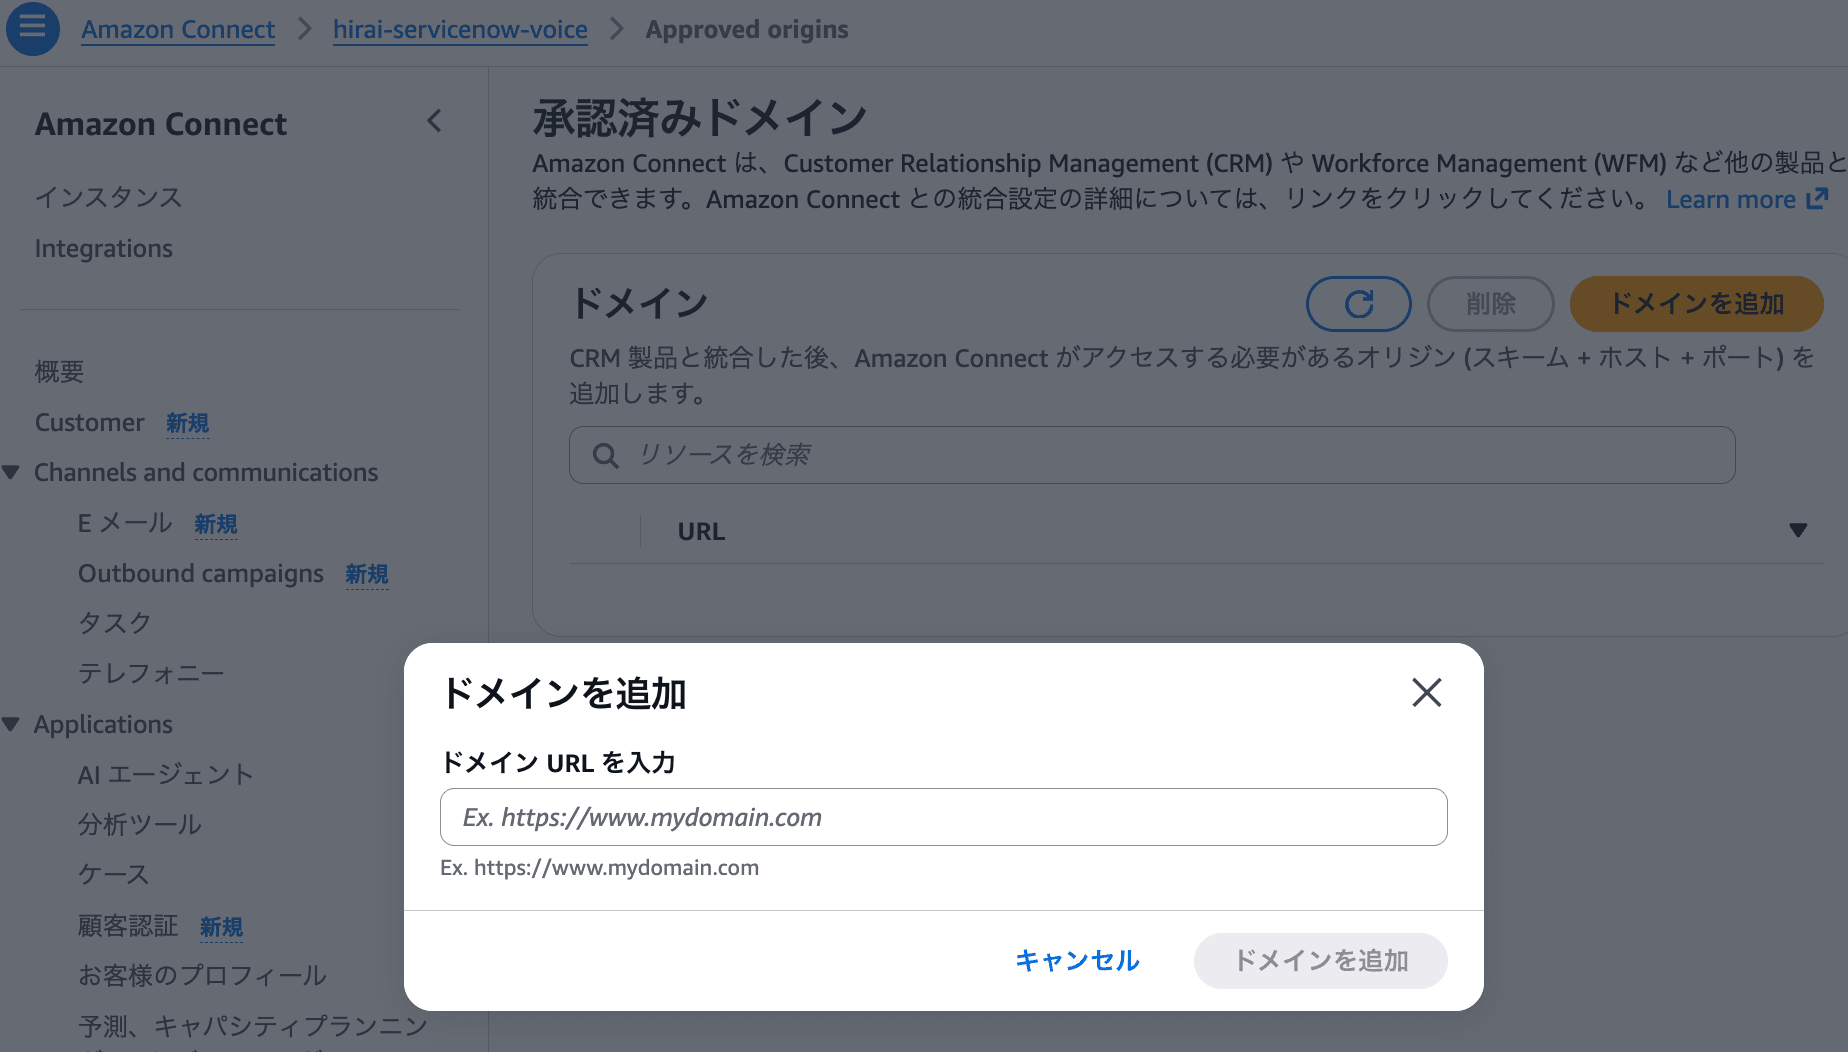
Screen where the ServiceNow instance URL (https://<PDI instance name>.service-now.com) is registered in the Approved origins of Amazon Connect
Next, in Data Streaming, associate the Kinesis Stream that you confirmed in the Deploy Stack step.
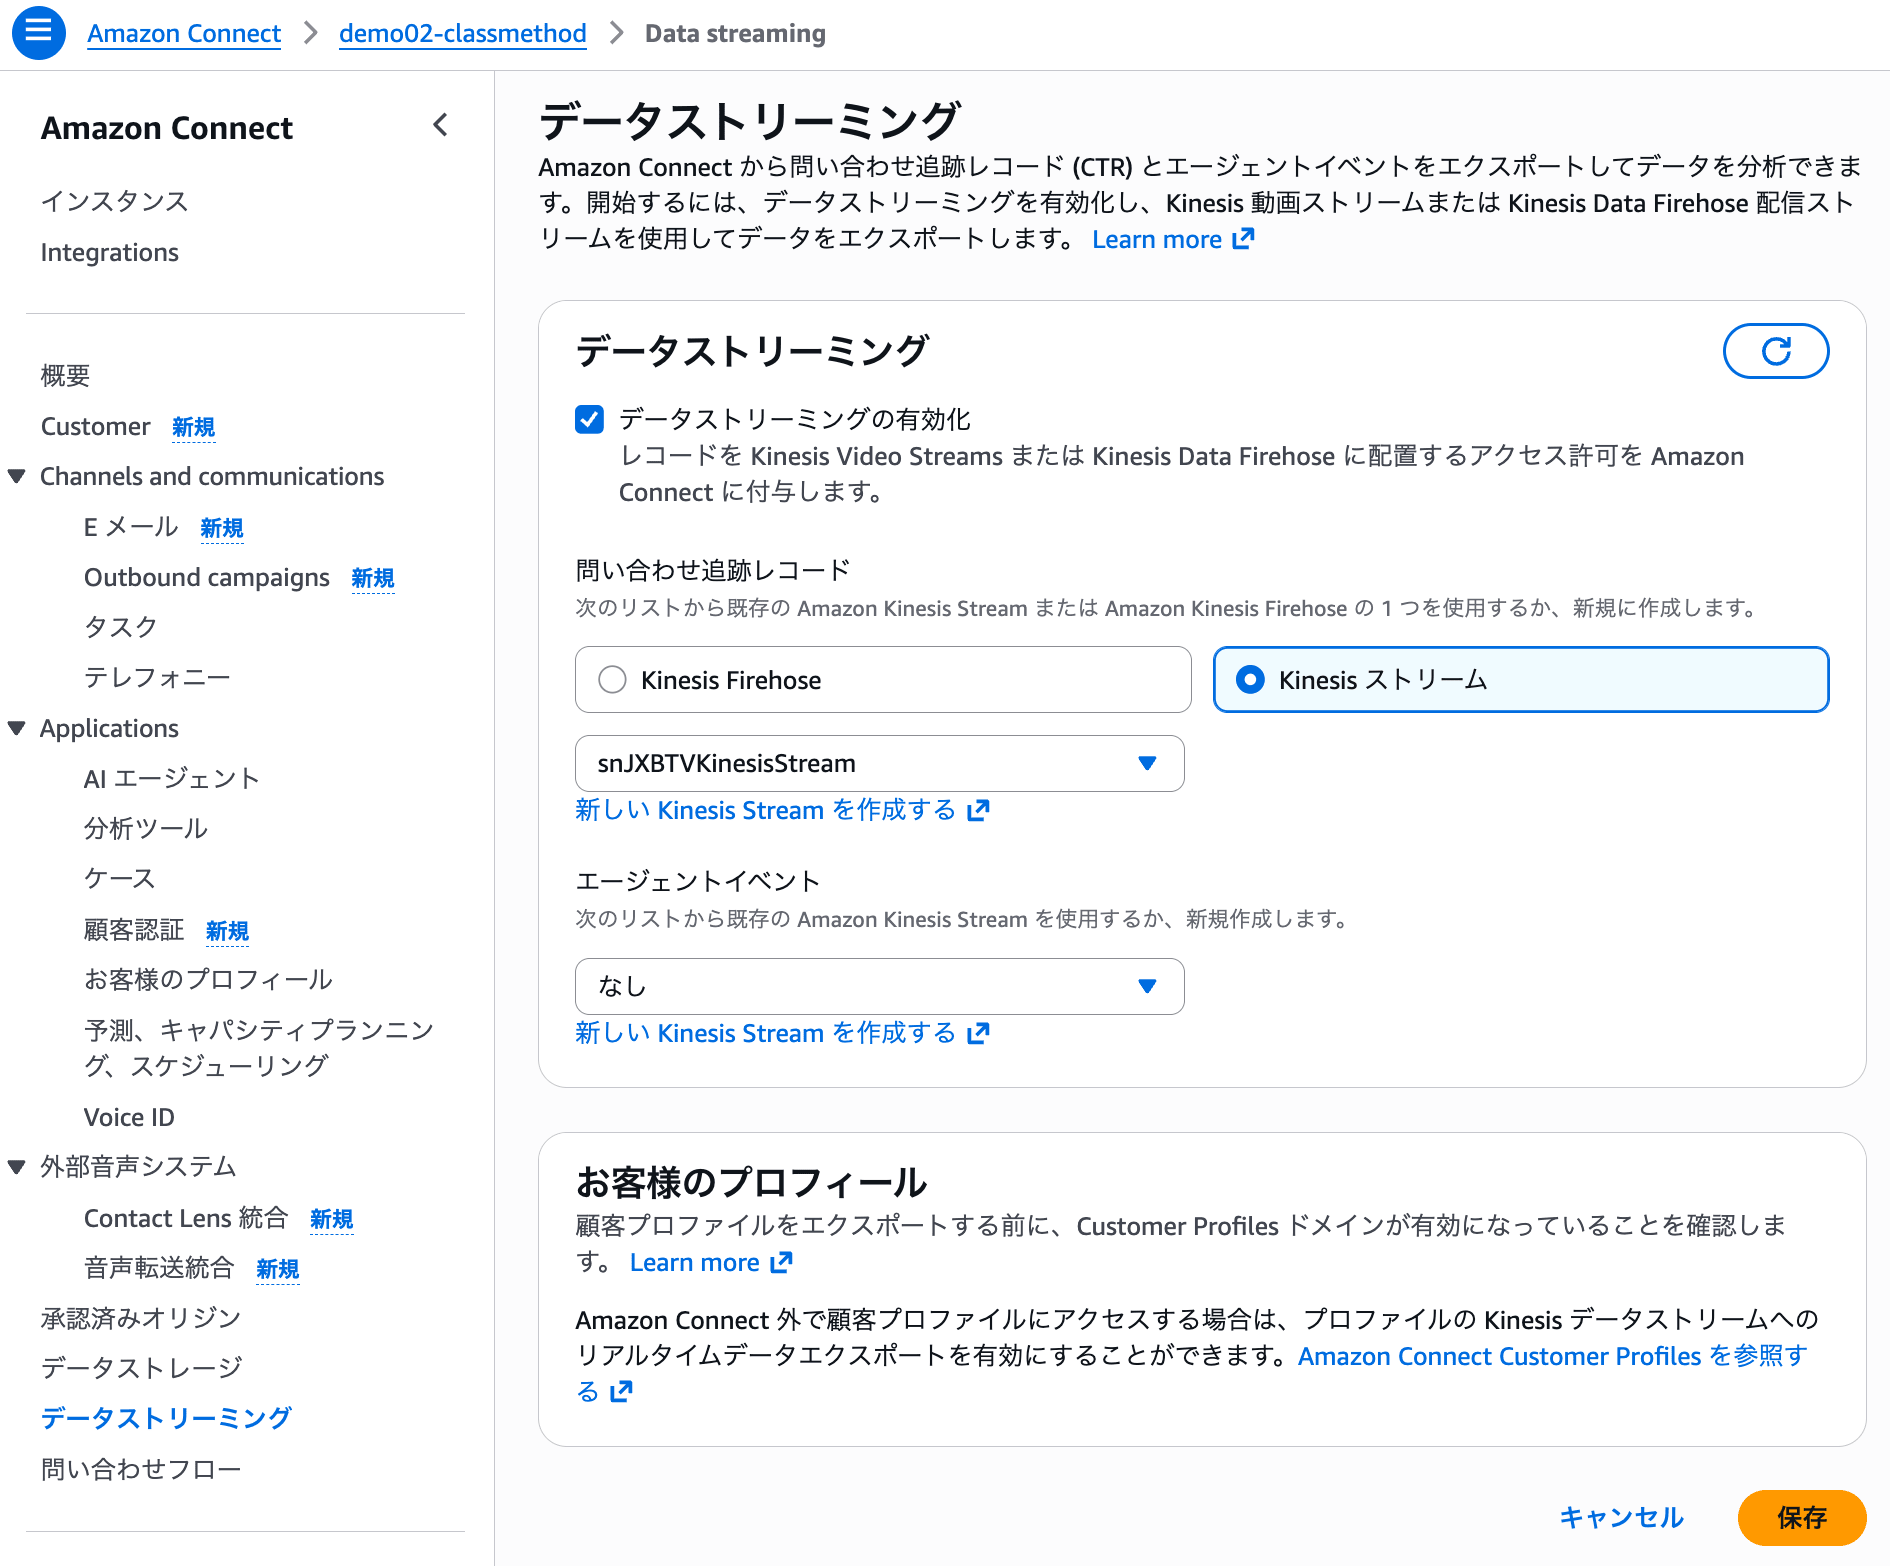
Configuration screen of Data Streaming. The Kinesis Stream created by CloudFormation is selected as the destination for Contact Trace Records
Then, in the Contact flows configuration screen, select the Bot created in the Deploy Lex Bot step from the Amazon Lex section and click Add Lex Bot.
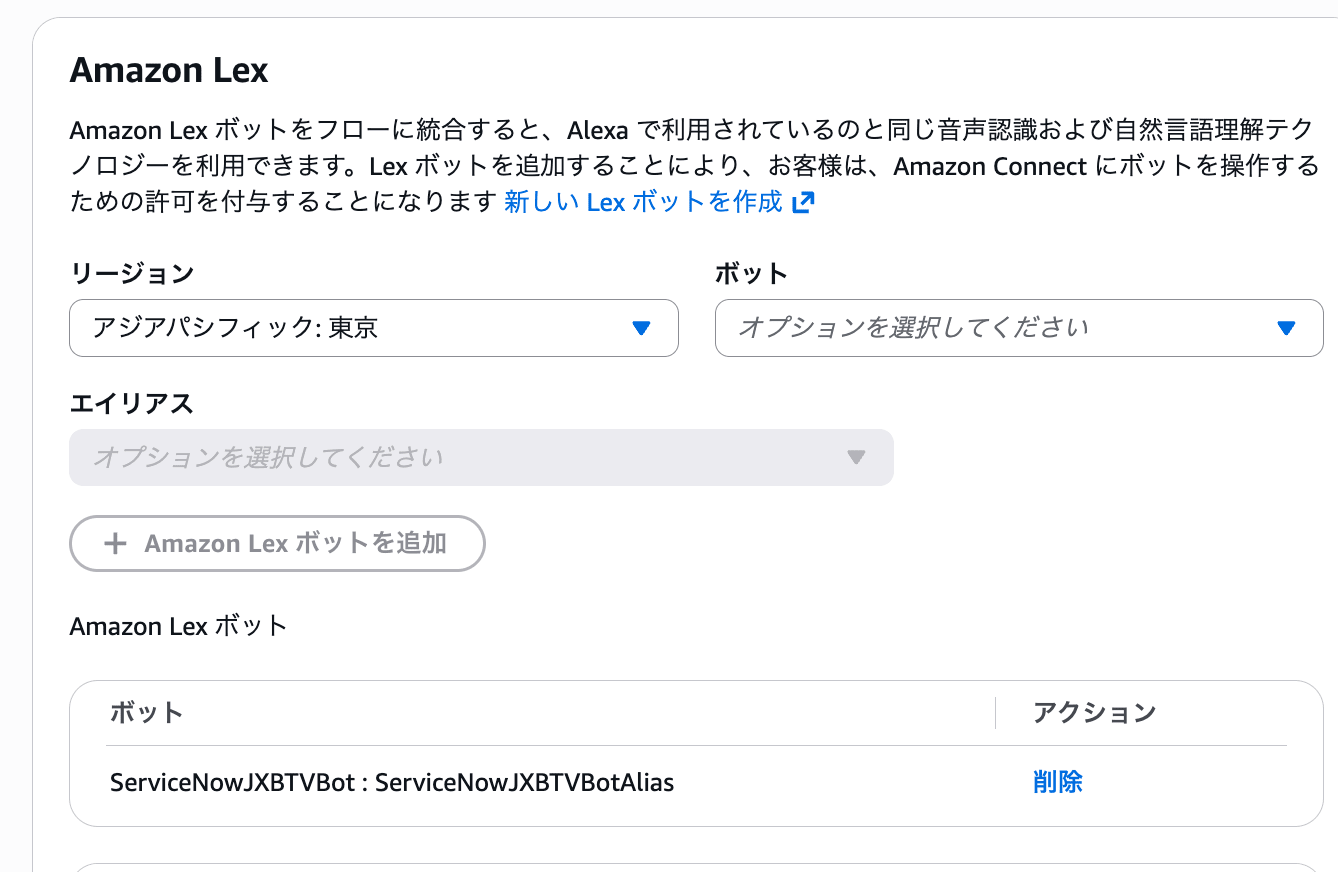
Adding the Lex Bot in the Contact flows configuration screen
Similarly, select the Lambda function created in the Deploy Stack step from the Amazon Lambda section and click Add Lambda Function.
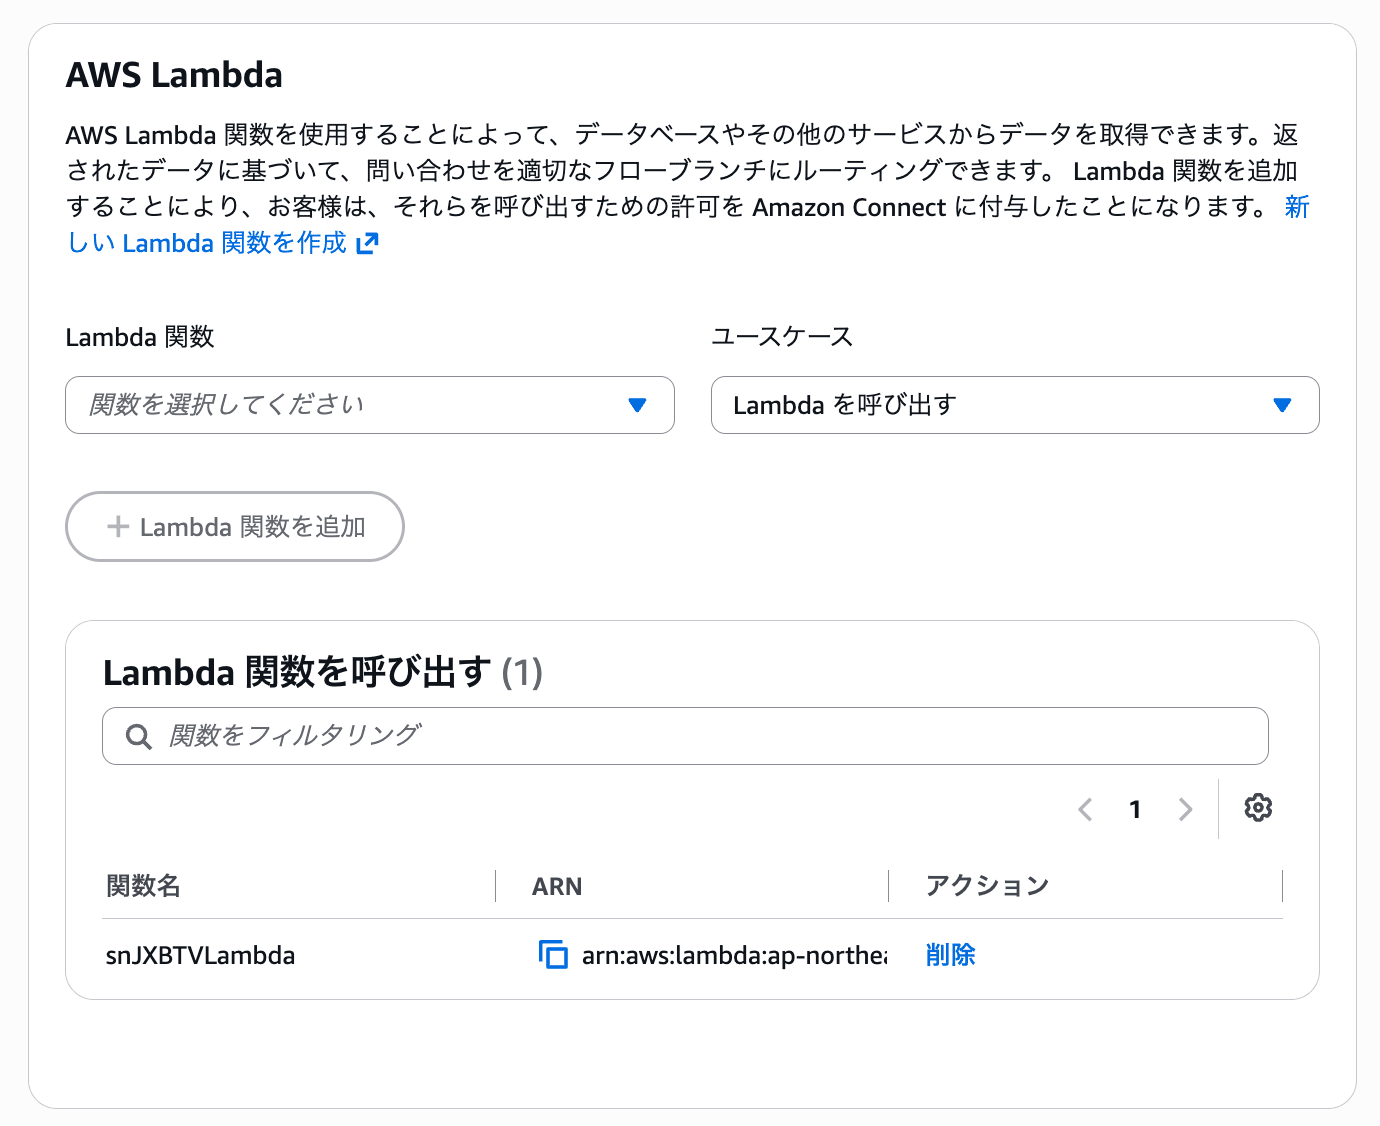
Adding the Lambda function in the Contact flows configuration screen
Finally, open the Bot in the Lex console and select the relevant alias from Aliases under Deployment, and the Alias ARN is displayed in the Resource-based policy section. Enter this in the form on the ServiceNow Connect Setup screen and Submit.
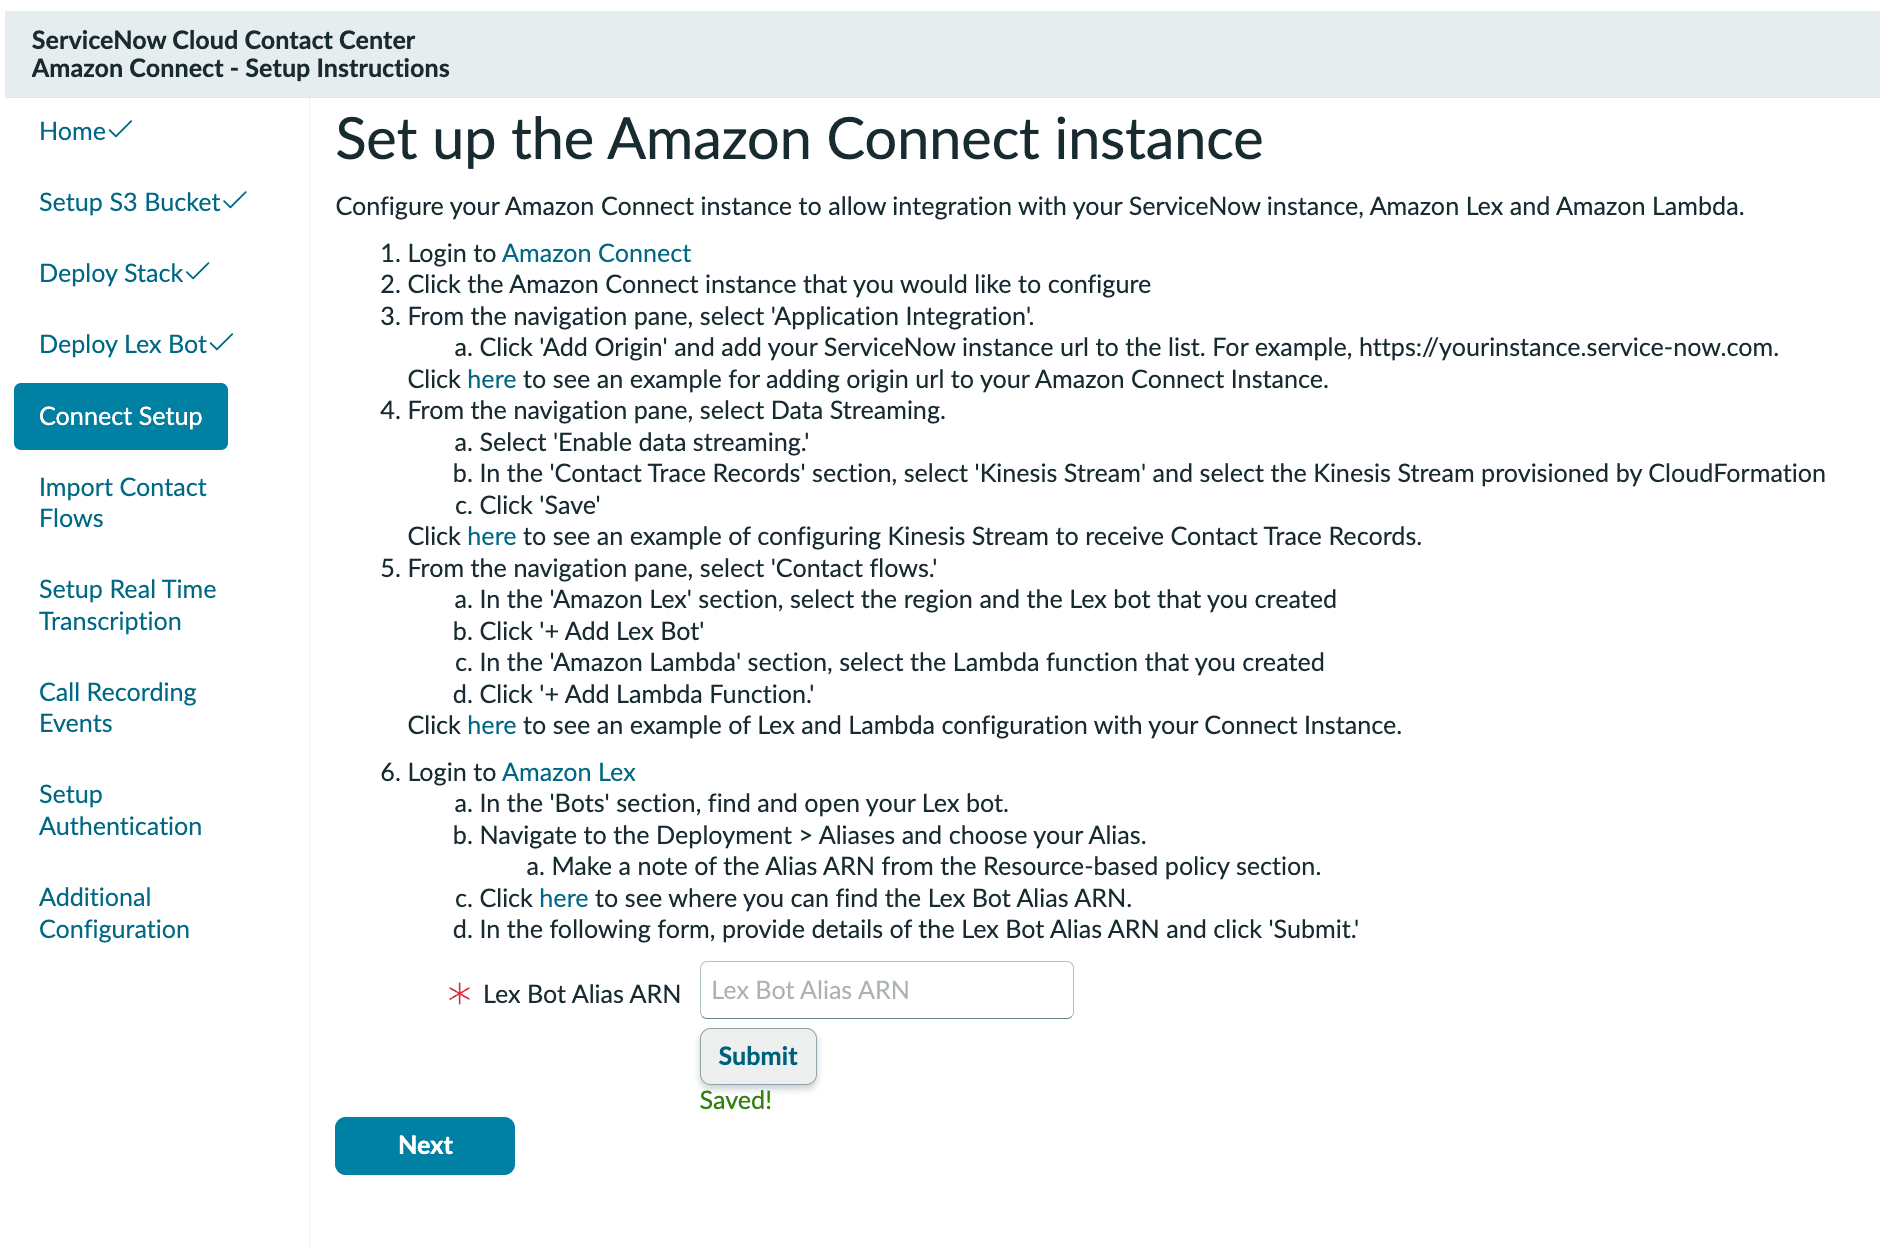
Screen entering the Lex Bot Alias ARN into the ServiceNow form
The Lex Bot Alias ARN has the format arn:aws:lex:ap-northeast-1:111111111111:bot-alias/<Bot ID>/<Bot Alias ID>, and the Lex V2 Bot ID and Alias ID are each included in the path.
Import Contact Flows
In the Import Contact Flows step, you import the sample contact flows provided by ServiceNow into Amazon Connect.
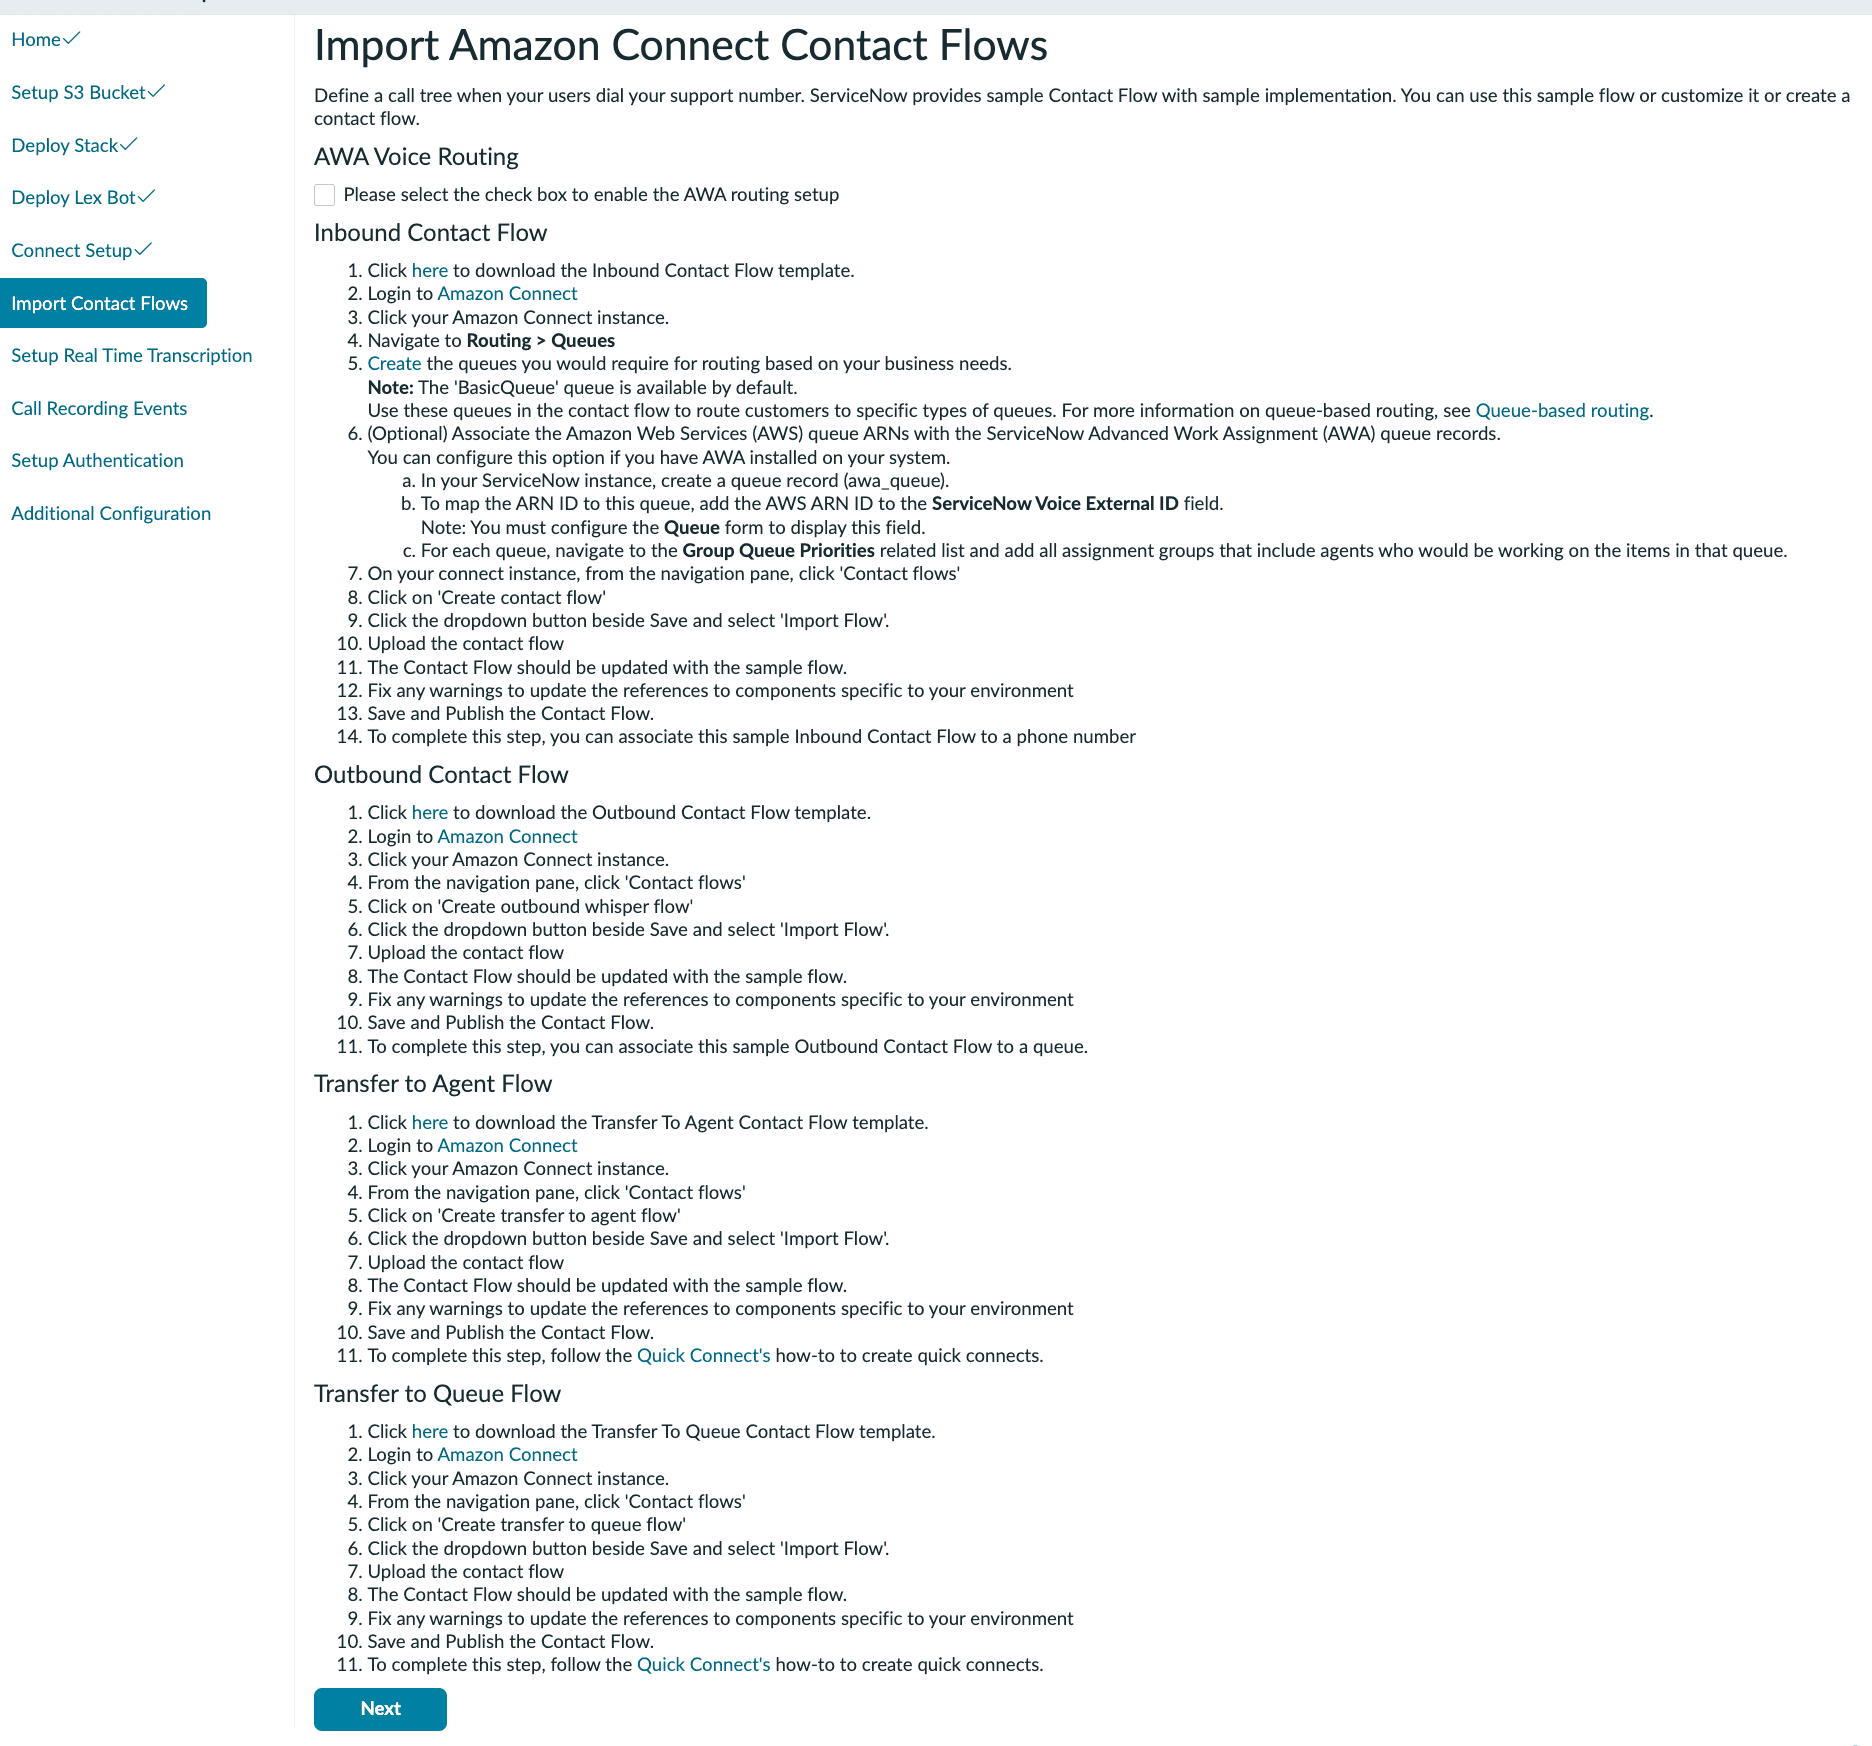
Description screen of Import Amazon Connect Contact Flows. Instructions for AWA Voice Routing, Inbound Contact Flow, Outbound Contact Flow, Transfer to Agent Flow, and Transfer to Queue Flow are listed
The AWA Voice Routing checkbox at the top of the screen is an option for whether to control the routing itself with ServiceNow's own queue management engine (Advanced Work Assignment, hereafter AWA). In the scope of this verification, I first wanted to confirm inbound call handling, agent response, and recording integration using only Amazon Connect's native queue functionality, so I proceeded without checking this.
For the Inbound Contact Flow and Outbound Contact Flow, download each template and import it from Import Flow on the Amazon Connect Contact flows screen.
Immediately after the import, warnings appear because the Lambda functions and Lex Bot referenced in the template point to those in the original environment. Open the blocks with warnings, re-point the references to the Lambda function and Lex Bot deployed in your own environment, and then Publish.
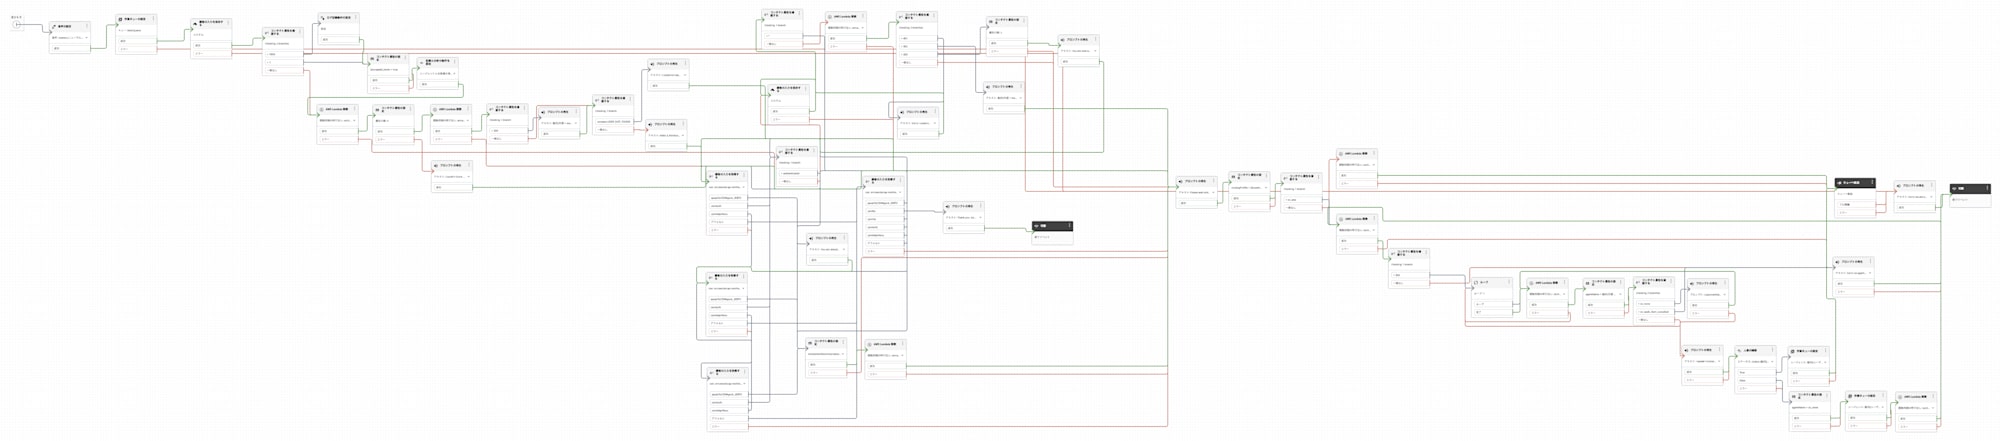
Canvas of the imported Inbound Contact Flow
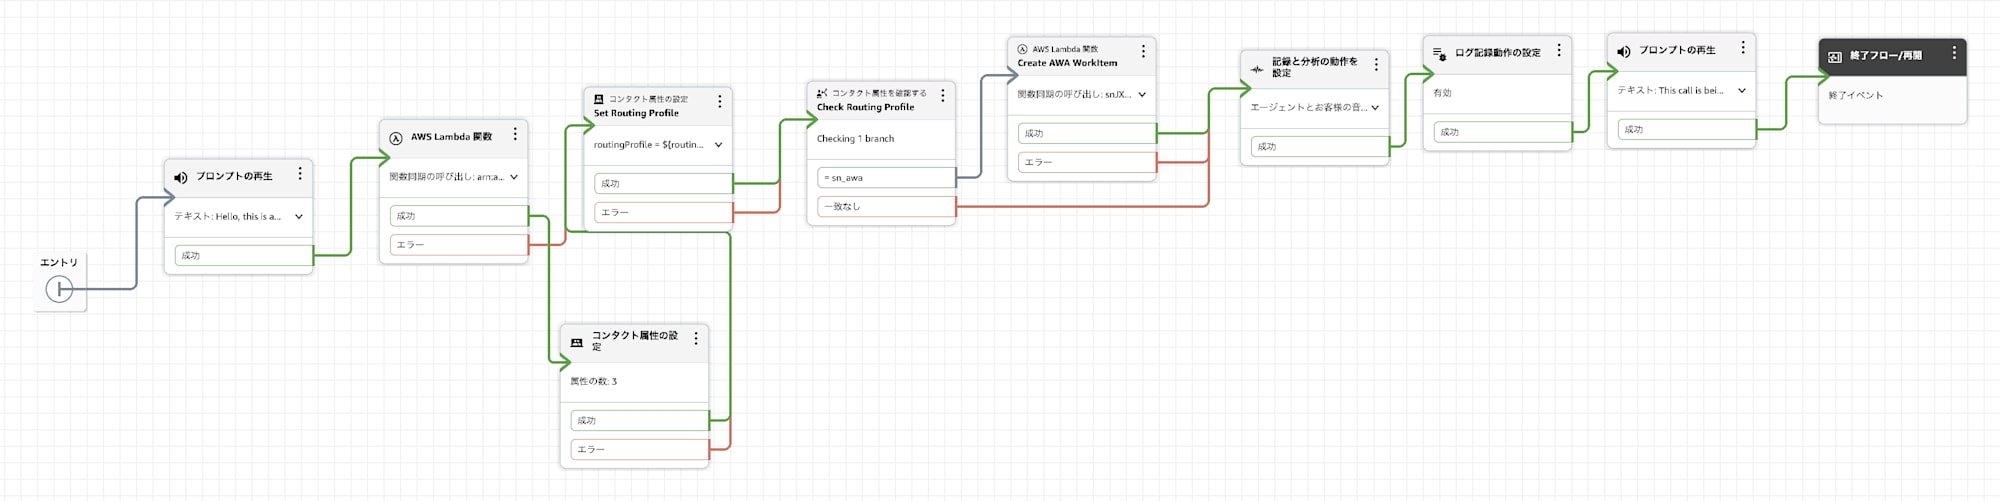
Canvas of the imported Outbound Contact Flow
When I checked the definition (JSON) of the imported flow, in the Inbound Contact Flow, right after an incoming call, a voice guidance asking for consent to recording is played, and then an operation called createCSMInteraction is invoked against ServiceNow via a Lambda function. In a single call of this, the creation of a CSM Interaction record and the customer matching by caller number are both performed, and the customer's sys_id and name are returned as the response.
In addition, the latter half of the flow included an operation called triggerAWARouting and a Lambda invocation for writing the agent assignment result back to DynamoDB. This is a mechanism for assigning agents in coordination with AWA.
The Outbound Contact Flow was also imported with the same procedure, and I went as far as associating it with a phone number.
The Transfer to Agent Flow and Transfer to Queue Flow were not included in the scope of this verification (confirming inbound calls, agent response, and recording integration), so I did not create those flows.
Setup Real Time Transcription
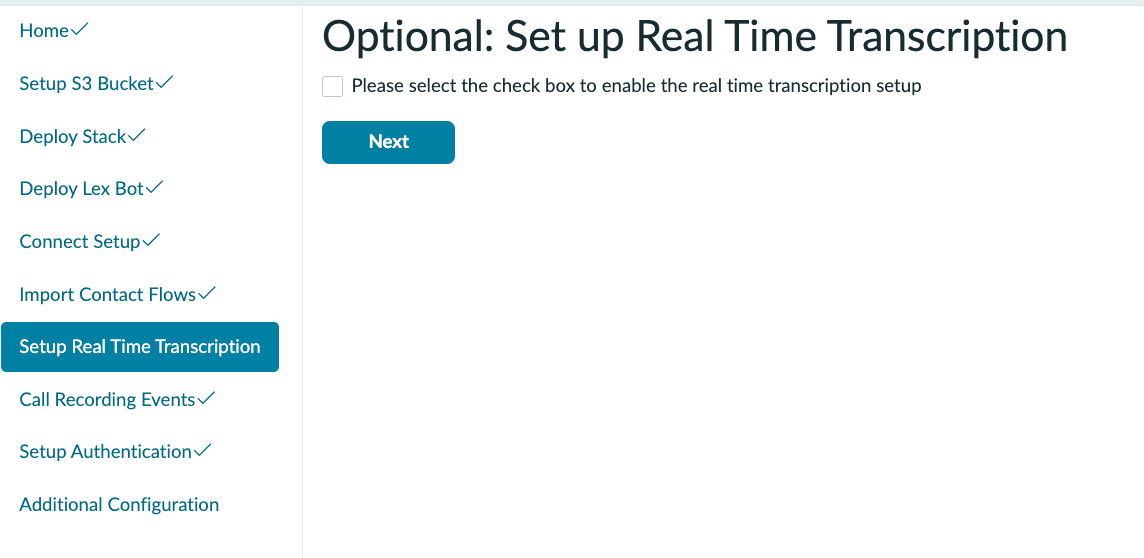
Description screen of Setup Real Time Transcription
Since I am not using real-time transcription this time, I skipped this step. If you enable the checkbox, you can see the additional settings that are required.
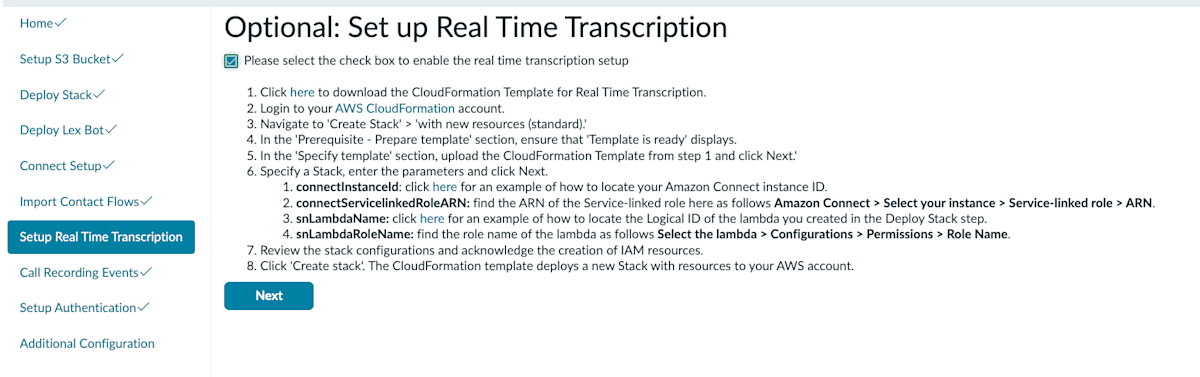
Setting items displayed when the checkbox is enabled
Call Recording Events
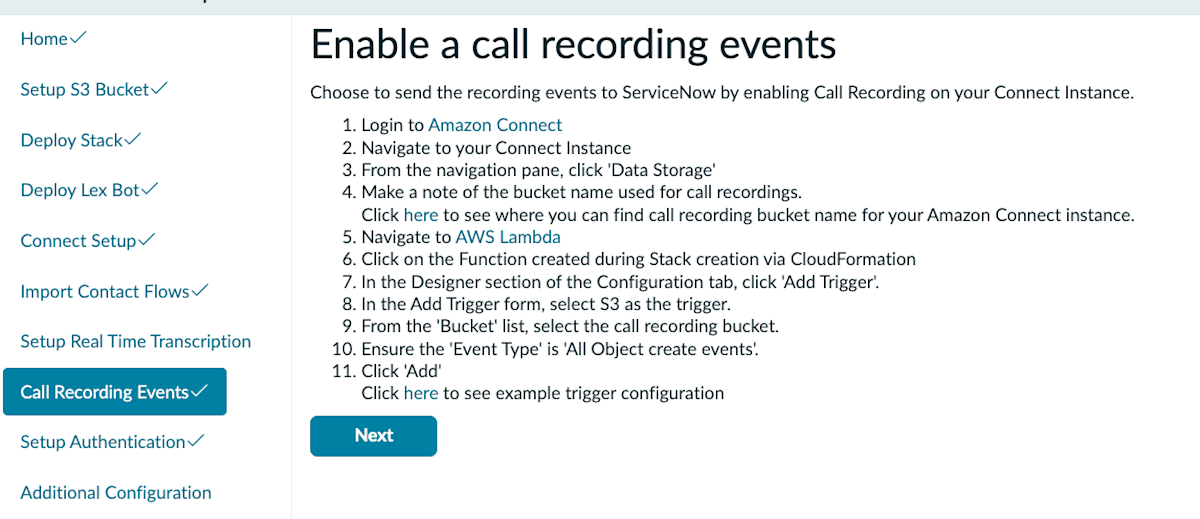
Description screen of Enable a call recording events. It instructs you to check the call recording bucket name in Data Storage of Amazon Connect, add S3 as a trigger for AWS Lambda, and specify the bucket and the event type "All object create events"
This step is the very mechanism for automatically linking post-call recordings and transcripts to ServiceNow Interactions, and it cannot be skipped. It is a different feature from the earlier Setup Real Time Transcription (an option for displaying real-time transcription during a call), and this configuration is mandatory for post-call recording and transcript integration.
The actual configuration is as follows: open the function created in Deploy Stack in the AWS Lambda console, add S3 as a trigger from "Triggers" on the "Configuration" tab, and specify the call recording bucket as the bucket and "All object create events" as the event type.
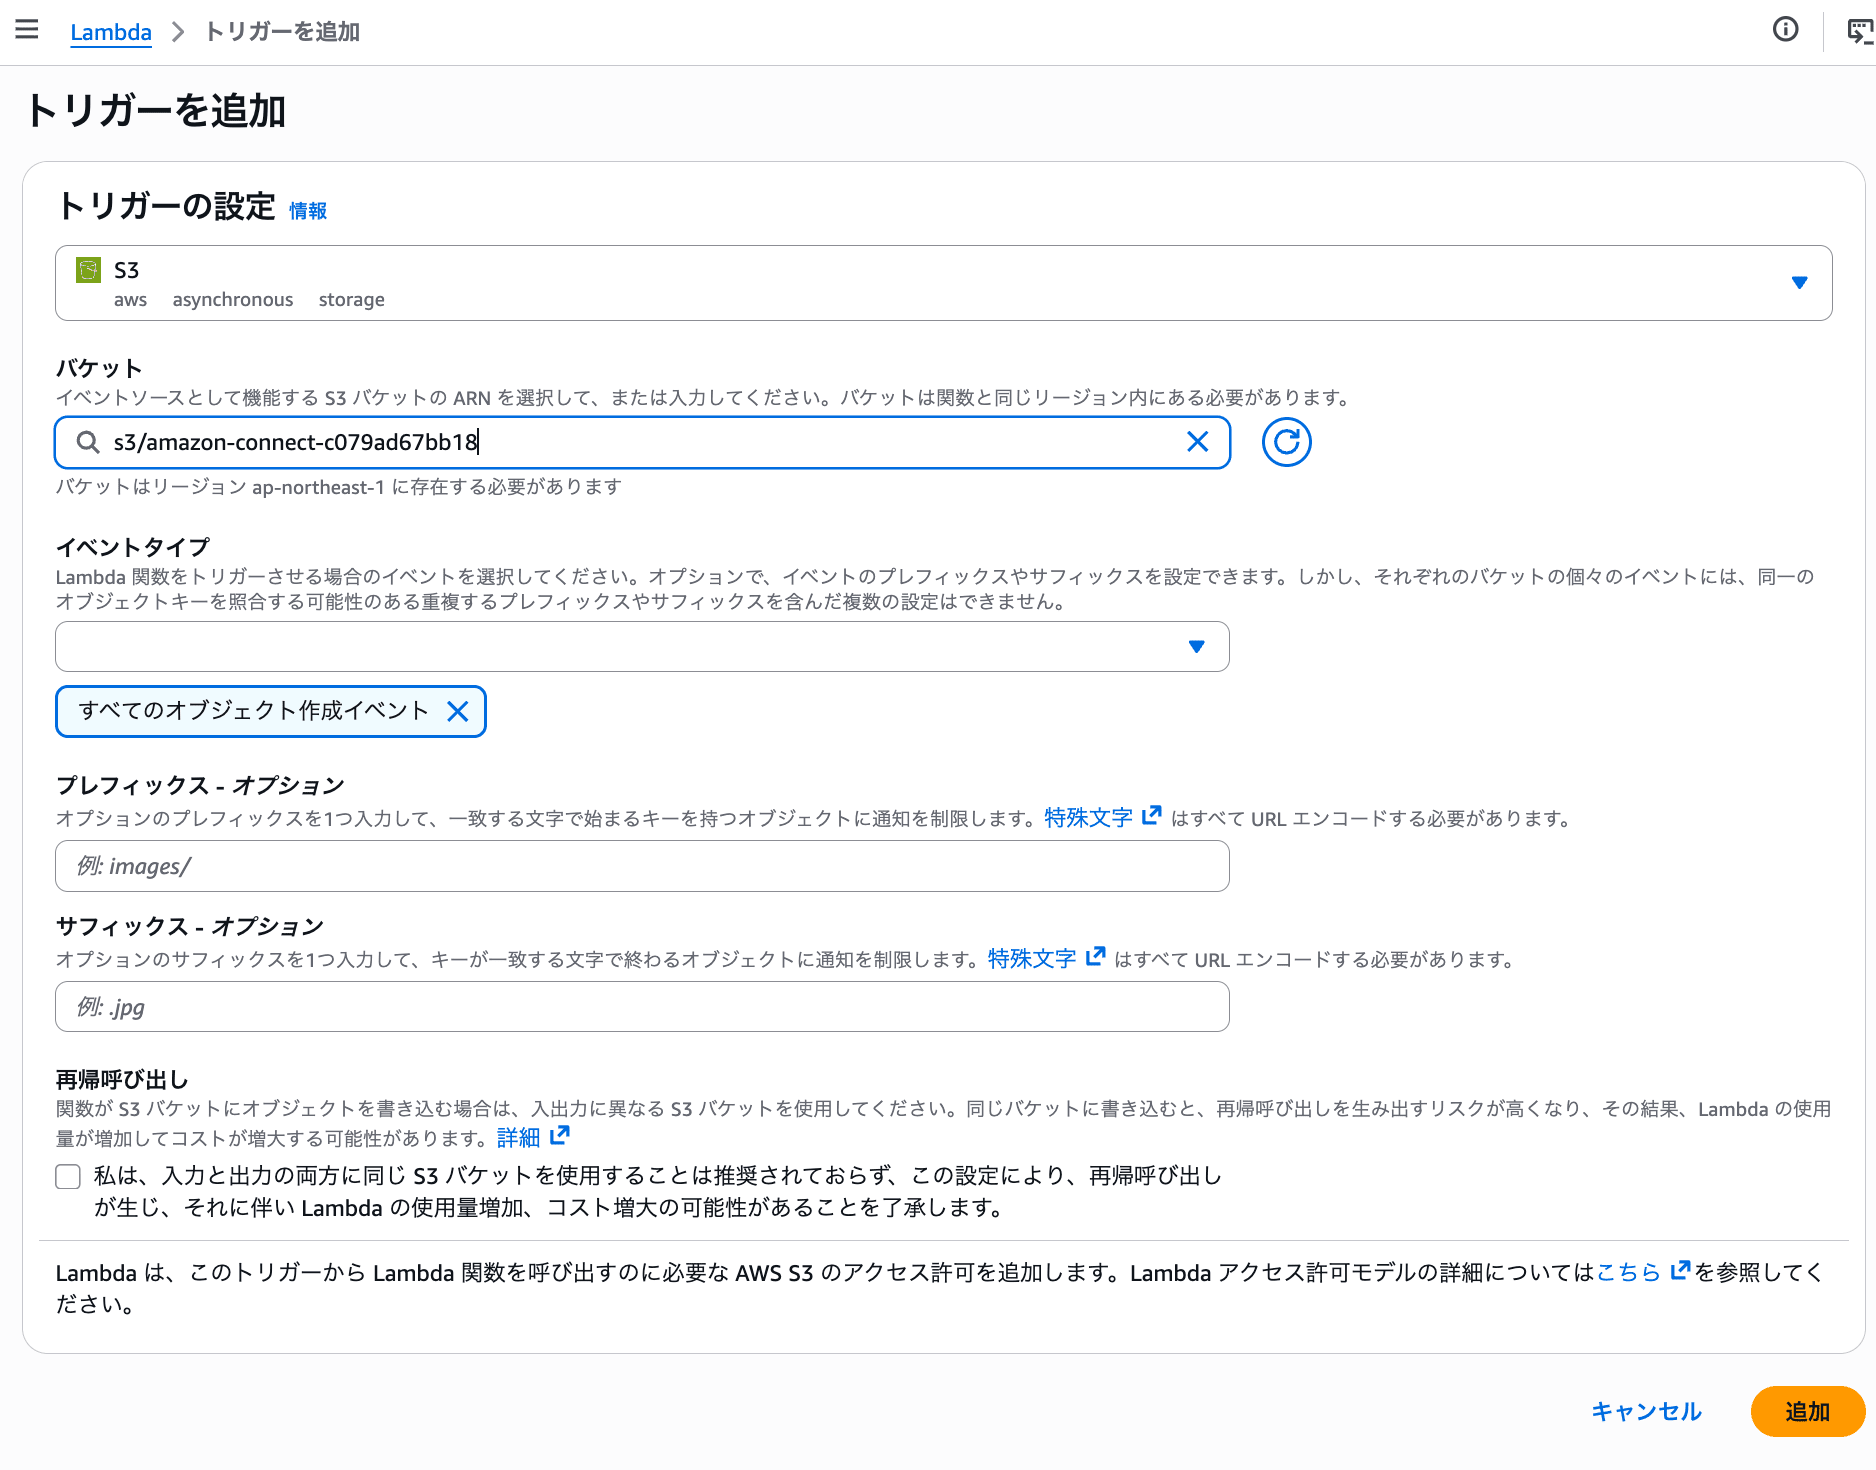
Screen adding a trigger in the AWS Lambda console
Setup Authentication
In the Setup Authentication step, you create a service account (a ServiceNow User record with Web Service Access Only enabled) to be used when calling ServiceNow from AWS.
'
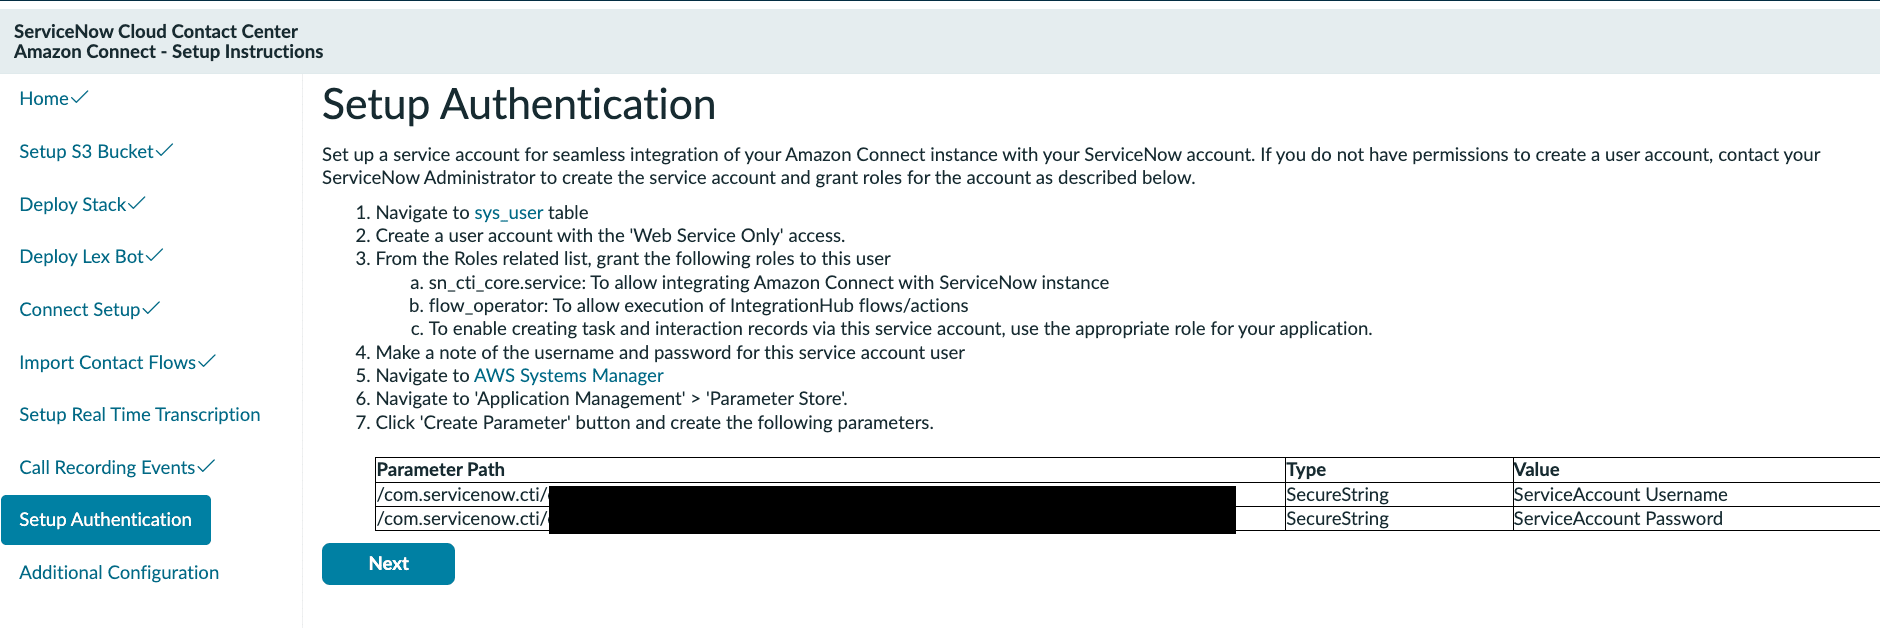
Description screen of Setup Authentication. It instructs you to create a Web Service Access Only user in the sys_user table and register parameters in AWS Systems Manager Parameter Store
For how to create a new user with Web Service Access Only enabled, please refer to the following article.
I enabled it using the method introduced in that article and confirmed that Web Service Access Only was set to true.
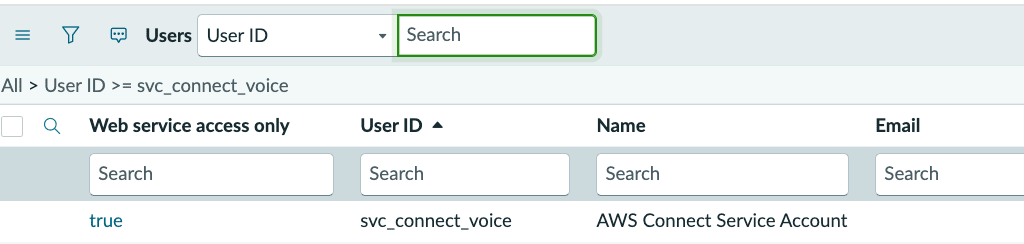
Screen confirming that Web Service Access Only has been enabled for the created service account (AWS Connect Service Account)
Next, regarding roles, in addition to sn_cti_core.service (required for integration with Amazon Connect) and flow_operator (required for running IntegrationHub flows), which are explicitly stated in the guide, I also assigned sn_customerservice_agent so that CSM Interaction records can be created.
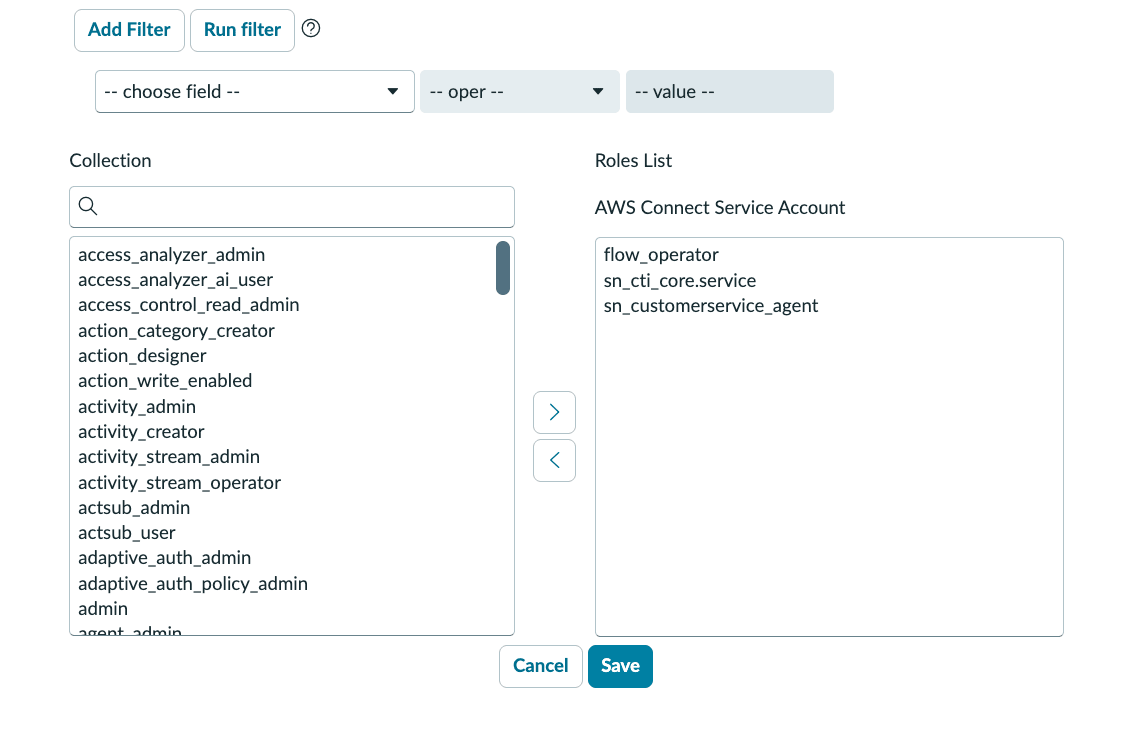
Screen selecting the three roles sn_cti_core.service, flow_operator, and sn_customerservice_agent for the service account
Next, register this username and password in AWS Systems Manager Parameter Store as SecureString.
/com.servicenow.cti/<app-specific ID>/<scope identifier>/default/service_account_user: the username created in ServiceNow/com.servicenow.cti/<app-specific ID>/<scope identifier>/default/service_account_password: the password that was set
The ID in the parameter path is a value tied to the app registration on the ServiceNow side and differs for each environment. You need to copy and use the value displayed on the screen as is.
Additional Configuration
The last step is Additional Configuration. This screen lists the following items.
- Configure Openframe: settings to embed the Amazon Connect CCP (softphone) in the ServiceNow screen
- Create interaction records for outgoing calls: property settings to also create Interactions for outbound calls
- Set up phone authentication: an option to set up PIN authentication for operations over the phone
- Agent Roles: roles to assign to agents (
sn_openframe_user,awa_agent,awa_integration_user,awa_external_user,interaction_integration_user) - Enable Interaction Controls: settings to configure the Amazon Connect Spoke and OAuth credentials and enable call operations via ICC (Interaction Controls Component)
- Queue synchronization for Voice call routing: settings to link ServiceNow Queue records with queues on the Amazon Connect side
- Activating AmazonConnectAgentTransferQueue
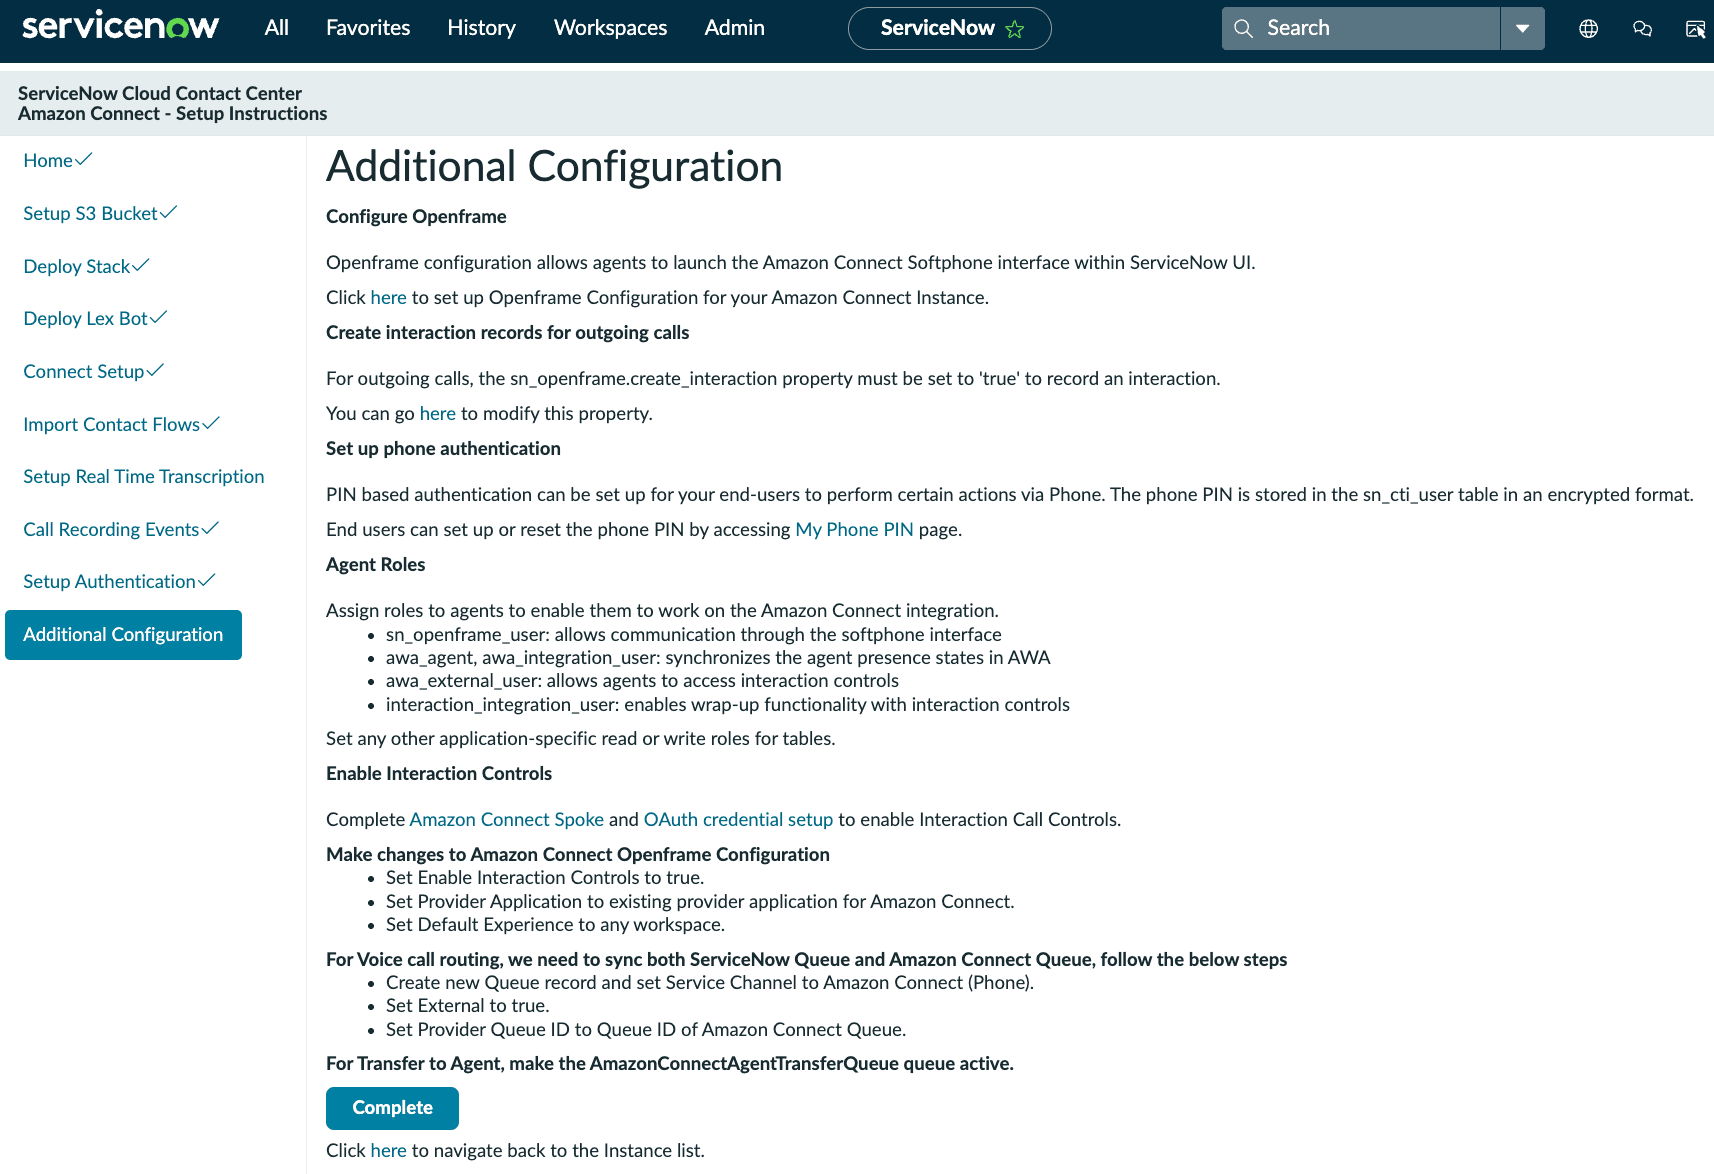
Description screen of Additional Configuration
What I addressed this time are Configure Openframe, Agent Roles, the queue synchronization for Voice call routing, and activating AmazonConnectAgentTransferQueue.
The Interaction creation setting for outbound calls was left out because this verification focused on inbound calls.
PIN authentication is a feature that allows customers who call in to enter a PIN with dial operations and perform self-service operations that require identity verification. Since this verification did not target such customer-facing self-service operations, I did not configure it.
Enable Interaction Controls (ICC) is a feature for incorporating call operations (answer, hold, transfer, etc.) into the ServiceNow workspace as native operations, rather than as buttons on the Amazon Connect CCP screen itself. Enabling it requires separate configuration of the Amazon Connect Spoke (a spoke for IntegrationHub) and OAuth credentials. This time, I positioned the work as a stage of confirming that calls can be received and answered from the Amazon Connect CCP screen embedded via OpenFrame, so I postponed the ICC configuration.
Configure Openframe
Configure Openframe is the setting for embedding the Amazon Connect CCP (Contact Control Panel, softphone) into the ServiceNow screen. When I clicked the "here" link, I was taken to a completion screen showing Done.
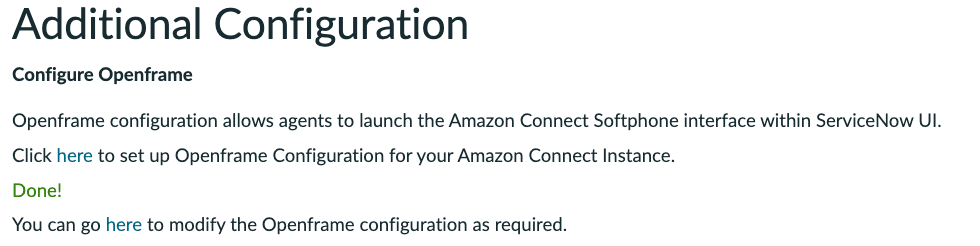
Done completion screen displayed after clicking the "here" link
When I opened the "You can go here to modify the Openframe configuration as required." link, I was taken to the record screen of the Openframe Configuration. No changes were needed, so I moved on to the next step.
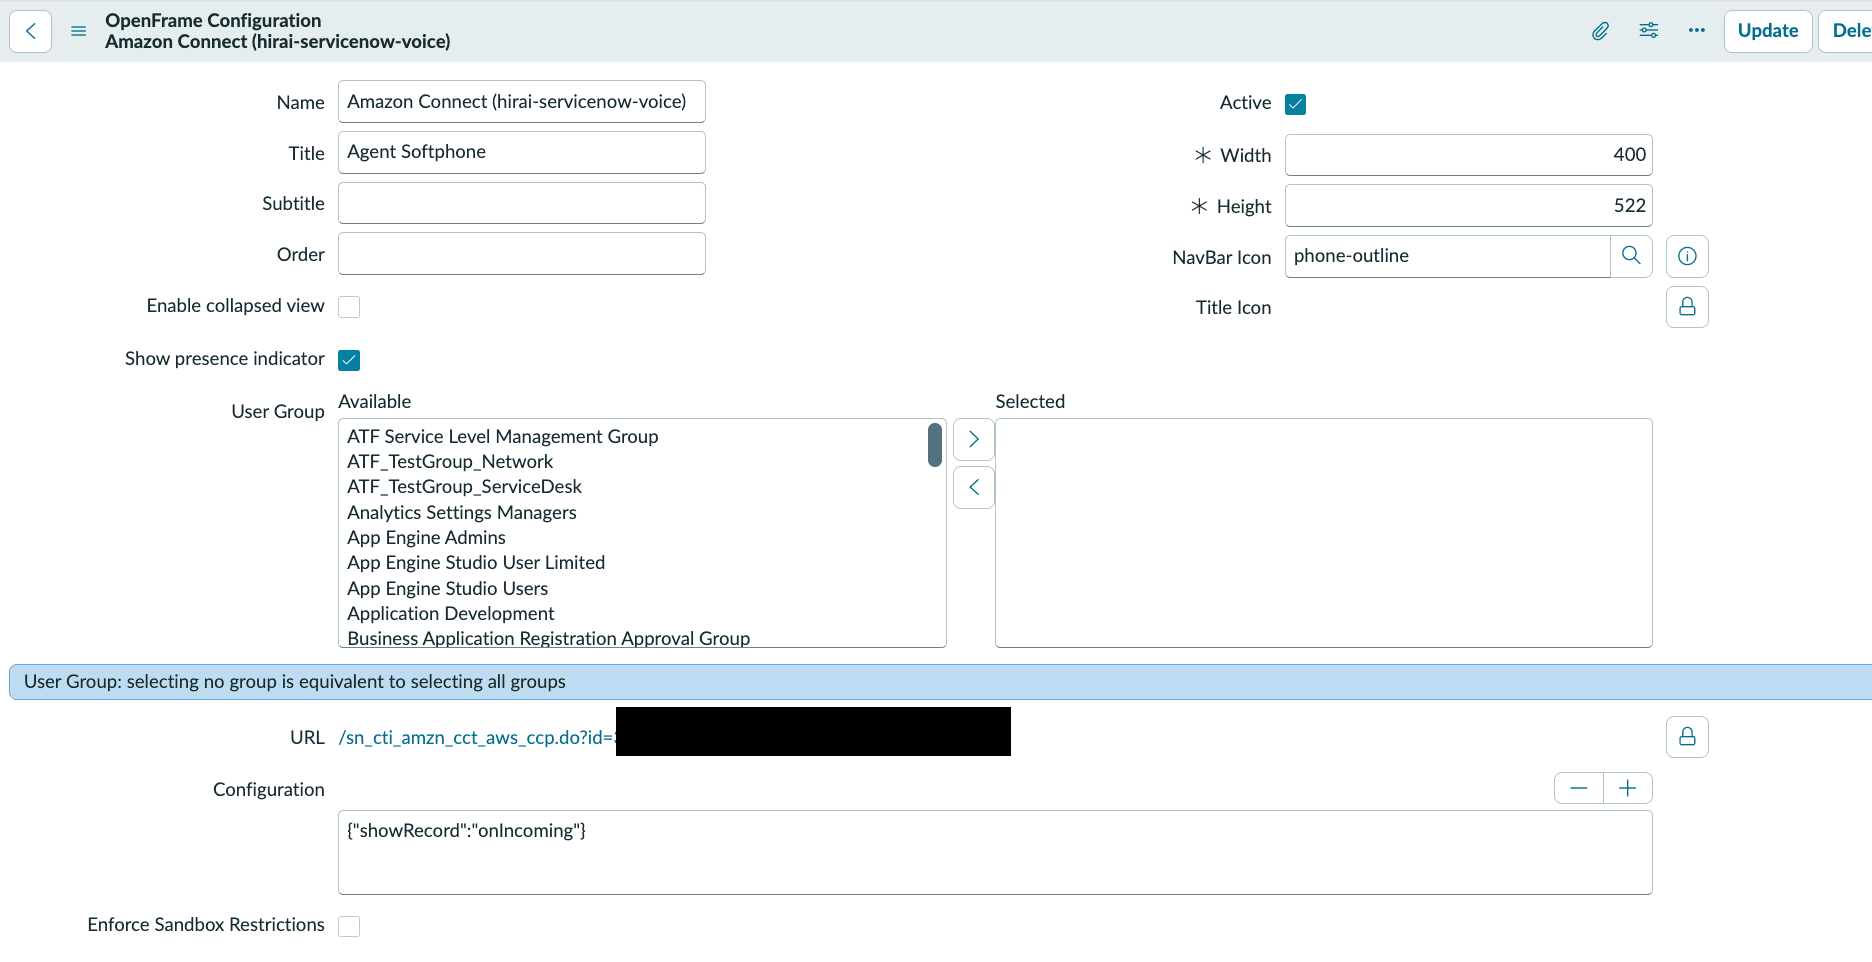
Agent Roles
The Agent Roles section lists sn_openframe_user, which is required for OpenFrame softphone communication. In addition to this, I assigned to the agent's (hirai) user record sn_customerservice_agent for handling CSM Interactions, and awa_agent and awa_integration_user, which are required for agent presence synchronization with AWA.
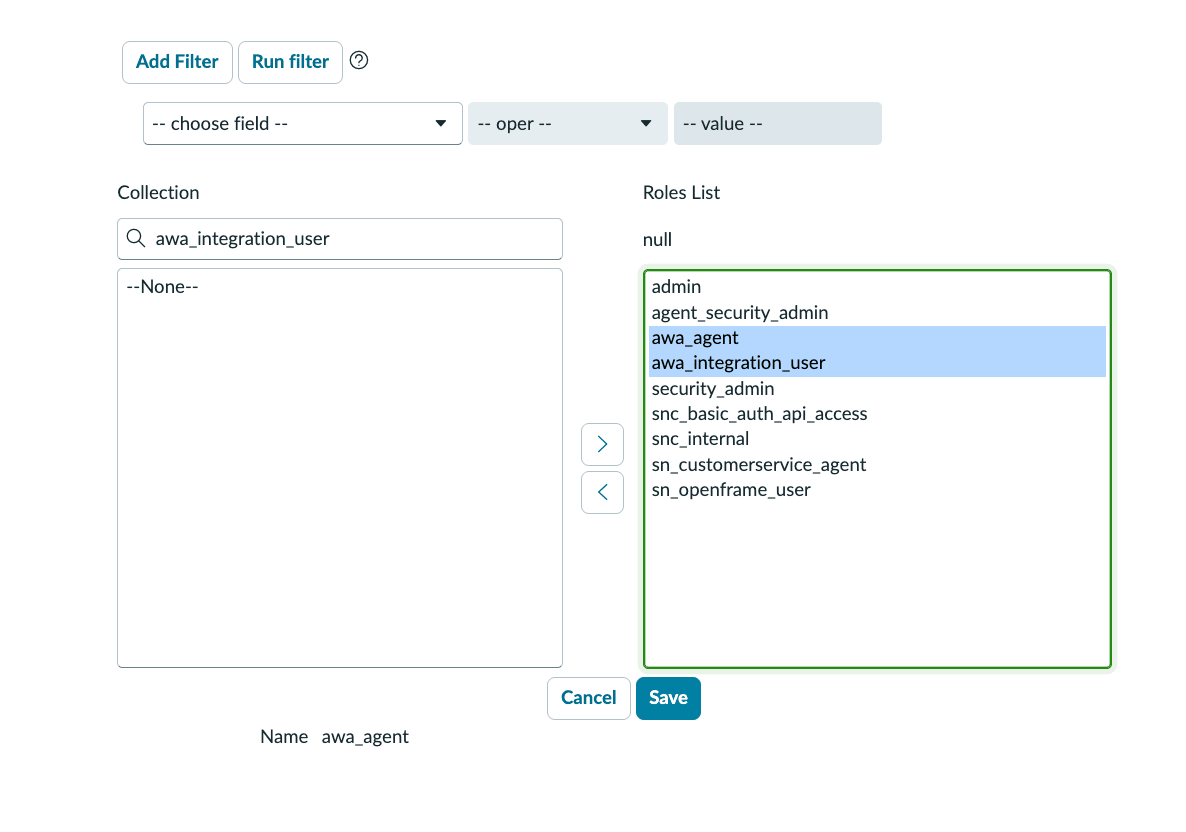
Screen where awa_agent and awa_integration_user have been added to the agent's role list
Queue Synchronization for Voice Call Routing
Search for "Queues" in the Filter Navigator and go to the Queue list screen.
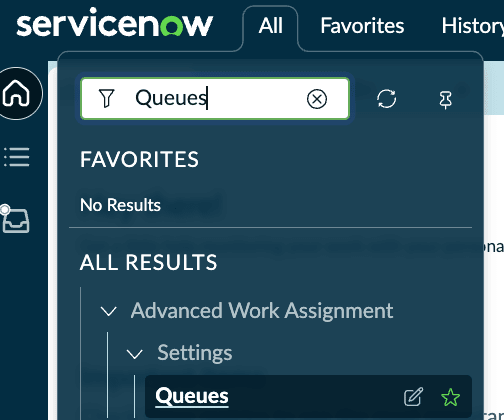
Queue list screen
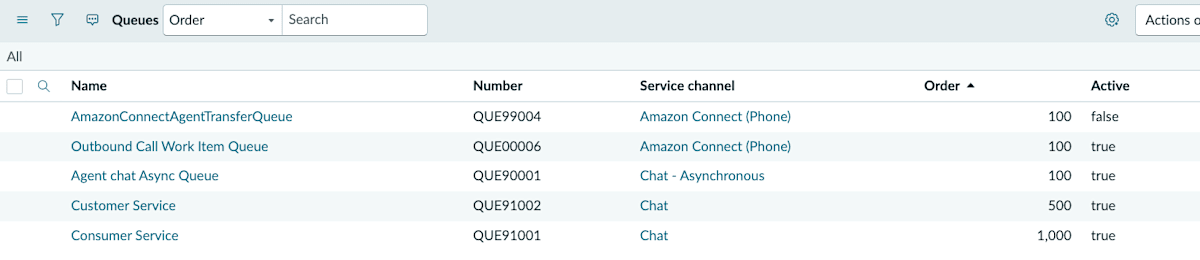
Queue list screen (continued)
First, when I checked AmazonConnectAgentTransferQueue, which was automatically generated at installation, Active was still false, so I clicked here and changed it to true.
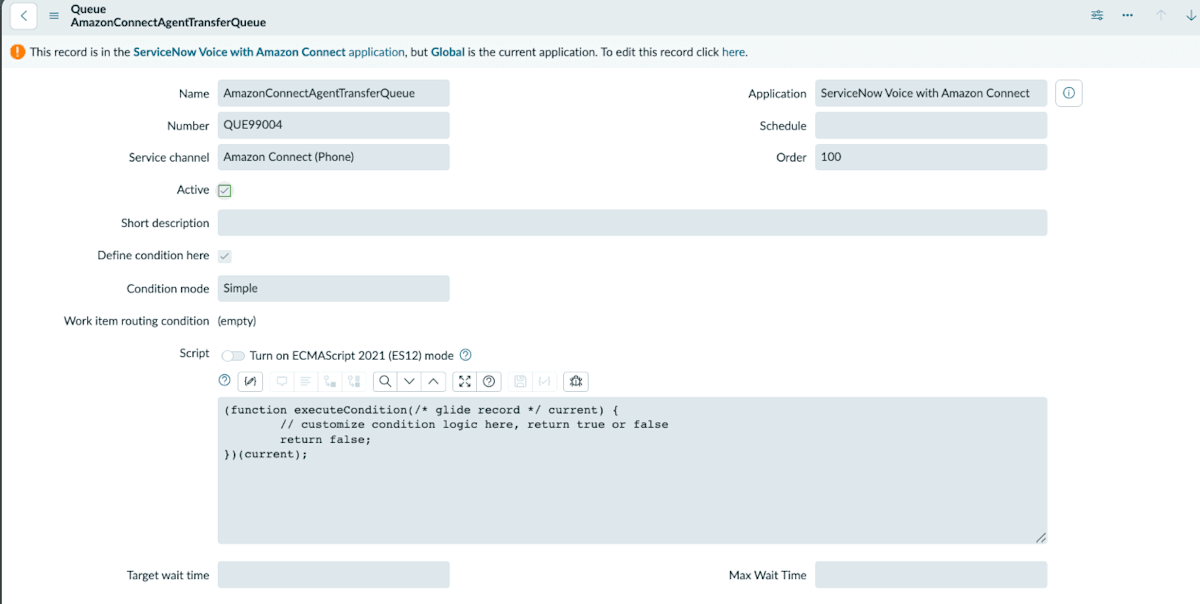
Record screen of AmazonConnectAgentTransferQueue. Click here to set Active to true
Next, I created a new Queue record corresponding to the BasicQueue on the Amazon Connect side. Just creating it did not show the External and Provider Queue ID fields on the form. So I right-clicked the title area of the record, opened "Configure" → "Form Layout", searched for external in the Available list, found External and Provider queue ID, and added them to the Selected list.
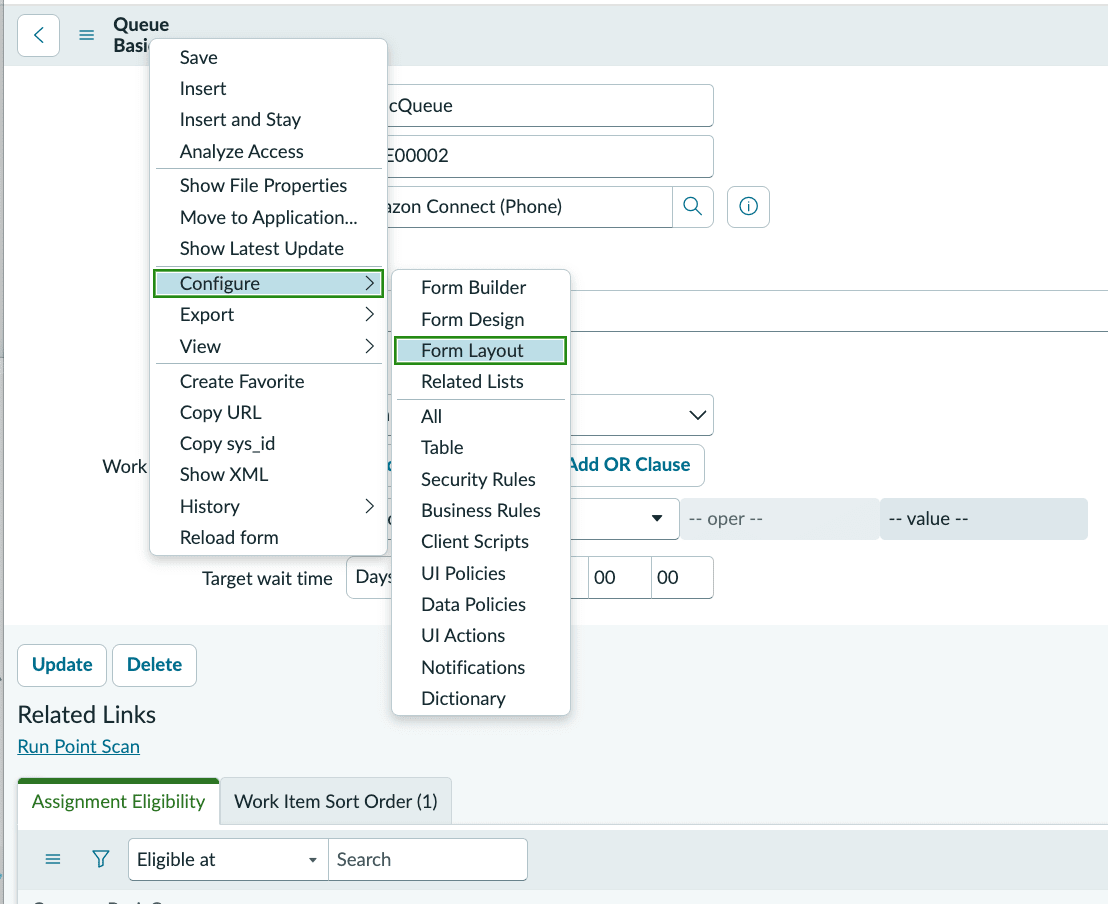
Screen of opening Form Layout from Configure on the BasicQueue record
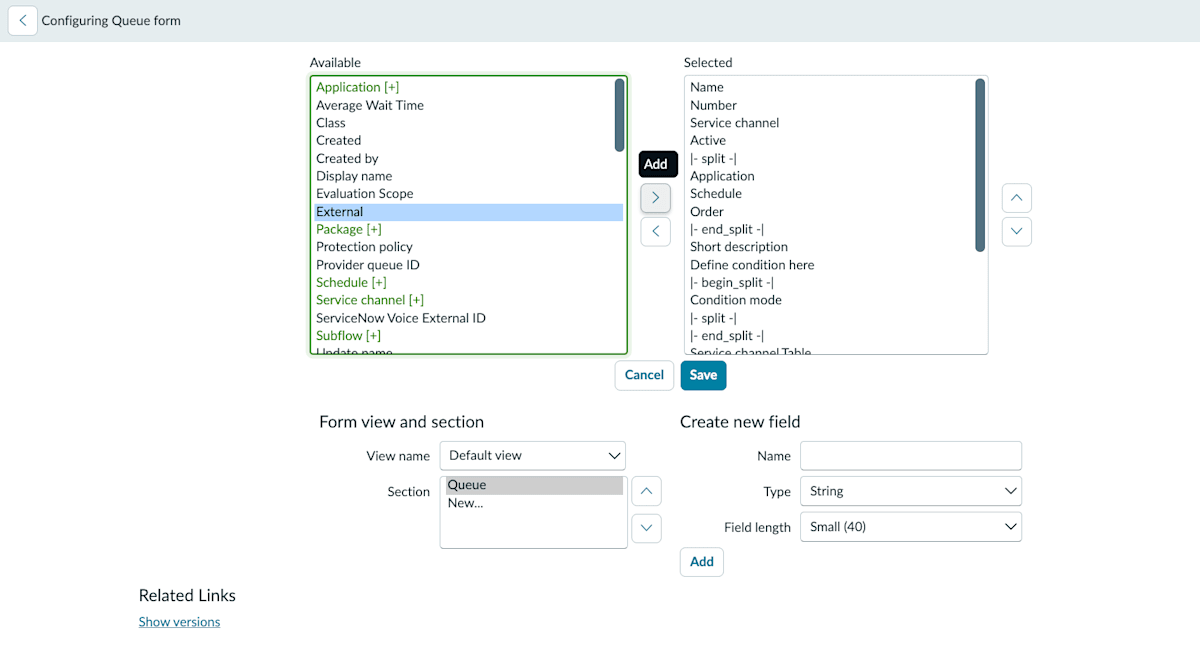
Edit screen of Form Layout. Searching for external in the Available list finds External and Provider queue ID
For the two added fields, I set External to true and Provider Queue ID to the Queue ID of the BasicQueue on the Amazon Connect side (the UUID part at the end of the Queue ARN), then saved.
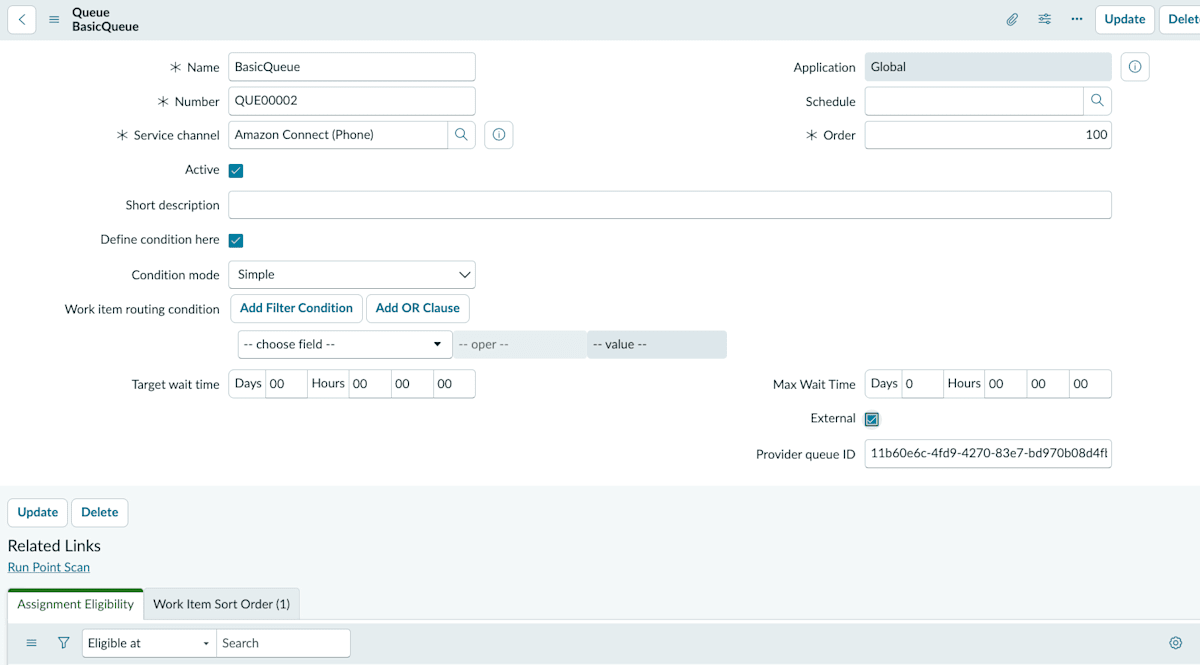
The BasicQueue record saved with External and Provider Queue ID set
After completing the configuration up to this point, when I opened the CSM/FSM Configurable Workspace, the Openframe embedded frame started working.
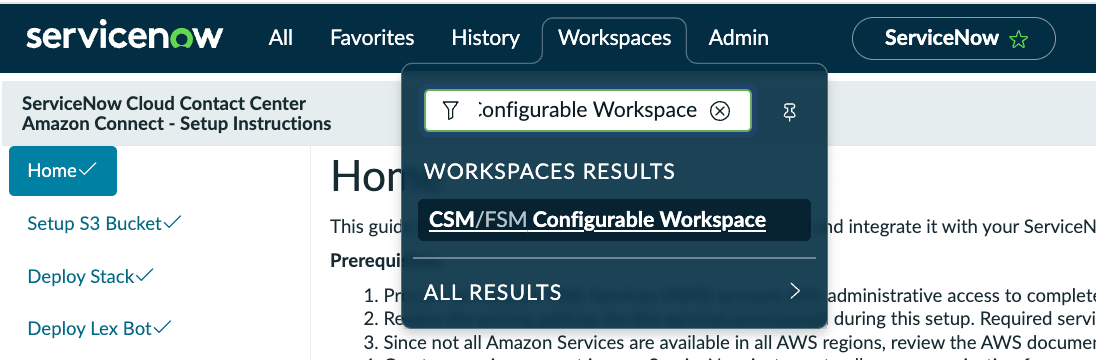
Home screen of the CSM/FSM Configurable Workspace
When I opened the workspace, the Amazon Connect login screen opened automatically in a separate tab.
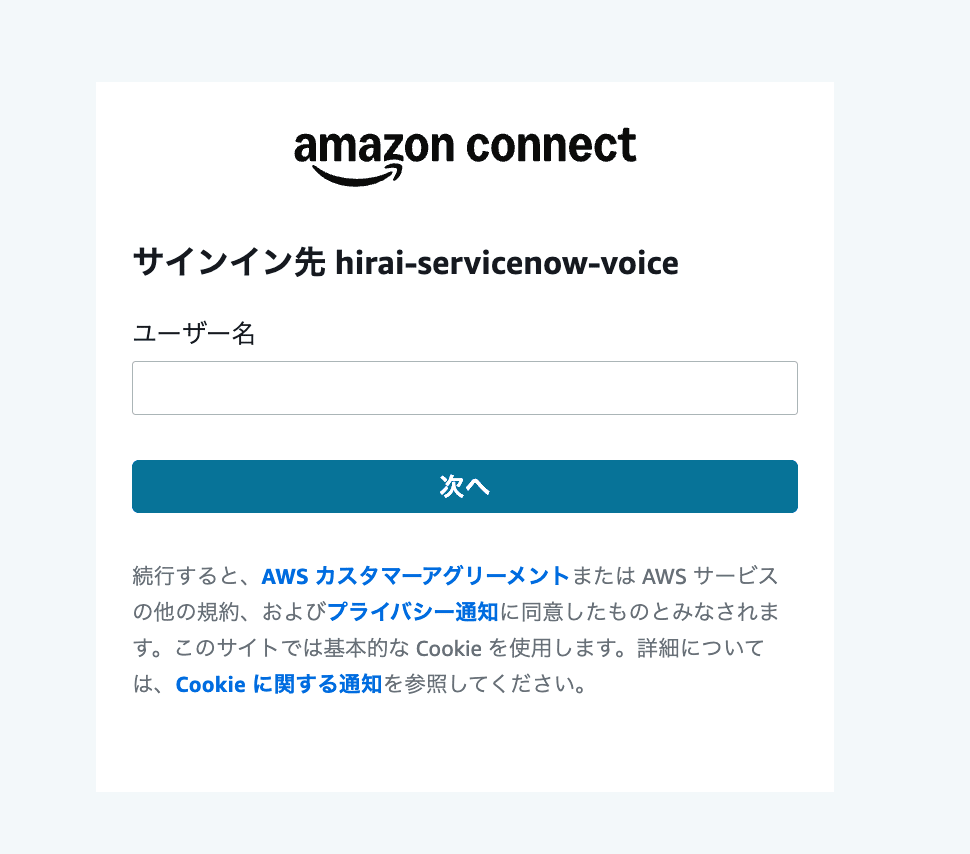
Amazon Connect sign-in screen opened automatically via Openframe
This behavior is normal and by design. Because the Amazon Connect login screen cannot be displayed directly inside an iframe due to X-Frame-Options restrictions, only the first login is done in a separate tab or window, and after a successful login that tab closes and the embedded panel is displayed on the ServiceNow side in an authenticated state.
At this point I logged in as the Amazon Connect agent user, set the status to Available, and proceeded with the operation check.
Operation Check
Calls are operated by opening Agent Softphone from the three-dot (more actions) icon at the top of the screen.

Agent Softphone opened from the three-dot icon
In the inbound test, I called the phone number associated with Amazon Connect, and when the caller waited about 10 seconds without pressing any keypad keys, the call was connected to an operator. If you press 1 or 1999, you will be connected to the voice bot, so please do not enter anything.
In addition, I was able to confirm that an Interaction (IMS0000009) was automatically created on ServiceNow.
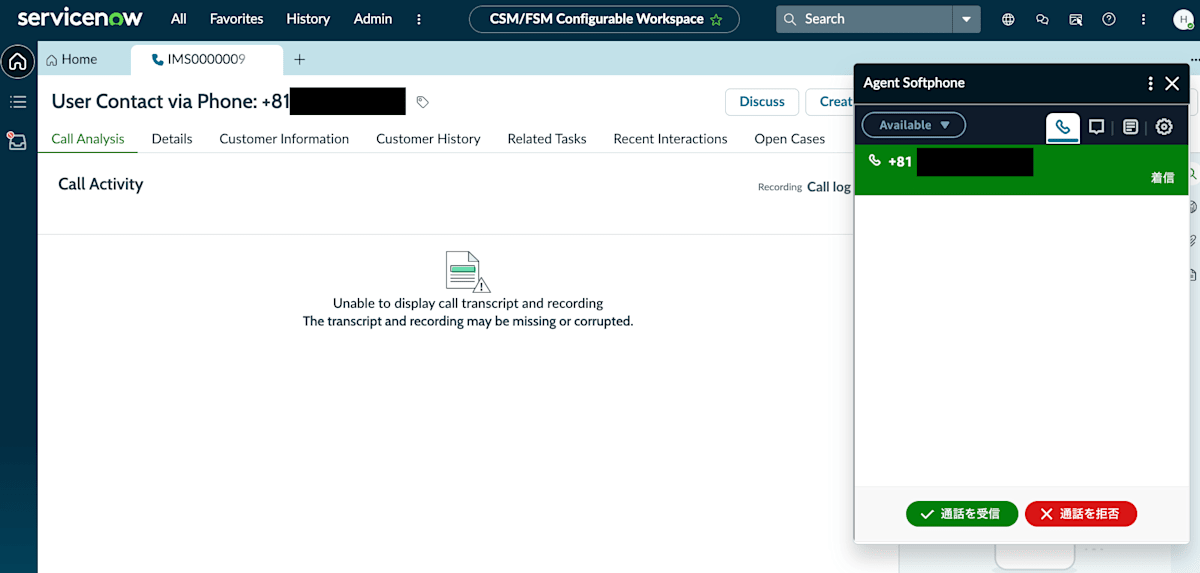
Interaction (IMS0000009) automatically created when the call started
After the call ends, it transitions to the ACW (After Call Work) state.
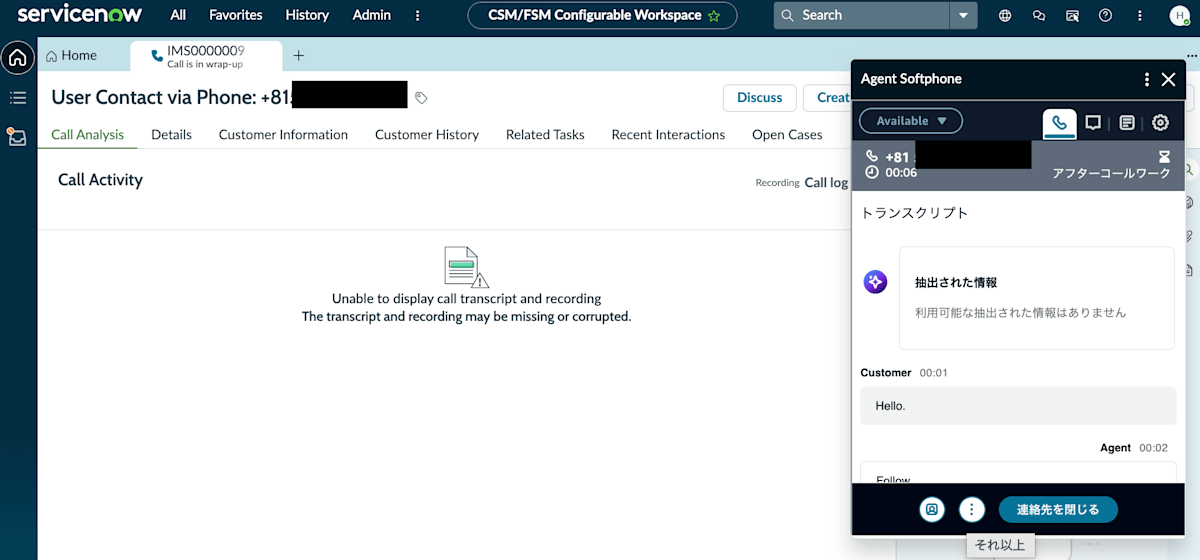
Agent Softphone in the ACW state after the call ended
If there is anything to add on the Details tab, fill it in and Save.
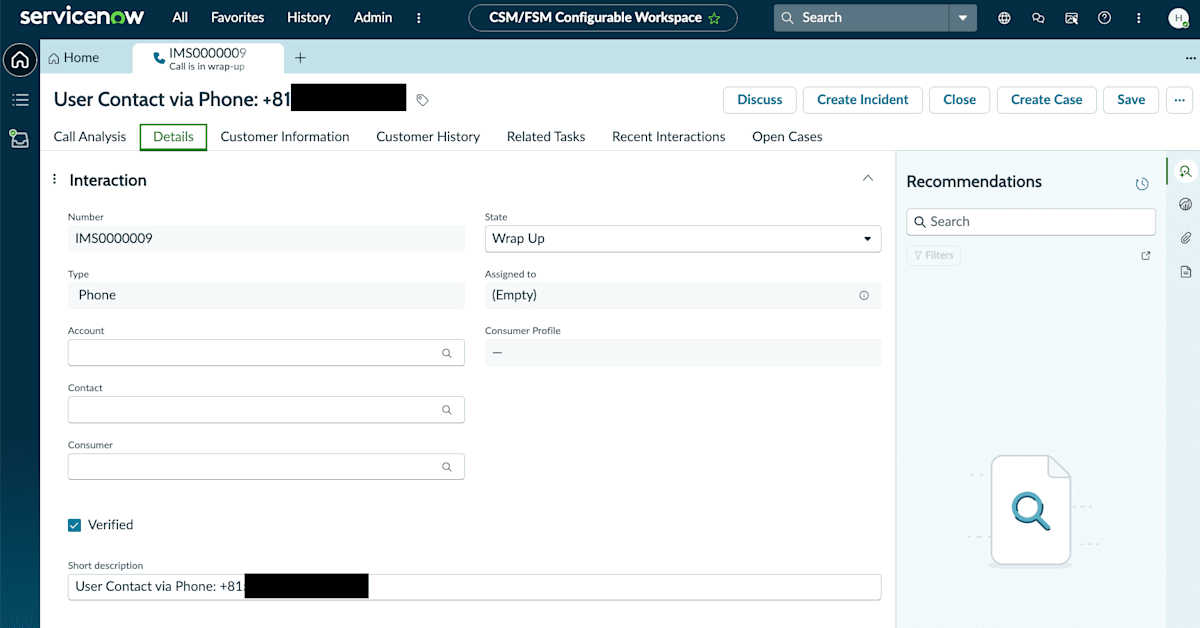
Details tab of the Interaction. Screen for entering additional information and saving
Call Activity (the area where the recording and transcript are displayed) had not yet been output right after the call ended. Since it takes a few minutes for the analysis by Amazon Transcribe and Contact Lens to complete, I waited a while here and checked again.
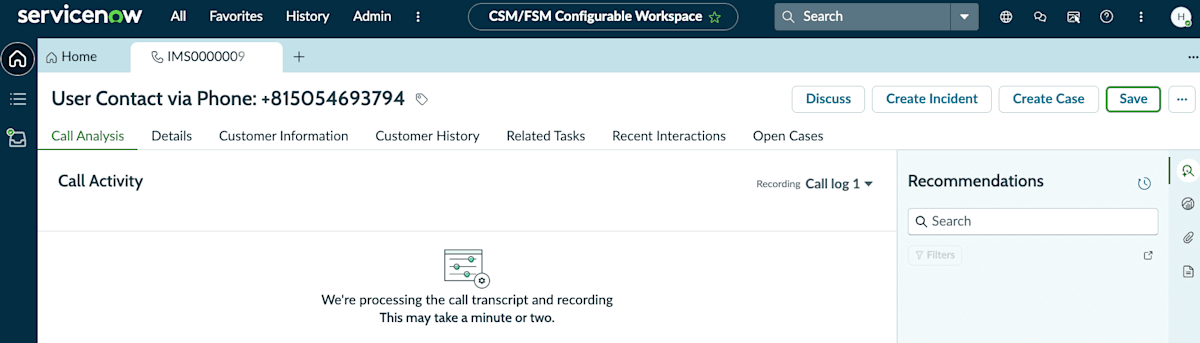
Call Analysis tab right after the call. Call Activity is not yet displayed
When I opened it again a few minutes later, a recording player and the transcript were displayed in Call Activity, and I was able to play back the recording and check the transcript.
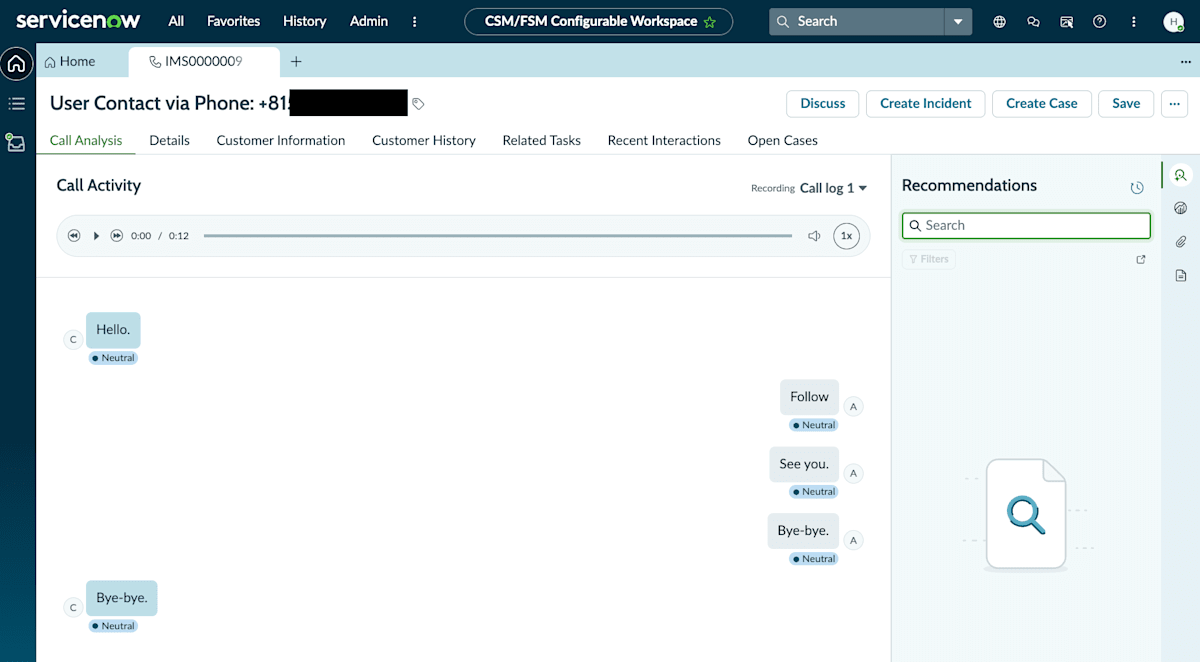
Call Activity displayed a few minutes later. The recording playback controls and the per-utterance transcript can be seen
Summary
I built the standard integration of ServiceNow Voice with Amazon Connect from scratch in a PDI environment and was able to confirm everything from inbound calls to automatic Interaction creation and recording and transcript integration.
Since the following items were skipped this time, in addition to verifying these in the future, I would also like to try whether the contact flow messages, which are currently in English, can be localized into Japanese.
- AWA Voice Routing (Import Contact Flows)
- Transfer to Agent Flow and Transfer to Queue Flow (Import Contact Flows)
- Setup Real Time Transcription
- Create interaction records for outgoing calls (Additional Configuration)
- Set up phone authentication (Additional Configuration)
- Enable Interaction Controls (ICC) (Additional Configuration)
When considering adoption, it seems a good idea to carry out each step of the Setup Guide in order, and then actually place an incoming call to check everything end to end, from Interaction creation to the reflection of the recording and transcript.