![[Resource Release] We conducted a hands-on workshop for building AI agents with Amazon Bedrock AgentCore Managed Harness!](https://images.ctfassets.net/ct0aopd36mqt/7M0d5bjsd0K4Et30cVFvB6/5b2095750cc8bf73f04f63ed0d4b3546/AgentCore2.png?w=3840&fm=webp)
[Resource Release] We conducted a hands-on workshop for building AI agents with Amazon Bedrock AgentCore Managed Harness!
This page has been translated by machine translation. View original
Introduction
Hello, I'm Kamino from the consulting department who loves Amazon Bedrock AgentCore.
The other day, I hosted a hands-on event using Amazon Bedrock AgentCore Managed Harness. The content was about creating an AI agent using only the AWS console without writing any code. It's a simple experience where you start from a chatbot and grow an AI agent by adding tools step by step.
Since we're at it, I'd like to publish the hands-on instructions so anyone can try them!
The slide materials used in the lecture part are published on SpeakerDeck. They summarize the overall picture of AgentCore and the positioning of Managed Harness, so it's smooth if you skim through them before starting the hands-on, but since it's also a director's cut of previous materials, it's fine to just take a quick look.
Managed Harness
Before getting into the hands-on instructions, let me briefly introduce Managed Harness.
Managed Harness allows you to behave as an AI agent simply by configuring the model, tools to integrate, and system prompt on the console, without implementing any code on the user side.
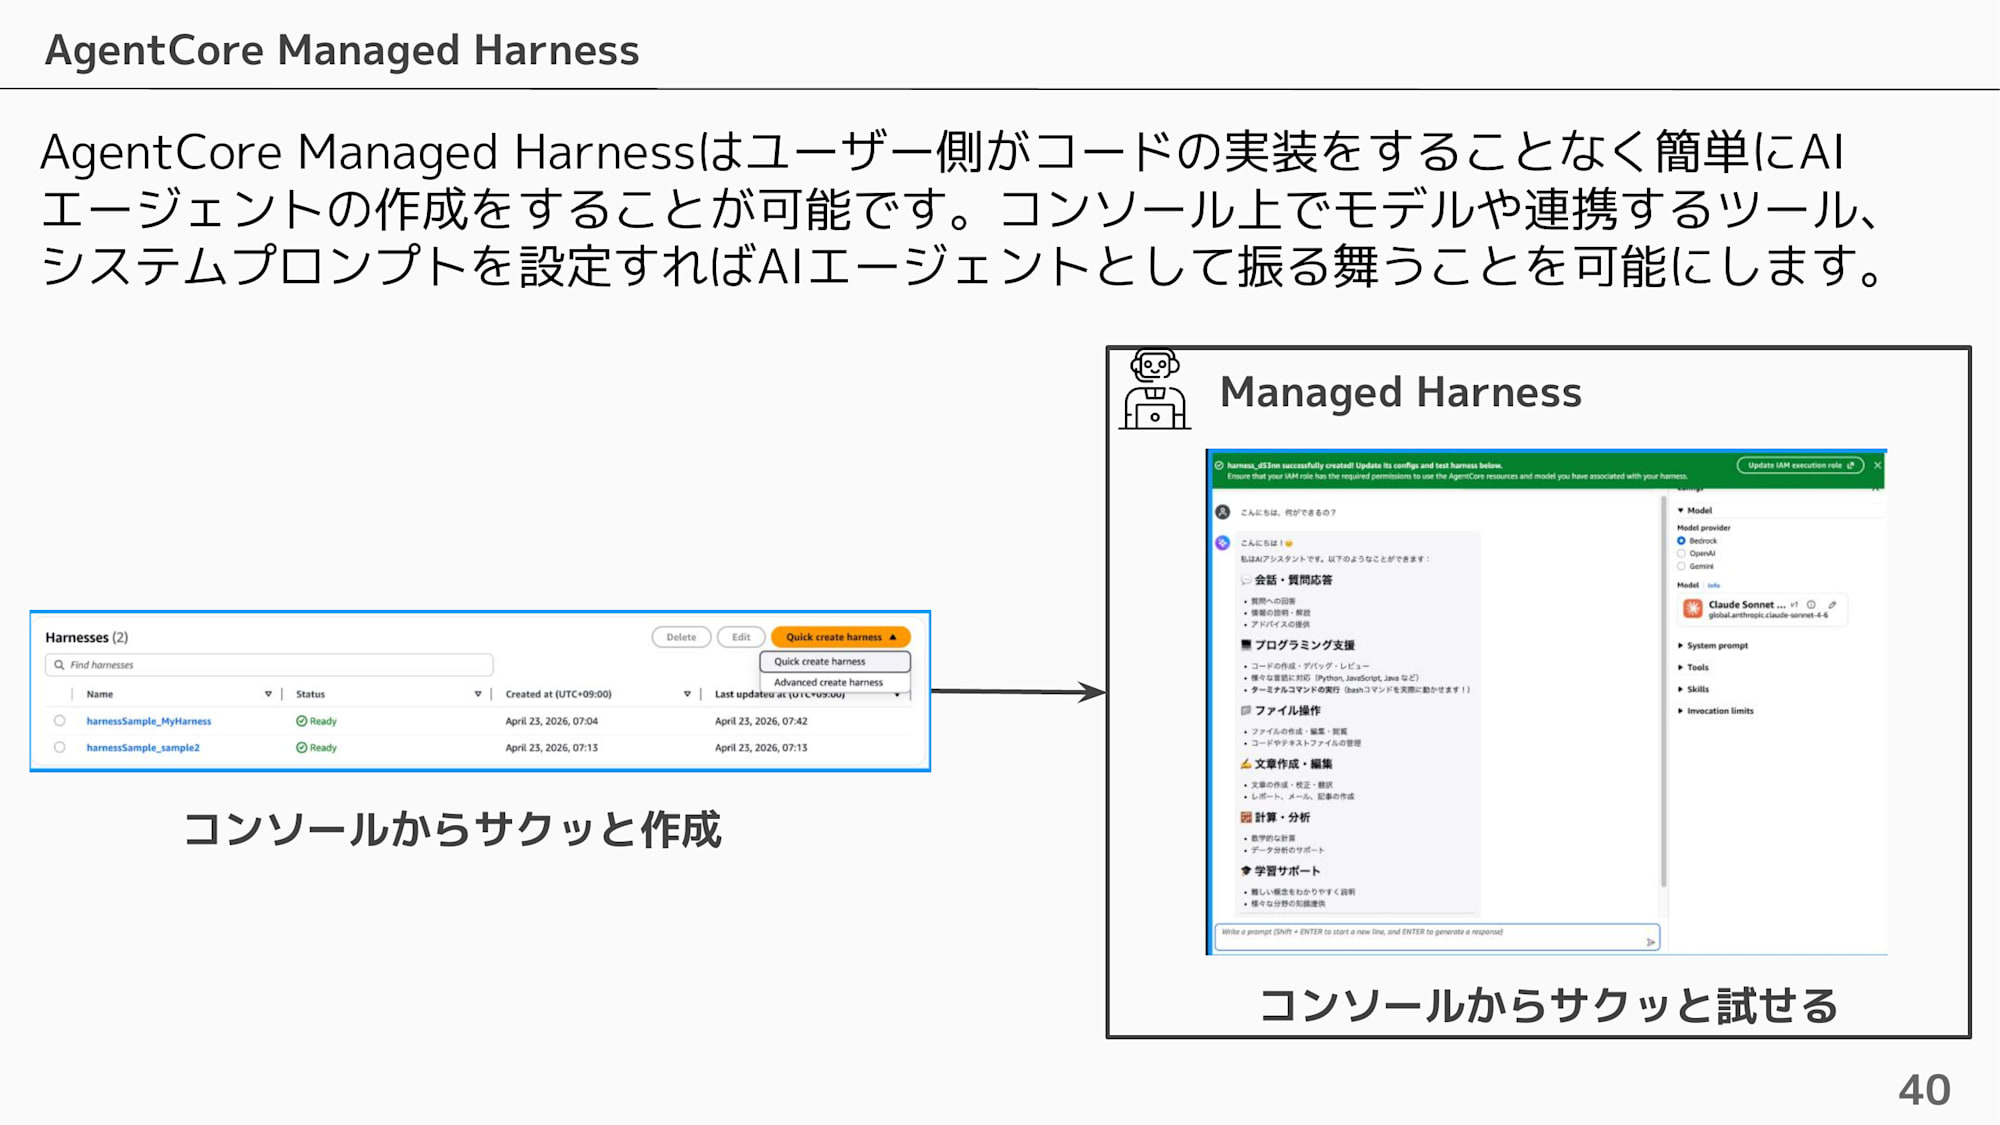
The big appeal is that you can quickly create it on the console and quickly try it from the playground screen!
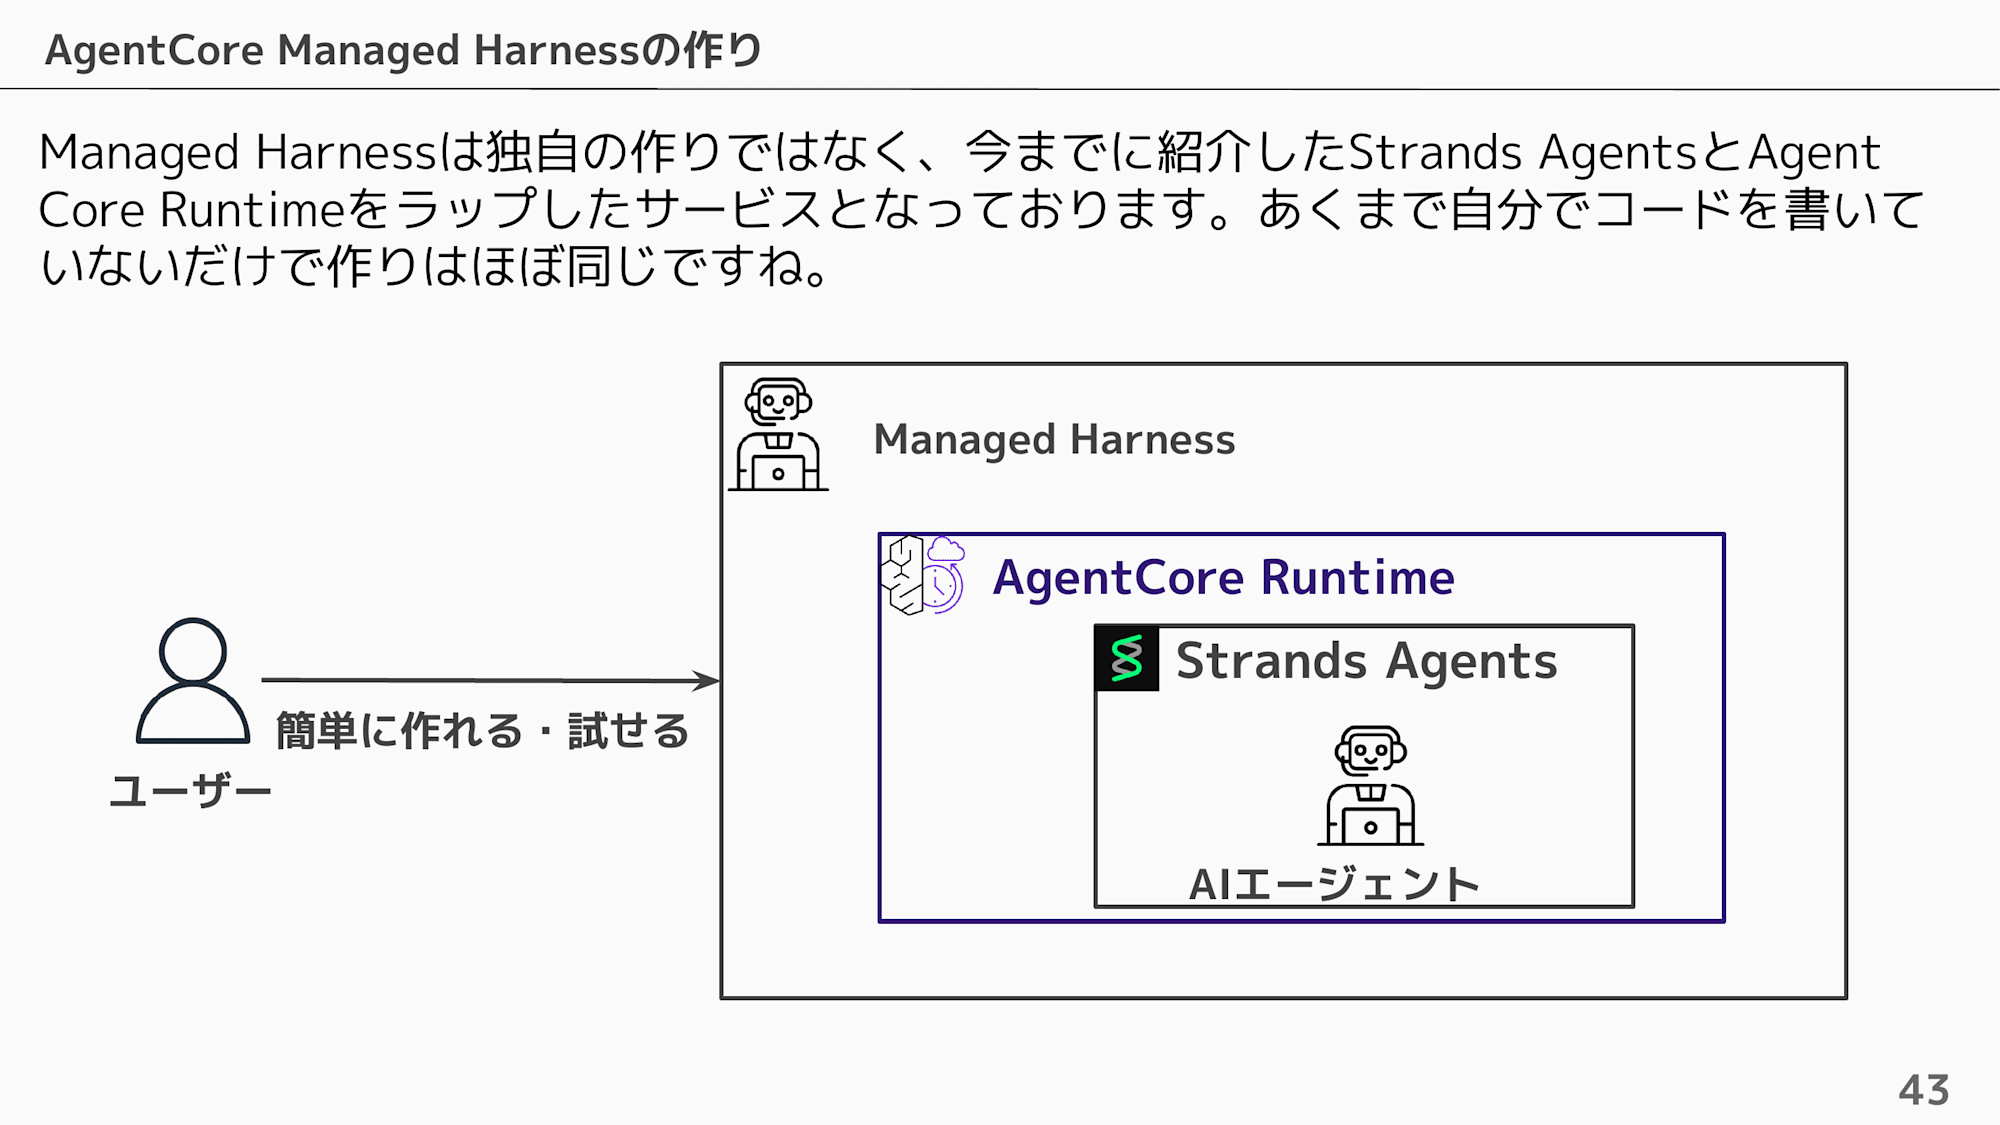
Internally, it is a service that wraps Strands Agents and AgentCore Runtime. It's essentially the same structure, just without writing the code yourself.
As configuration items, you can freely combine System Prompt / Model / Memory / Gateway / Browser / Code Interpreter / Skill / Remote MCP Server.

Hands-on Structure
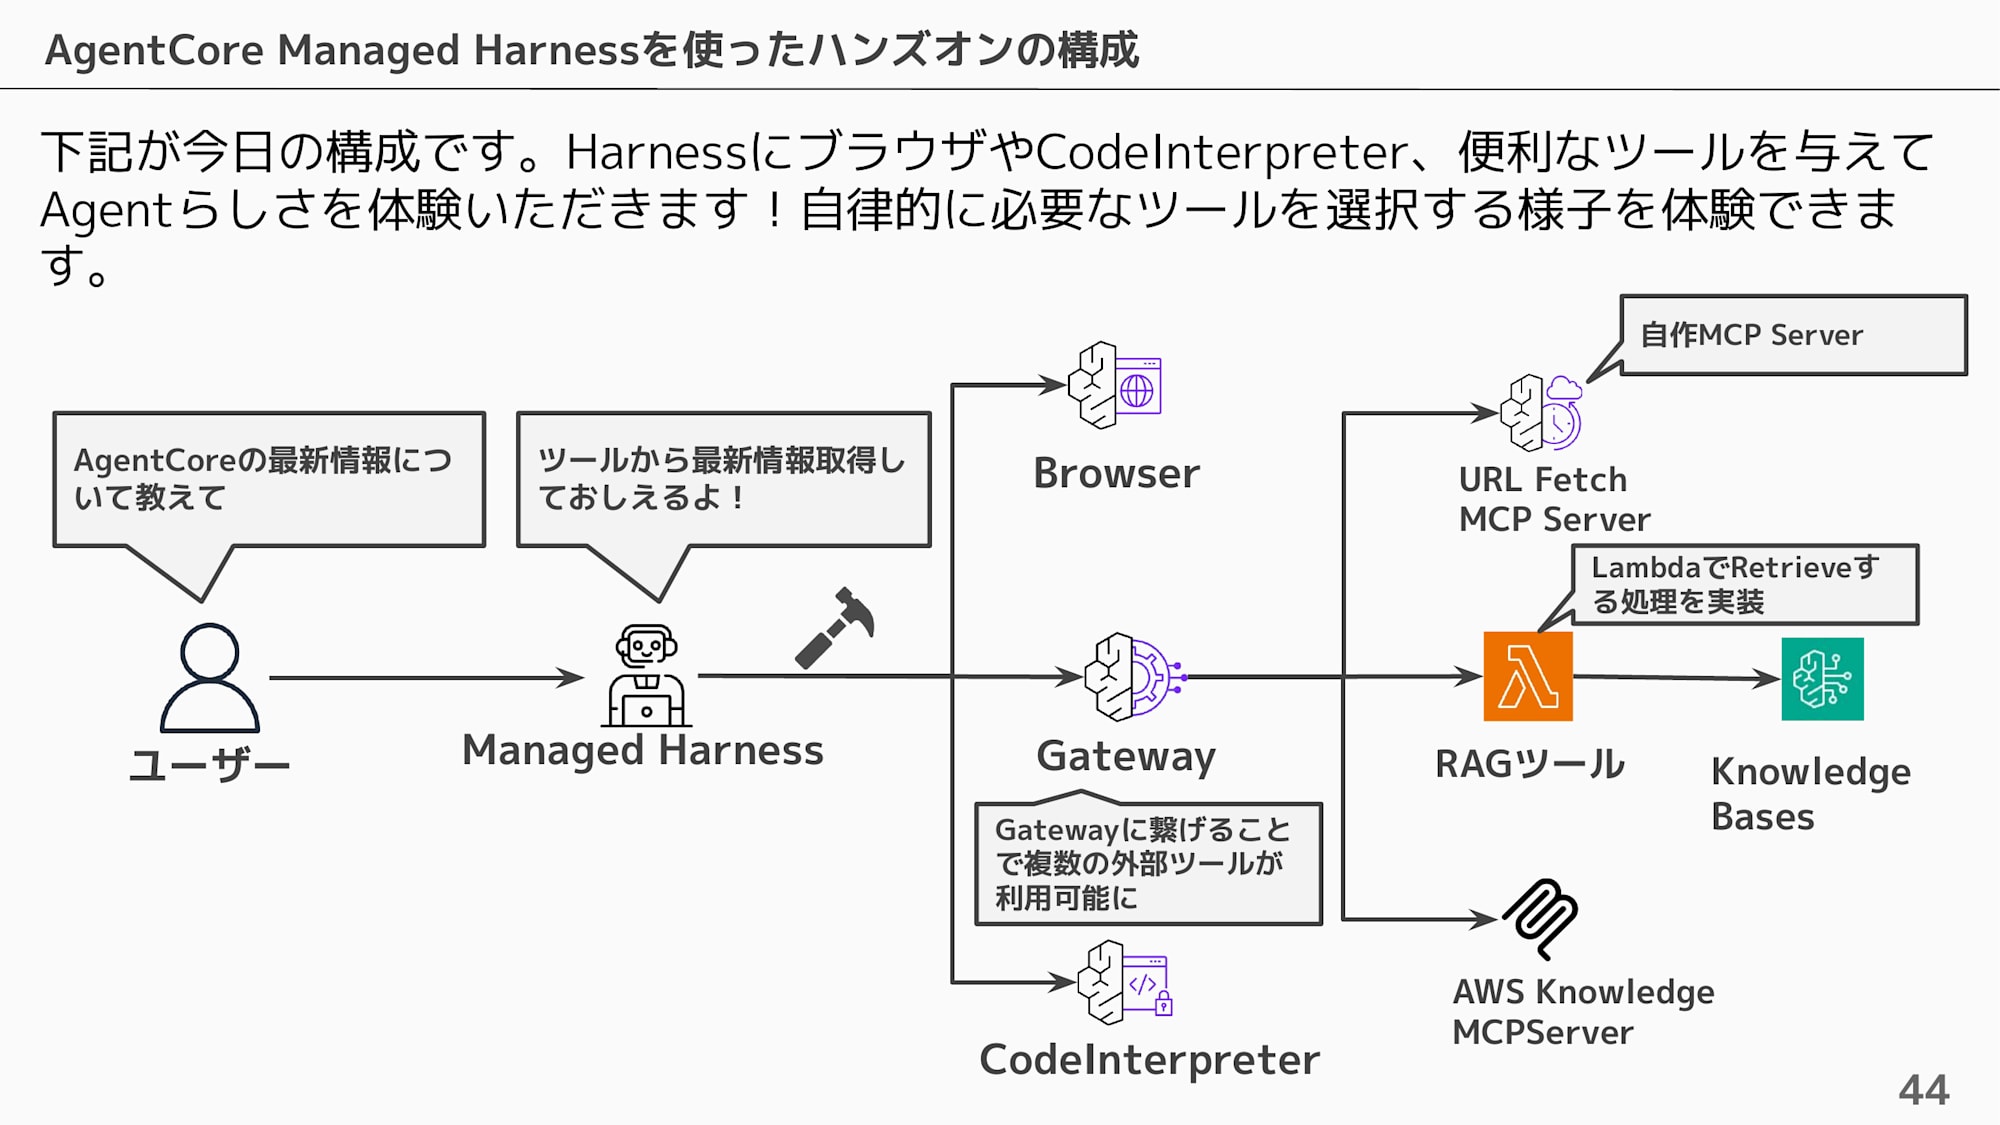
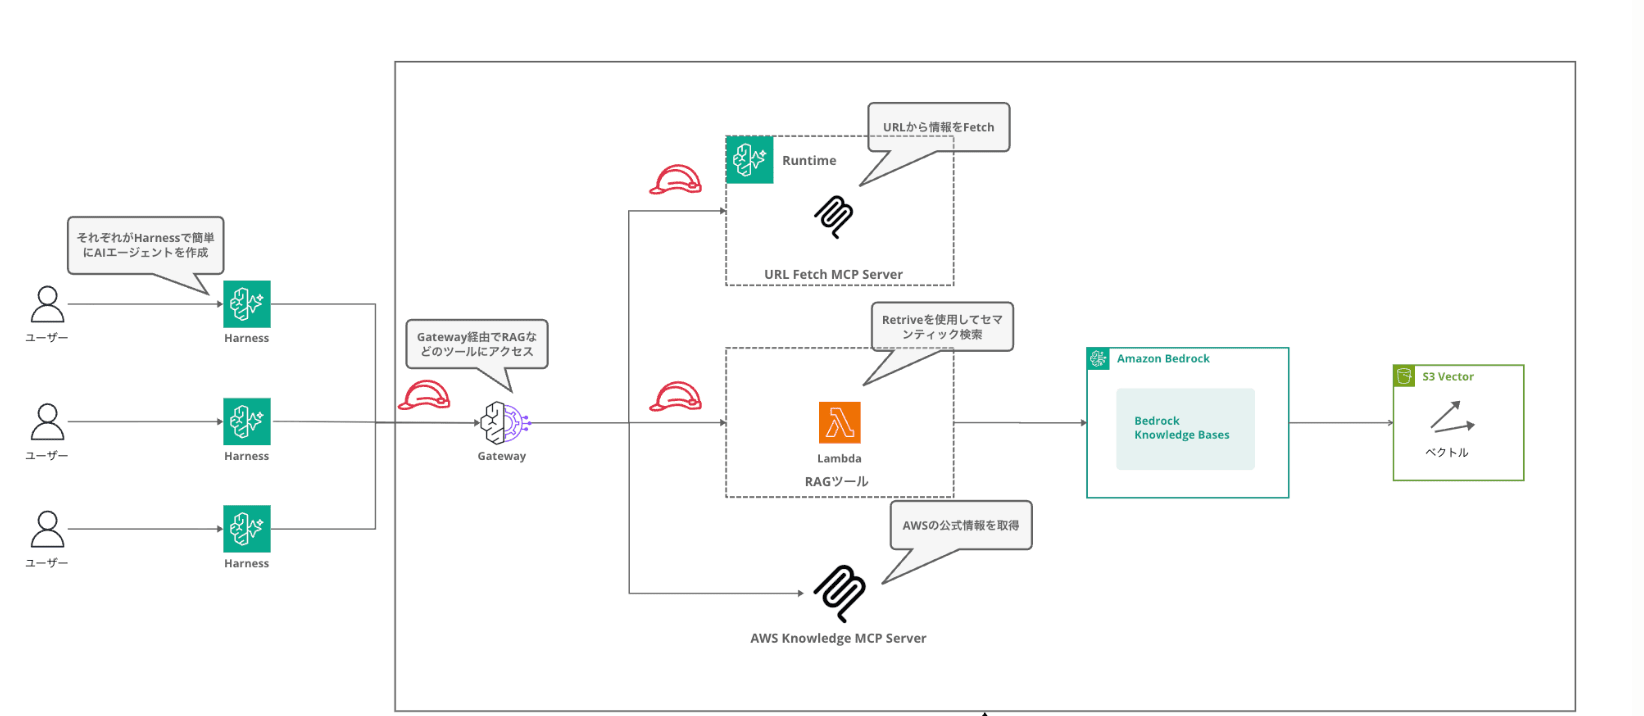
In this hands-on, we'll give Managed Harness Browser, Code Interpreter, and RAG tools via Gateway, and have you experience how the agent autonomously selects the necessary tools.
The hands-on proceeds with the following part breakdown.
| Part | Content |
|---|---|
| Part 1 | Create a Harness and interact with it |
| Part 2 | Change behavior with prompts |
| Part 3 | Retrieve information from the Web — Browser |
| Part 4 | Write code and have it calculate — Code Interpreter |
| Part 5 | Search internal documents — Gateway / RAG |
| Part 6 | Check what's happening behind the scenes — Observability |
| Bonus | Evaluate the agent — Evaluations |
Prerequisites
| Item | Content |
|---|---|
| Time Required | About 60 minutes (excluding advance preparation) |
| Region | us-east-1 (N. Virginia) |
| Requirements | AWS account (Administrator privileges recommended) |
| Local Environment | Node.js 24, Docker (required for Gateway deployment in advance preparation) |
| CDK | CDK Bootstrap complete (npx cdk bootstrap) |
Parts 1–4 can be tried immediately with just an AWS account. To experience the Gateway / RAG in Part 5, you need to deploy the Gateway and Knowledge Base with CDK in advance.
Advance Preparation
Building Gateway and Knowledge Base (CDK)
Deploy the Gateway and Knowledge Base used in Part 5 with CDK. The CDK project is published on GitHub. During the hands-on event, I set it up in the account in advance and attendees did not do this themselves.
It may be best for an administrator or someone familiar with CDK to do this ahead of time.
Deploying this kit makes the following 3 tools available via Gateway.
| Target | Tool Name | Description | Implementation |
|---|---|---|---|
| kb-retrieve | retrieve_documents | Document search from Knowledge Base | Lambda |
| web-tools | fetch_webpage | Web page text retrieval | FastMCP on Runtime |
| aws-knowledge | search_documentation etc. | AWS official documentation search | AWS Hosted MCP Server |
CDK Deploy
# Clone repository
git clone https://github.com/yuu551/agentcore-gateway-kit.git
cd agentcore-gateway-kit

# Install dependencies
npm install

# Check template
npx cdk synth

# Deploy (2 stacks: KnowledgeBase + Gateway)
npx cdk deploy --all
Deployment takes a few minutes. When complete, KnowledgeBaseId / DataSourceId / DataSourceBucketName will be displayed in the CDK Output. Please note these down as they will be used in later steps.
Knowledge Base Sync
Right after deployment, documents are not yet synchronized, so run the sync.
aws bedrock-agent start-ingestion-job \
  --knowledge-base-id <KnowledgeBaseId> \
  --data-source-id <DataSourceId>
Sample data with an AgentCore overview document is placed in the S3 bucket, so once sync is complete you can immediately try RAG search.
If you want to add your own documents, just upload them to the S3 bucket and re-run the sync.
aws s3 cp my-document.txt s3://<DataSourceBucketName>/

aws bedrock-agent start-ingestion-job \
  --knowledge-base-id <KnowledgeBaseId> \
  --data-source-id <DataSourceId>
For those who want to know more about building the Gateway CDK, please also refer to the article below.
AWS Account Preparation
- Go to https://console.aws.amazon.com/ and sign in
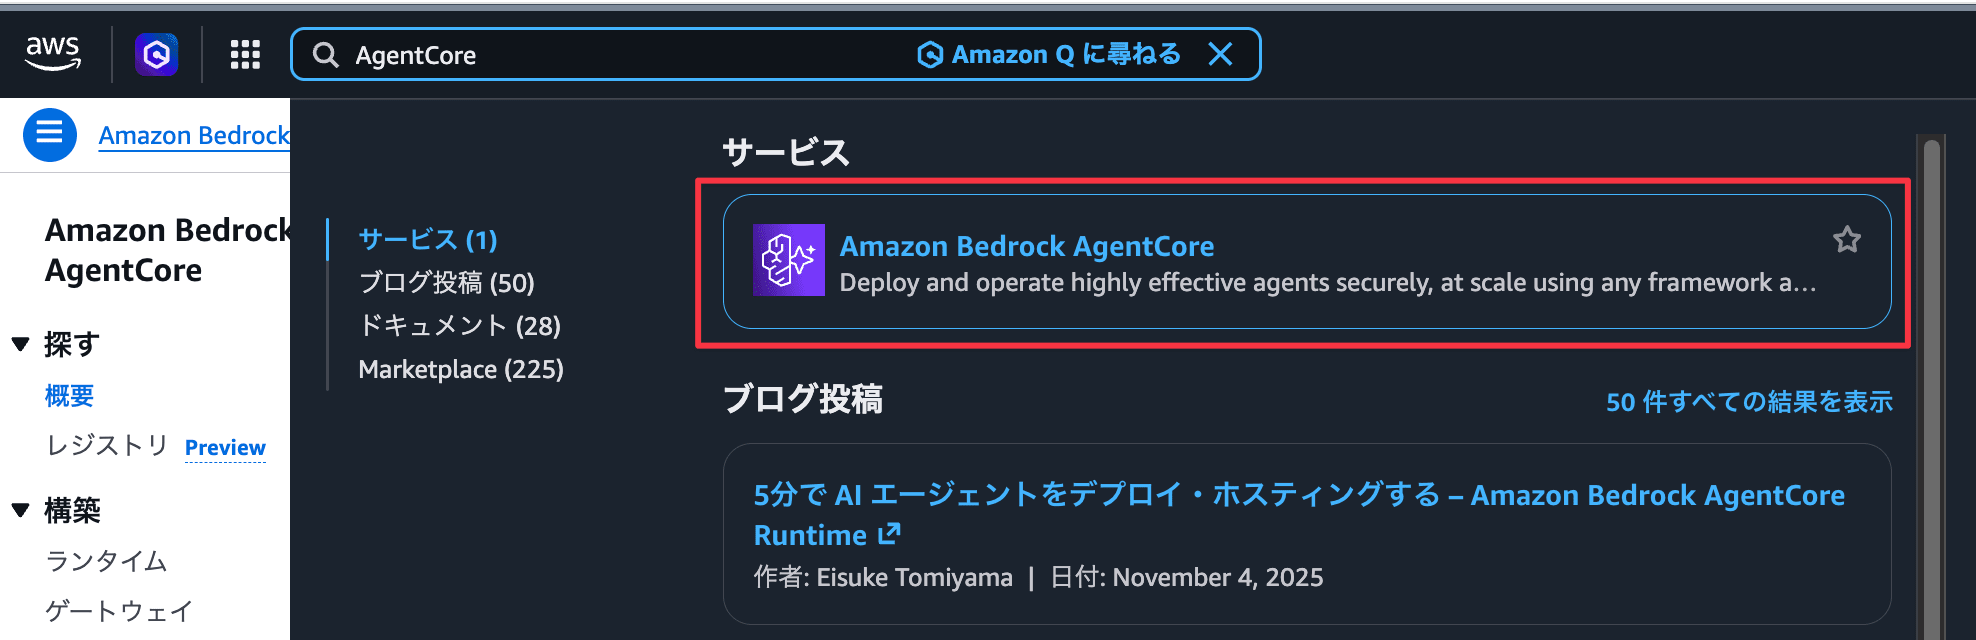
- Change the region in the upper right of the screen to "US East (N. Virginia)" us-east-1

- Type "AgentCore" in the search bar and click "Amazon Bedrock AgentCore"
Advance preparation is now complete! From here we'll get into the hands-on.
Part 1: Create a Harness and Interact with It
Create an AI agent in just a few clicks and have your first interaction.
1-1. Create a Harness
- From the left menu of the Bedrock console, click "Harness preview" under "Build"
- Click the "Quick create harness" button in the upper right of the screen
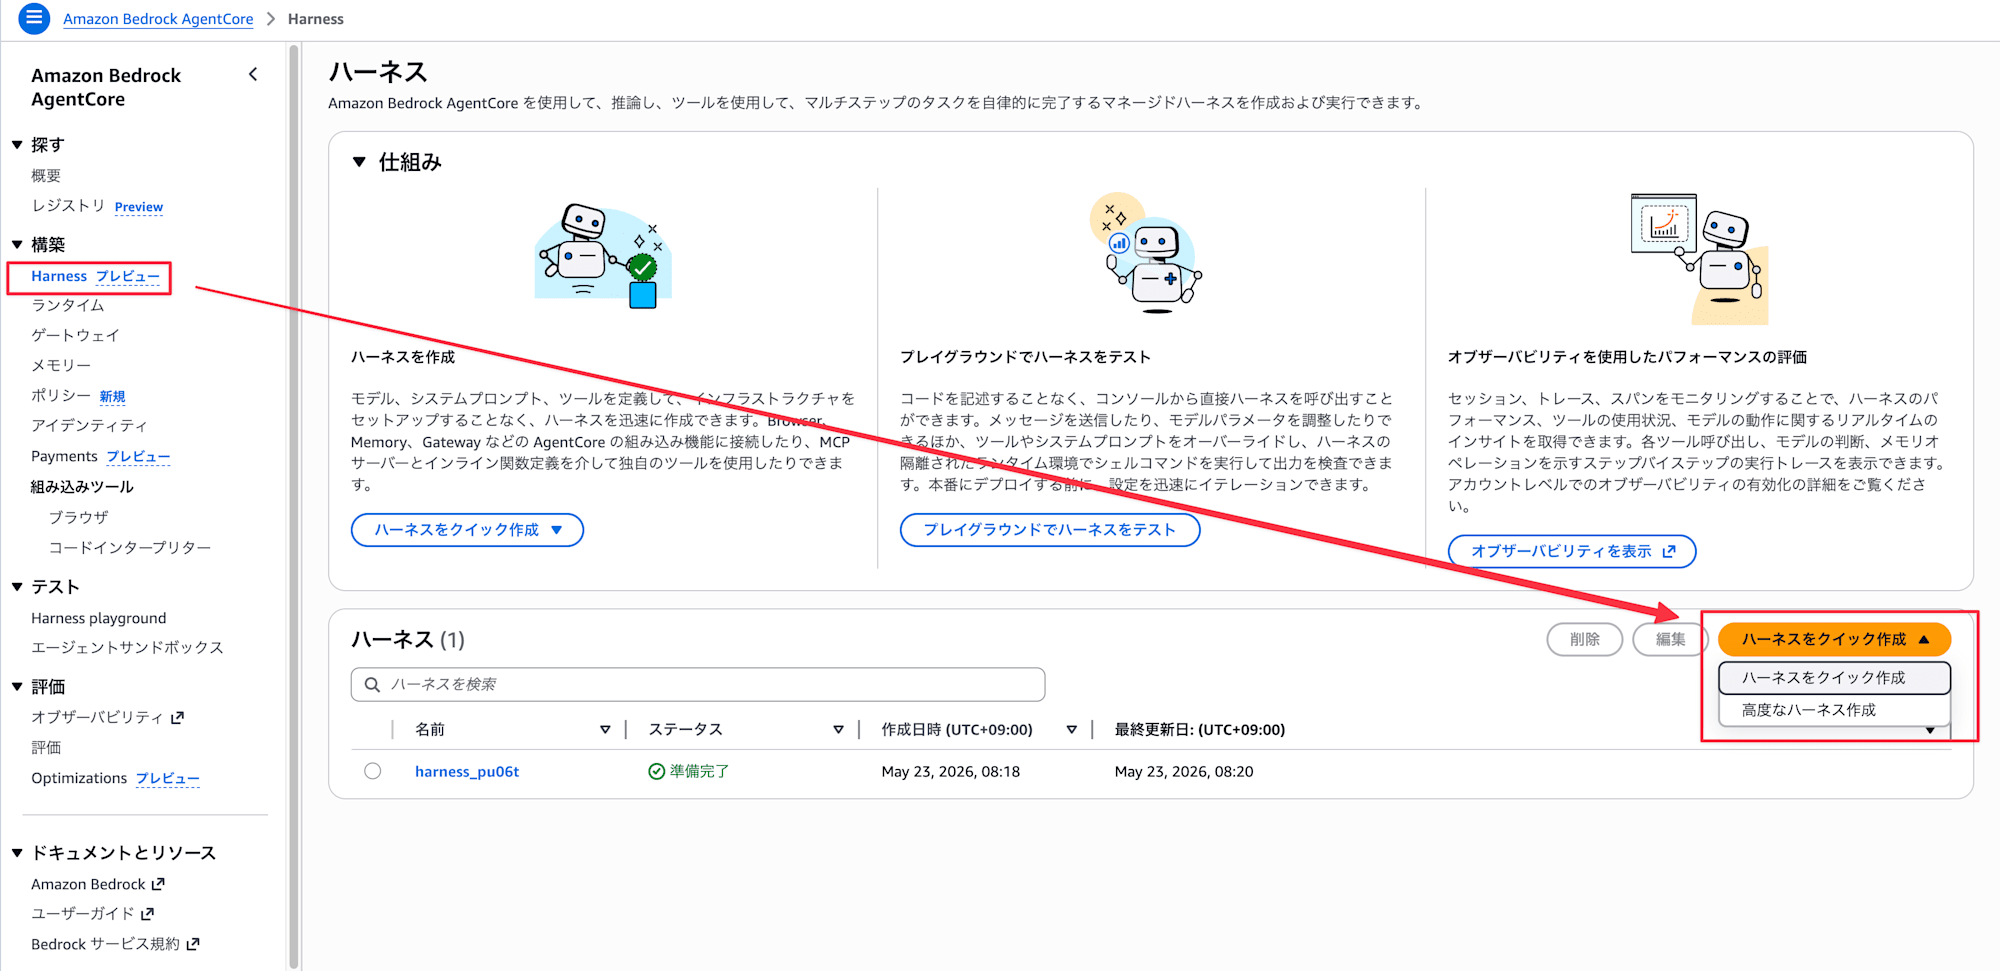
- It will be automatically generated in about 30 seconds and you'll be redirected to the playground screen
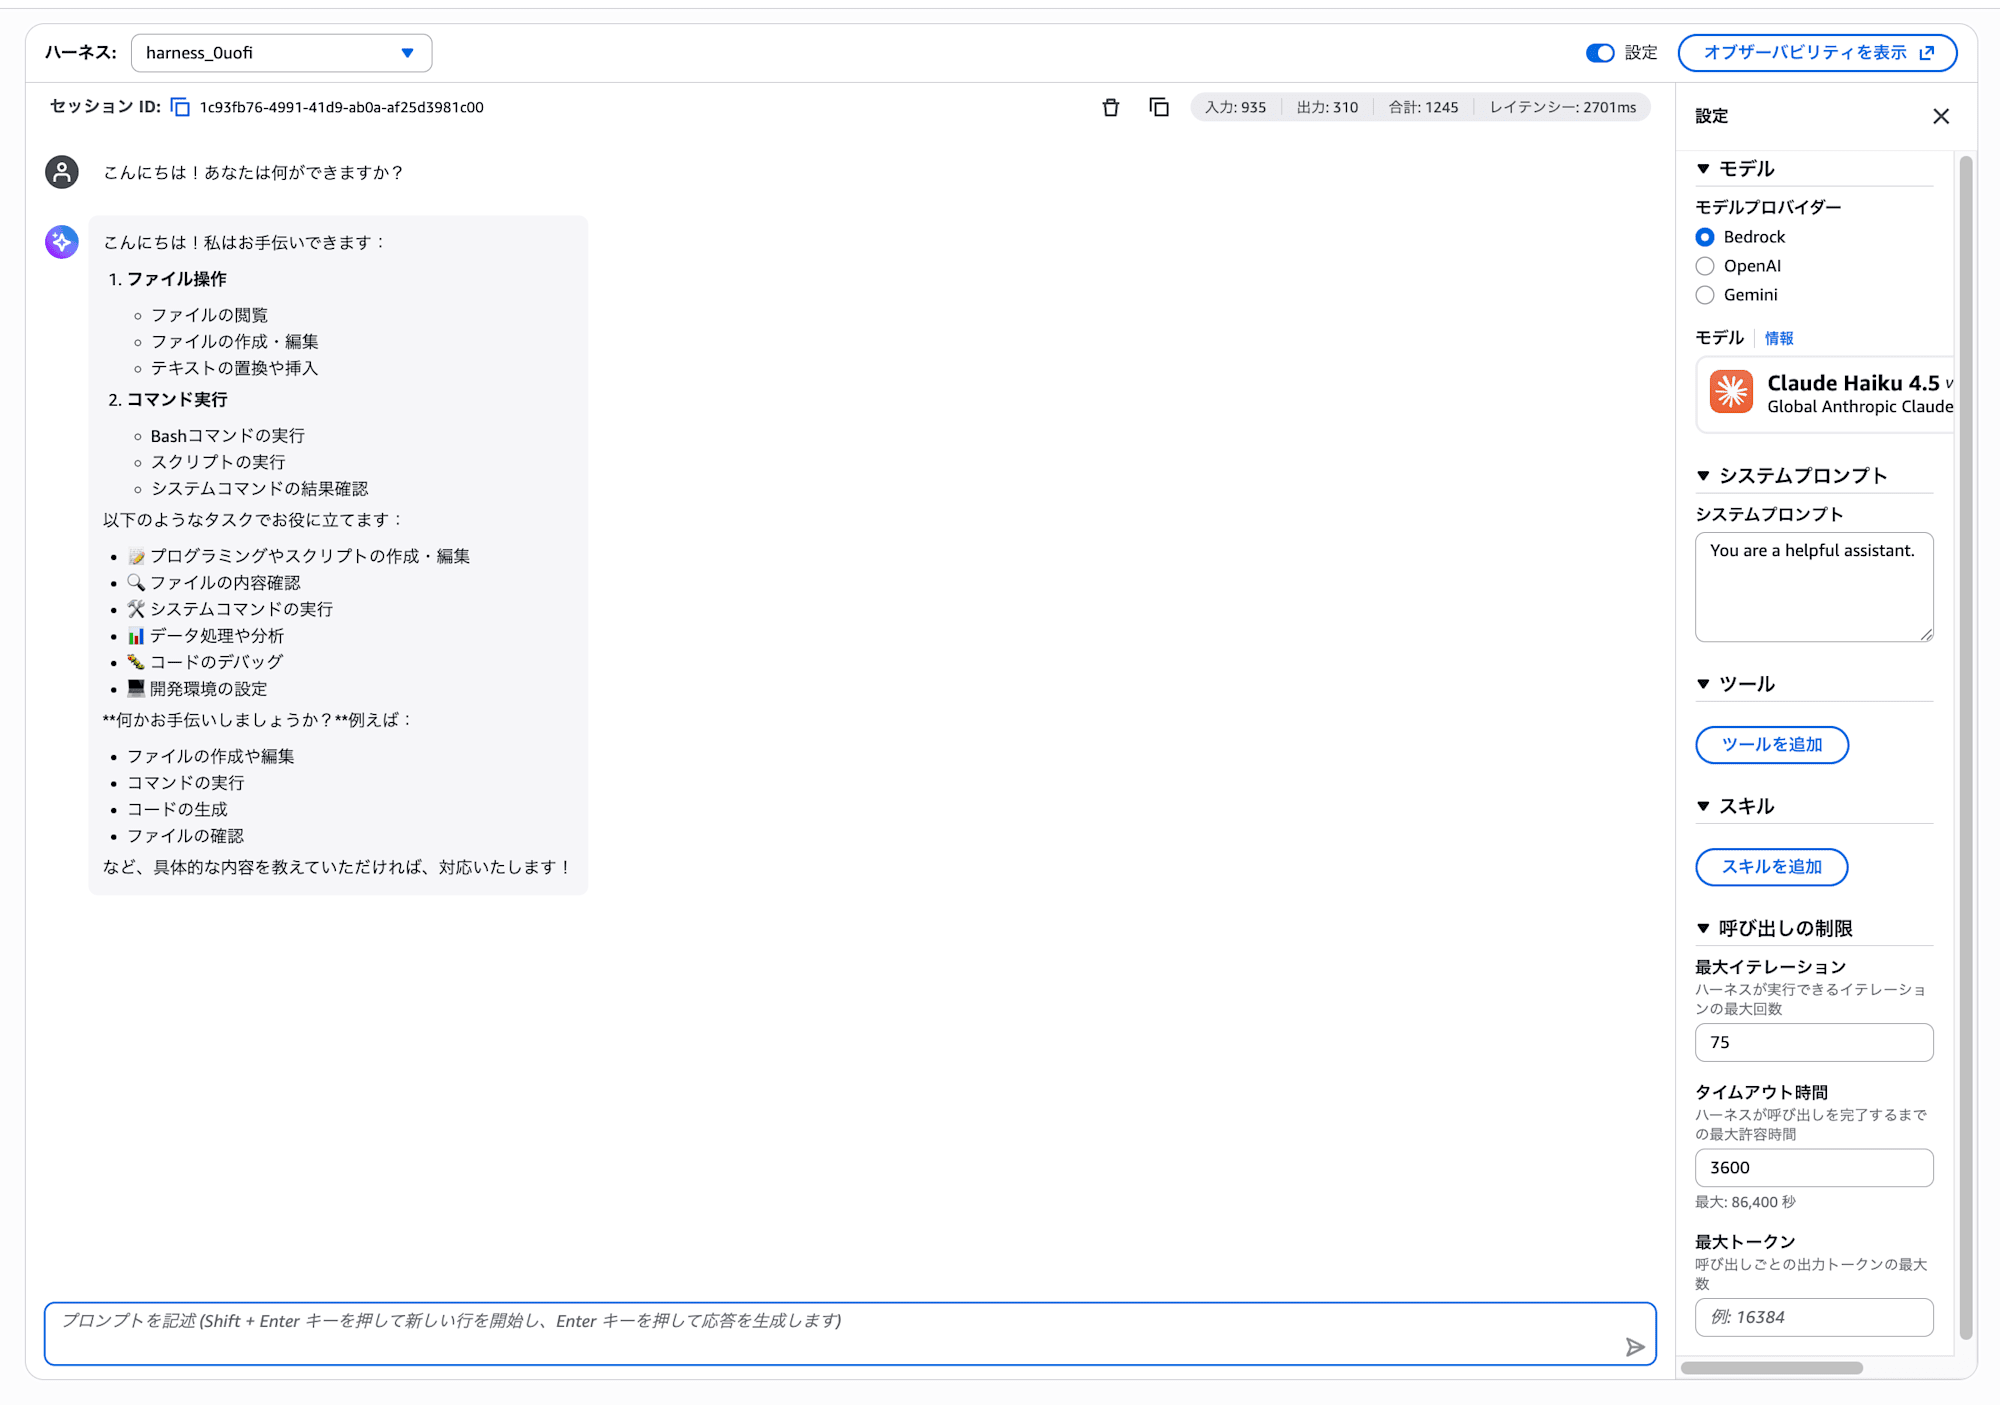
Success if the playground screen with a chat input field is displayed!
1-2. Try Changing the Model
Let's experience how easily the model can be changed.
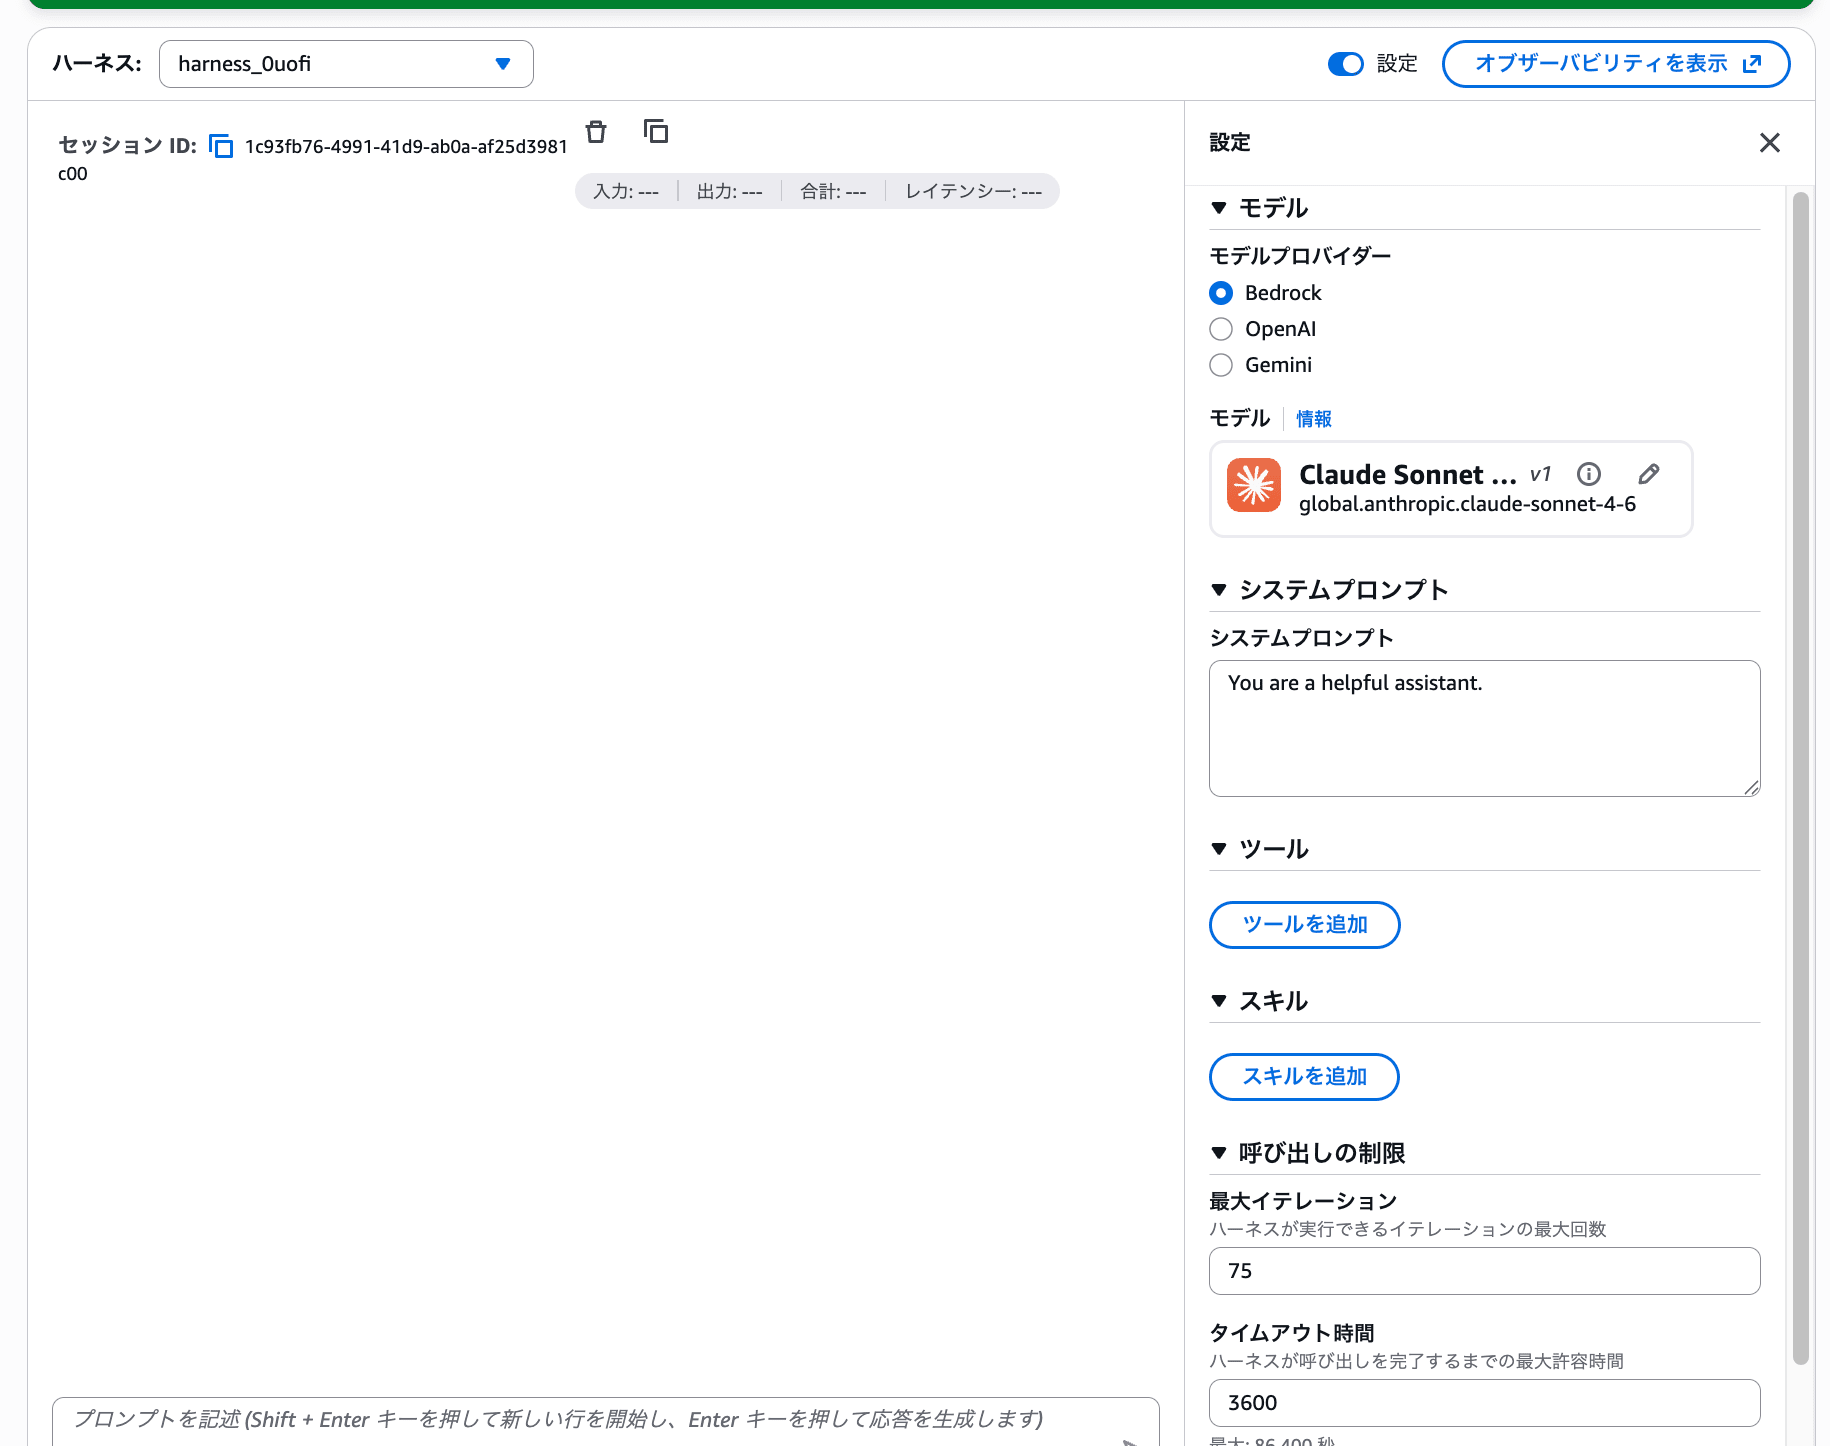
- Turn the "Settings" toggle ON in the upper right of the playground screen
- A settings panel will appear on the right
- Click the pencil icon next to the model name in the "Model" section
- The model selection dialog will open
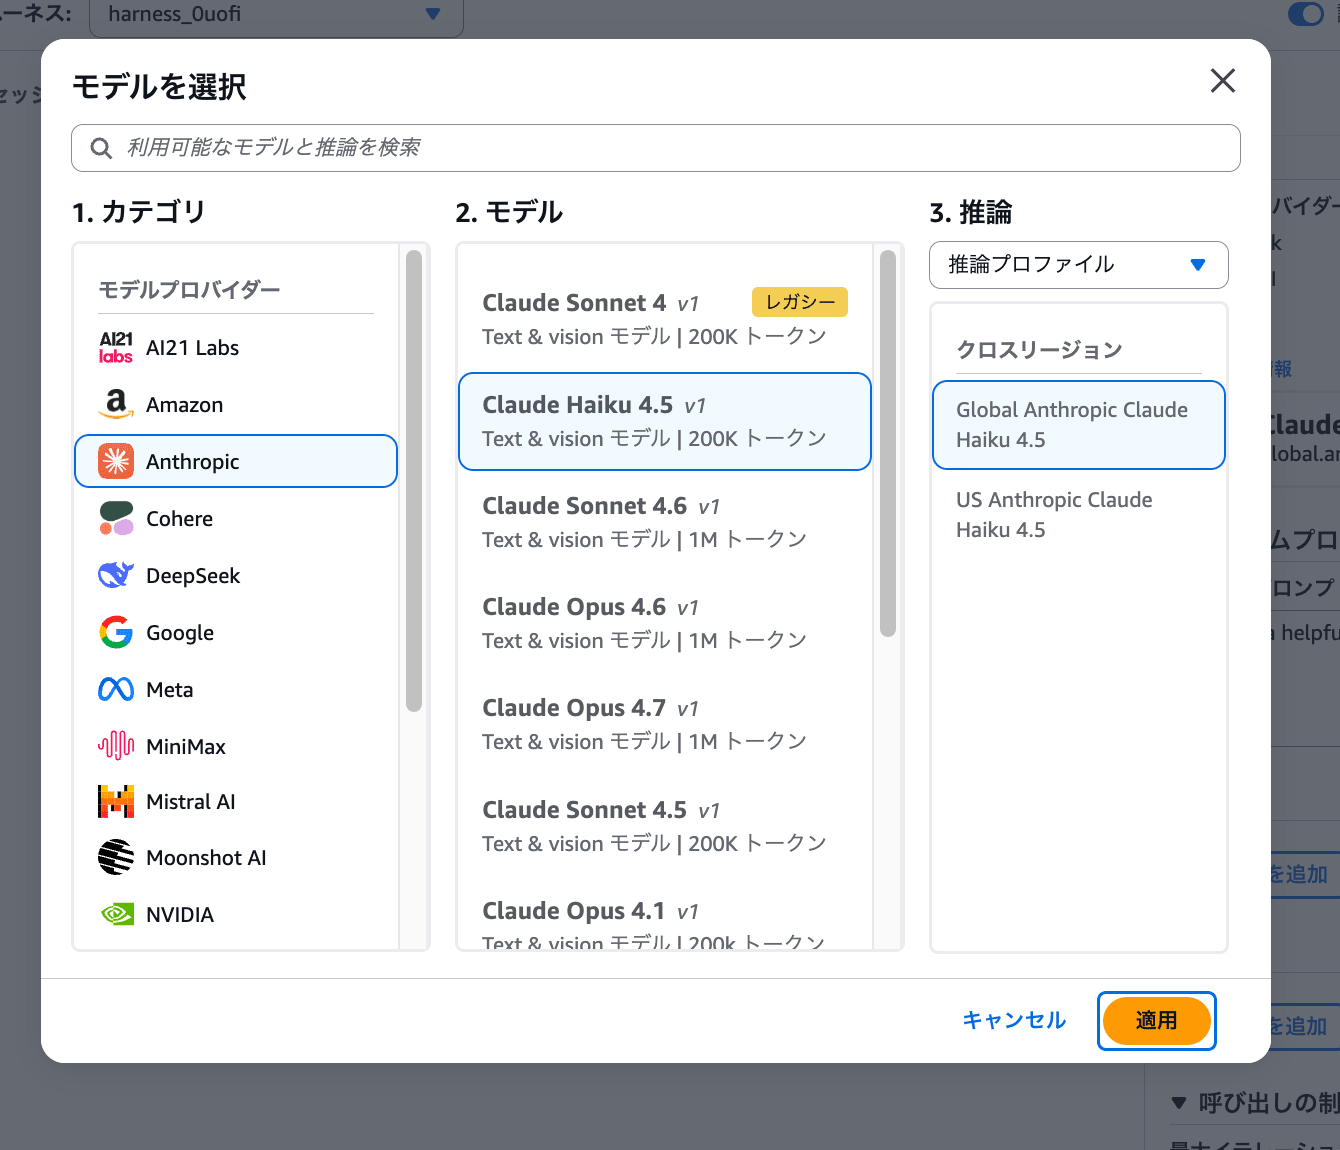
You can choose from models from various providers such as Anthropic, Amazon, Google, and Meta. This time, select Claude Haiku 4.5 and click "Apply".
Being able to switch between Bedrock / OpenAI / Gemini model providers with one click is also a feature of Managed Harness.
1-3. First Interaction
Type the following in the chat input field and send it.
Hello! What can you do?
It's OK if you get a self-introduction-like response!
1-4. Try an "Agent-like" Instruction
Next, try sending this.
Please research the latest information on Amazon Bedrock AgentCore and summarize the key features in a table.
How was it? It should only be able to answer within the model's knowledge and unable to retrieve the latest information.
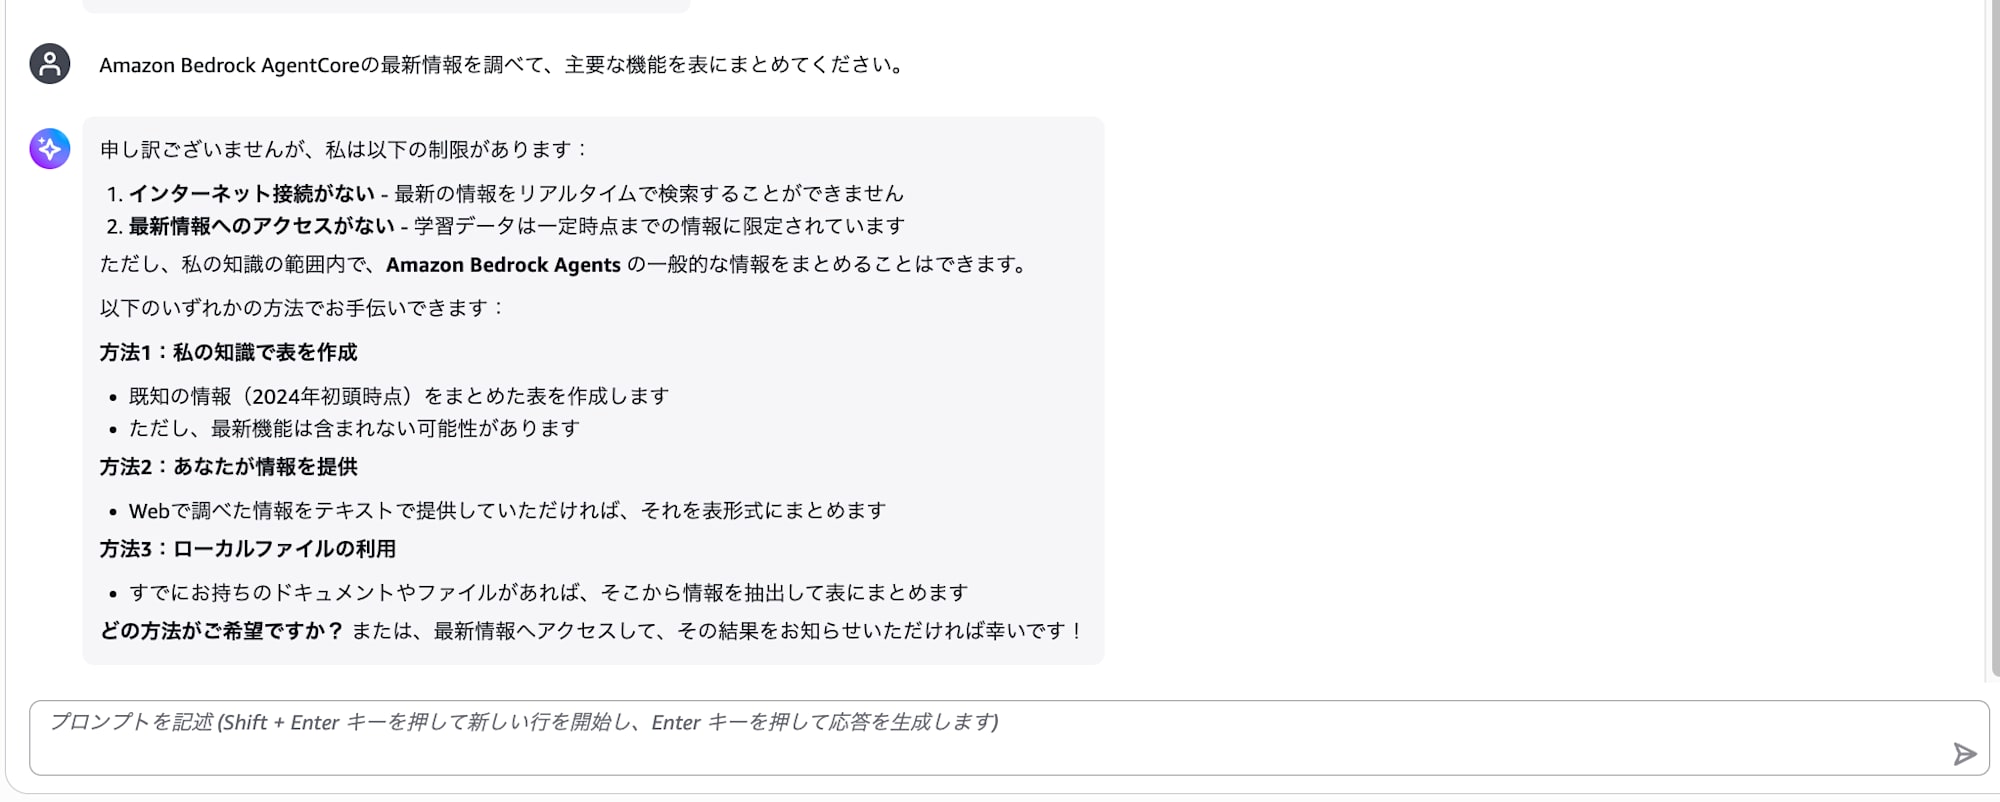
Since we haven't configured any tools to retrieve information yet, this is to be expected.
From here, let's grow it into an agent that can retrieve information from the right places!
Part 2: Change Behavior with Prompts
Experience how the agent's behavior changes by modifying the system prompt.
2-1. Change the System Prompt
- Find the "System Prompt" section in the settings panel
- Delete the existing content and copy & paste the following
You are an AWS technical consultant named "TechNavi".

## Role
- You provide advice on AWS service selection and architecture design
- Always respond in a polite and specific manner
- Include accurate AWS service names in your responses

## Response Style
- State the conclusion first, then explain the details
- When there are multiple options, create a comparison table
- Include cost considerations
- Once entered, it will be reflected in the next interaction
What you're changing here is a temporary setting in the playground. Since it won't be saved as the Harness's actual settings, if you want to persist it, you need to change and save it from the Harness editing screen.
2-2. Experience the Change
Try sending the following.
I want to build a web application. Which services should I use?
How did it change compared to the general response in Part 1? It should respond professionally as "TechNavi", structured in order from conclusion to details, with comparison tables and mentions of cost considerations.
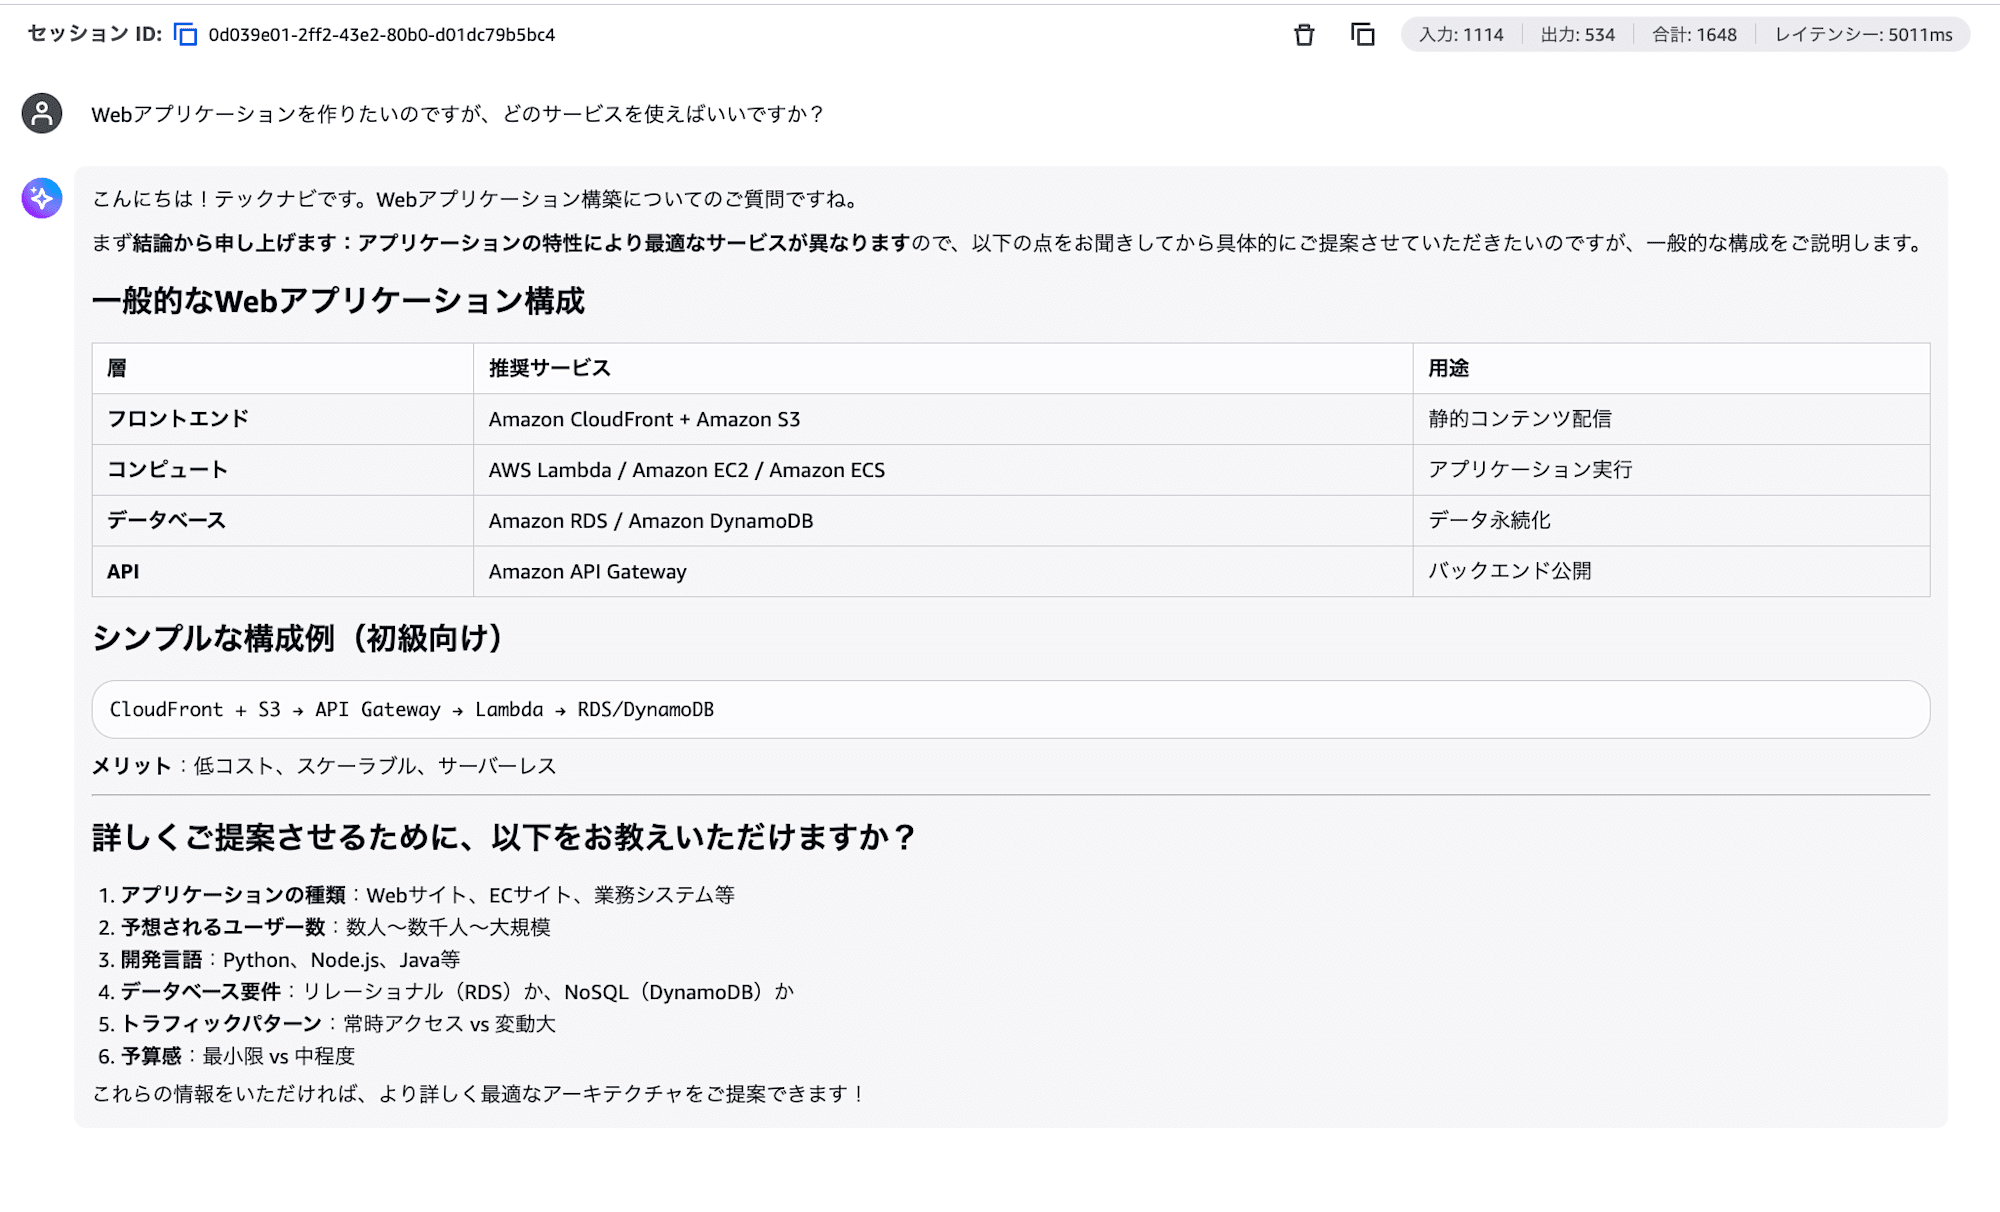
With just one system prompt, the agent's behavior changes!
2-3. Revert the System Prompt
Since Parts 3 and beyond focus on tool integration experiences, let's delete the content in the "System Prompt" field and leave it empty.
Part 3: Retrieve Information from the Web — Browser
Add the Browser tool and experience how the agent autonomously operates the web in real time.
3-1. Add the Browser Tool
- Click the "Add tool" button in the "Tools" section of the settings panel
- Select the browser tool under "Select tool type"
- Select "AgentCore Browser Tool"
- Click "Add"
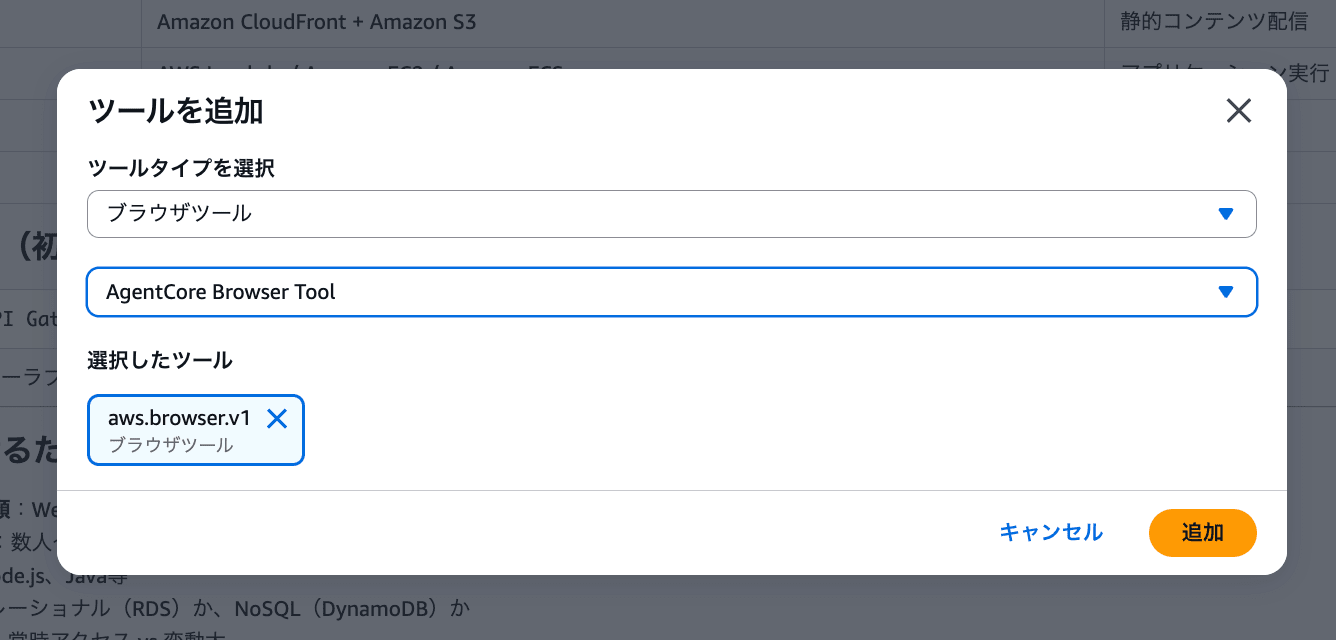
It's OK if "aws.browser.v1" is displayed in the tools section of the settings panel!
3-2. Have It Look Up the Latest Information on the Web
Send the following. This time we're specifying a URL directly.
Please access the following URL, and summarize Amazon Bedrock AgentCore's key features and use cases in a table.
https://docs.aws.amazon.com/bedrock-agentcore/latest/devguide/what-is-bedrock-agentcore.html
The agent autonomously opens the URL in a browser, reads the page content, and organizes it. Please confirm that a status like "Opening browser" is displayed.
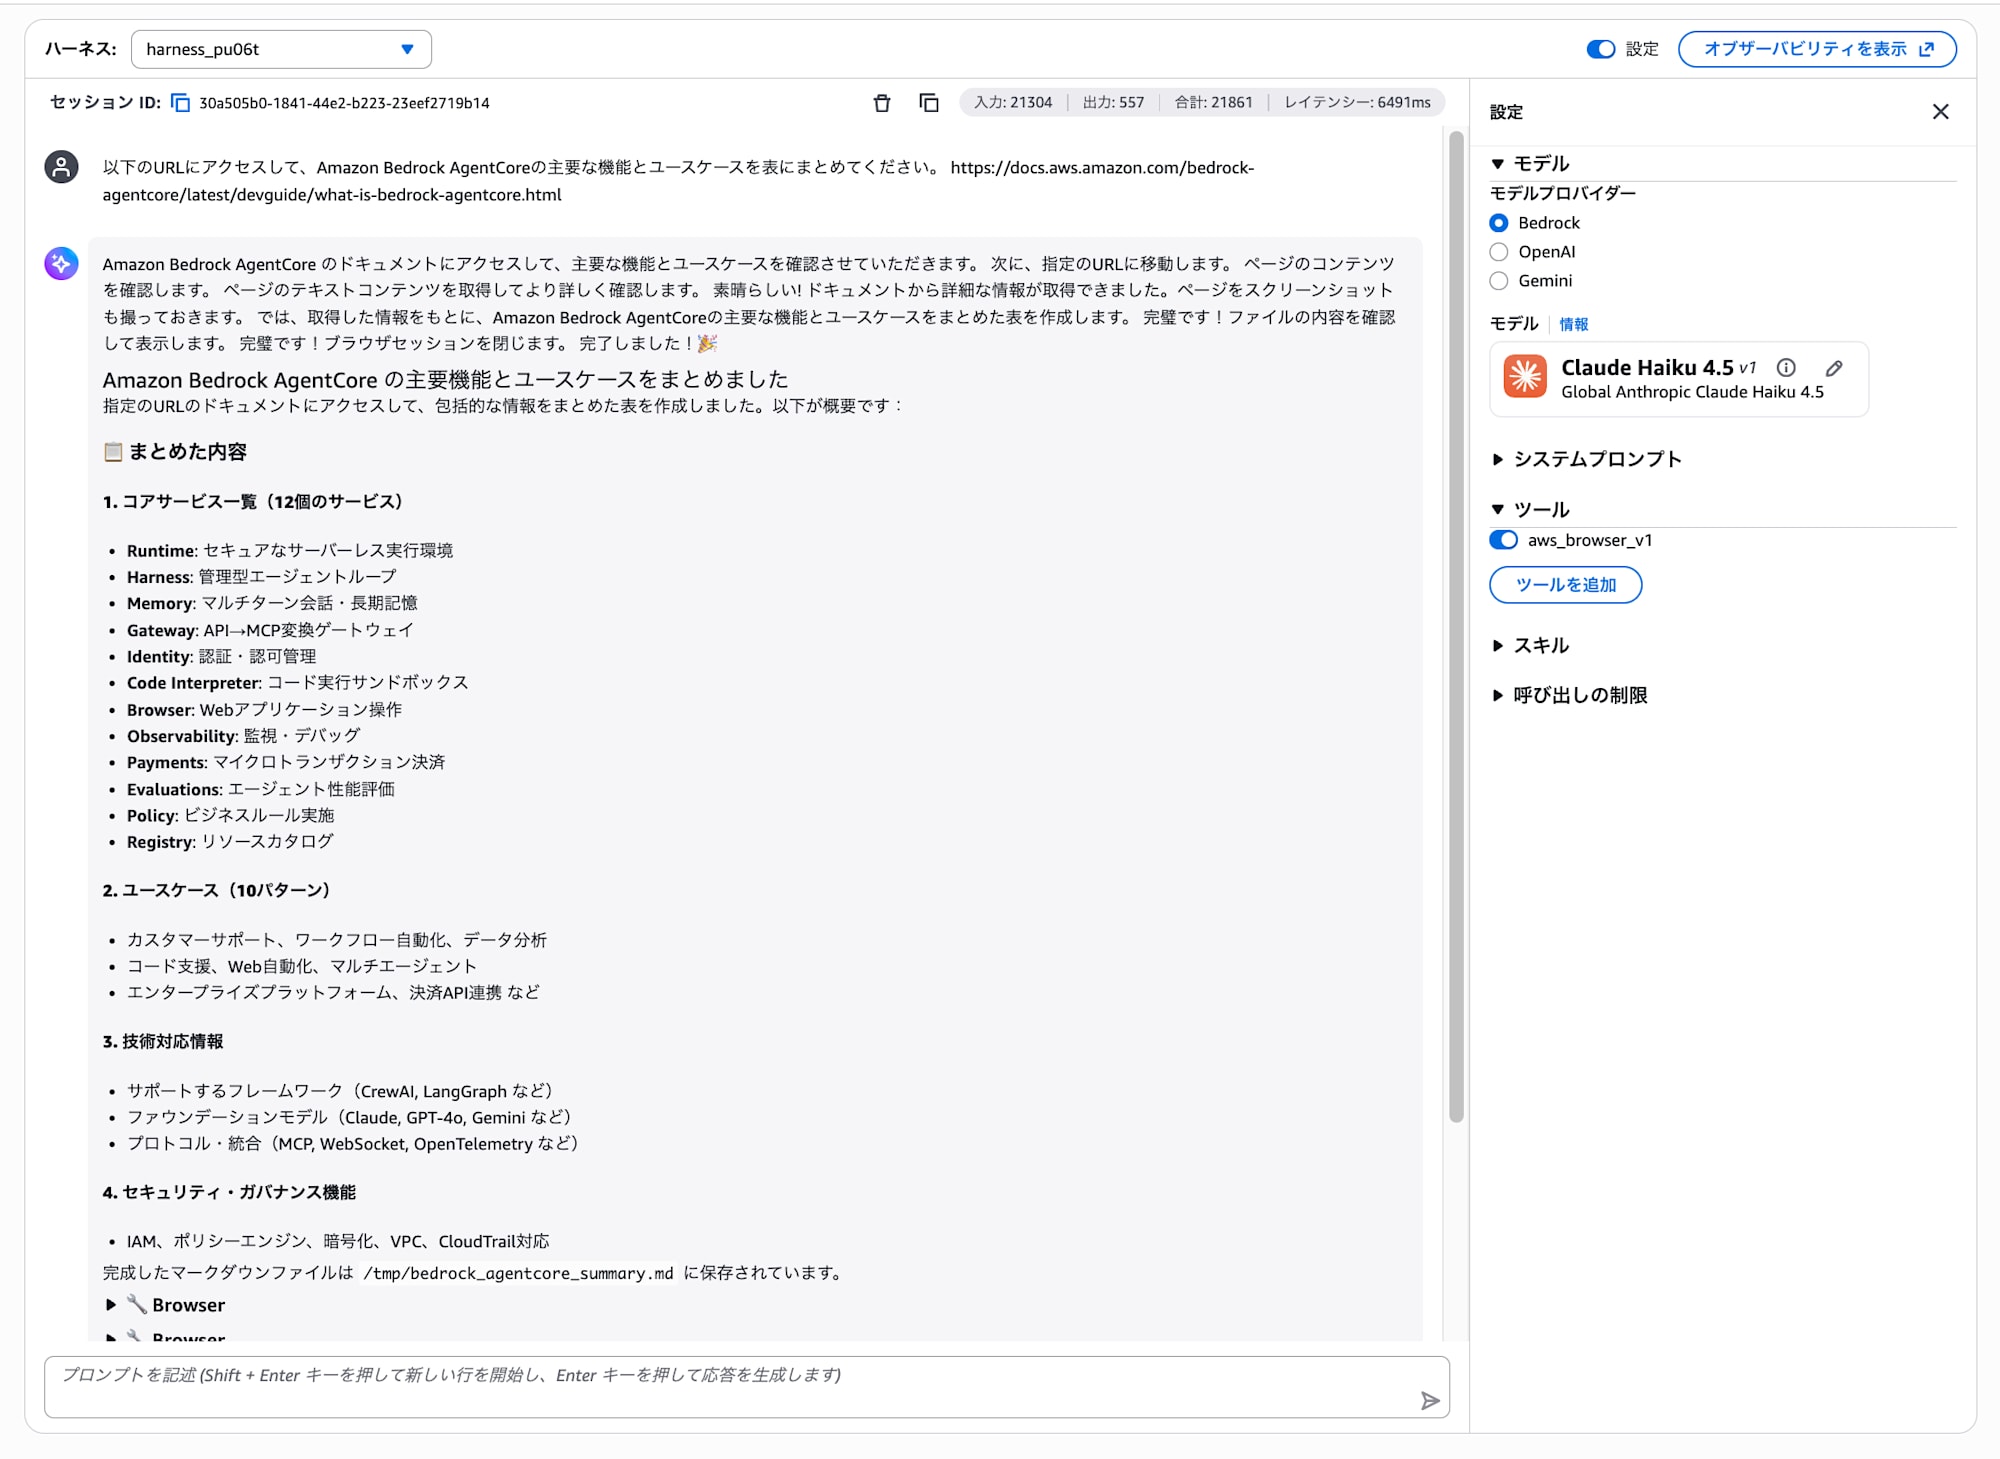
The information that couldn't be answered in Part 1 is now retrieved from the web via the browser tool and answered!
About the Browser Tool's Use Cases
There's a reason we specified the URL directly this time. The Browser tool is not well-suited for the purpose of "searching with a search engine to gather information". The search engine's anti-bot measures may trigger CAPTCHAs, and it takes extra time and tokens.
The official documentation's troubleshooting also contains the following statement.
Structure your agent to avoid search engines and implement the following architecture pattern:
- Use the Browser tool only for specific page actions, not general web searching
- Use non-browser MCP tools like Tavily search for general web search operations
It's more efficient to use the Browser tool for purposes like accessing a specific URL and reading the page content, and to use MCP tools like the AWS Knowledge MCP Server or Tavily Search introduced in Part 5 for information search.
3-3. Watch the Browser Operation in Real Time
You can observe the agent browsing the web in real time.
- While the task from step 3-2 is running (or after sending a new question), open another browser tab
- Bedrock console → Click "Built-in tools" under "Build" in the left menu
- Click "Browser"

- In the "Browser sessions" section, look for a session with status "Ready"
- Click the "View live session" link

A new window will open, displaying the agent browsing web pages in real time!
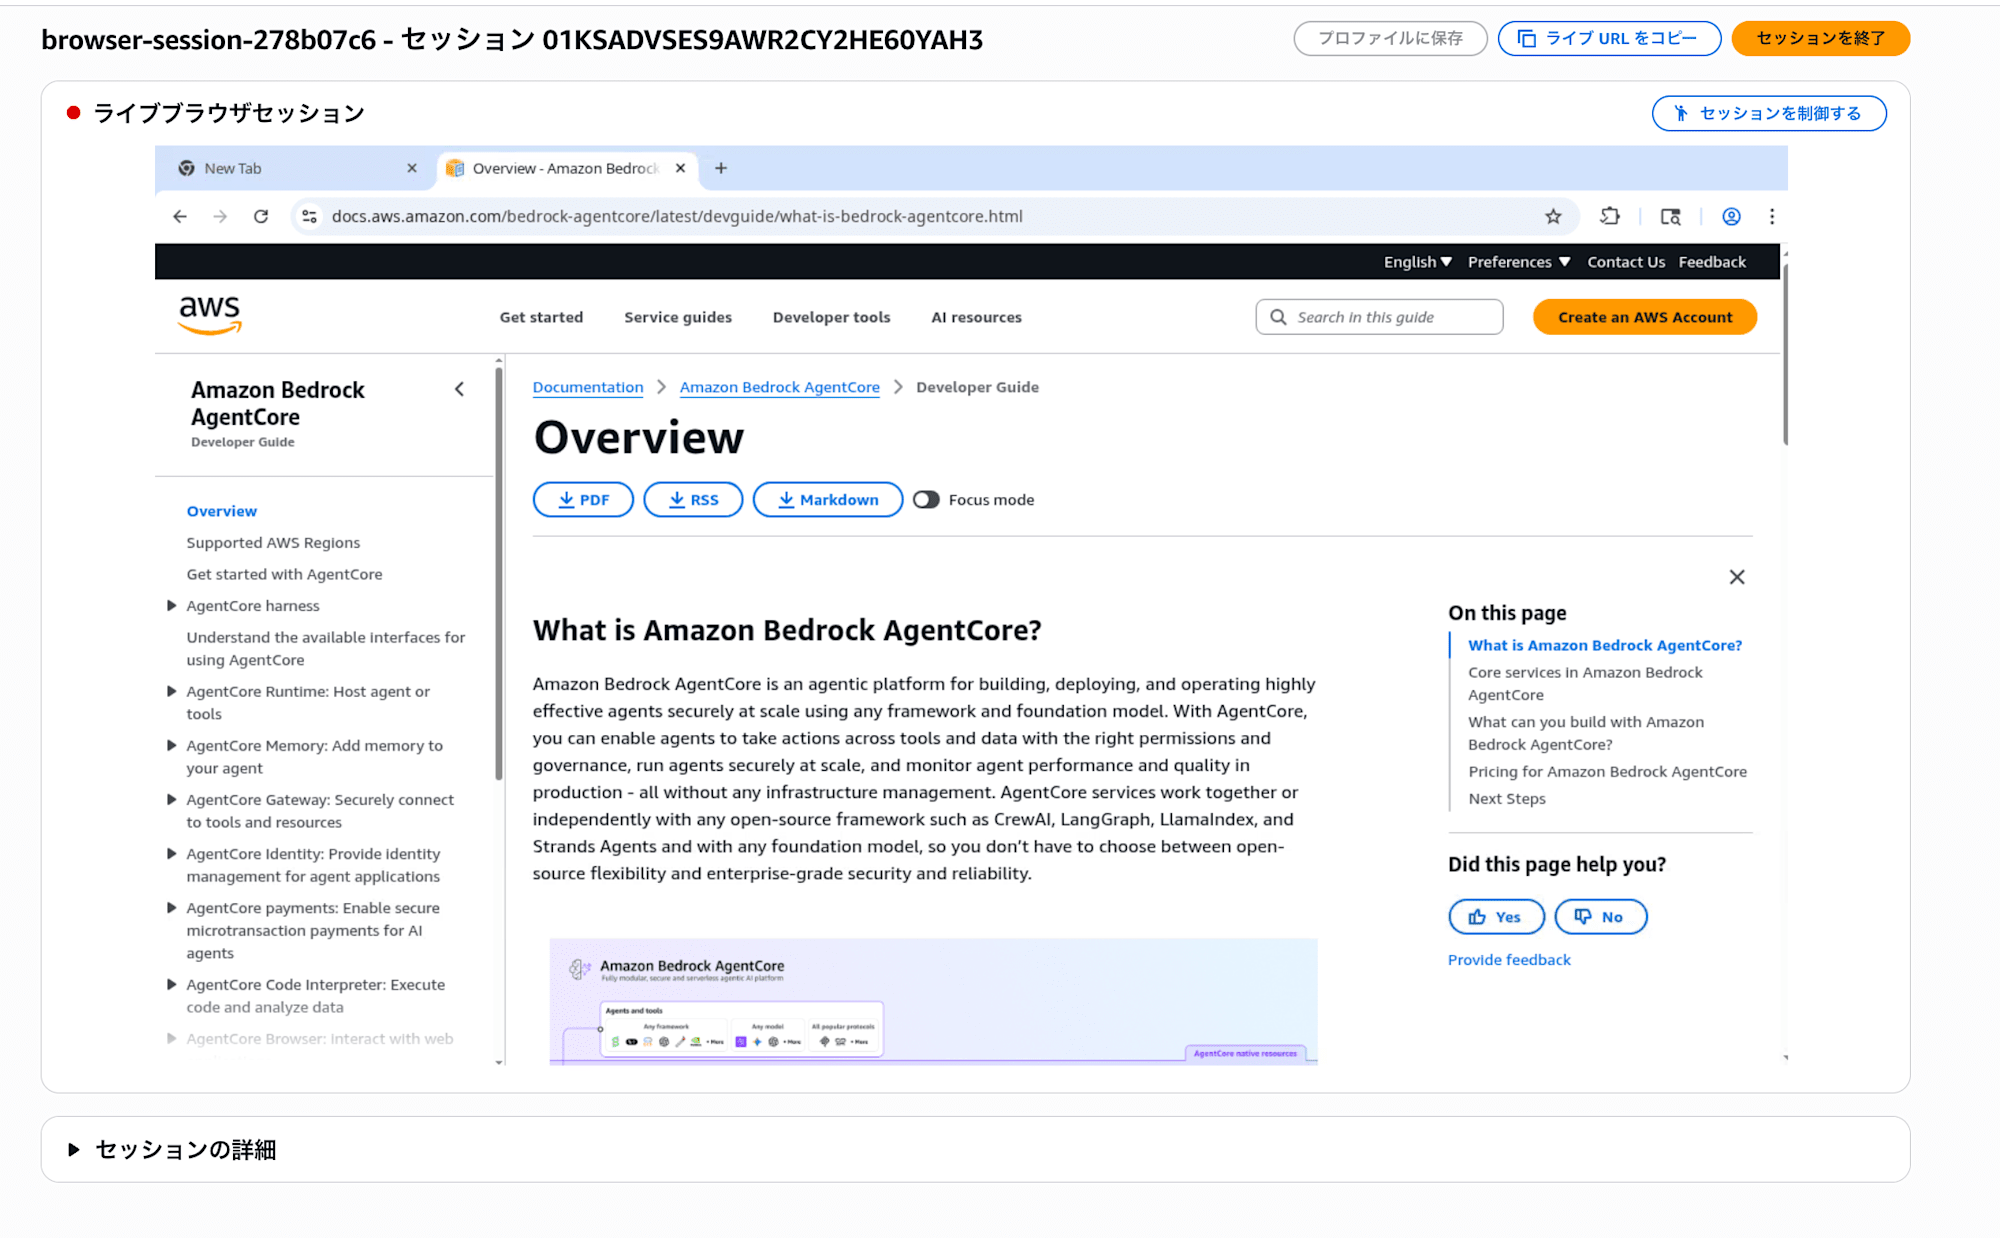
It's interesting to be able to watch the AI operating the browser right in front of you. It judges each time and takes appropriate actions.
Part 4: Write Code and Have It Calculate — Code Interpreter
Add the Code Interpreter tool and experience how it can execute code and perform data analysis.
4-1. Add the Code Interpreter Tool
- Click the "Add tool" button in the "Tools" section of the settings panel
- Select code interpreter under "Select tool type"
- Select "AgentCore Code Interpreter Tool"
- Click "Add"
There may be a cold start of about 30 seconds on the first launch. Just wait patiently.
4-2. Have It Calculate an AWS Cost Comparison
Send the following.
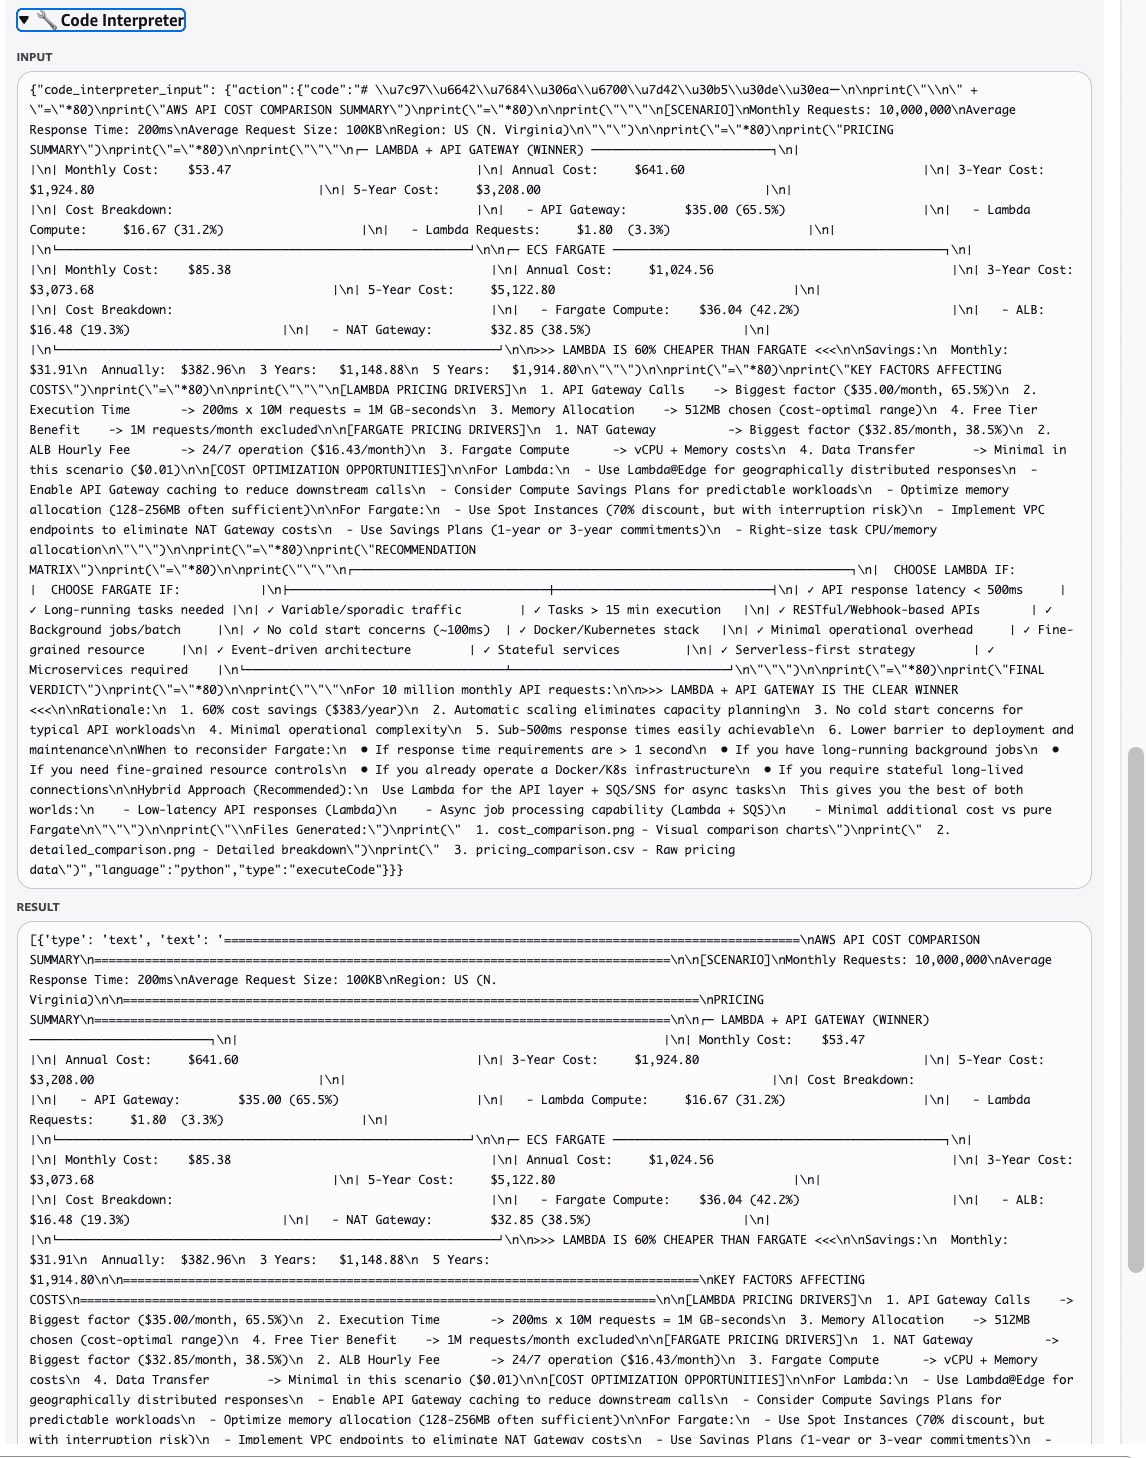
Assuming an API with 10 million requests per month, please compare the costs of Lambda + API Gateway and ECS Fargate. Calculate the monthly cost for each and tell me which is cheaper.
The agent automatically generates and executes Python code, and outputs a comparison table of the cost calculation results.
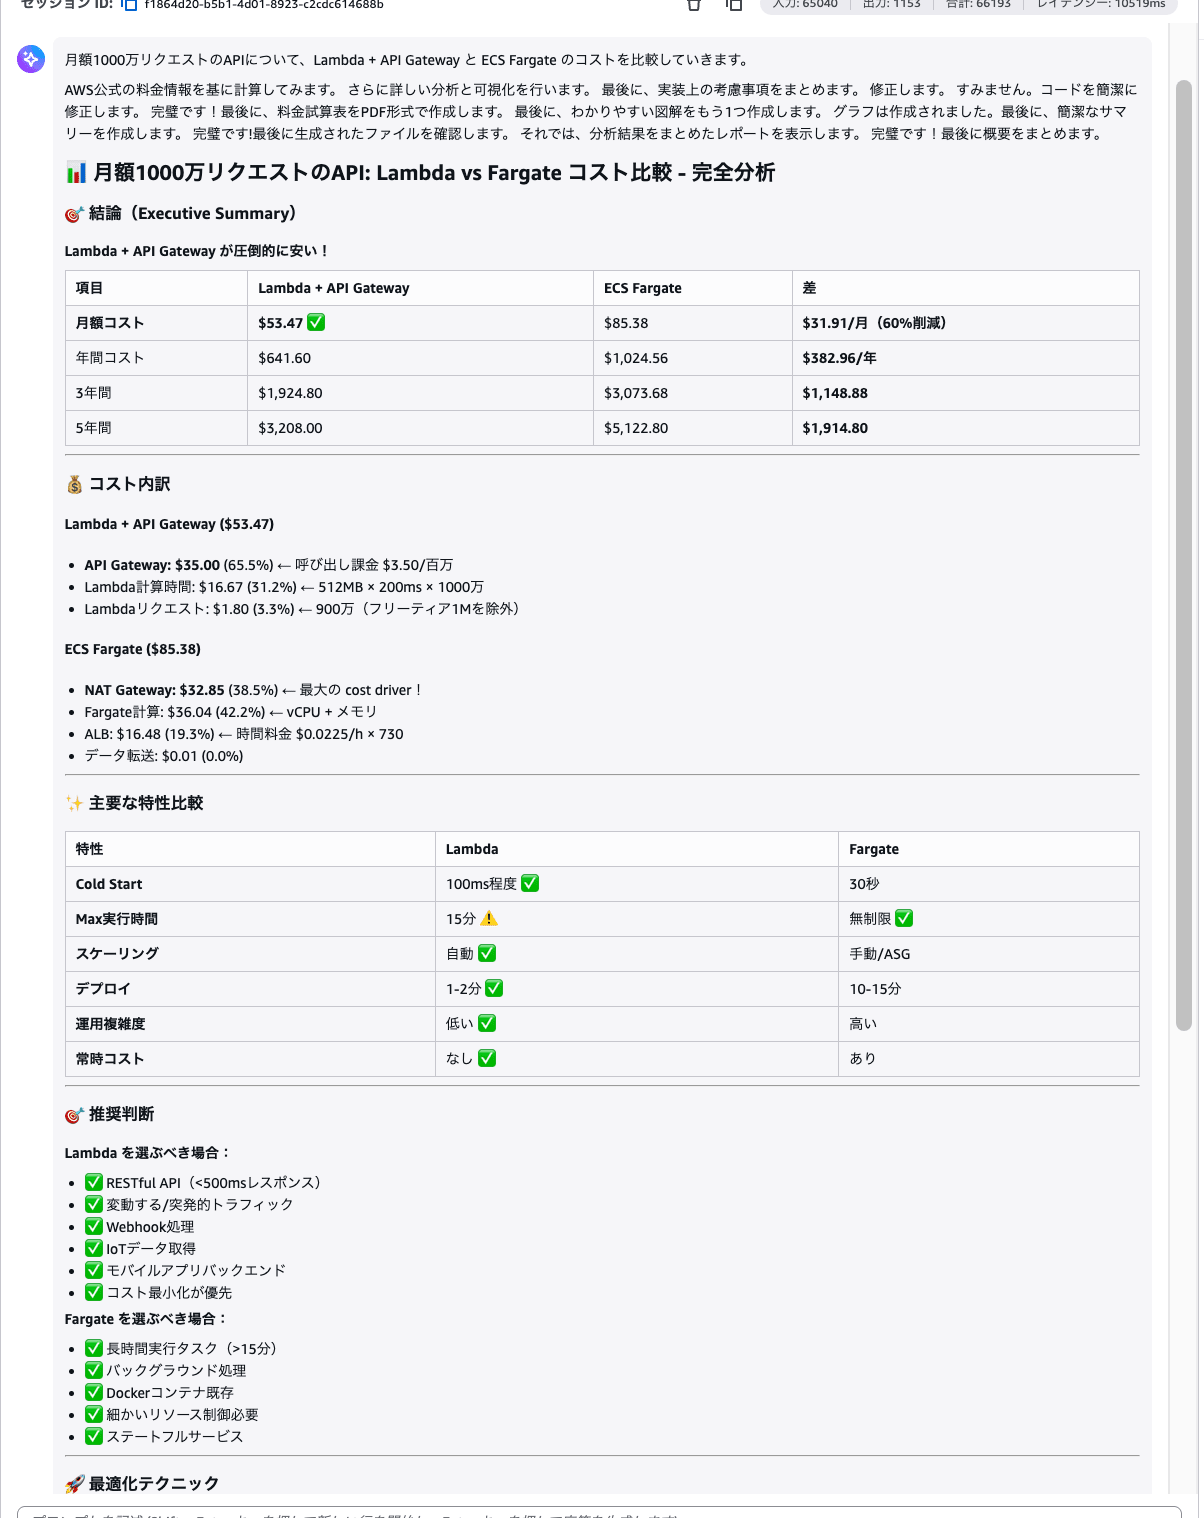
Behind the scenes, Code Interpreter executes code multiple times to calculate. If you open the tool call logs, you can see the agent working hard on the calculations!
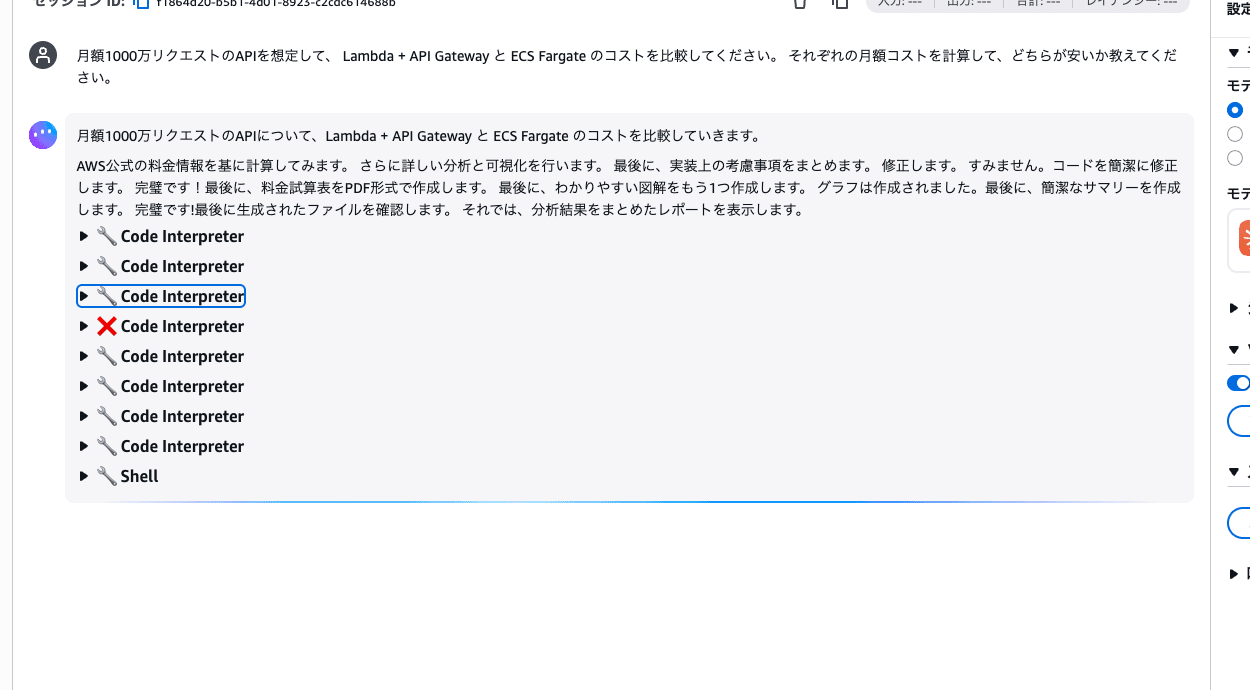
Expanding the log also lets you see the actual Python code that was executed. Code Interpreter is a service that safely executes code in a sandbox completely isolated from the agent's environment.
Note that files generated by Code Interpreter (such as CSV or graph images) cannot be directly downloaded from the playground. If you want to make full use of file output, it's worth considering tools that output to a specified S3, or implementing it separately in code.
4-3. Experience Automatic Tool Selection
Next, send this.
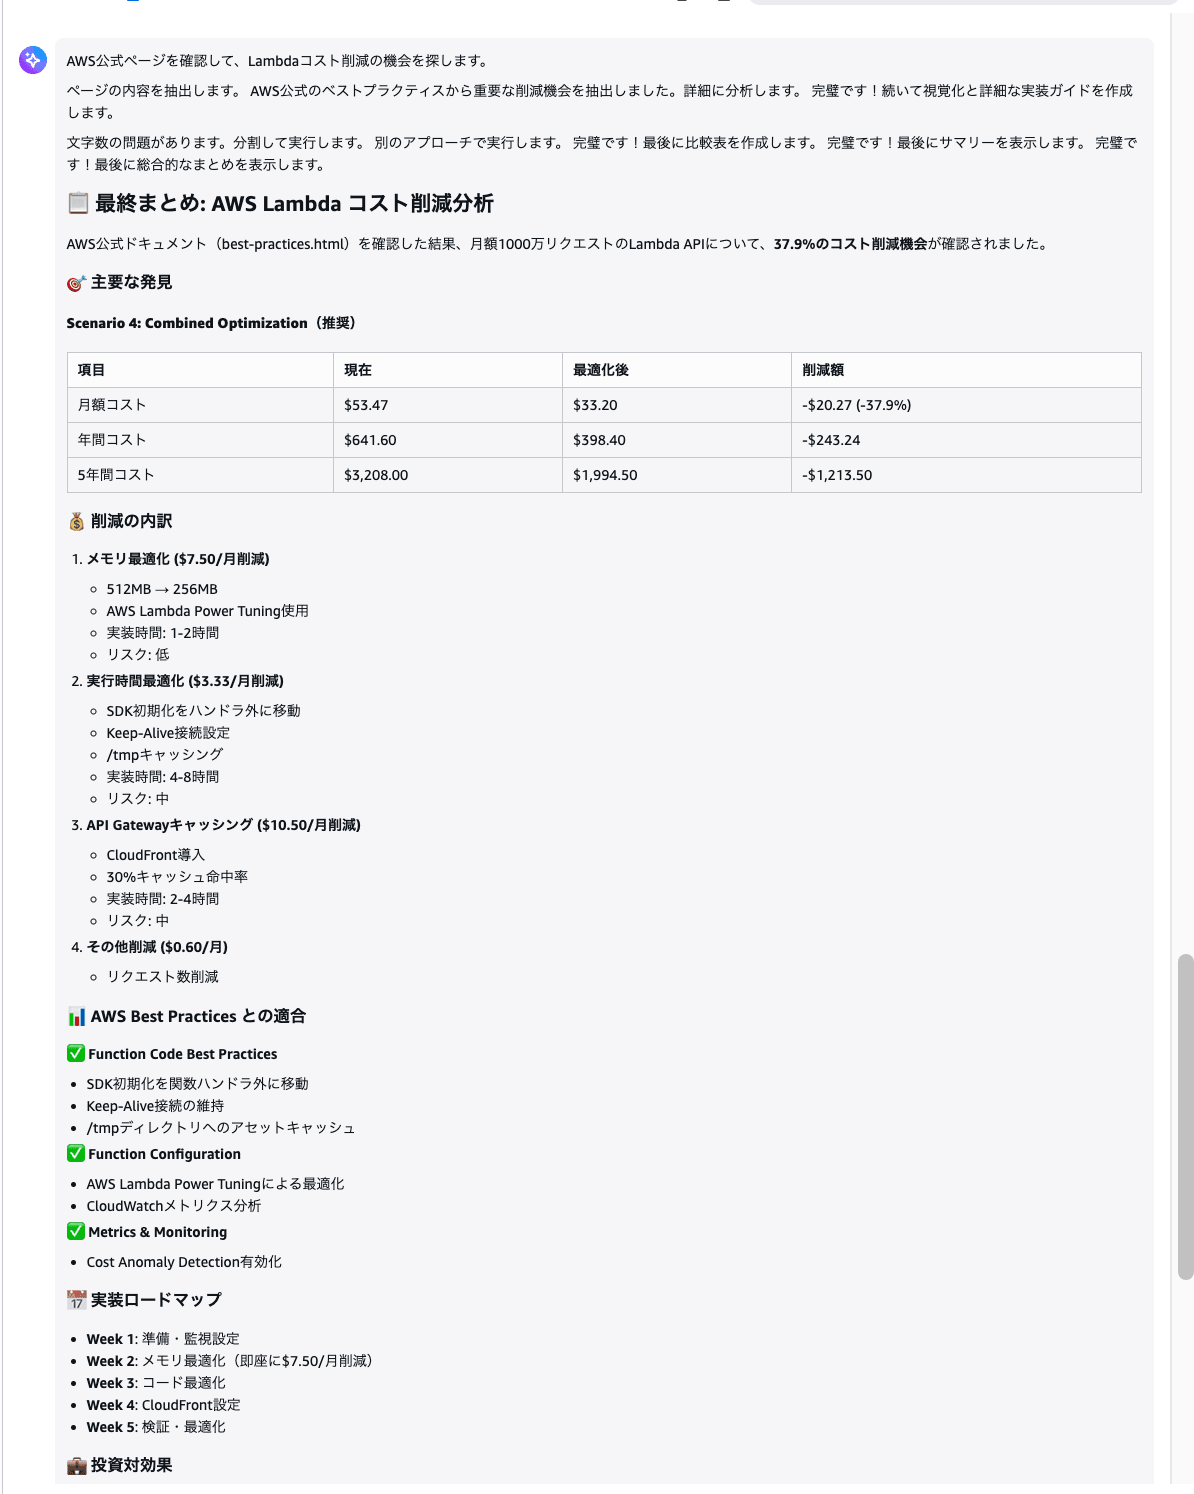
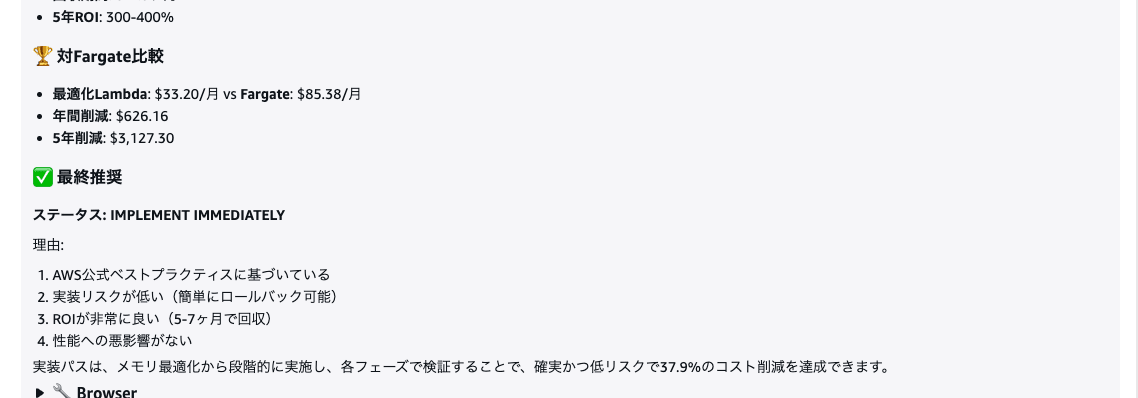
Please check the following AWS official page and find out if there are ways to further reduce the Lambda costs from earlier. Also estimate the amount of savings.
https://docs.aws.amazon.com/lambda/latest/dg/best-practices.html
Observe how the agent automatically uses Code Interpreter (calculation) and Browser (web browsing) as needed. Which tool to use is not specified by humans — the agent judges on its own.
So far, we've tried two tools: Browser and Code Interpreter!
What's interesting is that the agent itself judges when to use which tool. Without individually instructing it to go look at the web page and then calculate, it combines the appropriate tools for a single question to build its answer.
Part 5: Search Internal Documents — Gateway / RAG
Connect to the Knowledge Base via Gateway and experience an agent that can reference internal documents.
Connecting Gateway to Harness means that by adding just one, multiple tools (KB search, AWS documentation search, web retrieval) become available all at once.
5-1. Configure Gateway in the Harness
Gateway is configured not from the playground's settings panel but from the Harness editing screen. Since changes here update the Harness's actual settings, you need to click "Save" at the end.
- Click "Harness preview" under "Build" in the left menu, and return to the harness list
- Select the harness you created this time and click "Edit"
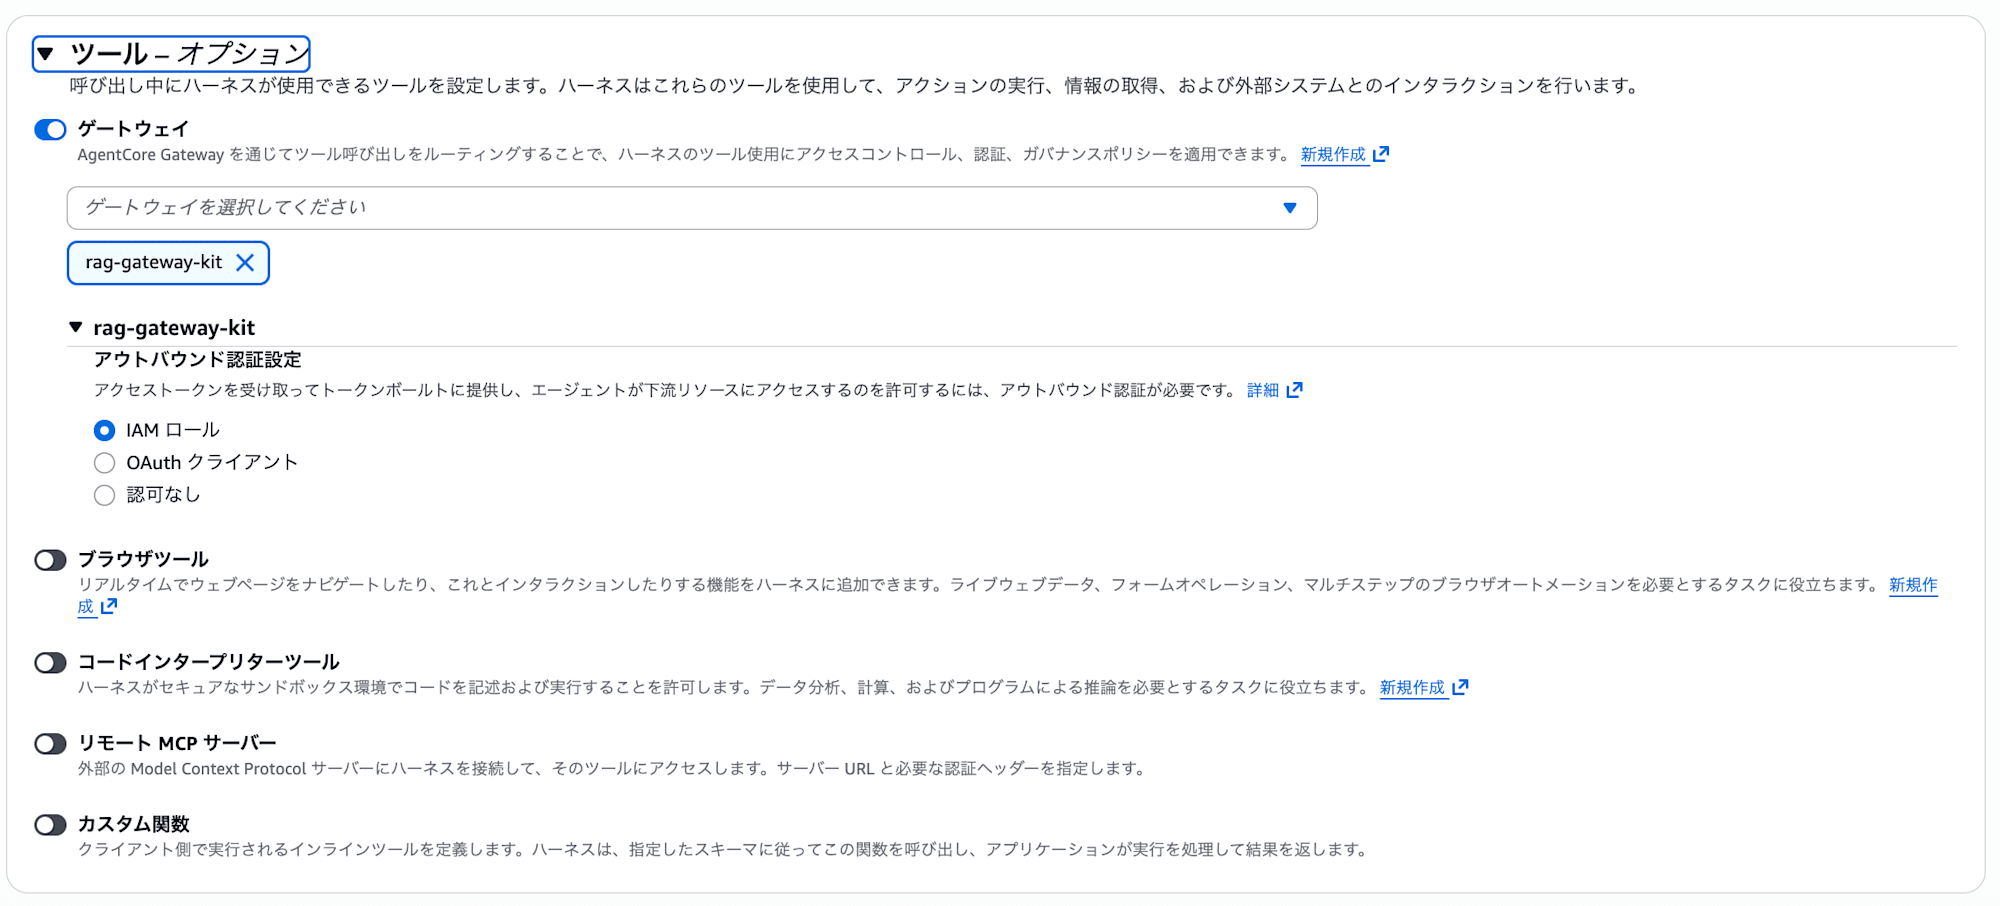
- Check "Gateway" in the "Tools & Options" section
- Select
rag-gateway-kitunder "Please select a gateway" - Select "IAM role" for outbound authentication
- Click "Save"
After configuring, click "Test harness in playground" to return to the playground.
5-2. Ask the Knowledge Base a Question
Send the following.
Using RAG, please search for information about AgentCore Runtime deployment procedures.
It's OK if you get a response citing the contents of the document retrieved from the Knowledge Base via Gateway!
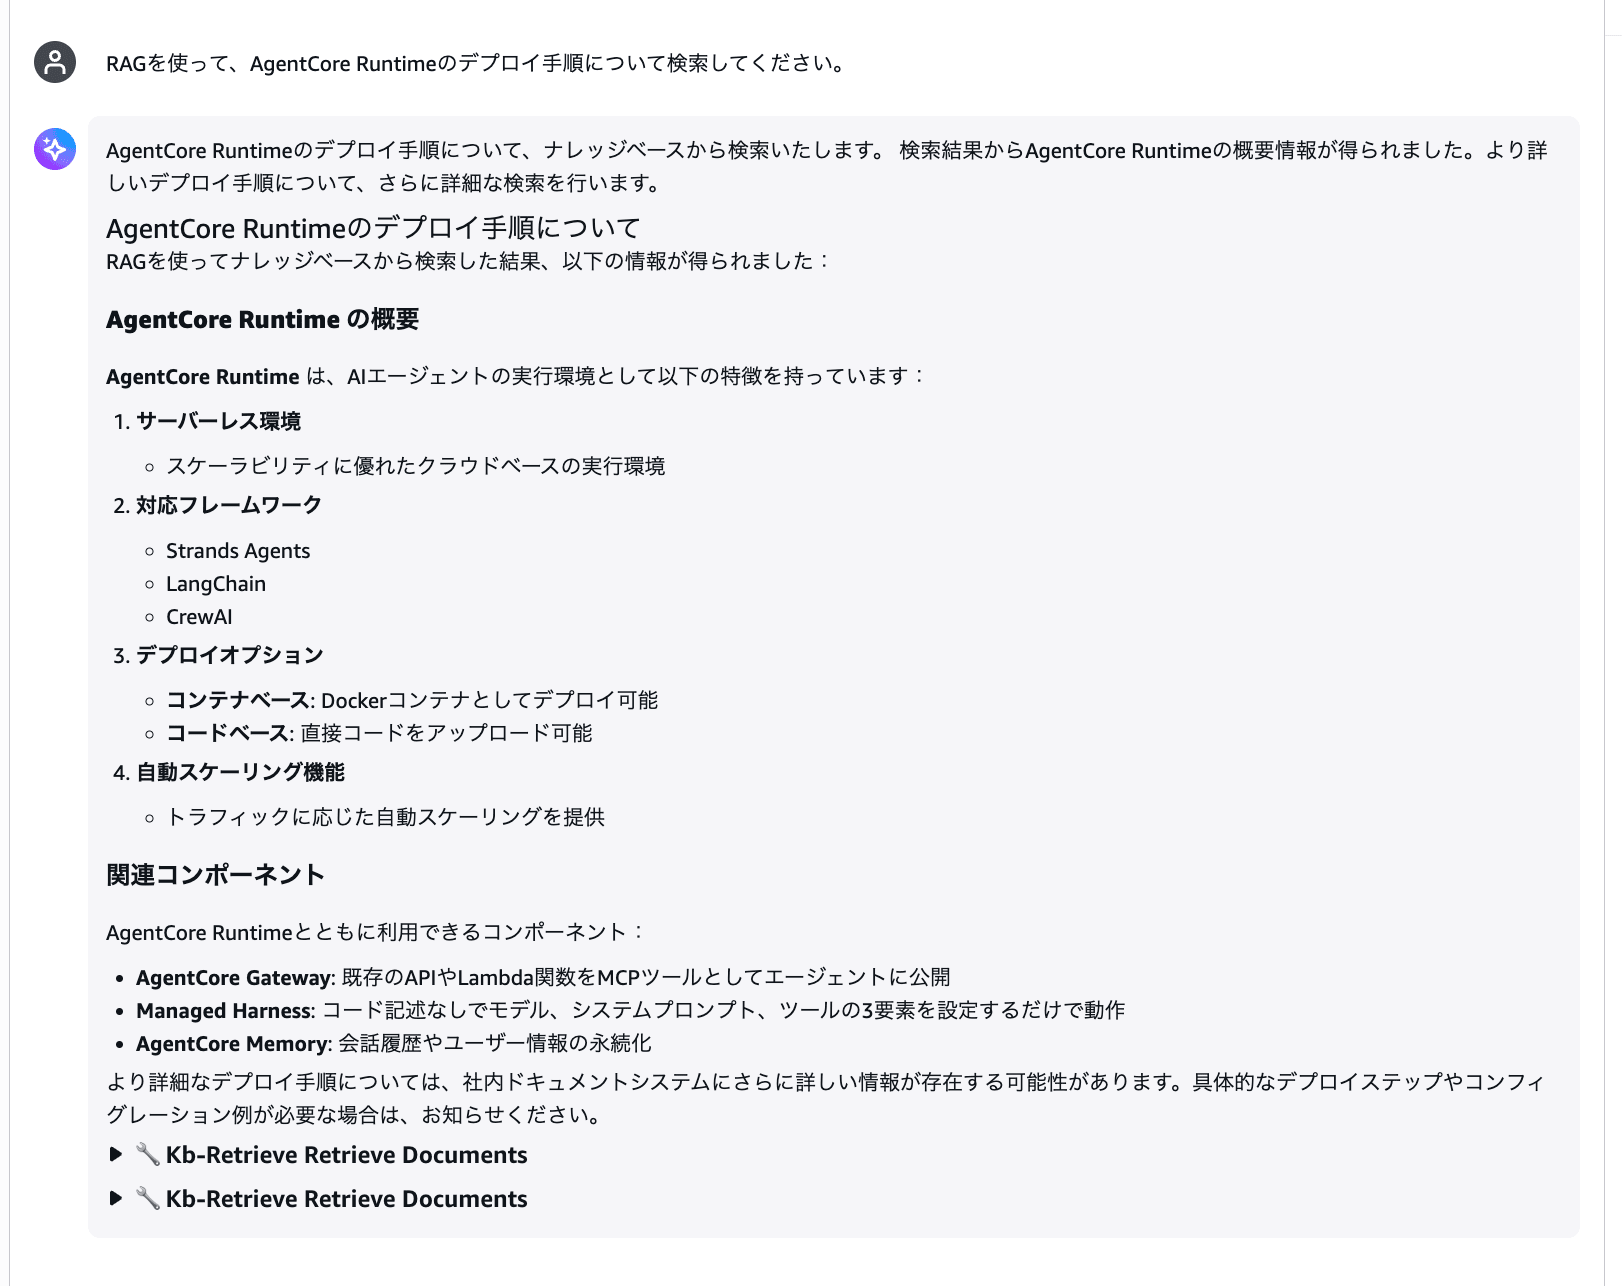
If the tool call log shows "Kb-Retrieve Retrieve Documents", it's answering from documents that were ingested in advance, not from the web.
5-3. Try Adding a Document (Optional)
The Knowledge Base documents are stored in the S3 bucket (rag-gw-datasource-*). You can also add your own documents and try them out.
- Open the
rag-gw-datasource-*bucket in the S3 console and upload a text file - Bedrock console → Left menu "Knowledge Bases" → Open "RagGatewayKnowledgeBase"
- Select the data source and click the "Sync" button
- Once sync is complete, return to the playground and ask a question about the content of the added document
5-4. Try the Other Gateway Tools
Gateway contains not only KB search, but also an AWS Knowledge MCP Server and URL Fetch tool.
The AWS Knowledge MCP Server is a tool that can search AWS official documentation. Try sending the following.
Please tell me about AgentCore Payments.
The agent searches the official documentation via the AWS Knowledge MCP Server and responds.
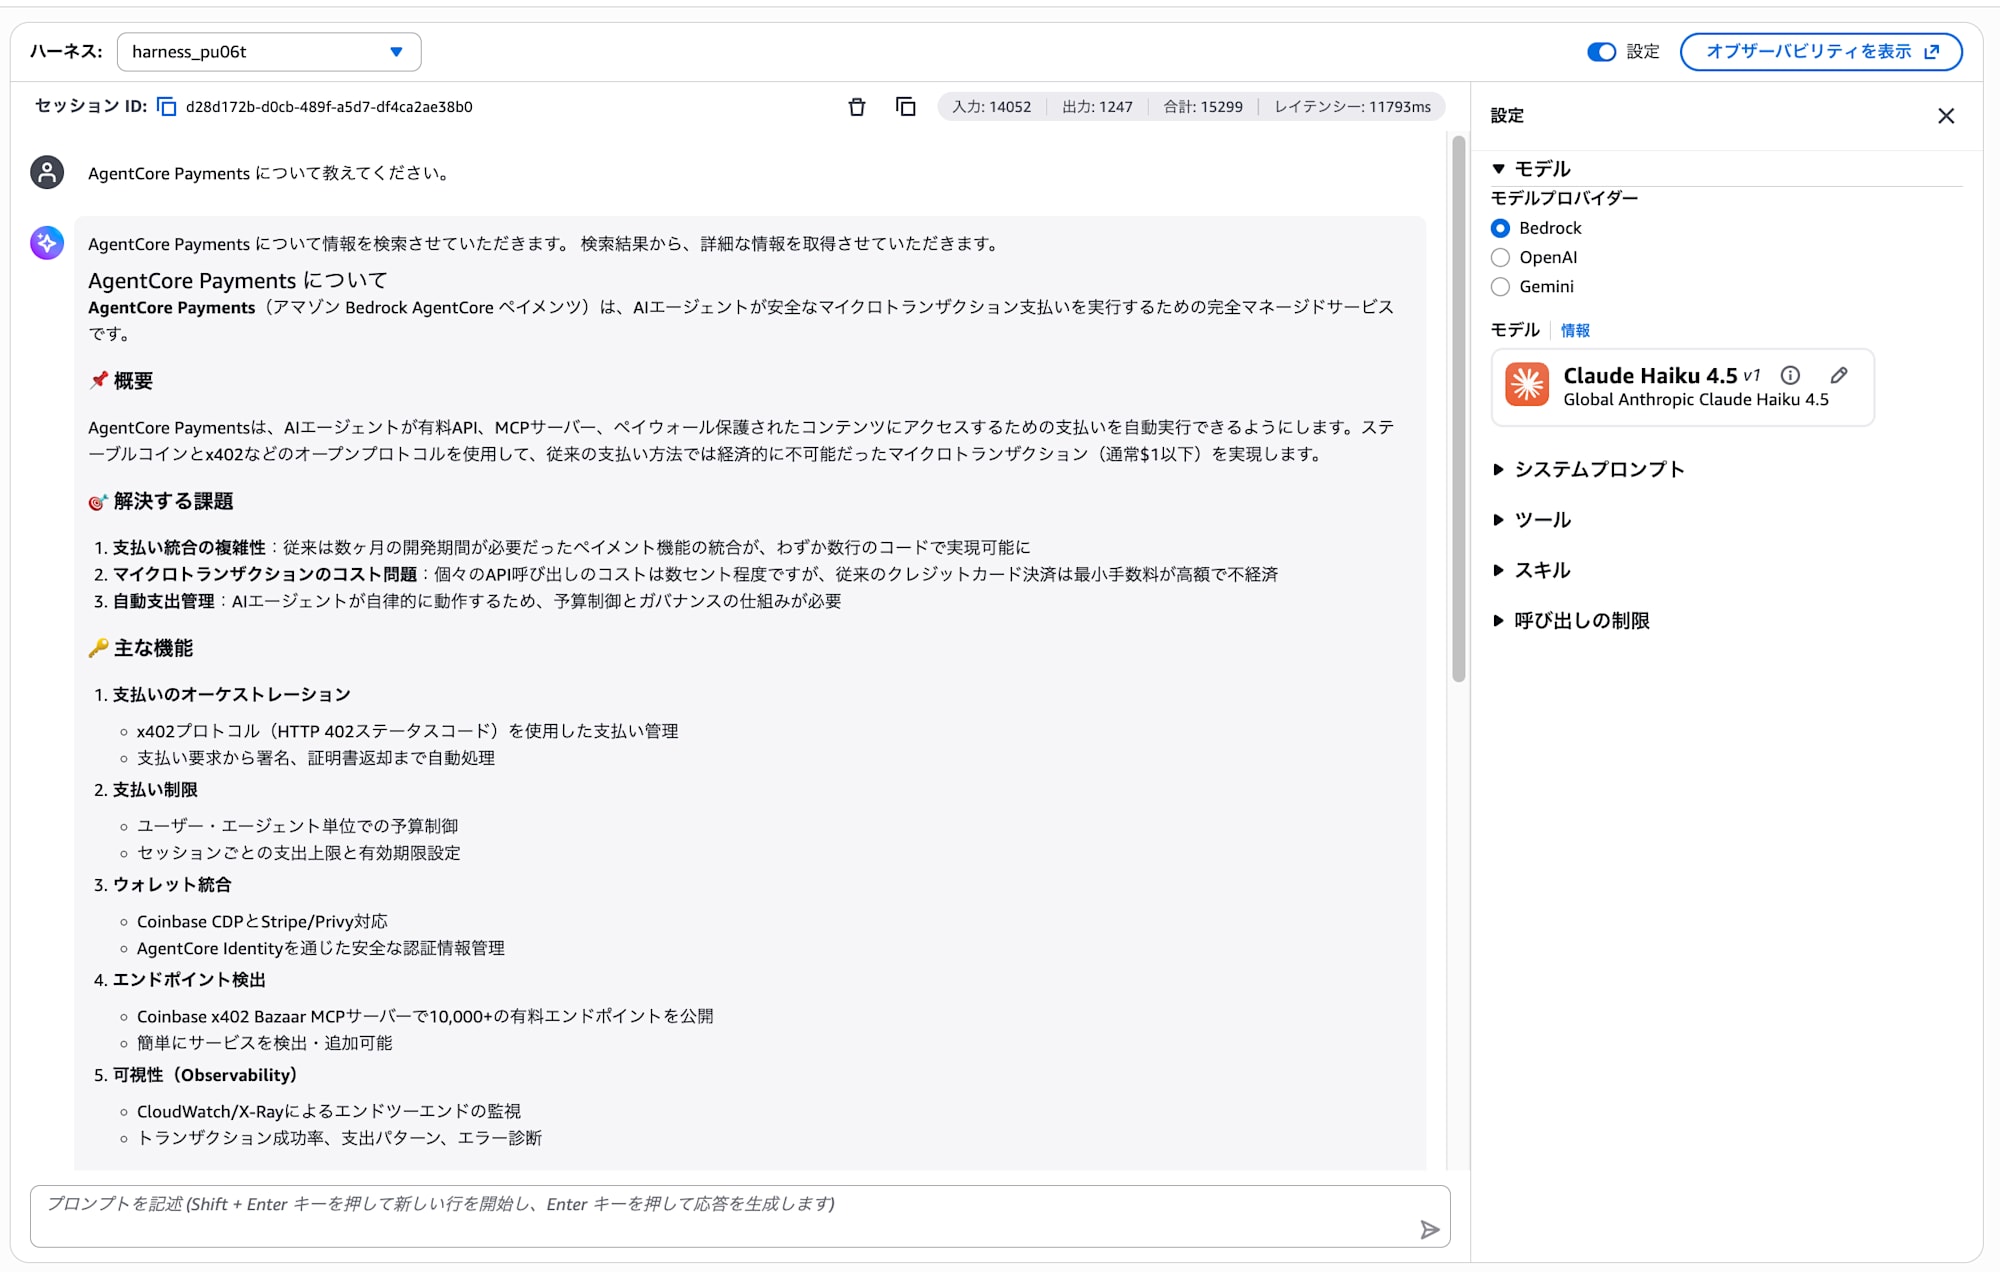
Looking at the tool call logs, you can see that Aws-Knowledge Aws Search Documentation and Aws-Knowledge Aws Read Documentation are being used.

Next, let's also try the URL Fetch tool.
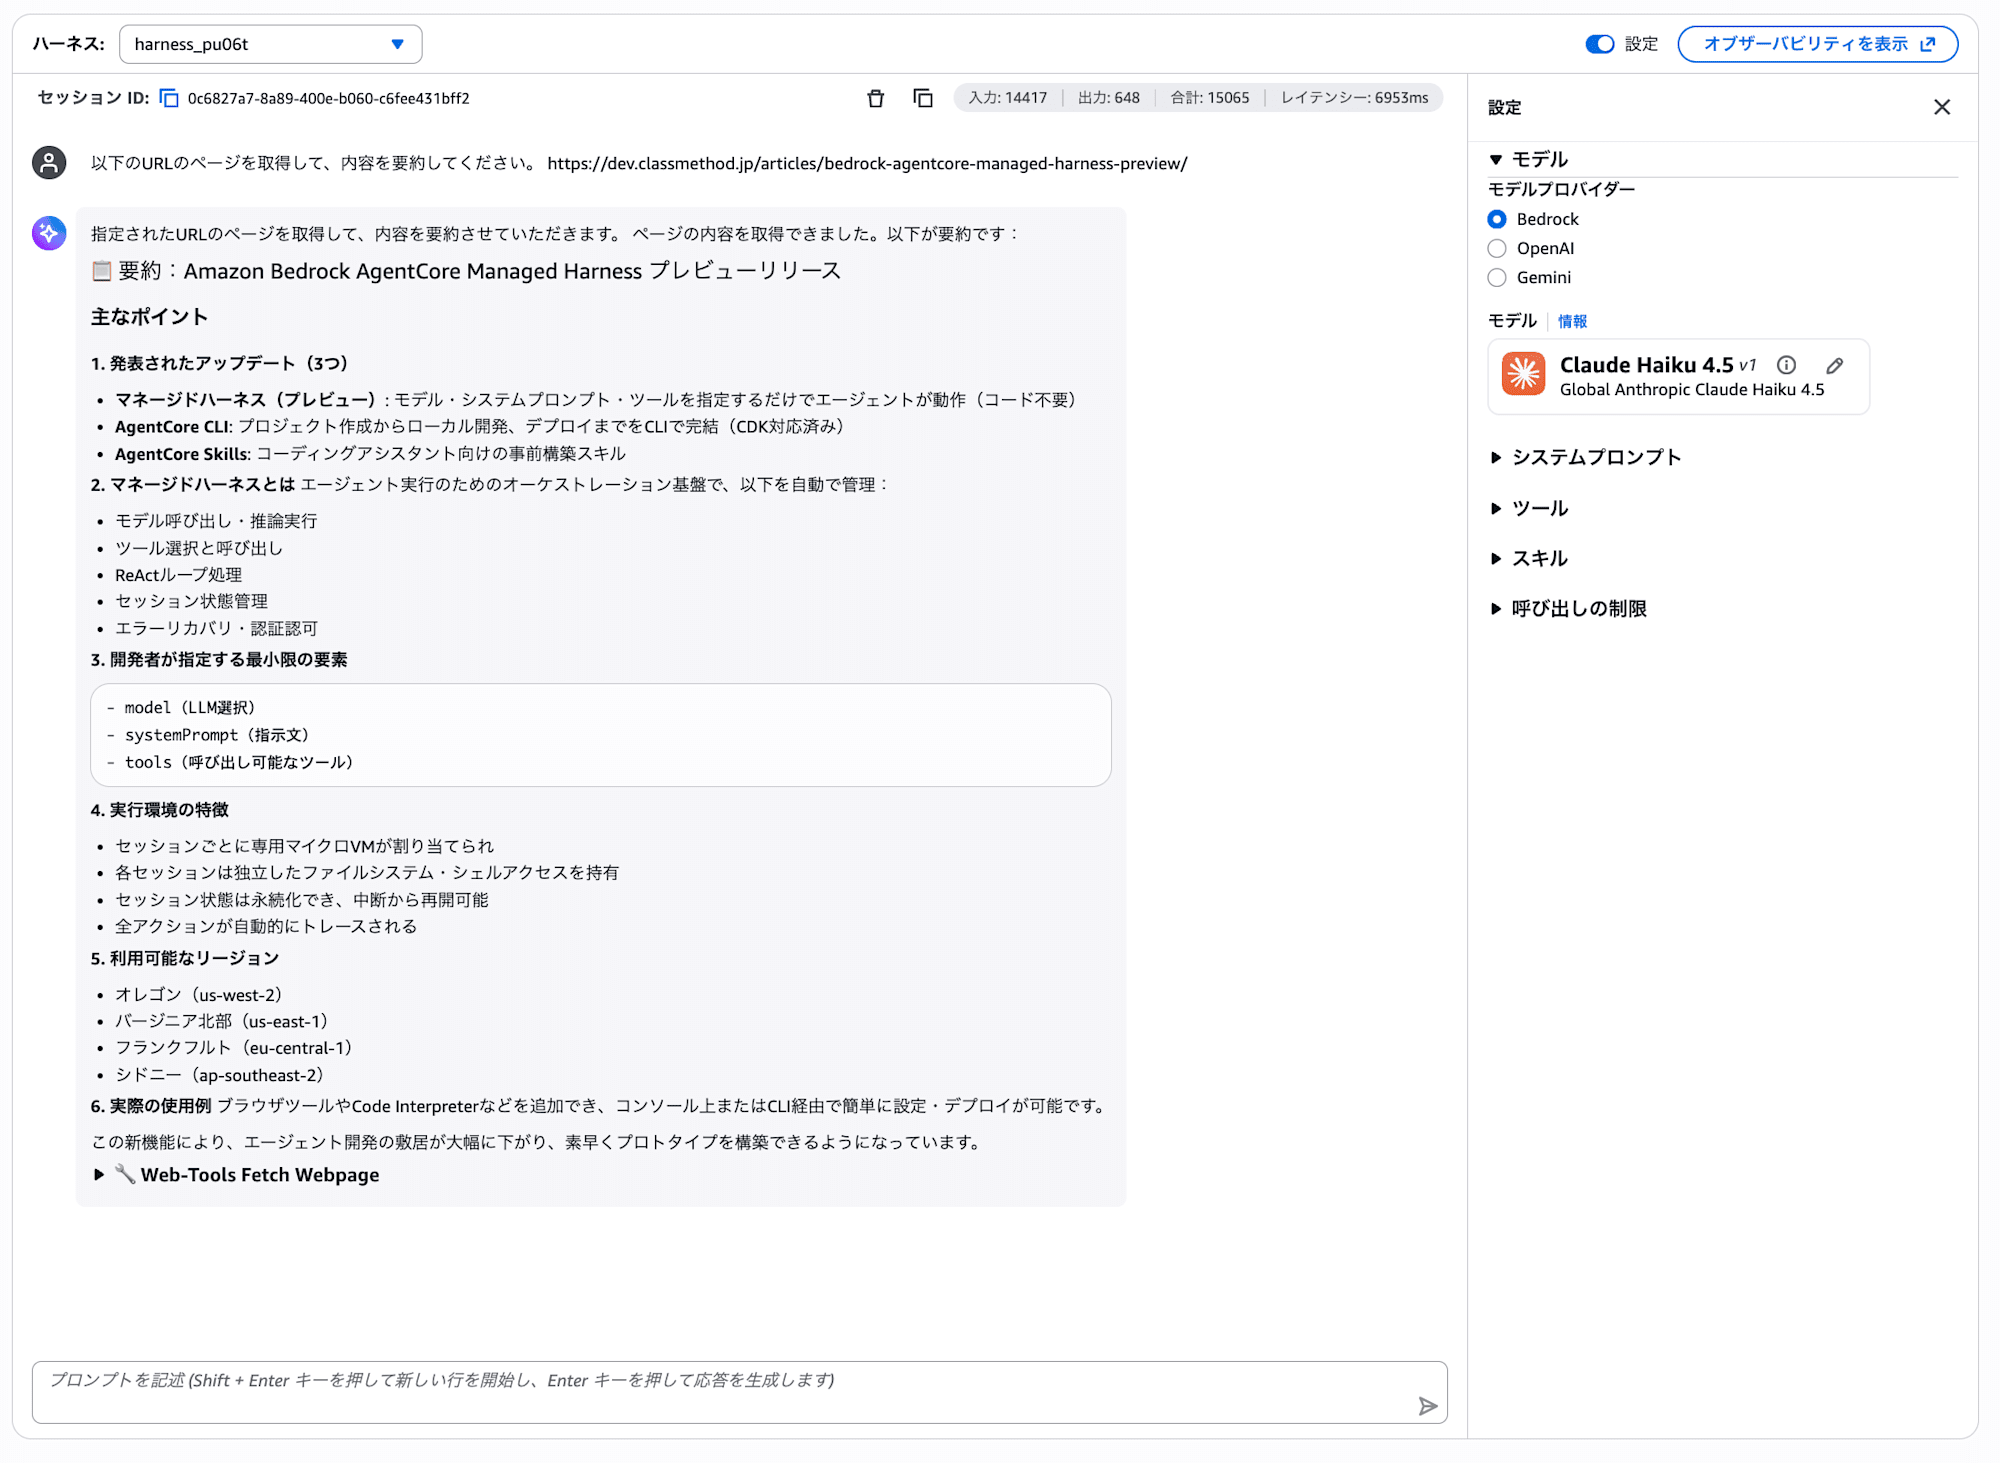
Please retrieve the following URL's page and summarize its content.
https://dev.classmethod.jp/articles/bedrock-agentcore-managed-harness-preview/
The fetch_webpage tool within Gateway is used to retrieve the content of the specified web page and summarize it.
It's great that by adding just one Gateway, multiple tools become available all at once. It's also a nice point that you can easily add new features to the Gateway and don't need to change the harness itself.
Going back to the discussion of the Browser tool's use cases mentioned in Part 3, searching AWS official documentation is more efficient when using the AWS Knowledge MCP Server as we did this time. You can leverage existing assets, the response is faster, and token consumption is lower.
The image is to limit the Browser tool to situations where you access a specific URL and perform page operations, and to choose appropriate MCP tools for information search based on the purpose.
Supplement: AWS Knowledge MCP Server Can Be Used Without Gateway
Even if building the Gateway is difficult, the AWS Knowledge MCP Server alone can be added directly from the playground.
- Click the "Add tool" button in the "Tools" section of the settings panel
- Select remote MCP server under "Select tool type"
- Enter
https://knowledge-mcp.global.api.awsas the endpoint URL - Click "Add"
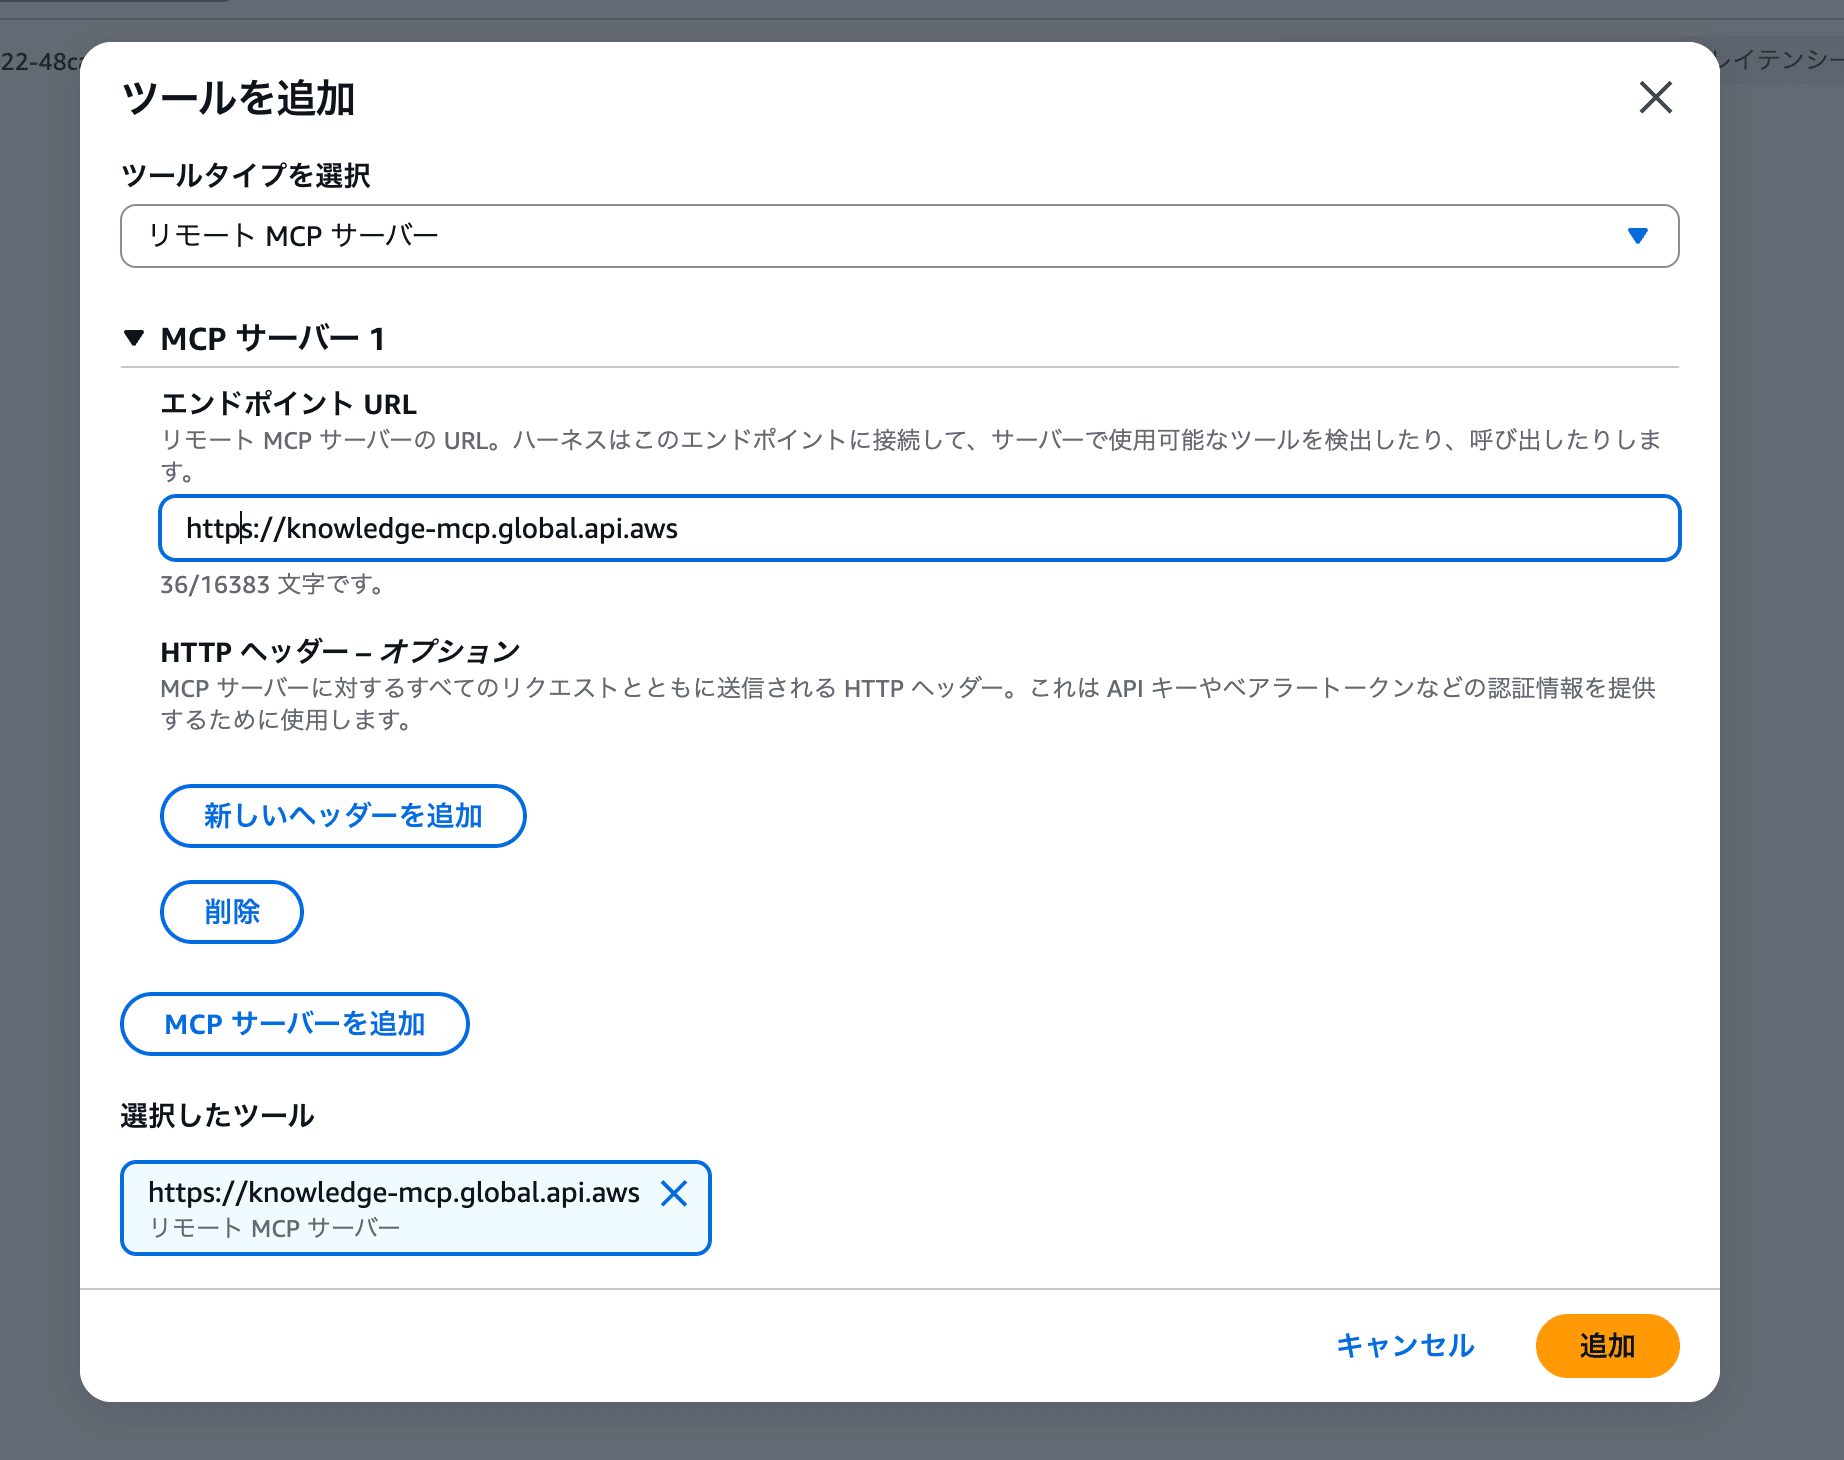
Once added, it will appear as mcp_1 in the tools section of the settings panel. After that, try asking a question to search AWS official documentation the same way as in Part 5-4.
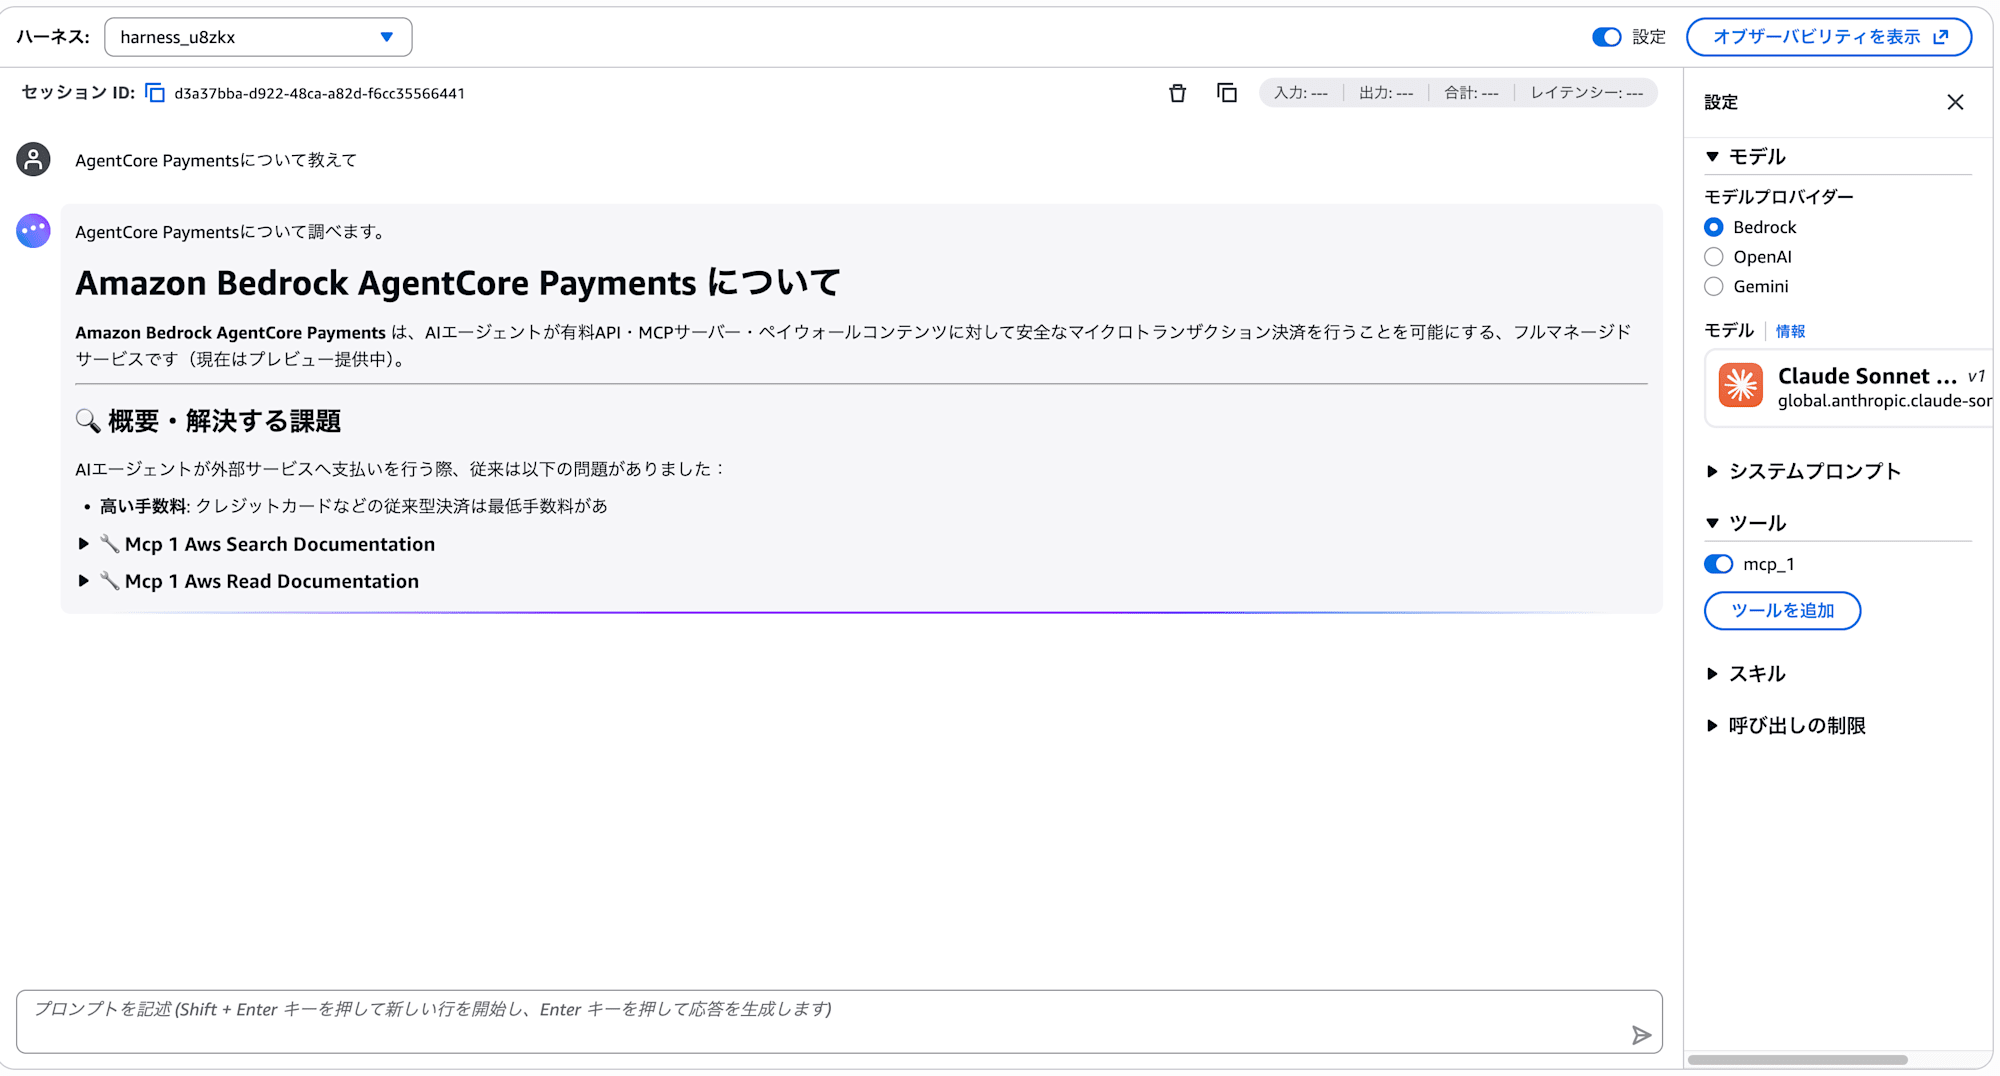
The first time may take about 30 seconds to connect to the MCP server. After the second time it will work smoothly.
If you only need to search AWS documentation, this is sufficient. Adding MCP servers is easy, so publicly available MCP Servers are easy to handle in Harness too!
Part 6: Check What's Happening Behind the Scenes — Observability
The main agent building experience is complete up to Part 5. From here, try it if you have time.
There is a "Show observability" button in the upper right of the playground screen.

Clicking it opens a dashboard where you can check the agent's execution traces and resource consumption.
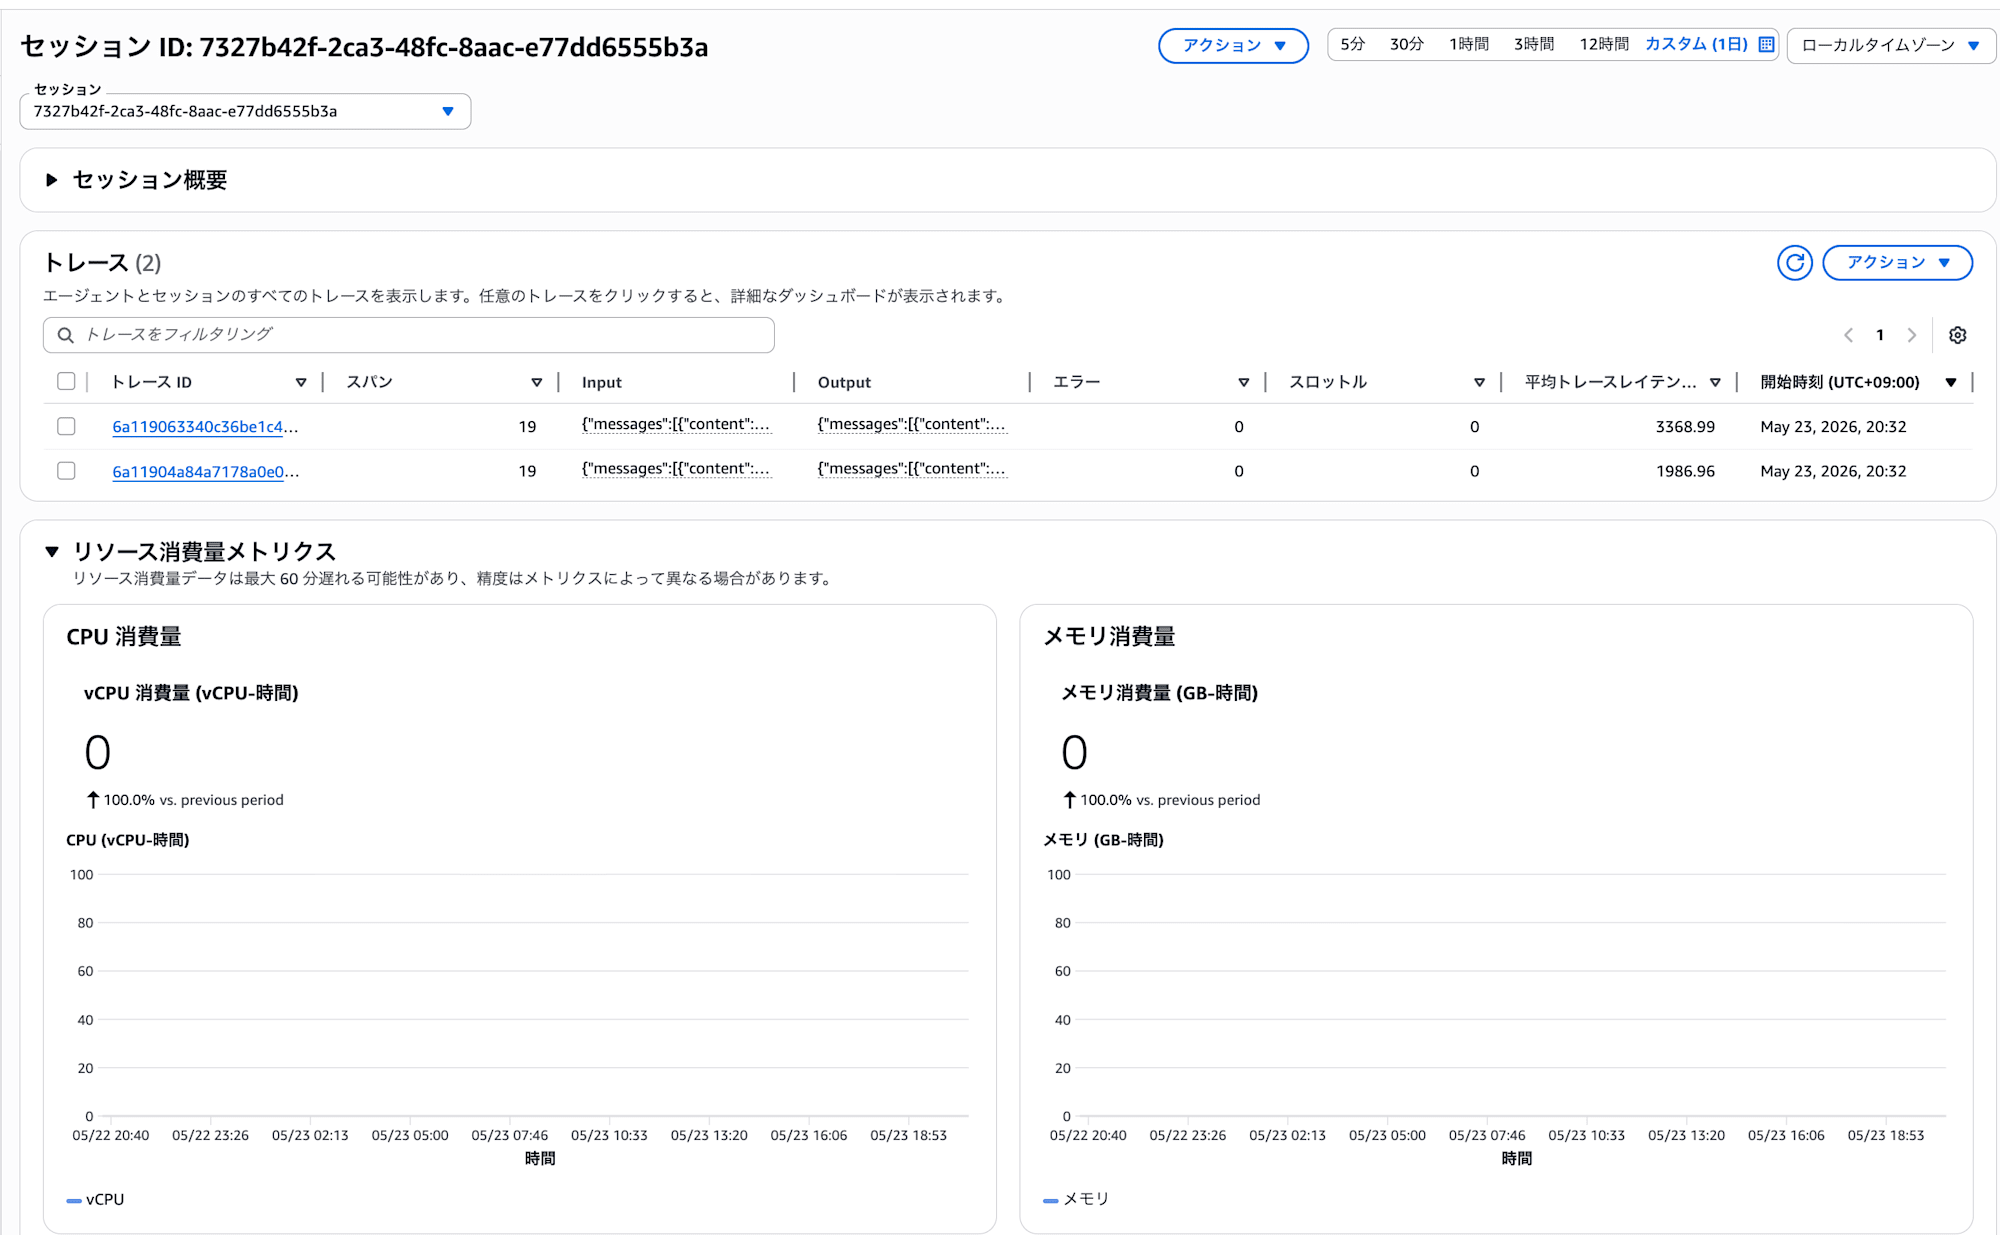
A list of traces per session and CPU/memory consumption metrics are displayed. Clicking on a trace ID lets you check the agent's internal operations in detail.
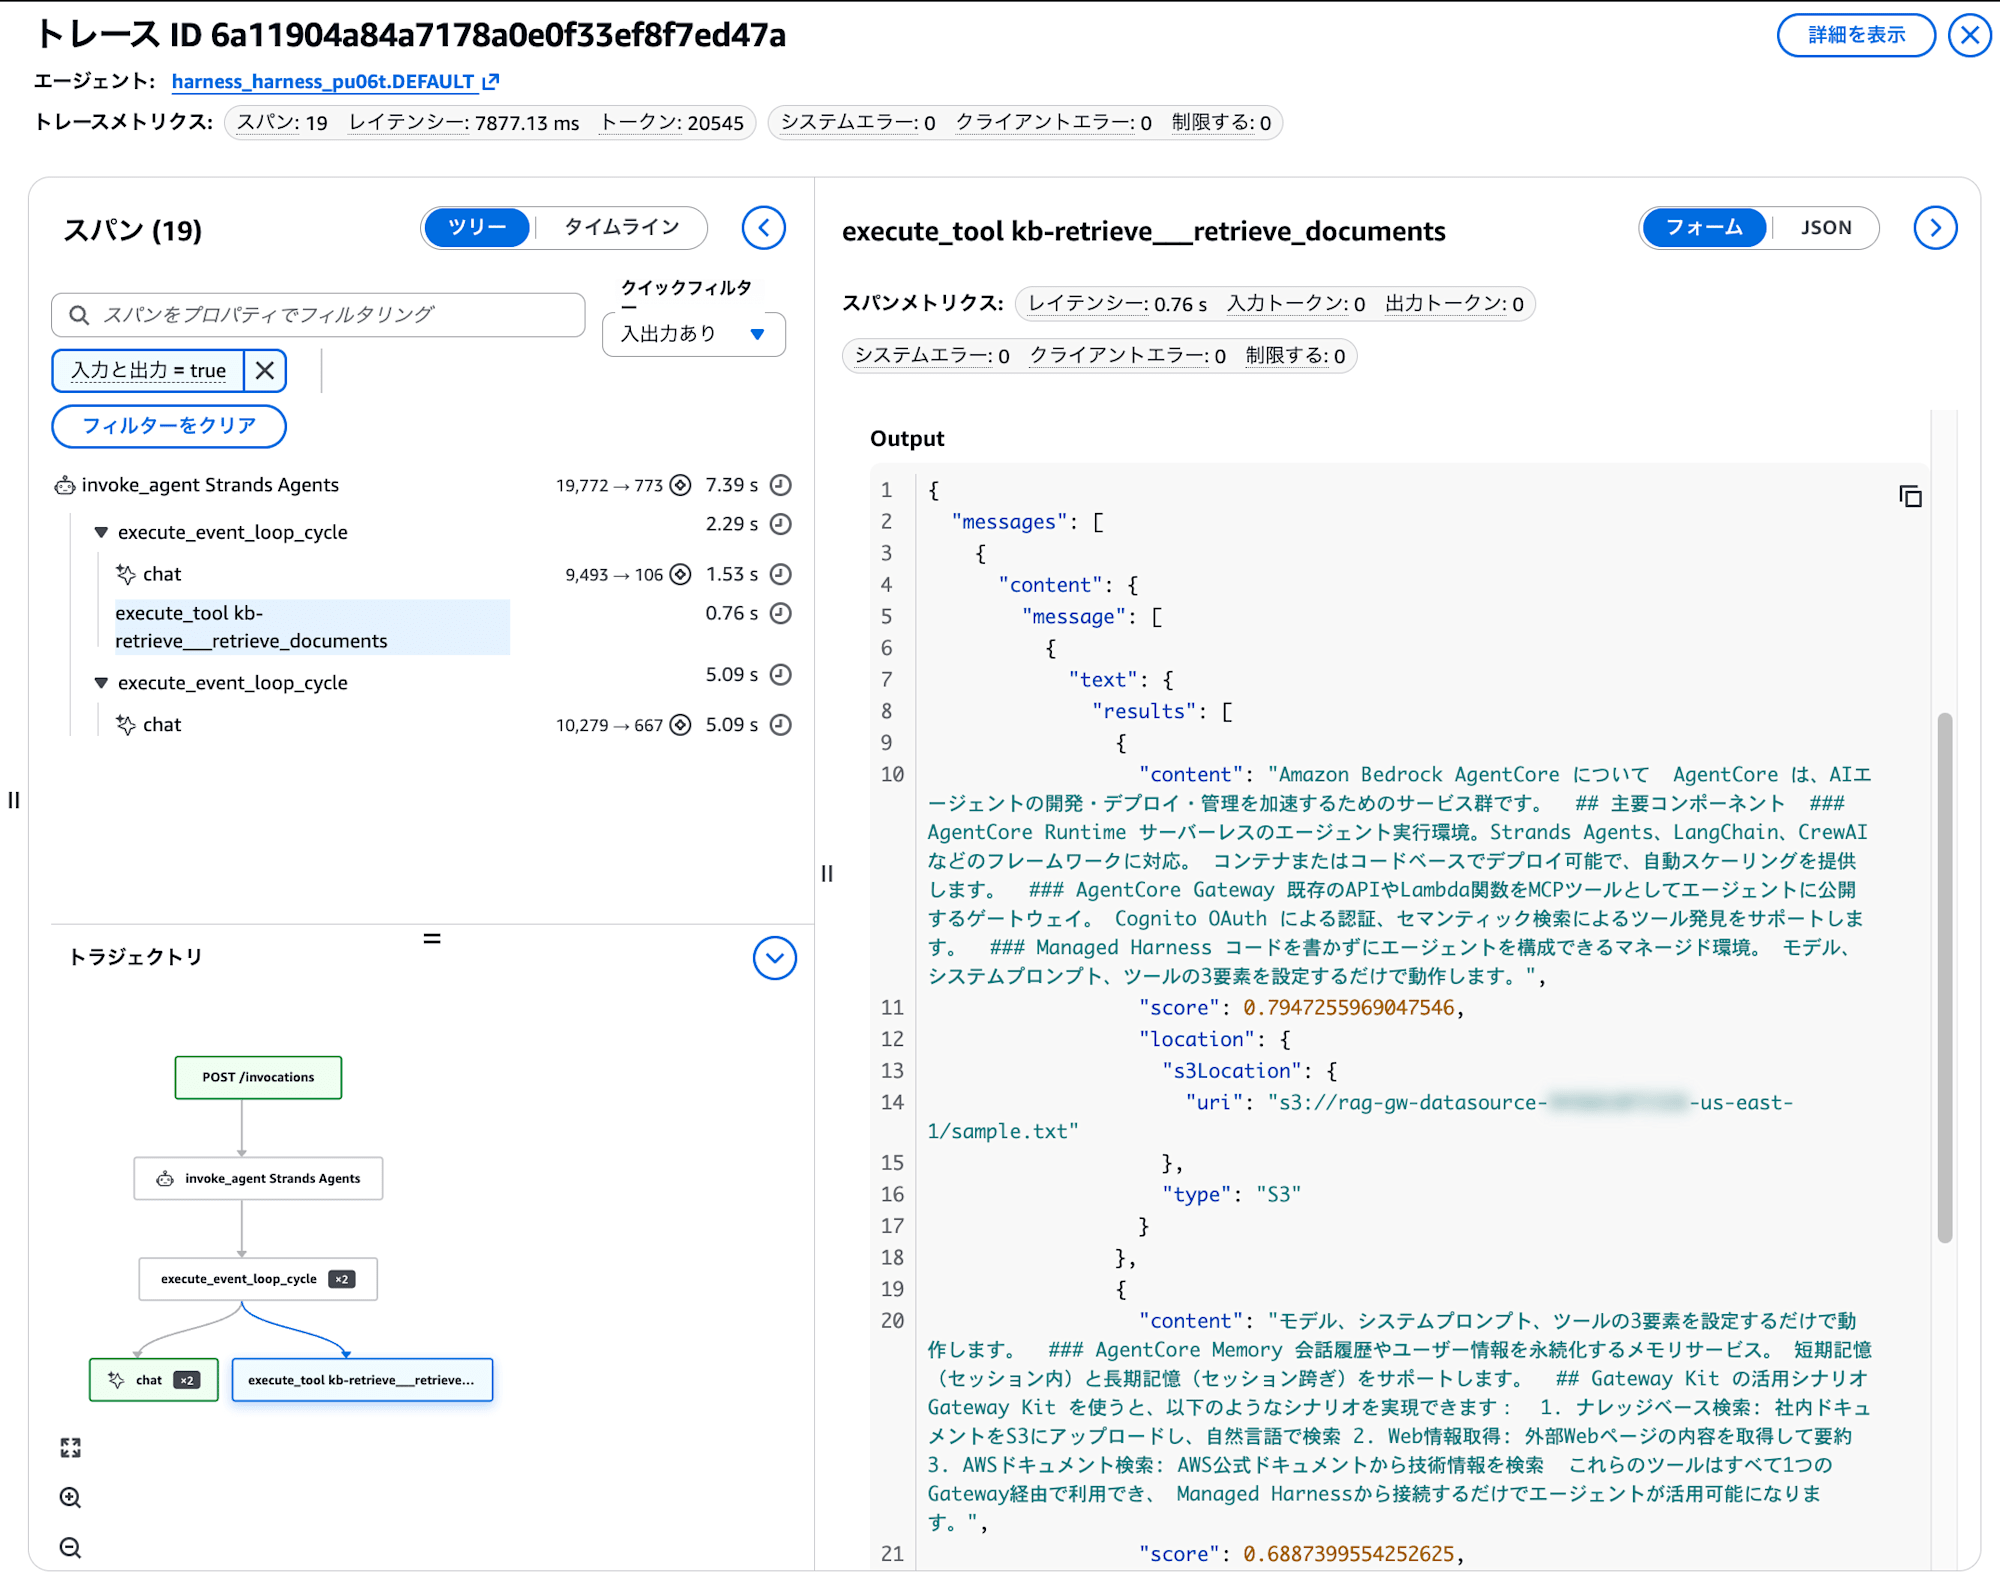
The span tree on the left shows which tools the agent called in what order. You can check the latency and token count for each span, and the tool input/output is displayed on the right.
In this example, you can even confirm the content of the documents retrieved from the Knowledge Base. The trajectory at the bottom visualizes the flow of agent thinking → tool calls → responses as a flowchart.
When actually operating, you use this observability feature to identify where time is being spent and improve performance, or find unintended actions and review processing for continuous improvement. Being able to visually see the processing is helpful for gaining insights.
Bonus: Evaluate the Agent — Evaluations
A mechanism for automatically evaluating the quality of the agent you built is also available. It can be configured from "Evaluations" under "Evaluations" in the left menu.
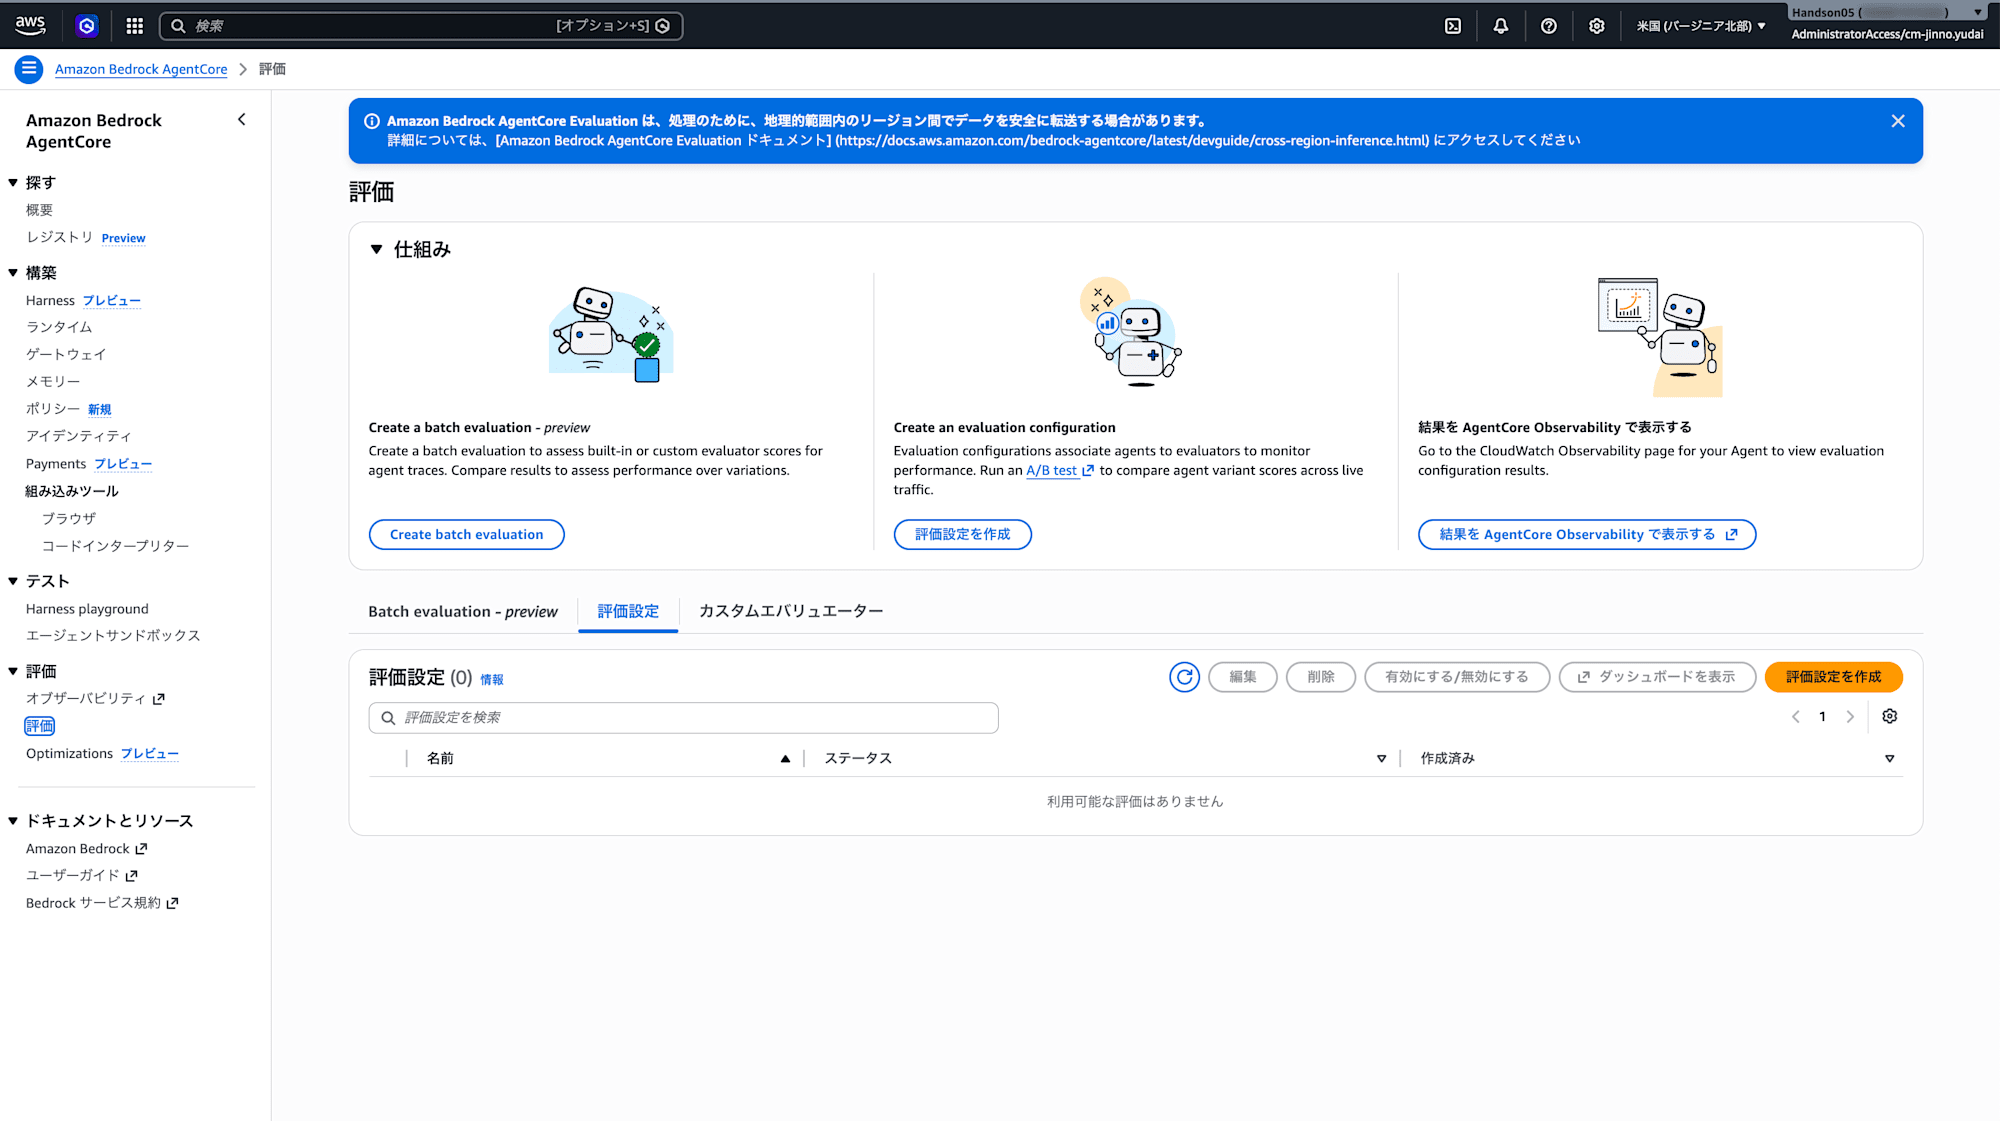
Creating an Evaluation Configuration
Clicking "Create evaluation configuration" opens the evaluation settings screen.
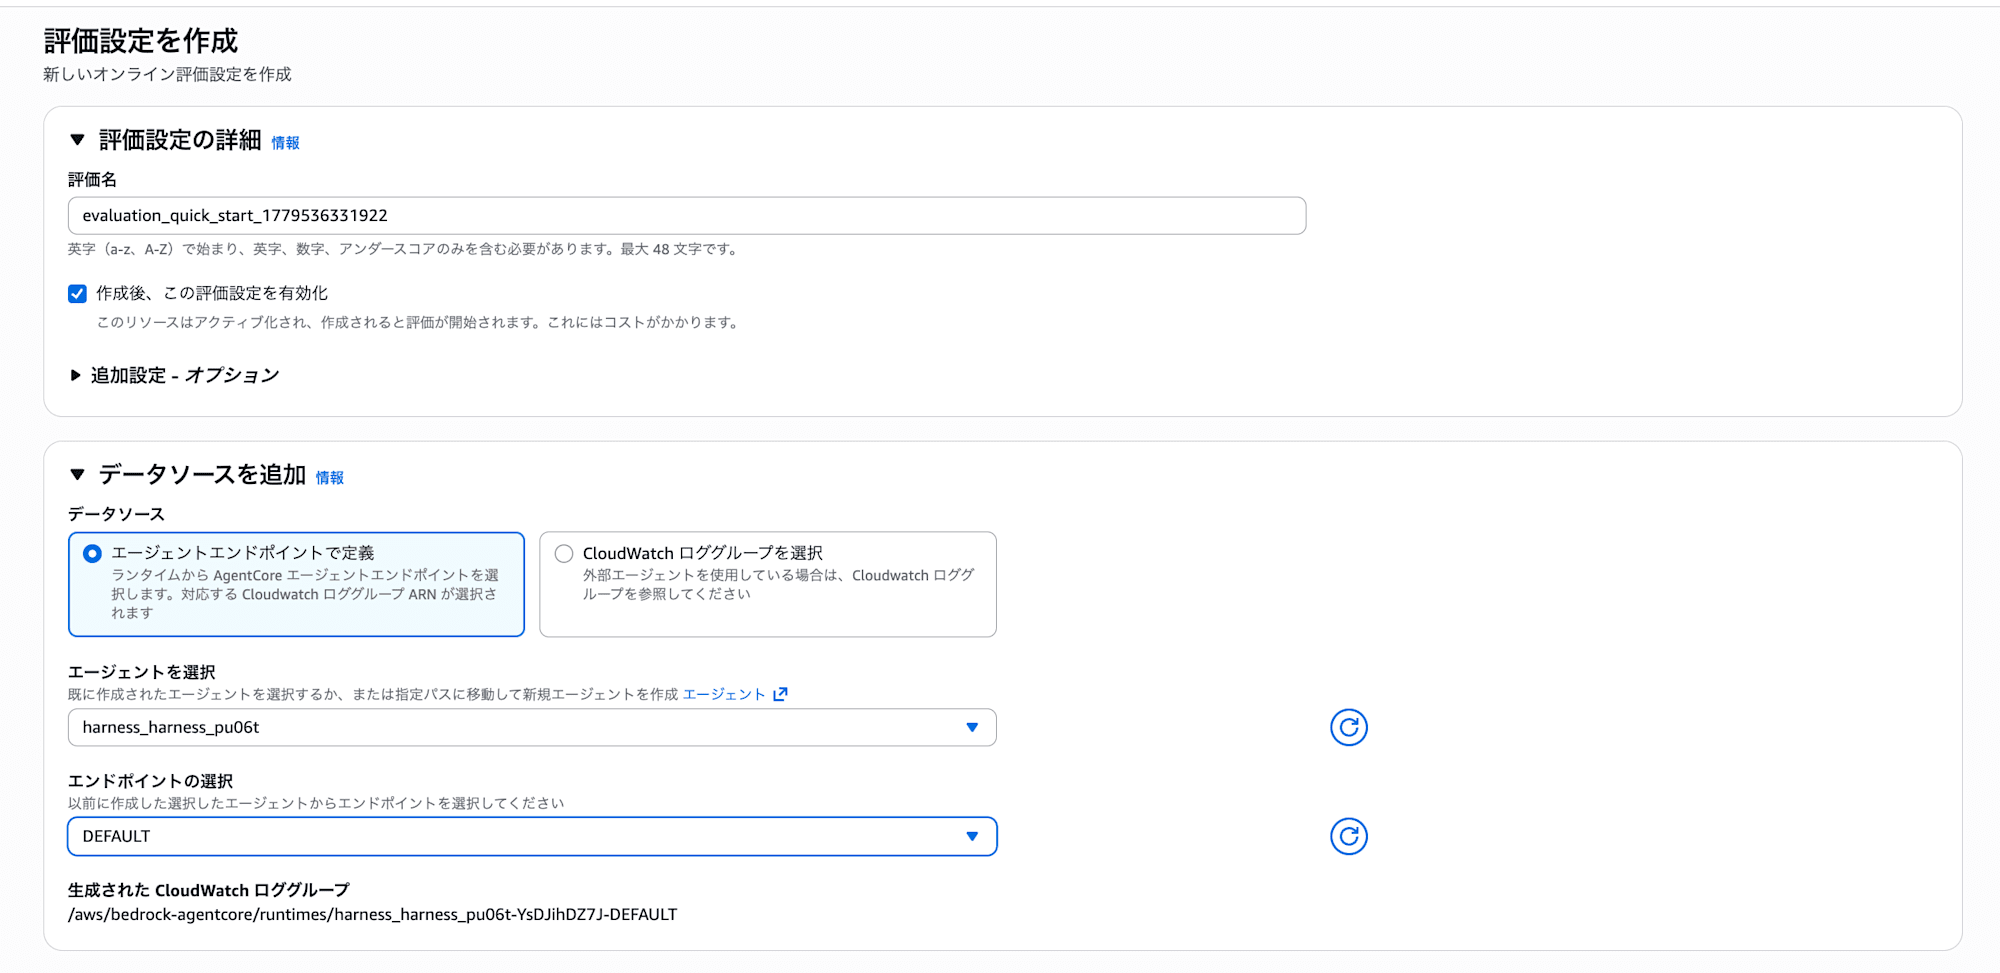
Just by selecting the agent and endpoint, you can automatically evaluate the traces of that agent. Checking "Enable this evaluation configuration after creation" will immediately start the evaluation.
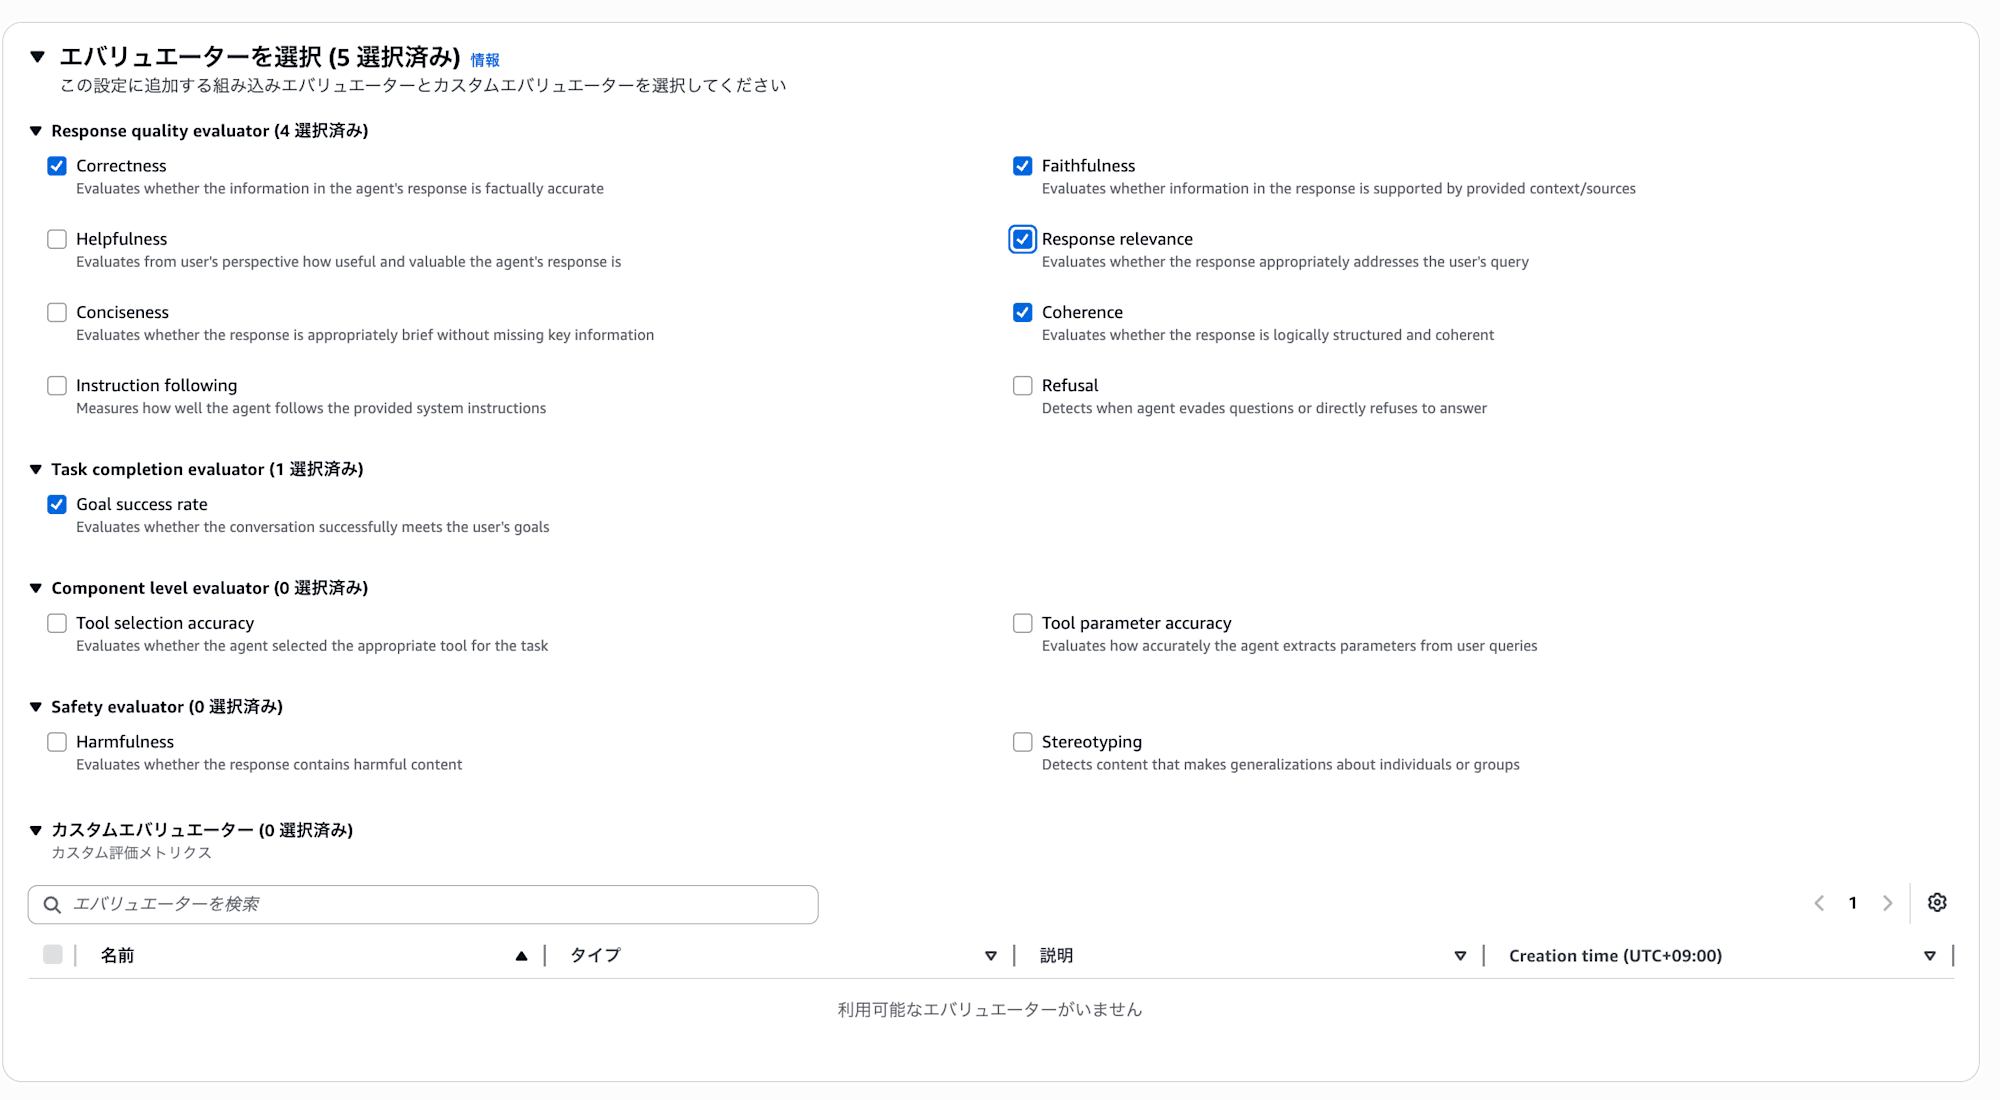
Selecting Evaluators
Multiple built-in evaluators are provided. For this hands-on, we selected the following 5.
- Correctness
- Looks at whether the information contained in the response is factually accurate. It can be used to verify that information retrieved from tools is correctly reflected.
- Faithfulness
- Looks at whether the response is based on the context retrieved from tools. This is a check to see if the content of documents retrieved by RAG is not being fabricated.
- Response relevance
- Looks at whether the response accurately addresses the user's question. This is to confirm that the response is not off-topic from the question.
- Coherence
- Looks at whether the response is logically structured and consistent.
- Goal success rate
- Looks at whether the user's goals were achieved throughout the entire session. While the other four evaluate individual responses (TRACE), this one's characteristic is that it evaluates the entire session.
Please select based on your purpose.
| Category | Evaluator | Scope | Evaluation Content |
|---|---|---|---|
| Response quality | Correctness | TRACE | Evaluates whether the information in the response is factually accurate |
| Response quality | Faithfulness | TRACE | Evaluates whether the response is based on the provided context/sources |
| Response quality | Response relevance | TRACE | Evaluates whether the response appropriately addresses the user's question |
| Response quality | Coherence | TRACE | Evaluates whether the response is logically structured and consistent |
| Response quality | Helpfulness | TRACE | Evaluates how useful and valuable the response is from the user's perspective |
| Response quality | Conciseness | TRACE | Evaluates whether the response is appropriately concise without omitting important information |
| Response quality | Instruction following | TRACE | Evaluates how well the system prompt instructions are followed |
| Response quality | Refusal | TRACE | Detects whether questions are evaded or responses are directly refused |
| Task completion | Goal success rate | SESSION | Evaluates whether the user's goals were achieved throughout the entire session |
| Component level | Tool selection accuracy | TOOL_CALL | Evaluates whether the appropriate tool was selected for the task |
| Component level | Tool parameter accuracy | TOOL_CALL | Evaluates whether tool parameters were accurately extracted from user input |
| Safety | Harmfulness | TRACE | Detects whether harmful content is included in responses |
| Safety | Stereotyping | TRACE | Detects generalizations/stereotypes about specific groups |
| Trajectory | TrajectoryExactOrderMatch | SESSION | Evaluates whether the actual tool call order exactly matches expectations |
| Trajectory | TrajectoryInOrderMatch | SESSION | Evaluates whether the expected tools are included in order (other tools in between are OK) |
| Trajectory | TrajectoryAnyOrderMatch | SESSION | Evaluates whether all expected tools were used regardless of order |
Scope represents the granularity of evaluation. TRACE evaluates individual responses (one interaction), SESSION evaluates the entire session (multiple interactions), and TOOL_CALL evaluates tool selection and parameters respectively.
Trajectory-type evaluations allow you to define the expected tool call order and verify whether the agent made the correct tool selection.
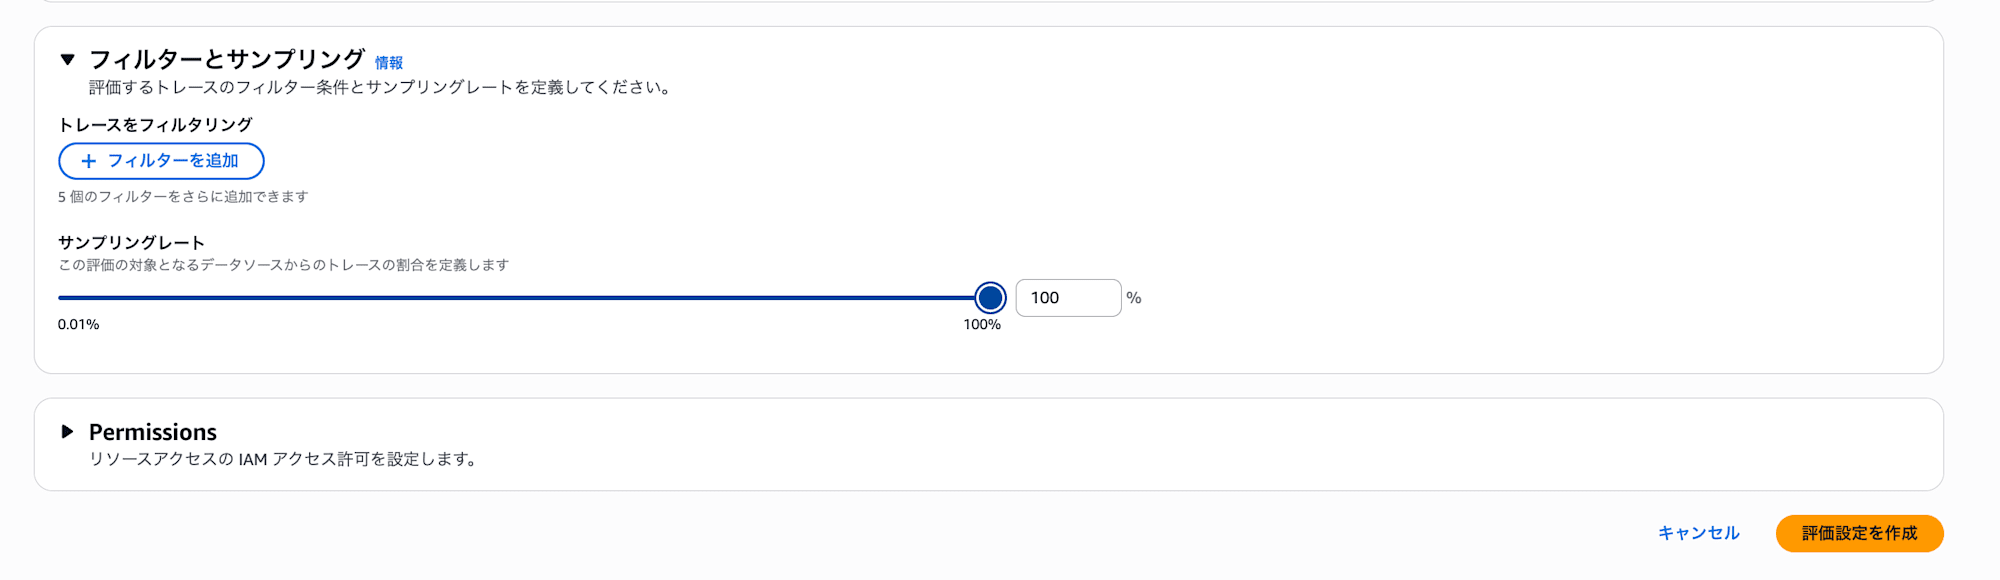
In this online evaluation, the traces during the hands-on are being evaluated in real time, but with batch evaluation, you can prepare a dataset and evaluate in bulk offline. If you want to systematically measure quality by preparing expected values (ground truth data) like Trajectory evaluation, consider batch evaluation as well.
You can set the percentage of traces to be evaluated with the sampling rate (100% is fine for the hands-on).
Checking Evaluation Results
After asking several questions and completing the evaluation, scores can be viewed at the session level and trace level.
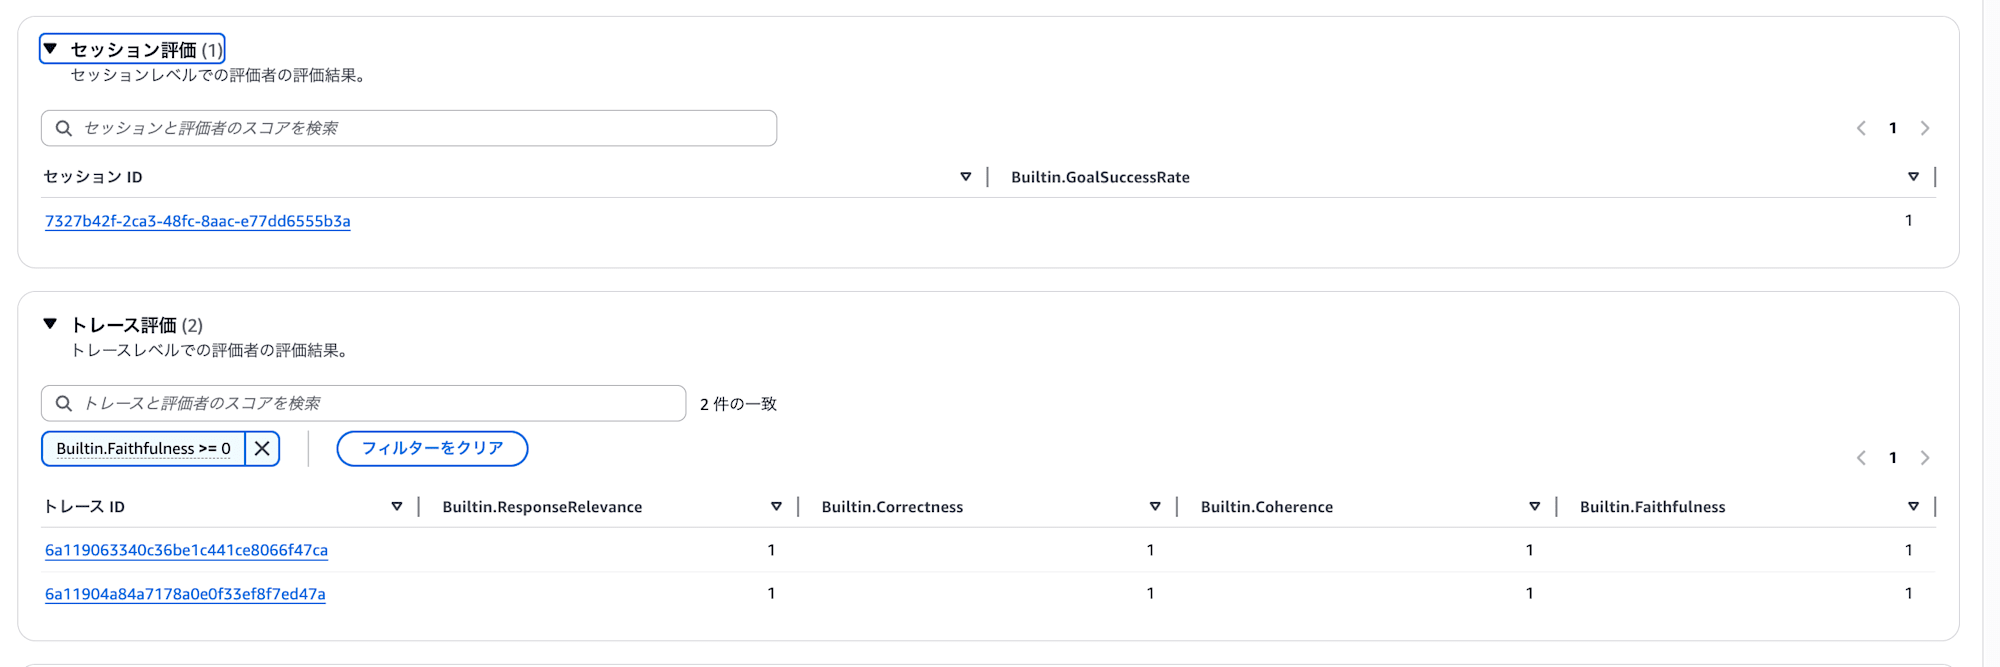
Scores such as ResponseRelevance / Correctness / Coherence / Faithfulness are automatically assigned to each trace.
Evaluation results can also be viewed from the observability dashboard introduced in Part 6.
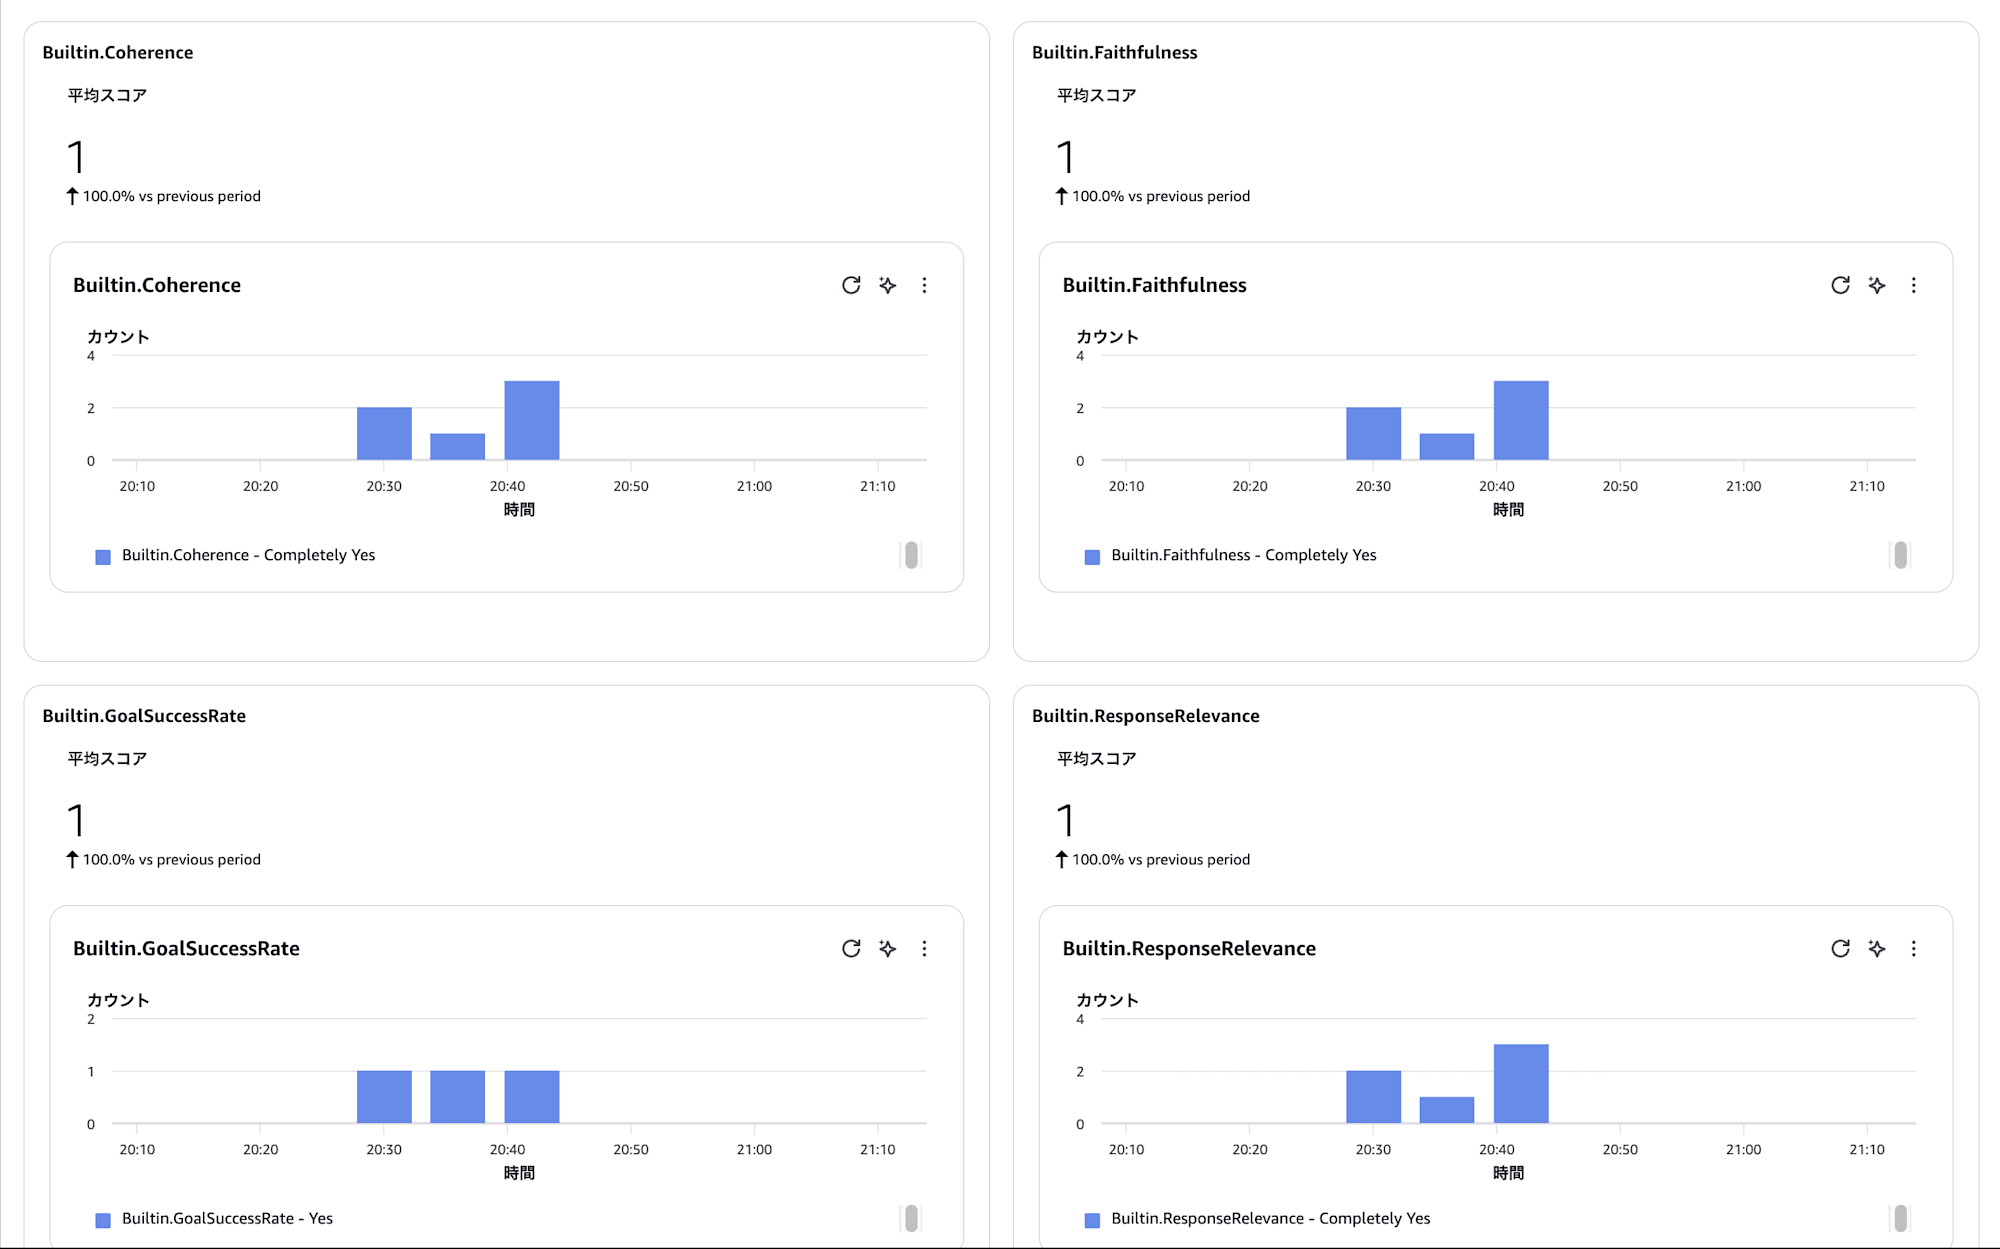
The flow is to check this dashboard, verify what kind of behavior is occurring with the observability features mentioned earlier, and identify any problematic interactions.
In production operation, you run a cycle of improving the system prompt and tool configuration based on these evaluation results.
Of course, since these are results determined by AI, it is also important not to take them at face value and to visually verify any results that feel off.
Cleanup
To delete the resources created during the hands-on, follow the steps below.
- Bedrock console → Harness preview → Select the created harness and click "Delete"
- Delete the Gateway / Knowledge Base deployed with CDK
cd agentcore-gateway-kit
npx cdk destroy --all
Closing
Were you able to experience that you can build an AI agent with Managed Harness alone?
Starting from a chatbot and progressively adding tools like Browser / Code Interpreter / Gateway, you can clearly see how the agent autonomously selects tools and carries out tasks. I hope you also got a sense of how the agent's capabilities continue to expand by connecting external tools and data sources through the Gateway.
The Managed Harness we explored this time is just the entry point to AgentCore. The following article summarizes what kind of service suite AgentCore is as a whole.
If you want to develop and deploy agents more flexibly, there is an option called AgentCore CLI. The implementation in code is not that difficult either, so please refer to the following article for how to get started.
I hope this article was helpful in some way. Thank you very much for reading to the end!