![[Copilot Studio] Comparing methods for giving an agent KPI data for aggregation: chat attachments, file knowledge, and SharePoint](https://images.ctfassets.net/ct0aopd36mqt/wp-thumbnail-00eddef75cb5ee39286e0aa370a96e4f/040bbf127b84da0ee2c483485da1dd29/microsoft-eyecatch.jpg?w=3840&fm=webp)
[Copilot Studio] Comparing methods for giving an agent KPI data for aggregation: chat attachments, file knowledge, and SharePoint
This page has been translated by machine translation. View original
Introduction
Hello, I'm Kema.
To have an agent aggregate numbers, you first need to decide "how to pass the source data to the agent for aggregation."
The easiest approach is to attach an Excel file in the test chat and have it aggregate.
However, attaching a file every time is cumbersome in actual agent use scenarios.
Ideally, the agent would have the data from the start, and you could just say "aggregate this" without any attachment.
This article covers methods for passing structured data (Excel) for aggregation to an agent, with hands-on verification as of June 2026.
We compare three approaches—chat attachment, file knowledge, and SharePoint—focusing on whether the code interpreter can aggregate without attachment simply by adding a file to knowledge.
I hope this serves as a reference for those who want to give an agent collected data permanently for analysis.
This article is the 5th installment in a series on building agents with Copilot Studio.
The series aims to build an agent that handles "collection → aggregation → charts → insights → documentation" end-to-end, and this article covers the "collection" entry point—how to pass data as a prerequisite for aggregation.
Target audience: Those who want to give an agent data permanently in Copilot Studio for aggregation and analysis
Series Article List
| # | Theme | Article |
|---|---|---|
| Part 1 | First agent | Creating Your First Agent |
| Part 2 | Knowledge | Trying Knowledge-Grounded Answers Based on Files |
| Part 3 | Topics, Tools, Flows | Building "Behavior" with Topics, Tools, and Agent Flows |
| Part 4 | Templates, Autonomous Triggers, Multi-agent | Expanding the Configuration with Templates, Autonomous Triggers, and Multi-agent |
| Part 5 | Collection (How to Pass Data) | (This article) |
1. What We're Doing This Time
We compare methods for passing aggregation-ready structured data (Excel) to an agent.
- Organize data-passing methods into 3 routes (chat attachment, file knowledge, SharePoint)
- Test whether the code interpreter can aggregate without attachment simply by adding a file to knowledge
- Try the official recommended approach (SharePoint + Work IQ) hands-on and verify whether testing is possible without publishing
For verification, we use the same fictional monthly KPI data (fictional) for three SaaS companies (CloudNova / StreamForge / Datapeak) as before.
2. Why "How to Pass Data" Is the Key Question
To aggregate KPIs with the code interpreter, you need to provide the Excel to be aggregated to the agent.
The method of passing it determines whether "you hand it over manually each time" or "the agent already has it."
The official documentation summarizes two methods for the code interpreter to ingest structured data:
Copilot Studio agents can use code interpreter to analyze structured files that are provided to the agent by the following two ways:
- As an end-user, when you upload structured files while chatting with the agent.
- As a maker, when you add SharePoint Documents library as a knowledge source, which in turn contains the structured files.
Source: Use code interpreter to analyze structured data (preview) | Microsoft Learn
In this article, in addition to the officially documented methods of "chat attachment (Route A in this article)" and "SharePoint (Route C in this article)," we also test whether aggregation is possible via "direct file knowledge (Route B in this article)," where an Excel file is uploaded directly to the agent as knowledge.
3. Three Routes for Passing Data
In this article, we compare the following three methods for passing aggregation-ready Excel to an agent.
Image of the data retrieval flow between each component (chat, Dataverse, SharePoint) and the agent across the three data routes
| Route | Method | How Data Is Held | Official Documentation | Best Suited For |
|---|---|---|---|---|
| A: Chat Attachment | Attach Excel each conversation | Temporary (that conversation only) | Officially supported as end-user attachment | One-off analysis, ad hoc questions |
| B: File Knowledge | Upload Excel as a file and make it knowledge | Permanent (held by agent) | Not explicitly stated for aggregation via direct upload (independent verification in this article) | Aggregating the same data every time without attachment |
| C: SharePoint (Work IQ) | Add SharePoint Documents library as knowledge and enable Work IQ | Permanent (synced with SharePoint) | Officially supported as SharePoint document integration | Large data, sync to latest, or access control required |
In this article, we verify all three routes hands-on.
We start with the easy Route A (chat attachment), then move on to Route B (file knowledge), and finally Route C (SharePoint + Work IQ), which the official documentation presents as the standard approach.
4. Route A: Aggregating via Chat Attachment
Route A is the easiest method.
You attach an Excel file each conversation and have it aggregate on the spot.
This corresponds to "end-user file upload during conversation," which the official documentation explicitly lists as a structured data input for the code interpreter.
As an end-user, when you upload structured files while chatting with the agent.
Source: Use code interpreter to analyze structured data (preview) | Microsoft Learn
4.1 Prepare the Verification Excel
We use the same Excel for all three routes (A, B, C) in this article.
To calculate year-over-year (YoY), we need data from the same period in the prior year.
We prepare an Excel with monthly KPIs for three companies × (October–December of 2024 and 2025) in a single RawMonthly sheet.
Since the code interpreter handles aggregation, this file contains only raw data—no aggregation formulas or summary sheets.
Verification Excel generation script (click to expand)
#!/usr/bin/env python3
"""Generate a verification Excel for YoY aggregation.

Raw data to be read by the code interpreter (CI).
Contains monthly KPIs for 3 companies × (Oct–Dec 2024 and 2025) in one RawMonthly sheet.
Since aggregation (totals, averages, YoY) is handled deterministically by CI's Python (pandas),
this file contains no aggregation formulas or summary sheets (only raw data is passed).
"""
from openpyxl import Workbook
from openpyxl.worksheet.table import Table, TableStyleInfo

OUT = "kpi-raw-data-yoy.xlsx"

# Raw data (fictional). Oct–Dec 2024 values are lower (pre-growth); Oct–Dec 2025 values reflect growth.
# (Company, Month, ARR (million yen), NRR (%), Operating Profit Margin (%))
RAW = [
    ("CloudNova", "2024-10", 1600, 116, 11),
    ("CloudNova", "2024-11", 1625, 117, 11.5),
    ("CloudNova", "2024-12", 1650, 118, 12),
    ("StreamForge", "2024-10", 1160, 105, -1),
    ("StreamForge", "2024-11", 1180, 106, -0.5),
    ("StreamForge", "2024-12", 1200, 107, 0),
    ("Datapeak", "2024-10", 2450, 124, 16.5),
    ("Datapeak", "2024-11", 2500, 125, 17),
    ("Datapeak", "2024-12", 2550, 126, 17.5),
    ("CloudNova", "2025-10", 1900, 119, 13),
    ("CloudNova", "2025-11", 1950, 120, 13.5),
    ("CloudNova", "2025-12", 2000, 121, 14),
    ("StreamForge", "2025-10", 1280, 108, 0.5),
    ("StreamForge", "2025-11", 1300, 109, 1),
    ("StreamForge", "2025-12", 1320, 110, 1.5),
    ("Datapeak", "2025-10", 2750, 127, 18.5),
    ("Datapeak", "2025-11", 2800, 128, 19),
    ("Datapeak", "2025-12", 2880, 129, 19.5),
]


def main() -> None:
    wb = Workbook()
    ws = wb.active
    ws.title = "RawMonthly"
    ws.append(["Company", "Month", "ARR", "NRR", "OPM"])
    for row in RAW:
        ws.append(list(row))
    table = Table(displayName="RawMonthly", ref=f"A1:E{len(RAW) + 1}")
    table.tableStyleInfo = TableStyleInfo(
        name="TableStyleMedium2", showRowStripes=True
    )
    ws.add_table(table)
    wb.save(OUT)
    print(f"saved {OUT}")


if __name__ == "__main__":
    main()
Save this script as make_excel_yoy.py and run it with the following command (openpyxl is required).
pip install openpyxl
python make_excel_yoy.py
# Example output
saved kpi-raw-data-yoy.xlsx
The resulting RawMonthly sheet has 18 rows: 3 companies × 2 years × 3 months (Oct–Dec).
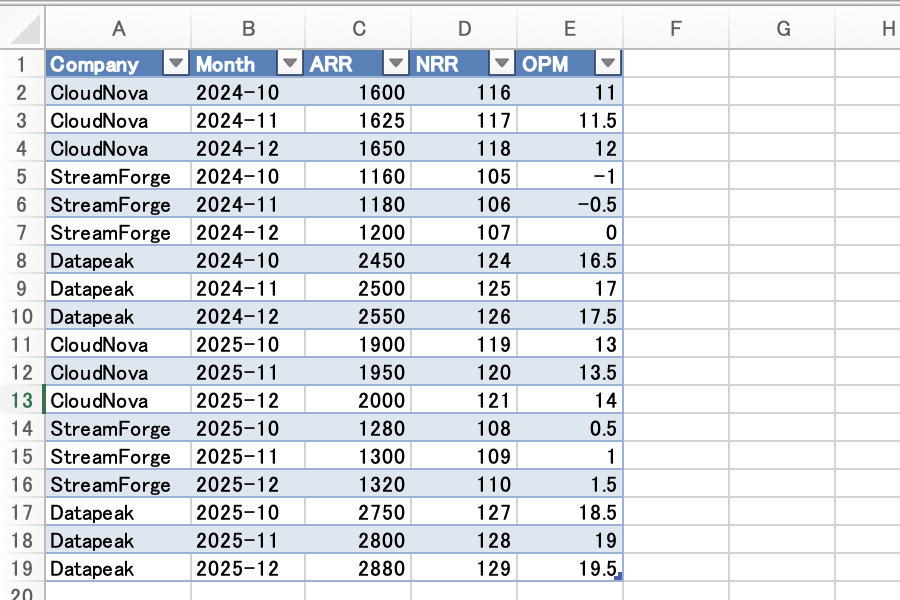
The RawMonthly sheet of the generated kpi-raw-data-yoy.xlsx. Five columns—Company, Month, ARR, NRR, OPM—contain raw data (18 rows) for 3 companies across Oct–Dec 2024/2025
When having the code interpreter aggregate this file, we consider the result correct ("pass") if it matches the following values (pass criteria).
Rounding: ARR and NRR to 0 decimal places, operating profit margin (OPM) to 1 decimal place, YoY to 1 decimal place.
| Company | 2024 ARR Avg | 2024 NRR Avg | 2024 OPM Avg | 2025 ARR Avg | 2025 NRR Avg | 2025 OPM Avg | ARR YoY |
|---|---|---|---|---|---|---|---|
| CloudNova | 1625 | 117 | 11.5 | 1950 | 120 | 13.5 | +20.0% |
| StreamForge | 1180 | 106 | -0.5 | 1300 | 109 | 1.0 | +10.2% |
| Datapeak | 2500 | 125 | 17.0 | 2810 | 128 | 19.0 | +12.4% |
The calculation method for each value is as follows:
- ARR/NRR/OPM averages: Simple average of the 3 months (Oct–Dec) for that year (same for both 2024 and 2025). For example, CloudNova's 2025 NRR average is (119 + 120 + 121) ÷ 3 = 120, and 2025 OPM average is (13 + 13.5 + 14) ÷ 3 = 13.5. Similarly for 2024: NRR average (116 + 117 + 118) ÷ 3 = 117, OPM average (11 + 11.5 + 12) ÷ 3 = 11.5.
- ARR YoY: (2025 ARR average ÷ 2024 ARR average − 1) × 100. For CloudNova: 2025 ARR average (1900 + 1950 + 2000) ÷ 3 = 1950, 2024 ARR average (1600 + 1625 + 1650) ÷ 3 = 1625, so (1950 ÷ 1625 − 1) × 100 = +20.0%.
4.2 Attach to Chat and Request Aggregation
Attach kpi-raw-data-yoy.xlsx via the "Upload file" button in the test chat input field, then send the aggregation request.
Please aggregate the attached Excel (RawMonthly sheet) using the code interpreter (Python/pandas). For each company (CloudNova / StreamForge / Datapeak), calculate the average ARR, NRR, and OPM for 2024 and 2025, and also calculate the ARR year-over-year growth (YoY%). Round ARR and NRR to integers (0 decimal places), OPM to 1 decimal place, and YoY to 1 decimal place. Please calculate using Python code, not LLM inference.
In my environment, the agent loaded the RawMonthly sheet (18 rows) from the attached file into the code interpreter and executed Python for aggregation.
The aggregation results matched the pass criteria from 4.1 (CloudNova ARR YoY +20.0%, StreamForge +10.2%, Datapeak +12.4%, NRR and OPM all matched).
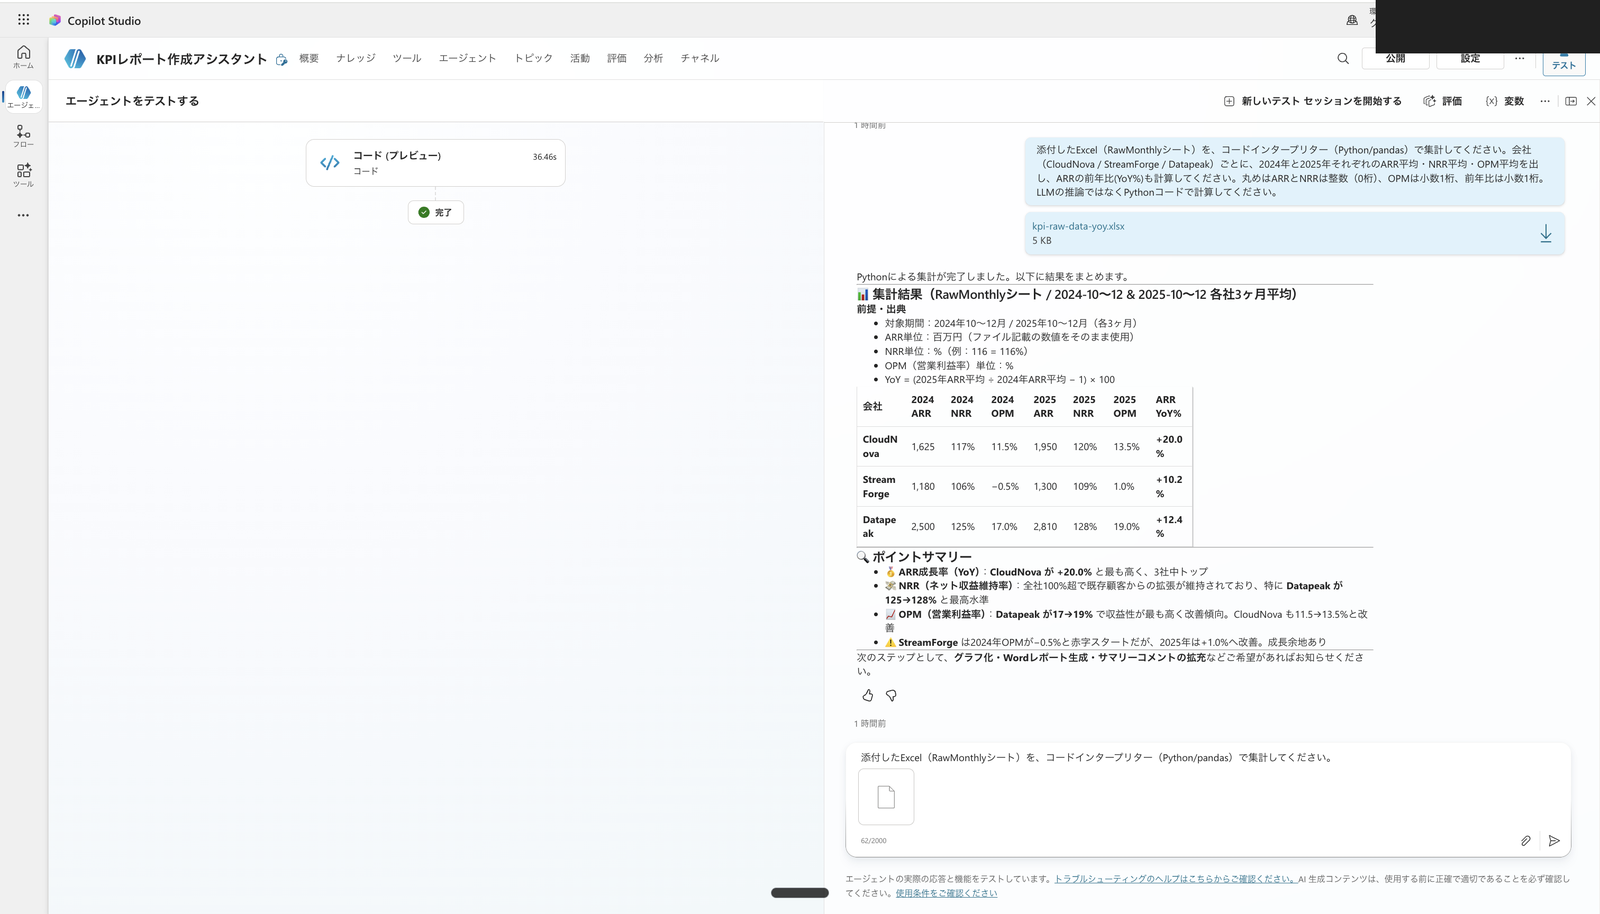
Full test view. kpi-raw-data-yoy.xlsx was attached in the upper right with an aggregation request; the activity map on the left shows "Code (Preview)" completed (execution time 36.46 seconds); the right shows the ARR, NRR, OPM averages and YoY by company and year, matching the pass criteria
Route A is convenient but requires an attachment every conversation.
If you want to aggregate the same data every time without attachment, Route B (file knowledge) described next is more suitable.
5. Route B: Holding in File Knowledge and Aggregating
5.1 Purpose of This Verification
The officially supported inputs for structured data in the code interpreter are chat attachment (Route A in this article) and SharePoint Documents library connection (Route C in this article).
The option of directly "uploading a file and making it knowledge" (Route B in this article) is not included in those.
We therefore verify hands-on whether the code interpreter can aggregate from file knowledge containing an Excel file without chat attachment.
Note that uploaded files are stored in Dataverse, indexed, and made into knowledge.
Files uploaded in Copilot Studio use Microsoft Dataverse to ingest raw files and create indexes and vector embeddings.
Source: Unstructured data as a knowledge source | Microsoft Learn
5.2 Add the Excel to File Knowledge
We use the same kpi-raw-data-yoy.xlsx prepared in Route A's section 4.1.
From the agent's "Knowledge" page (or overview page), open "Add knowledge" and add kpi-raw-data-yoy.xlsx via file upload.
Give the knowledge a name and description.
The description helps generative orchestration select this knowledge, so write something that makes clear what data it contains.
The description should be detailed, especially if generative AI is enabled, because it helps generative orchestration.
Source: Upload files as a knowledge source | Microsoft Learn
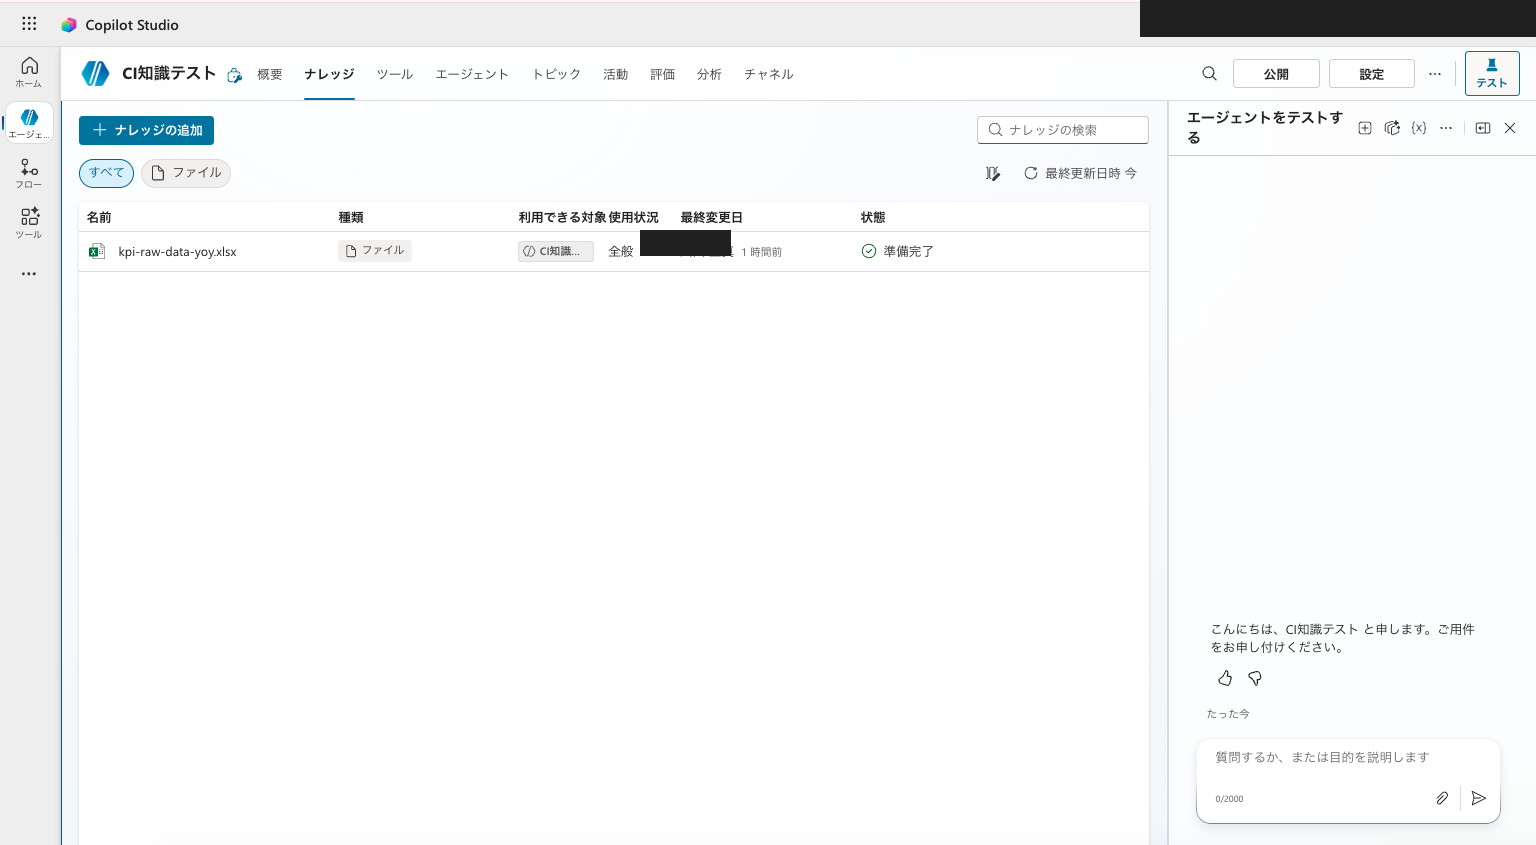
kpi-raw-data-yoy.xlsx added as file knowledge and indexing complete. The agent can now reference this data without attachment
5.3 Enable the Code Interpreter
The code interpreter must be enabled per environment and is off by default.
In the agent's "Settings" → "Generative AI" under "File processing capabilities", turn on "Code interpreter".
- In Copilot Studio, select Settings > Generative AI. Under File processing capabilities, turn on the File uploads toggle.
- Under File processing capabilities, turn on the Code interpreter toggle.
- Select Save.
Source: Use code interpreter to analyze structured data (preview) | Microsoft Learn
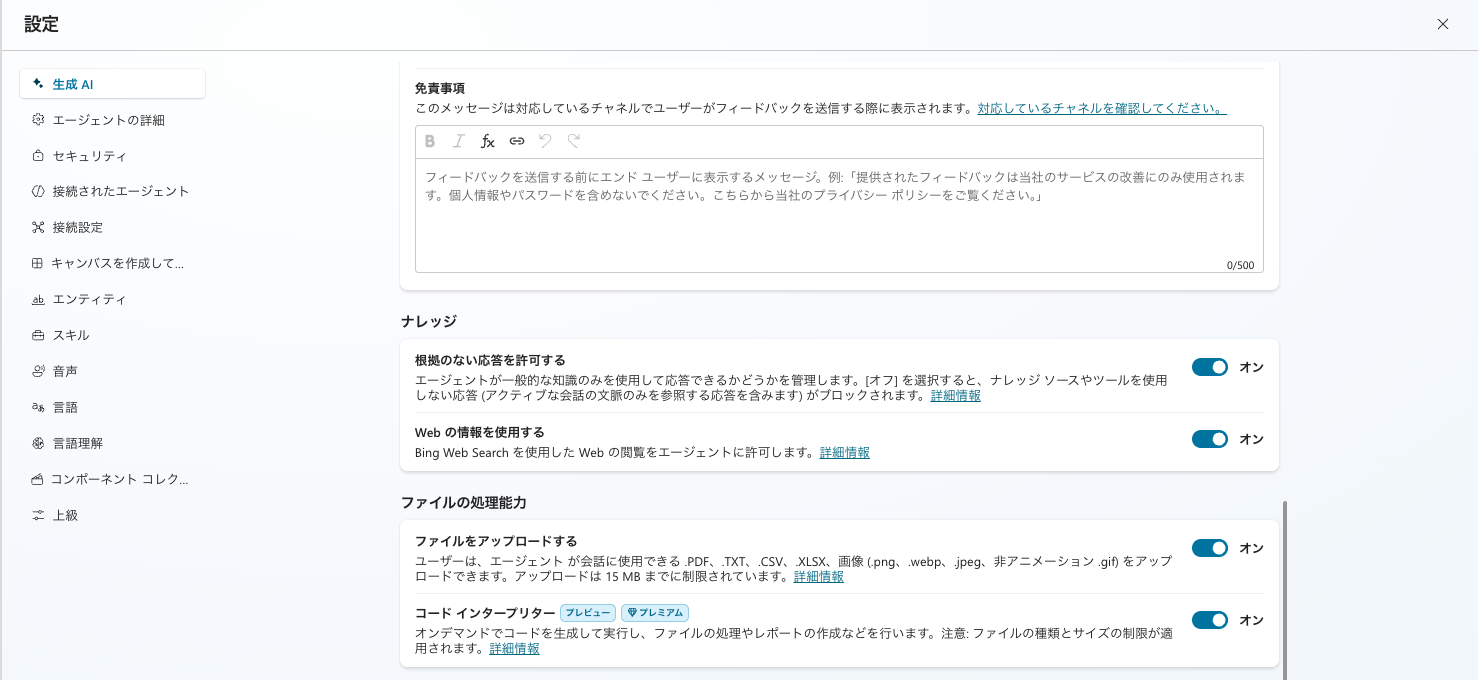
Turn on "Code interpreter" under "Settings" → "Generative AI" → "File processing capabilities." In my environment, it was enabled along with "Upload files"
5.4 Request Aggregation Without Attachment
In the test chat, request aggregation of the data in knowledge without attaching a file.
Please aggregate the KPI Excel (RawMonthly sheet) in your knowledge using the code interpreter (Python/pandas). For each company (CloudNova / StreamForge / Datapeak), calculate the average ARR, NRR, and OPM for 2024 and 2025, and also calculate the ARR year-over-year growth (YoY%). Round ARR and NRR to integers (0 decimal places), OPM to 1 decimal place, and YoY to 1 decimal place. Please calculate using Python code, not LLM inference.
In my environment, the agent first retrieved data from knowledge, then executed Python with the code interpreter.
The aggregation results matched the pass criteria from 4.1 (CloudNova ARR YoY +20.0%, Datapeak +12.4%, StreamForge +10.2%, NRR and OPM all matched).
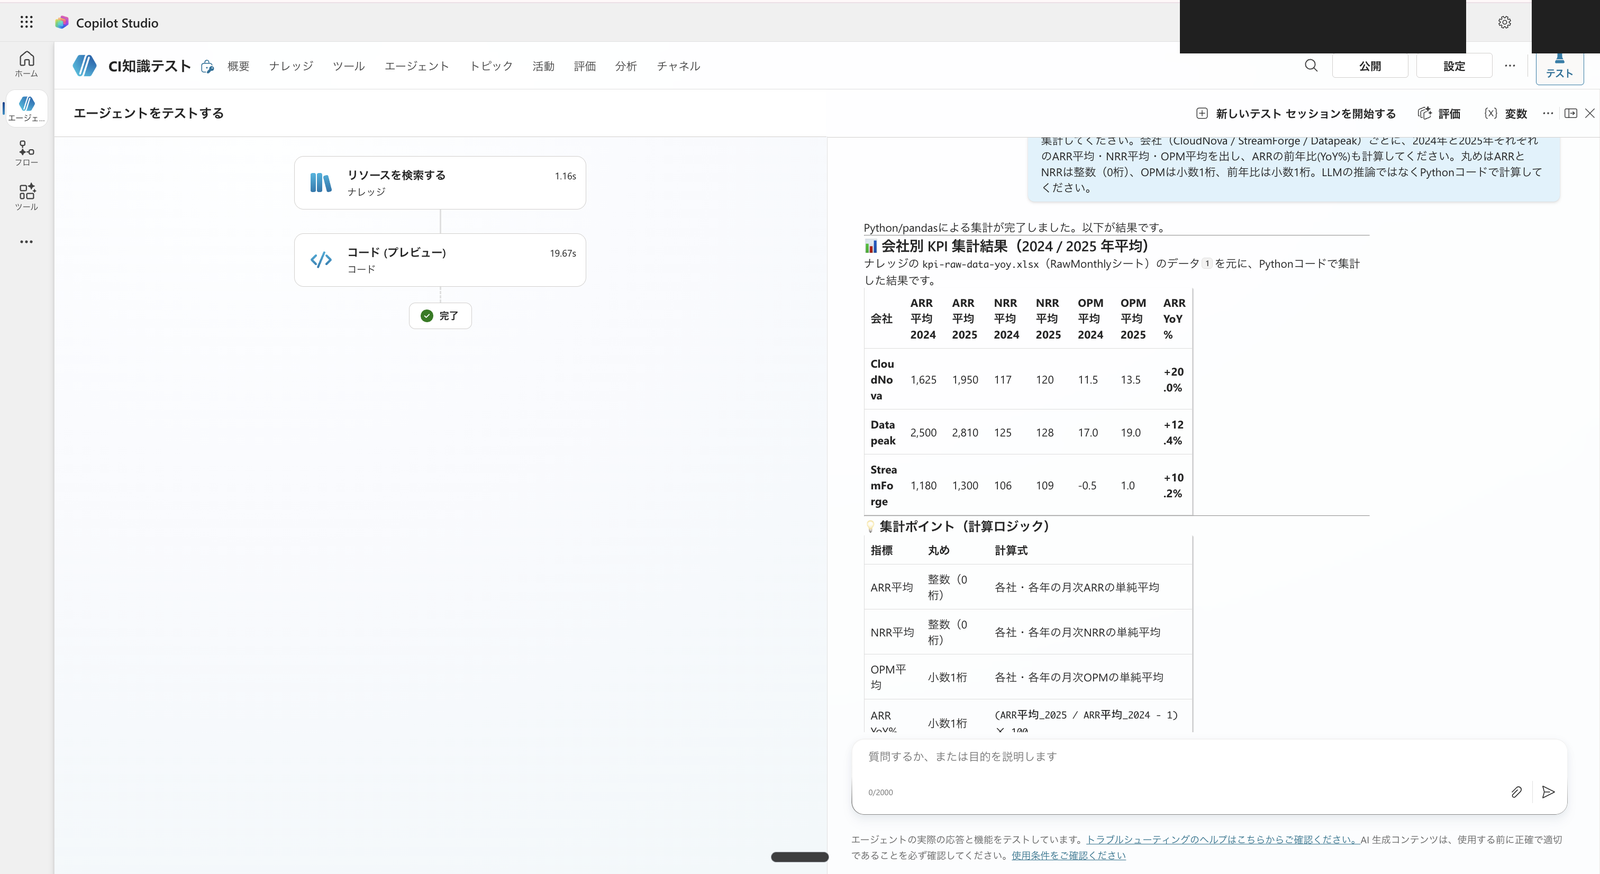
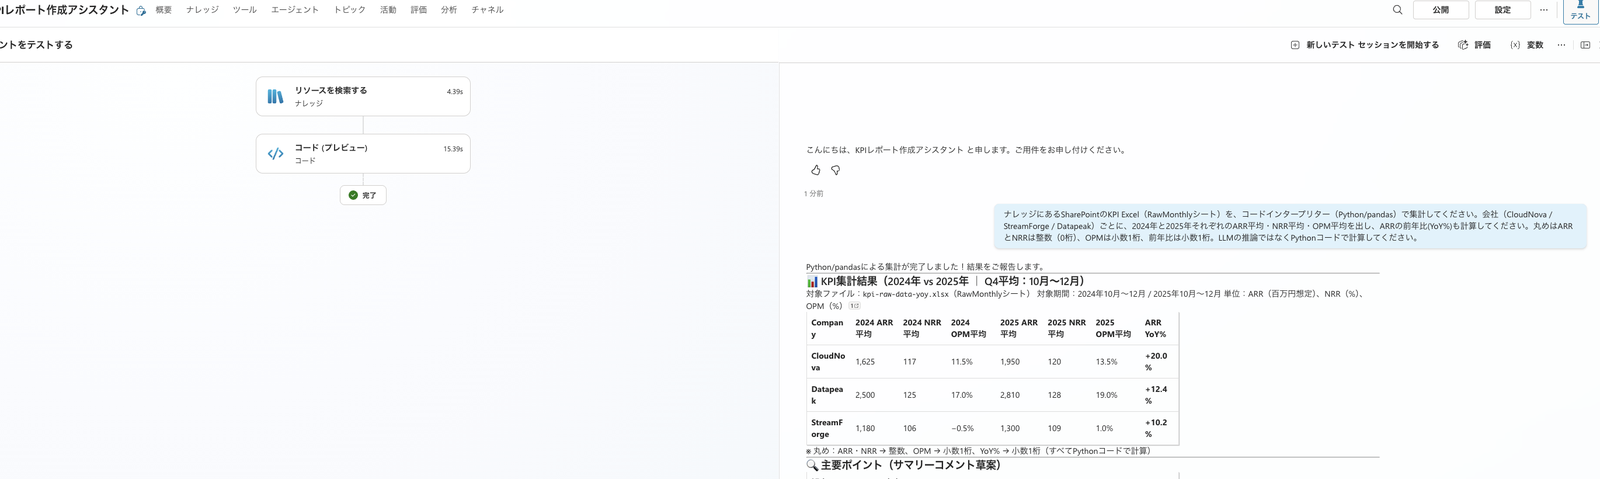
Result of requesting "aggregate the KPI from knowledge" without any attachment. The agent indicated "retrieve data from knowledge and aggregate with Python," and returned ARR, NRR, OPM averages and YoY by company and year matching the pass criteria
Without chat attachment or SharePoint setup, the agent was able to aggregate its own data using the code interpreter.
From the perspective of giving an agent data permanently for analysis, file knowledge is the most straightforward option.
5.5 Caveats for Route B (Scope of Official Support)
Route B is convenient, but there are important prerequisites to understand.
The first is that this is not an officially documented route.
As noted in Section 2, the official documentation lists chat attachment and the SharePoint Documents library as the two supported structured data inputs for the code interpreter.
The fact that it worked with file knowledge is a hands-on result from my environment and is not an officially guaranteed method.
For production use where reliability is critical, consider Route C (SharePoint + Work IQ) in the next section.
The second is how data is passed.
In my environment, the knowledge search returned the Excel content as text, and the code interpreter ingested that as data within the code for aggregation.
For a small table like this one, all rows fit, but with a large number of rows, the knowledge search might only return a portion, risking missed data.
For large data or cases where you need to reliably aggregate all records, Route C is the more solid choice.
The third is file updates.
File uploads are static—updating the original file is not automatically reflected; you need to re-upload it manually.
In the upload files method, files are static. So, if the file is updated, those updates aren't reflected in the uploaded version unless manually updated.
Source: Add unstructured data as a knowledge source | Microsoft Learn
6. Route C: Holding via SharePoint (Work IQ) and Aggregating
When data is large, needs to stay in sync with the latest version, or requires per-user permission control, the SharePoint route that the official documentation presents as the standard approach is the right fit.
6.1 Difference from Route B
Route C (SharePoint connector) and Route B (file upload) differ in data storage location, freshness, and permission handling.
On storage and freshness:
Route C references data while it remains in SharePoint and reflects the latest content in real time.
The official documentation compares two options for using SharePoint as knowledge (option 1 via file upload / option 2 via SharePoint connector), and Route C corresponds to option 2.
Scenario Option 1: file upload Option 2: SharePoint connector Content storage Copied into Dataverse from SharePoint Resides in SharePoint Content freshness Content is synchronized every four to six hours, based on ingestion completion Real time, and reflects the latest available content Dataverse storage consumption Yes, for copied files and search indexes No
Source: Unstructured data as a knowledge source | Microsoft Learn
In contrast, Route B in this article (local Excel file upload) is a static approach where a copy is stored in Dataverse.
Updates to the original file are not reflected until you manually re-upload (see 5.5).
The way permissions are checked also differs.
With the connector (Route C), every time a user makes a query, the system performs a live check of their credentials against the data source to verify access before responding.
When a user makes a query, the system uses their connection information to check the data source and verify they have permission to see the content. Even though the system stores chunks and indexes locally in Dataverse, it performs a live check on the queries to make sure the current user has access to the data before providing a summary or response.
Source: Unstructured data as a knowledge source | Microsoft Learn
6.2 Add "SharePoint" to Knowledge
First, place the aggregation Excel (same kpi-raw-data-yoy.xlsx as Route B) in a SharePoint document library.
Then open "Knowledge" → "Add knowledge" in the agent.
One important note here:
The "Add knowledge" dialog has two entry points for SharePoint.
- "SharePoint" inside "File uploads" at the top: This copies individual files or folders from SharePoint to Dataverse. It does not support the Documents library for use with the code interpreter.
- "SharePoint" in the recommended section: This is the full integration via the SharePoint connector. For structured data with the code interpreter, use this one in the recommended section.
The SharePoint option in the file upload section is for uploading individual SharePoint files or folders to your agent. This option uploads a copy of the file from SharePoint to Dataverse and maintains a synchronous relationship to keep the file up to date.
The other SharePoint option provides the full SharePoint integration in Copilot Studio using the SharePoint connector. Use this option when you need full SharePoint connector capabilities, custom authentication configurations, or advanced query options.
Source: Unstructured data as a knowledge source | Microsoft Learn
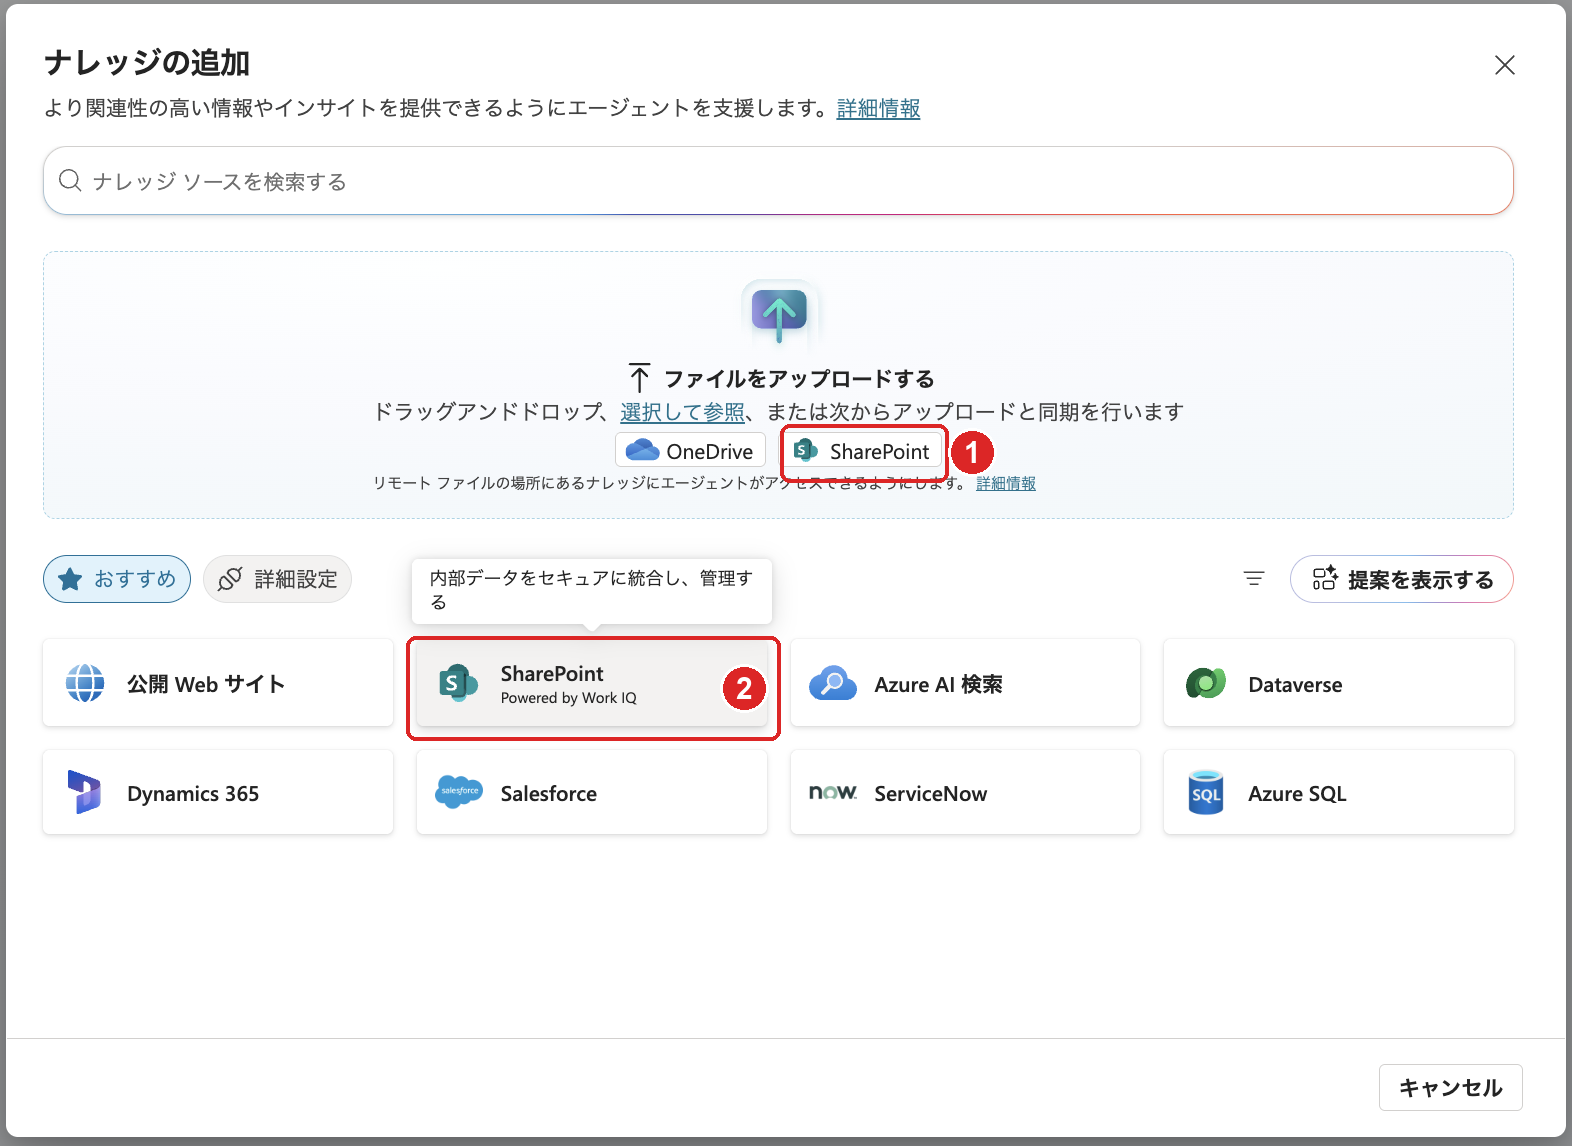
The two SharePoints in "Add knowledge." The top one is inside "File uploads" (copies to Dataverse, does not support Documents library); the bottom one is the SharePoint connector in the recommended section. Use the bottom recommended section one for the code interpreter
Enter the URL of the SharePoint site (or document library), add a name and description, and add it.
Once the SharePoint source shows "Ready" in the knowledge list, the agent can reference that data.
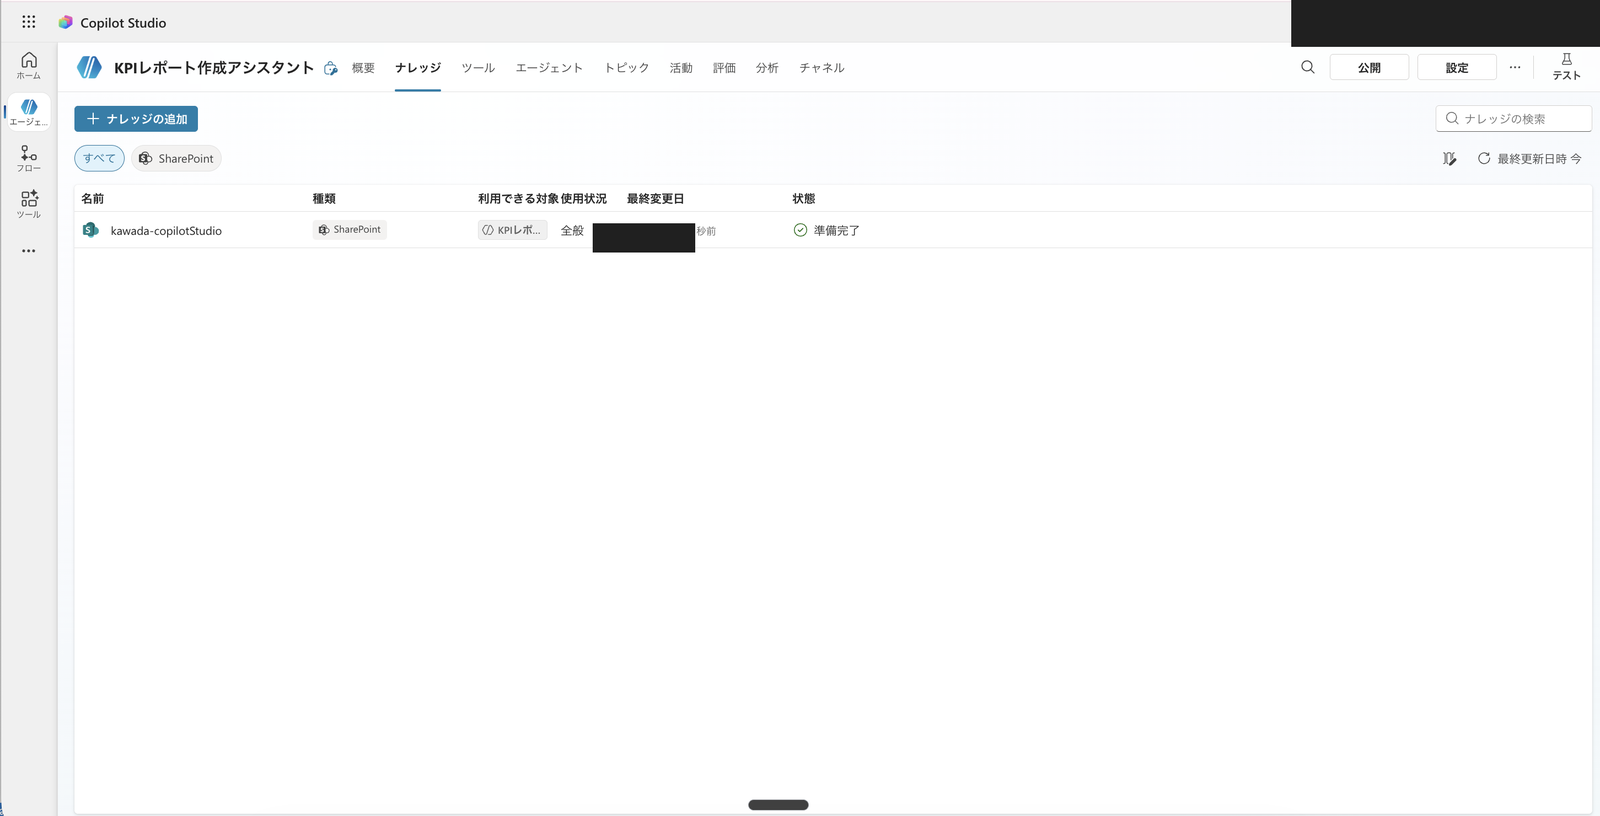
SharePoint document library added to knowledge with status showing "Ready." The "Publish" button remains in the upper right, indicating the agent has not been published yet
6.3 Turn On Work IQ
The code interpreter was turned on in 5.3.
For Route C, additionally turn on Work IQ.
The official procedure is: add SharePoint to knowledge, turn on the code interpreter and Work IQ, save, publish, then test.
- If your agent doesn't already have a SharePoint structured data file as a knowledge source, add this SharePoint file as a knowledge source.
- In Copilot Studio, select Settings > Generative AI. Under File processing capabilities, turn on the Code interpreter toggle.
- Under Search, select Turn on Work IQ.
- Select Save.
- If you added a SharePoint file following instructions in the first step, publish your agent.
- Test your agent by giving it a query that requires the agent to do a computation in order to answer.
Source: Use code interpreter to analyze structured data (preview) | Microsoft Learn
In practice, go to "Settings" → "Generative AI" under "Search" and turn on "Grounding with tenant graph using semantic search", then save.
The official "Turn on Work IQ" corresponds to "Grounding with tenant graph using semantic search" in the Japanese UI.
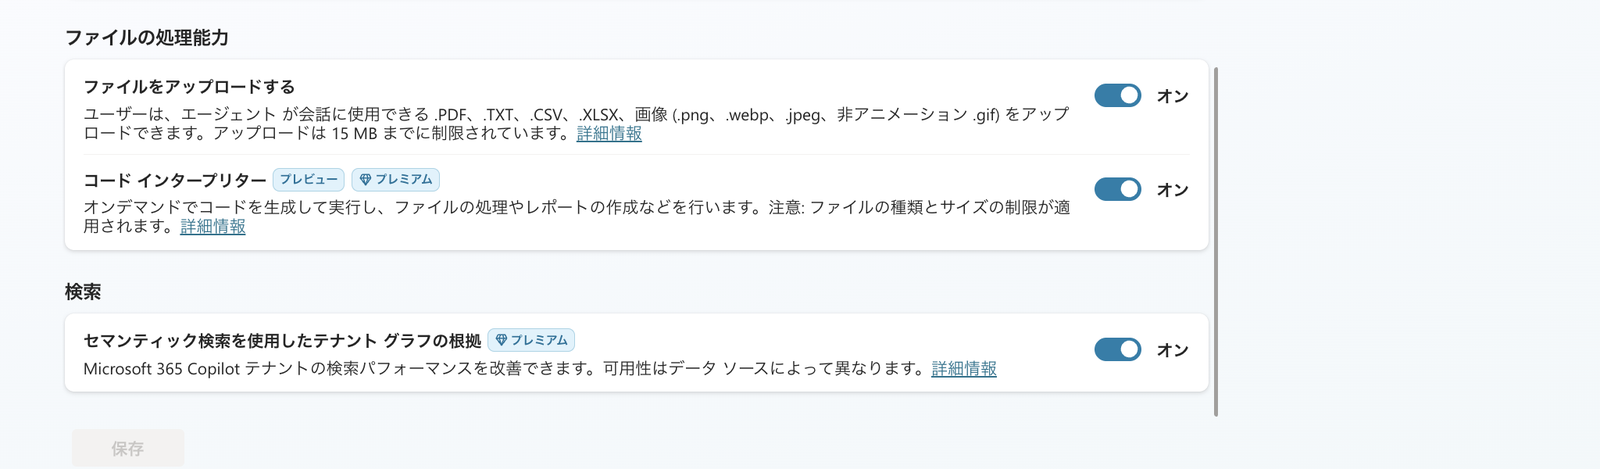
Turn on the code interpreter under "File processing capabilities" and turn on "Grounding with tenant graph using semantic search" (= Work IQ) under "Search"
6.4 Testing Without Publishing
The official procedure includes "publish the agent" in step 5.
However, this is one step in the procedure—it does not say "you cannot test without publishing."
The test panel reflects the saved draft, not the published version.
The Test agent pane automatically refreshes when you select Save after editing your topics.
Source: Quickstart guide for building agents with generative AI | Microsoft Learn
So, without publishing (without pressing the "Publish" button in the upper right), I requested the same aggregation as Route B in the test panel.
Please aggregate the KPI Excel in SharePoint knowledge (RawMonthly sheet) using the code interpreter (Python/pandas). For each company (CloudNova / StreamForge / Datapeak), calculate the average ARR, NRR, and OPM for 2024 and 2025, and also calculate the ARR year-over-year growth (YoY%). Round ARR and NRR to integers (0 decimal places), OPM to 1 decimal place, and YoY to 1 decimal place. Please calculate using Python code, not LLM inference.
Even without publishing, the agent retrieved data from the SharePoint knowledge and then executed Python with the code interpreter.
The aggregation results matched the pass criteria from 4.1 (CloudNova ARR YoY +20.0%, Datapeak +12.4%, StreamForge +10.2%, NRR and OPM all matched).
Result of requesting aggregation in the test panel without publishing. The left trace shows "Search resources (knowledge retrieval)" → "Code (code interpreter execution)," confirming that the SharePoint Excel was retrieved and aggregated with Python, returning numbers matching the pass criteria
7. Giving Data to an Analysis Sub-agent in a Multi-agent Setup
The end-goal end-to-end agent envisions a structure with a parent agent serving as the front door and sub-agents for each step.
In this case, how to give data to the "analysis sub" responsible for aggregation becomes the key question.
This is where an important official specification comes into play: when a parent agent calls a child agent, only the conversation history is automatically carried over.
Copilot Studio passes along the conversation history by default when one agent calls another, so the connected agent knows what's already been discussed.
Source: Explore multi-agent orchestration patterns | Microsoft Learn
Therefore, you cannot design with the assumption that a file attached to the parent is automatically passed as-is to the analysis sub (passing additional data is not verified in this article).
For the analysis sub to aggregate, the sub itself needs to have the data.
As verified in this article, if you give the sub data via file knowledge (Route B) or SharePoint (Route C), the sub can aggregate its own data when delegated from the parent—that is the design pattern.
8. Using the 3 Routes Appropriately
After verifying on an actual environment, the ways to pass data can be summarized as follows.
- For one-time analysis, use Route A (chat attachment). Since data is passed each conversation, no permanent configuration is needed.
- If you want to aggregate the same data every time without attachments, use Route B (file knowledge). This is the easiest approach, and for small data, the code interpreter was able to aggregate without attachments. However, this is not an officially guaranteed route, and there is a risk of data being missed with large datasets.
- If you need large data, synchronization with the latest data, or access control, use Route C (SharePoint + Work IQ). This is the method officially presented as the proper approach, and it is suited for production use. Publishing is required for delivery to production channels, but operation could be verified in the test panel without publishing.
The practical solution for having a sub-agent hold data comes down to choosing between B and C based on data size and reliability.
Summary
We compared the "ways to pass data" that precede aggregation across 3 routes.
- The official inputs for the code interpreter are chat attachments and SharePoint Documents
- Even with file knowledge (Route B), the code interpreter was able to aggregate without attachments (small data, not officially guaranteed)
- For large data or when synchronization and permissions are required, SharePoint + Work IQ (Route C) is the proper approach. In my environment, aggregation was possible in the test panel even without publishing
- When a parent agent calls a child agent, what is automatically carried over is the conversation history. It is safer to have child agents responsible for aggregation hold the data in their own knowledge in advance (automatic carry-over of attached files was not verified in this article)
References
- Use code interpreter to analyze structured data (preview) | Microsoft Learn
- Upload files as a knowledge source | Microsoft Learn
- Add unstructured data as a knowledge source | Microsoft Learn
- Unstructured data as a knowledge source | Microsoft Learn
- Explore multi-agent orchestration patterns | Microsoft Learn
- FAQ for Copilot Studio billing and licensing | Microsoft Learn