[アップデート] Amazon Bedrock AgentCore IdentityのディスカバリーURLがOAuth 2.0の認可サーバーメタデータに対応しました!

はじめに
こんにちは、スーパーマーケットが大好きなコンサル部の神野です。
Amazon Bedrock AgentCore IdentityのディスカバリーURLがOAuth 2.0の認可サーバーメタデータに対応しました!
ぱっと見で・・・何が変わったのかはわからないですね・・・
まずはアップデートの中身を解説しつつ、実際に試してみました!
主な変更点
あれ、認可サーバーメタデータ・・・なにそれ??ってなりますよね。
AgentCoreでCognitoなどを使うときにディスカバリーURLとして /.well-known/openid-configuration で終わるURLを指定していたと思います。あのURLが返す設定情報のOAuth 2.0版です。
ディスカバリーURLは認可サーバーの設定情報(メタデータ)が公開されているURLです。これまではOIDCの形式しか受け付けなかったので、OAuth 2.0だけの認可サーバーはエンドポイントの手入力などが必要でした。
それが今回からはURLを1つ渡すだけで済むようになりました!
AgentCoreはメタデータから必要な値を取り出して使います。図はメタデータの一例で、載る項目は認可サーバーが対応するフローによって変わります。
| 項目 | 内容 |
|---|---|
| 対象 | Gateway・RuntimeのJWTオーソライザー(インバウンド)とIdentityのカスタムOAuthプロバイダー(アウトバウンド) |
| リージョン | AgentCoreが使えるすべてのリージョン |
| 料金 | 追加料金なし |
ディスカバリーURLとして受け付けるパターンはドキュメントに載っています。
^[^\s?#]+/\.well-known/(openid-configuration|oauth-authorization-server)(/[^\s?#]+)?$
インバウンドとアウトバウンドのドキュメントはこちらです。
どんな場面で役立つか
GoogleやEntra IDはOIDCのメタデータも公開しているのでこれまでどおり使えますが、今回のアップデートが役立つのはRFC 8414のメタデータだけを公開しているサービスです。主なIdPとリモートMCPサーバーで確認してみました。
リモートMCPサーバーの多くはRFC 8414のメタデータだけでしたが、MCPの仕様でも認可サーバーはどちらか一方を公開すればよいことになっています。
そのため、こうしたMCPサーバーにエージェントからつなぐときもプロバイダーにURLを1つ渡せば設定できます。
確認に使ったコマンドと結果(2026年11月14日時点)
for base in https://accounts.google.com https://login.microsoftonline.com/common/v2.0 \
  https://mcp.linear.app https://mcp.atlassian.com https://mcp.notion.com https://mcp.asana.com \
  https://mcp.sentry.dev https://mcp.canva.com https://mcp.hubspot.com https://mcp.intercom.com; do
  printf "%s oauth-authorization-server=%s openid-configuration=%s\n" "$base" \
    "$(curl -s -o /dev/null -w '%{http_code}' $base/.well-known/oauth-authorization-server)" \
    "$(curl -s -o /dev/null -w '%{http_code}' $base/.well-known/openid-configuration)"
done
| 接続先 | oauth-authorization-server | openid-configuration |
|---|---|---|
| Google(accounts.google.com) | 200 | 200 |
| Entra ID(common/v2.0) | 404 | 200 |
| Linear MCP | 200 | 200 |
| Atlassian MCP | 200 | 404 |
| Notion MCP | 200 | 404 |
| Asana MCP | 200 | 404 |
| Sentry MCP | 200 | 404 |
| Canva MCP | 200 | 404 |
| HubSpot MCP | 200 | 404 |
| Intercom MCP | 200 | 404 |
Entra IDのようにissuerにパスが付く場合、RFC 8414ではホストの直後に /.well-known/oauth-authorization-server を挿入します。この形式も確認しましたが404でした(2026年11月21日に確認)。
curl -s -o /dev/null -w '%{http_code}\n' https://login.microsoftonline.com/.well-known/oauth-authorization-server/common/v2.0
404
一方インバウンドで役立つのは、MCPサーバー用の認可サーバーを自分で立ててGatewayやRuntimeの入口を守る場合です。検証の前半ではこの形を小さく再現して理解を深めていきます!
やってみる
検証は前半と後半に分けて進めます。
- 前半はOAuth 2.0だけの認可サーバーを自作してインバウンドとアウトバウンドの両方に指定します。
- 後半は実際のAtlassian MCPにつないでJiraにタスクを作成します。
前半の構成はこちらで、Lambda関数URLで公開した自作の認可サーバーをGatewayとIdentityの両方から参照します。
OIDCのメタデータがない認可サーバーでも動くかを確かめるため、自作の認可サーバーは oauth-authorization-server のメタデータだけを返して openid-configuration には404を返すようつくります!
使用したバージョンは下記のとおりで、リージョンはバージニア北部(us-east-1)を使いました。
| 項目 | バージョン |
|---|---|
| Python | 3.14.6 |
| uv | 0.13.6 |
| boto3 | 1.44.0 |
| PyJWT | 2.15.1 |
| cryptography | 50.0.2 |
| httpx | 0.28.1 |
| Lambdaのランタイム | python3.14(arm64) |
プロジェクトを準備する
検証に使ったコードはGitHubで公開しているので、クローンして依存ライブラリをインストールします。
git clone https://github.com/yuu551/agentcore-oauth2-discovery-demo.git
cd agentcore-oauth2-discovery-demo
uv sync
各スクリプトは作成したリソースの名前やIDを state.json に保存し、次のスクリプトや後片付けで読み込みます。
common.py(共通の処理)
import json
import pathlib
import time

import boto3

REGION = "us-east-1"
STATE = pathlib.Path("state.json")
session = boto3.Session(region_name=REGION)

def load_state():
    return json.loads(STATE.read_text()) if STATE.exists() else {}

def save_state(**values):
    state = {**load_state(), **values}
    STATE.write_text(json.dumps(state, indent=2, ensure_ascii=False))
    return state

def remember(key, name):
    # 作成したリソースの名前を state.json のリストに追記する(後片付けはここに記録したものだけを消す)
    names = load_state().get(key, [])
    if name not in names:
        save_state(**{key: [*names, name]})

def forget(*keys):
    # 削除し終えたリソースの記録を state.json から外す
    state = {k: v for k, v in load_state().items() if k not in keys}
    STATE.write_text(json.dumps(state, indent=2, ensure_ascii=False))

def create_role(name, service, policy_arns=(), inline_policy=None):
    iam = session.client("iam")
    trust = {
        "Version": "2012-10-17",
        "Statement": [{"Effect": "Allow", "Principal": {"Service": service}, "Action": "sts:AssumeRole"}],
    }
    arn = iam.create_role(RoleName=name, AssumeRolePolicyDocument=json.dumps(trust))["Role"]["Arn"]
    remember("roles", name)
    for policy_arn in policy_arns:
        iam.attach_role_policy(RoleName=name, PolicyArn=policy_arn)
    if inline_policy:
        iam.put_role_policy(RoleName=name, PolicyName="inline", PolicyDocument=json.dumps(inline_policy))
    time.sleep(10)  # IAMロールの反映待ち
    return arn
OAuth 2.0だけの認可サーバーを用意する
まずはクライアントIDとシークレットを送るとJWTを返す、client_credentials(ユーザーを介さないトークン発行)だけに対応した最小限の認可サーバーをLambdaで作ります。
そのメタデータを返す部分はこちらです。
    # RFC 8414 の認可サーバーメタデータ(openid-configuration は用意しない)
    # client_credentials だけなので認可エンドポイントは持たず、response_type も空にする
    if method == "GET" and path == "/.well-known/oauth-authorization-server":
        return response(200, {
            "issuer": issuer,
            "token_endpoint": f"{issuer}/token",
            "jwks_uri": f"{issuer}/jwks",
            "response_types_supported": [],
            "grant_types_supported": ["client_credentials"],
            "token_endpoint_auth_methods_supported": ["client_secret_basic", "client_secret_post"],
            "scopes_supported": ["demo.read"],
        })
ほかにはJWTの署名を確認するための公開鍵を返す /jwks と、クライアントIDとシークレットを確認してJWTを発行する /token を用意しています。
auth_server/app.py(全文)
"""OIDCのメタデータを公開しない最小のOAuth 2.0認可サーバー(client_credentialsのみ)"""
import base64
import json
import os
import time
import uuid
from urllib.parse import parse_qs

import jwt
from cryptography.hazmat.primitives import serialization
from jwt.algorithms import RSAAlgorithm

KID = "demo-key-1"
CLIENT_ID = os.environ["CLIENT_ID"]
CLIENT_SECRET = os.environ["CLIENT_SECRET"]
PRIVATE_KEY = serialization.load_pem_private_key(os.environ["PRIVATE_KEY_PEM"].encode(), password=None)
PUBLIC_JWK = {**json.loads(RSAAlgorithm.to_jwk(PRIVATE_KEY.public_key())), "kid": KID, "use": "sig", "alg": "RS256"}

def response(status, body):
    return {"statusCode": status, "headers": {"content-type": "application/json"}, "body": json.dumps(body)}

def handler(event, context):
    method = event["requestContext"]["http"]["method"]
    path = event["rawPath"]
    issuer = f"https://{event['requestContext']['domainName']}"
    print(json.dumps({"method": method, "path": path, "user_agent": event["headers"].get("user-agent")}))

    # RFC 8414 の認可サーバーメタデータ(openid-configuration は用意しない)
    # client_credentials だけなので認可エンドポイントは持たず、response_type も空にする
    if method == "GET" and path == "/.well-known/oauth-authorization-server":
        return response(200, {
            "issuer": issuer,
            "token_endpoint": f"{issuer}/token",
            "jwks_uri": f"{issuer}/jwks",
            "response_types_supported": [],
            "grant_types_supported": ["client_credentials"],
            "token_endpoint_auth_methods_supported": ["client_secret_basic", "client_secret_post"],
            "scopes_supported": ["demo.read"],
        })

    if method == "GET" and path == "/jwks":
        return response(200, {"keys": [PUBLIC_JWK]})

    if method == "POST" and path == "/token":
        raw = event.get("body") or ""
        if event.get("isBase64Encoded"):
            raw = base64.b64decode(raw).decode()
        form = {k: v[0] for k, v in parse_qs(raw).items()}

        # client_secret_basic と client_secret_post の両方を受け付ける
        auth = event["headers"].get("authorization", "")
        if auth.startswith("Basic "):
            client_id, _, client_secret = base64.b64decode(auth[6:]).decode().partition(":")
        else:
            client_id, client_secret = form.get("client_id"), form.get("client_secret")
        print(json.dumps({"grant_type": form.get("grant_type"), "client_id": client_id, "scope": form.get("scope")}))

        if (client_id, client_secret) != (CLIENT_ID, CLIENT_SECRET):
            return response(401, {"error": "invalid_client"})
        if form.get("grant_type") != "client_credentials":
            return response(400, {"error": "unsupported_grant_type"})

        now = int(time.time())
        claims = {
            "iss": issuer,
            "sub": client_id,
            "client_id": client_id,
            "scope": form.get("scope", "demo.read"),
            "iat": now,
            "exp": now + 3600,
            "jti": str(uuid.uuid4()),
        }
        token = jwt.encode(claims, PRIVATE_KEY, algorithm="RS256", headers={"kid": KID})
        return response(200, {"access_token": token, "token_type": "Bearer", "expires_in": 3600})

    return response(404, {"error": "not_found"})
setup_auth_server.py を実行すると、依存ライブラリをLambda向けにまとめて認証なしの関数URLで公開します。署名鍵とクライアントシークレットは検証用なので、その場で作って環境変数に渡しています。
setup_auth_server.py
"""最小のOAuth 2.0認可サーバーをLambda関数URLで公開する"""
import io
import pathlib
import secrets
import subprocess
import zipfile

from cryptography.hazmat.primitives import serialization
from cryptography.hazmat.primitives.asymmetric import rsa

from common import create_role, remember, save_state, session

NAME = "oauth2-only-as"
BUILD = pathlib.Path("build/auth_server")

# 依存ライブラリをLambda(arm64)向けに取得してzipにまとめる
subprocess.run(
    ["uv", "pip", "install", "--target", str(BUILD), "--python-platform", "aarch64-manylinux2014",
     "--python-version", "3.14", "--only-binary", ":all:", "pyjwt", "cryptography"],
    check=True,
)
buf = io.BytesIO()
with zipfile.ZipFile(buf, "w") as z:
    for f in BUILD.rglob("*"):
        z.write(f, f.relative_to(BUILD))
    z.write("auth_server/app.py", "app.py")

# 検証用なので署名鍵とクライアントシークレットはその場で作って環境変数に渡す
key = rsa.generate_private_key(public_exponent=65537, key_size=2048)
pem = key.private_bytes(serialization.Encoding.PEM, serialization.PrivateFormat.PKCS8, serialization.NoEncryption()).decode()
client_id, client_secret = "demo-client", secrets.token_urlsafe(32)

role_arn = create_role(f"{NAME}-role", "lambda.amazonaws.com",
                       ["arn:aws:iam::aws:policy/service-role/AWSLambdaBasicExecutionRole"])
lam = session.client("lambda")
lam.create_function(
    FunctionName=NAME, Runtime="python3.14", Architectures=["arm64"], Role=role_arn,
    Handler="app.handler", Code={"ZipFile": buf.getvalue()}, Timeout=10,
    Environment={"Variables": {"CLIENT_ID": client_id, "CLIENT_SECRET": client_secret, "PRIVATE_KEY_PEM": pem}},
)
remember("functions", NAME)
lam.get_waiter("function_active_v2").wait(FunctionName=NAME)

url = lam.create_function_url_config(FunctionName=NAME, AuthType="NONE")["FunctionUrl"].rstrip("/")
lam.add_permission(FunctionName=NAME, StatementId="public-url", Action="lambda:InvokeFunctionUrl",
                   Principal="*", FunctionUrlAuthType="NONE")
lam.add_permission(FunctionName=NAME, StatementId="public-invoke", Action="lambda:InvokeFunction",
                   Principal="*", InvokedViaFunctionUrl=True)

state = save_state(
    issuer=url,
    discovery_url=f"{url}/.well-known/oauth-authorization-server",
    client_id=client_id,
    client_secret=client_secret,
)
print("discovery_url:", state["discovery_url"])
uv run setup_auth_server.py
discovery_url: https://xxxxxxxx.lambda-url.us-east-1.on.aws/.well-known/oauth-authorization-server
curlで2つのディスカバリーURLを確認してみます。
ISSUER=$(jq -r .issuer state.json)
curl -s $ISSUER/.well-known/oauth-authorization-server | jq .
curl -s -o /dev/null -w "openid-configuration: %{http_code}\n" $ISSUER/.well-known/openid-configuration
{
  "issuer": "https://xxxxxxxx.lambda-url.us-east-1.on.aws",
  "token_endpoint": "https://xxxxxxxx.lambda-url.us-east-1.on.aws/token",
  "jwks_uri": "https://xxxxxxxx.lambda-url.us-east-1.on.aws/jwks",
  "response_types_supported": [],
  "grant_types_supported": [
    "client_credentials"
  ],
  "token_endpoint_auth_methods_supported": [
    "client_secret_basic",
    "client_secret_post"
  ],
  "scopes_supported": [
    "demo.read"
  ]
}
openid-configuration: 404
oauth-authorization-server だけがメタデータを返して openid-configuration は404なので、これまでのAgentCoreでは指定できなかった認可サーバーが用意できました!
さっそくGatewayに紐付けてみましょうか。
Gatewayのインバウンド認可に指定する
まずはインバウンドです。
Gatewayには届いたJWTを確認するカスタムJWTオーソライザーがあるので、そのディスカバリーURLに oauth-authorization-server のURLをそのまま指定します。
gateway = ctl.create_gateway(
    name="oauth2-discovery-demo",
    roleArn=gateway_role,
    protocolType="MCP",
    authorizerType="CUSTOM_JWT",
    authorizerConfiguration={
        "customJWTAuthorizer": {
            "discoveryUrl": state["discovery_url"],
            "allowedClients": [state["client_id"]],
        }
    },
)
setup_gateway.py(全文)
"""OAuth 2.0のディスカバリーURLでインバウンド認可するGatewayを作る"""
import io
import time
import zipfile

from common import create_role, load_state, remember, save_state, session

state = load_state()
lam = session.client("lambda")
ctl = session.client("bedrock-agentcore-control")

# ツールにするLambda関数
buf = io.BytesIO()
with zipfile.ZipFile(buf, "w") as z:
    z.write("tool/app.py", "app.py")
tool_role = create_role("oauth2-demo-tool-role", "lambda.amazonaws.com",
                        ["arn:aws:iam::aws:policy/service-role/AWSLambdaBasicExecutionRole"])
tool_arn = lam.create_function(
    FunctionName="oauth2-demo-tool", Runtime="python3.14", Architectures=["arm64"], Role=tool_role,
    Handler="app.handler", Code={"ZipFile": buf.getvalue()},
)["FunctionArn"]
remember("functions", "oauth2-demo-tool")

gateway_role = create_role(
    "oauth2-demo-gateway-role", "bedrock-agentcore.amazonaws.com",
    inline_policy={"Version": "2012-10-17", "Statement": [
        {"Effect": "Allow", "Action": "lambda:InvokeFunction", "Resource": tool_arn}]},
)

# discoveryUrl に oauth-authorization-server を指定する(今回のポイント)
gateway = ctl.create_gateway(
    name="oauth2-discovery-demo",
    roleArn=gateway_role,
    protocolType="MCP",
    authorizerType="CUSTOM_JWT",
    authorizerConfiguration={
        "customJWTAuthorizer": {
            "discoveryUrl": state["discovery_url"],
            "allowedClients": [state["client_id"]],
        }
    },
)
gateway_id = gateway["gatewayId"]
save_state(gateway_id=gateway_id, gateway_url=gateway["gatewayUrl"])
while (status := ctl.get_gateway(gatewayIdentifier=gateway_id)["status"]) == "CREATING":
    time.sleep(5)
print("gateway:", status)

target = ctl.create_gateway_target(
    gatewayIdentifier=gateway_id,
    name="greeting",
    targetConfiguration={"mcp": {"lambda": {
        "lambdaArn": tool_arn,
        "toolSchema": {"inlinePayload": [{
            "name": "say_hello",
            "description": "名前を受け取ってあいさつを返す",
            "inputSchema": {"type": "object", "properties": {"name": {"type": "string"}}, "required": ["name"]},
        }]},
    }}},
    credentialProviderConfigurations=[{"credentialProviderType": "GATEWAY_IAM_ROLE"}],
)
while (t := ctl.get_gateway_target(gatewayIdentifier=gateway_id, targetId=target["targetId"]))["status"] == "CREATING":
    time.sleep(5)
print("target:", t["status"])

print(ctl.get_gateway(gatewayIdentifier=gateway_id)["authorizerConfiguration"])
tool/app.py(ツールのLambda)
def handler(event, context):
    # Gatewayから呼ばれるツール。引数のnameにあいさつを返す
    return {"message": f"こんにちは、{event.get('name', 'ゲスト')}さん!"}
ツールには名前を受け取ってあいさつを返すLambda関数を登録しています。
作ってみましょう!
uv run setup_gateway.py
gateway: READY
target: READY
{'customJWTAuthorizer': {'discoveryUrl': 'https://xxxxxxxx.lambda-url.us-east-1.on.aws/.well-known/oauth-authorization-server', 'allowedClients': ['demo-client']}}
エラーにならずにREADYになり、設定にも oauth-authorization-server のURLが入っています。
続いて次の3パターンでGatewayからツール一覧(tools/list)を取得し、最後にツールを実行します。
- トークンなし
- 別の鍵で署名したJWT(中身は本物と同じ)
- 自作の認可サーバーが発行したJWT
call_gateway.py
"""Gatewayのtools/listとtools/callを、トークンなし・ありで呼び出す"""
import sys
import time

import httpx
import jwt
from cryptography.hazmat.primitives.asymmetric import rsa

from common import load_state

state = load_state()

def get_token():
    # 自作の認可サーバーから client_credentials でトークンを取得する
    res = httpx.post(f"{state['issuer']}/token",
                     auth=(state["client_id"], state["client_secret"]),
                     data={"grant_type": "client_credentials", "scope": "demo.read"})
    return res.raise_for_status().json()["access_token"]

def mcp(method, params, token=None):
    headers = {"Content-Type": "application/json", "Accept": "application/json, text/event-stream"}
    if token:
        headers["Authorization"] = f"Bearer {token}"
    return httpx.post(state["gateway_url"], headers=headers,
                      json={"jsonrpc": "2.0", "id": 1, "method": method, "params": params})

if __name__ == "__main__":
    token = sys.argv[1] if len(sys.argv) > 1 else None
    res = mcp("tools/list", {})
    print("トークンなし:", res.status_code, res.text[:200])

    # 同じクレームで、認可サーバーとは別の鍵で署名したJWT
    other_key = rsa.generate_private_key(public_exponent=65537, key_size=2048)
    now = int(time.time())
    forged = jwt.encode({"iss": state["issuer"], "sub": state["client_id"], "client_id": state["client_id"],
                         "scope": "demo.read", "iat": now, "exp": now + 600},
                        other_key, algorithm="RS256", headers={"kid": "demo-key-1"})
    res = mcp("tools/list", {}, forged)
    print("別の鍵で署名:", res.status_code, res.text[:200])

    token = token or get_token()
    res = mcp("tools/list", {}, token)
    print("トークンあり:", res.status_code, [t["name"] for t in res.json()["result"]["tools"]])

    res = mcp("tools/call", {"name": "greeting___say_hello", "arguments": {"name": "神野"}}, token)
    print("ツール実行:", res.status_code, res.json()["result"]["content"][0]["text"])
uv run call_gateway.py
トークンなし: 401 {"jsonrpc":"2.0","id":0,"error":{"code":-32001,"message":"Missing Bearer token"}}
別の鍵で署名: 403 {"jsonrpc":"2.0","id":0,"error":{"code":-32002,"message":"insufficient_scope - The request requires higher privileges than provided by the access token."}}
トークンあり: 200 ['greeting___say_hello']
ツール実行: 200 {"message":"こんにちは、神野さん!"}
自作の認可サーバーが発行したJWTだけがツールまで届きました!
別の鍵で署名したJWTは発行元(issuer)やクライアントIDを本物と同じにしても拒否されました。エラーの文言はinsufficient_scopeでしたが、メタデータの公開鍵で署名を確認できたJWTだけが通っていますね。
Gatewayから実際に認可サーバーへリクエストが届いているかも、Lambdaのログで確認してみます。
aws logs filter-log-events --region us-east-1 --log-group-name /aws/lambda/oauth2-only-as \
  --output json | jq -r '.events[] | select(.message|startswith("{\"method"))
  | "\(.timestamp/1000|strftime("%H:%M:%S")) \(.message|rtrimstr("\n"))"'
02:36:30 {"method": "GET", "path": "/.well-known/oauth-authorization-server", "user_agent": "Apache-HttpClient/UNAVAILABLE (Java/25.0.5.1)"}
02:37:00 {"method": "GET", "path": "/.well-known/oauth-authorization-server", "user_agent": "Apache-HttpClient/UNAVAILABLE (Java/25.0.5.1)"}
02:37:01 {"method": "GET", "path": "/jwks", "user_agent": "Apache-HttpClient/UNAVAILABLE (Java/25.0.5.1)"}
02:37:02 {"method": "POST", "path": "/token", "user_agent": "python-httpx/0.28.1"}
ログを見ると、AgentCore(Apache-HttpClient)は次のタイミングで認可サーバーにアクセスしていました。
- Gatewayの作成時にメタデータを取得
- 最初のリクエストを受けたときにもう一度メタデータを取得
- JWTを受け取ったときに
jwks_uriから公開鍵を取得
インバウンドの動きが分かったので、次はアウトバウンドも試してみましょう!
カスタムOAuthプロバイダーに指定する
次はアウトバウンドとして、エージェントが外部サービスのトークンを取得するときに使うカスタムOAuthプロバイダーを作成します。oauthDiscovery に先ほどのディスカバリーURLを指定すると、トークンの発行先などはURLの先のメタデータから取得されます。
provider = ctl.create_oauth2_credential_provider(
    name="oauth2-only-as",
    credentialProviderVendor="CustomOauth2",
    oauth2ProviderConfigInput={
        "customOauth2ProviderConfig": {
            "oauthDiscovery": {"discoveryUrl": state["discovery_url"]},
            "clientId": state["client_id"],
            "clientSecret": state["client_secret"],
        }
    },
)
トークンはまずエージェント自身を表すワークロードのトークンを取得し、それを添えてIdentityに依頼します。ユーザーを介さないのでフローにはM2M(マシン同士)を指定し、取得したアクセストークンはそのまま先ほどのGatewayに送ってみます。
workload_token = dp.get_workload_access_token(workloadName="oauth2-demo-agent")["workloadAccessToken"]
access_token = dp.get_resource_oauth2_token(
    workloadIdentityToken=workload_token,
    resourceCredentialProviderName="oauth2-only-as",
    scopes=["demo.read"],
    oauth2Flow="M2M",
)["accessToken"]
outbound.py(全文)
"""OAuth 2.0のディスカバリーURLでカスタムOAuthプロバイダーを作り、M2Mでトークンを取得する"""
import json

import jwt

from call_gateway import mcp
from common import load_state, save_state, session

state = load_state()
ctl = session.client("bedrock-agentcore-control")
dp = session.client("bedrock-agentcore")

ctl.create_workload_identity(name="oauth2-demo-agent")
save_state(workload_name="oauth2-demo-agent")

# oauthDiscovery に oauth-authorization-server を指定する(今回のポイント)
provider = ctl.create_oauth2_credential_provider(
    name="oauth2-only-as",
    credentialProviderVendor="CustomOauth2",
    oauth2ProviderConfigInput={
        "customOauth2ProviderConfig": {
            "oauthDiscovery": {"discoveryUrl": state["discovery_url"]},
            "clientId": state["client_id"],
            "clientSecret": state["client_secret"],
        }
    },
)
save_state(provider_name="oauth2-only-as")
discovered = provider["oauth2ProviderConfigOutput"]["customOauth2ProviderConfig"]["oauthDiscovery"]
print("ディスカバリー結果:", json.dumps(discovered, indent=2, ensure_ascii=False))

# エージェントの立場でAgentCore Identityにトークンを頼む(ユーザーなしのM2M)
workload_token = dp.get_workload_access_token(workloadName="oauth2-demo-agent")["workloadAccessToken"]
access_token = dp.get_resource_oauth2_token(
    workloadIdentityToken=workload_token,
    resourceCredentialProviderName="oauth2-only-as",
    scopes=["demo.read"],
    oauth2Flow="M2M",
)["accessToken"]
print("取得したトークンの中身:", json.dumps(jwt.decode(access_token, options={"verify_signature": False}), indent=2))

# 取得したトークンで、さきほどのGatewayを呼び出す
res = mcp("tools/call", {"name": "greeting___say_hello", "arguments": {"name": "AgentCore Identity"}}, access_token)
print("Gateway呼び出し:", res.status_code, res.json()["result"]["content"][0]["text"])
uv run outbound.py
ディスカバリー結果: {
  "discoveryUrl": "https://xxxxxxxx.lambda-url.us-east-1.on.aws/.well-known/oauth-authorization-server"
}
取得したトークンの中身: {
  "iss": "https://xxxxxxxx.lambda-url.us-east-1.on.aws",
  "sub": "demo-client",
  "client_id": "demo-client",
  "scope": "demo.read",
  "iat": 1795228627,
  "exp": 1795232227,
  "jti": "68e860b0-066b-494a-ae80-77c65a3bf781"
}
Gateway呼び出し: 200 {"message":"こんにちは、AgentCore Identityさん!"}
自作の認可サーバーが発行したトークンが取れていますね! 発行元(iss)は自作の認可サーバーの関数URLで、スコープも依頼した demo.read になっています。さらにそのトークンでGatewayのツールも実行できました。
認可サーバーのログにはAgentCore側からのメタデータ取得とトークンの依頼が残っていました。
02:37:07 {"method": "GET", "path": "/.well-known/oauth-authorization-server", "user_agent": "Apache-HttpClient/UNAVAILABLE (Java/25.0.5.1)"}
02:37:07 {"method": "POST", "path": "/token", "user_agent": "Apache-HttpClient/UNAVAILABLE (Java/25.0.5.1)"}
流れを絵にしてみるとこんな感じです。
ここまでで基本的な仕組みが分かったので、次は実際のSaaSにつないでみましょう!
Atlassian MCPにつないでみる
後半は認可サーバーメタデータだけを公開しているAtlassian MCPにつなぎます!
Jiraの無料プランで作ったサイトを使い、ユーザーの同意を経て取得したトークンでタスクを作成するところまで試します!
認可サーバーのディスカバリーURLを調べる
MCPサーバーが使う認可サーバーはMCPサーバー側の情報から2段階でたどれます。
MCPサーバーにトークンなしでリクエストすると、401と一緒に保護リソースメタデータ(RFC 9728)の場所が返ってきます。その authorization_servers に書かれているのが使う認可サーバーです。
curl -s -D - -o /dev/null -X POST https://mcp.atlassian.com/v2/mcp | grep -iE '^(HTTP|www-authenticate)'
curl -s https://mcp.atlassian.com/.well-known/oauth-protected-resource/v2/mcp | jq '{resource, authorization_servers}'
HTTP/2 401
www-authenticate: Bearer resource_metadata="https://mcp.atlassian.com/.well-known/oauth-protected-resource/v2/mcp"
{
  "resource": "https://mcp.atlassian.com/v2/mcp",
  "authorization_servers": [
    "https://auth.atlassian.com/VCeDsk8ZHncYF1g234fKtc4lNipbBhu3"
  ]
}
認可サーバーのURLにはパスが付いているので、ホストの直後に /.well-known/oauth-authorization-server を挿入したURLがディスカバリーURLになります。OIDCのメタデータもあわせて確認しました。
AS=https://auth.atlassian.com/.well-known/oauth-authorization-server/VCeDsk8ZHncYF1g234fKtc4lNipbBhu3
curl -s $AS | jq '{issuer, authorization_endpoint, token_endpoint, registration_endpoint}'
# OIDC(ホストの直後に挿入する形式と、issuerの末尾に付ける形式)
curl -s -o /dev/null -w '%{http_code}\n' https://auth.atlassian.com/.well-known/openid-configuration/VCeDsk8ZHncYF1g234fKtc4lNipbBhu3
curl -s -o /dev/null -w '%{http_code}\n' https://auth.atlassian.com/VCeDsk8ZHncYF1g234fKtc4lNipbBhu3/.well-known/openid-configuration
{
  "issuer": "https://auth.atlassian.com/VCeDsk8ZHncYF1g234fKtc4lNipbBhu3",
  "authorization_endpoint": "https://auth.atlassian.com/authorize",
  "token_endpoint": "https://auth.atlassian.com/oauth/token",
  "registration_endpoint": "https://auth.atlassian.com/VCeDsk8ZHncYF1g234fKtc4lNipbBhu3/dcr/register"
}
404
404
OIDCのメタデータはどちらの形式も404で、RFC 8414のメタデータだけが返ってきました。末尾にパスが続く形ですが、「主な変更点」で紹介したパターンの (/[^\s?#]+)? に当てはまるのでそのまま指定できます。
Atlassian側でAgentCoreのドメインを許可する
Atlassian MCPにOAuthで接続できるサービスは管理者がドメイン単位で許可するので、管理画面(admin.atlassian.com)の「コネクタ」→「Atlassian MCP サーバー」からAgentCoreのドメインを追加します。
https://bedrock-agentcore.us-east-1.amazonaws.com/**
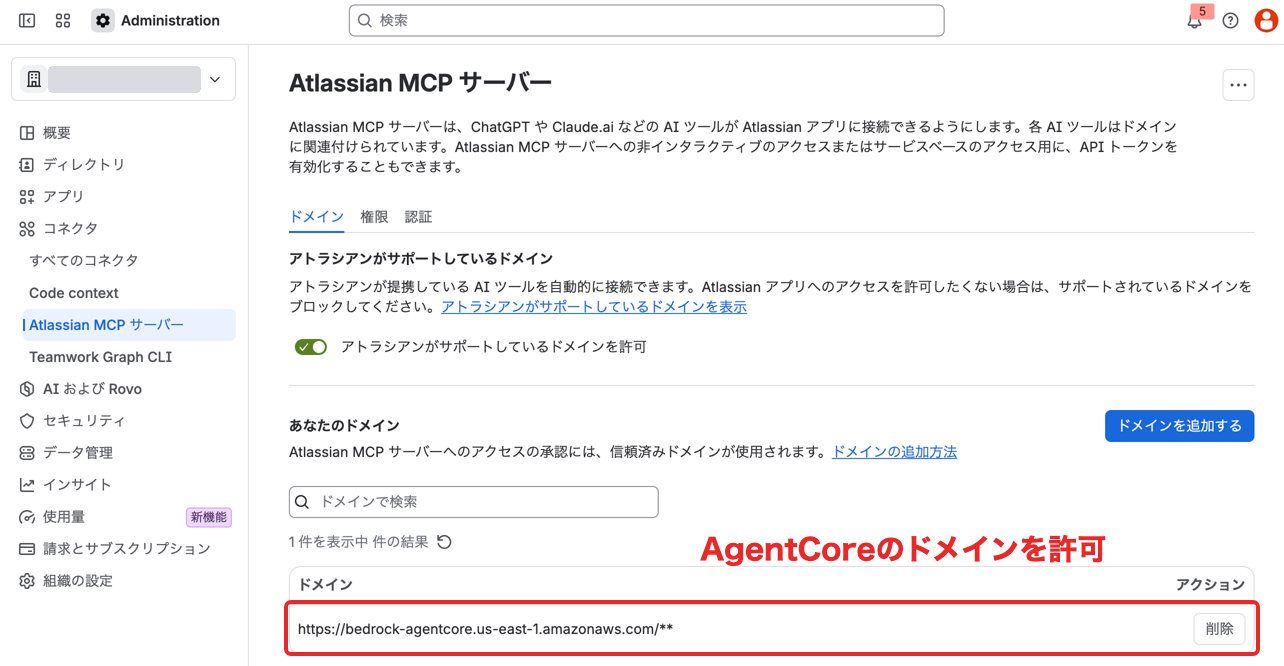
自分のプロバイダーのコールバックURLだけに絞ろうとパスまで指定してみましたが、末尾に /** を付けた形も含めてブロックされました。Atlassianのドキュメントでも照合するのはクライアントのoriginとされているので、同じリージョンの別のAWSアカウントのAgentCoreとは区別できない点は押さえておきましょう。
ディスカバリーURLでプロバイダーを作る
クライアントIDとシークレットは動的クライアント登録(DCR)で発行してもらえるので、メタデータの registration_endpoint に登録内容を送ります。
ただし登録内容に入れるAgentCoreのコールバックURLはプロバイダーを作るまで決まらないので、仮のクライアントIDで作ってから本物の値に差し替えます。
DISCOVERY_URL = "https://auth.atlassian.com/.well-known/oauth-authorization-server/VCeDsk8ZHncYF1g234fKtc4lNipbBhu3"

def provider_config(client_id, client_secret):
    return {"customOauth2ProviderConfig": {
        "oauthDiscovery": {"discoveryUrl": DISCOVERY_URL},
        "clientId": client_id,
        "clientSecret": client_secret,
    }}

# コールバックURLを知るため、仮のクライアントIDで先に作る
callback_url = ctl.create_oauth2_credential_provider(
    name=PROVIDER, credentialProviderVendor="CustomOauth2",
    oauth2ProviderConfigInput=provider_config("placeholder", "placeholder"),
)["callbackUrl"]

# メタデータの registration_endpoint に、コールバックURLをリダイレクト先として登録する(DCR)
metadata = httpx.get(DISCOVERY_URL).json()
client = httpx.post(metadata["registration_endpoint"], json={
    "client_name": "agentcore-oauth2-discovery-demo",
    "redirect_uris": [callback_url],
    "grant_types": ["authorization_code", "refresh_token"],
    "response_types": ["code"],
    "token_endpoint_auth_method": "client_secret_basic",
}).raise_for_status().json()

ctl.update_oauth2_credential_provider(
    name=PROVIDER, credentialProviderVendor="CustomOauth2",
    oauth2ProviderConfigInput=provider_config(client["client_id"], client["client_secret"]),
)
同じスクリプトでワークロードIDも作り、同意後にブラウザを戻すローカルのURL(http://localhost:8799/callback)を allowedResourceOauth2ReturnUrls に登録しています。
atlassian_setup.py(全文)
"""Atlassian MCP v2の認可サーバーを、ディスカバリーURLだけでカスタムOAuthプロバイダーに登録する"""
import httpx

from common import save_state, session

# https://mcp.atlassian.com/.well-known/oauth-protected-resource/v2/mcp の authorization_servers にある認可サーバー
DISCOVERY_URL = "https://auth.atlassian.com/.well-known/oauth-authorization-server/VCeDsk8ZHncYF1g234fKtc4lNipbBhu3"
RETURN_URL = "http://localhost:8799/callback"  # 同意後にブラウザを戻すローカルのURL
WORKLOAD = "atlassian-demo-agent"
PROVIDER = "atlassian-mcp-v2"
ctl = session.client("bedrock-agentcore-control")

ctl.create_workload_identity(name=WORKLOAD, allowedResourceOauth2ReturnUrls=[RETURN_URL])
save_state(atlassian_workload=WORKLOAD, atlassian_return_url=RETURN_URL)

def provider_config(client_id, client_secret):
    return {"customOauth2ProviderConfig": {
        "oauthDiscovery": {"discoveryUrl": DISCOVERY_URL},
        "clientId": client_id,
        "clientSecret": client_secret,
    }}

# コールバックURLを知るため、仮のクライアントIDで先に作る
callback_url = ctl.create_oauth2_credential_provider(
    name=PROVIDER, credentialProviderVendor="CustomOauth2",
    oauth2ProviderConfigInput=provider_config("placeholder", "placeholder"),
)["callbackUrl"]
save_state(atlassian_provider=PROVIDER)

# メタデータの registration_endpoint に、コールバックURLをリダイレクト先として登録する(DCR)
metadata = httpx.get(DISCOVERY_URL).json()
client = httpx.post(metadata["registration_endpoint"], json={
    "client_name": "agentcore-oauth2-discovery-demo",
    "redirect_uris": [callback_url],
    "grant_types": ["authorization_code", "refresh_token"],
    "response_types": ["code"],
    "token_endpoint_auth_method": "client_secret_basic",
}).raise_for_status().json()

ctl.update_oauth2_credential_provider(
    name=PROVIDER, credentialProviderVendor="CustomOauth2",
    oauth2ProviderConfigInput=provider_config(client["client_id"], client["client_secret"]),
)
print("callbackUrl:", callback_url)
print("登録したクライアント:", {k: client.get(k) for k in ["client_name", "redirect_uris", "token_endpoint_auth_method"]})
uv run atlassian_setup.py
callbackUrl: https://bedrock-agentcore.us-east-1.amazonaws.com/identities/oauth2/callback/xxxxxxxx
登録したクライアント: {'client_name': 'agentcore-oauth2-discovery-demo', 'redirect_uris': ['https://bedrock-agentcore.us-east-1.amazonaws.com/identities/oauth2/callback/xxxxxxxx'], 'token_endpoint_auth_method': 'client_secret_basic'}
プロバイダーに渡したのはディスカバリーURLとクライアントの情報だけで、認可やトークンのエンドポイントはメタデータから読み取られます。
ユーザーの同意を経てトークンを取得する
Jiraを操作するトークンはユーザー本人の同意を経て取得するので、oauth2Flow には USER_FEDERATION を指定します。
1回目の依頼で返ってくる認可URLをブラウザで開いて同意すると、AgentCoreのコールバックを経て自分で決めた戻り先にブラウザが戻ってきます。そこで認可の完了を知らせるとトークンがToken Vaultに保存され、もう一度依頼すればアクセストークンが返ってきます。
スコープには保護リソースメタデータの scopes_supported をすべて指定し、resources にはMCPサーバーのURLを渡します。
MCP_URL = "https://mcp.atlassian.com/v2/mcp"
# MCPサーバーの保護リソースメタデータに載っているスコープをすべて要求する
SCOPES = httpx.get("https://mcp.atlassian.com/.well-known/oauth-protected-resource/v2/mcp").json()["scopes_supported"]

def request_token(workload_token, session_uri=None):
    params = dict(workloadIdentityToken=workload_token, resourceCredentialProviderName=state["atlassian_provider"],
                  scopes=SCOPES, resources=[MCP_URL], oauth2Flow="USER_FEDERATION",
                  resourceOauth2ReturnUrl=state["atlassian_return_url"])
    if session_uri:
        params["sessionUri"] = session_uri
    return dp.get_resource_oauth2_token(**params)
戻り先では、届いたリクエストのパスが /callback で session_id が1回目の依頼の sessionUri と一致したときだけ完了を知らせます。
# wait_for_callback の中で、戻ってきたリクエストを確認する
ok = url.path == "/callback" and session_id == session_uri

# get_token の中で、確認できた session_id を使って完了を通知する
session_id = wait_for_callback(result["sessionUri"])
dp.complete_resource_token_auth(userIdentifier={"userId": USER_ID}, sessionUri=session_id)
今回はローカルで1人だけで試すのでユーザーIDは固定ですが、複数人が使うアプリではログイン中のユーザーが認可を始めたユーザーと同じかも照合します。
atlassian_connect.py(全文)
"""ユーザーの同意を経てAtlassian MCP v2のトークンを取得し、ツール一覧を取得する"""
import http.server
import json
import time
import urllib.parse

import httpx

from common import load_state, session

state = load_state()
dp = session.client("bedrock-agentcore")
USER_ID = "demo-user"  # ローカルで1人だけで試すので固定のユーザーIDにする
MCP_URL = "https://mcp.atlassian.com/v2/mcp"
# MCPサーバーの保護リソースメタデータに載っているスコープをすべて要求する
SCOPES = httpx.get("https://mcp.atlassian.com/.well-known/oauth-protected-resource/v2/mcp").json()["scopes_supported"]

def request_token(workload_token, session_uri=None):
    params = dict(workloadIdentityToken=workload_token, resourceCredentialProviderName=state["atlassian_provider"],
                  scopes=SCOPES, resources=[MCP_URL], oauth2Flow="USER_FEDERATION",
                  resourceOauth2ReturnUrl=state["atlassian_return_url"])
    if session_uri:
        params["sessionUri"] = session_uri
    return dp.get_resource_oauth2_token(**params)

def wait_for_callback(session_uri):
    # 戻り先(/callback)に、認可を始めたときと同じ session_id が届くまで待つ
    received = {}

    class Handler(http.server.BaseHTTPRequestHandler):
        def do_GET(self):
            url = urllib.parse.urlparse(self.path)
            session_id = urllib.parse.parse_qs(url.query).get("session_id", [""])[0]
            ok = url.path == "/callback" and session_id == session_uri
            if ok:
                received["session_id"] = session_id
            else:
                print("認可を始めたリクエストと一致しないので無視しました:", self.path, flush=True)
            self.send_response(200 if ok else 400)
            self.send_header("content-type", "text/plain; charset=utf-8")
            self.end_headers()
            message = "同意が完了しました。ターミナルに戻ってください。" if ok else "認可を始めたリクエストと一致しません。"
            self.wfile.write(message.encode())

        def log_message(self, *args):
            pass

    deadline = time.time() + 600  # 認可URLの有効期限は10分
    with http.server.HTTPServer(("localhost", 8799), Handler) as server:
        while "session_id" not in received:
            server.timeout = deadline - time.time()
            if server.timeout <= 0:
                raise TimeoutError("10分以内に同意が完了しませんでした")
            server.handle_request()
    return received["session_id"]

def get_token():
    workload_token = dp.get_workload_access_token_for_user_id(
        workloadName=state["atlassian_workload"], userId=USER_ID)["workloadAccessToken"]
    result = request_token(workload_token)
    if "accessToken" not in result:
        print("認可URL:", result["authorizationUrl"])
        print("ブラウザで開いて同意してください。戻り先を待っています...", flush=True)
        session_id = wait_for_callback(result["sessionUri"])
        print("戻り先で認可を始めたときと同じsession_idを受け取りました")
        # 認可を始めたユーザーと同じユーザーIDで、受け取ったセッションの完了を通知する
        dp.complete_resource_token_auth(userIdentifier={"userId": USER_ID}, sessionUri=session_id)
        result = request_token(workload_token, session_id)
    print("アクセストークンを取得しました(先頭):", result["accessToken"][:12], "...")
    return result["accessToken"]

class MCPClient:
    def __init__(self, token):
        self.headers = {"Authorization": f"Bearer {token}", "Content-Type": "application/json",
                        "Accept": "application/json, text/event-stream"}
        self.next_id = 1
        res, init = self.request("initialize", {"protocolVersion": "2025-06-18", "capabilities": {},
                                                "clientInfo": {"name": "agentcore-demo", "version": "0.1"}})
        self.headers["Mcp-Session-Id"] = res.headers["mcp-session-id"]
        # 初期化で合意したプロトコルバージョンを以降のリクエストに付ける
        self.headers["MCP-Protocol-Version"] = init["result"]["protocolVersion"]
        self.request("notifications/initialized", {}, notify=True)
        print("initialize:", res.status_code, init["result"]["serverInfo"])

    def request(self, method, params, notify=False):
        body = {"jsonrpc": "2.0", "method": method, "params": params}
        if not notify:
            body["id"] = self.next_id
            self.next_id += 1
        res = httpx.post(MCP_URL, headers=self.headers, json=body, timeout=60)
        text = res.text
        if "text/event-stream" in res.headers.get("content-type", ""):
            text = next((l[5:] for l in text.splitlines() if l.startswith("data:")), "{}")
        return res, (json.loads(text) if text.strip() else {})

    def call_tool(self, name, arguments):
        _, body = self.request("tools/call", {"name": name, "arguments": arguments})
        return body["result"]["content"][0]["text"]

if __name__ == "__main__":
    mcp = MCPClient(get_token())
    res, tools = mcp.request("tools/list", {})
    names = [t["name"] for t in tools["result"]["tools"]]
    print("tools/list:", res.status_code, f"{len(names)}件", names)
uv run atlassian_connect.py
表示された認可URLをブラウザで開き、Atlassianアカウントでログインして同意します。
認可URL: https://bedrock-agentcore.us-east-1.amazonaws.com/identities/oauth2/authorize?request_uri=urn%3Aietf%3Aparams%3Aoauth%3Arequest_uri%3Axxxxxxxx
ブラウザで開いて同意してください。戻り先を待っています...
戻り先で認可を始めたときと同じsession_idを受け取りました
アクセストークンを取得しました(先頭): eyJraWQiOiJh ...
initialize: 200 {'name': 'atlassian-mcp-server', 'icons': [...], 'version': '1.0.0'}
tools/list: 200 26件 ['getAccessibleAtlassianResources', 'atlassianUserInfo', 'getConfluenceContent', ...]
トークンが取れてAtlassian MCPのツール26件が返ってきました! 認可URLの転送先もメタデータの authorization_endpoint(https://auth.atlassian.com/authorize)だったので、ディスカバリーURLだけでAgentCoreがログイン画面まで案内してくれていますね。
Jiraにタスクを作成する
最後に、取得したトークンでJiraにタスクを作成します。SITE_URL と PROJECT_KEY は自分のサイトとプロジェクトに置き換えてください(無料サイトには最初から KAN というプロジェクトがあります)。
"""Atlassian MCP v2のツールでJiraのタスクを作成する"""
import json

from atlassian_connect import MCPClient, get_token

SITE_URL = "https://your-site.atlassian.net"  # タスクを作るサイトのURLに置き換える
PROJECT_KEY = "KAN"  # タスクを作るプロジェクトのキーに置き換える(無料サイトでは最初からあるKAN)

mcp = MCPClient(get_token())
# アクセスできるサイトの一覧から、URLが一致するサイトのcloudIdを使う
resources = json.loads(mcp.call_tool("getAccessibleAtlassianResources", {}))["data"]["resources"]
cloud_id = next(r["cloudId"] for r in resources if r["url"] == SITE_URL)
created = mcp.call_tool("createJiraIssue", {
    "cloudId": cloud_id,
    "projectKey": PROJECT_KEY,
    "issueType": "Task",
    "summary": "AgentCore IdentityからAtlassian MCP経由で作成したタスク",
    "description": "Amazon Bedrock AgentCore IdentityのカスタムOAuthプロバイダーに、RFC 8414のディスカバリーURLだけを設定して取得したトークンで作成しました。",
})
print("作成したタスク:", created)
uv run atlassian_jira.py
アクセストークンを取得しました(先頭): eyJraWQiOiJh ...
initialize: 200 {'name': 'atlassian-mcp-server', 'icons': [...], 'version': '1.0.0'}
作成したタスク: {"data":{"id":"10003","key":"KAN-4"}}
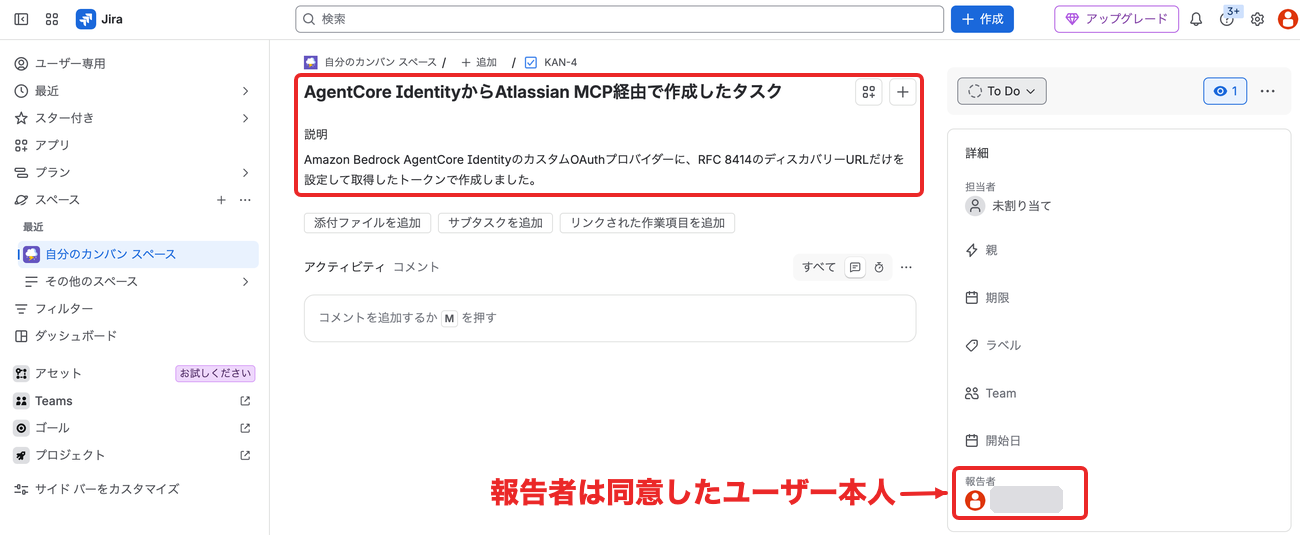
2回目は1回目の同意で取得したトークンがToken Vaultに保存されているので、ブラウザでの操作なしにすぐトークンが返ってきました。Jiraを開くと同意したユーザー本人を報告者としてタスクが作成されていて、エージェントがユーザーの権限で操作していることが分かりますね!
後片付け
各スクリプトは作成したリソースを state.json に記録しているので、後片付けのスクリプトは記録されたものだけを削除します。途中までしか試していなくても、作成済みのリソースだけが消えます。
cleanup.py
"""検証で作ったリソースを削除する(state.json に記録したものだけを消す)"""
import time

from common import forget, load_state, session

state = load_state()
ctl = session.client("bedrock-agentcore-control")
lam = session.client("lambda")
iam = session.client("iam")

# Gateway(先にターゲットを消す)
if gateway_id := state.get("gateway_id"):
    for t in ctl.list_gateway_targets(gatewayIdentifier=gateway_id)["items"]:
        ctl.delete_gateway_target(gatewayIdentifier=gateway_id, targetId=t["targetId"])
    while ctl.list_gateway_targets(gatewayIdentifier=gateway_id)["items"]:
        time.sleep(5)
    ctl.delete_gateway(gatewayIdentifier=gateway_id)
    forget("gateway_id", "gateway_url")
    print("Gatewayを削除しました")

# アウトバウンド側
if name := state.get("provider_name"):
    ctl.delete_oauth2_credential_provider(name=name)
    forget("provider_name")
    print("プロバイダーを削除しました")
if name := state.get("workload_name"):
    ctl.delete_workload_identity(name=name)
    forget("workload_name")
    print("ワークロードIDを削除しました")

# Lambda関数とIAMロール
for fn in state.get("functions", []):
    lam.delete_function(FunctionName=fn)
    print("Lambda関数を削除しました:", fn)
forget("functions")
for role in state.get("roles", []):
    for p in iam.list_attached_role_policies(RoleName=role)["AttachedPolicies"]:
        iam.detach_role_policy(RoleName=role, PolicyArn=p["PolicyArn"])
    for policy in iam.list_role_policies(RoleName=role)["PolicyNames"]:
        iam.delete_role_policy(RoleName=role, PolicyName=policy)
    iam.delete_role(RoleName=role)
    print("IAMロールを削除しました:", role)
forget("roles")
atlassian_cleanup.py
"""Atlassian MCPの接続で作ったリソースを削除する(state.json に記録したものだけを消す)"""
from common import forget, load_state, session

state = load_state()
ctl = session.client("bedrock-agentcore-control")
if name := state.get("atlassian_provider"):
    ctl.delete_oauth2_credential_provider(name=name)
    print("プロバイダーを削除しました")
if name := state.get("atlassian_workload"):
    ctl.delete_workload_identity(name=name)
    print("ワークロードIDを削除しました")
forget("atlassian_provider", "atlassian_workload", "atlassian_return_url")
uv run cleanup.py
uv run atlassian_cleanup.py
Lambdaのロググループ(/aws/lambda/oauth2-only-as と /aws/lambda/oauth2-demo-tool)は残るので、不要なら削除してください。Atlassian側では管理画面で追加したドメインを削除し、検証用に作ったサイトが不要ならサイトごと削除しておきます。
おわりに
ちょっと中身は難しかったアップデートですが、認可サーバーメタデータのディスカバリーURLを指定するとインバウンドとアウトバウンドの両方がOIDCのメタデータなしで動きました!
Atlassian MCPのようにRFC 8414のメタデータだけを公開しているリモートMCPサーバーにつなぎたい場合に役立ちそうですね!
本記事が少しでも参考になりましたら幸いです!最後までご覧いただきありがとうございました!