AsyncGeneratorでイベントストリーミングパイプラインを構築する — コールバック地獄からの脱却

はじめに
サーバーで複数ステップの処理を実行し、各ステップの進捗をリアルタイムでブラウザに伝えたい ── Webアプリ開発でよくある要件です。
たとえば、ユーザーがフォームを送信すると、サーバー側で「バリデーション → API呼び出し → 後処理」の3ステップが走り、各ステップの開始・完了・エラーをSSE(Server-Sent Events)でブラウザに逐次通知する、というケースです。
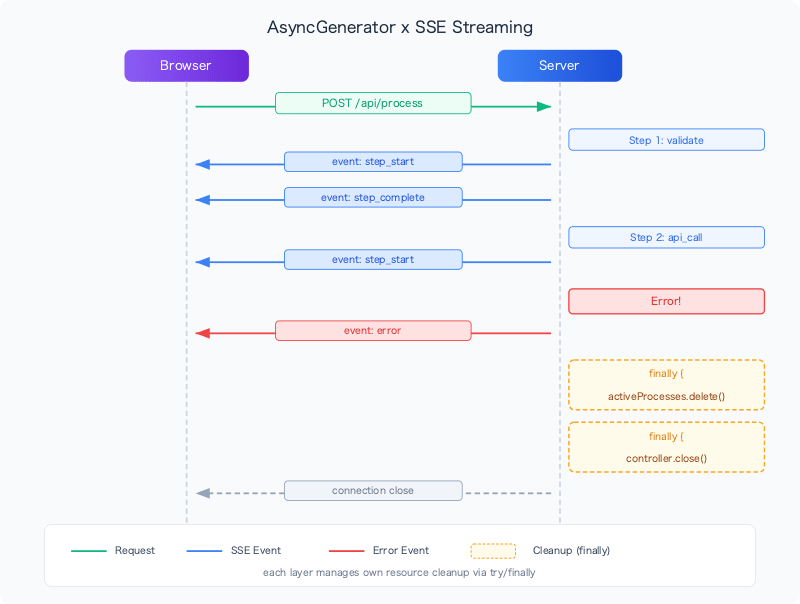
この「イベントを順番に生成する非同期処理」の実装に、AsyncGenerator(非同期ジェネレーター) が最適でした。本記事では、コールバックやEventEmitterとの違いを実際のコードで比較し、AsyncGeneratorの利点を解説します。
前提・環境
- TypeScript / Node.js
- SvelteKit(サーバーサイド処理)
よくある課題:「ステップ2が失敗したとき、どうする?」
3つのアプローチの違いは、正常系のコードだけでは見えません。ステップ途中でエラーが発生したときの挙動 で差が出ます。
以下の共通シナリオで比較します:
- ステップ1: パラメータの検証
- ステップ2: 外部API呼び出し(ここで失敗する想定)
- ステップ3: 結果の後処理
- 全ステップ完了後、セッション情報をクリーンアップ
コールバック
function processTask(
  input: TaskInput,
  onStepStart: (step: string) => void,
  onStepComplete: (step: string, result: unknown) => void,
  onError: (error: Error) => void,
  onComplete: (result: unknown) => void
) {
  const sessionId = createSession();

  onStepStart("validate");
  validate(input)
    .then((validated) => {
      onStepComplete("validate", validated);
      onStepStart("api_call");
      return callExternalApi(validated);
    })
    .then((apiResult) => {
      onStepComplete("api_call", apiResult);
      onStepStart("postprocess");
      return postprocess(apiResult);
    })
    .then((final) => {
      onStepComplete("postprocess", final);
      deleteSession(sessionId); // クリーンアップ
      onComplete(final);
    })
    .catch((error) => {
      deleteSession(sessionId); // ここでもクリーンアップが必要
      onError(error);
    });
}
問題点:
- コールバック引数が5つ。ステップが増えるたびに増える
deleteSessionを.thenと.catchの両方に書く必要がある(書き忘れるとリーク)- Promise チェーンが深くなるとネストが深くなる
EventEmitter
const processor = new TaskProcessor();

// イベントリスナーの登録(処理の実行前)
processor.on("step_start", (step) => sendSSE("step_start", step));
processor.on("step_complete", (step, result) => sendSSE("step_complete", { step, result }));
processor.on("error", (err) => {
  sendSSE("error", err.message);
  // ここでクリーンアップ?
  // でも sessionId にアクセスできるのか?
});
processor.on("complete", (result) => {
  sendSSE("complete", result);
  // ここでもクリーンアップ
});

// 処理の実行(リスナー登録とは別の場所)
processor.process(input);
問題点:
- リスナー登録と処理実行が分離 → コードを読む人は上下に視線を往復する必要がある
- エラー時のクリーンアップを
errorとcompleteの両方で書く必要がある - イベント名が文字列 → タイポしても型エラーにならない
- リスナーの解除を忘れるとメモリリーク
AsyncGenerator
async function* processTask(input: TaskInput): AsyncIterable<ProcessingEvent> {
  const sessionId = createSession();

  try {
    yield { type: "step_start", step: "validate" };
    const validated = await validate(input);
    yield { type: "step_complete", step: "validate", result: validated };

    yield { type: "step_start", step: "api_call" };
    const apiResult = await callExternalApi(validated);  // ← ここで例外が発生しても…
    yield { type: "step_complete", step: "api_call", result: apiResult };

    yield { type: "step_start", step: "postprocess" };
    const final = await postprocess(apiResult);
    yield { type: "step_complete", step: "postprocess", result: final };

    yield { type: "complete", result: final };
  } finally {
    deleteSession(sessionId);  // ← finally で1箇所だけ書けばOK
  }
}
try/finally でクリーンアップが1箇所に集約されています。ステップ2で例外が発生しても、finally が確実に実行されます。
呼び出し側も直感的です:
try {
  for await (const event of processTask(input)) {
    sendSSE(event.type, event);
  }
} catch (error) {
  sendSSE("error", error);
}
全体像
実装:AsyncGenerator × SSE ストリーミング
ここからは、実際のプロジェクトで採用した実装を紹介します。
イベント型の定義
パイプラインが発行するイベントをDiscriminated Unionで定義します。type フィールドで switch 分岐すると、各 case 内でプロパティが自動的に絞り込まれます。
interface ProcessingEvent {
  type: "step_start" | "step_complete" | "step_error" | "progress" | "complete" | "error";
  stepId?: string;
  processorType?: string;
  progress?: number;
  data?: unknown;
  error?: string;
  timestamp: Date;
}
処理エンジン
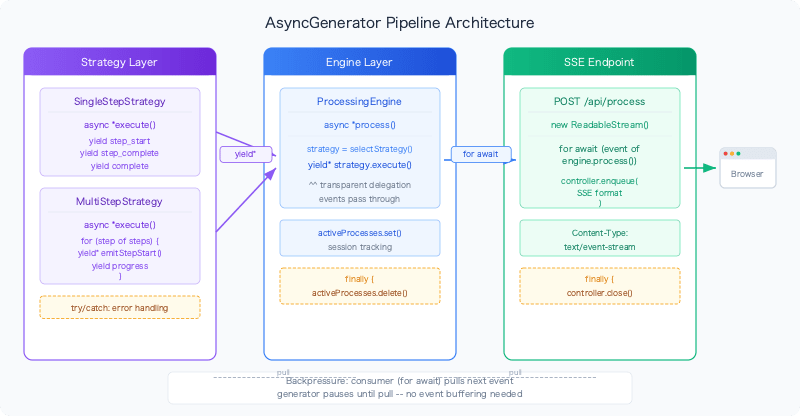
処理エンジンのコアです。async * で非同期ジェネレーター関数を定義し、各ステップのイベントを yield で返します。
class ProcessingEngine {
  private activeProcesses = new Map<string, ProcessingContext>();

  async *process(
    config: ProcessingConfig,
    parameters: Record<string, unknown>
  ): AsyncIterable<ProcessingEvent> {
    const sessionId = this.generateSessionId();
    const context: ProcessingContext = {
      sessionId,
      parameters,
      startTime: new Date()
    };

    this.activeProcesses.set(sessionId, context);

    try {
      // 処理タイプに応じた戦略を選択
      const strategy = this.selectStrategy(config);

      // 戦略のイベントをそのまま委譲
      yield* strategy.execute(config, context);
    } catch (error) {
      yield {
        type: "error" as const,
        error: error instanceof Error ? error.message : "Unknown error",
        timestamp: new Date()
      };
    } finally {
      // 正常でもエラーでも必ずセッション解放
      this.activeProcesses.delete(sessionId);
    }
  }
}
ポイントは try/finally パターンです。activeProcesses マップでセッションを追跡し、処理完了時に finally で確実に解放します。EventEmitter なら complete と error の両方にクリーンアップを書く必要がありますが、AsyncGenerator なら1箇所だけで済みます。
yield* による委譲
yield* はジェネレーター関数のキーワードで、別のジェネレーターが生成する値をすべて透過的に転送します。
yield* strategy.execute(config, context);
これにより、strategy.execute() が yield するイベントが、そのまま process() の呼び出し元に伝わります。処理戦略の内部実装を変更しても、エンジンのコードは一切変更不要です。
処理戦略の実装
各処理タイプを個別のクラスとして実装します。基底クラスにイベント発行ヘルパーを持たせることで、yield のボイラープレートを減らせます。
abstract class ProcessingStrategy {
  abstract execute(
    config: ProcessingConfig,
    context: ProcessingContext
  ): AsyncIterable<ProcessingEvent>;

  // ヘルパー:step_start イベントを生成
  protected async *emitStepStart(stepId: string): AsyncIterable<ProcessingEvent> {
    yield { type: "step_start", stepId, timestamp: new Date() };
  }

  // ヘルパー:step_complete イベントを生成
  protected async *emitStepComplete(
    stepId: string,
    data?: unknown
  ): AsyncIterable<ProcessingEvent> {
    yield { type: "step_complete", stepId, data, timestamp: new Date() };
  }

  // ヘルパー:error イベントを生成
  protected async *emitError(error: string): AsyncIterable<ProcessingEvent> {
    yield { type: "error", error, timestamp: new Date() };
  }
}
ヘルパーメソッド自体も async * で定義し、呼び出し側で yield* で委譲します。こうすると yield 文を直接書くのと同じ効果で、イベント生成のロジックを基底クラスに集約できます。
具体的な処理戦略の実装例です:
class SingleStepStrategy extends ProcessingStrategy {
  async *execute(
    config: ProcessingConfig,
    context: ProcessingContext
  ): AsyncIterable<ProcessingEvent> {
    const stepId = "main";

    try {
      // ステップ開始を通知
      yield* this.emitStepStart(stepId);

      // パラメータを展開して処理
      const result = this.buildPayload(config, context.parameters);

      // ステップ完了を通知(処理結果を含む)
      yield* this.emitStepComplete(stepId, result);

      // 全体完了を通知
      yield { type: "complete", data: result, timestamp: new Date() };
    } catch (error) {
      const message = error instanceof Error ? error.message : "Processing failed";
      yield* this.emitError(message);
    }
  }
}
yield* でヘルパーに委譲し、通常の yield で直接イベントを返す ── 両方を混在させられるのがAsyncGeneratorの柔軟性です。
SSEエンドポイント:AsyncGeneratorの消費側
ここが AsyncGenerator の真価が発揮される場所です。for await...of でイベントを受け取り、そのまま SSE 形式でクライアントに流します。
// SvelteKit の API エンドポイント
export const POST: RequestHandler = async ({ request }) => {
  const { config, parameters } = await request.json();

  const stream = new ReadableStream({
    async start(controller) {
      const encoder = new TextEncoder();

      try {
        for await (const event of engine.process(config, parameters)) {
          // イベントを SSE 形式に変換して送信
          const data = `event: processing\ndata: ${JSON.stringify(event)}\n\n`;
          controller.enqueue(encoder.encode(data));
        }

        // 完了通知
        const done = `event: complete\ndata: ${JSON.stringify({ complete: true })}\n\n`;
        controller.enqueue(encoder.encode(done));
      } catch (error) {
        const errorEvent = `event: error\ndata: ${JSON.stringify({
          error: error instanceof Error ? error.message : "Processing failed"
        })}\n\n`;
        controller.enqueue(encoder.encode(errorEvent));
      } finally {
        controller.close();
      }
    }
  });

  return new Response(stream, {
    headers: {
      "Content-Type": "text/event-stream",
      "Cache-Control": "no-cache",
      Connection: "keep-alive"
    }
  });
};
AsyncGenerator と ReadableStream の相性が良い理由:
for await...ofでイベントを1つずつ受け取り、SSE形式に変換してcontroller.enqueueするだけ- ジェネレーターが次のイベントを
yieldするまで、ループは自然に待機する(バックプレッシャー) - エンジン側の
try/finallyでセッション解放、エンドポイント側のfinallyでcontroller.close()── 各層が自分のリソースを管理
処理戦略の拡張
新しい処理タイプを追加するときは、ProcessingStrategy を継承したクラスを作ってエンジンに登録するだけです。エンジンもSSEエンドポイントも変更不要です。
class MultiStepStrategy extends ProcessingStrategy {
  async *execute(
    config: ProcessingConfig,
    context: ProcessingContext
  ): AsyncIterable<ProcessingEvent> {
    const steps = config.steps ?? [];

    for (let i = 0; i < steps.length; i++) {
      yield* this.emitStepStart(steps[i].id);

      const result = await this.executeStep(steps[i], context);

      yield* this.emitStepComplete(steps[i].id, result);
      yield {
        type: "progress",
        progress: ((i + 1) / steps.length) * 100,
        timestamp: new Date()
      };

      // 次のステップに結果を引き渡す
      context.parameters = { ...context.parameters, previousResult: result };
    }

    yield { type: "complete", timestamp: new Date() };
  }
}
yield* による委譲が、Strategy パターンとの組み合わせを自然にしています。エンジンは yield* strategy.execute() を呼ぶだけで、戦略がどんなイベントを何個 yield するか知る必要がありません。
3つのアプローチの比較まとめ
| 特性 | コールバック | EventEmitter | AsyncGenerator |
|---|---|---|---|
| 処理フロー | .then チェーンで分散 |
リスナー登録と実行が分離 | 上から下への直線的なフロー |
| エラー時のクリーンアップ | .then と .catch の両方に記述 |
error と complete の両方に記述 |
finally に1箇所だけ |
| 型安全性 | コールバック引数ごとに個別の型 | イベント名が文字列(タイポに弱い) | ProcessingEvent 型で統一 |
| 合成 | ネスト地獄 | リスナー増殖 | yield* で透過的に委譲 |
| バックプレッシャー | なし | なし | for await...of で自動制御 |
| SSEとの統合 | コールバック内で enqueue |
リスナー内で enqueue |
for await...of + enqueue |
バックプレッシャー は見落としがちな利点です。for await...of は、消費側が次のイベントを要求するまでジェネレーターを一時停止させます。ネットワークが遅いクライアントに対して、サーバー側でイベントが無制限に溜まる問題が自然に解決されます。
まとめ
AsyncGenerator は「複数のイベントを順番に生成する非同期処理」に最適なパターンです。
async *で非同期ジェネレーター関数を定義yieldでイベントを発行yield*で別のジェネレーターに委譲 → Strategy パターンと相性が良いfor await...ofで消費 →ReadableStream+ SSE との統合が自然try/finallyでリソースの確実なクリーンアップ → 書き忘れリスクがない
特にSSEストリーミングとの組み合わせでは、イベント生成(ジェネレーター)とイベント配信(SSEエンドポイント)が綺麗に分離され、各層が自分のリソース管理に専念できる設計になります。