Bodygram Platform × Gemini APIでバーチャル試着を試してみた
概要
今回、Bodygram PlatformとGemini APIを組み合わせて、バーチャル試着アプリを試してみたので手順と結果をまとめてみました。
バーチャル試着というとGoogle Vertex AIのVirtual Try-On APIやAmazon NovaのVirtual try-onなど試着に特化したAPIが既に提供されていますが、いずれもサイズ感をモデルに合わせて適用する挙動になるためサイズ感が計れません。
そこで今回は、写真から身体計測ができるBodygram Platformと、Gemini APIの画像生成を組み合わせて、全身写真+服の寸法+モデルの身体計測値を元にサイズ感を確認できるバーチャル試着アプリを作ってみました。
今回作るもの
流れとしては以下になります。
- 身体スキャン機能: ユーザーの正面・側面写真からBodygram APIで身体計測値を取得
- バーチャル試着機能: 全身写真+服の寸法+モデルの身体計測値をプロンプトとして、Gemini APIで服を着用したイメージ画像を生成
- フィット判定: 計測値と服のサイズを比較してフィードバックを表示
動作確認環境
- Node.js: 22.21.1
- pnpm: 10.24.0
- Next.js: 16.1.6
- React: 19.2.3
- Bodygram Platform API
- Gemini API (Google Gen AI SDK): 1.34.0
- モデル名: gemini-3-pro-image-preview(2026年1月時点プレビュー版)
- Tailwind CSS: 4.1.18
Bodygram Platformとは
Bodygramは、人物の全身写真(正面, 右横)と体重、身長、性別から身体の計測値を推定できるサービスです。
Bodygramで取得できる計測値
Bodygram Platformでは、写真から以下のような計測値を取得できます。
| 計測項目 | 説明 |
|---|---|
| height | 身長 |
| bustGirth | 胸囲 |
| waistGirth | ウエスト |
| hipGirth | ヒップ |
| insideLegHeight | 股下 |
| backNeckPointToWristLengthR | 袖丈 |
| neckGirth | 首回り |
| acrossBackShoulderWidth | 肩幅 |
他にも計測項目はありますが、詳細はBodygram Platform Docsを参照してください。
Bodygramの登録手順
- Bodygram Platformにアクセスしてアカウントを作成
- 組織(Organization)を作成してOrganization IDを取得
- APIキーを発行
フリープランでは月に20回まで無料でスキャンが利用できます。
Bodygram Platform APIの使い方
認証
上で取得したAPIキーをAuthorizationヘッダーに指定して認証します。
const response = await fetch(
  `https://platform.bodygram.com/api/orgs/${organizationId}/scans`,
  {
    method: "POST",
    headers: {
      "Content-Type": "application/json",
      Authorization: apiKey,
    },
    body: JSON.stringify({ photoScan: data }),
  },
);
スキャンリクエストの作成
身体計測を行うには、POST /api/orgs/{orgId}/scans エンドポイントにリクエストを送信します。
リクエストボディ
interface CreateScanRequestPhotoFields {
  age: number; // 年齢
  weight: number; // 体重(グラム単位)
  height: number; // 身長(ミリメートル単位)
  gender: "male" | "female";
  frontPhoto: string; // 正面写真(Base64エンコード)
  rightPhoto: string; // 右側面写真(Base64エンコード)
}
const scanData: CreateScanRequestPhotoFields = {
  age: 31,
  gender: "female",
  height: 161 * 10, // cm → mm
  weight: 50 * 1000, // kg → g
  frontPhoto: frontBase64,
  rightPhoto: rightBase64,
};
APIクライアントの実装
簡易的に試すため、Server Actions経由でAPIを呼び出すクライアントクラスを実装します。
const API_BASE_URL = "https://platform.bodygram.com/api";

export class BodygramClient {
  private apiKey: string;
  private organizationId: string;

  constructor(apiKey: string, organizationId: string) {
    this.apiKey = apiKey;
    this.organizationId = organizationId;
  }

  async createScan(data: CreateScanRequestPhotoFields): Promise<Scan> {
    const response = await fetch(
      `${API_BASE_URL}/orgs/${this.organizationId}/scans`,
      {
        method: "POST",
        headers: {
          "Content-Type": "application/json",
          Authorization: this.apiKey,
        },
        body: JSON.stringify({ photoScan: data }),
      },
    );

    if (!response.ok) {
      const errorBody = await response.text();
      throw new Error(
        `Failed to create scan: ${response.status} - ${errorBody}`,
      );
    }

    const responseData = await response.json();
    // response: { entry: Scan }
    return responseData.entry;
  }

  async getScan(scanId: string): Promise<Scan> {
    const response = await fetch(
      `${API_BASE_URL}/orgs/${this.organizationId}/scans/${scanId}`,
      {
        method: "GET",
        headers: {
          Authorization: this.apiKey,
        },
      },
    );

    if (!response.ok) {
      throw new Error(`Failed to get scan: ${response.statusText}`);
    }

    const responseData = await response.json();
    return responseData.entry;
  }
}
レスポンスの構造
スキャンが完了すると、以下のような形式でレスポンスが返ってきます。
interface Scan {
  id: string;
  status: "success" | "failure";
  entryDate: number; // Unix Timestamp
  measurements?: Measurement[];
  bodyComposition?: BodyComposition;
}

interface Measurement {
  name: string; // 'chest', 'waist', 'hip' など
  value: number; // ミリメートル単位
  unit: "mm";
}
スキャンの実行
BodygramClientクラスで定義したcreateScanメソッドを呼び出してスキャンを実行します。
"use server";

import { BodygramClient } from "@/lib/bodygram/client";
import type { CreateScanRequestPhotoFields, Scan } from "@/types/bodygram";

export async function createScanAction(
  data: CreateScanRequestPhotoFields,
): Promise<Scan> {
  const apiKey = process.env.BODYGRAM_API_KEY;
  const orgId = process.env.BODYGRAM_ORG_ID;

  if (!apiKey || !orgId) {
    throw new Error("BODYGRAM_API_KEY and BODYGRAM_ORG_ID must be set");
  }

  const client = new BodygramClient(apiKey, orgId);

  const scan = await client.createScan(data);

  if (!scan.id) {
    throw new Error("Scan ID missing in create response");
  }

  if (scan.status === "failure") {
    const errorCode = scan.error?.code || "unknown";
    throw new Error(`Scan failed with error: ${errorCode}`);
  }

  return scan;
}
Gemini APIによる画像生成
今回はGoogle GenAI SDK(@google/genai)でGemini APIを呼び出して画像生成を行います。Nano Banana Proを利用するために gemini-3-pro-image-preview モデルを使用します。
セットアップ
Google AI SDKをインストールします。
pnpm add @google/genai
環境変数にAPIキーを設定します。
GOOGLE_GENAI_API_KEY=your-gemini-api-key
クライアントの初期化
import { GoogleGenAI } from "@google/genai";

const apiKey = process.env.GOOGLE_GENAI_API_KEY;
if (!apiKey) {
  throw new Error("GOOGLE_GENAI_API_KEY environment variable is required");
}

const ai = new GoogleGenAI({ apiKey });
Safety Settingsの設定
Gemini APIでは、生成コンテンツの安全性を制御するためのSafety Settingsを設定できます。
import { HarmCategory, HarmBlockThreshold } from "@google/genai";

const SAFETY_SETTINGS = [
  {
    // ハラスメント: 個人攻撃、脅迫、いじめなどを含むコンテンツをブロック
    category: HarmCategory.HARM_CATEGORY_HARASSMENT,
    threshold: HarmBlockThreshold.BLOCK_MEDIUM_AND_ABOVE,
  },
  {
    // ヘイトスピーチ: 人種、性別、宗教等に基づく差別的なコンテンツをブロック
    category: HarmCategory.HARM_CATEGORY_HATE_SPEECH,
    threshold: HarmBlockThreshold.BLOCK_MEDIUM_AND_ABOVE,
  },
  {
    // 性的コンテンツ: 露骨な性的表現や不適切な画像生成をブロック
    category: HarmCategory.HARM_CATEGORY_SEXUALLY_EXPLICIT,
    threshold: HarmBlockThreshold.BLOCK_MEDIUM_AND_ABOVE,
  },
  {
    // 危険なコンテンツ: 有害な行為を助長する情報をブロック
    category: HarmCategory.HARM_CATEGORY_DANGEROUS_CONTENT,
    threshold: HarmBlockThreshold.BLOCK_MEDIUM_AND_ABOVE,
  },
];
BLOCK_NONEは開発時のテスト用途にのみ使用し、本番環境ではBLOCK_MEDIUM_AND_ABOVE以上を推奨
プロンプト
以下のようにプロンプトを生成します。
// 身体計測値を含むプロンプトセクションを構築
function buildBodyMeasurementsSection(
  measurements: ExtendedUserMeasurements,
): string {
  const lines: string[] = ["## SUBJECT BODY MEASUREMENTS"];

  const measurementLabels = [
    { key: "height", label: "Height" },
    { key: "acrossBackShoulderWidth", label: "Shoulder Width" },
    { key: "bustGirth", label: "Bust Girth" },
    { key: "waistGirth", label: "Waist Girth" },
    { key: "hipGirth", label: "Hip Girth" },
    { key: "insideLegHeight", label: "Inseam" },
  ];

  for (const { key, label } of measurementLabels) {
    const value = measurements[key];
    if (value !== undefined) {
      lines.push(`- ${label}: ${Math.round(value / 10)}cm`);
    }
  }

  return lines.join("\n");
}

// 服の寸法セクションを構築
function buildClothingSection(clothing: ClothingItem): string {
  const lines: string[] = ["## CLOTHING SPECIFICATIONS"];

  lines.push(`- Name: ${clothing.name}`);
  lines.push(`- Type: ${clothing.type}`);
  lines.push(`- Fit Style: ${clothing.fit}`);
  lines.push("- Dimensions:");

  if (clothing.dimensions.length) {
    lines.push(`  - Length: ${clothing.dimensions.length}cm`);
  }
  if (clothing.dimensions.chestWidth) {
    lines.push(`  - Chest Width: ${clothing.dimensions.chestWidth}cm`);
  }
  if (clothing.dimensions.shoulderWidth) {
    lines.push(`  - Shoulder Width: ${clothing.dimensions.shoulderWidth}cm`);
  }

  return lines.join("\n");
}
服タイプ別の指示
トップス、ボトムス、アウターなど服のタイプに応じて、適切な指示をプロンプトに含めます。
function buildClothingTypeInstructions(type: ClothingType): string {
  const instructions: Record<ClothingType, string> = {
    tops: `### TOPS-SPECIFIC INSTRUCTIONS
- CRITICAL: Preserve the subject's existing lower body clothing (pants, skirt, etc.)
- The top should naturally overlap with the waistband of existing bottoms
- Maintain the original pose and leg positioning exactly
- If the subject is wearing a jacket/coat, this top replaces only the inner layer`,

    bottoms: `### BOTTOMS-SPECIFIC INSTRUCTIONS
- CRITICAL: Preserve the subject's existing upper body clothing (shirt, top, etc.)
- The bottoms should connect naturally at the waist with existing top
- Maintain the original upper body pose exactly
- Ensure appropriate hem length based on the subject's leg measurements`,

    outerwear: `### OUTERWEAR-SPECIFIC INSTRUCTIONS
- CRITICAL: Layer the outerwear OVER the subject's existing clothing
- Do NOT remove or replace the inner clothing layers
- The outerwear should drape naturally over existing garments
- Maintain visibility of inner clothing at collar, cuffs, and hem where appropriate`,

    dress: `### DRESS-SPECIFIC INSTRUCTIONS
- Replace the subject's entire torso and leg clothing with the dress
- Maintain the original pose and body positioning
- The dress should fit naturally from shoulders to the appropriate hem length
- Preserve any accessories (watch, jewelry, etc.) if visible`,
  };

  return instructions[type];
}
- トップス: 既存のボトムス(パンツ、スカート)を維持
- ボトムス: 既存のトップスを維持
- アウター: 既存の服の上にレイヤリング
- ワンピース: 上下の服を置き換え
Virtual Try-On APIの場合はこの辺りをよしなにやってくれますが、Geminiの場合は細かく指示をする必要があります。
完全なプロンプト構造
最終的なプロンプトは以下の構造で生成されます。
export function buildTryOnPrompt(
  measurements: ExtendedUserMeasurements,
  clothing: ClothingItem,
): string {
  const sections = [
    "=== VIRTUAL TRY-ON IMAGE GENERATION TASK ===",
    "",
    "## OBJECTIVE",
    "Generate a photorealistic image showing the person in Photo 1 wearing the clothing item from Photo 2.",
    "The result must be a natural-looking photograph, NOT an illustration or digital rendering.",
    "",
    buildBodyMeasurementsSection(measurements),
    "",
    buildClothingSection(clothing),
    "",
    buildSizeComparisonSection(measurements, clothing),
    "",
    "## ABSOLUTE CONSTRAINTS (DO NOT VIOLATE)",
    "",
    "### FACE PRESERVATION",
    "- DO NOT modify the subject's face in any way",
    "- Keep the exact same facial features, expression, skin tone, and makeup",
    "- The face must be 100% identical to Photo 1",
    "",
    "### BODY AND CLOTHING SIZE PRESERVATION",
    "- DO NOT alter the subject's body proportions, height, or physique",
    "- The subject's body must remain exactly as measured in the SUBJECT BODY MEASUREMENTS section",
    "- DO NOT resize, stretch, or distort the clothing item from Photo 2",
    "- The clothing dimensions must remain exactly as specified in the CLOTHING SPECIFICATIONS section",
    "- Show the natural fit result of the actual clothing size on the actual body size",
    "- If the clothing is too tight or too loose for the body, show that realistically",
    "",
    "## CRITICAL REQUIREMENTS",
    "",
    buildClothingTypeInstructions(clothing.type),
    "",
    "### GENERAL REQUIREMENTS",
    "1. OUTPUT: Full-body photograph from head to feet",
    "2. QUALITY: Professional photo quality, natural lighting consistent with original",
    "3. POSE: Maintain the exact same pose, facial expression, and background from Photo 1",
    "4. FIT: Show realistic fabric draping based on the actual size difference between body and clothing",
    "5. REALISM: Natural fabric folds, shadows, and body interaction",
    "",
    "## COMPLIANCE",
    "- Generate only appropriate, professional imagery",
    "- No revealing, suggestive, or inappropriate content",
    "- Maintain the subject's dignity and professionalism",
    "- If the request cannot be fulfilled appropriately, respond with text only",
    "",
    "## OUTPUT FORMAT",
    "Generate ONE image showing the try-on result.",
    "After the image, provide a brief Japanese feedback (2-3 sentences) about the fit.",
  ];

  return sections.join("\n");
}
プロンプト設計のポイント:
- 顔の保持: 顔を一切変更しないよう明示的に指示
- サイズ保持: 体型・服のサイズを変更せず、実際のフィット感を表現
- 服タイプ別処理: トップス着用時は下半身を維持するなど、服の種類に応じた処理
- コンプライアンス: 不適切なコンテンツ生成を防止
マルチモーダル入力でバーチャル試着
Gemini APIにユーザーの写真と服の画像を渡し、着用イメージを生成します。
import { GoogleGenAI, HarmCategory, HarmBlockThreshold } from "@google/genai";

const GEMINI_MODEL = "gemini-3-pro-image-preview";

export async function generateTryOnAction(
  request: ExtendedTryOnRequest,
): Promise<ExtendedTryOnResponse> {
  const ai = new GoogleGenAI({ apiKey: process.env.GOOGLE_GENAI_API_KEY });

  // 入力バリデーション
  const validation = validateTryOnRequest(
    request.userPhoto,
    request.userMeasurements,
    request.clothing,
  );
  if (!validation.isValid) {
    return {
      success: false,
      error: `入力データの検証に失敗しました:\n${formatValidationErrors(validation.errors)}`,
      errorCode: validation.errors[0]?.code || "VALIDATION_ERROR",
    };
  }

  // プロンプトを構築
  const prompt = buildTryOnPrompt(request.userMeasurements, request.clothing);

  // リクエストパーツを構築
  const contentParts = [
    {
      inlineData: {
        data: request.userPhoto, // ユーザーの写真(Base64)
        mimeType: "image/jpeg",
      },
    },
    {
      inlineData: {
        data: clothingBase64, // 服の画像(Base64)
        mimeType: "image/jpeg",
      },
    },
    { text: prompt },
  ];

  try {
    const response = await ai.models.generateContent({
      model: GEMINI_MODEL,
      contents: [
        {
          role: "user",
          parts: contentParts,
        },
      ],
      config: {
        safetySettings: SAFETY_SETTINGS,
      },
    });

    // レスポンスから画像とテキストを抽出
    let feedback = "";
    let resultImage: string | null = null;

    const candidate = response.candidates?.[0];
    if (candidate?.content?.parts) {
      for (const part of candidate.content.parts) {
        if (part.text) {
          feedback += part.text;
        } else if (part.inlineData?.data) {
          resultImage = part.inlineData.data;
        }
      }
    }

    return {
      success: true,
      resultImage: resultImage || request.userPhoto,
      feedback: feedback.trim() || "解析が完了しました。",
    };
  } catch (apiError) {
    const errorMessage =
      apiError instanceof Error ? apiError.message : String(apiError);

    // コンテンツポリシー違反の場合
    if (
      errorMessage.includes("SAFETY") ||
      errorMessage.includes("blocked") ||
      errorMessage.includes("content policy")
    ) {
      return {
        success: false,
        error:
          "コンテンツポリシーにより画像生成がブロックされました。別の写真でお試しください。",
        errorCode: "CONTENT_BLOCKED",
      };
    }

    return {
      success: false,
      error: `AI解析中にエラーが発生しました: ${errorMessage}`,
      errorCode: "API_ERROR",
    };
  }
}
Next.jsでサンプルアプリを構築
プロジェクト構成
src/
├── app/
│   ├── page.tsx                    # 身体スキャン画面
│   ├── actions.ts                  # Bodygram API呼び出し
│   ├── results/[id]/page.tsx       # 計測結果表示
│   ├── experiments/
│   │   └── virtual-try-on/
│   │       ├── page.tsx            # バーチャル試着画面
│   │       └── actions.ts          # Gemini API呼び出し
│   └── components/
│       ├── FileUpload.tsx
│       ├── TextField.tsx
│       ├── Button.tsx
│       └── ResultDisplay.tsx
├── lib/
│   ├── bodygram/
│   │   └── client.ts               # Bodygramクライアント
│   └── gemini/
│       ├── types.ts                # 型定義
│       ├── validation.ts           # バリデーション
│       └── prompt-builder.ts       # プロンプト構築
└── types/
    └── bodygram.ts                 # 型定義
身体スキャン画面の実装
ユーザーが基本情報と写真をアップロードする画面です。
'use client'

import { useState } from 'react'
import { useRouter } from 'next/navigation'
import { createScanAction } from './actions'

export default function Home() {
  const router = useRouter()
  const [step, setStep] = useState<'input' | 'scanning'>('input')
  const [formData, setFormData] = useState({
    age: 27,
    gender: 'female' as const,
    height: 162,
    weight: 50,
  })
  const [frontPhoto, setFrontPhoto] = useState<File | null>(null)
  const [rightPhoto, setRightPhoto] = useState<File | null>(null)

  const startScan = async () => {
    if (!frontPhoto || !rightPhoto) {
      alert('写真を両方アップロードしてください')
      return
    }

    setStep('scanning')

    try {
      const frontBase64 = await processImage(frontPhoto)
      const rightBase64 = await processImage(rightPhoto)

      const scanData = {
        ...formData,
        height: formData.height * 10,   // 身長
        weight: formData.weight * 1000, // 体重
        frontPhoto: frontBase64,
        rightPhoto: rightBase64,
      }

      const result = await createScanAction(scanData)

      // ⚠️ PoCのためSessionStorageを使用
      // 本番環境ではサーバーサイドで暗号化して一時保存し、処理完了後に削除してください
      sessionStorage.setItem('scanResult', JSON.stringify(result))
      sessionStorage.setItem('frontPhotoBase64', frontBase64)

      router.push(`/results/${result.id}`)
    } catch (error) {
      console.error('Scan failed:', error instanceof Error ? error.message : 'Unknown error')
      alert('スキャンに失敗しました')
      setStep('input')
    }
  }

  return (
    <div className="min-h-screen bg-muted/30">
      <main className="container mx-auto max-w-5xl p-6">
        {step === 'input' && (
          <div className="flex flex-col gap-6">
            <h1 className="text-4xl font-bold">Bodygram Sample App</h1>

            {/* 基本情報入力 */}
            <div className="grid grid-cols-2 gap-4">
              <TextField label="年齢" value={formData.age} onChange={...} />
              <select value={formData.gender} onChange={...}>
                <option value="male">男性</option>
                <option value="female">女性</option>
              </select>
            </div>

            <div className="grid grid-cols-2 gap-4">
              <TextField label="身長 (cm)" value={formData.height} onChange={...} />
              <TextField label="体重 (kg)" value={formData.weight} onChange={...} />
            </div>

            {/* 写真アップロード */}
            <div className="grid grid-cols-2 gap-4">
              <FileUpload label="正面 (Front)" onFileSelect={setFrontPhoto} />
              <FileUpload label="右側面 (Right)" onFileSelect={setRightPhoto} />
            </div>

            <Button onPress={startScan}>スキャン開始</Button>
          </div>
        )}

        {step === 'scanning' && (
          <div className="flex flex-col items-center py-24">
            <div className="animate-spin h-16 w-16 border-4 border-primary rounded-full" />
            <p>Analyzing...</p>
          </div>
        )}
      </main>
    </div>
  )
}
Server Actionsでの API呼び出し
APIキーを読み込むためにNext.jsのServer Actionsを使います。
// app/actions.ts
"use server";

import { BodygramClient } from "@/lib/bodygram/client";

export async function createScanAction(
  data: CreateScanRequestPhotoFields,
): Promise<Scan> {
  const apiKey = process.env.BODYGRAM_API_KEY;
  const orgId = process.env.BODYGRAM_ORG_ID;

  if (!apiKey || !orgId) {
    throw new Error("API credentials not configured");
  }

  const client = new BodygramClient(apiKey, orgId);
  // ... 実装
}
バーチャル試着画面の実装
計測結果を元に、服を選んでバーチャル試着できる画面です。
"use client";

import { useEffect, useState } from "react";
import { generateTryOnAction } from "./actions";

export default function VirtualTryOnPage() {
  const [scanResult, setScanResult] = useState<Scan | null>(null);
  const [userPhoto, setUserPhoto] = useState<string | null>(null);
  const [selectedClothing, setSelectedClothing] = useState<ClothingItem | null>(
    null,
  );
  const [fitResult, setFitResult] = useState<FitResult | null>(null);

  // SessionStorageからスキャン結果を読み込み
  useEffect(() => {
    const saved = sessionStorage.getItem("scanResult");
    if (saved) setScanResult(JSON.parse(saved));

    const photo = sessionStorage.getItem("frontPhotoBase64");
    if (photo) setUserPhoto(photo);

    return () => {
      sessionStorage.removeItem("frontPhotoBase64");
    };
  }, []);

  const handleTryOn = async () => {
    if (!selectedClothing || !scanResult || !userPhoto) return;

    // スキャン結果から全計測値を抽出
    const userMeasurements = extractMeasurementsFromScan(scanResult);

    const response = await generateTryOnAction({
      userPhoto,
      userMeasurements,
      clothing: selectedClothing,
    });

    if (response.success) {
      setFitResult({
        score: calculateFitScore(selectedClothing, scanResult),
        feedback: response.feedback,
        resultImage: response.resultImage,
      });
    }
  };

  return (
    <div className="grid lg:grid-cols-2 gap-8">
      {/* 左側: 写真と服の選択 */}
      <div>
        <img src={`data:image/jpeg;base64,${userPhoto}`} alt="User" />
        <div className="grid grid-cols-2 gap-4">
          {clothingItems.map((item) => (
            <button key={item.id} onClick={() => setSelectedClothing(item)}>
              <img src={item.image} alt={item.name} />
              <p>{item.name}</p>
              <p>
                {item.type} / 着丈: {item.dimensions.length}cm
              </p>
            </button>
          ))}
        </div>
        <Button onPress={handleTryOn}>試着する</Button>
      </div>

      {/* 右側: 試着結果 */}
      <div>
        {fitResult && (
          <>
            <img
              src={`data:image/jpeg;base64,${fitResult.resultImage}`}
              alt="Result"
            />
            <p>Fit Score: {fitResult.score}</p>
            <p>{fitResult.feedback}</p>
          </>
        )}
      </div>
    </div>
  );
}
動作デモ
1. 身体スキャンの実行
基本情報を入力し、正面と右側面の写真をアップロードしてスキャンを開始します。
テストデータとしてGeminiに作成してもらった画像と情報を使用します。
- 身長: 162cm
- 体重: 50kg
- 年齢: 27歳
- 性別: 女性


以下は仮で用意したデモアプリの画面です。

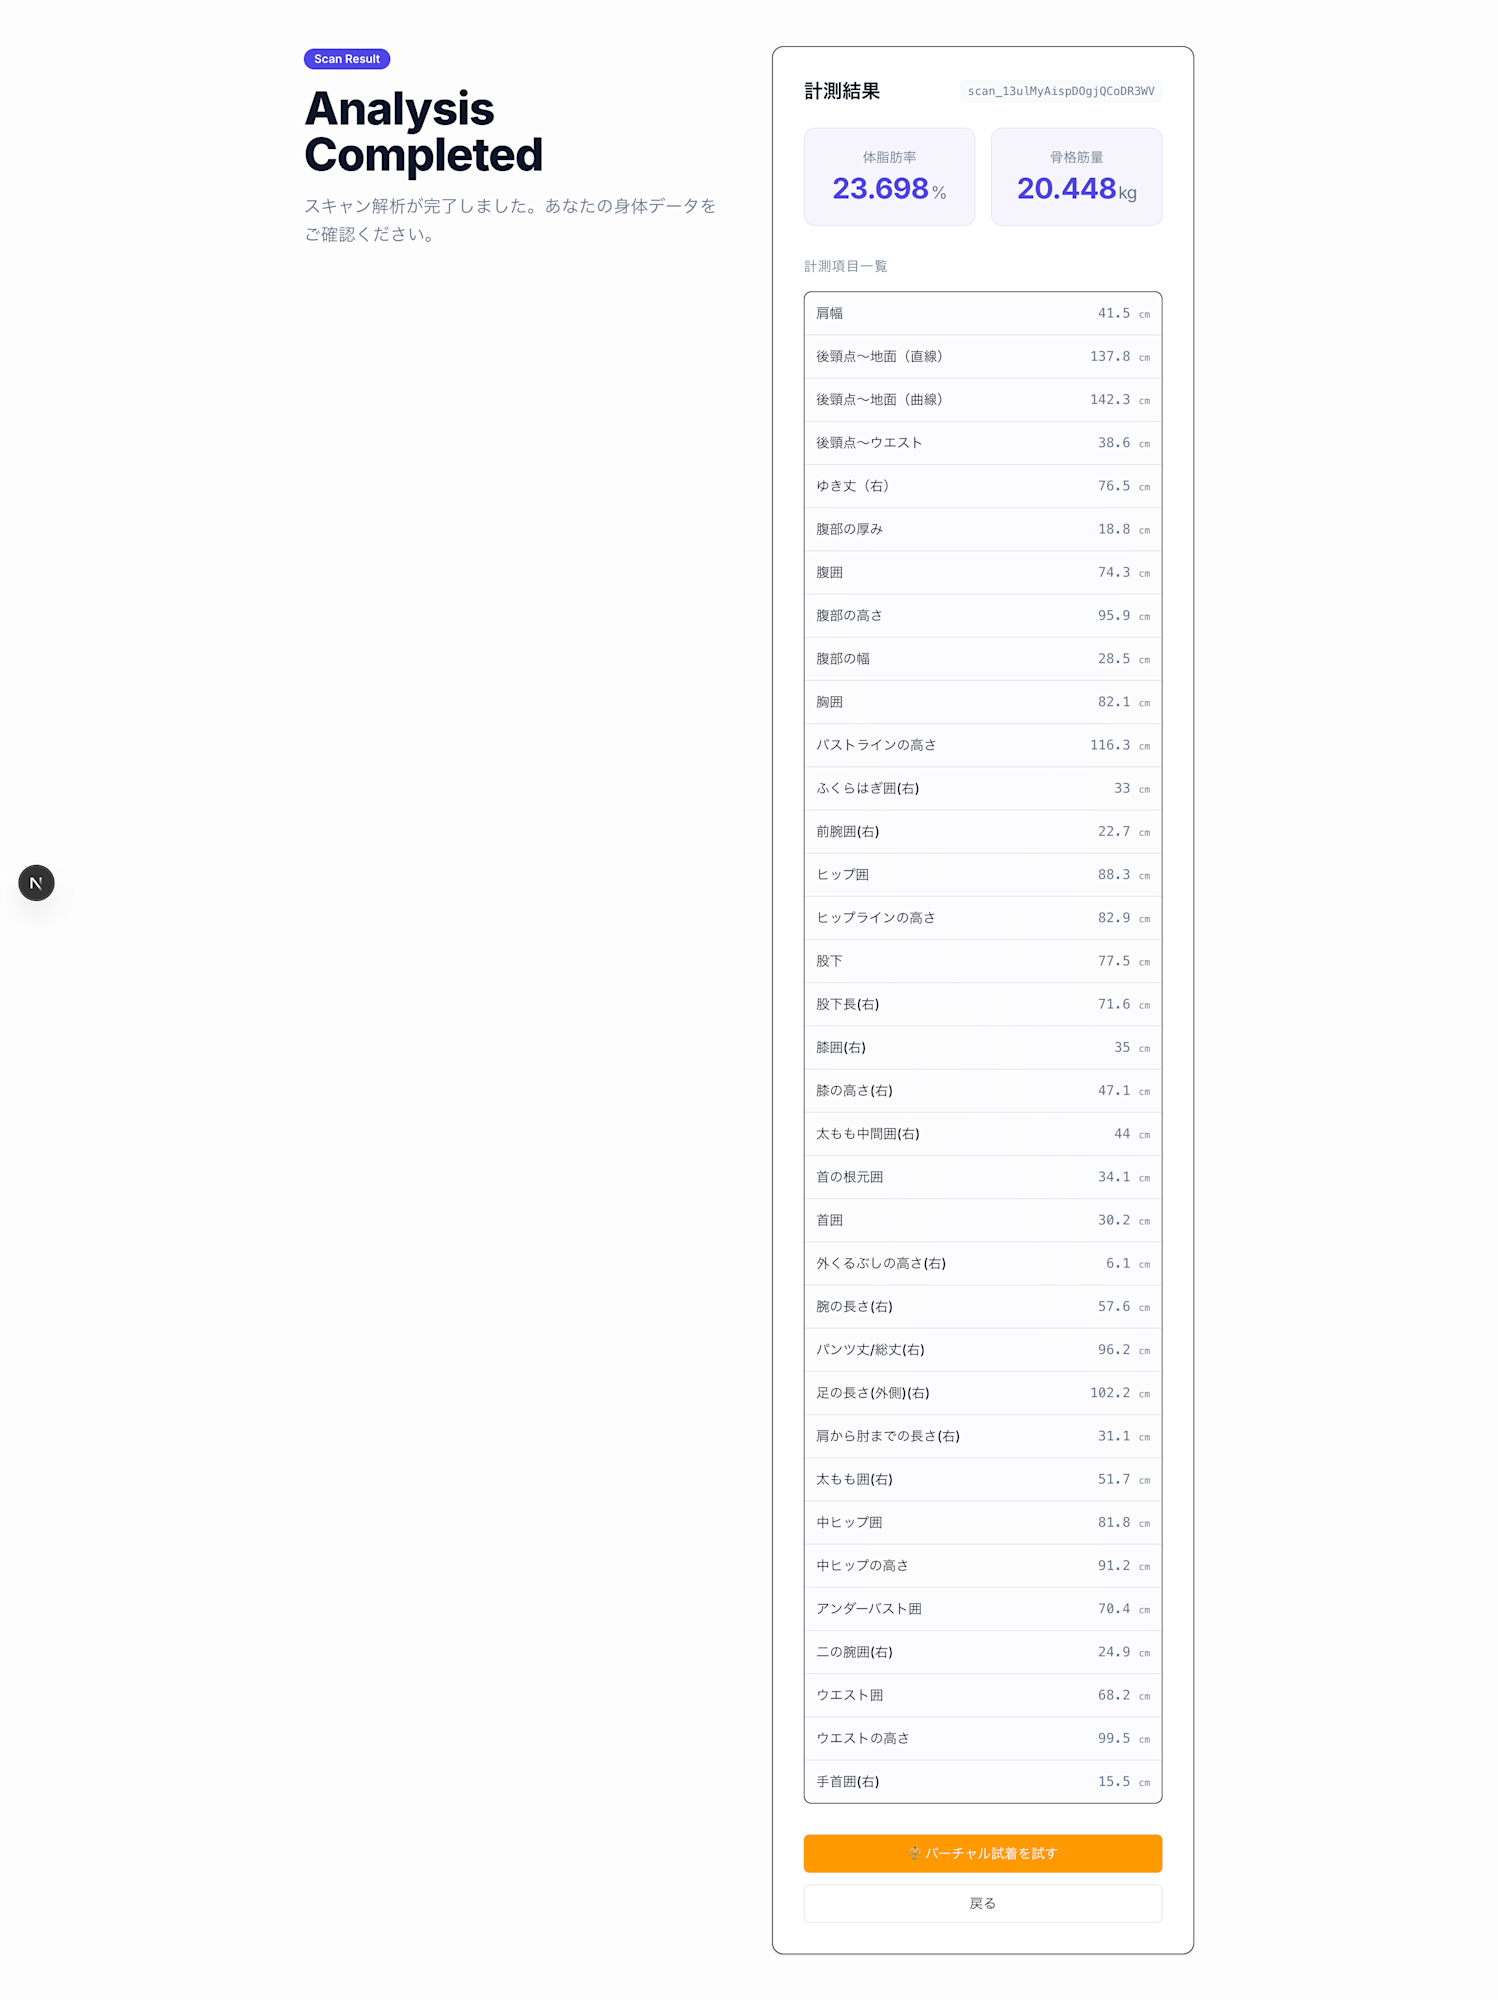
2. 計測結果の確認
スキャンが完了すると、以下のような計測値が取得できます。
| 計測項目 | 値 |
|---|---|
| 体脂肪率 | 23.698% |
| 骨格筋量 | 20.448kg |
| 肩幅 | 41.5cm |
| 後頸点〜地面(直線) | 137.8cm |
| 後頸点〜地面(曲線) | 142.3 cm |
| バスト囲 | 82.1cm |
| ウエスト囲 | 68.2cm |
| ヒップ囲 | 88.3cm |
3. 検証用の服データ
サイズ感の違いを確認するため、レディースとメンズの複数サイズを用意しました。
Tシャツ サイズ寸法
レディース
| サイズ | 着丈 | 身幅 | 肩幅 | 袖丈 |
|---|---|---|---|---|
| S | 60 | 43 | 36 | 16 |
| M | 63 | 46 | 38 | 17 |
| L | 66 | 49 | 40 | 18 |
メンズ
| サイズ | 着丈 | 身幅 | 肩幅 | 袖丈 |
|---|---|---|---|---|
| S | 66 | 48 | 43 | 19 |
| M | 69 | 51 | 45 | 21 |
| L | 72 | 54 | 47 | 23 |
(単位: cm)
{
  "clothing": [
    {
      "id": "shirt-women-s",
      "name": "ホワイトTシャツ(レディースS)",
      "type": "tops",
      "image": "/demo-clothing/shirt-01.png",
      "dimensions": {
        "length": 60,
        "chestWidth": 43,
        "shoulderWidth": 36,
        "sleeveLength": 16,
        "unit": "cm"
      },
      "fit": "regular"
    },
    {
      "id": "shirt-women-m",
      "name": "ホワイトTシャツ(レディースM)",
      "type": "tops",
      "image": "/demo-clothing/shirt-01.png",
      "dimensions": {
        "length": 63,
        "chestWidth": 46,
        "shoulderWidth": 38,
        "sleeveLength": 17,
        "unit": "cm"
      },
      "fit": "regular"
    },
    {
      "id": "shirt-women-l",
      "name": "ホワイトTシャツ(レディースL)",
      "type": "tops",
      "image": "/demo-clothing/shirt-01.png",
      "dimensions": {
        "length": 66,
        "chestWidth": 49,
        "shoulderWidth": 40,
        "sleeveLength": 18,
        "unit": "cm"
      },
      "fit": "regular"
    },
    {
      "id": "shirt-men-s",
      "name": "ホワイトTシャツ(メンズS)",
      "type": "tops",
      "image": "/demo-clothing/shirt-01.png",
      "dimensions": {
        "length": 66,
        "chestWidth": 48,
        "shoulderWidth": 43,
        "sleeveLength": 19,
        "unit": "cm"
      },
      "fit": "regular"
    },
    {
      "id": "shirt-men-m",
      "name": "ホワイトTシャツ(メンズM)",
      "type": "tops",
      "image": "/demo-clothing/shirt-01.png",
      "dimensions": {
        "length": 69,
        "chestWidth": 51,
        "shoulderWidth": 45,
        "sleeveLength": 21,
        "unit": "cm"
      },
      "fit": "regular"
    },
    {
      "id": "shirt-men-l",
      "name": "ホワイトTシャツ(メンズL)",
      "type": "tops",
      "image": "/demo-clothing/shirt-01.png",
      "dimensions": {
        "length": 72,
        "chestWidth": 54,
        "shoulderWidth": 47,
        "sleeveLength": 23,
        "unit": "cm"
      },
      "fit": "regular"
    }
  ]
}
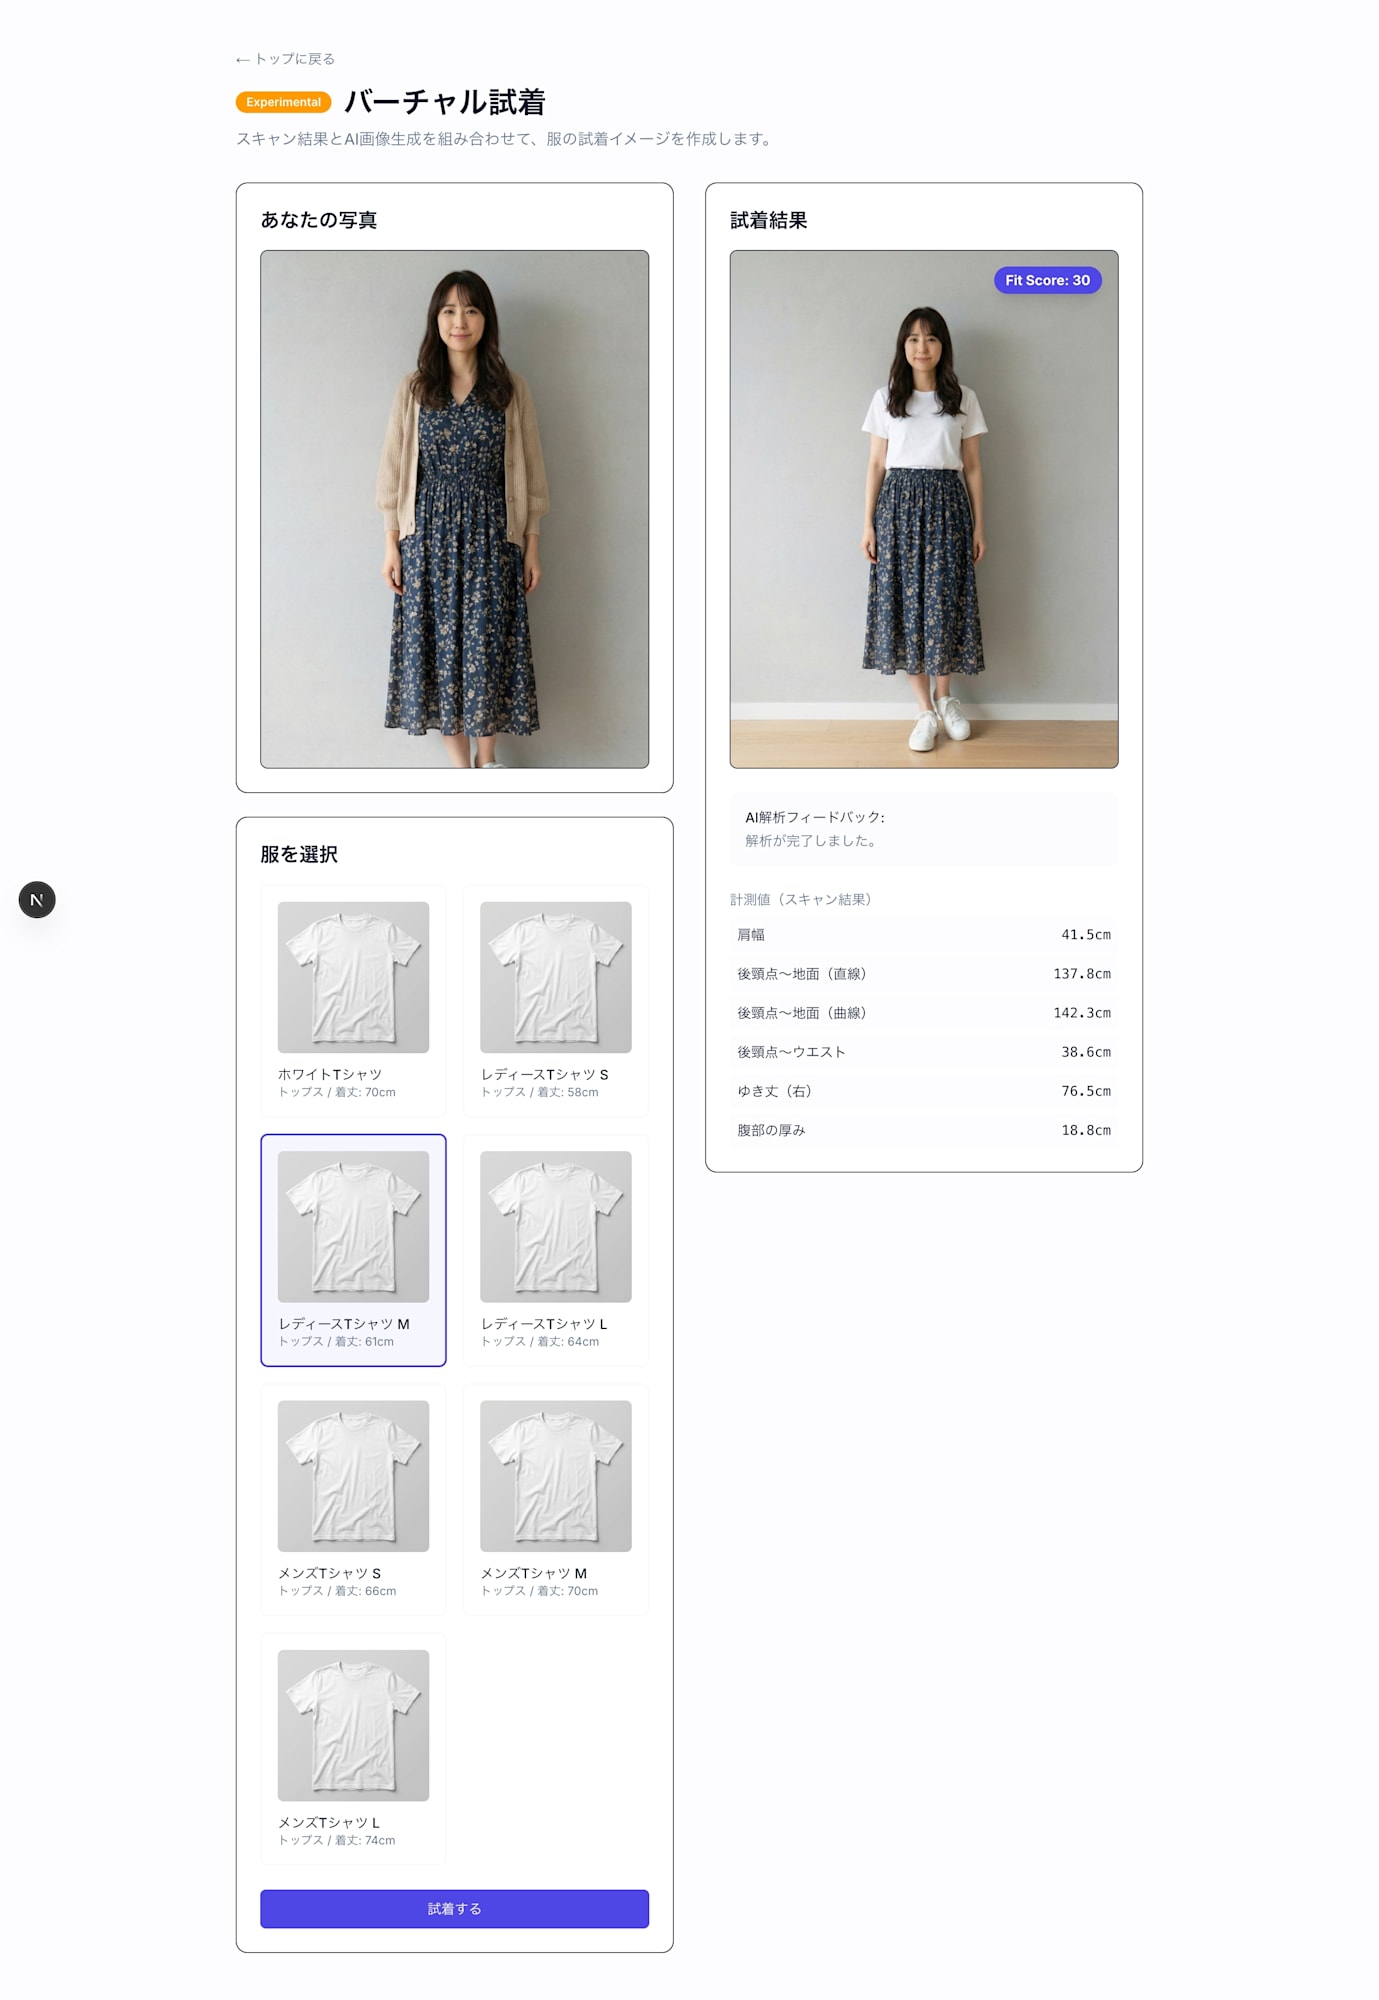
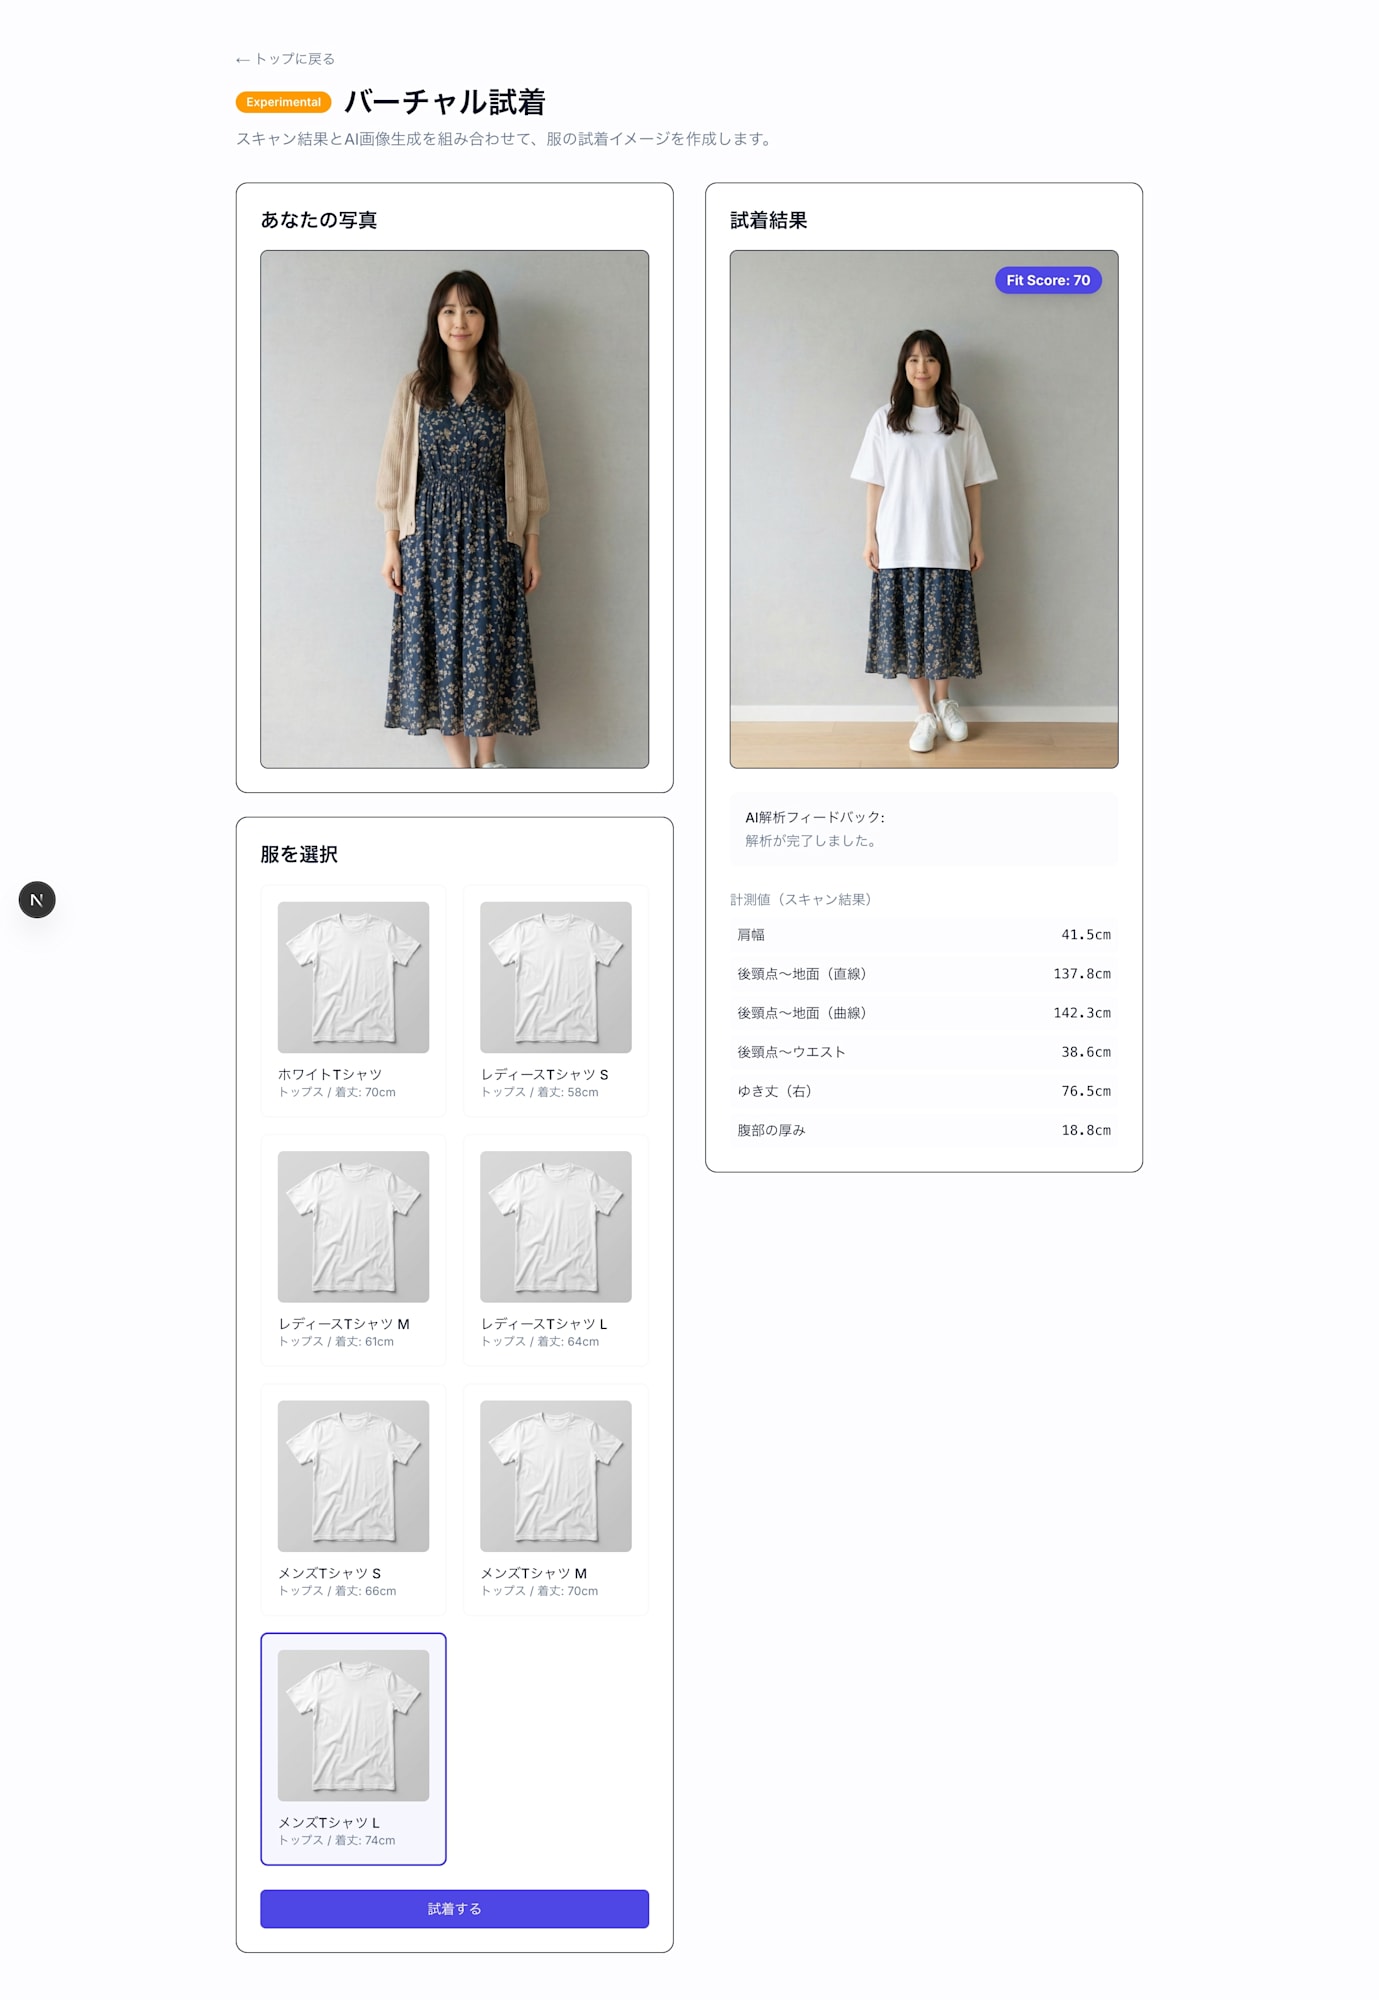
4. バーチャル試着の実行
計測結果ページから「バーチャル試着」に進み、服を選んで試着ボタンを押すと、試着後の画像が表示されます。
レディースM(肩幅38cm)の試着結果
モデルの肩幅(41.5cm)に対して服の肩幅(38cm)が小さいため、やや窮屈なフィット感が表現されています。
メンズL(肩幅47cm)の試着結果
モデルの肩幅(41.5cm)に対して服の肩幅(47cm)が大きいため、ゆったりとしたフィット感が表現されています。
プライバシーに関する注意事項
本記事で扱う身体計測データ・全身写真は、個人情報保護法における「要配慮個人情報」に該当する可能性があります。本番環境で同様のアプリケーションを構築する際は、以下の点に留意してください。
| 項目 | 対応内容 |
|---|---|
| 同意取得 | データ収集・AI処理についてユーザーから明示的な同意を取得する |
| データ最小化 | 必要最小限のデータのみ収集・送信する |
| 保存期間 | 処理完了後は速やかに削除し、不要な保存を避ける |
| 第三者送信 | Gemini APIへの画像送信について、Googleのデータ取り扱いポリシーを確認する |
| アクセス制御 | 計測データや画像へのアクセスを適切に制限する |
データの取り扱いについて
本記事のサンプルコードは検証のため一時保存先としてSessionStorageを使用していますが、本番環境ではサーバーサイドで暗号化して一時保存し、処理完了後に即時削除することを推奨します。
まとめ
今回は、Bodygram PlatformとGemini APIを組み合わせて、オンラインでサイズ感を確認できるサンプルアプリを作成しました。
まだ生成画像の品質にばらつきがある等、改善の余地はありますが、サイズ感をAIで表現する上ではこの組み合わせは有用だと感じました。