L@EやCF2を使わずにレスポンスヘッダーを設定するCloudFront DistributionをAWS CDKで構築してみた
この記事は公開されてから1年以上経過しています。情報が古い可能性がありますので、ご注意ください。
こんにちは、CX事業本部 IoT事業部の若槻です。
昨年のAmazon CloudFrontのアップデートにより、Lambda@EdgeやCloudFront Functionを使わなくても、CloudFront Distributionでレスポンスヘッダーが設定できるようになりました。
このレスポンスヘッダーの設定は、コンソールまたはResponseHeadersPolicyのAPIを使用する必要がありますが、AWS CDKでもResponseHeadersPolicyのConstructのクラスが用意されていました。
というわけで今回は、レスポンスヘッダーを設定するCloudFront DistributionをAWS CDKで構築してみました。
やってみた
環境
- aws-cdk@1.145.0
- typescript@3.9.10
CDKスタック定義
CDKスタックの定義です。
import * as cdk from '@aws-cdk/core';
import * as cloudfront from '@aws-cdk/aws-cloudfront';
import * as iam from '@aws-cdk/aws-iam';
import * as s3 from '@aws-cdk/aws-s3';
import * as s3deploy from '@aws-cdk/aws-s3-deployment';
import * as cloudfront_origins from '@aws-cdk/aws-cloudfront-origins';
import * as acm from '@aws-cdk/aws-certificatemanager';

interface AwsCdkAppStackProps extends cdk.StackProps {
  certArn: string;
  customDomain: string;
}

export class AwsCdkAppStack2 extends cdk.Stack {
  constructor(scope: cdk.Construct, id: string, props: AwsCdkAppStackProps) {
    super(scope, id, props);

    const websiteBucket = new s3.Bucket(this, 'WebsiteBucket', {
      removalPolicy: cdk.RemovalPolicy.DESTROY,
    });

    const originAccessIdentity = new cloudfront.OriginAccessIdentity(
      this,
      'OriginAccessIdentity',
      {
        comment: 'website-distribution-originAccessIdentity',
      }
    );

    const webSiteBucketPolicyStatement = new iam.PolicyStatement({
      actions: ['s3:GetObject'],
      effect: iam.Effect.ALLOW,
      principals: [
        new iam.CanonicalUserPrincipal(
          originAccessIdentity.cloudFrontOriginAccessIdentityS3CanonicalUserId
        ),
      ],
      resources: [`${websiteBucket.bucketArn}/*`],
    });

    websiteBucket.addToResourcePolicy(webSiteBucketPolicyStatement);

    const responseHeadersPolicy = new cloudfront.ResponseHeadersPolicy(
      this,
      'ResponseHeadersPolicy',
      {
        securityHeadersBehavior: {
          contentTypeOptions: { override: true },
          frameOptions: {
            frameOption: cloudfront.HeadersFrameOption.DENY,
            override: true,
          },
          referrerPolicy: {
            referrerPolicy: cloudfront.HeadersReferrerPolicy.SAME_ORIGIN,
            override: true,
          },
          strictTransportSecurity: {
            accessControlMaxAge: cdk.Duration.seconds(63072000),
            includeSubdomains: true,
            preload: true,
            override: true,
          },
          xssProtection: {
            protection: true,
            modeBlock: true,
            override: true,
          },
        },
        customHeadersBehavior: {
          customHeaders: [
            {
              header: 'Cache-Control',
              value: 'no-cache',
              override: true,
            },
            {
              header: 'pragma',
              value: 'no-cache',
              override: true,
            },
            {
              header: 'server',
              value: '',
              override: true,
            },
          ],
        },
      }
    );

    const distribution = new cloudfront.Distribution(this, 'Distribution', {
      comment: 'website-distribution',
      defaultRootObject: 'index.html',
      errorResponses: [
        {
          ttl: cdk.Duration.seconds(300),
          httpStatus: 403,
          responseHttpStatus: 403,
          responsePagePath: '/error.html',
        },
        {
          ttl: cdk.Duration.seconds(300),
          httpStatus: 404,
          responseHttpStatus: 404,
          responsePagePath: '/error.html',
        },
      ],
      defaultBehavior: {
        allowedMethods: cloudfront.AllowedMethods.ALLOW_GET_HEAD,
        cachedMethods: cloudfront.CachedMethods.CACHE_GET_HEAD,
        cachePolicy: cloudfront.CachePolicy.CACHING_OPTIMIZED,
        viewerProtocolPolicy: cloudfront.ViewerProtocolPolicy.REDIRECT_TO_HTTPS,
        origin: new cloudfront_origins.S3Origin(websiteBucket, {
          originAccessIdentity,
        }),
        responseHeadersPolicy,
      },
      priceClass: cloudfront.PriceClass.PRICE_CLASS_ALL,
      certificate: acm.Certificate.fromCertificateArn(
        this,
        'CustomDomainCertificate',
        props.certArn
      ),
      domainNames: [props.customDomain],
      minimumProtocolVersion: cloudfront.SecurityPolicyProtocol.TLS_V1_2_2021,
    });

    new s3deploy.BucketDeployment(this, 'WebsiteDeploy', {
      sources: [
        s3deploy.Source.data(
          '/index.html',
          '<html><body><h1>Hello World</h1></body></html>'
        ),
        s3deploy.Source.data(
          '/error.html',
          '<html><body><h1>Error!!!!!!!!!!!!!</h1></body></html>'
        ),
      ],
      destinationBucket: websiteBucket,
      distribution: distribution,
      distributionPaths: ['/*'],
    });
  }
}
頻用のセキュリティヘッダーはsecurityHeadersBehaviorでinterfaceが用意されています。それ以外のヘッダーはcustomHeadersBehaviorを使用します。またヘッダーの削除はできないため、レスポンスから削除したいserverは空文字で上書きするようにしています。
また以前のエントリでも触れましたが、レスポンスヘッダーの設定は、CloudFront DistributionのCDK Constructの新しいクラスであるDistributionでのみサポートしているので、そちらを使用しています。作成したResponseHeadersPolicyをDistributionに設定します。
CDKデプロイしてDistributionを構築します。
動作確認
構築したサイトの配信アドレスにアクセスすると、レスポンスにヘッダーが設定されていることが確認できます!
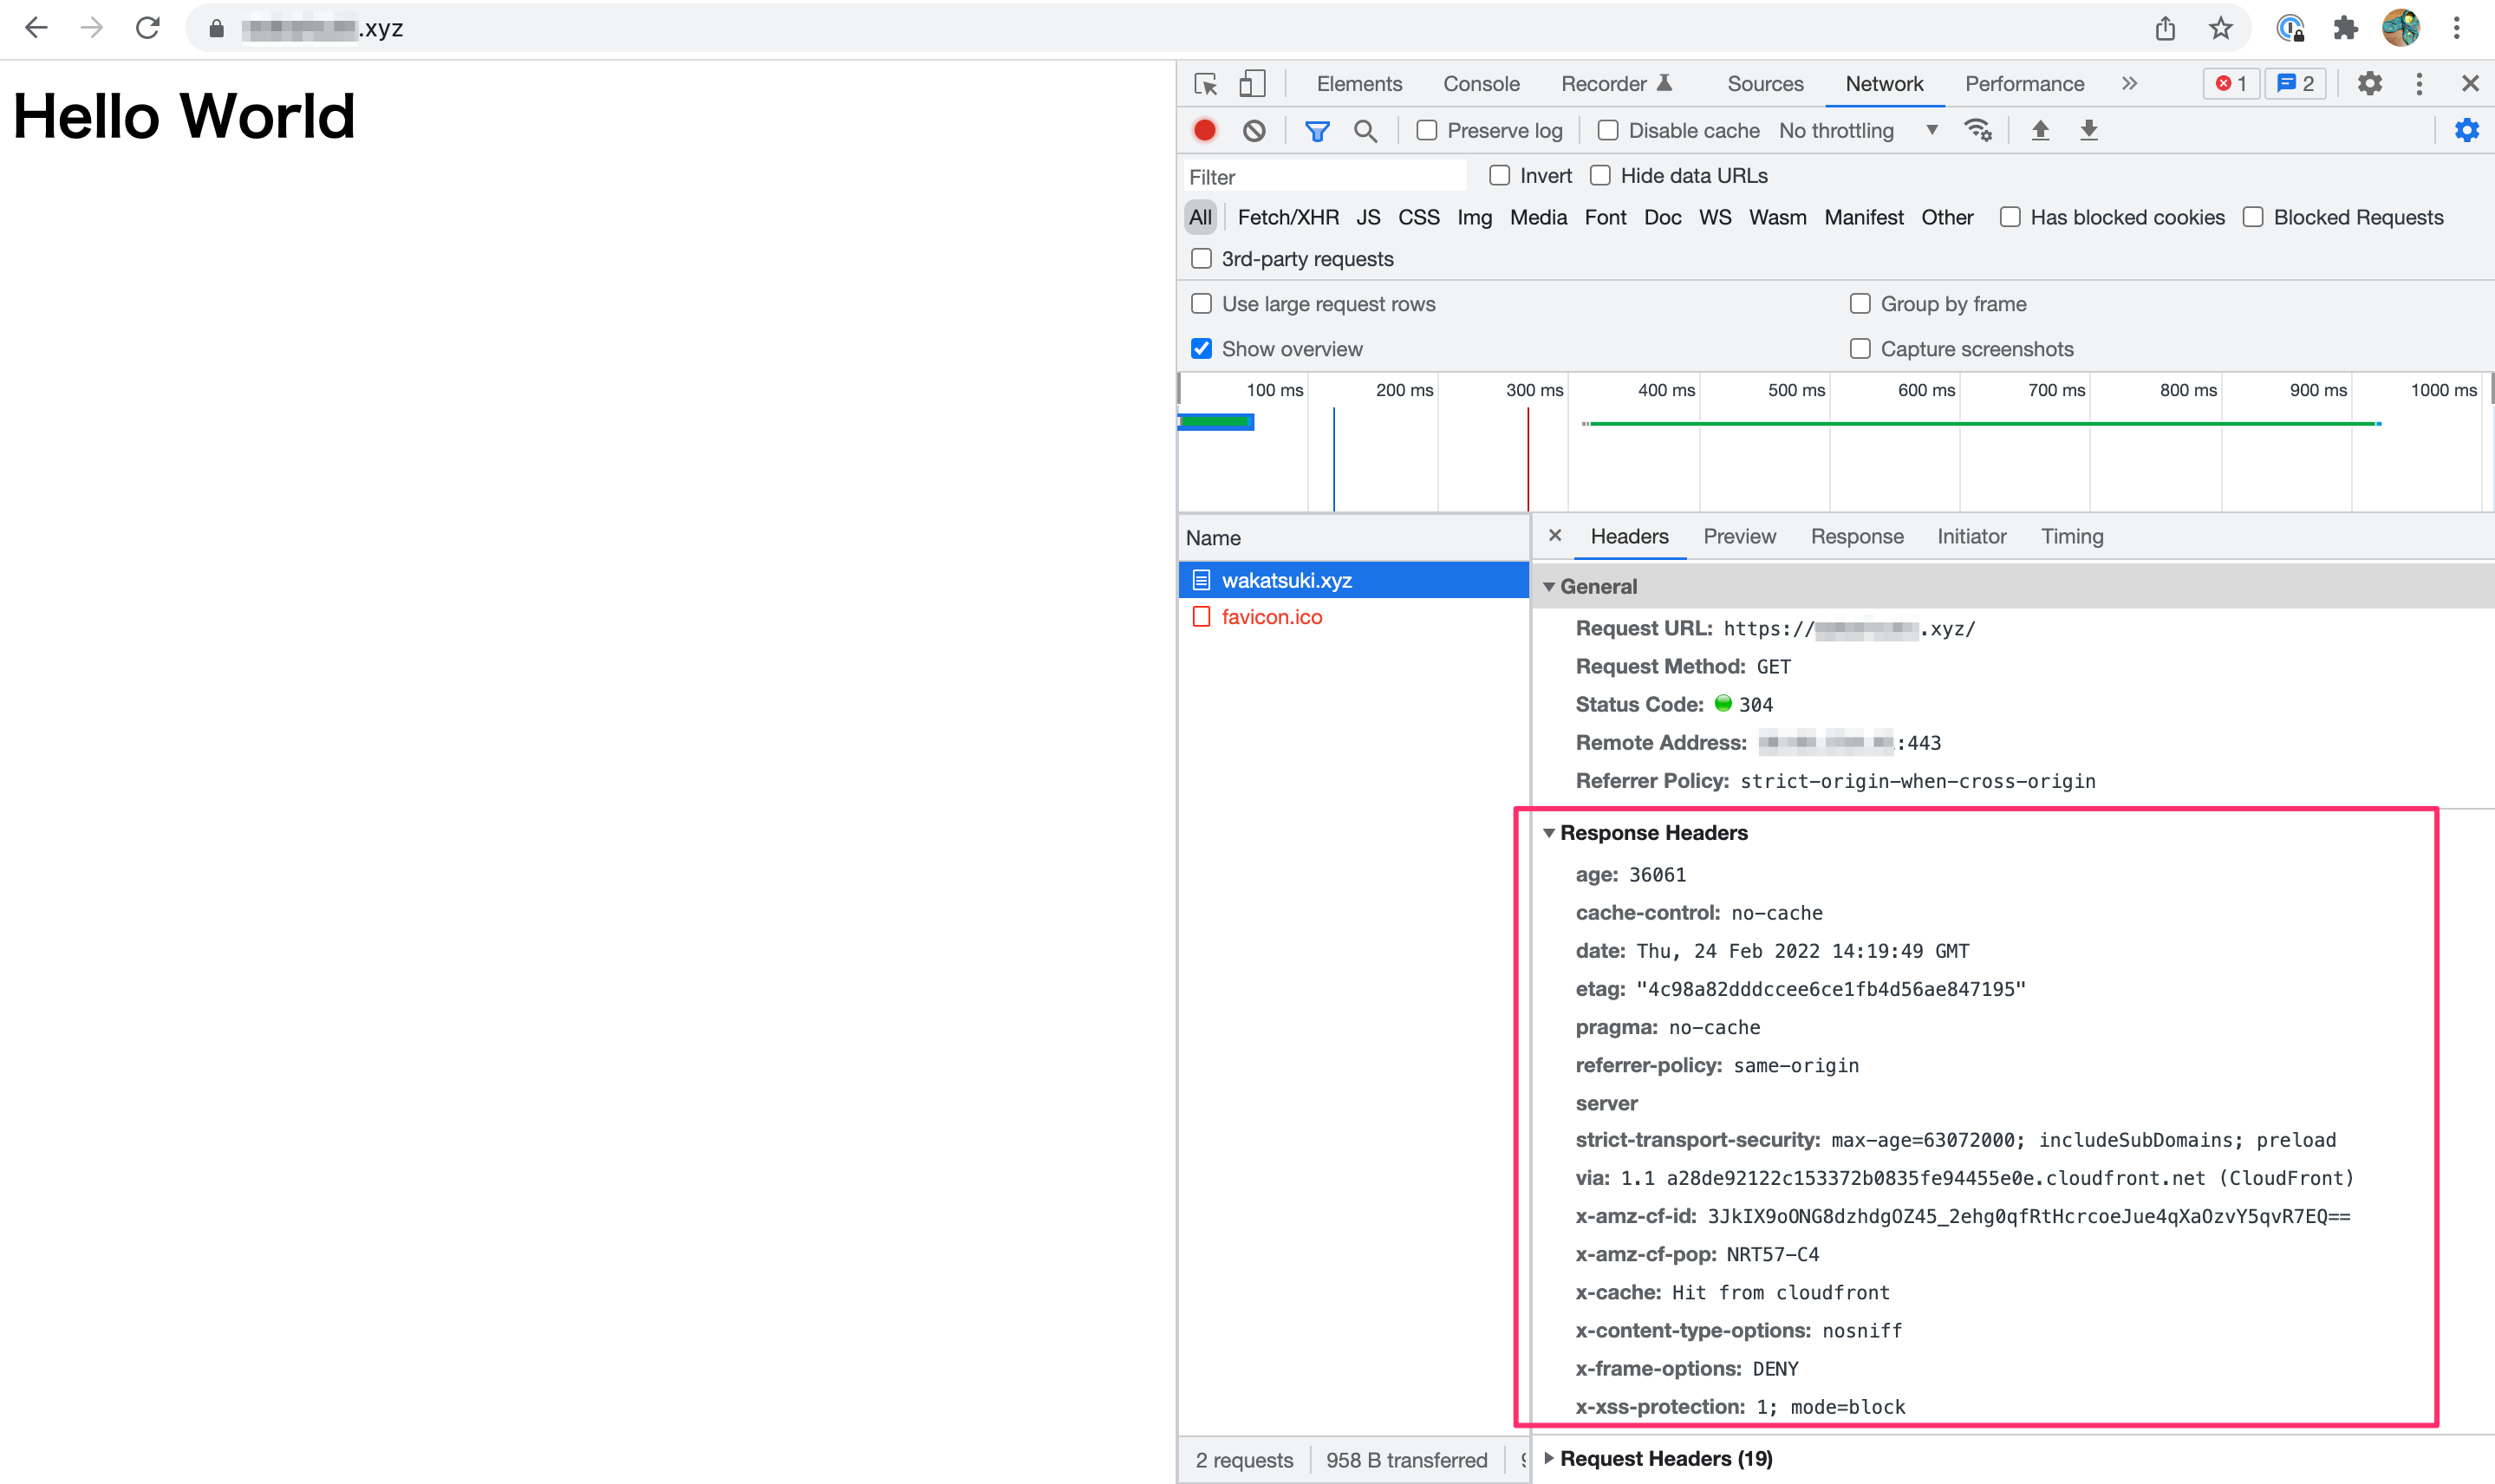
age: 36061
cache-control: no-cache
date: Thu, 24 Feb 2022 14:19:49 GMT
etag: "4c98a82dddccee6ce1fb4d56ae847195"
pragma: no-cache
referrer-policy: same-origin
server
strict-transport-security: max-age=63072000; includeSubDomains; preload
via: 1.1 a28de92122c153372b0835fe94455e0e.cloudfront.net (CloudFront)
x-amz-cf-id: 3JkIX9oONG8dzhdgOZ45_2ehg0qfRtHcrcoeJue4qXaOzvY5qvR7EQ==
x-amz-cf-pop: NRT57-C4
x-cache: Hit from cloudfront
x-content-type-options: nosniff
x-frame-options: DENY
x-xss-protection: 1; mode=block
おわりに
L@EやCF2を使わずにレスポンスヘッダーを設定するCloudFront DistributionをAWS CDKで構築してみました。
作らないといけないリソースが一つでも減る、そしてその設定をコードで管理しIaCで自動化できるようになる、エンジニアはこういうのがとても嬉しいのです。
以上