Cloud RunサービスをPrivate Service Connectでプロジェクト間にプライベート公開してみた
はじめに
こんにちは。
クラウド事業本部コンサルティング部の渡邉です。
マイクロサービスアーキテクチャを採用する際、異なるプロジェクト・チームが管理するサービス間をプライベートに接続したいケースがあります。
Google Cloudでは Private Service Connect(PSC) を使うことで、VPC Peeringを使わずにプロジェクトをまたいだプライベート接続を実現できます。
今回は、Cloud Runで動くサービスをPrivate Service Connectでプロジェクト間に公開し、別プロジェクトのVMからプライベートにアクセスするまでの手順を試してみました。
アーキテクチャ概要
今回構築するアーキテクチャは以下のとおりです。
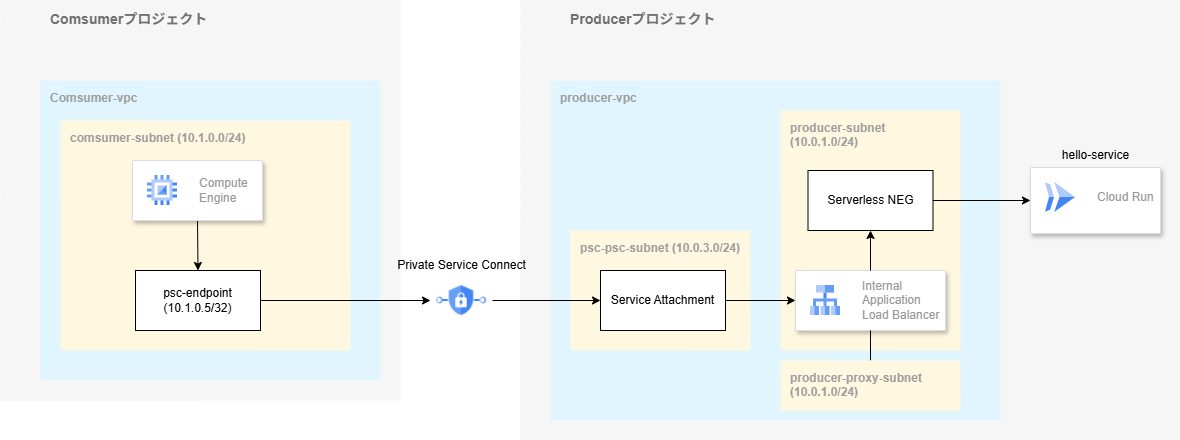
構築するアーキテクチャ
Producer側ではCloud RunをInternal Application Load Balancer(ALB)経由でPSCサービスとして公開します。Consumer側ではPSCエンドポイントを作成し、内部IPアドレスでProducerのCloud Runサービスにアクセスします。
コンポーネント構成
Consumerプロジェクトには以下のリソースを作成します。
- consumer-vpc — Consumerプロジェクト内のVPCネットワーク(
10.1.0.0/24) - PSCエンドポイント — Producer側のService Attachmentを指すフォワーディングルール。内部IP(
10.1.0.5)が割り当てられ、Consumer VPC内のVMはこのIPアドレスにリクエストを送るだけでProducerのCloud Runへ到達できます - テストVM — 外部IPなしで作成し、IAP経由でSSHして疎通確認に使用します
Producerプロジェクトには以下のリソースを作成します。
- Cloud Run(hello-service) —
--ingress=internalにより外部インターネットからのアクセスを遮断します。今回の構成ではInternal ALB経由のみでアクセスします - producer-vpc — Producerプロジェクト内のVPCネットワーク。用途の異なる3種類のサブネットを作成します
- ALB用サブネット(
10.0.1.0/24)— Internal ALBのフォワーディングルール(フロントエンドIP)が配置されます - プロキシ専用サブネット(
10.0.2.0/24、REGIONAL_MANAGED_PROXY)— Internal ALBのEnvoyプロキシが使用するサブネットです - PSC NATサブネット(
10.0.3.0/24、PRIVATE_SERVICE_CONNECT)— PSC接続のNAT変換に使用するサブネットです
- ALB用サブネット(
- Serverless NEG — Internal ALBのバックエンドとして、Cloud Runへのルーティングを担います
- Internal Application Load Balancer — Serverless NEGをバックエンドに持ち、PSCから受けたリクエストをCloud Runへ転送します
- Service Attachment — Internal ALBのフォワーディングルールをPSCサービスとして公開します。
ACCEPT_MANUALを指定してConsumerプロジェクトの承認リストを管理します
トラフィックフロー
Consumer VMからCloud Runへの通信は以下の経路をたどります。
テストVM → PSCエンドポイント(10.1.0.5)
  → [PSC / NAT変換] → Service Attachment(PSC NATサブネット)
  → Internal ALB(ALB用サブネット)
  → Serverless NEG → Cloud Run
PSCを経由する際にNAT変換が行われるため、ConsumerとProducerのIPアドレス範囲が重複していても通信できます。またトラフィックはGoogleのネットワーク内にとどまり、インターネットを経由しません。
| 特徴 | 説明 |
|---|---|
| IPアドレスの重複許容 | ProducerとConsumerでIPレンジが重複してもNATで吸収 |
| VPC Peeringなし | プロジェクト間接続にVPC Peeringは不要 |
| 承認制御 | 接続を許可するConsumerプロジェクトをProducer側で制御可能 |
| Ingressの閉域化 | Cloud RunのURLは外部公開されず、PSC経由のみアクセス可能 |
Private Service Connectとは
Private Service Connect(PSC) は、コンシューマーVPCネットワークからプロデューサーVPCネットワーク上のサービスにプライベートに接続するGoogle Cloudの機能です。
プロデューサーはサービスアタッチメントを作成してサービスを公開し、コンシューマーはそのサービスアタッチメントを参照するPSCエンドポイント(フォワーディングルール)を作成してプライベートに接続します。NAT(ネットワークアドレス変換)が使われるため、双方のIPアドレス範囲が重複していても通信できます。また、トラフィックはGoogleのネットワーク内にとどまります。
今回のCloud Runのユースケースでは、PSCで公開したいサービスのフロントとしてInternal Application Load Balancerが必要になります。Serverless NEGを使ってInternal ALBのバックエンドにCloud Runを設定し、そのフォワーディングルールをPSCで公開する構成です。
ハンズオン
前提条件
- Google Cloudプロジェクトが2つ用意されていること(Producer用、Consumer用)
gcloudCLIがインストール・認証済みであること
必要なAPIの有効化
Producerプロジェクト(Cloud Run・ネットワークリソースを作成)
gcloud services enable \
  run.googleapis.com \
  compute.googleapis.com \
  --project=$PRODUCER_PROJECT
Consumerプロジェクト(テストVM・PSCエンドポイントを作成。IAP経由でSSHするため iap.googleapis.com も必要)
gcloud services enable \
  compute.googleapis.com \
  iap.googleapis.com \
  --project=$CONSUMER_PROJECT
必要なIAMロール
| 操作 | 推奨ロール |
|---|---|
| Cloud Runのデプロイ | roles/run.admin |
| ネットワークリソースの作成 | roles/compute.networkAdmin |
| NEG・ロードバランサーの作成 | roles/compute.loadBalancerAdmin |
| サービスアタッチメントの作成 | compute.serviceAttachments.create |
変数の設定
export PRODUCER_PROJECT=<producer-project-id>
export CONSUMER_PROJECT=<consumer-project-id>
export REGION=asia-northeast1
Step 1: Producer側 — Cloud Runサービスをデプロイ
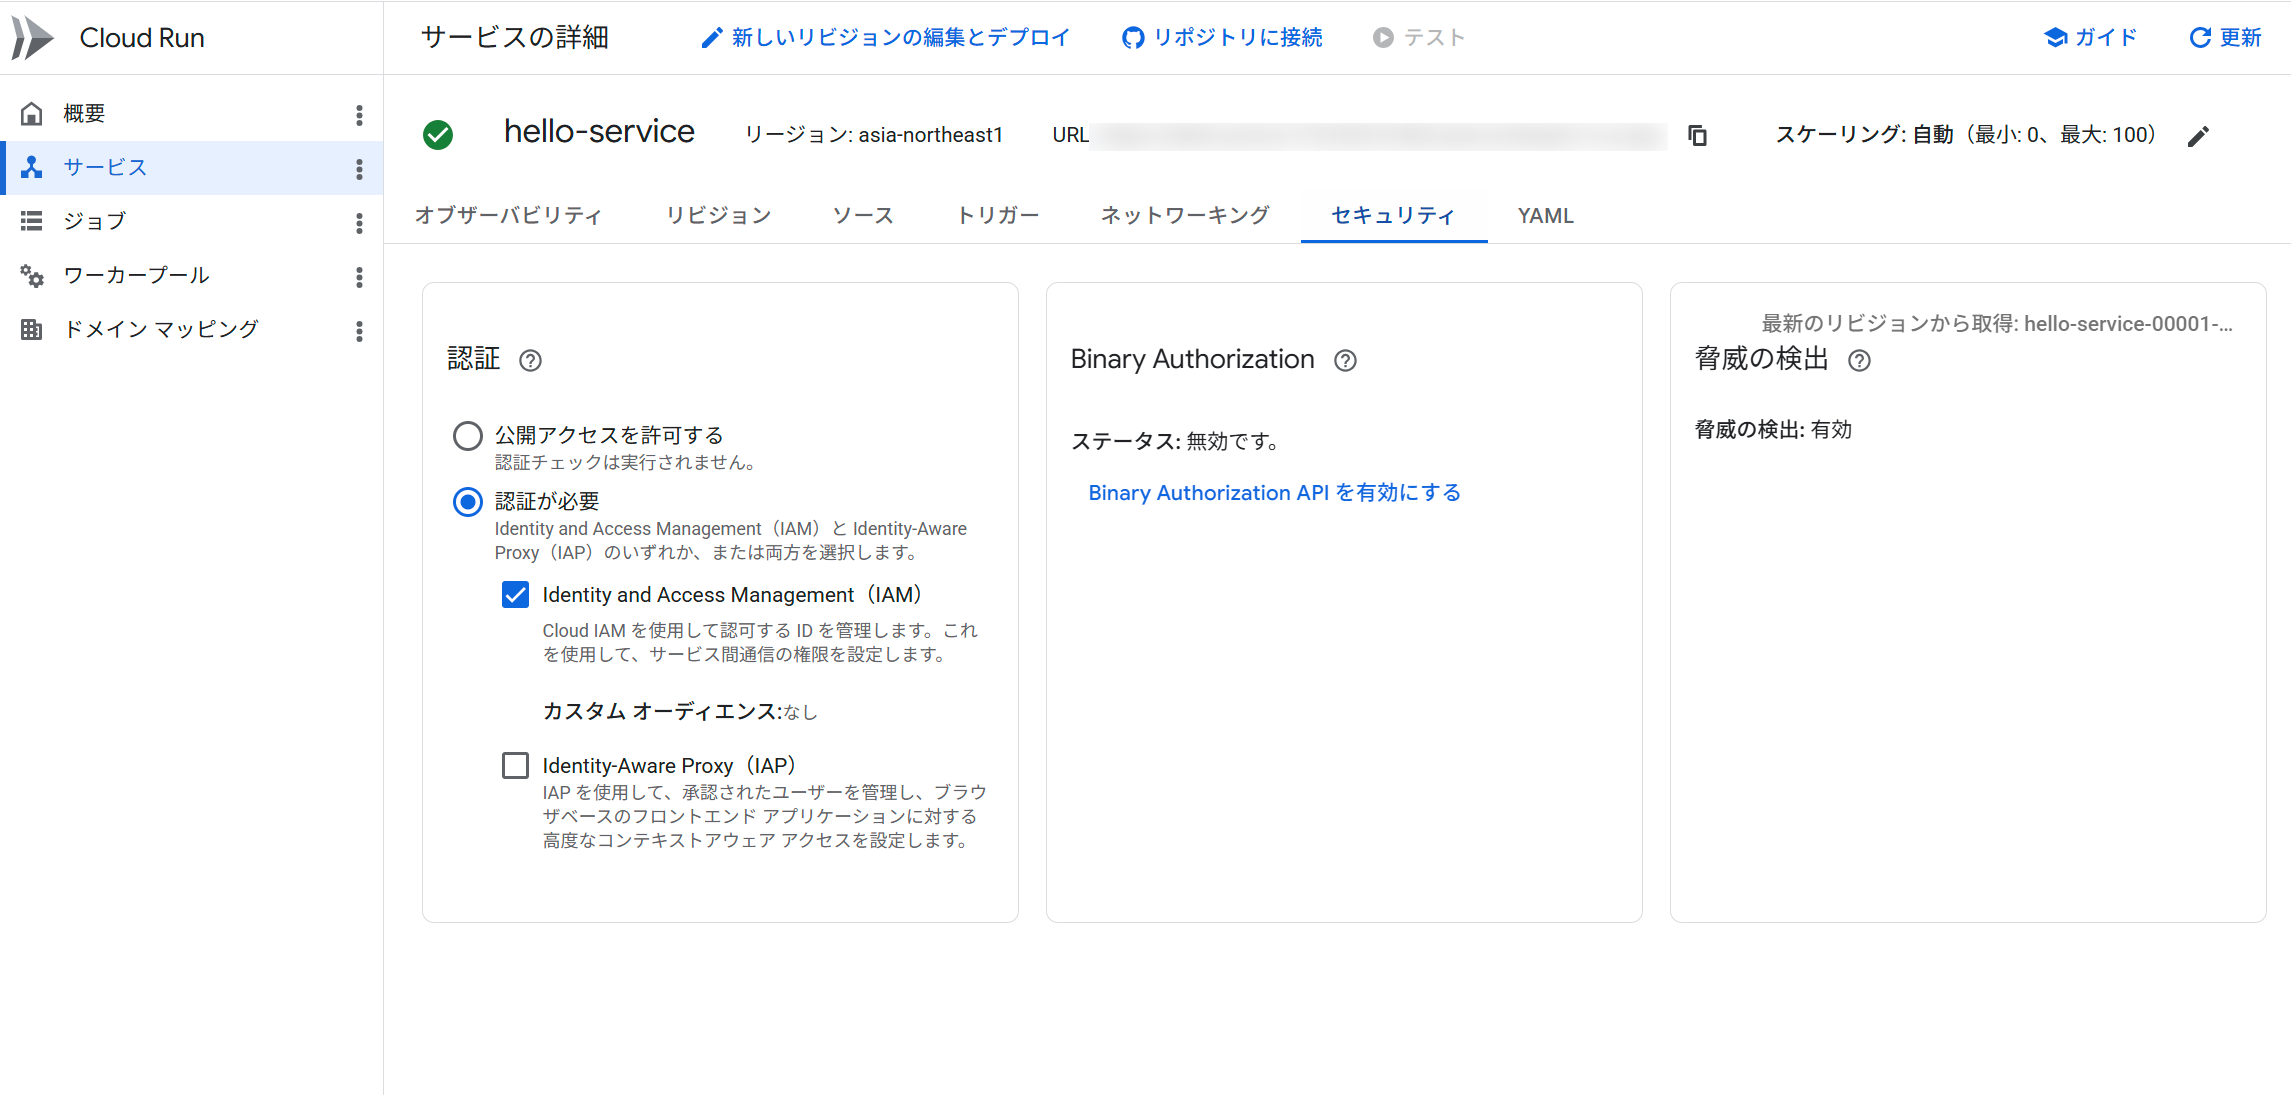
まずProducerプロジェクトにCloud Runサービスをデプロイします。--ingress=internal で外部インターネットからのアクセスを遮断し(今回の構成ではInternal ALB経由のみでアクセス)、--no-allow-unauthenticated でIAM認証を必須にします。
gcloud config set project $PRODUCER_PROJECT

gcloud run deploy hello-service \
  --image=us-docker.pkg.dev/cloudrun/container/hello \
  --platform=managed \
  --no-allow-unauthenticated \
  --ingress=internal \
  --region=$REGION
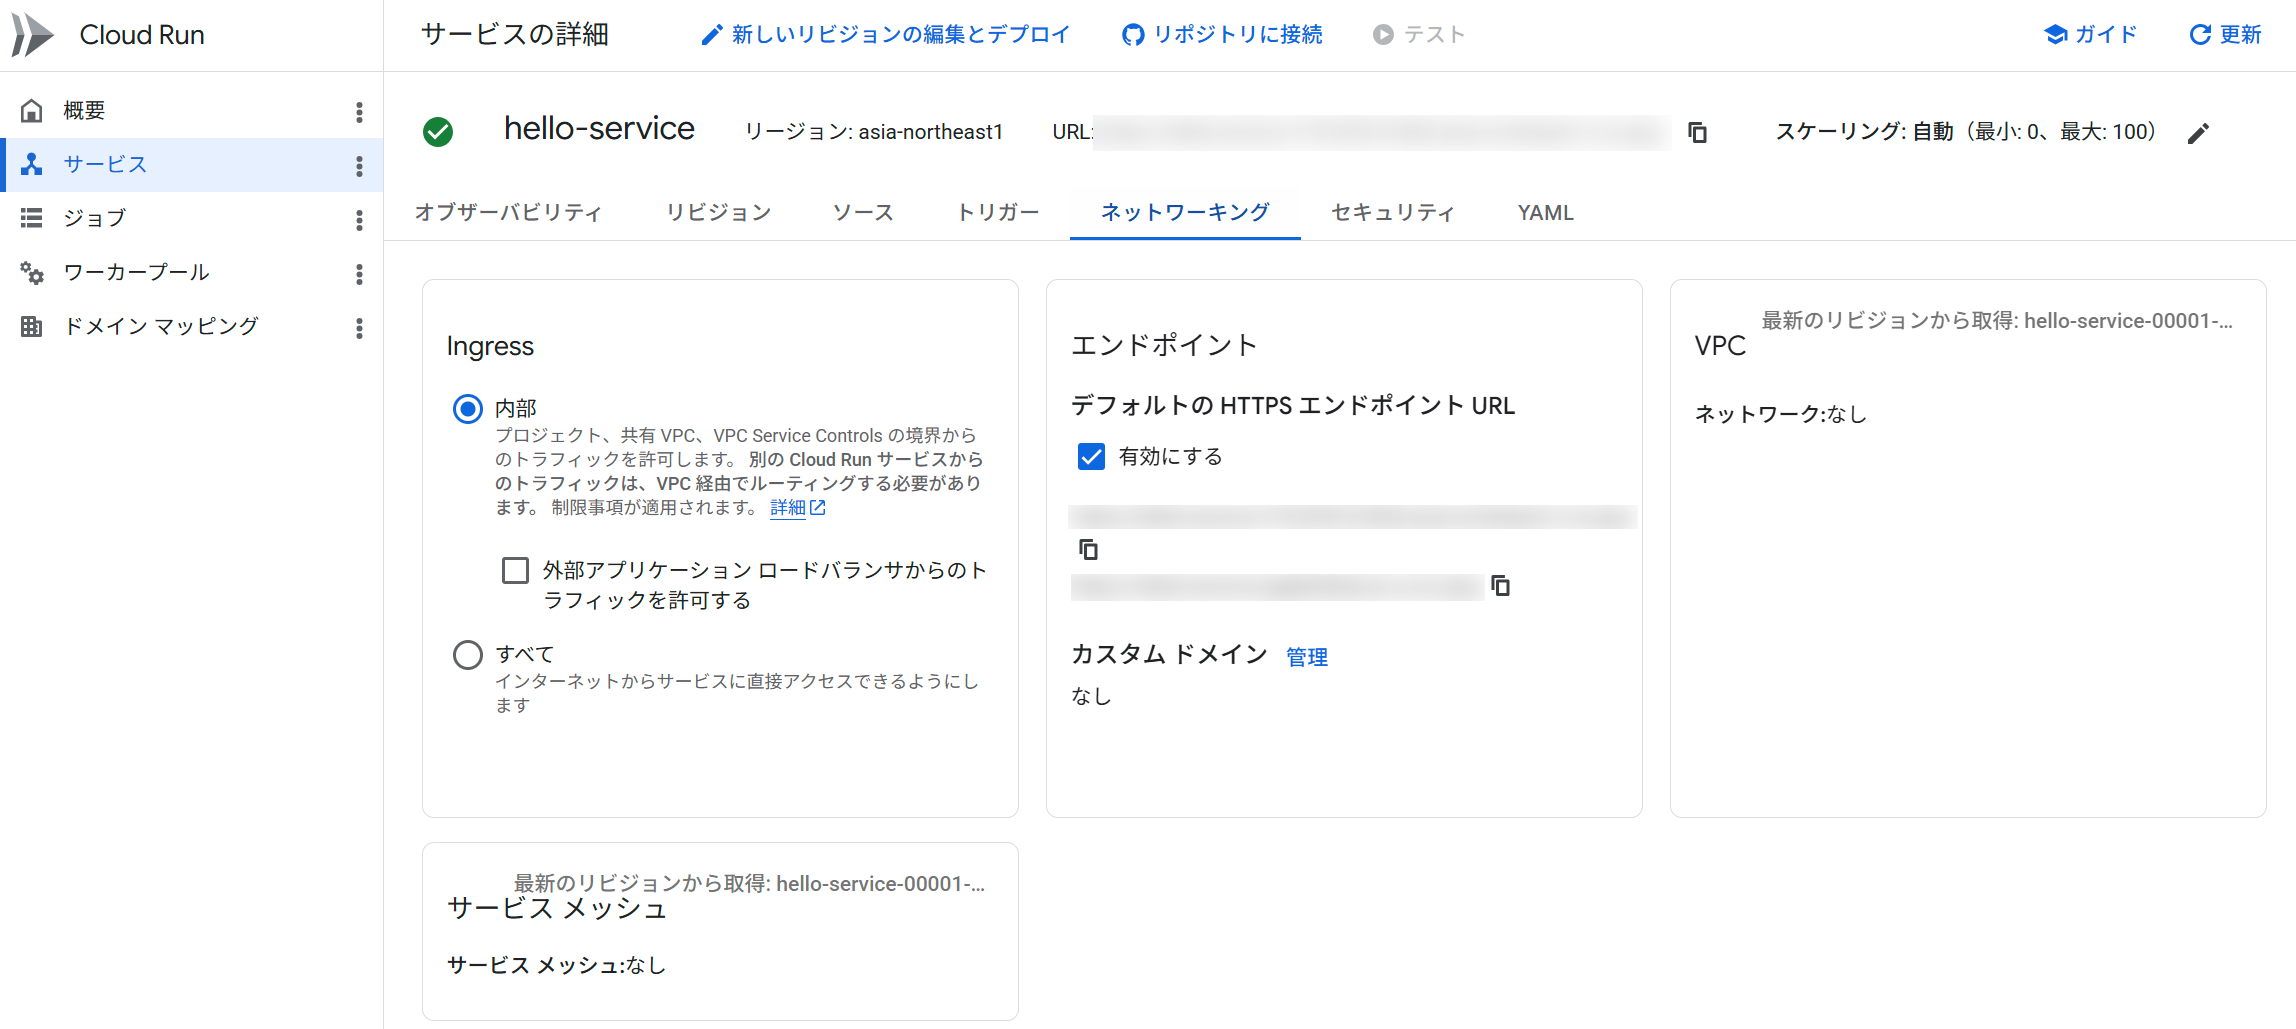
Ingress内部のCloud Run
Cloud Consoleで確認したCloud Runサービス
デプロイ後、ConsumerプロジェクトのテストVMが使用するサービスアカウント(Compute Engineデフォルトサービスアカウント)に roles/run.invoker を付与します。
# ConsumerプロジェクトのプロジェクトIDからプロジェクト番号を取得
export CONSUMER_PROJECT_NUMBER=$(gcloud projects describe $CONSUMER_PROJECT \
  --format="value(projectNumber)")

# テストVMのデフォルトサービスアカウントにCloud Run起動権限を付与
gcloud run services add-iam-policy-binding hello-service \
  --region=$REGION \
  --member="serviceAccount:${CONSUMER_PROJECT_NUMBER}-compute@developer.gserviceaccount.com" \
  --role="roles/run.invoker" \
  --project=$PRODUCER_PROJECT
Step 2: Producer側 — VPCとサブネットを作成
Internal ALBにはプロキシ専用サブネット(REGIONAL_MANAGED_PROXY)、PSC公開にはNATサブネット(PRIVATE_SERVICE_CONNECT)がそれぞれ必要です。
# VPC作成
gcloud compute networks create producer-vpc \
  --subnet-mode=custom \
  --project=$PRODUCER_PROJECT

# ALB用サブネット
gcloud compute networks subnets create producer-subnet \
  --network=producer-vpc \
  --range=10.0.1.0/24 \
  --region=$REGION \
  --project=$PRODUCER_PROJECT

# Internal ALB用プロキシ専用サブネット
gcloud compute networks subnets create producer-proxy-subnet \
  --network=producer-vpc \
  --range=10.0.2.0/24 \
  --region=$REGION \
  --purpose=REGIONAL_MANAGED_PROXY \
  --role=ACTIVE \
  --project=$PRODUCER_PROJECT

# PSC用NATサブネット
gcloud compute networks subnets create producer-psc-subnet \
  --network=producer-vpc \
  --range=10.0.3.0/24 \
  --region=$REGION \
  --purpose=PRIVATE_SERVICE_CONNECT \
  --project=$PRODUCER_PROJECT
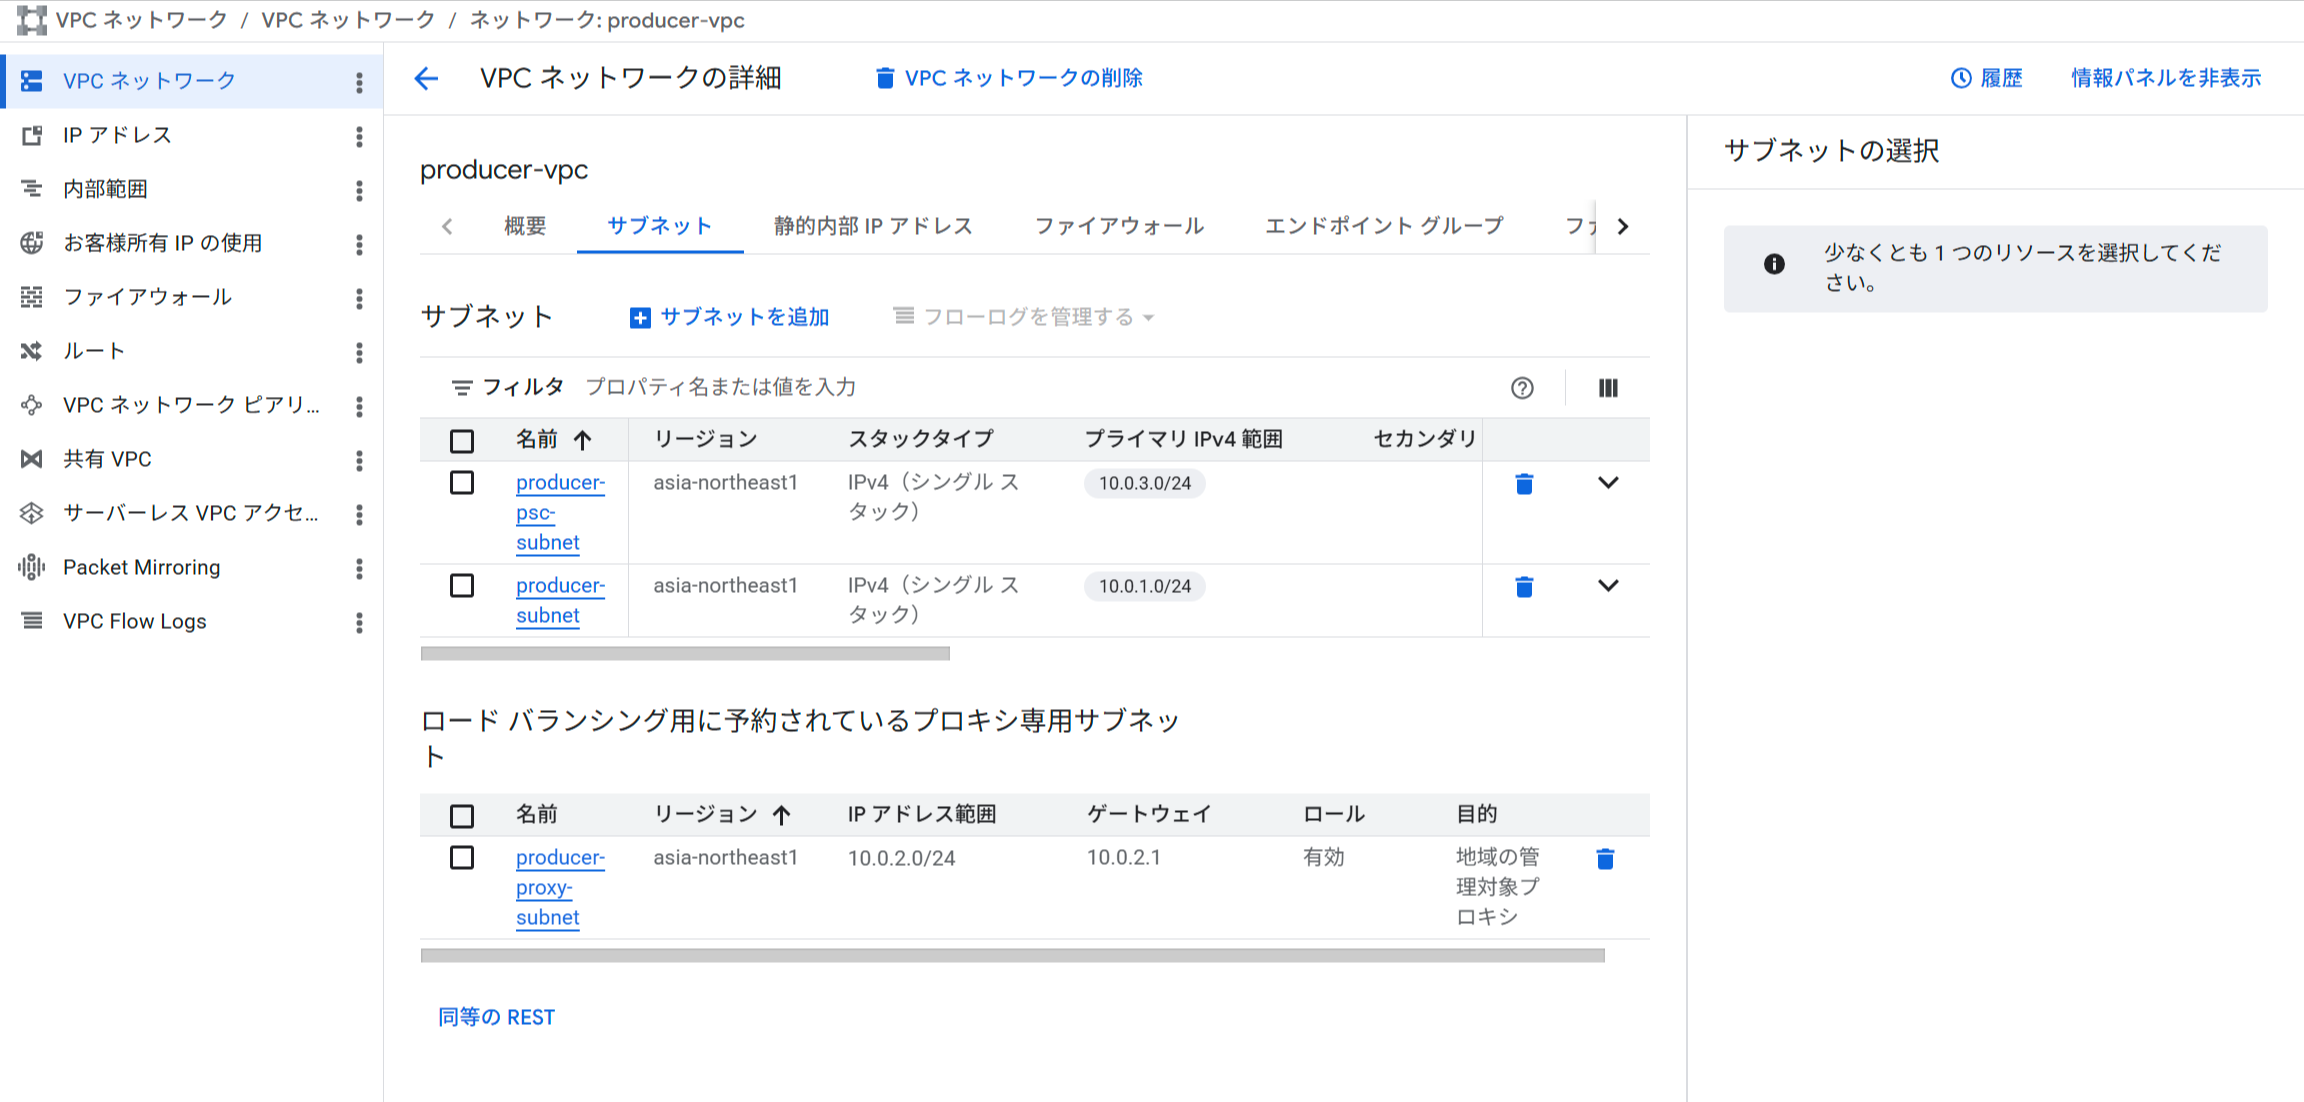
Producer側のVPCとサブネット(3種類)
Step 3: Producer側 — Internal Application Load Balancerを構築
Serverless NEGを作成してCloud Runを指定し、Internal ALBのバックエンドとして接続します。
# Serverless NEG作成
gcloud compute network-endpoint-groups create hello-serverless-neg \
  --region=$REGION \
  --network-endpoint-type=serverless \
  --cloud-run-service=hello-service \
  --project=$PRODUCER_PROJECT

# バックエンドサービス作成
gcloud compute backend-services create hello-backend-service \
  --load-balancing-scheme=INTERNAL_MANAGED \
  --protocol=HTTP \
  --region=$REGION \
  --project=$PRODUCER_PROJECT

# NEGをバックエンドに追加
gcloud compute backend-services add-backend hello-backend-service \
  --region=$REGION \
  --network-endpoint-group=hello-serverless-neg \
  --network-endpoint-group-region=$REGION \
  --project=$PRODUCER_PROJECT

# URLマップ作成
gcloud compute url-maps create hello-url-map \
  --default-service=hello-backend-service \
  --region=$REGION \
  --project=$PRODUCER_PROJECT

# ターゲットHTTPプロキシ作成
gcloud compute target-http-proxies create hello-http-proxy \
  --url-map=hello-url-map \
  --region=$REGION \
  --project=$PRODUCER_PROJECT

# フォワーディングルール作成(Internal ALBのフロントエンドIP)
gcloud compute forwarding-rules create hello-forwarding-rule \
  --load-balancing-scheme=INTERNAL_MANAGED \
  --network=producer-vpc \
  --subnet=producer-subnet \
  --target-http-proxy=hello-http-proxy \
  --target-http-proxy-region=$REGION \
  --region=$REGION \
  --ports=80 \
  --project=$PRODUCER_PROJECT
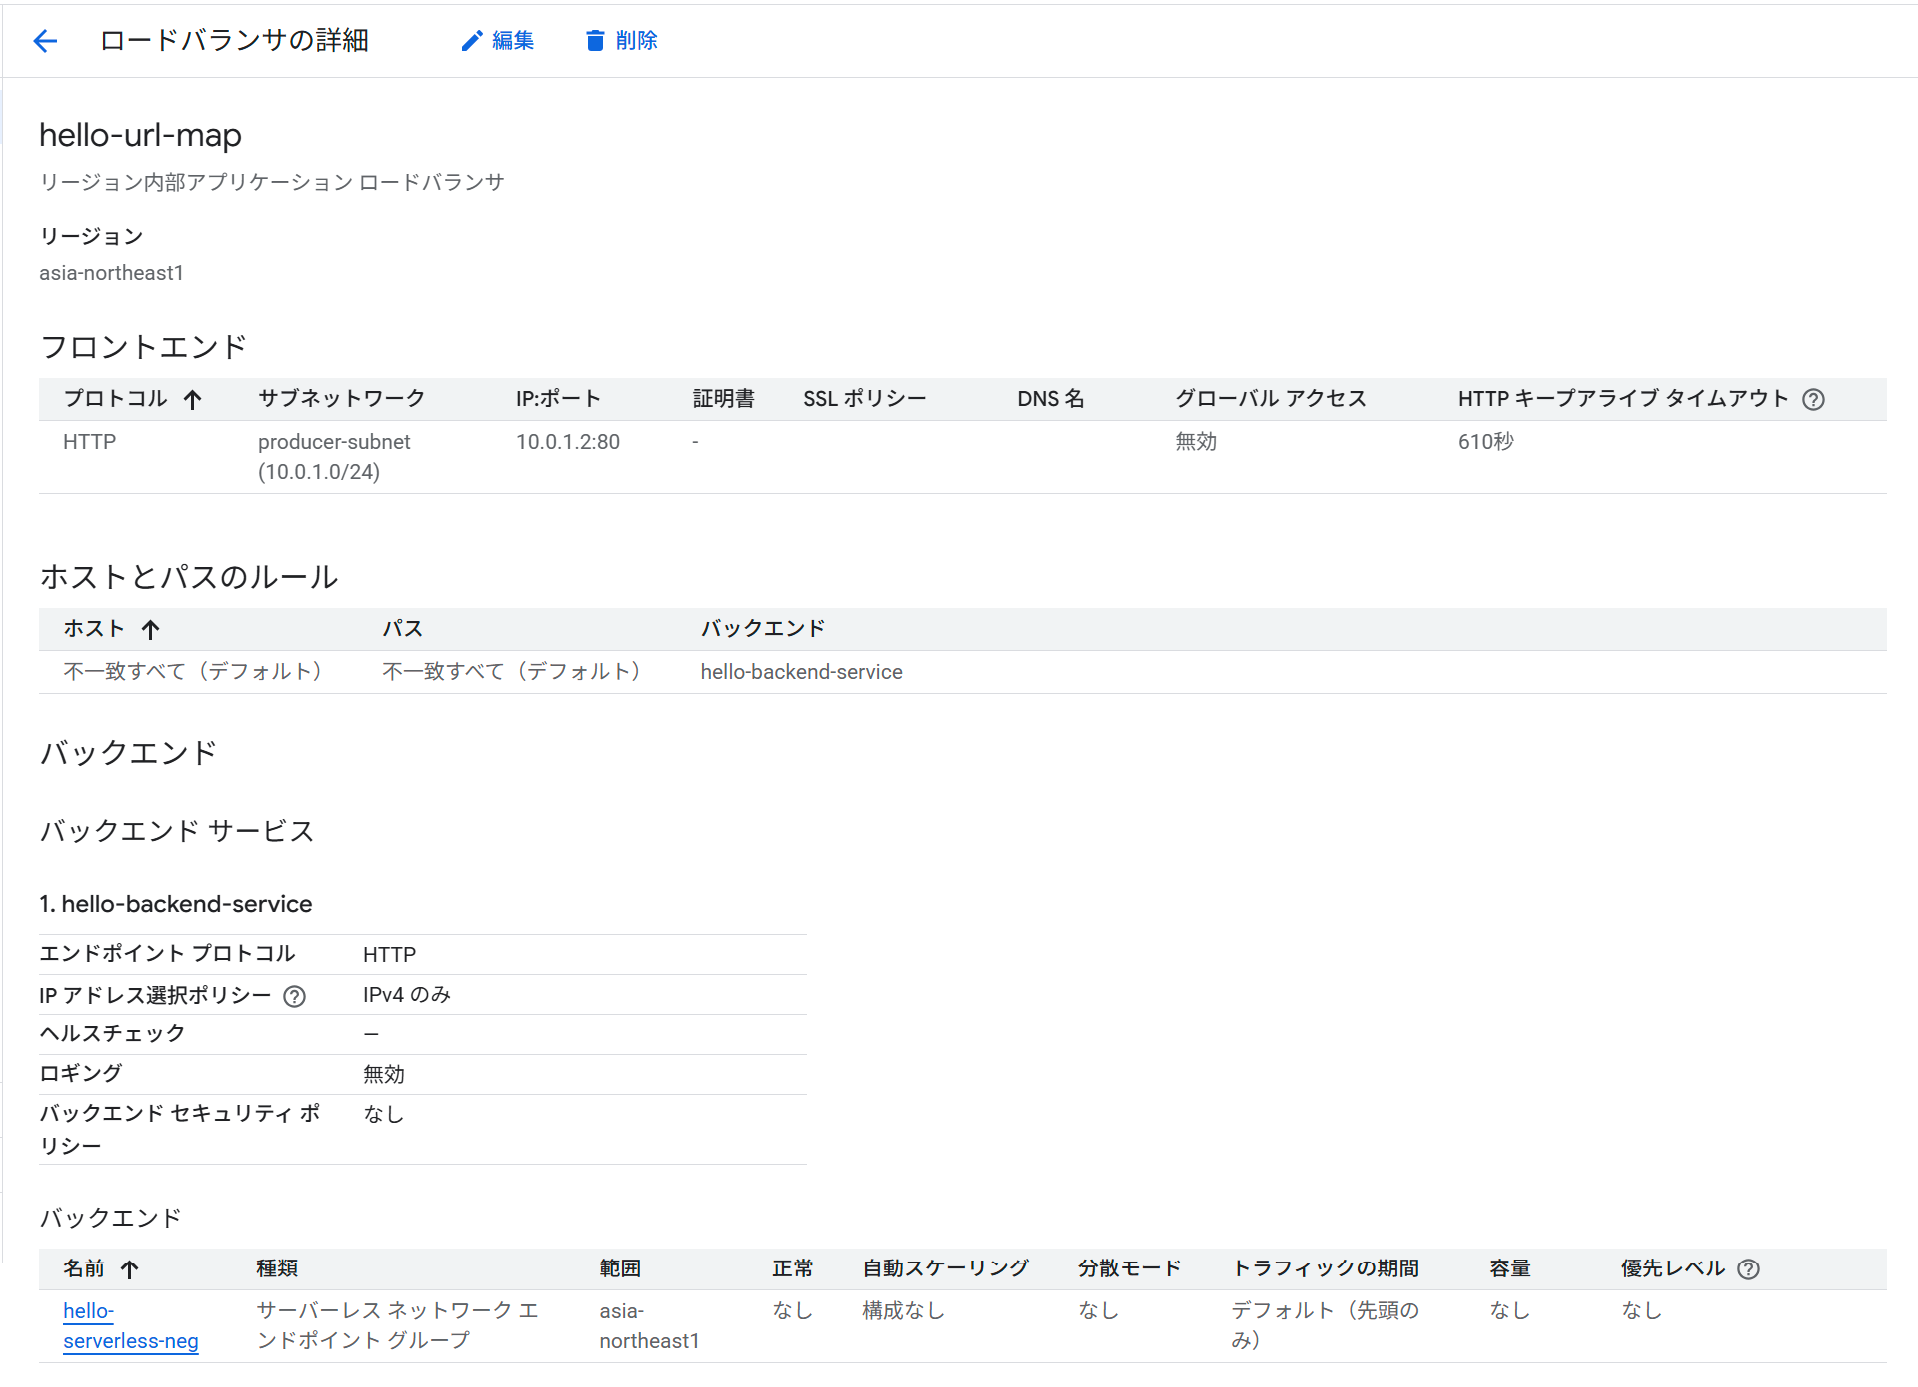
Internal ALB
Step 4: Producer側 — PSC Service Attachmentを作成して公開
Internal ALBのフォワーディングルールをPSCサービスとして公開します。ACCEPT_MANUAL を指定し、接続を許可するConsumerプロジェクトをリストで制御します。
gcloud compute service-attachments create hello-service-attachment \
  --region=$REGION \
  --producer-forwarding-rule=hello-forwarding-rule \
  --connection-preference=ACCEPT_MANUAL \
  --nat-subnets=producer-psc-subnet \
  --consumer-accept-list=$CONSUMER_PROJECT=10 \
  --project=$PRODUCER_PROJECT
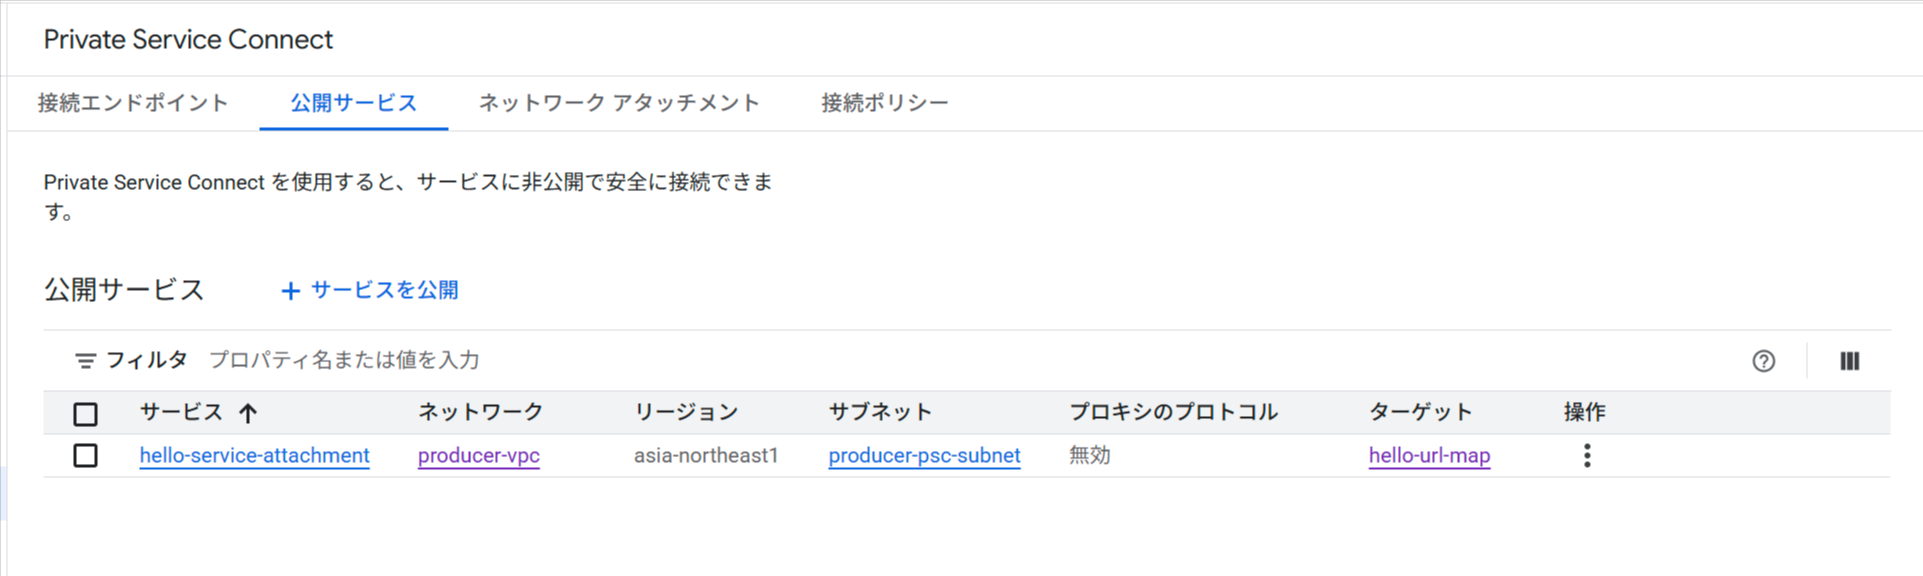
PSC Service Attachmentの作成結果
--consumer-accept-list の =10 はConsumerプロジェクトから許可する接続数の上限です。
Service AttachmentのURIを確認します(Consumer側でエンドポイント作成時に使用)。
gcloud compute service-attachments describe hello-service-attachment \
  --region=$REGION \
  --project=$PRODUCER_PROJECT \
  --format="value(selfLink)"
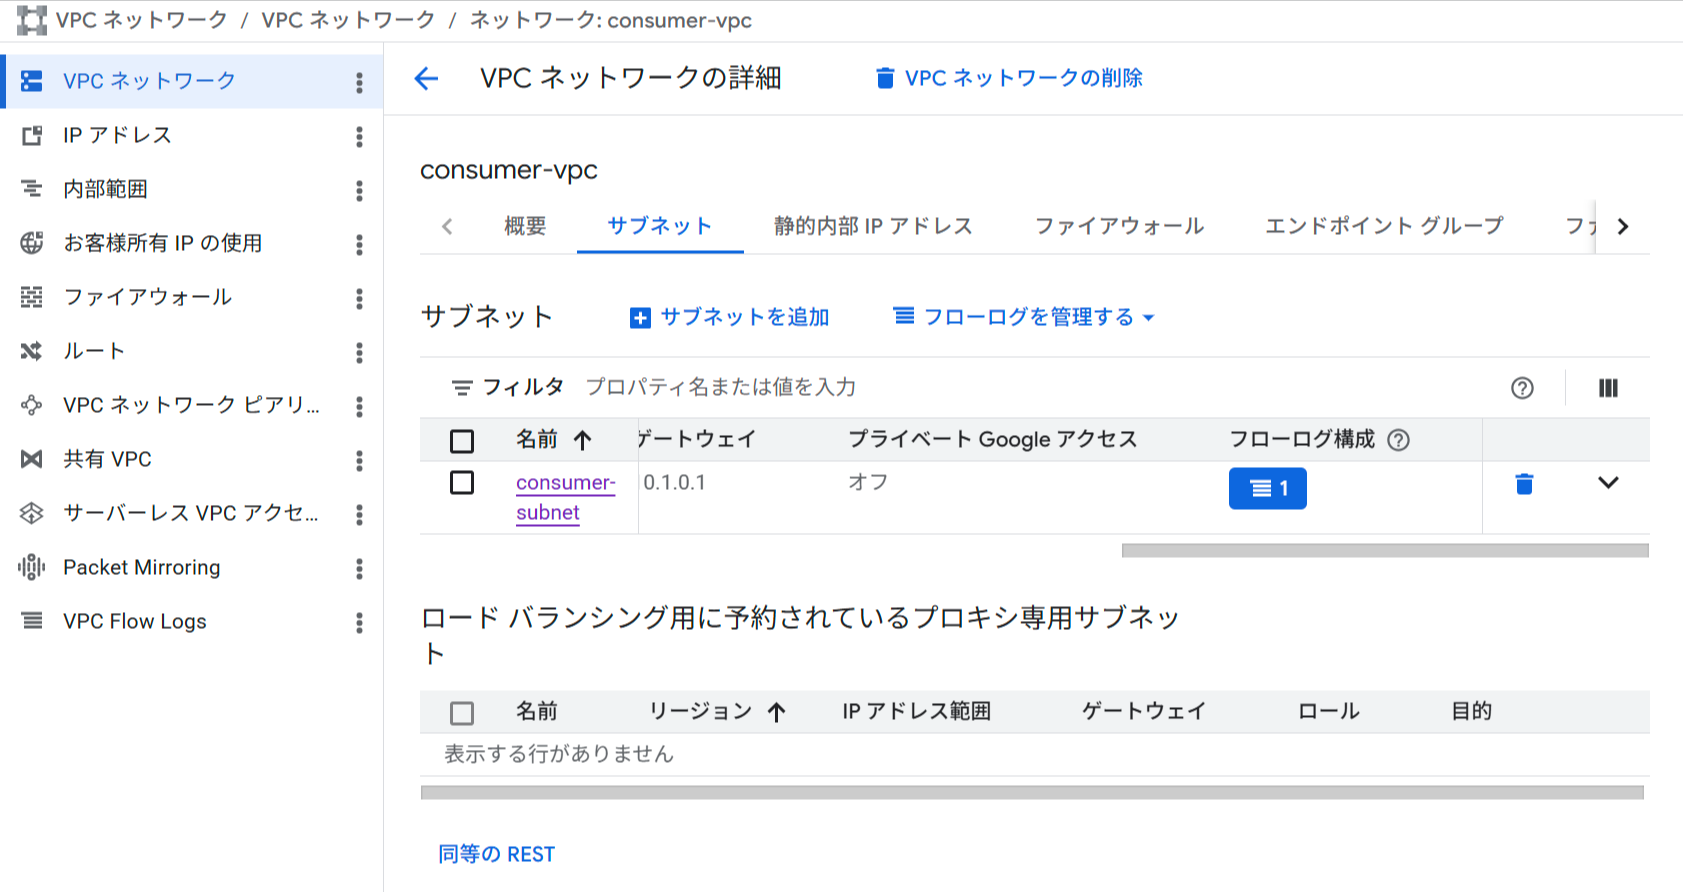
Step 5: Consumer側 — VPCとサブネットを作成
gcloud config set project $CONSUMER_PROJECT

gcloud compute networks create consumer-vpc \
  --subnet-mode=custom \
  --project=$CONSUMER_PROJECT

gcloud compute networks subnets create consumer-subnet \
  --network=consumer-vpc \
  --range=10.1.0.0/24 \
  --region=$REGION \
  --project=$CONSUMER_PROJECT
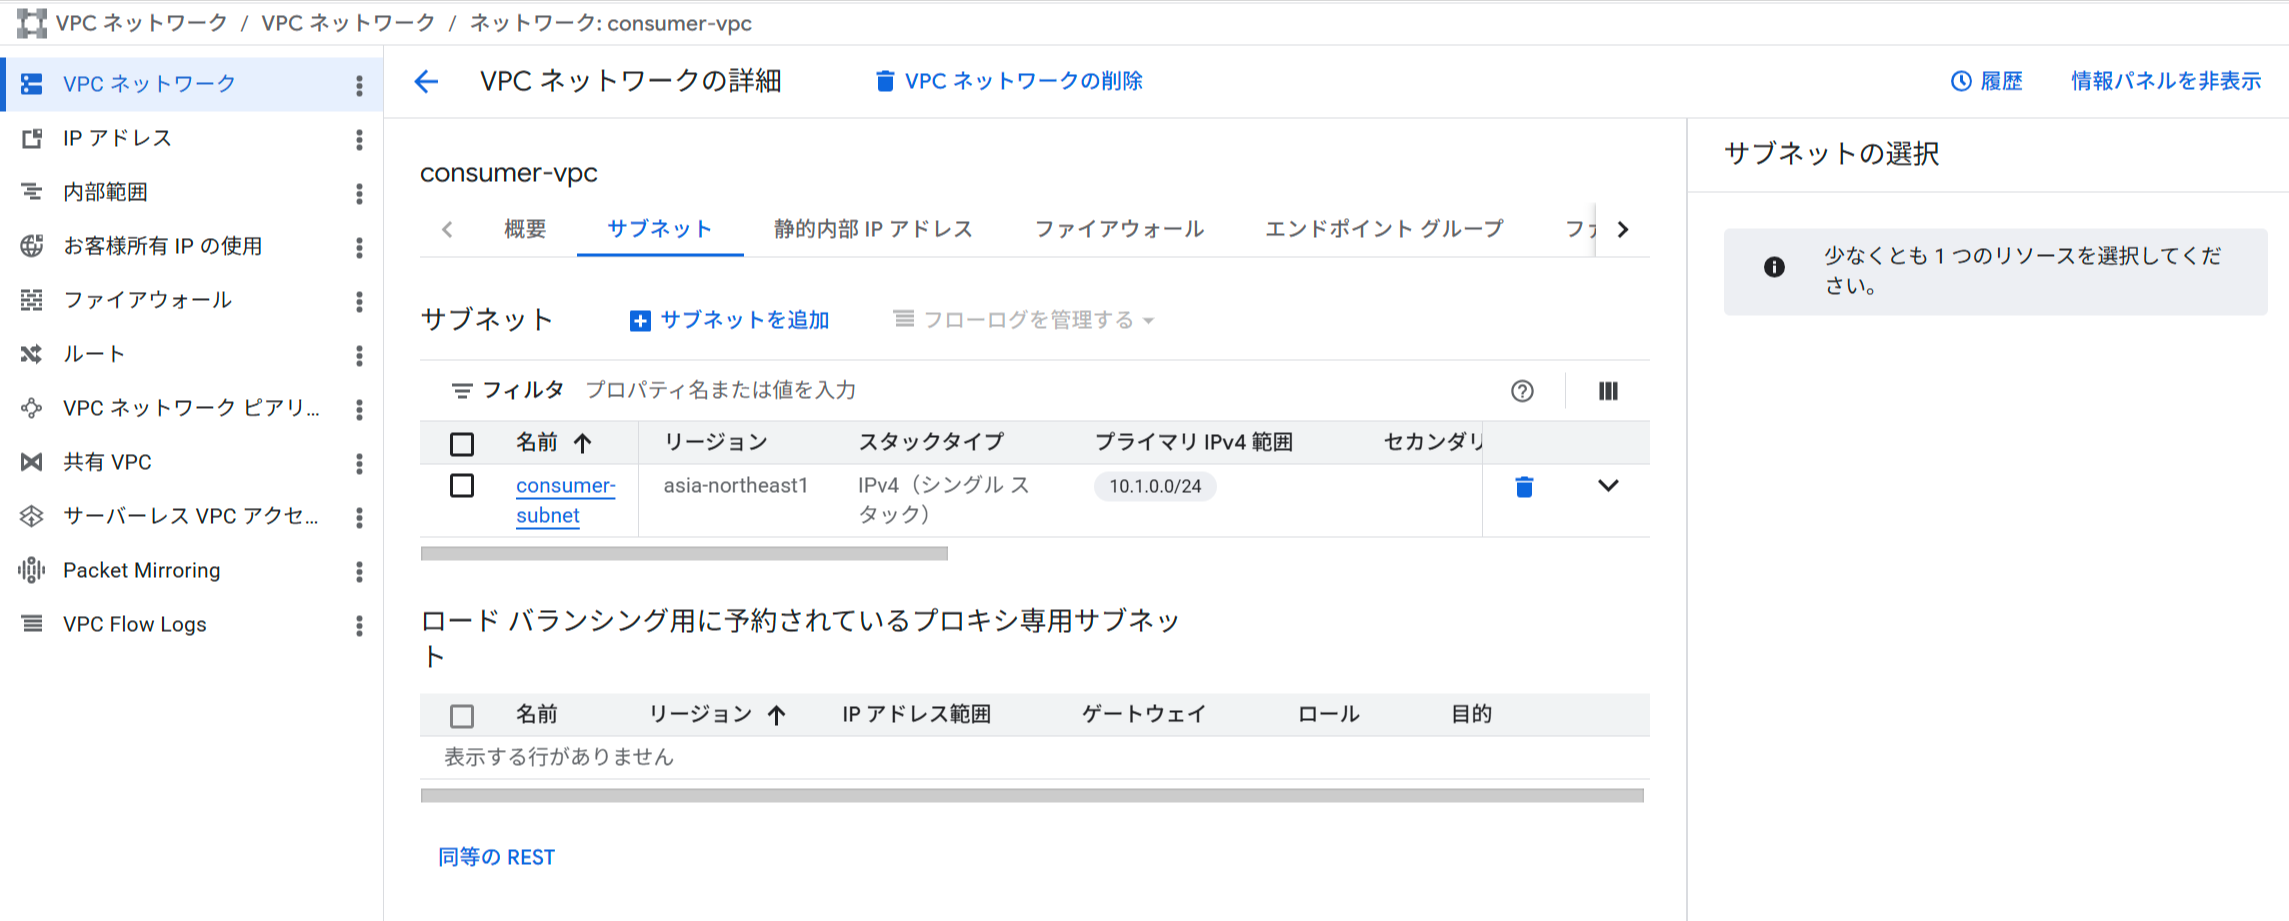
Consumer側のVPCとサブネット
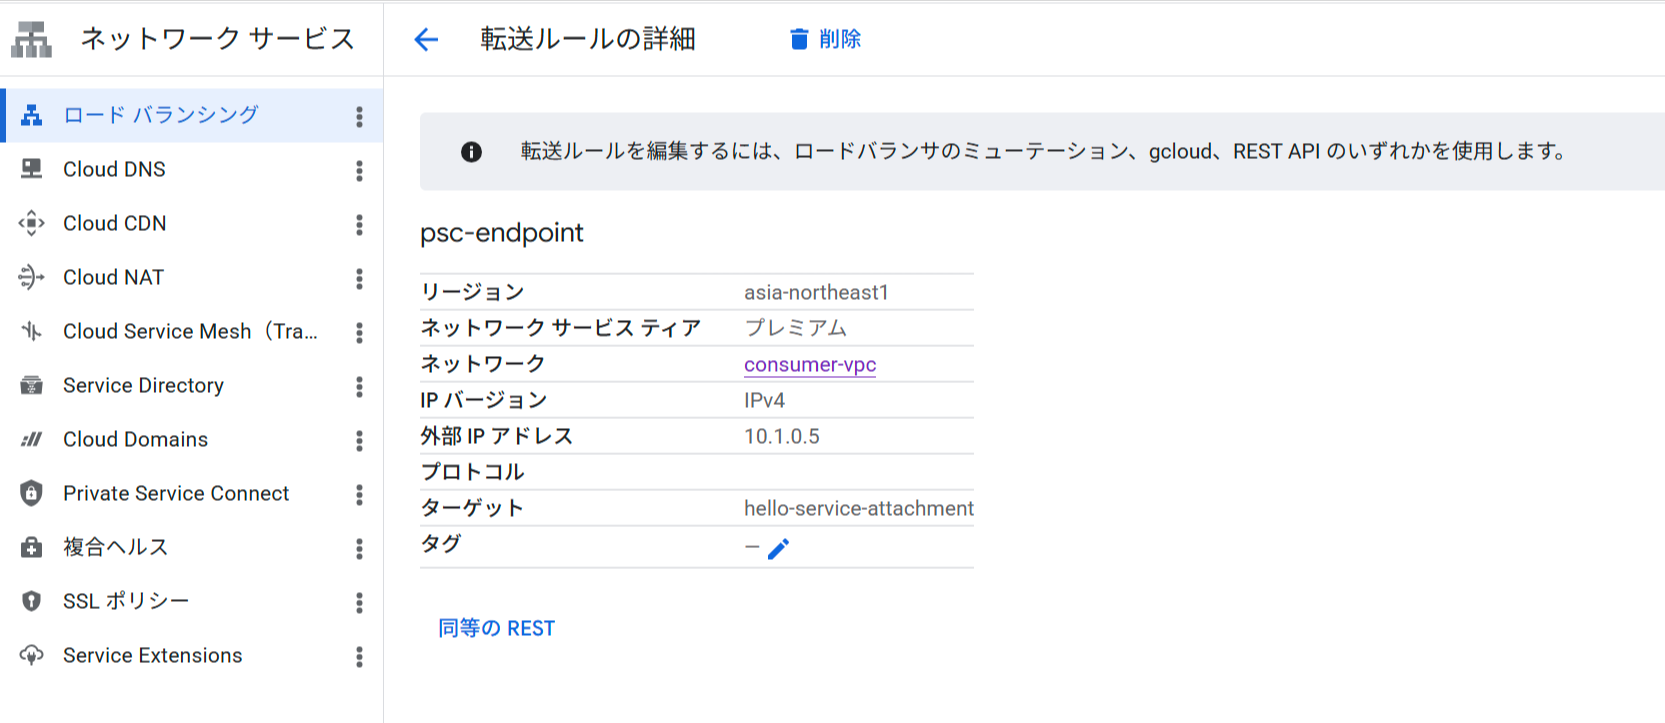
Step 6: Consumer側 — PSC Endpointを作成
PSCエンドポイント用の内部IPを予約し、Producer側のService Attachmentを指すフォワーディングルール(PSCエンドポイント)を作成します。
# PSCエンドポイント用の内部IP予約
gcloud compute addresses create psc-endpoint-ip \
  --region=$REGION \
  --subnet=consumer-subnet \
  --addresses=10.1.0.5 \
  --project=$CONSUMER_PROJECT

# PSCエンドポイント作成(Service AttachmentのURIを指定)
export SERVICE_ATTACHMENT_URI=$(gcloud compute service-attachments describe hello-service-attachment \
  --region=$REGION \
  --project=$PRODUCER_PROJECT \
  --format="value(selfLink)")

gcloud compute forwarding-rules create psc-endpoint \
  --region=$REGION \
  --network=consumer-vpc \
  --address=psc-endpoint-ip \
  --target-service-attachment=$SERVICE_ATTACHMENT_URI \
  --project=$CONSUMER_PROJECT
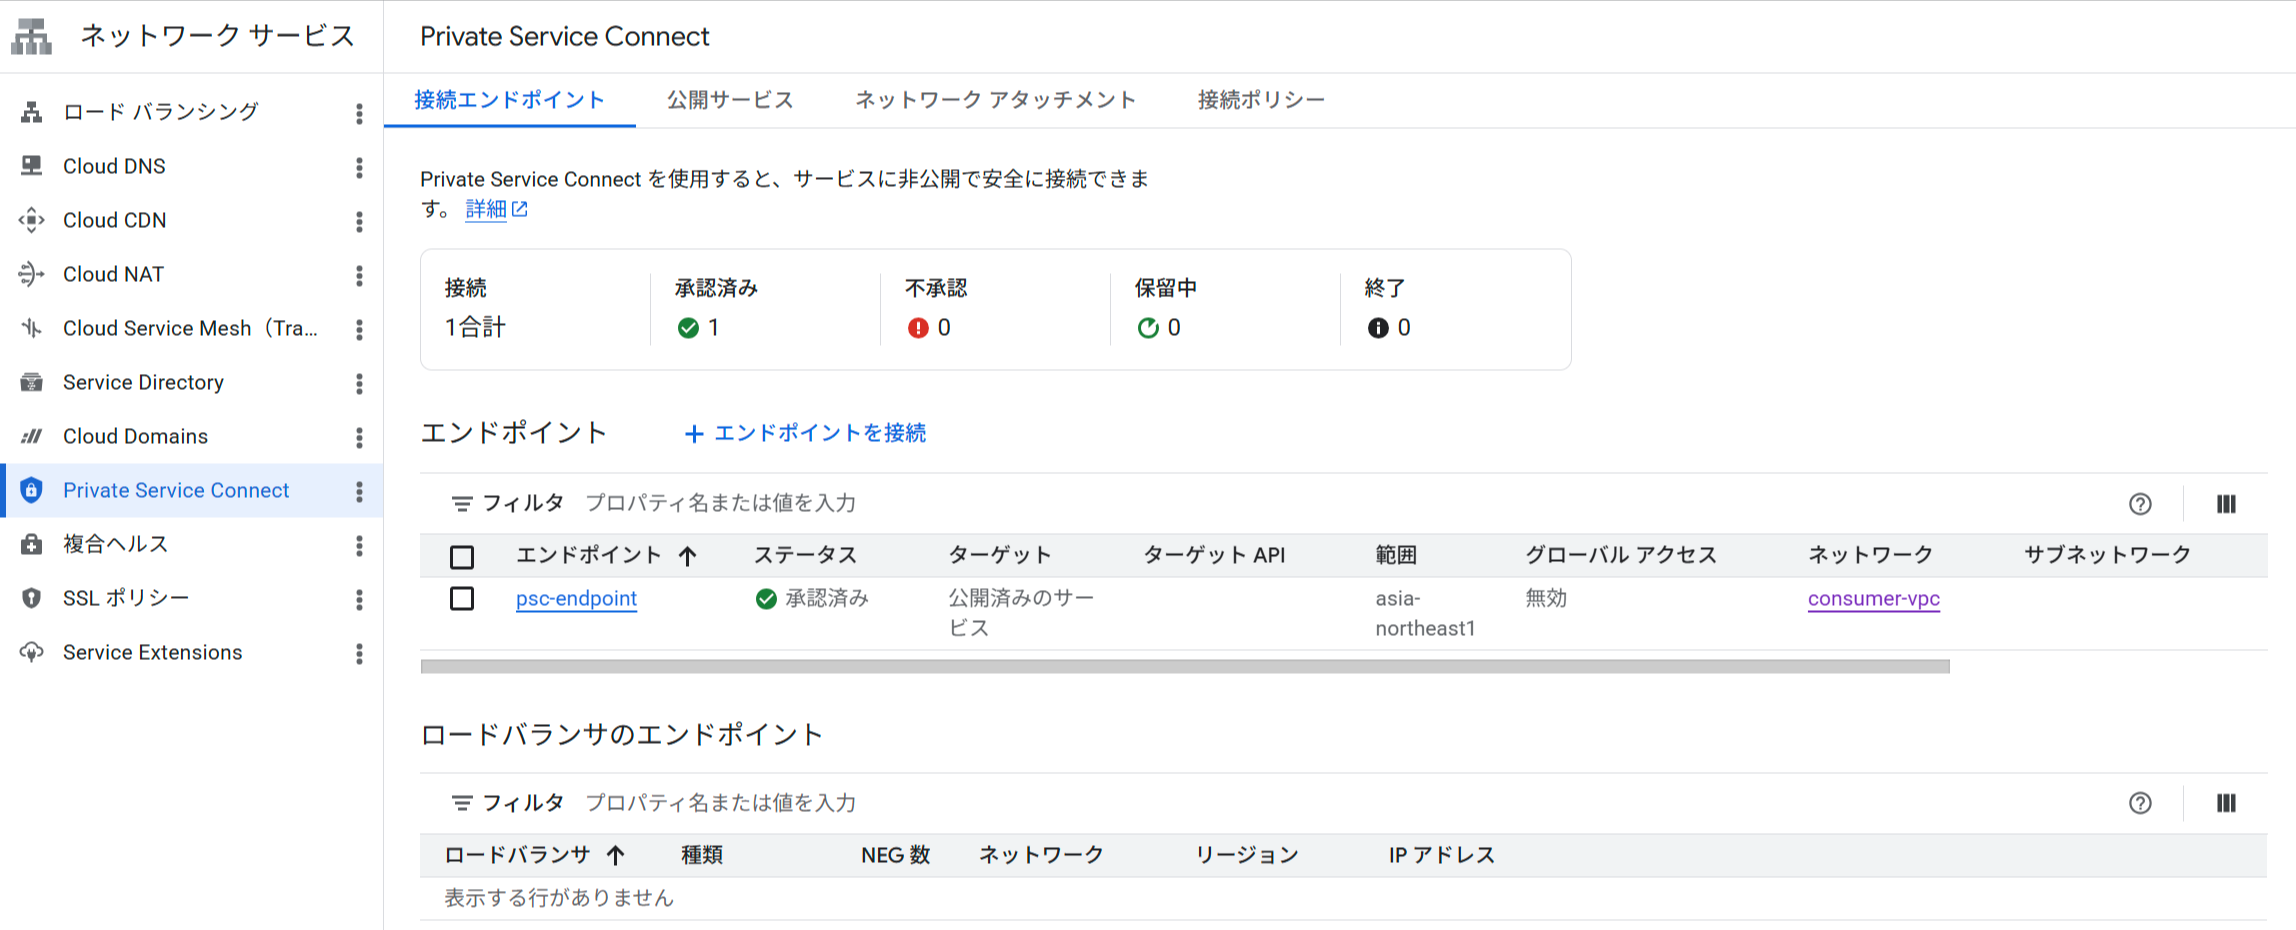
PSCエンドポイントの作成結果
PSCエンドポイントの接続ステータス(ACCEPTED)
Step 7: 接続ステータスの確認
Producer側でPSC接続が承認済みになっていることを確認します。
gcloud compute service-attachments describe hello-service-attachment \
  --region=$REGION \
  --project=$PRODUCER_PROJECT \
  --format="yaml(connectedEndpoints)"
connectedEndpoints:
- consumerNetwork: https://www.googleapis.com/compute/v1/projects/<consumer-project-id>/global/networks/consumer-vpc
  endpoint: https://www.googleapis.com/compute/v1/projects/<consumer-project-id>/regions/asia-northeast1/forwardingRules/psc-endpoint
  endpointWithId: https://www.googleapis.com/compute/v1/projects/<consumer-project-id>/regions/asia-northeast1/forwardingRules/1721306832411448892
  pscConnectionId: '181490208401850373'
  status: ACCEPTED
status: ACCEPTED が表示されれば接続が確立しています。PENDING の場合はConsumerプロジェクトが承認リストに含まれているか確認してください。
Step 8: Consumer側 — 疎通確認
Consumer VPC内にテスト用VMを作成し、PSCエンドポイントのIPアドレス(10.1.0.5)へのアクセスを確認します。IAP(Identity-Aware Proxy)経由でSSHするため、先にファイアウォールルールを作成します。
# IAP SSH用のファイアウォールルール作成
gcloud compute firewall-rules create allow-iap-ssh \
  --network=consumer-vpc \
  --allow=tcp:22 \
  --source-ranges=35.235.240.0/20 \
  --project=$CONSUMER_PROJECT

# テスト用VM作成(外部IPなし)
gcloud compute instances create test-vm \
  --zone=${REGION}-b \
  --machine-type=e2-micro \
  --network-interface=network=consumer-vpc,subnet=consumer-subnet,no-address \
  --project=$CONSUMER_PROJECT
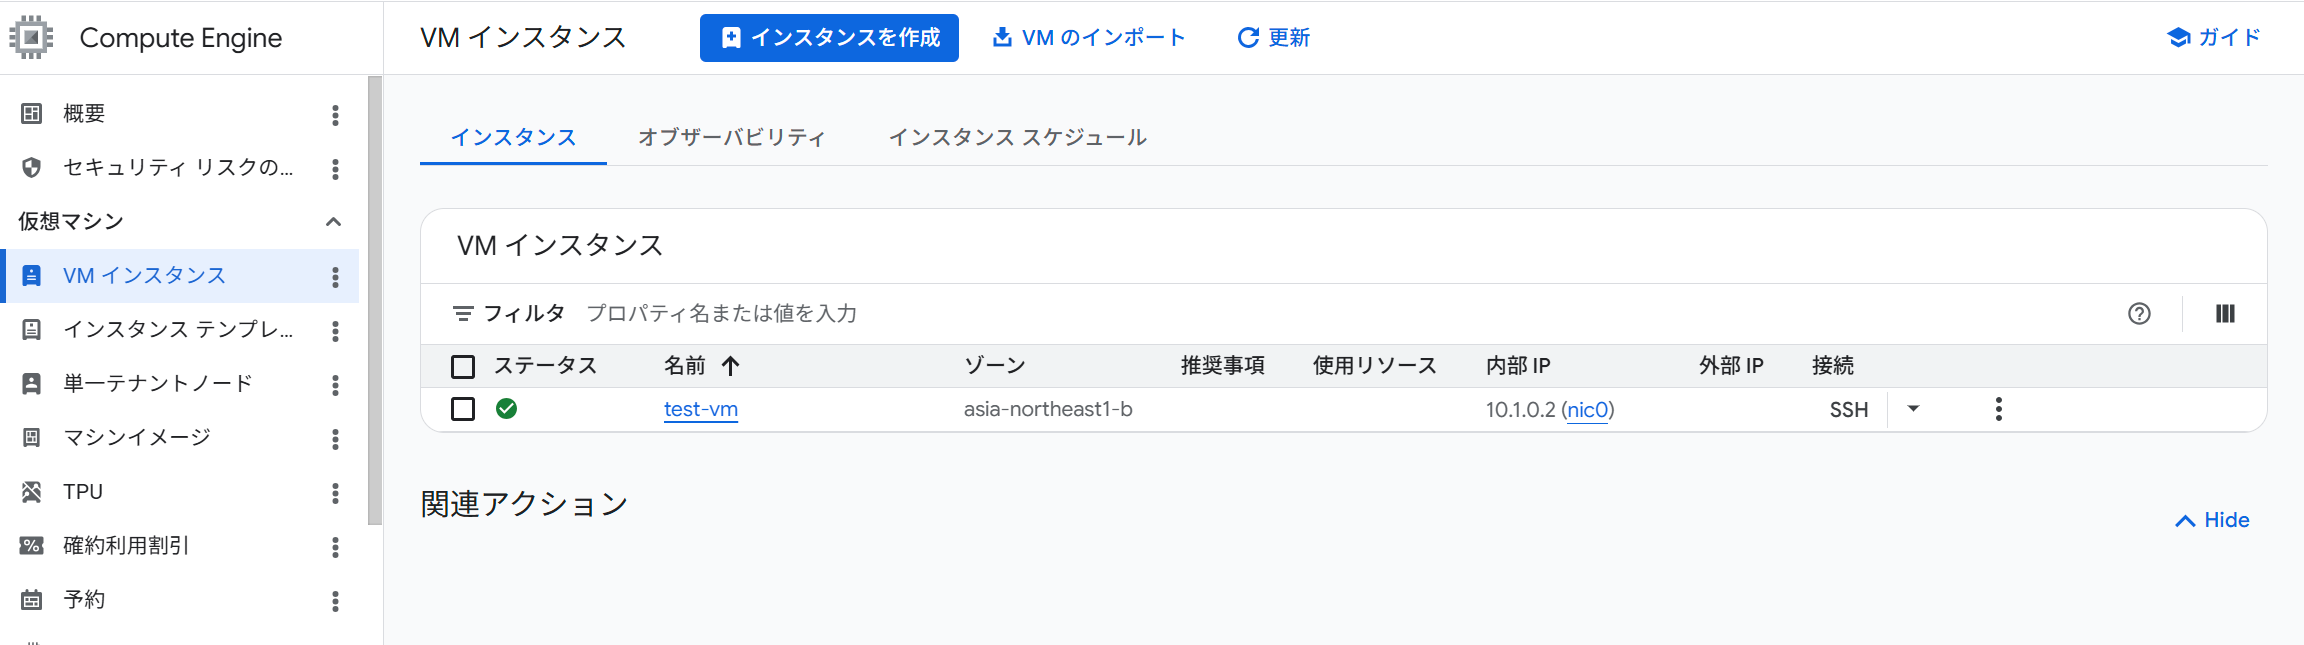
テストVM
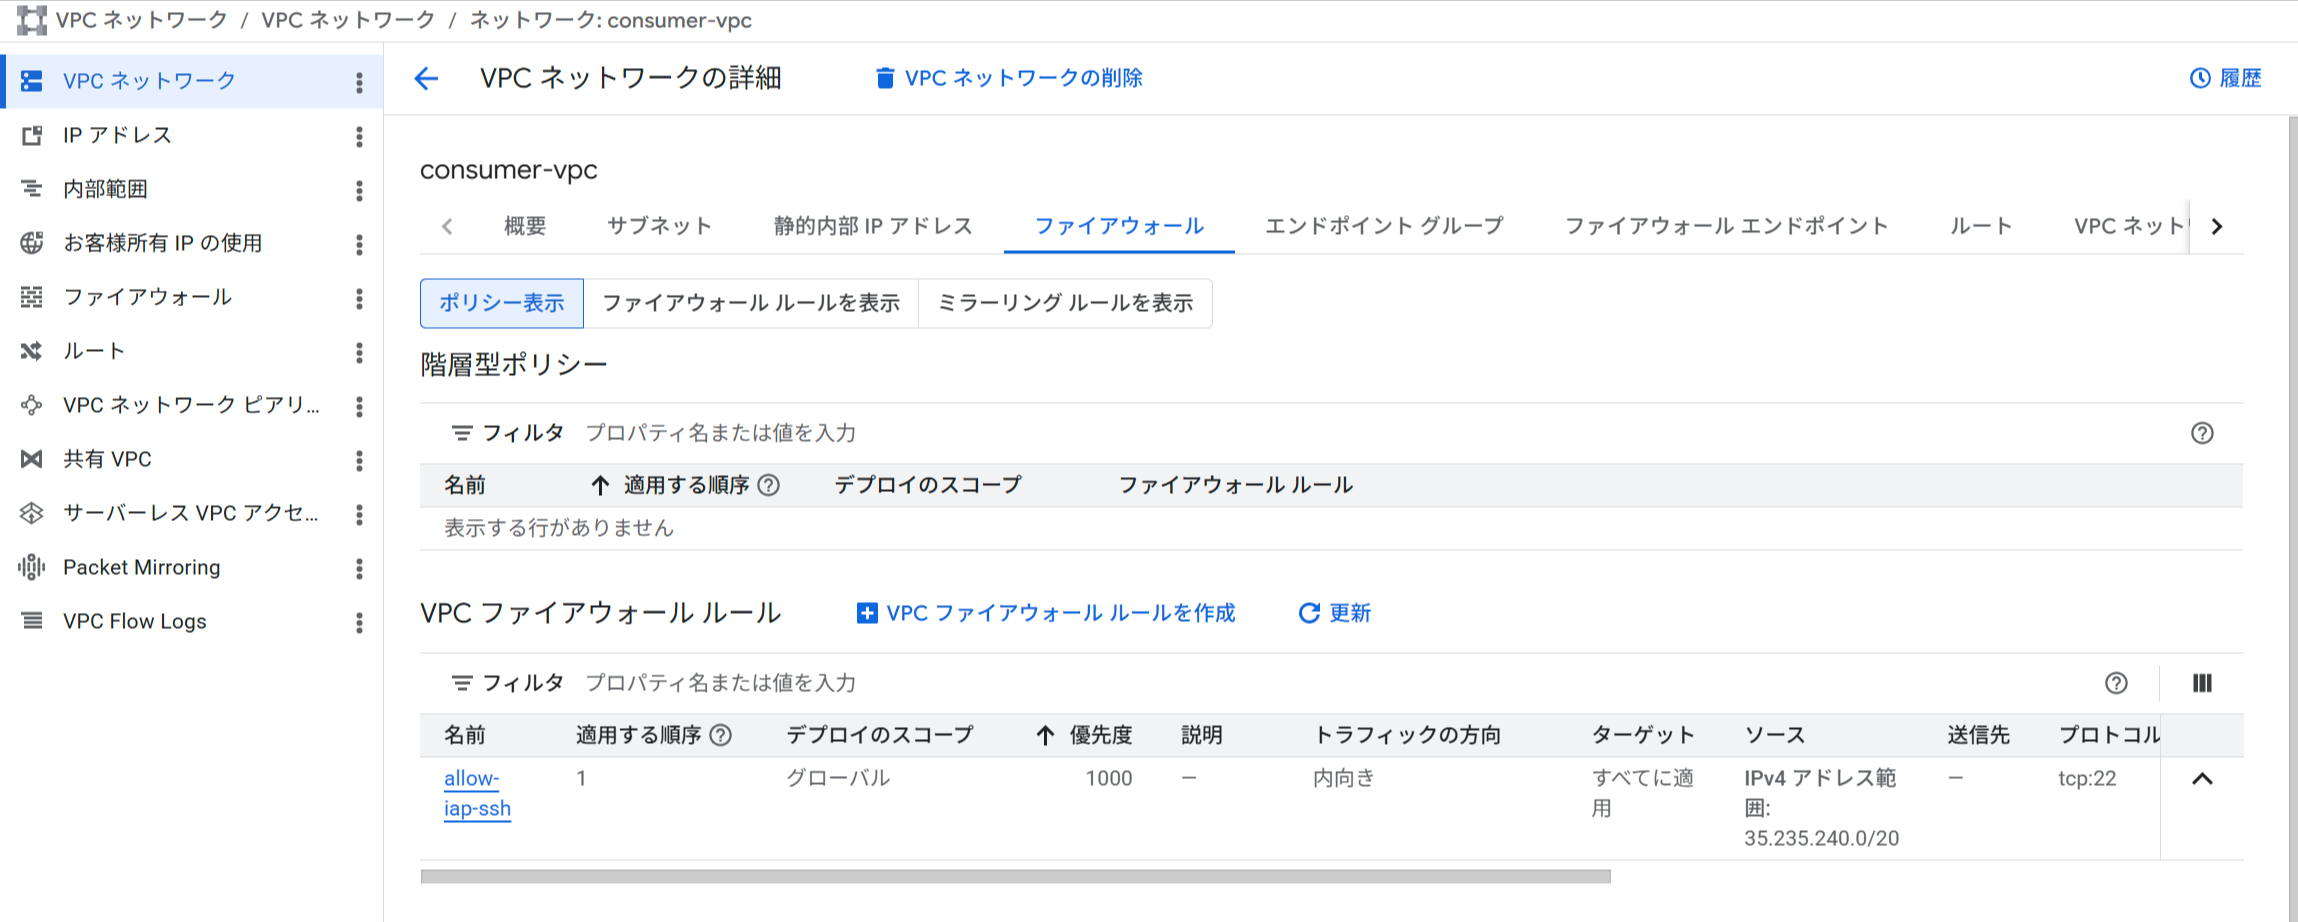
IAP SSH用ファイアウォールルール
IAM認証が必須のため、VMのメタデータサーバーからID Tokenを取得してリクエストに付与します。まずID Tokenのaudience(対象URL)として使うCloud RunサービスのURLを確認します。
# Cloud RunサービスのURLを確認(ID Tokenのaudienceに指定する)
gcloud run services describe hello-service \
  --region=$REGION \
  --project=$PRODUCER_PROJECT \
  --format="value(status.url)"
# 例: https://hello-service-xxxxxxxxxx-an.a.run.app
VMにSSHし、メタデータサーバーからID Tokenを取得してPSCエンドポイント経由でアクセスします。
gcloud compute ssh test-vm \
  --zone=${REGION}-b \
  --project=$CONSUMER_PROJECT \
  --tunnel-through-iap

# VM内で実行
user@test-vm:~$ CLOUD_RUN_URL=<上記で確認したCloud Run URL>
TOKEN=$(curl -s \
  "http://metadata.google.internal/computeMetadata/v1/instance/service-accounts/default/identity?audience=${CLOUD_RUN_URL}" \
  -H "Metadata-Flavor: Google")
curl -s http://10.1.0.5/ -H "Authorization: Bearer ${TOKEN}"
<!doctype html>
<html lang=en>
<head>
<meta charset=utf-8>
<meta name="viewport" content="width=device-width, initial-scale=1">
<meta name="robots" content="noindex,nofollow">
<title>Congratulations | Cloud Run</title>
...
---以下省略---
<title>Congratulations | Cloud Run</title> を含むHTMLが返ってくれば成功です。--no-allow-unauthenticated により有効なID Tokenを持つ roles/run.invoker 付与済みのサービスアカウントからのみアクセスできていることが確認できます。
Step 9: Cloud Loggingでリクエストを確認
Cloud RunのリクエストログはProducerプロジェクトのCloud Loggingに自動的に記録されます。gcloud logging read でフィルタして確認します。
gcloud logging read \
  "resource.type=cloud_run_revision \
  AND resource.labels.service_name=hello-service \
  AND logName=projects/${PRODUCER_PROJECT}/logs/run.googleapis.com%2Frequests" \
  --project=$PRODUCER_PROJECT \
  --limit=5 \
  --format="table(timestamp, httpRequest.remoteIp, httpRequest.status, httpRequest.userAgent)"
リクエストが到達していれば、以下のような出力が得られます。
TIMESTAMP                    REMOTE_IP                             STATUS  USER_AGENT
2026-05-07T01:26:49.421521Z  fda3:e722:ac3:cc00:22b:7027:a00:302  200     curl/7.88.1
httpRequest.remoteIp にはIPv6アドレスが記録されます。PSC → Internal ALB → Serverless NEG → Cloud Runというトラフィックパスでは、Cloud RunのリクエストログにはGoogleのネットワーク基盤(Andromeda)が内部的に使用するIPv6アドレスが記録されます。Consumer VMの実際のIPアドレス(10.1.x.x)は記録されません。
なお、status: 200 になっていればPSCプライベート接続およびIAM認証が正常に動作していることが確認できます。
Step 10: VPC Flow LogsでConsumer VMの実際のIPを確認
Cloud RunのリクエストログではGoogleの内部IPv6アドレスしか記録されませんが、Consumer側のVPC Flow Logsを使うとVM(10.1.x.x)の実際のIPアドレスを確認できます。
まずConsumerサブネットでVPC Flow Logsを有効化します。
gcloud compute networks subnets update consumer-subnet \
  --region=$REGION \
  --enable-flow-logs \
  --project=$CONSUMER_PROJECT
VPC Flow Logsの有効化
有効化後、再度VMからcurlでリクエストを送信します(Flow Logsはリアルタイムではなく数分のラグがあります)。
gcloud compute ssh test-vm \
  --zone=${REGION}-b \
  --project=$CONSUMER_PROJECT \
  --tunnel-through-iap

# VM内で実行
CLOUD_RUN_URL=<Cloud Run URL>
TOKEN=$(curl -s \
  "http://metadata.google.internal/computeMetadata/v1/instance/service-accounts/default/identity?audience=${CLOUD_RUN_URL}" \
  -H "Metadata-Flavor: Google")
curl -s http://10.1.0.5/ -H "Authorization: Bearer ${TOKEN}" > /dev/null
数分後にConsumerプロジェクトのCloud LoggingでFlow Logsを確認します。dest_ip でPSCエンドポイントIP(10.1.0.5)に絞り込みます。
gcloud logging read \
  "resource.type=gce_subnetwork \
  AND resource.labels.subnetwork_name=consumer-subnet \
  AND logName=projects/${CONSUMER_PROJECT}/logs/compute.googleapis.com%2Fvpc_flows \
  AND jsonPayload.connection.dest_ip=\"10.1.0.5\"" \
  --project=$CONSUMER_PROJECT \
  --limit=5 \
  --format="table(timestamp, jsonPayload.connection.src_ip, jsonPayload.connection.src_port, jsonPayload.connection.dest_ip, jsonPayload.connection.dest_port)"
src_ip にConsumer VMの内部IP(10.1.x.x)、dest_ip にPSCエンドポイントIP(10.1.0.5)が表示されます。
TIMESTAMP                       SRC_IP    SRC_PORT  DEST_IP   DEST_PORT
2026-05-07T01:43:35.713343437Z  10.1.0.2  52328     10.1.0.5  80
Cloud RunのリクエストログだけではConsumerのIPを特定できませんが、Consumer側のVPC Flow Logsと組み合わせることでエンドツーエンドのトレーサビリティが得られます。
考察:各ホップにおける接続元IPの変化
今回のハンズオンを通じて、Consumer VMからCloud Runに至るまでにIPアドレスが複数回変換されることが確認できました。各ホップでどのように変化するかを整理します。
① Consumer VM → PSCエンドポイント
Consumer VMはPSCエンドポイントのIP(10.1.0.5)へリクエストを送ります。この時点の送信元IPはConsumer VMのIP(10.1.0.2)です。
② PSCエンドポイント → Service Attachment(PSC SNAT)
PSCエンドポイントがService Attachmentへ接続する際、PSC NATサブネット(10.0.3.0/24)を使ったSNATが行われます。Consumer VMのIP(10.1.0.2)はPSC NATサブネットのIP(10.0.3.x)に書き換えられてProducer VPCへ届きます。これにより、ConsumerとProducerのIPレンジが重複していても通信できます。
③ Forwarding Rule → Envoyプロキシ(接続終端・再確立)
Internal ALB(INTERNAL_MANAGED)はプロキシ型LBであるため、EnvoyプロキシがForwarding Ruleへの接続を一度終端します。Envoyはプロキシ専用サブネットのIP(10.0.2.x)を持ち、URL Mapのルーティングを適用したうえでバックエンドへ新規に接続を張り直します。送信元IPはここで10.0.2.xに変わります。
④ Serverless NEG → Cloud Run(Andromeda変換)
EnvoyからServerless NEG経由でCloud Runへのリクエストは、GoogleのネットワークインフラであるAndromedaを通じて転送されます。Cloud Runが受け取る接続元IPはAndromedaが内部的に使用するIPv6アドレス(fda3:e722:ac3:cc00:...)となります。
送信元IPの変化

Consumer VM   PSC SNAT          Envoy終端・再確立      Andromeda変換
10.1.0.2  →  10.0.3.x      →  10.0.2.x          →  fda3:e722:...(IPv6)
             (PSC NATサブネット) (プロキシ専用サブネット)  (Cloud Runが記録するIP)
| ホップ | 送信元IP | 変換の種類 |
|---|---|---|
| Consumer VM → PSC Endpoint | 10.1.0.2 |
— |
| PSC Endpoint → Service Attachment | 10.0.3.x |
PSC SNAT(PSC NATサブネット) |
| Forwarding Rule → Envoy → Backend Service | 10.0.2.x |
Envoyによる接続終端・再確立(プロキシ専用サブネット) |
| Serverless NEG → Cloud Run | fda3:e722:... |
Andromedaによる内部変換 |
IPが多段階で変換されるため、Cloud RunのリクエストログだけではConsumer VMのIPを特定できません。Step 9とStep 10で確認したように、Cloud RunリクエストログはProducer側の観測、VPC Flow LogsはConsumer側の観測と役割を分けて組み合わせることで、エンドツーエンドのトレーサビリティを確保できます。
まとめ
Cloud RunサービスをPrivate Service Connectを使ってプロジェクト間にプライベート公開する構成を試しました。Internal ALBとServerless NEGを組み合わせることで、サーバーレスサービスをPSCのマネージドサービスとして公開できることが確認できました。
この構成を採用する際にはいくつか注意点があります。Cloud RunをPSCで公開するにはInternal Application Load Balancerを介する構成が必須であり、Cloud RunのエンドポイントをService Attachmentに直接指定することはできません。またInternal ALBを使用するリージョンにはプロキシ専用サブネット(REGIONAL_MANAGED_PROXY)が別途必要です。Serverless NEG・Internal ALB・Cloud Runはいずれも同一リージョンに配置する必要があります。また、PSC NATのTCP接続アイドルタイムアウトは20分であるため、長時間の接続が必要なサービスでは考慮が必要です。
マルチプロジェクト環境でサービス間をプライベート接続したい場合や、SaaS的にAPIを別チームに提供したい場合に、ぜひ検討してみてはいかがでしょうか。
この記事が誰かの助けになれば幸いです。
以上、クラウド事業本部コンサルティング部の渡邉でした!