
CloudFront + S3 のシンプル構成でブルーグリーンデプロイメントを試してみた
はじめに
静的サイトのホスティングといえば CloudFront + S3 の組み合わせが定番ですね。
直近業務で、CloudFront Continuous Deployment(継続的デプロイ) 機能を利用する機会があったので
CDKを利用して構築検証した内容を、今回はブログにしました!
CloudFront Continuous Deployment(継続的デプロイ) とは・・・
2022年11月に GA となった機能で ヘッダーや、重みをつけることでルーティングを制御し継続的デプロイを実現する機能になります。
今回はAWS CDK(TypeScript)を使ってインフラを構築し、実際にブルーグリーンデプロイメントを検証した手順と結果をまとめます。
アーキテクチャ概要
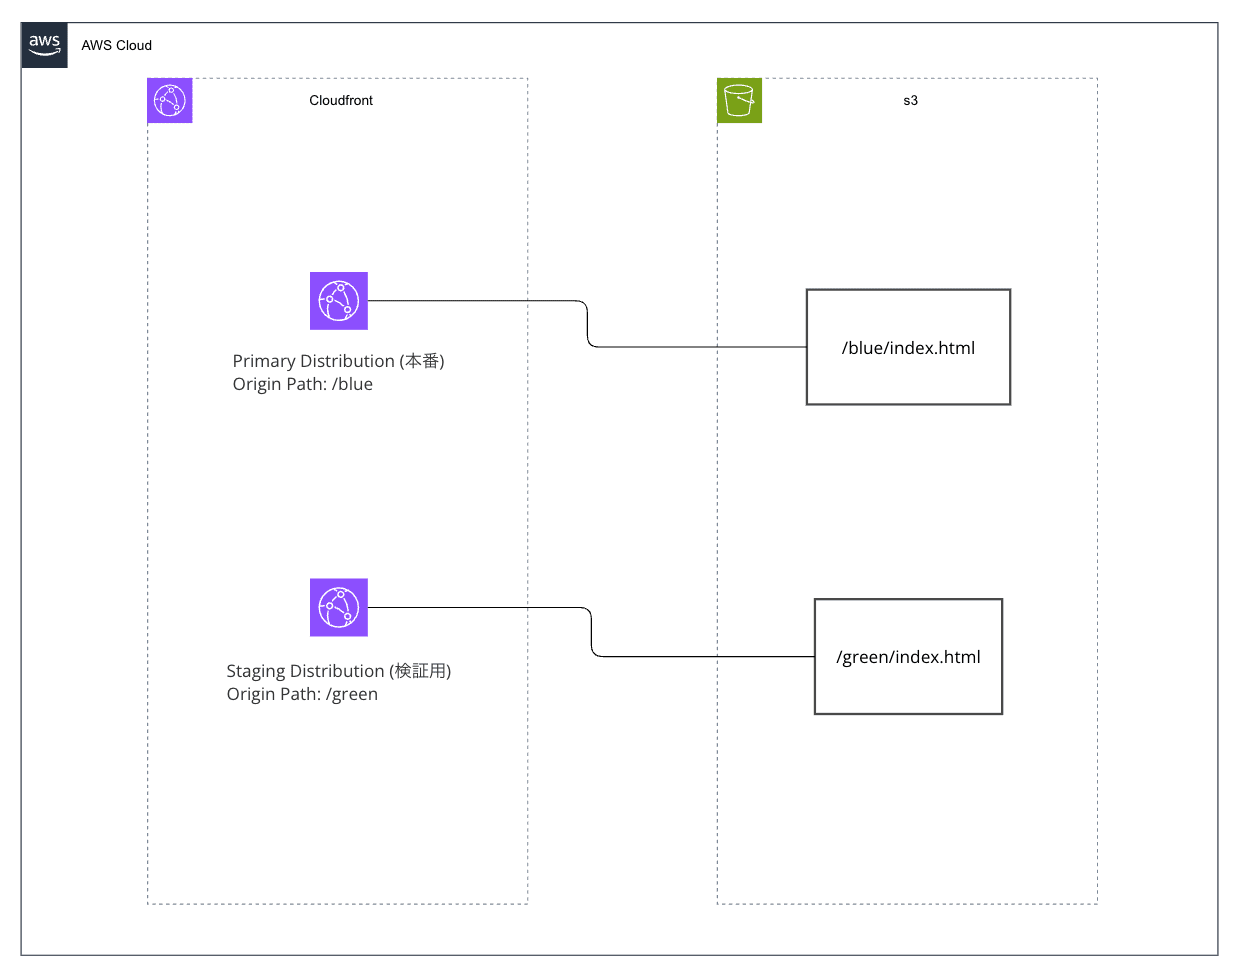
S3 バケットは 1つだけ 使用し、/blue と /green のプレフィックスでコンテンツを分離します。CloudFront の Origin Path でどちらのプレフィックスを参照するかを切り替えます。
ポイント
| 項目 | 内容 |
|---|---|
| 仕組み | Primary Distribution に対して Staging Distribution を作成し、Continuous Deployment Policy でトラフィックを振り分ける |
| S3 構成 | 1 バケット内の /blue /green プレフィックスで Blue/Green を分離 |
| トラフィック制御 | Weight-based(重み付け、最大15%)または Header-based(特定ヘッダーで振り分け) |
| セッション維持 | Cookie ベースのセッションスティッキネス(300〜3,600秒) |
| 昇格(Promote) | 検証 OK なら Staging の設定を Primary に昇格。DNS 変更は不要 |
CDK での構成
今回はなるべくシンプルに、以下の構成で検証します。
- S3 バケット × 1:
/blue(現行バージョン)と/green(新バージョン)のプレフィックスで管理 - CloudFront Distribution × 1(Primary / L2): Origin Path
/blue - Staging Distribution × 1(L1 /
CfnDistribution): Origin Path/green - Continuous Deployment Policy(L1 /
CfnContinuousDeploymentPolicy): Header-based で振り分け
重みづけでルーティングすることも可能ですが、今回は検証者が意図的にヘッダーを付与してリクエストすることで、確実に Staging 側のコンテンツを確認できるようにするためにHeader-based を選んでいます。
CDK 実装上の注意点
CloudFront Continuous Deployment は CDK の L2 コンストラクトが未提供 です。そのため以下の構成となります。
| リソース | コンストラクトレベル | 理由 |
|---|---|---|
| Primary Distribution | L2 (cloudfront.Distribution) |
OAC 自動設定など L2 の恩恵を受ける |
| Staging Distribution | L1 (cloudfront.CfnDistribution) |
staging: true プロパティが L2 に存在しない |
| Continuous Deployment Policy | L1 (cloudfront.CfnContinuousDeploymentPolicy) |
L2 未提供 |
| CDP → Primary の紐付け | Escape Hatch (addPropertyOverride) |
L2 の Distribution に ContinuousDeploymentPolicyId を追加 |
プロジェクト構成
infra/
├── bin/
│   └── cloudfront-bg.ts        # CDK App エントリーポイント
├── lib/
│   └── cloudfront-bg-stack.ts  # メインスタック
├── html/
│   ├── blue/
│   │   └── index.html          # → S3 /blue/index.html
│   └── green/
│       └── index.html          # → S3 /green/index.html
├── cdk.json
├── package.json
└── tsconfig.json
CDK コードのポイント解説
S3 バケット(1つ)とコンテンツデプロイ
const bucket = new s3.Bucket(this, "ContentBucket", {
  removalPolicy: cdk.RemovalPolicy.DESTROY,
  autoDeleteObjects: true,
  blockPublicAccess: s3.BlockPublicAccess.BLOCK_ALL,
});

// blue/ プレフィックスにデプロイ
new s3deploy.BucketDeployment(this, "DeployBlue", {
  sources: [s3deploy.Source.asset("./html/blue")],
  destinationBucket: bucket,
  destinationKeyPrefix: "blue",
});

// green/ プレフィックスにデプロイ
new s3deploy.BucketDeployment(this, "DeployGreen", {
  sources: [s3deploy.Source.asset("./html/green")],
  destinationBucket: bucket,
  destinationKeyPrefix: "green",
});
destinationKeyPrefix でアップロード先のプレフィックスを指定します。結果として S3 には blue/index.html と green/index.html が配置されます。
Primary Distribution(L2)— Origin Path /blue
const primaryDistribution = new cloudfront.Distribution(this, "PrimaryDistribution", {
  defaultBehavior: {
    origin: origins.S3BucketOrigin.withOriginAccessControl(bucket, {
      originPath: "/blue",   // ← S3 の /blue プレフィックスを参照
    }),
    viewerProtocolPolicy: cloudfront.ViewerProtocolPolicy.REDIRECT_TO_HTTPS,
    cachePolicy: cloudfront.CachePolicy.CACHING_OPTIMIZED,
  },
  defaultRootObject: "index.html",
  httpVersion: cloudfront.HttpVersion.HTTP2, // HTTP/3 は CDP 非対応
});
originPath: "/blue" を指定することで、CloudFront は S3 の blue/ 配下のオブジェクトを配信します。ユーザーが /index.html をリクエストすると、実際には s3://bucket/blue/index.html が返されます。
Staging Distribution(L1)— Origin Path /green
const stagingDistribution = new cloudfront.CfnDistribution(this, "StagingDistribution", {
  distributionConfig: {
    staging: true,  // ← これが Staging Distribution の鍵
    enabled: true,
    origins: [{
      id: "green-origin",
      domainName: bucket.bucketRegionalDomainName,
      originPath: "/green",  // ← S3 の /green プレフィックスを参照
      s3OriginConfig: { originAccessIdentity: "" },
      originAccessControlId: stagingOac.attrId,
    }],
    defaultCacheBehavior: {
      targetOriginId: "green-origin",
      viewerProtocolPolicy: "redirect-to-https",
      cachePolicyId: "658327ea-f89d-4fab-a63d-7e88639e58f6",
      compress: true,
    },
  },
});
同じバケットの /green プレフィックスを参照します。staging: true は L2 に存在しないプロパティのため、L1(CfnDistribution)を使用します。
Escape Hatch で CDP を Primary に紐付け
const cfnPrimary = primaryDistribution.node.defaultChild as cloudfront.CfnDistribution;
cfnPrimary.addPropertyOverride(
  "DistributionConfig.ContinuousDeploymentPolicyId",
  cdp.attrId,
);
L2 の Distribution には continuousDeploymentPolicyId プロパティがないため、escape hatch(addPropertyOverride)で L1 レベルのプロパティを直接追加します。
デプロイと検証
デプロイ(2段階)
当初は1回の cdk deploy で全リソースを作成しようとしましたが、以下のエラーが発生しました。
CREATE_FAILED | AWS::CloudFront::Distribution
Resource handler returned message: "Invalid request provided:
AWS::CloudFront::Distribution: Continuous deployment policy is not
supported during distribution creation."
CloudFront の CreateDistribution API は、新規作成時に ContinuousDeploymentPolicyId を指定するとエラーになります。 CDP の紐付けは UpdateDistribution(既存 Distribution の更新)でのみ可能です。
公式のワークフローガイドでも、手順は CopyDistribution → CreateContinuousDeploymentPolicy → UpdateDistribution の順で記載されており、CreateDistribution で CDP を紐付ける手順は存在しません。ただし「Create 時は不可」とは明記されておらず、API リファレンス上はパラメータ自体は存在するため、実際にやってみないとわからない制約です。
そのため、CDK コンテキスト変数を使って2段階でデプロイする構成にしました。
cd infra
pnpm install

# Phase 1: S3 + Primary Distribution を作成
pnpm cdk deploy

# Phase 2: Staging Distribution + CDP を追加し、Primary に紐付け
pnpm cdk deploy --context enableBlueGreen=true
CDK スタック内では this.node.tryGetContext("enableBlueGreen") で分岐し、Phase 1 では Primary Distribution のみ作成、Phase 2 で Staging + CDP を追加して addPropertyOverride で既存の Primary を更新します。
Phase 2 完了後、スタック出力に以下が表示されます。
Outputs:
CloudFrontBlueGreenStack.PrimaryDistributionDomain = dxxxxxxxxxxxxx.cloudfront.net
CloudFrontBlueGreenStack.PrimaryDistributionId = Exxxxxxxxxx
CloudFrontBlueGreenStack.StagingDistributionId = Eyyyyyyyyyy
CloudFrontBlueGreenStack.BucketName = cloudfront-bg-contentbucket-xxxxxxxxx
CloudFrontBlueGreenStack.TestBlueCommand = curl https://dxxxxxxxxxxxxx.cloudfront.net/
CloudFrontBlueGreenStack.TestGreenCommand = curl -H "aws-cf-cd-staging: true" https://dxxxxxxxxxxxxx.cloudfront.net/
動作確認
# Blue(Primary)の確認 - 通常のリクエスト
curl https://dxxxxxxxxxxxxx.cloudfront.net/
<!DOCTYPE html>
<html lang="ja">
<head>
  <meta charset="UTF-8">
  <meta name="viewport" content="width=device-width, initial-scale=1.0">
  <title>Blue Environment</title>
  <style>
    body { font-family: sans-serif; display: flex; justify-content: center; align-items: center; min-height: 100vh; margin: 0; background: #e8f4fd; }
    .container { text-align: center; padding: 2rem; border-radius: 12px; background: white; box-shadow: 0 4px 12px rgba(0,0,0,0.1); }
    h1 { color: #1565c0; font-size: 3em; }
    .version { color: #666; font-size: 1.2em; }
  </style>
</head>
<body>
  <div class="container">
    <h1>Blue Environment</h1>
    <p class="version">v1.0 - Production</p>
    <p>This is the current production environment.</p>
  </div>
</body>
</html>

# Green(Staging)の確認 - ヘッダー付きリクエスト
curl -H "aws-cf-cd-staging: true" https://dxxxxxxxxxxxxx.cloudfront.net/
<!DOCTYPE html>
<html lang="ja">
<head>
  <meta charset="UTF-8">
  <meta name="viewport" content="width=device-width, initial-scale=1.0">
  <title>Green Environment</title>
  <style>
    body { font-family: sans-serif; display: flex; justify-content: center; align-items: center; min-height: 100vh; margin: 0; background: #e8f5e9; }
    .container { text-align: center; padding: 2rem; border-radius: 12px; background: white; box-shadow: 0 4px 12px rgba(0,0,0,0.1); }
    h1 { color: #2e7d32; font-size: 3em; }
    .version { color: #666; font-size: 1.2em; }
  </style>
</head>
<body>
  <div class="container">
    <h1>Green Environment</h1>
    <p class="version">v2.0 - Staging</p>
    <p>This is the new version under verification.</p>
  </div>
</body>
</html>
同一ドメイン に対してヘッダーの有無だけで Blue / Green が切り替わることが確認できます。
昇格(Promote)
検証 OK なら、Staging の設定を Primary に昇格させます。この操作は GUI で実行 しました。

昇格後、通常のリクエスト(ヘッダーなし)でも Green の内容が返るようになります。
Note: 昇格は Staging の Distribution 設定(Origin Path 含む)を Primary にコピー する操作です。昇格後、Primary の Origin Path は
/greenに切り替わります。
curl  https://d2357u01coqn58.cloudfront.net/
<!DOCTYPE html>
<html lang="ja">
<head>
  <meta charset="UTF-8">
  <meta name="viewport" content="width=device-width, initial-scale=1.0">
  <title>Green Environment</title>
  <style>
    body { font-family: sans-serif; display: flex; justify-content: center; align-items: center; min-height: 100vh; margin: 0; background: #e8f5e9; }
    .container { text-align: center; padding: 2rem; border-radius: 12px; background: white; box-shadow: 0 4px 12px rgba(0,0,0,0.1); }
    h1 { color: #2e7d32; font-size: 3em; }
    .version { color: #666; font-size: 1.2em; }
  </style>
</head>
<body>
  <div class="container">
    <h1>Green Environment</h1>
    <p class="version">v2.0 - Staging</p>
    <p>This is the new version under verification.</p>
  </div>
</body>
</html>
検証結果
| 検証項目 | 結果 |
|---|---|
| CDK による2段階デプロイ | Phase 1(Primary)→ Phase 2(Staging + CDP)の2コマンドで全リソースがデプロイされた |
| S3 バケット 1つでの運用 | /blue /green プレフィックスで問題なく分離できた |
| Header-based でのトラフィック振り分け | ヘッダーの有無で Blue / Green を正しく切り替え可能 |
| Staging → Primary への昇格 | CLI 1 コマンドで全トラフィックが新バージョンに切り替わった |
| DNS 変更 | 不要。CloudFront のドメイン名は変わらない |
| ダウンタイム | 昇格時にダウンタイムは発生しなかった |
| ロールバック | 昇格前であれば CDP を無効化するだけで即座にロールバック可能 |
注意点・制約
- Distribution 作成時に CDP を紐付けできない(更新時のみ可)。CDK では2段階デプロイで対応
- Weight-based の場合、最大 15% までしかトラフィックを Staging に流せない
- アカウントあたり最大 20 個 の Staging Distribution / Continuous Deployment Policy
- HTTP/3 が有効な Distribution では利用不可
- S3 バケットポリシーに Staging Distribution からのアクセスも許可が必要(CDK L1 では自動設定されない)
- Primary と Staging はキャッシュを共有しない(Staging への最初のリクエストはキャッシュミスになる)
- 高トラフィック時は CloudFront がすべてのリクエストを Primary に送る場合がある
- 昇格後、CDK のスタック状態と実際のリソース状態にドリフトが発生する(後述)
昇格後の CDK 同期: ドリフト解消と次サイクルの準備
昇格(Promote)は CLI の update-distribution-with-staging-config で行うため、昇格後は CDK のスタック状態と実際の CloudFront 設定にドリフトが生じます。ここからが意外とハマりどころでした。
やりたいこと
昇格により Primary の Origin Path が /blue → /green に切り替わったので、CDK コードを実態に合わせつつ、次のリリースサイクル(Green → Blue への切り替え)に備えたい。
手順
1. CDK コードの Origin Path を入れ替える
lib/cloudfront-bg-stack.ts で Primary と Staging の Origin Path を交換します。
// Primary: 昇格後の実態に合わせて /green に
origin: origins.S3BucketOrigin.withOriginAccessControl(bucket, {
  originPath: "/green",  // 変更前: "/blue"
}),

// Staging: 次に検証するバージョンとして /blue に
originPath: "/blue",  // 変更前: "/green"
2. enableBlueGreen なしでデプロイ → エラー発生
pnpm cdk deploy
ここで以下のエラーが発生しました。
DELETE_FAILED | AWS::CloudFront::ContinuousDeploymentPolicy
The specified continuous deployment policy is currently associated with a distribution.

DELETE_FAILED | AWS::CloudFront::Distribution (StagingDistribution)
The specified staging distribution is currently used by a continuous deployment policy.
enableBlueGreen コンテキストなしでデプロイすると、CDK は Staging Distribution と CDP を削除しようとします。しかし CDP が Primary に紐付いたままのため、CDP も Staging も削除できない という循環的なエラーになります。
3. GUI で CDP を Primary から切り離す
先に CDP の紐付けを解除する必要があります。

4. CDK で再デプロイ
# DELETE_FAILED のリソースを削除
pnpm cdk deploy

# 入れ替え後のパスで Blue-Green を再構成
pnpm cdk deploy --context enableBlueGreen=true
まとめ
昇格後の CDK 同期には 3回のデプロイ/操作 が必要になります。
| 手順 | 操作 | 目的 |
|---|---|---|
| 1 | GUI: CDP を Primary から切り離し | 削除可能な状態にする |
| 2 | pnpm cdk deploy |
不要になった CDP / Staging / OAC を削除 |
| 3 | pnpm cdk deploy --context enableBlueGreen=true |
入れ替え後のパスで Blue-Green を再構成 |
CI/CD パイプラインに組み込む場合は、この一連の手順を自動化する必要があります。AWS 公式の CDK Pipeline サンプル が参考になります。
CloudFront Continuous Deployment を使えば、CloudFront + S3 バケット 1つ というシンプルな構成のまま、DNS 変更もカスタムルーティングロジックも不要で、安全なブルーグリーンデプロイメントが実現できました。
S3 バケットを 2つ用意する必要はなく、プレフィックス(/blue /green)と CloudFront の Origin Path で切り替えることで、管理がよりシンプルになります。
CDK では L2 コンストラクトが未対応のため L1 + escape hatch の組み合わせが必要ですが、1 スタック・1 コマンドで全リソースをデプロイ可能 な構成にできます。
特に Header-based の振り分けは、検証者だけが新バージョンを確認できるため、静的サイトのリリースプロセスとして非常に実用的です。
参考リンク
- Use CloudFront continuous deployment to safely test CDN configuration changes
- Work with a staging distribution and continuous deployment policy
- Quotas and other considerations for continuous deployment
- Achieving Zero-downtime deployments with Amazon CloudFront using blue/green continuous deployments
- Automating CloudFront Continuous Deployment with a CI/CD Pipeline
- aws-samples/amazon-cloudfront-continuousdeployment-cicd


