CoreAnimationとUIBezierPathを使用して円が拡大するアニメーションを実装する
この記事は公開されてから1年以上経過しています。情報が古い可能性がありますので、ご注意ください。
はじめに
こんばんは。モバイルアプリサービス部の平屋です。
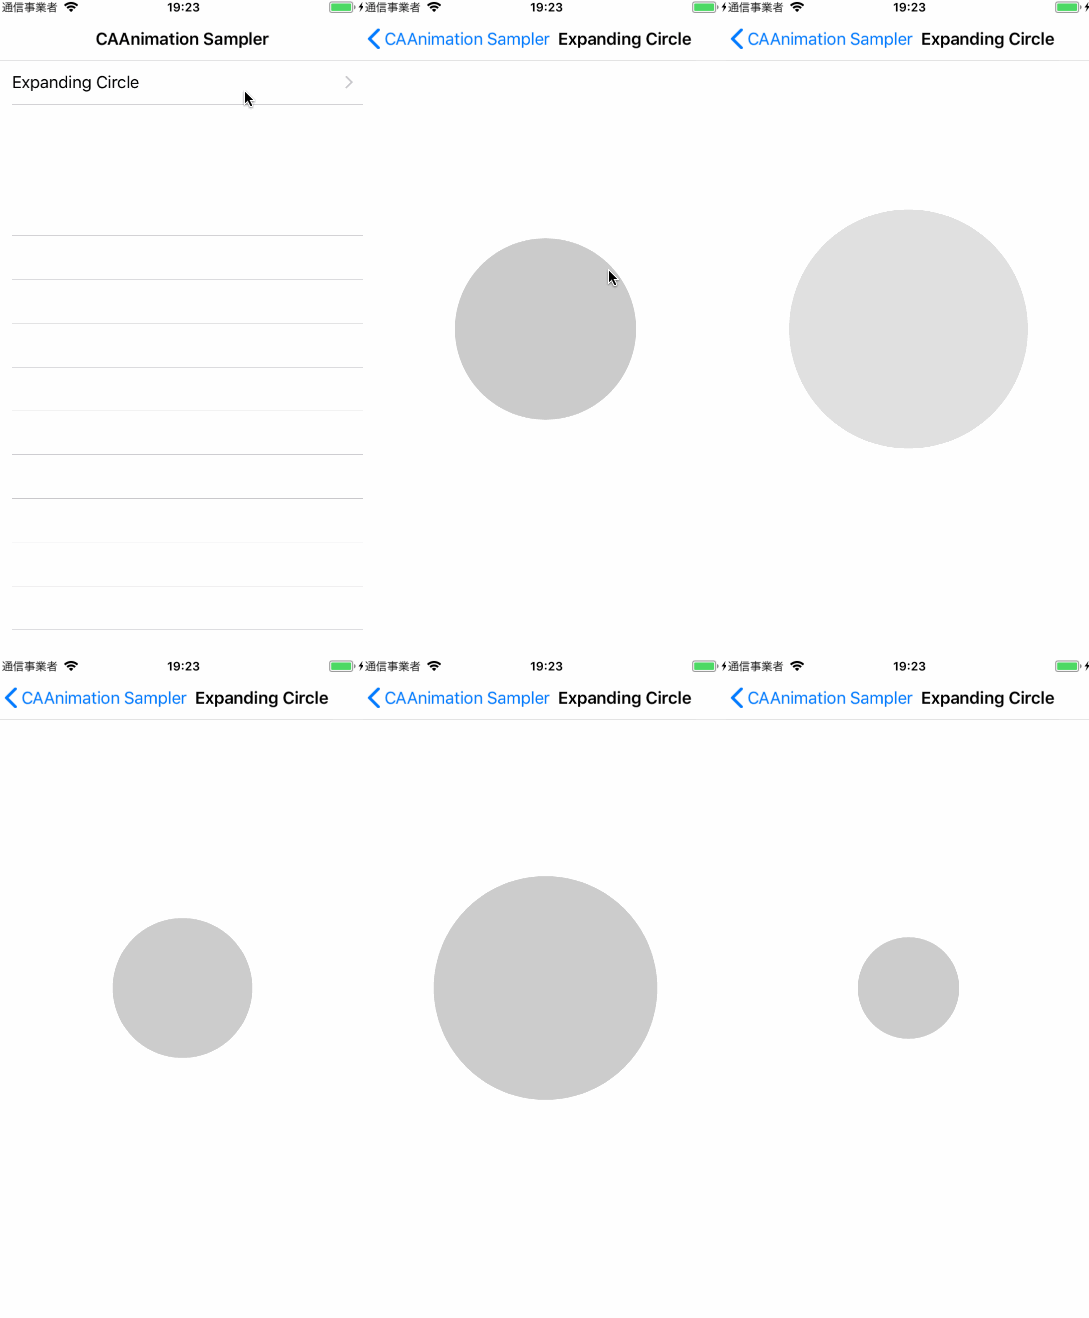
本記事では、CoreAnimationとUIBezierPathを使用して円が拡大するアニメーションを実装する方法を紹介します。
以下のスクリーンショットが実装結果です。

検証環境
本記事は以下の環境で検証を行っています。
- macOS Sierra 10.13.2
- Xcode Version 9.2 (9C40b)
実装
さっそく実装を紹介していきます。
CAShapeLayerを作成
アニメーション描画用のCAShapeLayerを作成し、ビューのレイヤーに追加します。
class ExpandingCircleView: UIView {

    var circleLayer: CAShapeLayer!

    override func awakeFromNib() {
        super.awakeFromNib()

        circleLayer = CAShapeLayer()
        circleLayer.frame = bounds
        circleLayer.fillColor = UIColor.black.withAlphaComponent(0.2).cgColor
        circleLayer.needsDisplayOnBoundsChange = true
        layer.addSublayer(circleLayer)
    }

    func animate() {
        // ...
    }
}
アニメーションの作成と適用
(1) アニメーション開始/終了時のパスを作成
アニメーション開始時のパスとして、半径100ptの円形のパスを作成し、アニメーションの開始値としてレイヤーに追加します。
また、終了時のパスとして、幅/高さがビューと等しい円形のパスを作成します。
func animate() {
    let startSize = CGSize(width: 100, height: 100)
    let inset = (bounds.width / 2) - (startSize.width / 2)
    let startRect = bounds.insetBy(dx: inset, dy: inset)
    let startPath = UIBezierPath(ovalIn: startRect).cgPath
    circleLayer.path = startPath

    let endPath = UIBezierPath(ovalIn: bounds).cgPath

    // ...
}
(2) パスを変化させるアニメーションを作成
アニメーション対象が「パス」のアニメーションを作成し、終了値/デュレーションなどを設定します。
func animate() {
    // ...

    let pathAnimation = CABasicAnimation(keyPath: "path") // パスを指定
    pathAnimation.toValue = endPath // 終了値
    pathAnimation.duration = 2 // アニメーション時間
    pathAnimation.fillMode = kCAFillModeForwards // アニメーション終了地点にフレームを残す
    pathAnimation.isRemovedOnCompletion = false // アニメーション終了後にフレームを残す

    // ...
}
(3) フェードアウトさせるアニメーションを作成
アニメーション対象が「不透明度」のアニメーションを作成し、開始値/終了値/デュレーションなどを設定します。
func animate() {
    // ...

    let fadeOutAnimation = CABasicAnimation(keyPath: "opacity") // 不透明度を指定
    fadeOutAnimation.fromValue = 1 // 開始値
    fadeOutAnimation.toValue   = 0 // 終了値
    fadeOutAnimation.duration  = 1 // アニメーション時間
    fadeOutAnimation.beginTime = 2 // 開始時間

    // ...
}
(4) 2つのアニメーションをグルーピング
(2)と(3)で作成したアニメーションをグルーピングし、デュレーション/繰り返し回数などを設定します。
そして、グループをレイヤーに追加します。
func animate() {
    // ...

    let animationGroup = CAAnimationGroup()
    animationGroup.duration = pathAnimation.duration + fadeOutAnimation.duration  // アニメーション時間
    animationGroup.repeatCount = .infinity // リピート回数:無限
    animationGroup.animations = [pathAnimation, fadeOutAnimation]

    circleLayer.add(animationGroup,
                    forKey: nil)
}
さいごに
本記事では、CoreAnimationとUIBezierPathを使用して円が拡大するアニメーションを実装する方法を紹介しました。
サンプルコードは以下のリポジトリで公開してます。
参考資料
- Core Animation | Apple Developer Documentation
- Core Animationプログラミングガイド (TP40004514 0.0.0)
- Fun with CAShapeLayer - Animations and Drawing Shapes in Swift | Jameson Quave
- iphone - CALayers didn't get resized on its UIView's bounds change. Why? - Stack Overflow
- iphone - CABasicAnimation unlimited repeat without HUGE_VALF? - Stack Overflow
- [iOS]CoreAnimationでお手軽にシーケンシャルなアニメーションを実装する - Qiita
- Core Animation 中級編 - Qiita


