GitHub Actions OIDC × Environments で複数 AWS アカウントへのデプロイを 1 つの workflow にまとめてみた

GitHub Actions の OIDC で複数 AWS アカウントにデプロイする workflow を、GitHub Environments でまとめてみました。
prod / stg のように AWS アカウントが分かれている構成では、GitHub Actions 側で IAM Role の ARN をどう切り替えるかが論点になります。今回は GitHub Environments の Environment-scoped Variables に ARN を持たせて workflow を1本にまとめ、各アカウントの Trust Policy では sub claim を environment 単位に制限しました。Environment の取り違えがあっても、別アカウントの IAM Role は OIDC 認証で弾かれます。
やりたいこと
1つの deploy.yml から workflow_dispatch の入力で prod / stg を選び、対応する AWS アカウントの IAM Role を AssumeRole します。
ポイントは次の2つです。
- GitHub 側: Environment-scoped Variables に IAM Role ARN を持たせて workflow を1本にまとめる
- AWS 側: 各アカウントの Trust Policy で environment・ブランチ・リポジトリを condition で絞り、別環境や別ブランチの OIDC token では AssumeRole できない状態にする
workflow YAML
検証用に以下のworkflowファイルを用意しました。
name: deploy

on:
  workflow_dispatch:
    inputs:
      environment:
        type: choice
        options:
          - prod
          - stg

jobs:
  deploy:
    runs-on: ubuntu-latest
    environment: ${{ inputs.environment }}
    permissions:
      id-token: write
      contents: read
    steps:
      - uses: actions/checkout@v6
      - uses: aws-actions/configure-aws-credentials@v6
        with:
          role-to-assume: ${{ vars.AWS_ROLE_ARN }}
          aws-region: ap-northeast-1
      - run: aws sts get-caller-identity
environment: ${{ inputs.environment }} で Environment を切り替え、ARN は vars.AWS_ROLE_ARN で参照します。Environment ごとに値が変わるので、workflow 側では同じ式を書くだけで済みます。
実際に environment=prod と environment=stg で実行すると、aws sts get-caller-identity の出力が切り替わります。
// environment=prod の出力
{
  "Account": "111111111111",
  "Arn": "arn:aws:sts::111111111111:assumed-role/GHADeployRole/GitHubActions"
}

// environment=stg の出力
{
  "Account": "222222222222",
  "Arn": "arn:aws:sts::222222222222:assumed-role/GHADeployRole/GitHubActions"
}
GitHub 側の設定
Environments を作る
Settings → Environments → New environment で prod と stg を作成します。
Environment ごとに Variables を入れる
各 Environment の Environment variables に AWS_ROLE_ARN を登録します。
| Environment | Variable 名 | 値 |
|---|---|---|
prod |
AWS_ROLE_ARN |
arn:aws:iam::111111111111:role/GHADeployRole |
stg |
AWS_ROLE_ARN |
arn:aws:iam::222222222222:role/GHADeployRole |
ARN は秘匿情報ではないので Secrets ではなく Variables で十分です。Secrets にすると GitHub Actions のジョブログ側で *** に置き換わります。CloudTrail のイベントと突き合わせて切り分けたいときに、GHA ログから ARN を直接読めない方が面倒なので Variables にしておくのが楽です。
Deployment branches and tags
Settings → Environments → <env> → Deployment branches and tags で許可ブランチを設定します。
prod:mainのみstg:mainとfeature/*
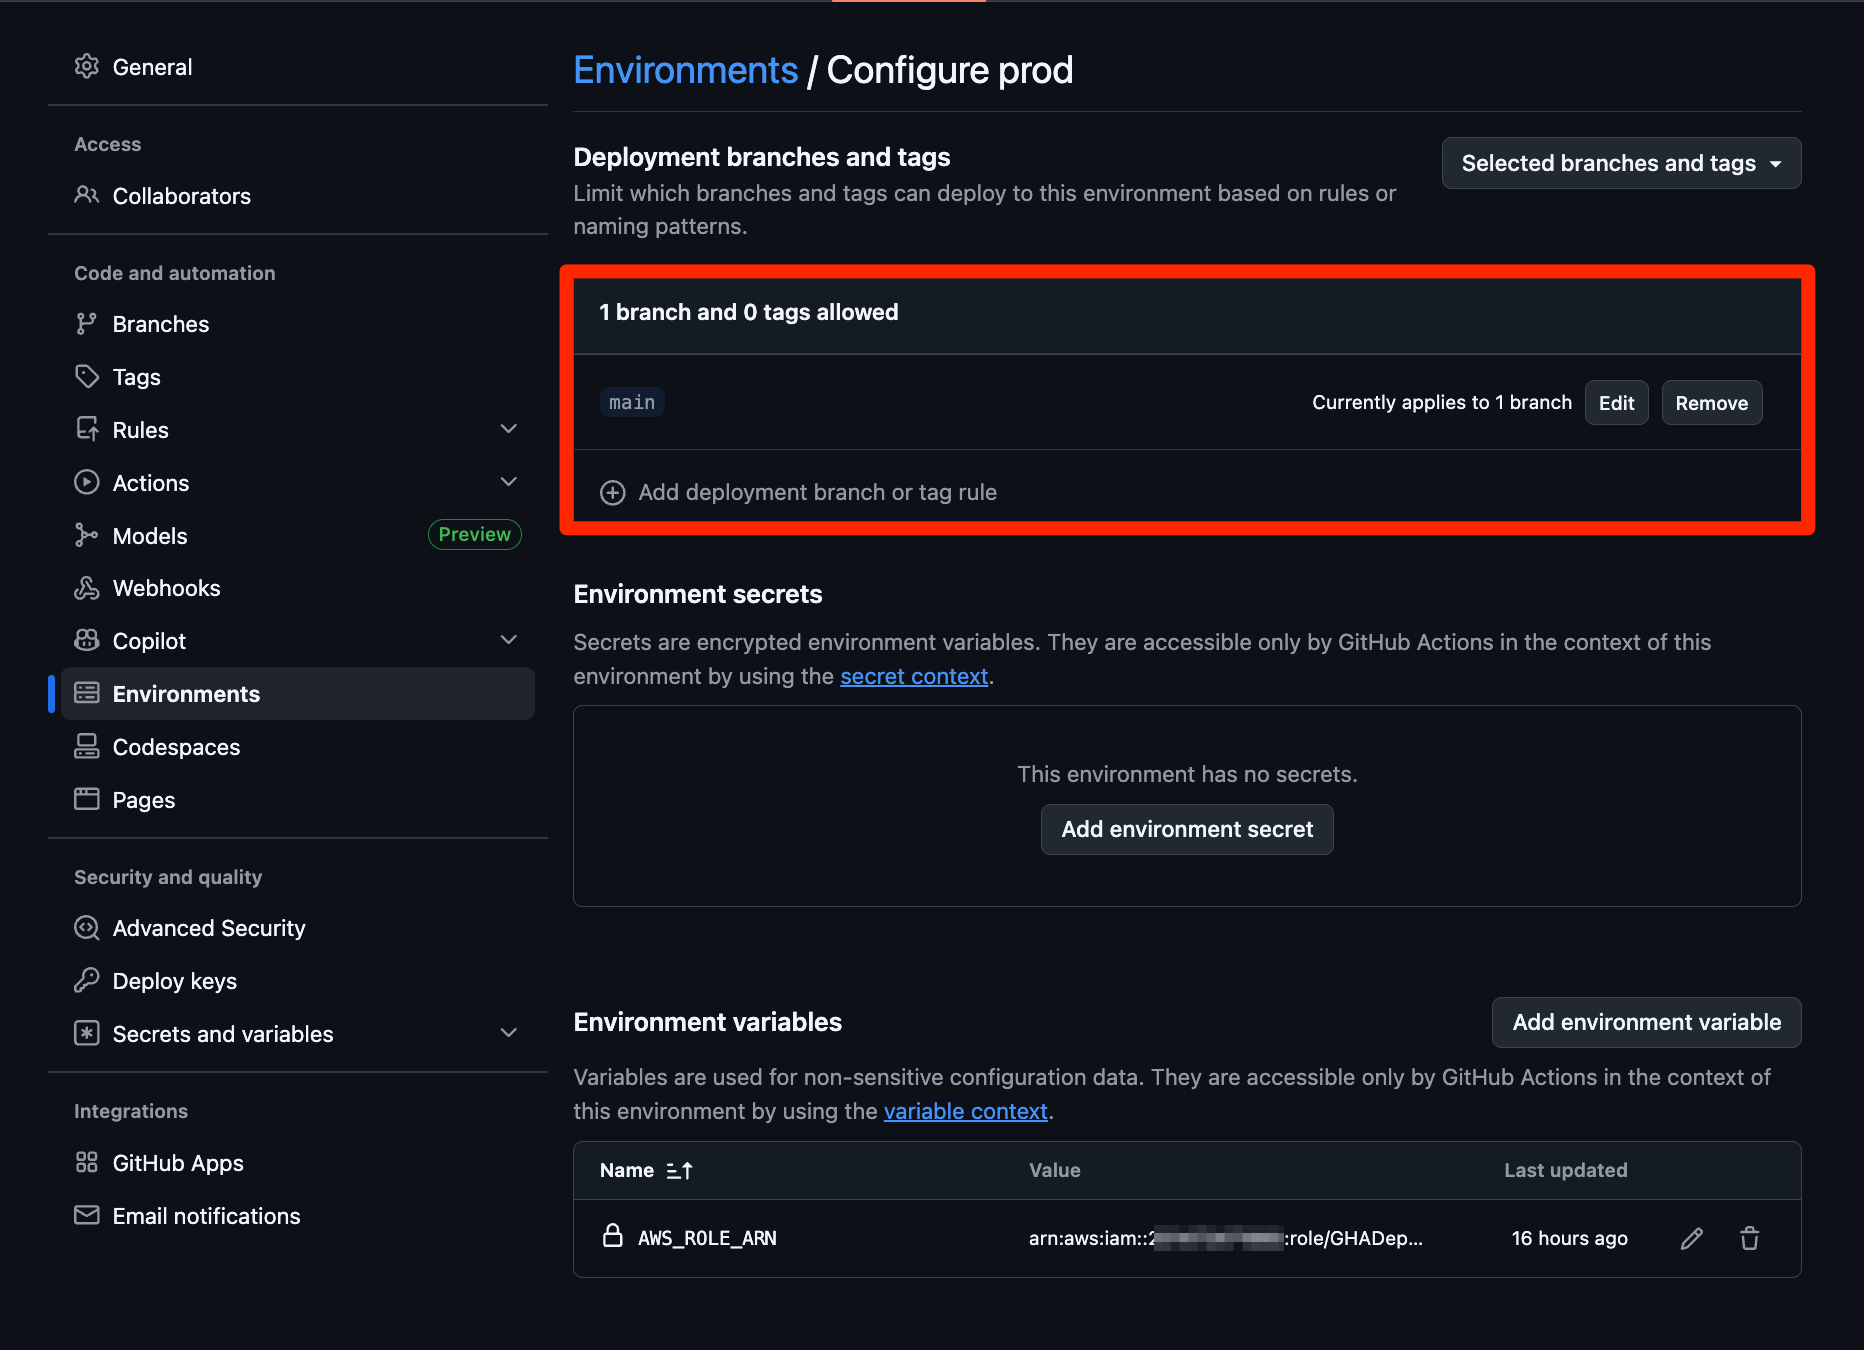
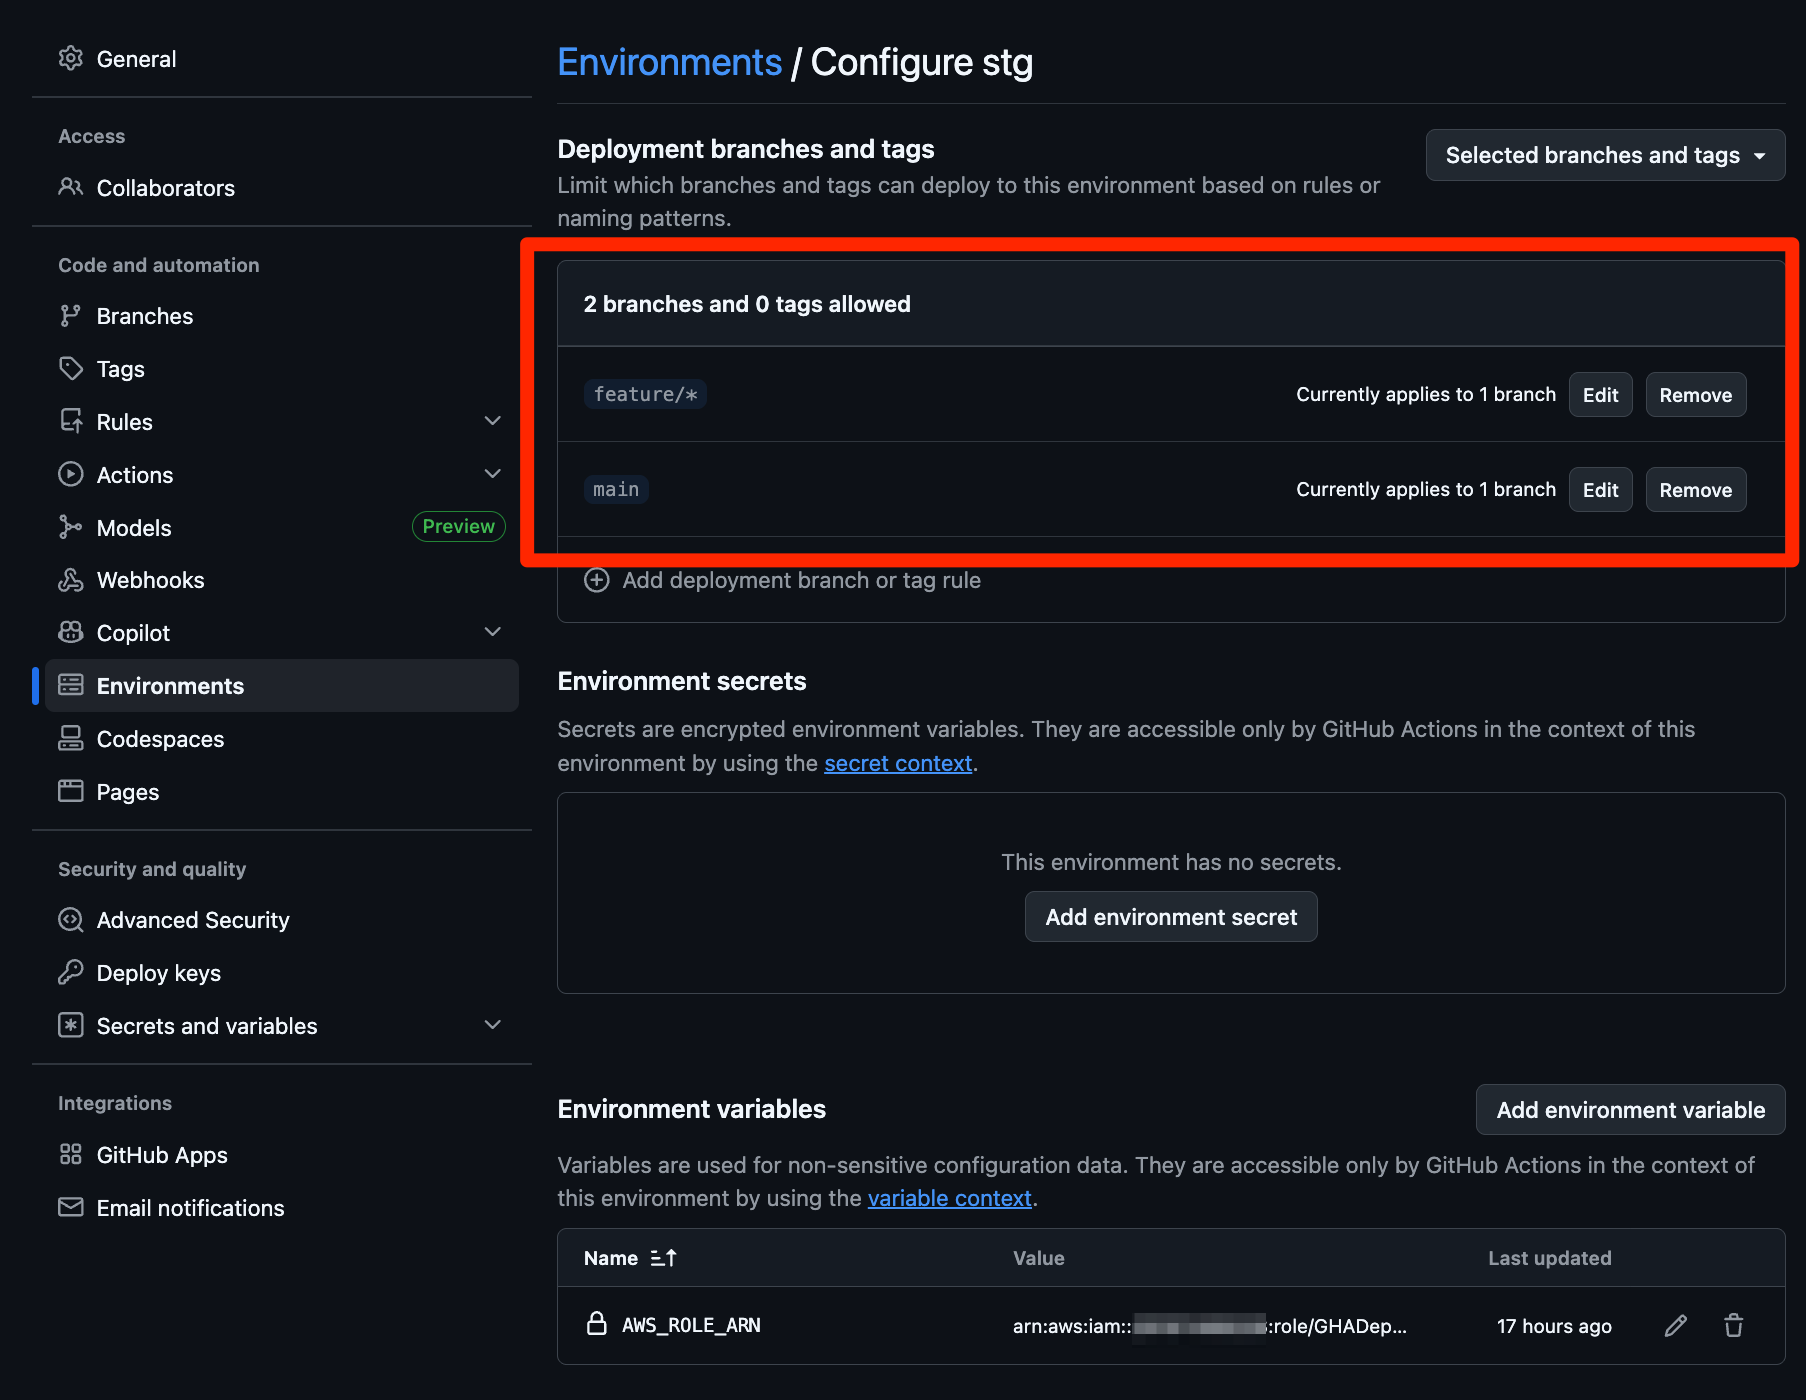
ここで設定したブランチ制御は GitHub 側でジョブ起動前にブロックする層です。AWS 側でも Trust Policy の condition で ref 等を制限できるので、両方書いて二重防御にしておくのがおすすめです(後述の「ブランチ単位でも制限する」節で詳しく説明します)。
AWS 側の設定(Terraform)
各 AWS アカウントに必要なのは次の2つです。
- OIDC Provider(
token.actions.githubusercontent.com) - IAM Role(Trust Policy の sub claim を
repo:OWNER/REPO:environment:NAMEで制限する)
ここでは1ルート構成 + partial backend config + env ごとの tfvars で同じコードを使い回します。
ディレクトリ構成
.
├── versions.tf
├── main.tf
├── variables.tf
├── outputs.tf
├── terraform.tfvars
└── envs/
    ├── prod.tfbackend
    ├── prod.tfvars
    ├── stg.tfbackend
    └── stg.tfvars
versions.tf
backend は空宣言(partial config)にして、path は init 時に注入します。
terraform {
  required_version = ">= 1.6"

  backend "local" {}

  required_providers {
    aws = {
      source  = "hashicorp/aws"
      version = "~> 5.0"
    }
  }
}
main.tf
OIDC Provider は data source で参照します。GitHub Actions 用の OIDC Provider はアカウントに1つだけ作る共有リソースとして扱う想定です。sub claim の environment は変数から組み立てます。
provider "aws" {
  region = var.aws_region
}

data "aws_iam_openid_connect_provider" "github" {
  url = "https://token.actions.githubusercontent.com"
}

data "aws_iam_policy_document" "trust" {
  statement {
    effect  = "Allow"
    actions = ["sts:AssumeRoleWithWebIdentity"]

    principals {
      type        = "Federated"
      identifiers = [data.aws_iam_openid_connect_provider.github.arn]
    }

    condition {
      test     = "StringEquals"
      variable = "token.actions.githubusercontent.com:aud"
      values   = ["sts.amazonaws.com"]
    }

    condition {
      test     = "StringEquals"
      variable = "token.actions.githubusercontent.com:sub"
      values   = ["repo:${var.repository}:environment:${var.environment_name}"]
    }
  }
}

resource "aws_iam_role" "github_actions" {
  name               = var.role_name
  assume_role_policy = data.aws_iam_policy_document.trust.json
}
OIDC Provider をまだ作っていないアカウントでは、初回だけ別途作る必要があります。マネジメントコンソールでも作れますし、別の Terraform 設定で1回作って終わり、でも良いです。
variables.tf
variable "environment_name" {
  type = string
}

variable "repository" {
  type = string
}

variable "aws_region" {
  type    = string
  default = "ap-northeast-1"
}

variable "role_name" {
  type    = string
  default = "GHADeployRole"
}
outputs.tf
output "role_arn" {
  value = aws_iam_role.github_actions.arn
}
環境別の backend config
state ファイルのパスを env ごとに分けます。
path = "terraform.prod.tfstate"
path = "terraform.stg.tfstate"
共通の tfvars
repo 固有の値は terraform.tfvars に置きます。terraform.tfvars は自動ロードされるので、apply 時に指定しなくても読み込まれます。
repository = "ORG/REPO"
role_name は env で変わらない想定なので variables.tf の default をそのまま使います。変えたい場合だけ terraform.tfvars 側に追記すれば足ります。
環境別の tfvars
env で値が変わるのは environment_name だけです。
environment_name = "prod"
environment_name = "stg"
apply 手順
env を切り替えるときは terraform init -backend-config=... -reconfigure で backend を入れ替えてから apply します。AWS の認証情報も env ごとに切り替えます(AWS_PROFILE を変えるか、別シェルで作業)。
# prod アカウントの認証情報を有効化(profile や環境変数で)
terraform init -backend-config=envs/prod.tfbackend -reconfigure
terraform apply -var-file=envs/prod.tfvars

# stg アカウントの認証情報に切り替えてから
terraform init -backend-config=envs/stg.tfbackend -reconfigure
terraform apply -var-file=envs/stg.tfvars
作業ディレクトリに terraform.prod.tfstate と terraform.stg.tfstate が並んで作られます。apply 後に出力される role_arn を、対応する GitHub Environment の AWS_ROLE_ARN Variable にコピーすれば完成です。
生成される Trust Policy
参考までに、Terraform が生成する prod アカウントの IAM Role の Trust Policy はこんな形になります。
{
  "Version": "2012-10-17",
  "Statement": [{
    "Effect": "Allow",
    "Principal": {
      "Federated": "arn:aws:iam::111111111111:oidc-provider/token.actions.githubusercontent.com"
    },
    "Action": "sts:AssumeRoleWithWebIdentity",
    "Condition": {
      "StringEquals": {
        "token.actions.githubusercontent.com:aud": "sts.amazonaws.com",
        "token.actions.githubusercontent.com:sub": "repo:ORG/REPO:environment:prod"
      }
    }
  }]
}
stg アカウントの IAM Role は sub が repo:ORG/REPO:environment:stg になります。
これで「prod アカウントの Role は prod Environment の OIDC token しか受け付けない」状態になります。Environment の取り違えで別アカウントの Role を叩こうとしても OIDC 認証で弾かれます。
実際に試したところ、prod の Variable AWS_ROLE_ARN を stg のロール ARN に差し替えて environment=prod で実行すると Could not assume role with OIDC: Not authorized to perform sts:AssumeRoleWithWebIdentity で失敗しました。stg アカウントの CloudTrail にも errorCode: AccessDenied のイベントが残ります。後述の「検証時に役立つツール」節で具体例を載せます。
ここまでは sub claim 1 つだけの最小形です。ブランチや repository でも制限したい場合は、後述の「ブランチ単位でも制限する」節で condition を足す例を載せます。
sub claim の挙動
GitHub 公式ドキュメントには次のように書かれています。
If you use a workflow with an environment, the
subfield must reference the environment name:
repo:ORG-NAME/REPO-NAME:environment:ENVIRONMENT-NAME
引用元: Configuring OpenID Connect in Amazon Web Services - Configuring the role and trust policy
environment: を指定すると sub claim は ref 形式から environment 形式に切り替わります。両方は入らない仕様です。
ブランチ単位でも制限する(Trust Policy と Deployment branches の二重防御)
Environment 単位で sub を絞れば AWS アカウントの取り違えは防げますが、それだけだと「同じ Environment の中で別ブランチから OIDC token が発行されたケース」は素通りします。ブランチも縛りたい場合、AWS 側と GitHub 側の両方で防御層を作れます。
AWS IAM 側で ref や repository を condition に書く
AWS は 2026-01 のアップデートで、Trust Policy の Condition に GitHub OIDC のプロバイダー固有 claim を書けるようにしました。それまでは aud / sub / email / oaud / amr の5つしか評価対象でなかったところに、下記の claim が加わっています。
| AWS STS condition key | 対応する JWT claim |
|---|---|
token.actions.githubusercontent.com:actor |
actor |
token.actions.githubusercontent.com:actor_id |
actor_id |
token.actions.githubusercontent.com:job_workflow_ref |
job_workflow_ref |
token.actions.githubusercontent.com:repository |
repository |
token.actions.githubusercontent.com:repository_id |
repository_id |
token.actions.githubusercontent.com:workflow |
workflow |
token.actions.githubusercontent.com:ref |
ref |
token.actions.githubusercontent.com:environment |
environment |
token.actions.githubusercontent.com:enterprise_id |
enterprise_id |
参考:
- Available keys for AWS OIDC federation - AWS Identity and Access Management(GitHub タブ)
- AWS STS now supports validation of identity provider-specific claims (2026-01)
sub の評価は引き続き必須なので、これらは sub に重ねて condition を増やす形になります。
prod 用 Role の Trust Policy に ref と repository を重ねるとこうなります。
{
  "Version": "2012-10-17",
  "Statement": [{
    "Effect": "Allow",
    "Principal": {
      "Federated": "arn:aws:iam::111111111111:oidc-provider/token.actions.githubusercontent.com"
    },
    "Action": "sts:AssumeRoleWithWebIdentity",
    "Condition": {
      "StringEquals": {
        "token.actions.githubusercontent.com:aud": "sts.amazonaws.com",
        "token.actions.githubusercontent.com:sub": "repo:ORG/REPO:environment:prod",
        "token.actions.githubusercontent.com:repository": "ORG/REPO",
        "token.actions.githubusercontent.com:ref": "refs/heads/main"
      }
    }
  }]
}
これで prod アカウントの Role は「ORG/REPO の main ブランチから、prod Environment を指定して動いたジョブ」しか引き受けません。
実機で :ref の値だけ refs/heads/nonexistent-test-branch に差し替えて、main から environment=stg を実行してみると Not authorized to perform sts:AssumeRoleWithWebIdentity で弾かれます。ref が condition として評価されている裏付けです。
stg 側で feature/* も許可したい場合、StringEquals ではブランチ名のワイルドカードが書けないので StringLike にして配列で渡します。
"StringLike": {
  "token.actions.githubusercontent.com:ref": [
    "refs/heads/main",
    "refs/heads/feature/*"
  ]
}
GitHub の Deployment branches and tags で UI 側でも制限する
Settings → Environments → <env> → Deployment branches and tags でも、どのブランチ・タグからその Environment にデプロイできるかを設定できます。
選べる選択肢は次の3つです。
Selected branches and tags: 個別にブランチ・タグを allowlist 登録Protected branches only: branch protection rules が設定されたブランチのみ許可All branches: 制限なし
例として今回の構成では次のように設定しています。
prodEnvironment →mainのみ許可stgEnvironment →mainとfeature/*を許可
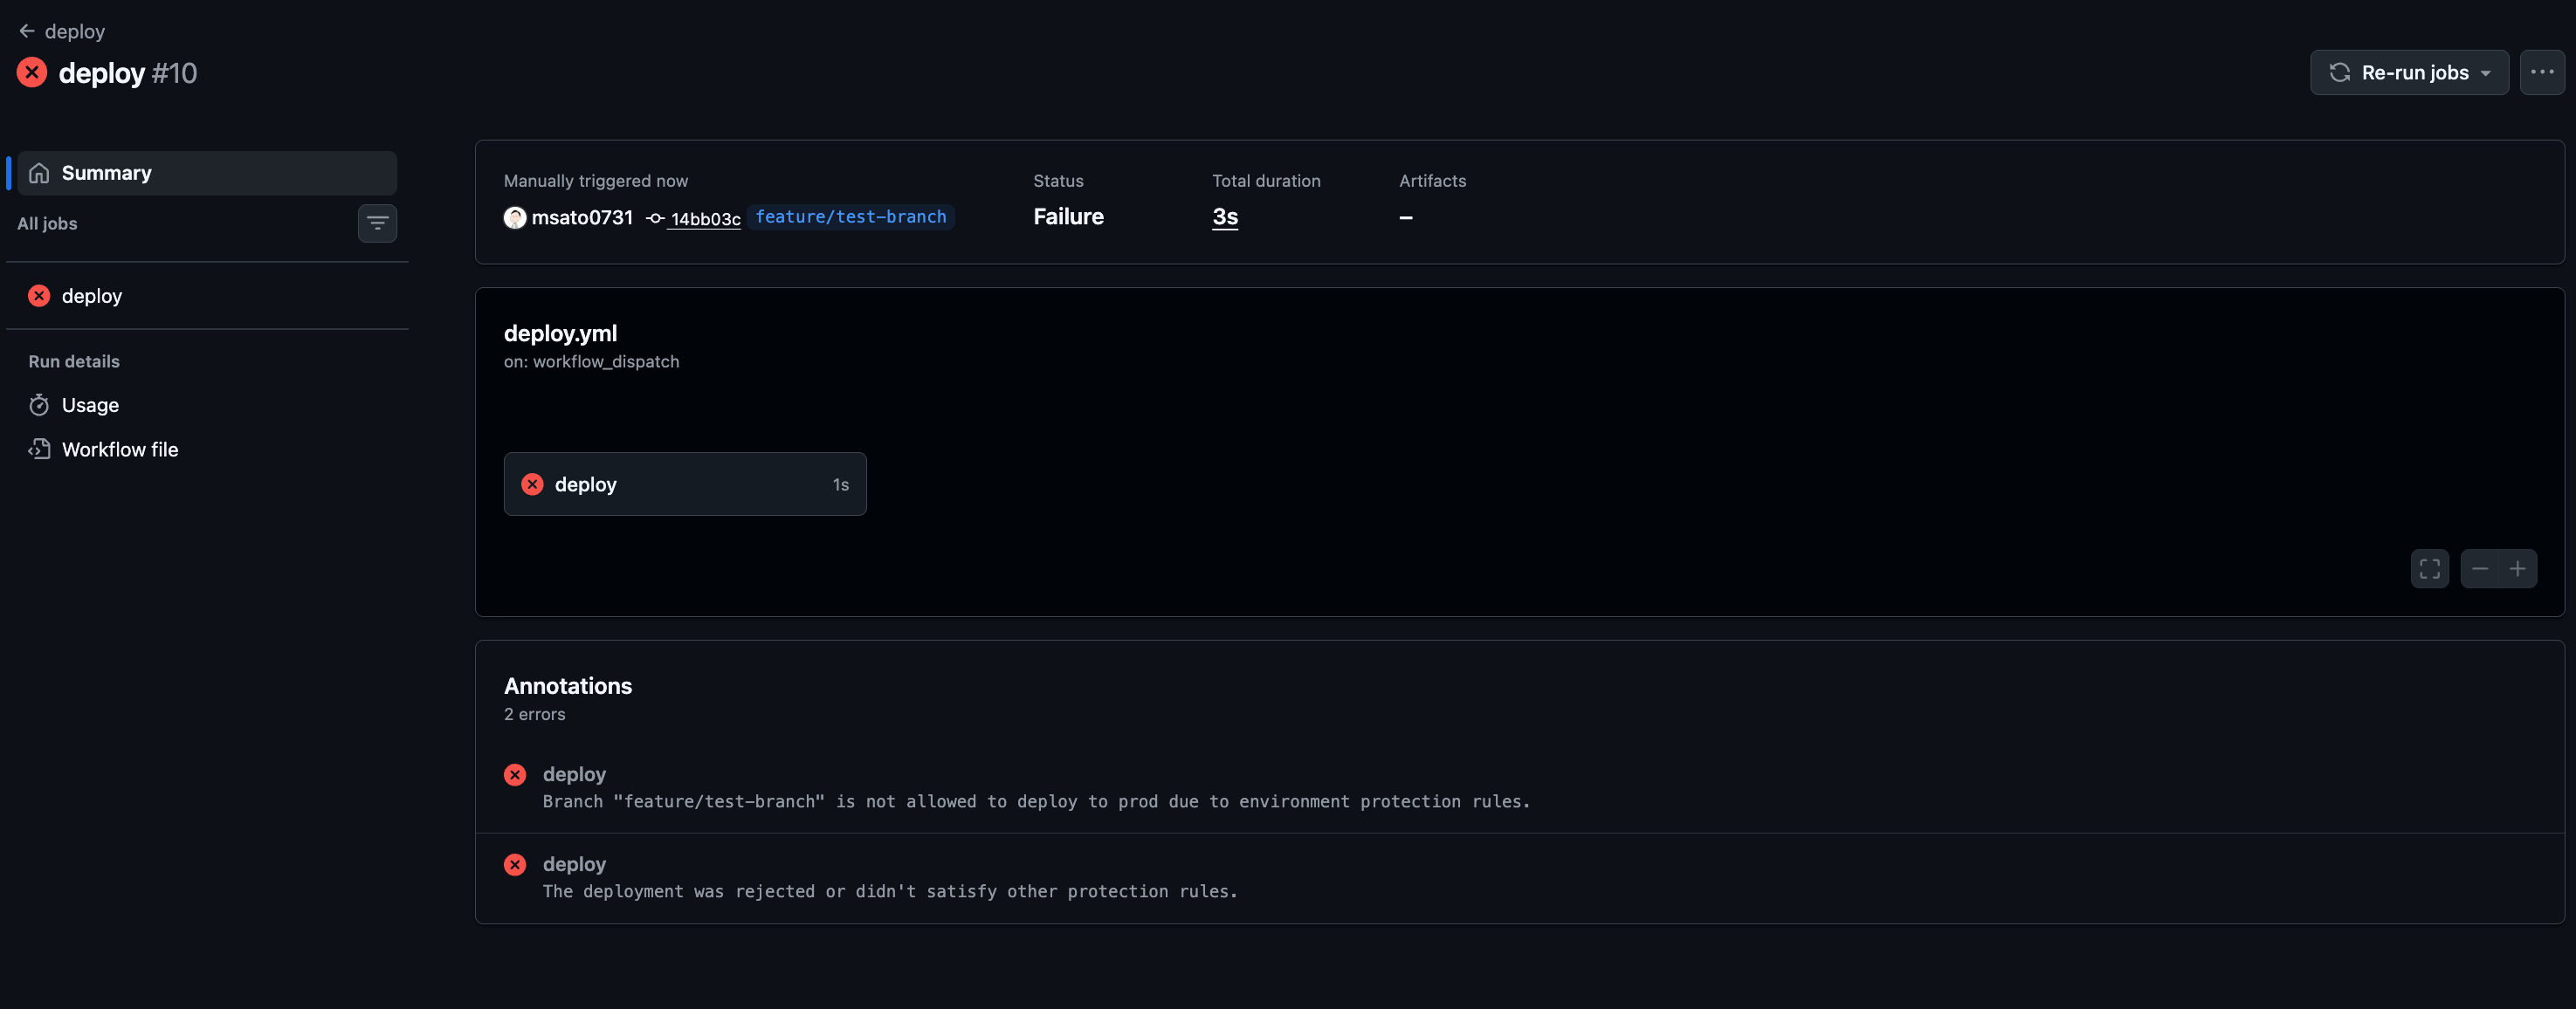
許可外ブランチで Environment を指定したジョブを実行すると、Actions 側でジョブが起動せず数秒で failure 扱いで終わります。実機で feature/test-branch から environment=prod を実行したケースでは、checkout 以降のステップは一切走りませんでした。AWS まで OIDC リクエストが届かないので、Trust Policy 側の condition チェックは発動しません。
二重防御として併用する
Trust Policy と Deployment branches はそれぞれ防御層が違うので、両方書いておくと役割が明確になります。
| 層 | 役割 | 失敗時の挙動 |
|---|---|---|
| Deployment branches and tags(GitHub 側) | 許可外ブランチからのジョブを起動前に弾く | Actions ジョブが起動せずに failure |
| Trust Policy(AWS 側) | OIDC token の中身を最終チェック | AssumeRole で AccessDenied |
検証時に役立つツール
OIDC 連携の動作確認は GitHub 側と AWS 側の両方から取れます。
GitHub Actions のログで OIDC token の claim を確認する
steve-todorov/oidc-debugger-action を workflow に一時的に入れると、Actions のログに JWT を decode した結果(sub / aud / repository / ref など約30個の claim)が JSON で出力されます。
- uses: steve-todorov/oidc-debugger-action@b6d83b24a379e77233fb6b26f1c1a662c4bf443c  # v1.0.2
  with:
    audience: sts.amazonaws.com
実際の出力(抜粋)です。
{
  "sub": "repo:ORG/REPO:environment:prod",
  "aud": "sts.amazonaws.com",
  "environment": "prod",
  "ref": "refs/heads/main",
  "ref_type": "branch",
  "repository": "ORG/REPO",
  "actor": "USERNAME",
  "workflow_ref": "ORG/REPO/.github/workflows/deploy.yml@refs/heads/main"
}
sub claim が repo:ORG/REPO:environment:prod の形になっているか、ここで一発で確認できます。Trust Policy の condition がハマっているときの一次切り分けに便利です。
JWT に含まれている ref / repository / actor などの claim も、AWS IAM Trust Policy 側の condition key として書けば評価されます(前節参照)。Trust Policy の condition を増やすときは、まずここで実値を確認してから書くと安心です。
サードパーティの個人リポジトリ依存になる点は注意してください。使う場合はコミット SHA でピン留めしておくと、後からタグが別の commit に張り替えられても影響を受けません。
AWS 側で実際に渡された claim を確認する
CloudTrail の AssumeRoleWithWebIdentity イベントを開くと、userIdentity フィールドに GitHub から渡された subject が記録されています。requestParameters には roleArn / roleSessionName / durationSeconds のみが入る形式で、subject 自体は userIdentity.userName と userIdentity.principalId の末尾で確認できます。Trust Policy の Condition でブロックされたケースでも、どの subject で来たかを後追いできます。
実際のイベント例です(別環境の token で拒否されたケース)。
{
  "eventName": "AssumeRoleWithWebIdentity",
  "errorCode": "AccessDenied",
  "errorMessage": "An unknown error occurred",
  "userIdentity": {
    "type": "WebIdentityUser",
    "userName": "repo:ORG/REPO:environment:prod",
    "principalId": "arn:aws:iam::222222222222:oidc-provider/token.actions.githubusercontent.com:sts.amazonaws.com:repo:ORG/REPO:environment:prod",
    "identityProvider": "arn:aws:iam::222222222222:oidc-provider/token.actions.githubusercontent.com"
  },
  "requestParameters": {
    "roleArn": "arn:aws:iam::222222222222:role/GHADeployRole",
    "roleSessionName": "GitHubActions",
    "durationSeconds": 3600
  }
}
このケースでは sub が :environment:prod ですが、roleArn は stg アカウントのロール(Trust Policy は :environment:stg を要求)だったため AccessDenied で拒否さています。
おわりに
GitHub Environments を軸に、workflow を1本のまま複数 AWS アカウントへデプロイする構成を試しました。アカウントが増えても workflow を増やす必要がなく、Environment と Trust Policy を1セット足せば追従できます。(今回はFreeプランのPrivateリポジトリで検証しました)
ブランチ単位の制限は AWS IAM 側の 2026-01 のアップデートで Trust Policy にも書けるようになりました。GitHub の Deployment branches and tags と組み合わせて、UI 側で起動前に弾く層と、AWS 側で OIDC token を最終チェックする層を二重で持っておくのが今のおすすめです。