Kiro CLI のサブエージェント機能でリポジトリを自動解析して技術設計書を生成してみた
はじめに
仕様書が存在せず誰もメンテナンスできないレガシーコード。このような課題を抱えるプロジェクトは少なくないと考えられます。
Kiro CLI v1.23.0 でサポートされたサブエージェント機能を用いて、こうしたコードベースのリバースエンジニアリングに挑戦してみました。
CodeGraphMCPServer を使う
ソースコードをグラフ構造として解析する方法はいくつかありますが、 CodeGraphMCPServer は Neo4j などの外部 DB が不要なゼロ構成が特徴です。
インストールと準備
まず、pip でインストールします。
pip install codegraph-mcp
次に、解析対象のリポジトリでインデックスを作成します。
codegraph-mcp index /path/to/your/monolog --full
これにより .codegraph/graph.db が生成され、グラフベースの解析が可能になります。
Kiro の設定
Kiro CLI でカスタムエージェントを作成し、CodeGraphMCPServer と連携させます。
カスタムエージェントの作成
Kiro CLI のカスタムエージェント機能を使って、CodeGraph 専用のエージェントを設定します。
以下をプロジェクト配下の .kiro/agents/codegraph-analyzer.json として保存します。
{
  "name": "codegraph-analyzer",
  "description": "Codebase Intelligence Agent",
  "prompt": "file://./codegraph-analyzer-prompt.md",
  "mcpServers": {
    "codegraph": {
      "command": "codegraph-mcp",
      "args": [
        "serve",
        "--repo",
        "/path/to/your/monolog"
      ]
    }
  },
  "tools": [
    "@codegraph"
  ],
  "toolAliases": {},
  "allowedTools": [
    "@codegraph"
  ],
  "toolsSettings": {},
  "resources": [],
  "hooks": {},
  "includeMcpJson": false,
  "model": null
}
エージェントのプロンプトは JSON 内に含めると扱いづらいので別ファイルで管理しましょう。
エージェントファイルと同じディレクトリに codegraph-analyzer-prompt.md という名前で保存します。
# Codebase Intelligence Agent

## Role

You are a specialized Codebase Intelligence Assistant that navigates and analyzes source code using graph-based relationships from codegraph MCP. Your strength is understanding code structure, dependencies, and execution flows beyond simple text search.

## Core Strategy

Think in graphs, not just files. Always consider:
- Entity relationships (calls, implements, depends on)
- Execution flow (caller → callee chains)
- Architectural patterns (modules, layers, interfaces)

## Analysis Approach

### Initial Discovery
1. Broad understanding first: Use `query_codebase` or `global_search` to locate relevant entities
2. Structural context: Check `get_file_structure` to understand component organization
3. Track entity IDs: Persist entity_ids from search results for follow-up graph queries

### Deep Analysis
- Tracing flows: Use `find_callees` recursively for downstream impact; `find_callers` for usage analysis
- Finding implementations: Use `find_implementations` for interface/abstract class realizations
- Dependency mapping: Use `find_dependencies` to understand what an entity relies on
- Code verification: Use `get_code_snippet` with context to examine actual logic

### When to use what
- `global_search`: Broad concept search across entire codebase
- `local_search`: Explore neighborhood of a known entity
- `analyze_module_structure`: Understand internal file organization
- `suggest_refactoring`: Identify improvement opportunities after analysis
- `execute_shell_command`: Supplementary tasks only (grep, ls) when graph queries insufficient

## Best Practices

Multi-step reasoning: Don't stop at finding an entity—trace its connections
- Example: Payment endpoint → Service layer → Repository → Database schema

Evidence-based answers: Always cite:
- File paths and line numbers
- Entity IDs for reproducibility
- Relationship types (implements, calls, depends)

Efficiency: Start with targeted graph queries before reading full files
- Avoid: `read_file_content` on every file in a directory
- Prefer: `query_codebase` → identify relevant entities → `get_code_snippet` for specific logic

## Output Format

- Describe relationships clearly: "Class A implements Interface B"
- Include entity_ids when referencing specific code entities
- Provide actionable insights with clear evidence trails

## Example Workflow

User: "Trace the payment processing flow"

Assistant approach:
1. `global_search("payment processing")` → find controller endpoint
2. `find_callees(controller_entity_id)` → identify service methods
3. `find_callees(service_entity_id)` → trace to repository/external APIs
4. `get_code_snippet` on critical points to verify business logic
5. Synthesize into clear flow diagram with evidence
試行錯誤中ですが、アプローチの方法やツールをいつ使うかを具体的に指示することで、アウトプットの安定性が向上する傾向が見られました。
解析プロンプトの作成
次に、メインエージェントに与えるプロンプトを作成します。このプロンプトでは、3 つの独立した視点 (構造・ロジック・実行フロー) からサブエージェントを並列実行させ、その結果を統合して技術設計書を生成します。
プロンプトにもあるように、Sequential Thinking MCP Server も利用しています。
# 依頼事項
リポジトリ解析および、それに基づく高度な技術設計書(Technical Design Document)の作成。

## 実行順序の厳格遵守

1. フェーズ1(並列的自律調査)の完遂が最優先事項です
   - あなたの最初のアクションは、サブエージェント `codegraph-analyzer` への調査依頼である必要があります
2. 全調査結果(Task A, B, C)が出揃うまで、フェーズ2およびフェーズ3を開始しないでください

## フェーズ1: 三角的自律調査

サブエージェント `codegraph-analyzer` に以下3つの独立した調査タスクを依頼してください。

### Task A: 構造的俯瞰
プロジェクトのディレクトリ階層、各モジュールの物理配置、およびシステムの開始点(Entry Points: API, Main, Routes)を特定させる。

### Task B: ロジック・契約・データ解析
以下を特定させる:
- インターフェースの定義と、それに対応する具体的実装
- 主要なデータモデル(Entities, DTOs, Schema)の構造と定義
- モジュール・エンティティ間の依存方向と結合関係

### Task C: 動的実行フロー
以下を追跡させる:
- 主要ユースケースにおける呼び出しフローの追跡
- 外部システム(DB, 外部API, ライブラリ)との接点および通信ロジック
- 核心的なビジネスロジックの具体的処理内容

各タスクの調査結果を個別に受領し、全て揃ってから次フェーズに進んでください。

## フェーズ2: 統合分析

前提条件: フェーズ1で収集された具体的なコード根拠、依存データ、および構造定義が揃っていること。

収集した3つの調査レポートを統合し、以下の分析を実行してください:

1. 整合性チェック
   - Task Aの構造と、Task Cの実際の呼び出しフローに矛盾がないか検証
   - 隠れた依存関係の有無を確認

2. 設計パターンの特定
   - 具象実装やモジュール構成から、採用されているアーキテクチャ(Clean, Hexagonal, Layered等)を断定

3. データ変容の追跡
   - 特定されたデータモデルが、各コンポーネントを通過する際にどのように加工・変換されるかを整理

4. 不足情報の補完
   - 情報が不十分な箇所があれば、具体的な entity_id や検索クエリを指定してサブエージェントに追加調査を依頼

フェーズ2の分析プロセスでは、複雑な推論が必要な場合に限り sequential-thinking を活用してください。

## フェーズ3: 最終出力

客観的な事実に基づき、以下の構成で Markdown 形式の設計書をファイル出力してください。

1. システム概要と設計思想
   - 判明した全体像、アーキテクチャ方針、およびシステムのエントリーポイント

2. モジュール構造図(Mermaid)
   - 物理/論理構成に基づくコンポーネントの関係図

3. 主要コンポーネント・カタログ
   - 各重要コンポーネントの名称、ファイルパス、責務、公開メソッド(シグネチャ、目的、副作用)、および依存関係

4. インターフェースおよび契約定義
   - インターフェースと具象クラスの対応表、および公開契約の定義

5. データモデルとエンティティ
   - システム内で扱われる主要なデータ構造および型の定義

6. クリティカル・シーケンス図(Mermaid)
   - 主要なビジネスロジックの実行フロー(正常系)

7. 依存関係および結合度マップ
   - 内部コンポーネント間の依存の強さと、ハブとなっているモジュールの特定

8. 外部連携仕様
   - 利用している外部ライブラリ、API、ミドルウェアとの接続点と役割

## 出力品質基準

- 具体的な根拠の明示: ファイルパス、entity_id、行番号を必ず記載
- Mermaid図の適切な抽象度: 1つの図に含めるノードは20個程度に抑える
- 客観性の徹底: 現状の正確な記述に徹し、主観的な改善提案やリファクタリング勧告は含めない
- 推測の排除: 不明な点は「不明」と明記し、憶測で補完しない
実行してみる
解析対象として、PHP の定番ロガーである monolog を分析してみます。
プロンプトを流し込むと、サブエージェントが並列実行を始めます。
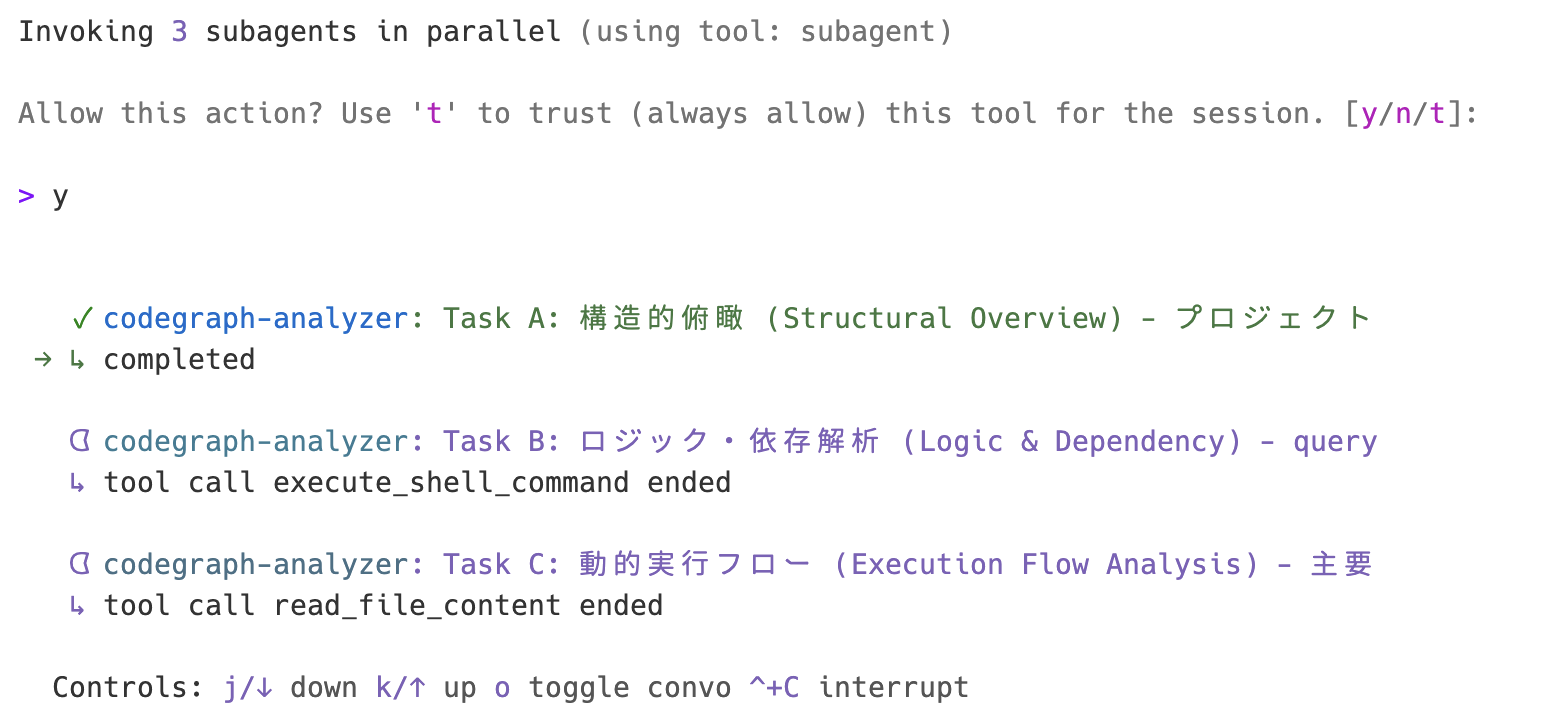
完了すると、フェーズ 2 で sequential-thinking が整合性をチェックします。
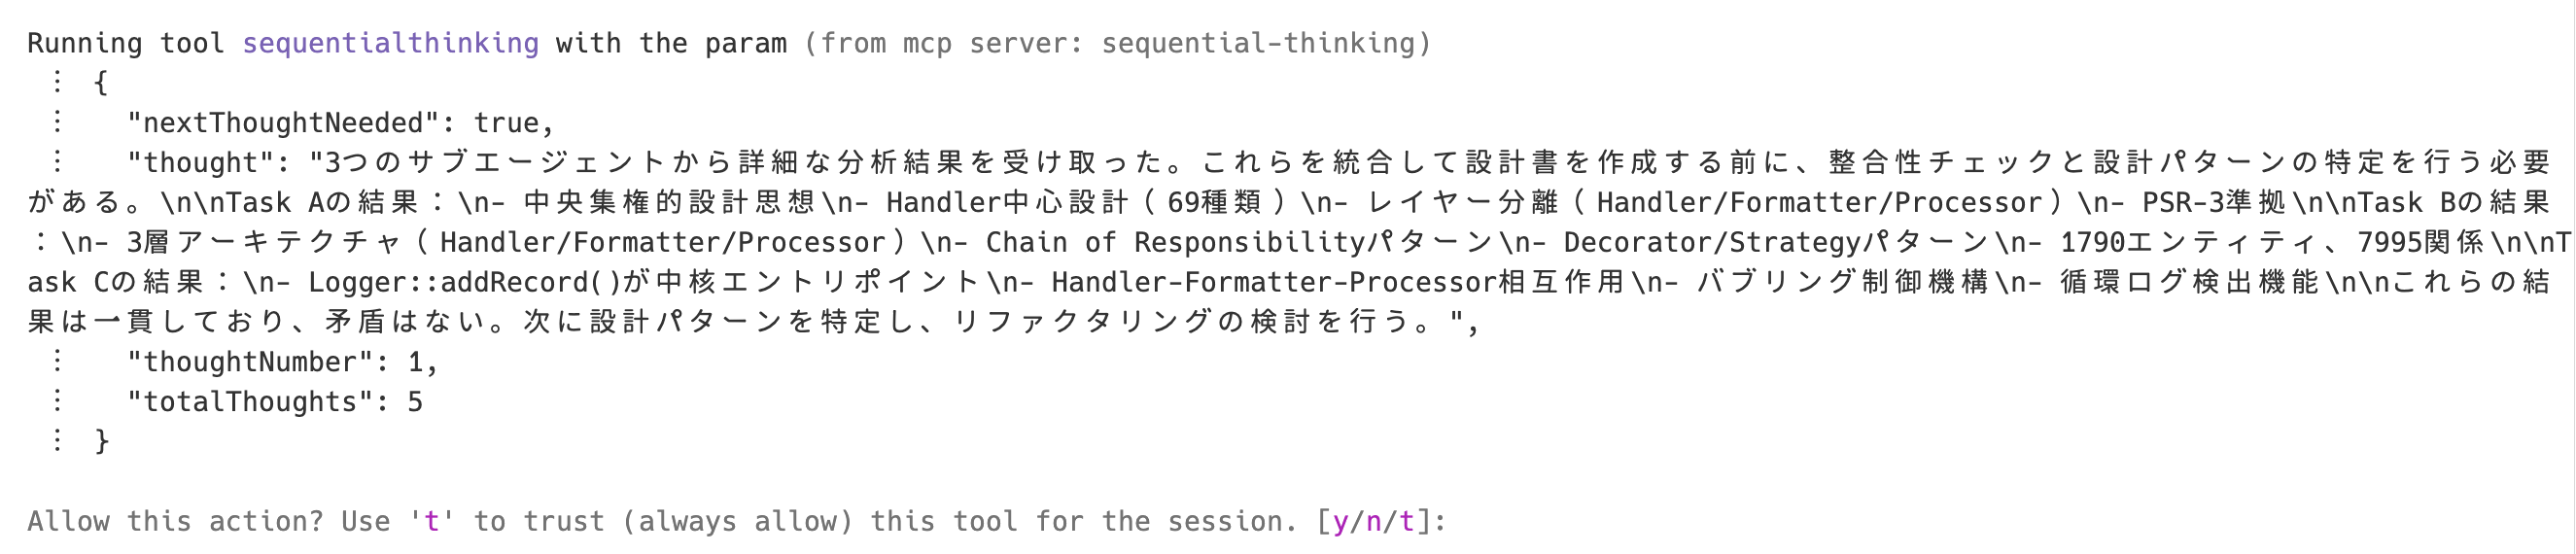
最後にファイルが出力されます。メインコンテキストウインドウの消費クレジットは 1.5 〜 2 くらいで、全体の消費クレジットは 5 くらいでした。
大量にクレジット消費するわけではないですが、枯渇には注意しましょう。
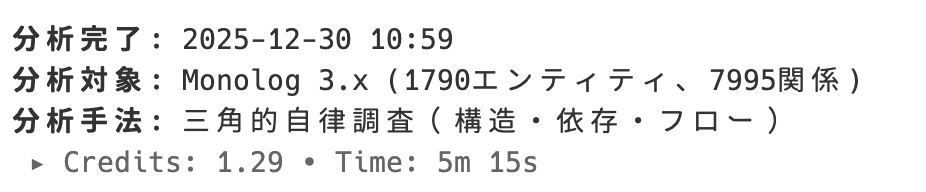
最終的なアウトプットは以下のようなものになっています。
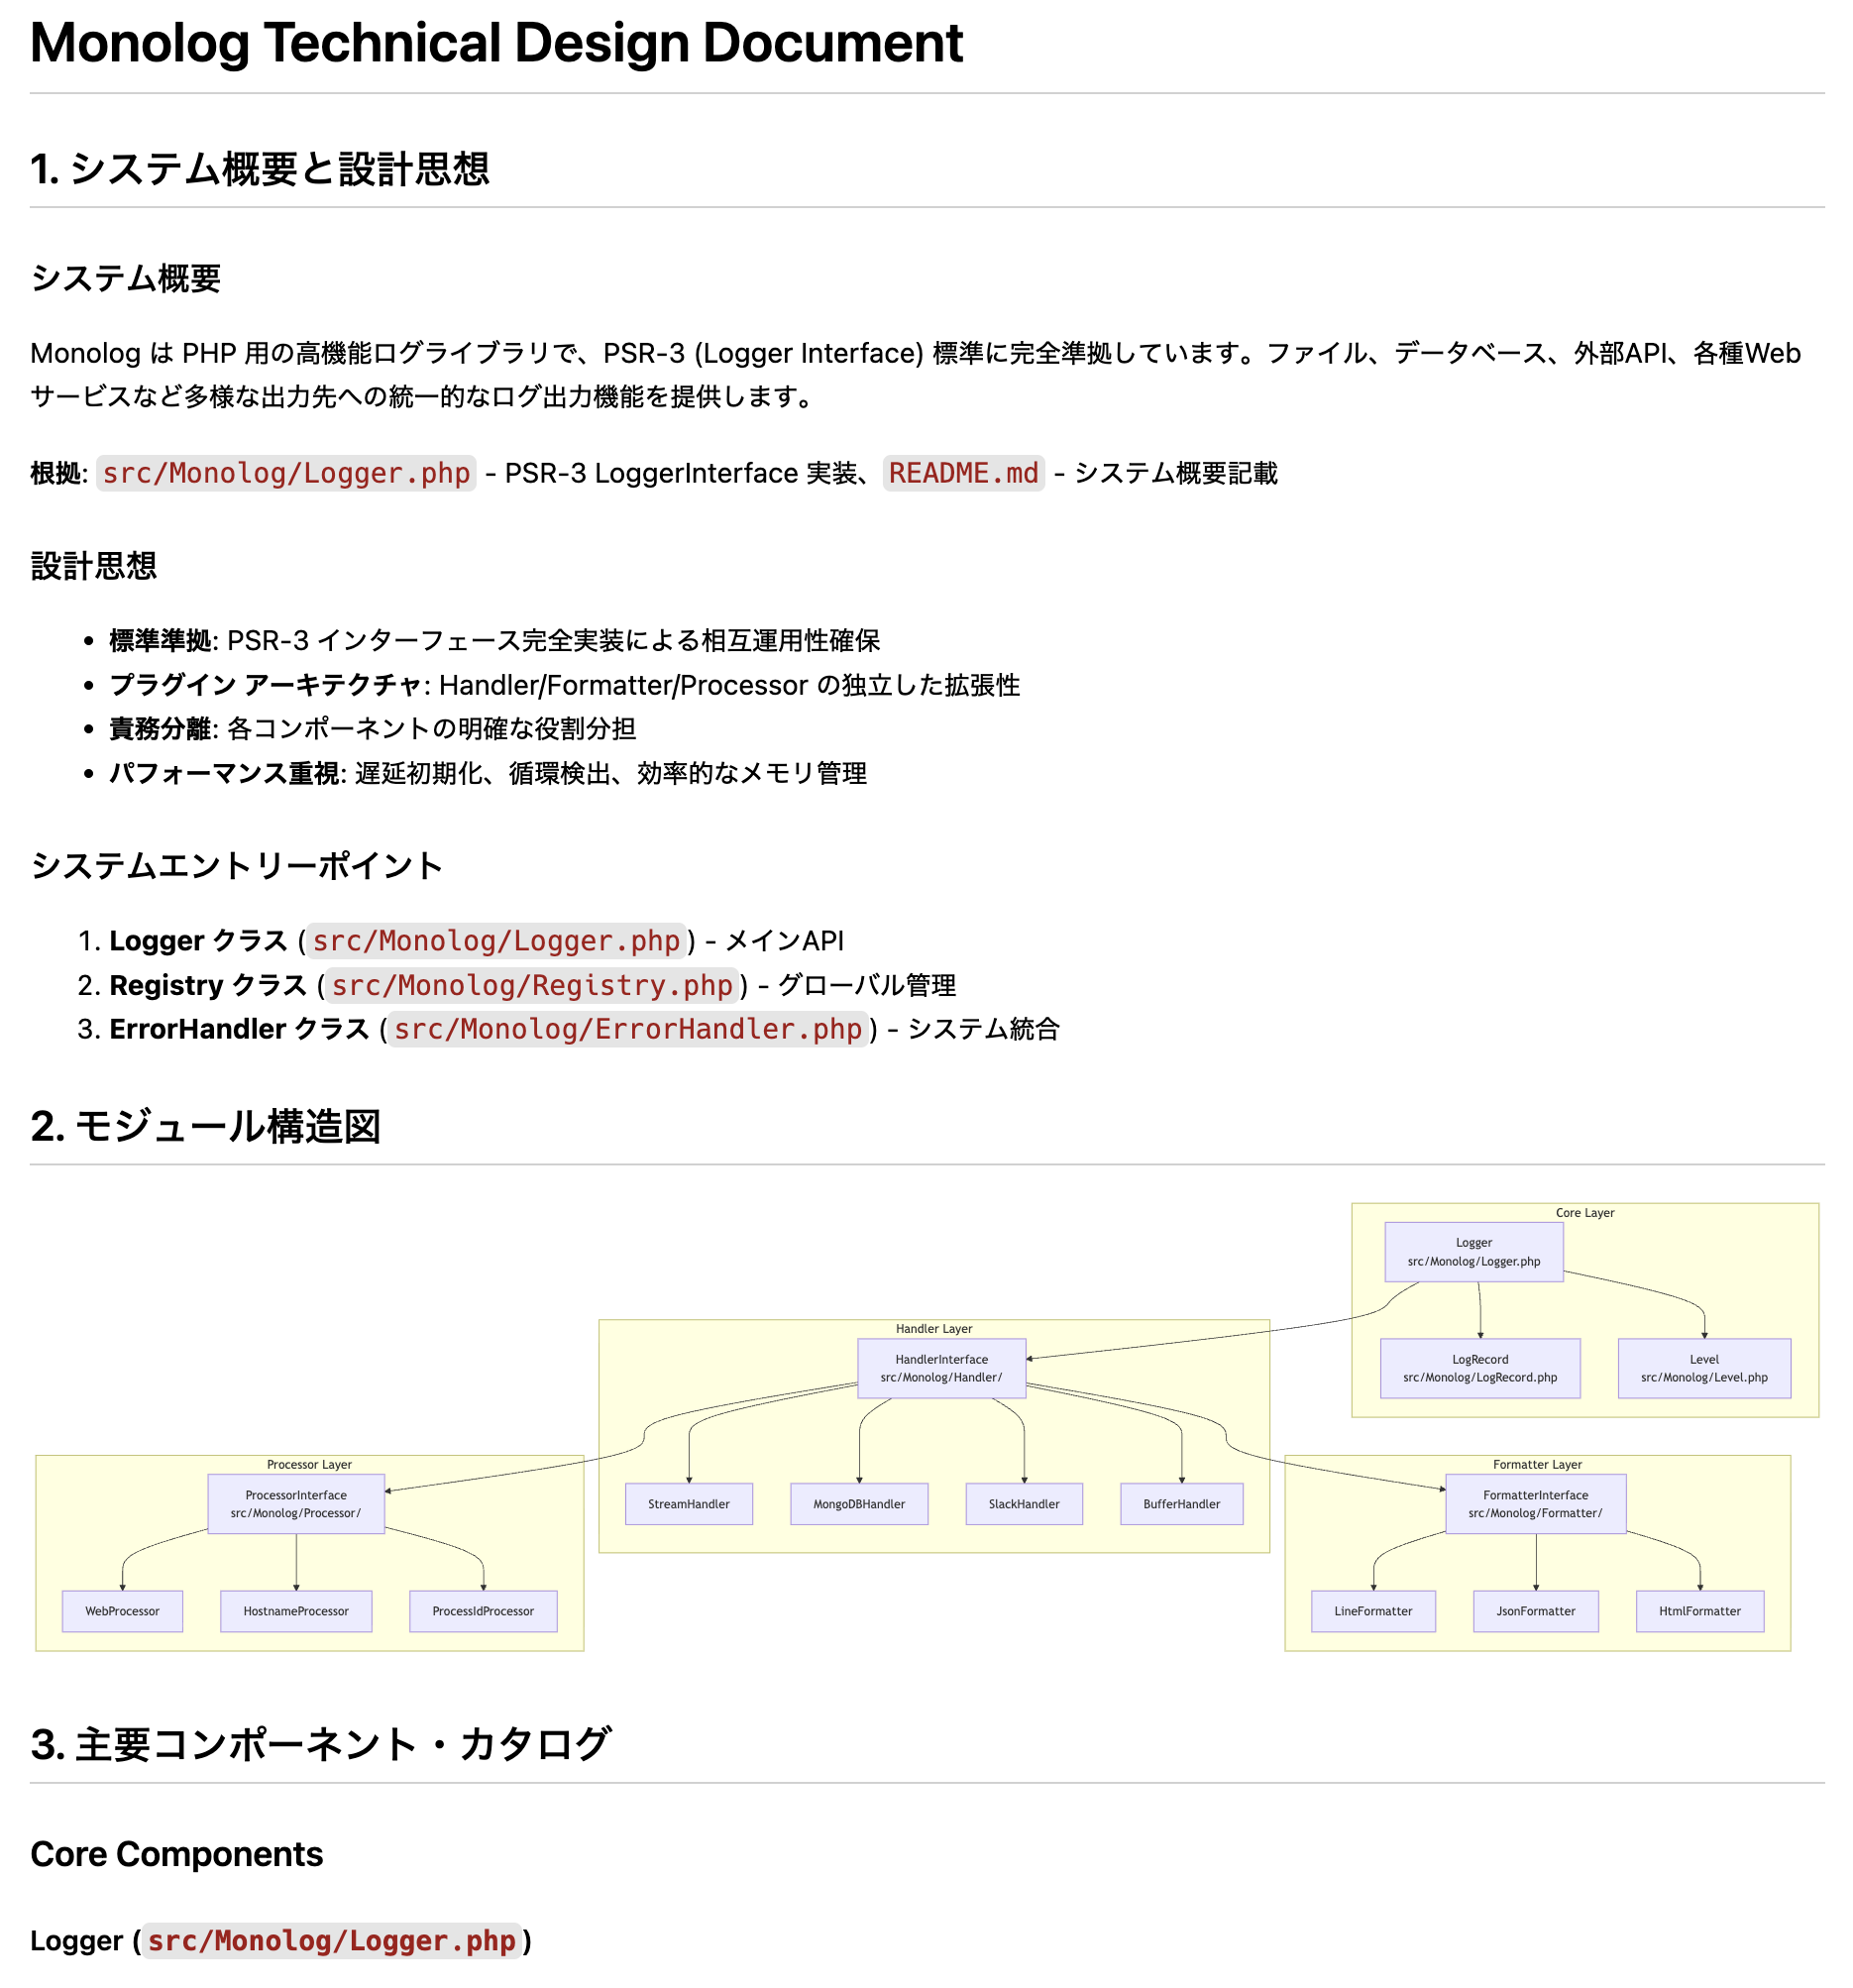
システム概要、モジュール構造図(Mermaid)、主要コンポーネント、依存関係など、実用的な技術設計書が自動生成されました。
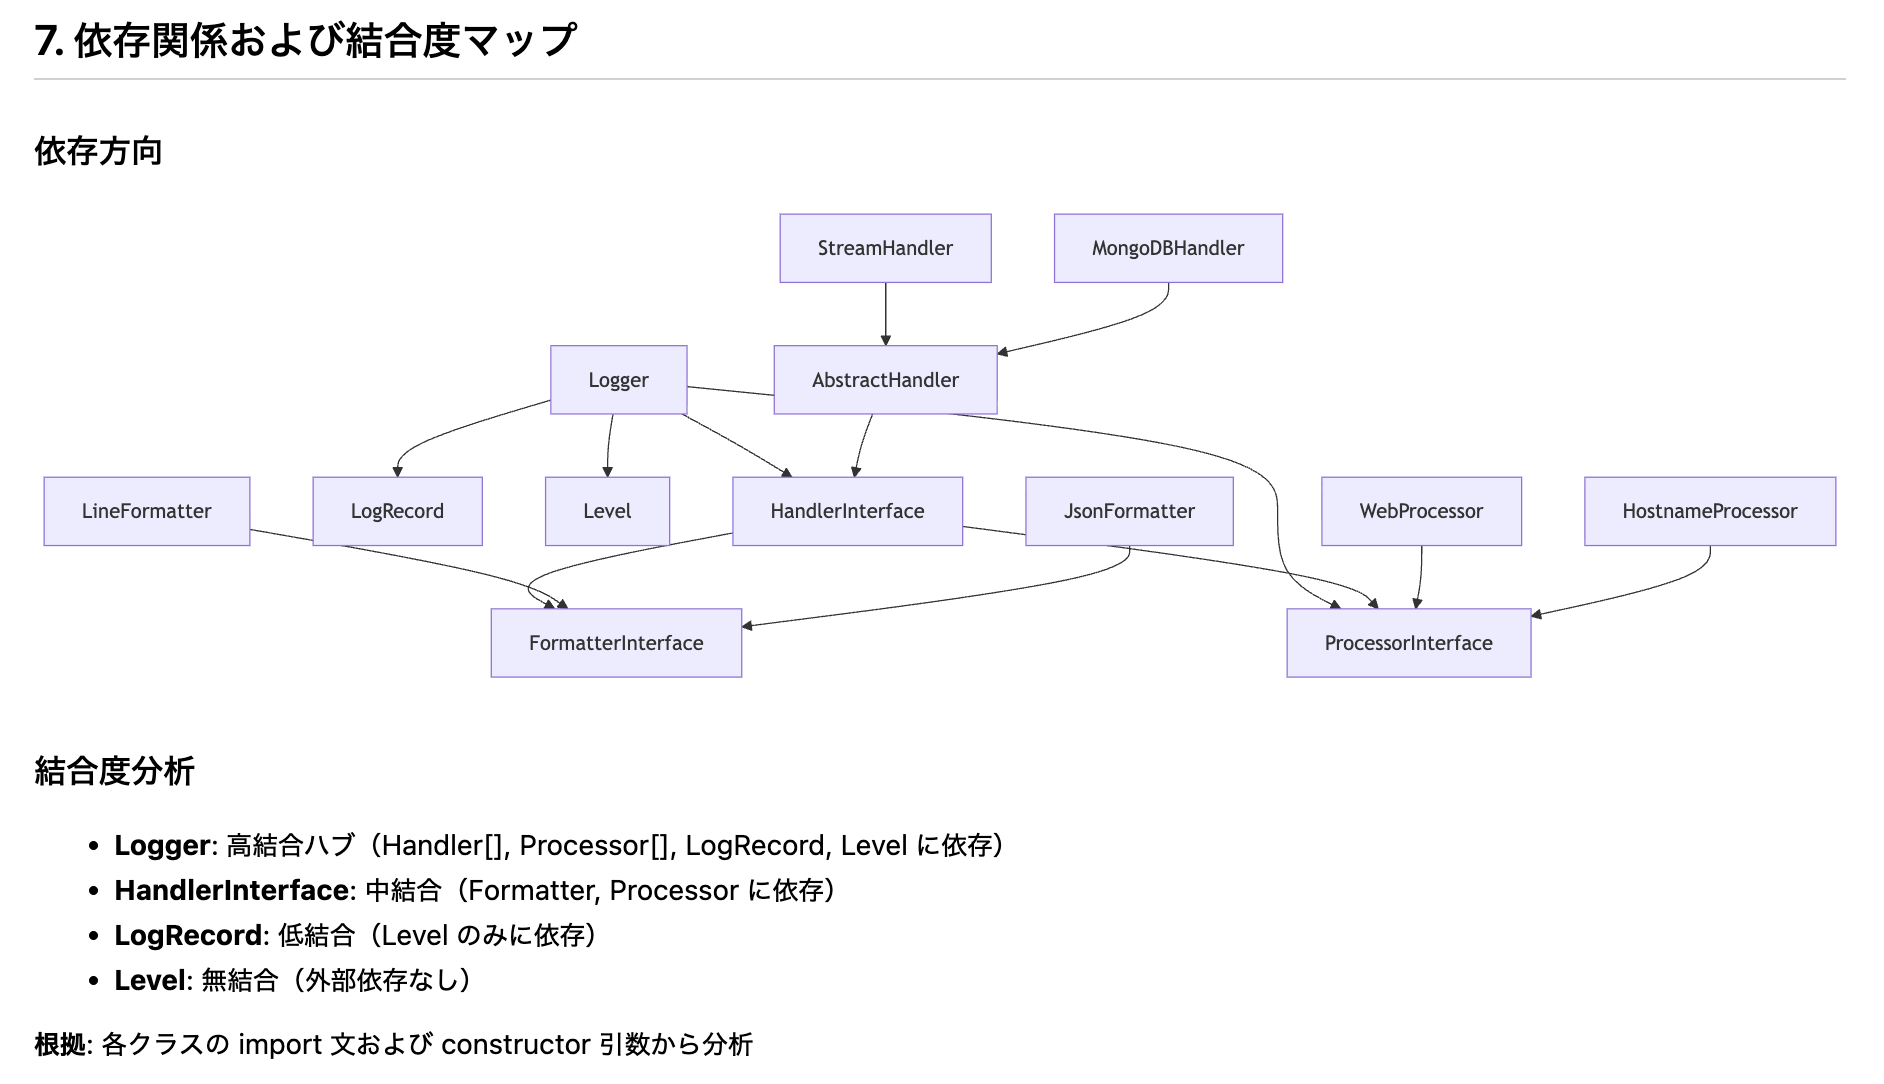
特に、グラフベースで解析しているため、クラス間の依存関係やインターフェース実装の対応関係が抽出されています。
おわりに
CodeGraphMCPServer は tree-sitter で解析するということもあり、以下の言語にも対応しているようです。
- Python
- TypeScript
- JavaScript
- Rust
- Go
- Java
- PHP
- C#
- C
- C++
- HCL
- Ruby
- Kotlin
- Swift
- Scala
- Lua
今回は技術設計書の生成でしたが、以下のような応用の可能性も考えられそうです。
- 影響範囲分析: 特定の関数やクラスを変更した際の影響範囲を
find_callersで追跡 - リファクタリング候補:
suggest_refactoringで技術的負債の特定
この記事が生成 AI を用いたコード解析を検討している方のお役に立てれば幸いです。