MMDetectionで様々な物体検出モデルを動かしてみた
この記事は公開されてから1年以上経過しています。情報が古い可能性がありますので、ご注意ください。
こんにちは。
データアナリティクス事業本部機械学習チームの中村です。
今回は、様々な物体検出モデルを動かすことが可能なMMDetectionというツールボックスをご紹介します。
MMDetectionとは
OpenMMLabプロジェクトが開発する物体検出に特化したツールボックスです。
一般的なモデルから最新モデルまで様々なモデルを使用することができます。
随時最新のモデルが取り込まれていますので、最新の論文動向を抑えたり、
一度ツールボックスに慣れておけば、今後も新しいモデルが出た際に、
同様のAPIであまり改変せずに試してみることなども可能となります。
オープンソースプロジェクトとなっており、ライセンスはApache License 2.0となります。
ツールボックス自体はPyTorchをベースとした作りとなっています。
各検出モデルはコンポーネントに分解されており、
自身で組み合わせてカスタマイズしたモデルを構築することも可能です。
使用可能なモデル
古いモデルでは、Faster R-CNN(NeurIPS'2015)モデルなど、
新しいモデルでは、YOLOX(CVPR'2021)など一通りのモデルを試すことが可能です。
学習済みモデルもダウンロード可能となっており、推論だけであればすぐに使用することが可能です。
以下が対応しているモデル一覧となります。
カスタムデータの学習についても対応しており、その使用方法についても別途記事にしようと思います。
今回は、モデルを取得しデモデータを推論する部分のみ動かしてみます。
今回動かすモデル
- 物体検出
- Faster R-CNN(NeurIPS'2015)
- YOLOX(CVPR'2021)
- DETR(ECCV'2020)
- Instance Segmentation
- Mask R-CNN(ICCV'2017)
- Panoptic Segmentation
- Panoptic FPN(CVPR'2019)
- Mask2Former(ArXiv'2021)
環境準備
Dockerコンテナ環境でJupyterLabを動作させて構築します。
公式のレポジトリから少し修正した以下を使用します。
この記事で動かすコードも以下に配置しています。
実際に動かしてみた
インポートと設定
from mmdet.apis import init_detector, inference_detector, show_result_pyplot
# device = 'cuda:0' # GPUが使える場合はこちら
device = 'cpu'
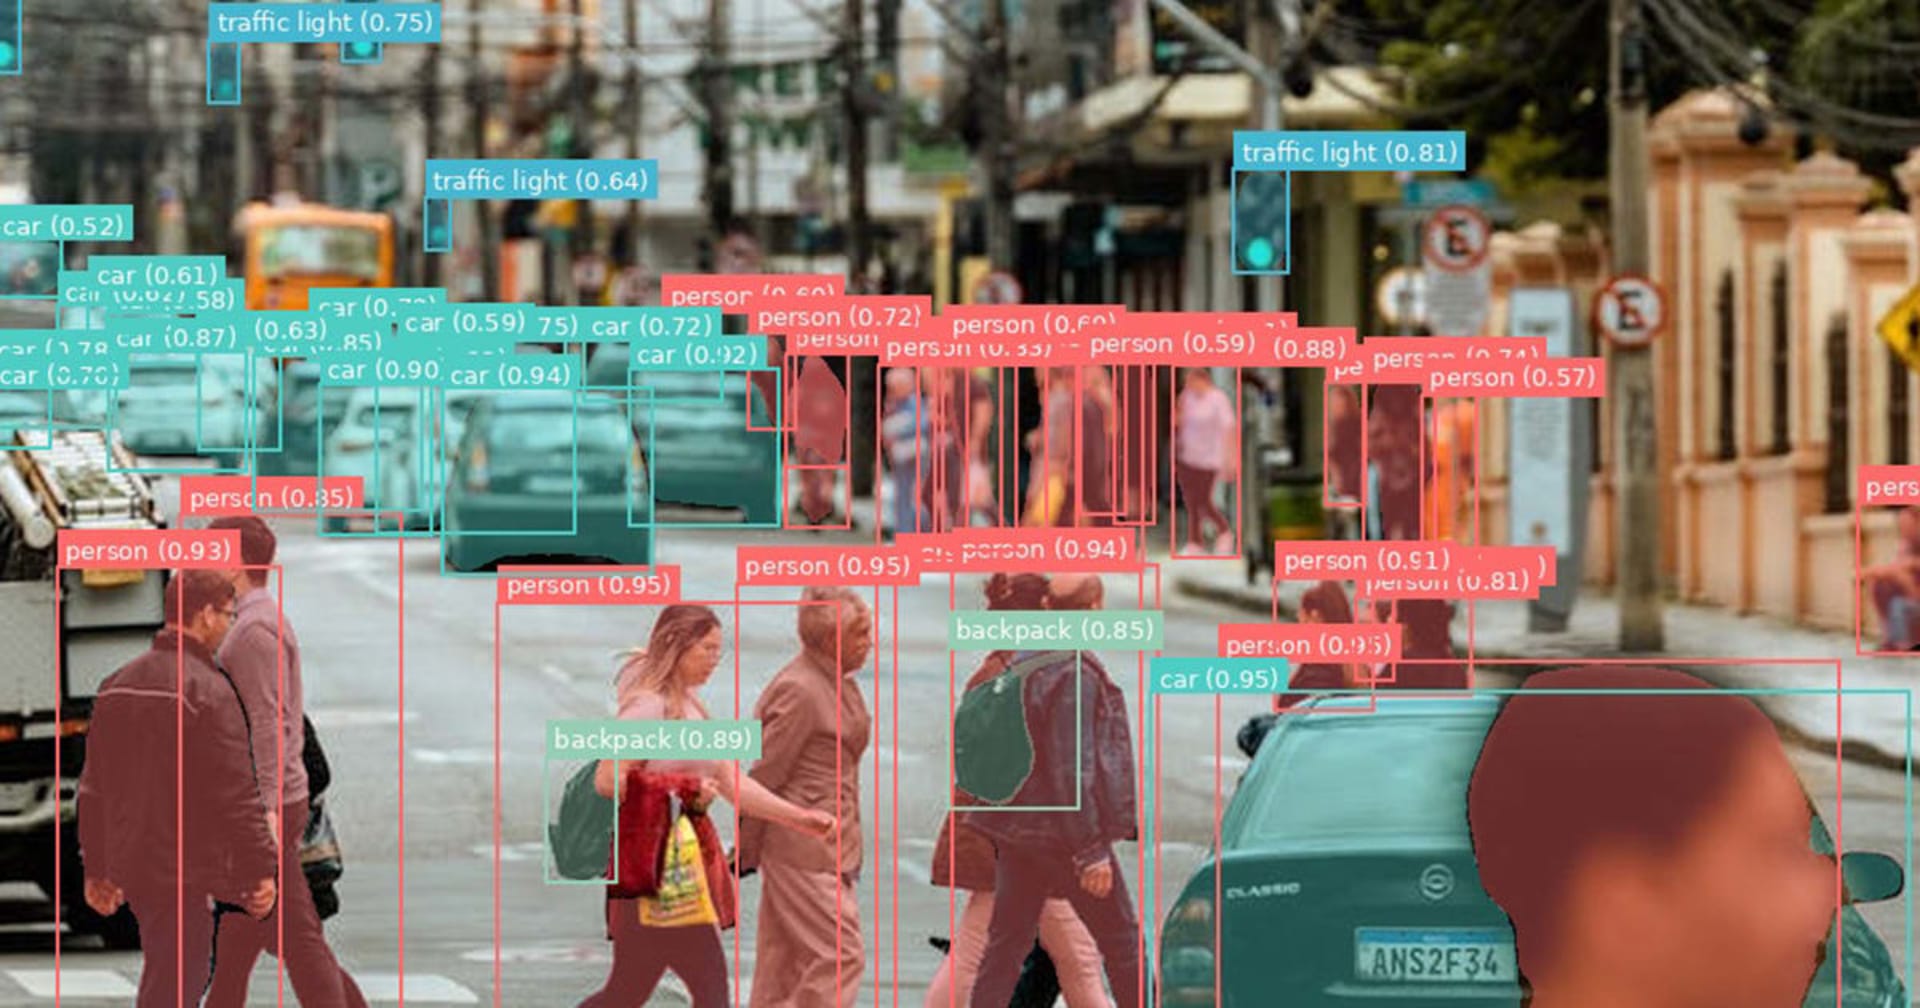
物体検出1:Faster R-CNN
Faster R-CNNは長くベースラインとして使用されてきたモデルとなります。
- モデルの取得
mimというpipに似たコマンドで操作します。mimコマンドを使うと、モデルファイルとともに、configファイルを取得することができます。- 一部
mimが使えないモデルがあるため、その場合はwgetコマンドで取得します。
!mim download mmdet --config faster_rcnn_r50_fpn_1x_coco --dest ./checkpoints
- 取得したモデル読み込み
config_file = './checkpoints/faster_rcnn_r50_fpn_1x_coco.py'
checkpoint_file = './checkpoints/faster_rcnn_r50_fpn_1x_coco_20200130-047c8118.pth'

# init a detector
model = init_detector(config_file, checkpoint_file, device=device)
- 推論処理
- せっかくなので推論時間を計測したところ3秒程度掛かりました。
%%time
# inference the demo image
result = inference_detector(model, '/mmdetection/demo/demo.jpg')

# CPU times: user 10.7 s, sys: 418 ms, total: 11.1 s
# Wall time: 2.92 s
- 結果の表示
- score_thr以上のスコアを持つbounding boxのみを表示できます。
- out_fileを指定することで画像ファイルとして書き出すことが可能です。
- かなり奥の小さい自動車まで検出できていそうです。
show_result_pyplot(model, '/mmdetection/demo/demo.jpg', result, score_thr=0.3)

物体検出2:YOLOX
YOLOXは、高速な物体検出モデルであるYOLOシリーズの新しいものとなります。
アーキテクチャはYOLOv3を改良したものとなっており、anchor freeの方式です。
様々な規模のものを試すことができ、今回は最も小さいtinyモデルを使用してみます。
- モデルの取得
!mim download mmdet --config yolox_tiny_8x8_300e_coco --dest ./checkpoints
- 取得したモデル読み込み
config_file = './checkpoints/yolox_tiny_8x8_300e_coco.py'
checkpoint_file = './checkpoints/yolox_tiny_8x8_300e_coco_20211124_171234-b4047906.pth'

# init a detector
model = init_detector(config_file, checkpoint_file, device=device)
- 推論処理
- 推論時間はFaster R-CNNよりかなり高速であることがわかります。
%%time
# inference the demo image
result = inference_detector(model, '/mmdetection/demo/demo.jpg')

# CPU times: user 390 ms, sys: 9.88 ms, total: 400 ms
# Wall time: 97.4 ms
- 結果の表示
- 検出精度は、奥の小さいcarや木の裏のcarを検出できていないようです。
- これらは、tinyより大きなモデルを使用することで改善する可能性があります。
show_result_pyplot(model, '/mmdetection/demo/demo.jpg', result, score_thr=0.3)

物体検出3:DETR
DETRはTransformerをベースとした物体検出モデルです。
- モデルの取得
!mim download mmdet --config detr_r50_8x2_150e_coco --dest ./checkpoints
- 取得したモデル読み込み
config_file = './checkpoints/detr_r50_8x2_150e_coco.py'
checkpoint_file = './checkpoints/detr_r50_8x2_150e_coco_20201130_194835-2c4b8974.pth'

# init a detector
model = init_detector(config_file, checkpoint_file, device=device)
- 推論処理
- 推論時間はFaster R-CNNより速くYOLOより遅いです。
%%time
# inference the demo image
result = inference_detector(model, '/mmdetection/demo/demo.jpg')

# CPU times: user 5.83 s, sys: 279 ms, total: 6.11 s
# Wall time: 1.52 s
- 結果の表示
- 論文の結果では、Faster R-CNNより性能が良いとされています。
- しかしこのデモ画像では誤検出が少し多いようです。
- NMSなどを調整する必要があるのかもしれません。
show_result_pyplot(model, '/mmdetection/demo/demo.jpg', result, score_thr=0.3)

Instance Segmentation:Mask R-CNN
Instance Segmentationは、物体検出に加えて、ピクセル単位でその物体の境界を判定します。
Instance Segmentationは、同じクラスの異なる物体を区別してSegmentationします。
また背景画像は特にSegmentationを行いません。
Mask R-CNNは、Instance Segmentationの代表的な手法の一つです。
動かす方法は、物体検出と同様で実施できます。
- モデルの取得
!mim download mmdet --config mask_rcnn_r50_caffe_fpn_mstrain-poly_3x_coco --dest ./checkpoints
- 取得したモデル読み込み
config_file = './checkpoints/mask_rcnn_r50_caffe_fpn_mstrain-poly_3x_coco.py'
checkpoint_file = './checkpoints/mask_rcnn_r50_caffe_fpn_mstrain-poly_3x_coco_bbox_mAP-0.408__segm_mAP-0.37_20200504_163245-42aa3d00.pth'

# init a detector
model = init_detector(config_file, checkpoint_file, device=device)
- 推論処理
%%time
# inference the demo image
result = inference_detector(model, '/mmdetection/demo/demo.jpg')

# CPU times: user 12 s, sys: 264 ms, total: 12.3 s
# Wall time: 3.23 s
- 結果の表示
show_result_pyplot(model, '/mmdetection/demo/demo.jpg', result)

Panoptic Segmentation1:Panoptic FPN
Panoptic Segmentationは近年研究されているSegmentationタスクです。
Panoptic SegmentationはInstance Segmentationをさらに背景画像のSegmentationまで可能にしたもので、
Instance SegmentationとSemantic Segmentationを足し合わせたようなタスクとなっています。
動かす方法は、物体検出と同様で実施できます。
- モデルの取得
!mim download mmdet --config panoptic_fpn_r50_fpn_1x_coco --dest ./checkpoints
- 取得したモデル読み込み
config_file = './checkpoints/panoptic_fpn_r50_fpn_1x_coco.py'
checkpoint_file = './checkpoints/panoptic_fpn_r50_fpn_1x_coco_20210821_101153-9668fd13.pth'

# init a detector
model = init_detector(config_file, checkpoint_file, device=device)
- 推論処理
%%time
# inference the demo image
result = inference_detector(model, '/mmdetection/demo/demo.jpg')

# CPU times: user 13.4 s, sys: 477 ms, total: 13.8 s
# Wall time: 3.59 s
- 結果の表示
show_result_pyplot(model, '/mmdetection/demo/demo.jpg', result)

Panoptic Segmentation2:Mask2Former
Mask2Formerは、TransformerをベースとしたSegmentationの手法です。
2021年12月に発表されたかなり最近のモデルとなります。
この記事で言及するモデルのうち、Mask2Formerのみ少し実行方法が異なり、
mimコマンドを使えないケースとなります。
(今後のアップデートにより使えるようになる可能性もあります。)
そのため以下からダウンロード先を参照します。
!wget https://download.openmmlab.com/mmdetection/v2.0/mask2former/mask2former_r50_lsj_8x2_50e_coco/mask2former_r50_lsj_8x2_50e_coco_20220326_224516-0091ce2b.pth -P ./checkpoints
- 取得したモデル読み込み
mimコマンドを使っていないため、configファイルが得られません。- そのためリポジトリ内にあるconfigファイルを参照します。
config_file = '/mmdetection/configs/mask2former/mask2former_r50_lsj_8x2_50e_coco.py'
checkpoint_file = './checkpoints/mask2former_r50_lsj_8x2_50e_coco_20220326_224516-0091ce2b.pth'

# init a detector
model = init_detector(config_file, checkpoint_file, device=device)
- 推論処理
- 処理時間は、Panoptic FPNより大きいようです。
%%time
# inference the demo image
result = inference_detector(model, '/mmdetection/demo/demo.jpg')

# CPU times: user 21.7 s, sys: 1.67 s, total: 23.4 s
# Wall time: 5.84 s
- 結果の表示
- 中心のbenchの足部分などより正確にSegmentationできていることがわかります。
show_result_pyplot(model, '/mmdetection/demo/demo.jpg', result)

まとめ
いかがでしたでしょうか。
使いやすいAPIで最新モデルを試すことができるため、比較検証なども進めやすいと思います。
物体検出を試す際のきっかけとなれば幸いです。
今後はカスタムデータを用いた学習などについて調べたいと思います。