OpenTacoでInfracostを使ってAWSコスト試算をやってみた
OpenTacoのカスタムコマンドを使うことで、OpenTacoのワークフロー上で他のツールを統合できます。
この方法で以前、OPAを使ったポリシーテストを試してみました。
今回はInfracostを使って、AWS利用費を試算してみます。
以下を参考にしています。
Infracost APIキーをGitHub Actions Secretsに登録
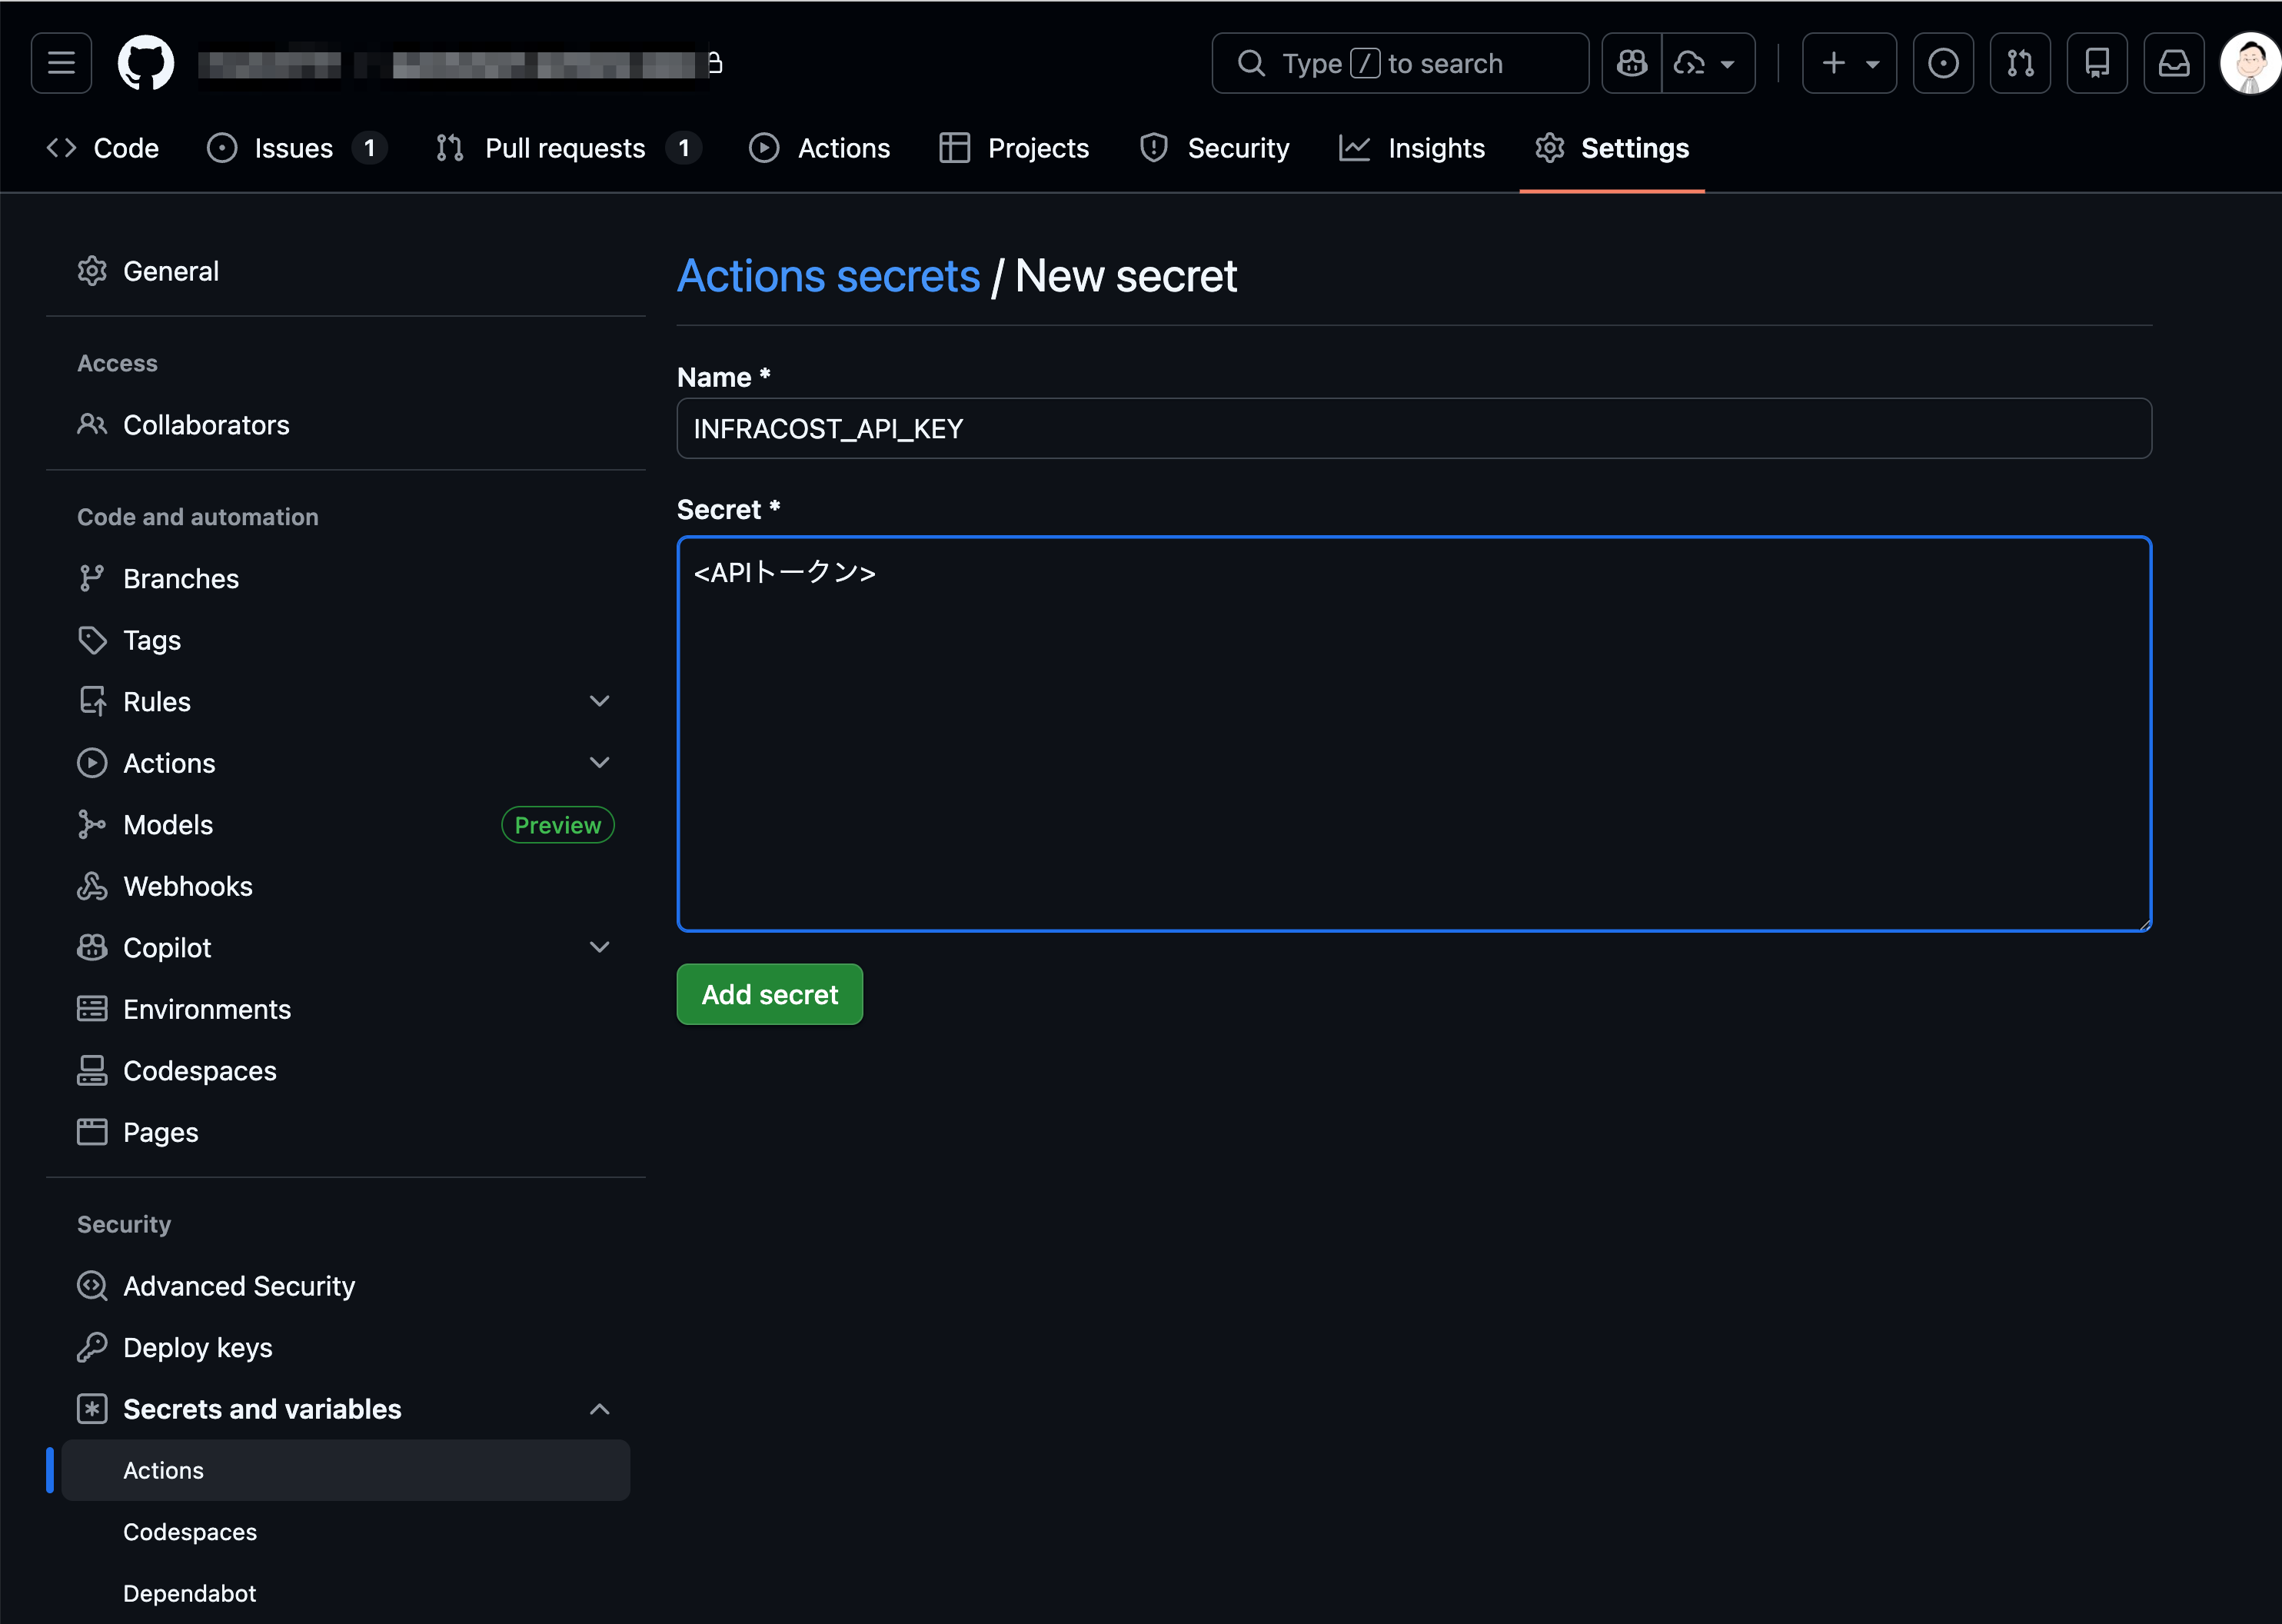
Infracost APIキーを取得します。
Infracost Cloudにログインして、Settings → Org Settings → API tokensの順で選択します。
CLI and CI/CD tokenが表示されるため、こちらをコピーします。

コピーしたトークンを、GitHub Actions SecretsにINFRACOST_API_KEYという名前で登録します。
Infracostをセットアップ(GitHub Actions)
GitHub Actions上でInfracostを利用できるようにするため、以下を追記します。
name: Digger Workflow

on:
  workflow_dispatch:
    inputs:
      spec:
        required: true
      run_name:
        required: false

run-name: '${{inputs.run_name}}'

jobs:
  digger-job:
    runs-on: ubuntu-latest
    permissions:
      contents: write      # required to merge PRs
      actions: write       # required for plan persistence
      id-token: write      # required for workload-identity-federation
      pull-requests: write # required to post PR comments
      issues: read         # required to check if PR number is an issue or not
      statuses: write      # required to validate combined PR status

    steps:
      - uses: actions/checkout@v4
+      - name: Setup Infracost
+        uses: infracost/actions/setup@v3
+        # See https://github.com/infracost/actions/tree/master/setup for other inputs
+        # If you can't use this action, use Docker image infracost/infracost:ci-0.10
+        with:
+          api-key: ${{ secrets.INFRACOST_API_KEY }}
      - name: ${{ fromJSON(github.event.inputs.spec).job_id }}
        run: echo "job id ${{ fromJSON(github.event.inputs.spec).job_id }}"
      - uses: diggerhq/digger@vLatest
        with:
          digger-spec: ${{ inputs.spec }}
          setup-aws: true
          setup-terraform: true
          terraform-version: 1.14.3
          aws-role-to-assume: ${{ secrets.AWS_ROLE_ARN }}
        env:
          GITHUB_CONTEXT: ${{ toJson(github) }}
          GITHUB_TOKEN: ${{ secrets.GITHUB_TOKEN }}
digger.ymlにInfracost用のカスタムコマンドを追加
digger.ymlにInfracost用のカスタムコマンドを追加します。
projects:
- name: production
  dir: prod
  workflow: with-infracost

workflows:
  with-infracost:
    plan:
      steps:
        - init
        - plan
        - run: infracost breakdown --path=. | tee -a $DIGGER_OUT
GitHub Pull Requestのコメント上でInfracostの結果を表示するため、$DIGGER_OUTにも出力しています。
$DIGGER_OUTについては以下をご確認ください。
動作確認
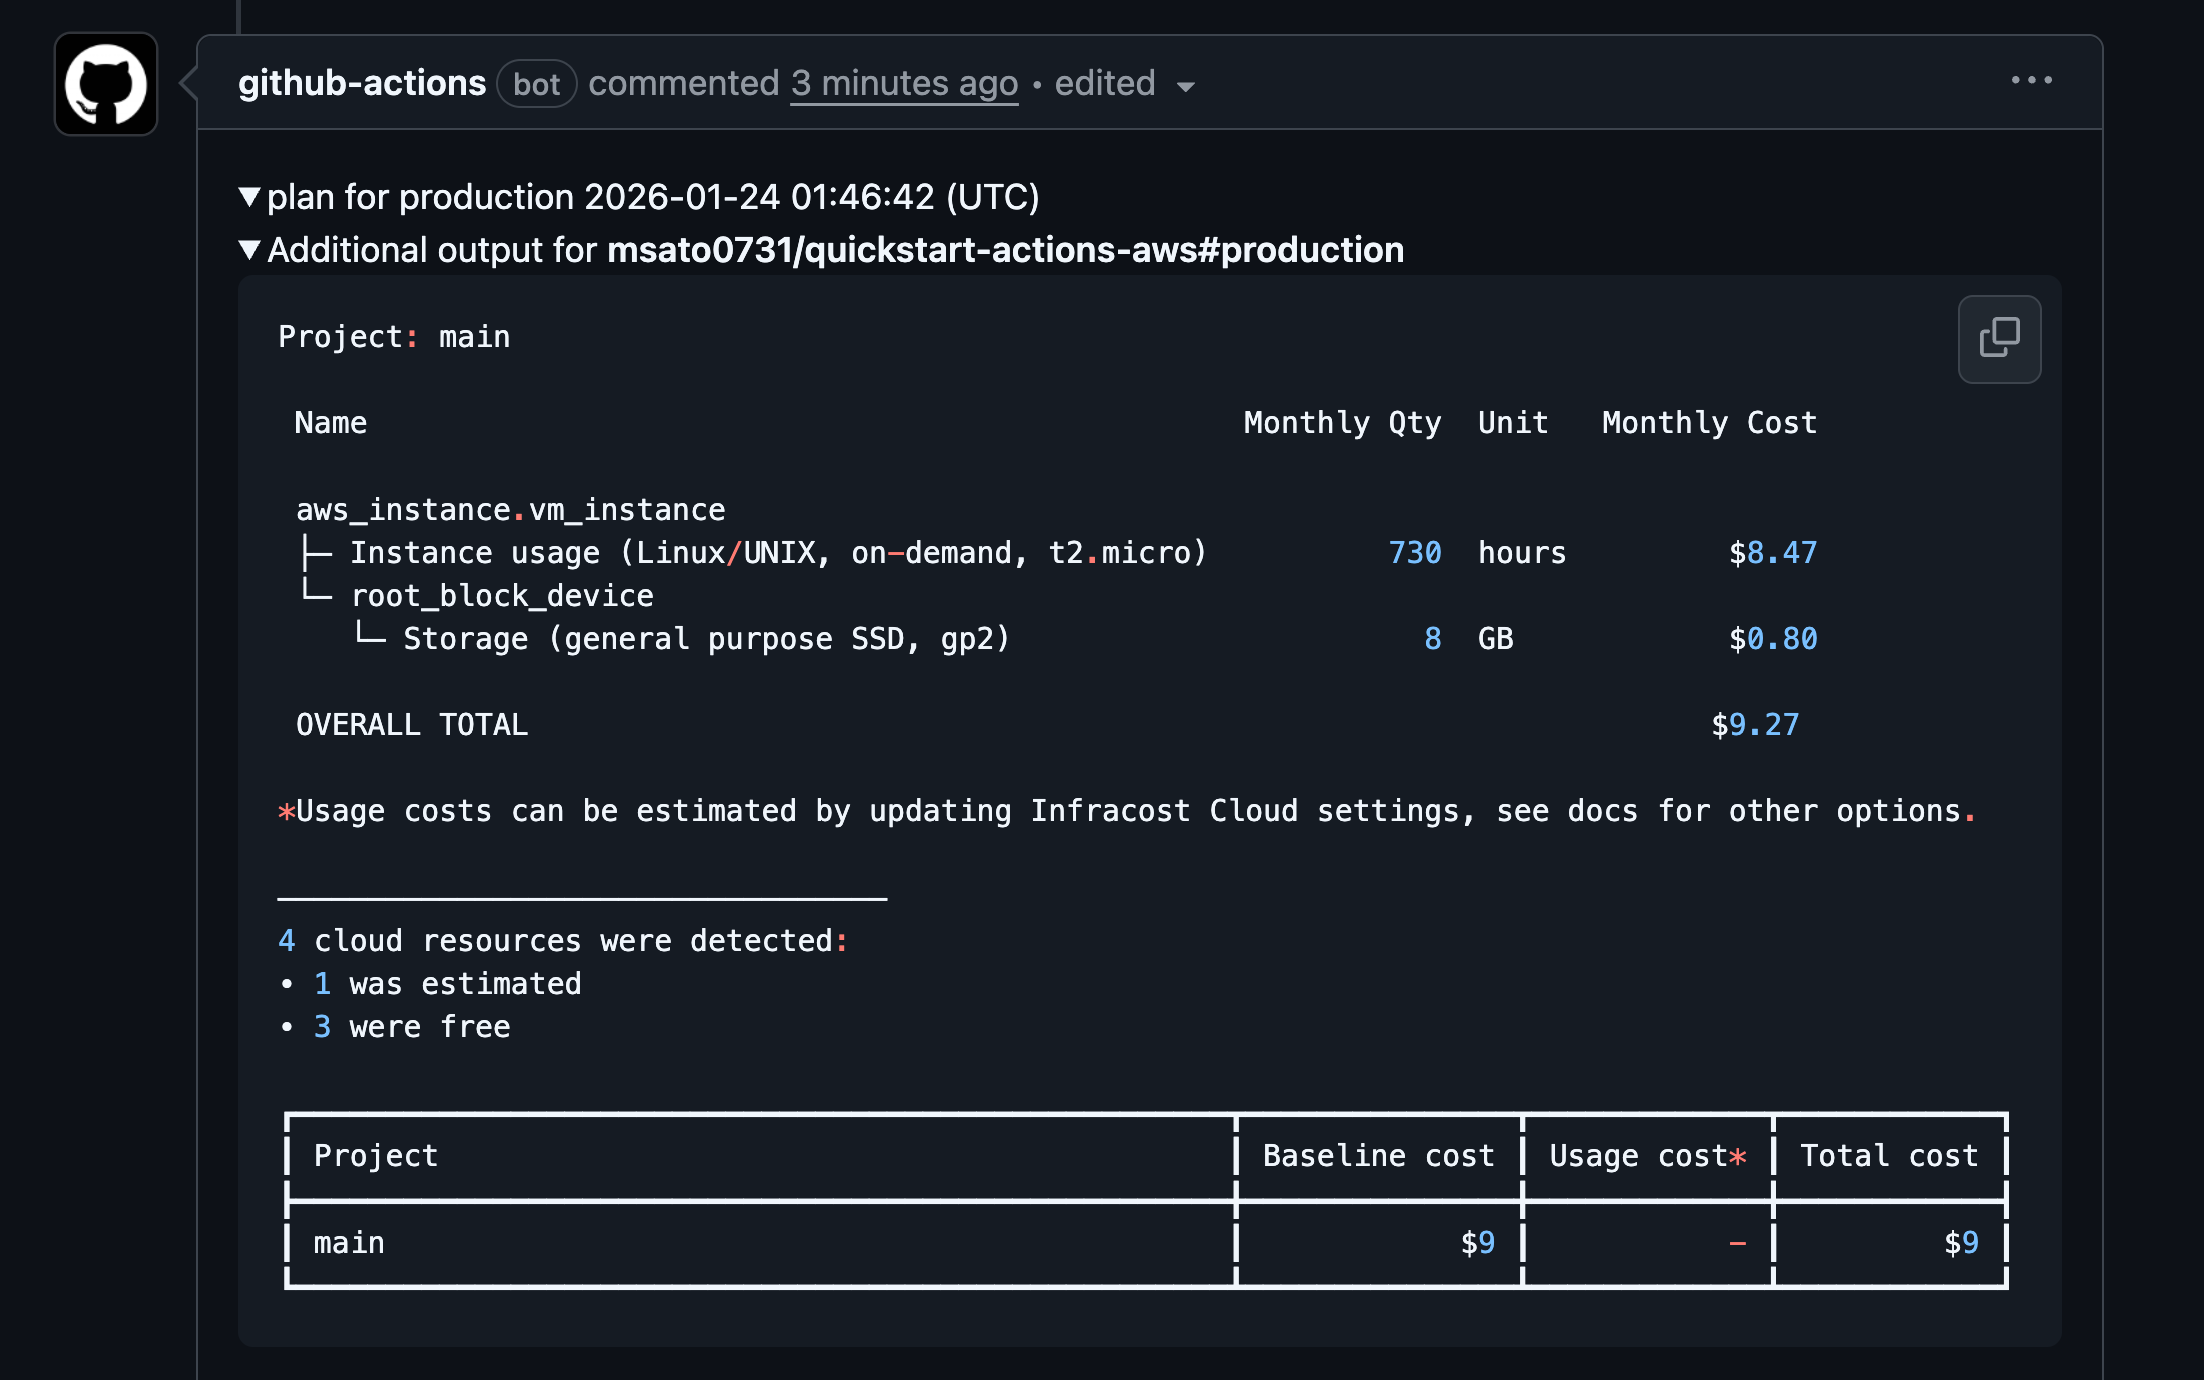
digger planを実行して、Pull Requestのコメントを確認してみました。
以下のようにInfracostの結果が確認できました。
ちなみに利用したTerraformコードは以下です。
provider "aws" {
  region = "us-east-1" # Replace with your desired AWS region
}

resource "aws_vpc" "vpc_network" {
  cidr_block = "10.0.0.0/16"
  tags = {
    Name = "terraform-network"
  }
}

resource "aws_subnet" "vpc_subnet" {
  vpc_id                  = aws_vpc.vpc_network.id
  cidr_block              = "10.0.1.0/24"
  availability_zone       = "us-east-1a"
  map_public_ip_on_launch = true

  tags = {
    Name = "terraform-subnet"
  }
}

resource "aws_security_group" "security_group" {
  vpc_id      = aws_vpc.vpc_network.id
  name_prefix = "terraform-"
  ingress {
    from_port   = 80
    to_port     = 80
    protocol    = "tcp"
    cidr_blocks = ["0.0.0.0/0"]
  }
}

resource "aws_instance" "vm_instance" {
  ami                    = "ami-05c13eab67c5d8861" # us-east-1 Amazon Linux 2023 AMI 2023.2.20231030.1 x86_64 HVM kernel-6.1
  instance_type          = "t2.micro"
  subnet_id              = aws_subnet.vpc_subnet.id
  vpc_security_group_ids = [aws_security_group.security_group.id]
  tags = {
    Name        = "terraform-instance"
  }
}
おわりに
OpenTacoのカスタムコマンドでInfracostを利用する方法についてでした。
Pull Requestのコメントでコスト見積もりが自動表示されるため、インフラ変更時のコスト影響をレビュー段階で把握できます。
今回は単純なコスト試算をご紹介しました。他にもコスト差分を確認する方法も公式ドキュメントで紹介されていますので合わせてご確認ください。
InfracostとGitHubリポジトリの連携は、OpenTacoに組み込む他にもGitHub Appを使った方法もあります。
興味がある方は以下の記事も確認してみてください。