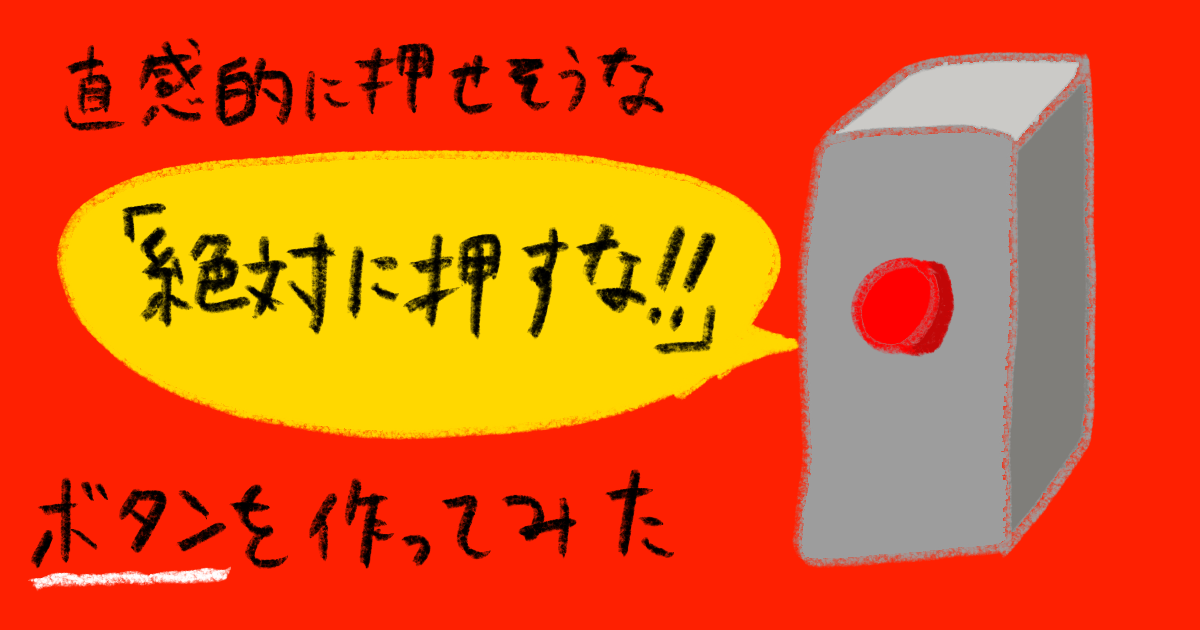
【Swift】直感的に押せそうな「絶対に押すな!」ボタンを作ってみた
この記事は公開されてから1年以上経過しています。情報が古い可能性がありますので、ご注意ください。
個人ではフラットデザインのボタンばかり使用していましたが、作成するアプリのターゲット年齢によってはフラットデザインだと直感的にボタンとして認識しにくいケースがあることを学びました。
なので、今回は直感的にボタンだと認識しやすいようなデザインのボタンを作ってみました。
 絶対に押すなよ!!
と言われると、
 絶対に押したくなっちゃいますよね。
そんな、ついつい押したくなるようなボタンを目指して、、
作ったもの
 Githubにコードを載せています。
環境
- Xcode 12.5
- Swift 5.4
まずはclassの作成
import UIKit

class PressableMaterialButton: UIButton {

    private let shadowOffsetHeight: CGFloat = 20

    override init(frame: CGRect) {
        super.init(frame: frame)
        configureUI()
    }

    required init?(coder: NSCoder) {
        super.init(coder: coder)
        configureUI()
    }

    // MARK: - Configure UI

    private func configureUI() {
        self.layer.cornerRadius = self.frame.height / 2
        addShadow(with: .shadowColorRed)
    }

    private func addShadow(with color: UIColor) {
        self.layer.shadowOffset = CGSize(width: 0, height: shadowOffsetHeight)
        self.layer.shadowColor = color.cgColor
        self.layer.shadowRadius = 1.0
        self.layer.shadowOpacity = 1.0
    }
}
以下で詳細について説明します。
ボタンに追加する影を作成
// 影の高さ
private let shadowOffsetHeight: CGFloat = 20
ボタンアクション時に影の高さ分だけ動かすという処理が必要となりますので影の高さをあらかじめインスタンスプロパティとして定義しておきます。
private func addShadow(with color: UIColor) {
        // 影の大きさ
        self.layer.shadowOffset = CGSize(width: 0, height: shadowOffsetHeight)
        // 影の色
        self.layer.shadowColor = color.cgColor
        // 影のぼかし量
        self.layer.shadowRadius = 1.0
        // 影の不透明度
        self.layer.shadowOpacity = 1.0
    }
}
- 影の大きさ 今回はy方向にのみ動くような表現をしたかったのでy方向にのみ値を入れています。
-
影の色 影の色には引数として渡された
UIColorをCGColorにして代入しています。 -
影のぼかし量、不透明度 今回はぼかした表現ではなくニョキと立体風な表現を行いたかったので影のぼかし量を
1.0に、不透明度も1.0に設定しました。
UIを構成する
private func configureUI() {
        // ボタンの形を丸型に変更
        self.layer.cornerRadius = self.frame.height / 2
        // 影に色を指定してボタンに追加
        addShadow(with: .shadowColorRed)
    }
-
ボタンの形を丸型に変更 今回は丸型の
UIButtonにしたかったのでself.layer.cornerRadius = self.frame.height / 2に設定しました。 -
作成した影に色を指定してボタンに追加 先程作成した
addShadow(with:)を呼び出しています。影の色にはUIColorのextension内で影用に作成した色を使用しています。
extension UIColor {
    static let shadowColorRed = UIColor.init(red: 192 / 255, green: 63 / 255, blue: 50 / 255, alpha: 1)
}
ボタンタッチ時の表現を作成
// MARK: - Touches methods
extension PressableMaterialButton {

    override func touchesBegan(_ touches: Set<UITouch>, with event: UIEvent?) {
        super.touchesBegan(touches, with: event)
        pressedButtonAnimation()
    }

    override func touchesEnded(_ touches: Set<UITouch>, with event: UIEvent?) {
        super.touchesEnded(touches, with: event)
        releasedButtonAnimation()
    }

    override func touchesCancelled(_ touches: Set<UITouch>, with event: UIEvent?) {
        super.touchesCancelled(touches, with: event)
        releasedButtonAnimation()
    }

    private func pressedButtonAnimation() {
        UIView.animate(withDuration: 0.1, delay: 0.0, options: .curveEaseIn) {
            self.transform = CGAffineTransform(translationX: 0, y: self.shadowOffsetHeight)
        }
        addShadowHeightAnimation(from: shadowOffsetHeight, to: 0, option: .easeIn)
    }

    private func releasedButtonAnimation() {
        UIView.animate(withDuration: 0.1, delay: 0.0, options: .curveEaseOut) {
            self.transform = CGAffineTransform.identity
        }
        addShadowHeightAnimation(from: 0, to: shadowOffsetHeight, option: .easeOut)
    }

    private func addShadowHeightAnimation(from fromValue: CGFloat, to toValue: CGFloat, option: CAMediaTimingFunctionName) {
        let animation = CABasicAnimation(keyPath: "shadowOffset")
        animation.duration = 0.1
        animation.fromValue = CGSize(width: 0, height: fromValue)
        animation.toValue = CGSize(width: 0, height: toValue)
        animation.timingFunction = CAMediaTimingFunction(name: option)
        animation.autoreverses = false
        animation.isRemovedOnCompletion = false
        animation.fillMode = CAMediaTimingFillMode.forwards
        self.layer.add(animation, forKey: nil)
    }
}
以下で詳細について説明します。
ボタンを押した時のアニメーションを作成
 private func pressedButtonAnimation() {
        // ボタンのy軸の位置を変更するアニメーションの呼び出し
        UIView.animate(withDuration: 0.1, delay: 0.0, options: .curveEaseIn) {
            // y軸を影の高さ分移動
            self.transform = CGAffineTransform(translationX: 0, y: self.shadowOffsetHeight)
        }
        // 影の高さを変更するアニメーションを呼び出し
        addShadowHeightAnimation(from: self.shadowOffsetHeight, to: 0, option: .easeIn)
    }
- ボタンのy軸の位置を変更するアニメーションの呼び出し
UIView.animateでアニメーションを呼び出しています。durationアニメーションの持続時間delayアニメーション開始遅延時間optionsどのようにアニメーションさせるかanimations行いたいアニメーションをここに記述します
しかし、
CALayerのshadowOffsetはUIKitのアニメーション対象外だった為、CABasicAnimationを用いてアニメーションを実現しました。 -
y軸を影の高さ分移動
self.transform = CGAffineTransform(translationX: 0, y: self.shadowOffsetHeight)で最初に定義した影の高さ分だけ下げています。 -
影の高さを変更するアニメーションを呼び出し
addShadowHeightAnimation(from: self.shadowOffsetHeight, to: 0, option: .easeIn)でfromの値には開始値、toの値には終了値、optionにはCAMediaTimingFunctionNameとしてどのようなタイミング関数で動きをさせたいかを決めます。
影の高さを変更するアニメーションを呼び出し
addShadowHeightAnimationの詳細について説明します。
private func addShadowHeightAnimation(from fromValue: CGFloat, to toValue: CGFloat, option: CAMediaTimingFunctionName) {
        // shadowOffsetのアニメーションを定義
        let animation = CABasicAnimation(keyPath: "shadowOffset")
        // アニメーション時間
        animation.duration = 0.1
        // アニメーション開始値
        animation.fromValue = CGSize(width: 0, height: fromValue)
        // アニメーション終了値
        animation.toValue = CGSize(width: 0, height: toValue)
        // アニメーションのタイミング関数
        animation.timingFunction = CAMediaTimingFunction(name: option)
        // 逆再生の可否
        animation.autoreverses = false
        // アニメーション完了後に状態を留める処理
        animation.isRemovedOnCompletion = false
        animation.fillMode = CAMediaTimingFillMode.forwards
        // shadowOffsetのアニメーションを追加
        self.layer.add(animation, forKey: nil)
    }
}
- shadowOffsetのアニメーションを定義
CABasicAnimation(keyPath:)のkeyPathに行いたいアニメーションのkeyPathを入力。 -
アニメーション時間 どのくらいの時間をかけてアニメーションさせるかを設定します。その時間の間に開始値から終了値までアニメーションしてくれます。
-
アニメーションのタイミング関数 アニメーションにどのようなタイミング関数で動かしたいか指定します。 今回使用したものでいくと、
.easeInは、はじめはゆっくり、後から速くになるアニメーションで、.easeOutは、はじめは速く、後からゆっくりになるアニメーションになります。 -
逆再生の可否 今回は逆再生の必要はないので
falseにしています。 -
アニメーション完了後に状態を留める処理
CABasicAnimationだとアニメーション後、元の状態に自動的に戻ろうとするので元の状態に戻らないように設定します。 -
shadowOffsetのアニメーションを追加
self.layerに追加してアニメーションとして動くようにします。
ボタンを離した時のアニメーションを作成
private func releasedButtonAnimation() {
        // ボタンのy軸の位置を変更するアニメーションの呼び出し
        UIView.animate(withDuration: 0.1, delay: 0.0, options: .curveEaseOut) {
            // y軸を変更する前の位置に戻す
            self.transform = CGAffineTransform.identity
        }
        // 影の高さを元の高さに戻すアニメーションを呼び出し
        addShadowHeightAnimation(from: 0, to: shadowOffsetHeight, option: .easeOut)
    }
-
ボタンのy軸の位置を変更するアニメーションの呼び出し 基本的には
pressedButtonAnimationと同じですが、AnimationOptionsを.curveEaseOutにしています。.curveEaseOutにすることではじめは早く、後からゆっくりになるアニメーションを行うことが出来ます。 -
y軸を変更する前の位置に戻す
self.transform = CGAffineTransform.identityでtransform前の状態に戻ることが出来ます。 -
影の高さを元の高さに戻すアニメーションを呼び出し ボタンが元の状態に戻る表現をしたい為、
addShadowHeightAnimationの開始値を0、終了値をメンバー変数のshadowOffsetHeightにしています。optionのeaseOutはUIView.AnimationOptionsと同じようにはじめは早く、後からゆっくりになるアニメーションを行ってくれます。
作成したアニメーションをtouchesメソッドに追加
    // 新しいタッチが発生したら
    override func touchesBegan(_ touches: Set<UITouch>, with event: UIEvent?) {
        super.touchesBegan(touches, with: event)
        pressedButtonAnimation()
    }
    // タッチした指がボタンから離れたら
    override func touchesEnded(_ touches: Set<UITouch>, with event: UIEvent?) {
        super.touchesEnded(touches, with: event)
        releasedButtonAnimation()
    }

    // システムのアラート等でタッチ状態がキャンセルされたら
    override func touchesCancelled(_ touches: Set<UITouch>, with event: UIEvent?) {
        super.touchesCancelled(touches, with: event)
        releasedButtonAnimation()
    }
タッチイベントが検出されると呼ばれるtouchedメソッド内にpressedButtonAnimation()とreleasedButtonAnimation()をそれぞれに追加
これでclassの中身は完成したので、storyboard上で追加したUIButtonのCustom classに作成したボタンのclassを入力するだけです。

あとは、IBAction等で行いたい処理を追加して下さい。
おわりに
デザインにもフラットデザインだけではなく、スキューモーフィズム、マテリアルデザインやニューモーフィズムなどがあります。 iOSで開発する際にはHuman Interface Guidelinesにしっかり添いながらもお客様に満足していただけるようなものを提供できるように学んでいきたいです。
また、本当にして欲しいことは思っているだけでは伝わりません。
しっかりと自分の想いを伝えることは大事ですね。