Python Serverless Microframework for AWS(chalice)でカスタム認証を設定する
この記事は公開されてから1年以上経過しています。情報が古い可能性がありますので、ご注意ください。
はじめに
前回の続きでPython Serverless Microframework for AWSでカスタム認証を設定する手順についてです。今回も基本的にはチュートリアル通りだったのですが、追加した手順などあった為、改めて記事として書いておきたいと思います。
カスタム認証
1.認証を行うLambda Functionの用意
カスタム認証を行うLambda Functionを用意します。Amazon API Gateway で Custom Authorization を使ってクライアントの認可を行うに書かれているコードをそのまま使用しました。Lambda Funtion名は「authFunction」です。
console.log('Loading function');

exports.handler = function(event, context) {

  // トークンを取得
  var token = event.authorizationToken;

  // ここではシンプルに「allow」「deny」「unauthorized」で判定
  switch (token) {
    case 'allow':
      // API へのリクエストを許可する
      context.succeed(generatePolicy('user', 'Allow', event.methodArn));
      break;
    case 'deny':
      // API へのリクエストを拒否する
      context.succeed(generatePolicy('user', 'Deny', event.methodArn));
      break;
    case 'unauthorized':
      // 評価に値しない場合など
      context.fail("Unauthorized");
      break;
    default:
      // エラー
      context.fail("error");
  }
};

var generatePolicy = function(principalId, effect, resource) {
  // IAM ポリシーを生成する
  return {
    principalId: principalId,
    policyDocument: {
      Version: '2012-10-17',
      Statement: [{
        Action: 'execute-api:Invoke',
        Effect: effect,
        Resource: resource
      }]
    }
  };
}
2.API Gatewayでのカスタムオーソライザーの作成
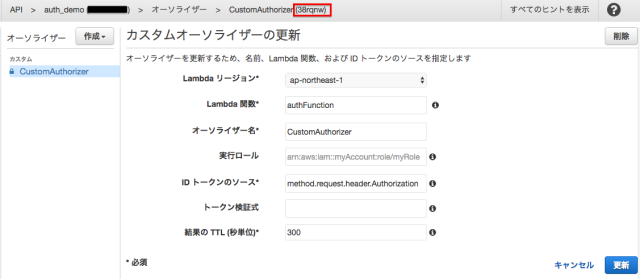
次にAPI Gatewayでのカスタムオーソライザーを作成します。API Gatewayは前回に作成した「auth_demo」を使用します。
こちらもAmazon API Gateway で Custom Authorization を使ってクライアントの認可を行うに書かれている方法をそのまま使用し、以下のように設定しました。
- Lambda リージョン・・・ap-northeast-1
- Lambda Function・・・authFunction
- オーソライザー名・・・CustomAuthorizer
- IDトークンのソース・・・method.request.header.Authorization
作成すると画面上部にカスタムオーソライザーのIDが表示されるので、メモしておきます。

3.プログラムの作成
前回作成したchaliceのプロジェクトに、カスタム認証を使うメソッドを追加しましょう。以下の様なメソッドをapp.pyに追加します。
@app.route('/custom_authenticated', methods=['GET'], authorization_type='CUSTOM', authorizer_id='38rqnw')
def custom_authenticated():
    return {"secure": True}
以下のコマンドでデプロイします。
$ chalice deploy
4.動作確認
最後に動作を確認します。まずはヘッダーに何も付けずにcurlを実行します。
$ curl -i -X GET https://xxxxxxxxxx.execute-api.ap-northeast-1.amazonaws.com/dev/custom_authenticated

HTTP/1.1 401 Unauthorized
(中略)
{"message":"Unauthorized"}
次にヘッダーを付与してcurlを実行します。ヘッダーの「Authorization」はカスタムオーソライザーの「IDトークンのソース」で指定したものです。
$ curl -i -X GET https://xxxxxxxxxx.execute-api.ap-northeast-1.amazonaws.com/dev/custom_authenticated \
--header 'Authorization: allow'

HTTP/1.1 200 OK
(中略)
{"secure": true}
認証できたようです。


