Stable DiffusionのAPIを使ってテキストから画像(txt2img)を作ったり、画像から画像(img2img)を作ってみる
この記事は公開されてから1年以上経過しています。情報が古い可能性がありますので、ご注意ください。
はじめに
生成AIのブームすごいですよね。OpenAIが提供するChatGPTなどをきっかけに文章生成の分野や画像、音声、動画など様々な分野でAIの活用がすすんでいます。
これまで文章生成の分野についてはいくつか検証を行ってきましたが、今回は画像生成の分野を試していこうと思います。
なにを検証するのか?
この記事ではStable diffusionが提供するAPIを経由して、
- テキストから画像を作成する
- 画像から画像を作成する
上記2つの検証を行います。
テキストから画像を生成する際には、ブラウザから実施する場合は DreamStudio や Hugging faceが提供するサービスなどがあります。今回はStability AIが提供する公式のAPIがあるようなので、そちらを利用して検証を行ってみようと思います。
まずはAPI Keyを発行する
API Keyを利用する際には、DreamStudioのページから発行ができるようです。私はGoogleアカウントを利用してアカウントの作成を行いました。
アカウントページからAPI Keyの発行を行います、簡単ですね。

発行したAPI Keyを使って画像を作成する
APIを経由して画像を作成する際にはREST APIなどの方法があるようですが、Python用のSDKが準備されているようなので、今回はこちらを利用してみようと思います。
まずはpipでSDKをインストールします。
pip install stability-sdk
テキストから画像を作ってみる
テキストから画像を作成する際の実装はサンプルコードを参考にしました。
.envからAPI Keyを読み込む以外は基本的にコピペで実装しましたが、ご参考までにサンプルコードは以下です。
from dotenv import load_dotenv
import os
import io
import warnings
from PIL import Image
from stability_sdk import client
import stability_sdk.interfaces.gooseai.generation.generation_pb2 as generation


# Load environment variables from .env file
load_dotenv()

# Get the API key from environment variable
stability_api_key = os.environ.get('STABILITY_KEY')
# Our Host URL should not be prepended with "https" nor should it have a trailing slash.
os.environ['STABILITY_HOST'] = 'grpc.stability.ai:443'

stability_api = client.StabilityInference(
    key=os.environ['STABILITY_KEY'], # API Key reference.
    verbose=True, # Print debug messages.
    engine="stable-diffusion-xl-1024-v0-9", # Set the engine to use for generation.
    # Available engines: stable-diffusion-xl-1024-v0-9 stable-diffusion-v1 stable-diffusion-v1-5 stable-diffusion-512-v2-0 stable-diffusion-768-v2-0
    # stable-diffusion-512-v2-1 stable-diffusion-768-v2-1 stable-diffusion-xl-beta-v2-2-2 stable-inpainting-v1-0 stable-inpainting-512-v2-0
)

# Set up our initial generation parameters.
answers = stability_api.generate(
    prompt="expansive landscape rolling greens with blue daisies and yggdrasil under a blue alien sky, masterful, ghibli",
    seed=992446758, # If a seed is provided, the resulting generated image will be deterministic.
                    # What this means is that as long as all generation parameters remain the same, you can always recall the same image simply by generating it again.
                    # Note: This isn't quite the case for CLIP Guided generations, which we tackle in the CLIP Guidance documentation.
    steps=50, # Amount of inference steps performed on image generation. Defaults to 30.
    cfg_scale=8.0, # Influences how strongly your generation is guided to match your prompt.
                   # Setting this value higher increases the strength in which it tries to match your prompt.
                   # Defaults to 7.0 if not specified.
    width=1024, # Generation width, if not included defaults to 512 or 1024 depending on the engine.
    height=1024, # Generation height, if not included defaults to 512 or 1024 depending on the engine.
    samples=1, # Number of images to generate, defaults to 1 if not included.
    sampler=generation.SAMPLER_K_DPMPP_2M # Choose which sampler we want to denoise our generation with.
                                                 # Defaults to k_dpmpp_2m if not specified. Clip Guidance only supports ancestral samplers.
                                                 # (Available Samplers: ddim, plms, k_euler, k_euler_ancestral, k_heun, k_dpm_2, k_dpm_2_ancestral, k_dpmpp_2s_ancestral, k_lms, k_dpmpp_2m, k_dpmpp_sde)
)

# Set up our warning to print to the console if the adult content classifier is tripped.
# If adult content classifier is not tripped, save generated images.
for resp in answers:
    for artifact in resp.artifacts:
        if artifact.finish_reason == generation.FILTER:
            warnings.warn(
                "Your request activated the API's safety filters and could not be processed."
                "Please modify the prompt and try again.")
        if artifact.type == generation.ARTIFACT_IMAGE:
            img = Image.open(io.BytesIO(artifact.binary))
            img.save(str(artifact.seed)+ ".png") # Save our generated images with their seed number as the filename.
stability_api.generate() の関数内で画像生成に必要な情報を指定しているようです。
少しプロンプトを変更して試してみたいと思います。
プロンプトを作成するコツについては以下のページで紹介されていましたが、今回はテストが目的のためシンプルなプロンプトで試してみます。
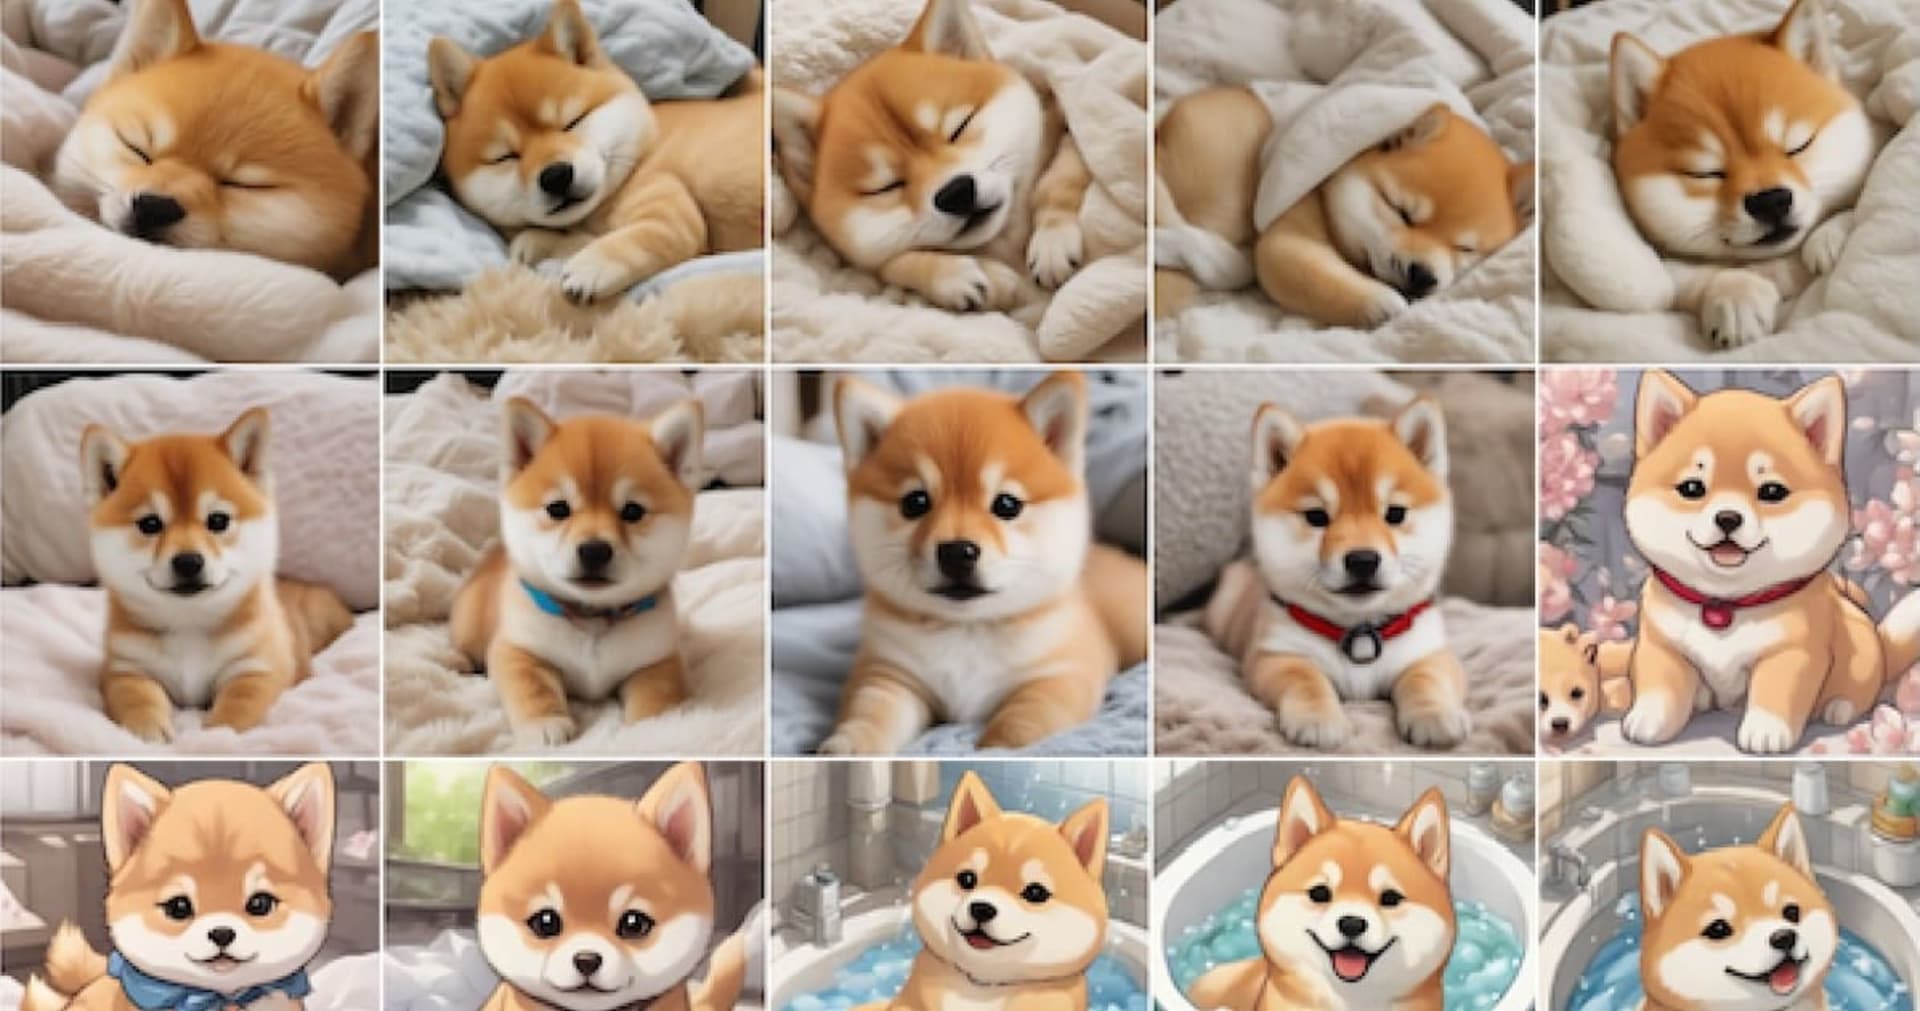
A Shiba Inu is riding a skateboard in the style of anime
結果

か、、、かわいい。。。。。。
もっと様々なパターンのShiba-inuを見たくなりますね。
今回は深掘りしませんが、stepsやcfg_scalesなどのパラメータを調整したりするとより変化が見られそうです。
画像から画像(img2img)を作ってみる
次は画像から画像を作ってみたいと思います。今回の検証においては、先程作成したShiba-inu画像を利用します。この可愛いShiba-inuをもう少しリアルにして、黒いパーカーを着てくれるか試してみようと思います。
プロンプトとソースコードは以下です。
プロンプト
prompt="Hyper realistic detailed a Shiba Inu is riding a skateboard, wear black hoodie",
ソースコード
from dotenv import load_dotenv
import io
import os
import warnings

from PIL import Image
from stability_sdk import client
import stability_sdk.interfaces.gooseai.generation.generation_pb2 as generation

# Our Host URL should not be prepended with "https" nor should it have a trailing slash.
os.environ['STABILITY_HOST'] = 'grpc.stability.ai:443'

# Load environment variables from .env file
load_dotenv()

# Get the API key from environment variable
stability_api_key = os.environ.get('STABILITY_KEY')
# Our Host URL should not be prepended with "https" nor should it have a trailing slash.
os.environ['STABILITY_HOST'] = 'grpc.stability.ai:443'

# Set up our connection to the API.
stability_api = client.StabilityInference(
key=os.environ['STABILITY_KEY'], # API Key reference.
verbose=True, # Print debug messages.
engine="stable-diffusion-xl-1024-v0-9", # Set the engine to use for generation.
# Available engines: stable-diffusion-xl-1024-v0-9 stable-diffusion-v1 stable-diffusion-v1-5 stable-diffusion-512-v2-0 stable-diffusion-768-v2-0
# stable-diffusion-512-v2-1 stable-diffusion-768-v2-1 stable-diffusion-xl-beta-v2-2-2 stable-inpainting-v1-0 stable-inpainting-512-v2-0
)

# Load image as an Image object
image_path = img = './sk8_shiba.png'
img = Image.open(image_path)
# Set up our initial generation parameters.
answer = stability_api.generate(
prompt="Hyper realistic detailed a Shiba Inu is riding a skateboard, wear black hoodie",
init_image=img, # Assign our previously generated img as our Initial Image for transformation.
start_schedule=0.8, # Set the strength of our prompt in relation to our initial image.
seed=123463446, # If attempting to transform an image that was previously generated with our API,
# initial images benefit from having their own distinct seed rather than using the seed of the original image generation.
steps=50, # Amount of inference steps performed on image generation. Defaults to 30.
cfg_scale=8.0, # Influences how strongly your generation is guided to match your prompt.
# Setting this value higher increases the strength in which it tries to match your prompt.
# Defaults to 7.0 if not specified.
width=1024, # Generation width, defaults to 512 if not included.
height=1024, # Generation height, defaults to 512 if not included.
sampler=generation.SAMPLER_K_DPMPP_2M # Choose which sampler we want to denoise our generation with.
# Defaults to k_dpmpp_2m if not specified. Clip Guidance only supports ancestral samplers.
# (Available Samplers: ddim, plms, k_euler, k_euler_ancestral, k_heun, k_dpm_2, k_dpm_2_ancestral, k_dpmpp_2s_ancestral, k_lms, k_dpmpp_2m, k_dpmpp_sde)
)

# Set up our warning to print to the console if the adult content classifier is tripped.
# If adult content classifier is not tripped, save generated image.
for resp in answer:
for artifact in resp.artifacts:
if artifact.finish_reason == generation.FILTER:
warnings.warn(
"Your request activated the API's safety filters and could not be processed."
"Please modify the prompt and try again.")
if artifact.type == generation.ARTIFACT_IMAGE:
global img2
img2 = Image.open(io.BytesIO(artifact.binary))
img2.save("shibainu-sk8-"+str(artifact.seed)+ "-img2img.png") # Save our generated image with its seed number as the filename and the img2img suffix so that we know this is our transformed image.
出力結果

パッチリしてる!!黒パーカー着てる!!!
少し画像を修正したいときや変更を行いたいときに良さそうですね。
txt2imgで画像を作成する際とのAPI利用の違いとしては、img2imgを利用する場合は init_image を指定することと start_schedule を指定して画像とプロンプトの関連性を指定するところが主な違いです。
AIアバター的なやつも作れるのかやってみる
上記の内容をみていると、一時期話題にあがったAIアバター的なものも簡単に作れるのではないかと思ったので、実際にできるかを試してみたいと思います。
今回は自分のセルフィーをもとにアバターができるか試してみます。
インプットに利用した画像は以下です、ベトナム滞在時に髪を切った直後に撮ったセルフィーを使ってみました。
個人情報保護の観点からエフェクトをかけていますが、実際に利用した画像はエフェクトがかかっていない画像を利用しました。

プロンプトは以下のような内容にしてみました。
prompt=""" detailed realistic man character cyberpunk, realistic, neon, art, beautiful, 4K, collar, cyber armour """,
細かいことはあまり考えていませんが、とりあえずサイバーっぽい画像が出たら嬉しいなと思ってpromptを作成しました。
結果

かっこいいいい!!!! それっぽい!!!!
思ったより良い感じのアウトプットが出ました。
まとめ
今回は生成AIの中でも画像の分野を検証してみました。 非常に簡単に様々な効果を得ることができて楽しいですね、どんどん試していきたいです。
めちゃくちゃ簡単に利用ができるので、是非試してみてください〜!