Strands Agents + Amazon Bedrock AgentCoreでA2Aサーバーを構築してデプロイする
はじめに
こんにちは、スーパーマーケットが大好きなコンサルティング部の神野です。
最近年が明けたと思ったらもう2月ですね。早い・・・
最近、A2Aといったプロトコルについて耳にする機会がちょくちょく増えています。
異なるフレームワークで作られたエージェント同士が疎通して処理を実行するためのプロトコルです。
A2AがAgentCoreでサポートしているのは理解しているのですが、改めてどういった挙動をするのかな・・・?と最近気になることが増えてきたので、実際にAgentCoreとStrands Agentsを使って、手を動かして初歩的なところから解説していければと思い本記事を書いてみました!
前提
使用環境・ライブラリバージョン
今回は下記ライブラリを使用しました。
- Python 3.12
- uv 0.9.26
- strands-agents[a2a] >= 1.23.0
- bedrock-agentcore >= 1.2.0
- bedrock-agentcore-starter-toolkit >= 0.2.8
- strands-agents-tools[a2a-client] >= 0.2.19
- AWS CLIが設定済み
- 使用したリージョン
- us-west-2
A2Aプロトコルとは
A2A(Agent-to-Agent)は、異なるベンダー/フレームワークで構築されたAIエージェント同士の相互運用を目的としたオープン標準プロトコルです。Googleが立ち上げ、Linux Foundationがホストするプロジェクトとして公開・移管されました。
Welcome to the official documentation for the Agent2Agent (A2A) Protocol, an open standard designed to enable seamless communication and collaboration between AI agents.
Originally developed by Google and now donated to the Linux Foundation, A2A provides the definitive common language for agent interoperability in a world where agents are built using diverse frameworks and by different vendors.
主な特徴は下記となります。
- ベンダーに依存しない相互運用性を実現
- LangGraph、CrewAI、Strands Agentsなど異なるプラットフォームのエージェントを接続可能
- JSON-RPCプロトコルで通信
- MCP(Model Context Protocol)と補完的に機能
クライアントはまずAgent Cardを取得して、通信するエージェントの能力を理解し、その後JSON-RPCでメッセージを送信する流れになります。
具体的には下記GoogleのYouTubeで詳細があるので、見てみると学びになります。わかりやすいです。
Agent Card
Agent Cardは、A2Aプロトコルの特徴です。
エージェントが自身の情報を公開するためのJSONメタデータドキュメントで、/.well-known/agent-card.json エンドポイントで取得できます。
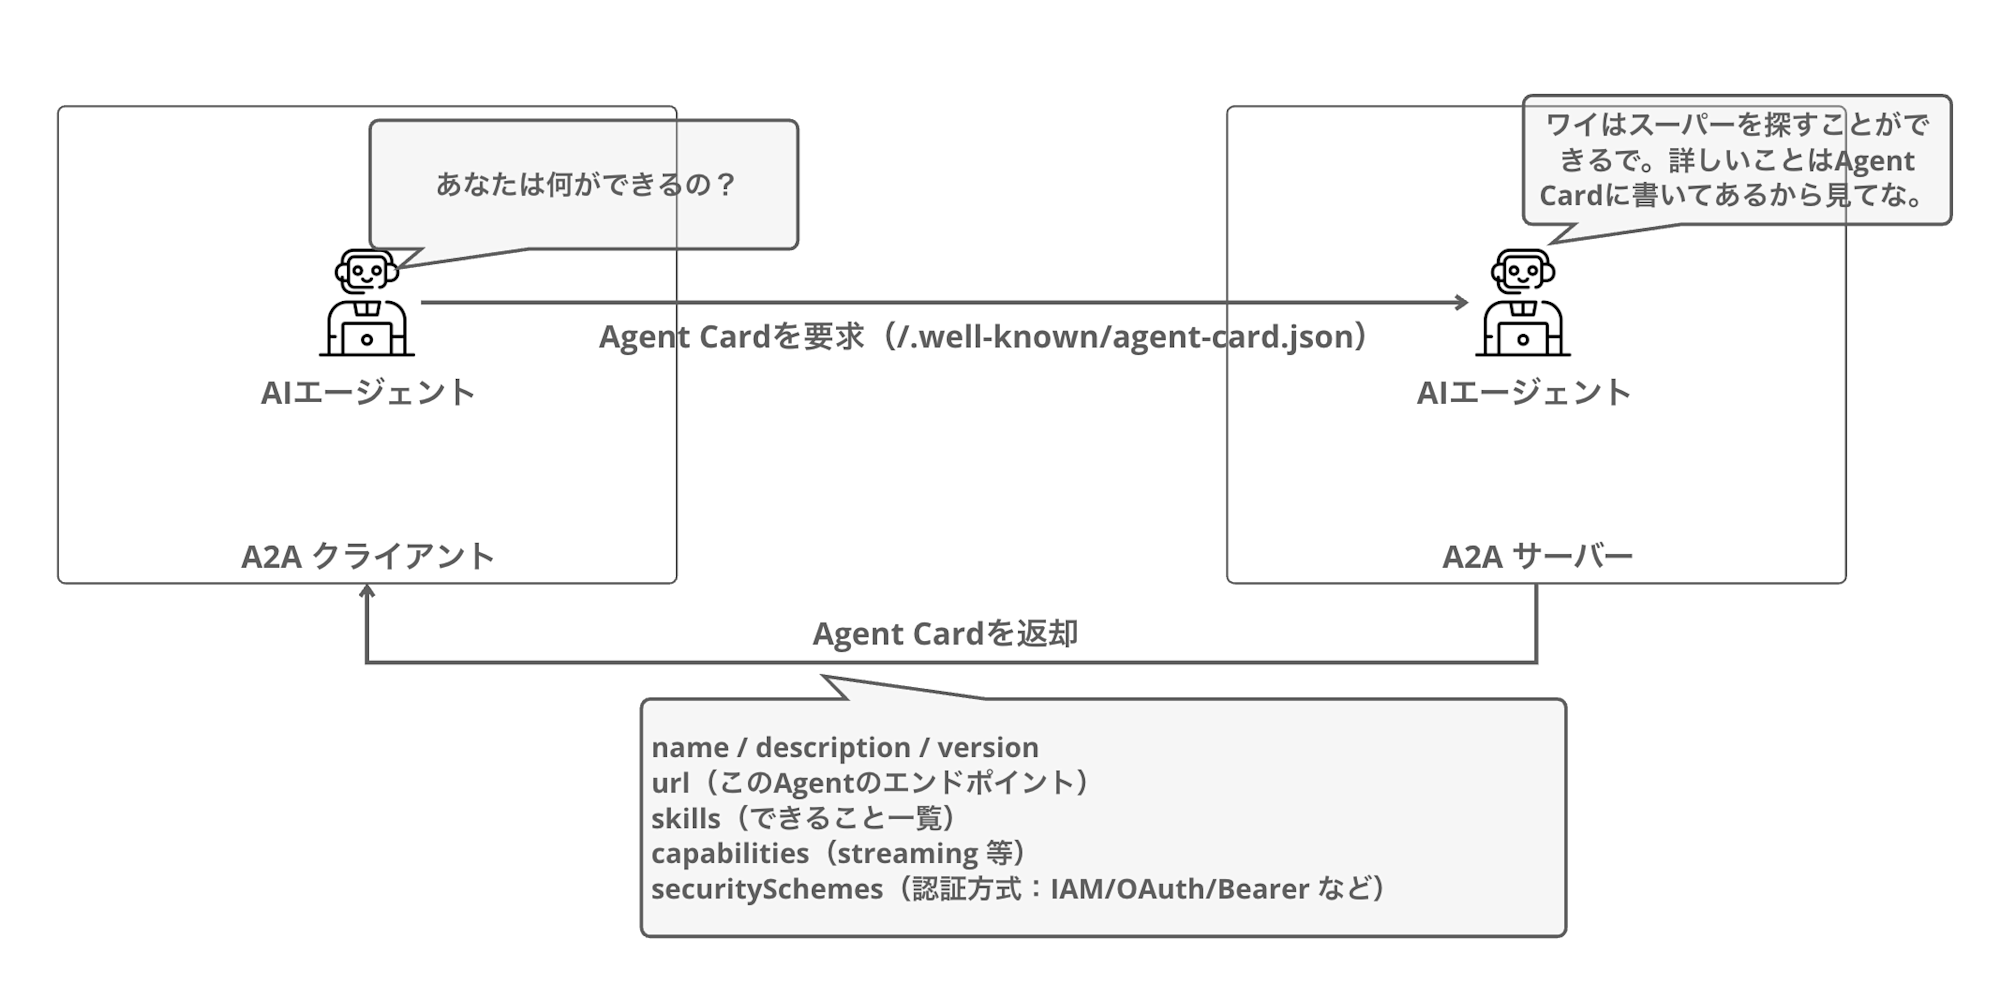
クライアントはAgent Cardを取得することで、そのエージェントが何をできるのか、どのように認証すればよいのかを理解することができます。これにより、エージェント同士が互いの能力を理解し、適切に連携できるようになります。
実際のAgent CardのJSONは下記のような形式になります。
{
  "name": "Calculator Agent",
  "description": "A calculator agent that can perform basic arithmetic operations.",
  "url": "http://127.0.0.1:9000/",
  "version": "0.0.1",
  "capabilities": {
    "streaming": true,
    "pushNotifications": false
  },
  "skills": [
    {
      "id": "calculator",
      "name": "calculator",
      "description": "Perform basic arithmetic operations",
      "inputModes": ["text"],
      "outputModes": ["text"]
    }
  ],
  "securitySchemes": {
    "bearer": {
      "type": "http",
      "scheme": "bearer"
    }
  },
  "security": ["bearer"]
}
Agent CardはAIエージェントのまさに名刺のようなものだと考えるとわかりやすいですね。
概念的なところはふんわりわかったのですが、まだ腹落ちしきれていないので実装を進めて理解を深めていきましょう。
実装
ここからはStrands AgentsでA2Aサーバーを実装していきます。
プロジェクトのセットアップ
まずはプロジェクトフォルダを作成し、必要なパッケージをインストールします。今回は uv を使用してセットアップしていきます。
mkdir a2a-agentcore-demo
cd a2a-agentcore-demo
uv init
必要なライブラリをインストールします。
uv add 'strands-agents[a2a]' bedrock-agentcore bedrock-agentcore-starter-toolkit strands-agents-tools
A2Aサーバーの実装
A2Aサーバーを実装します。今回はシンプルな計算エージェントを作成してみます。
公式ドキュメントの実装を使わせていただきます。
import logging
import os
from strands_tools.calculator import calculator
from strands import Agent
from strands.multiagent.a2a import A2AServer
import uvicorn
from fastapi import FastAPI

logging.basicConfig(level=logging.INFO)

# AgentCore Runtimeで動作する場合は環境変数からURLを取得
runtime_url = os.environ.get('AGENTCORE_RUNTIME_URL', 'http://127.0.0.1:9000/')

logging.info(f"Runtime URL: {runtime_url}")

# Strands Agentを作成
strands_agent = Agent(
    name="Calculator Agent",
    description="A calculator agent that can perform basic arithmetic operations.",
    tools=[calculator],
    callback_handler=None
)

host, port = "0.0.0.0", 9000

# A2AServerでラップ
a2a_server = A2AServer(
    agent=strands_agent,
    http_url=runtime_url,
    serve_at_root=True,  # ルートパスでサーブ
    enable_a2a_compliant_streaming=True  # A2A仕様準拠のストリーミング
)

app = FastAPI()

@app.get("/ping")
def ping():
    return {"status": "healthy"}

# A2AサーバーをFastAPIアプリにマウント
app.mount("/", a2a_server.to_fastapi_app())

if __name__ == "__main__":
    uvicorn.run(app, host=host, port=port)
作成したAgentは A2AServer クラスでラップすることでA2Aプロトコル互換になります。
特に難しい処理など不要でA2Aサーバーにできるのは良いですね。
http_url パラメータには公開URLを指定しますが、AgentCoreデプロイ時は環境変数から取得するようにしています。
動作確認(ローカル)
実装したA2Aサーバーをローカルで動作確認してみます。
サーバーの起動
uv run my_a2a_server.py
Agent Cardの確認
別のターミナルを開いて、Agent Cardを取得してみます。
curl http://localhost:9000/.well-known/agent-card.json | jq .
{
  "capabilities": {
    "streaming": true
  },
  "defaultInputModes": [
    "text"
  ],
  "defaultOutputModes": [
    "text"
  ],
  "description": "A calculator agent that can perform basic arithmetic operations.",
  "name": "Calculator Agent",
  "preferredTransport": "JSONRPC",
  "protocolVersion": "0.3.0",
  "skills": [
    {
      "description": "Calculator powered by SymPy for comprehensive mathematical operations.\n\nThis tool provides advanced mathematical functionality through multiple operation modes,\nincluding expression evaluation, equation solving, calculus operations (derivatives, integrals),\nlimits, series expansions, and matrix operations. Results are formatted with appropriate\nprecision and can be displayed in scientific notation when needed.\n\nHow It Works:\n------------\n1. The function parses the mathematical expression using SymPy's parser\n2. Based on the selected mode, it routes the expression to the appropriate handler\n3. Variables and constants are substituted with their values when provided\n4. The expression is evaluated symbolically and/or numerically as appropriate\n5. Results are formatted based on precision preferences and value magnitude\n6. Rich output is generated with operation details and formatted results\n\nOperation Modes:\n--------------\n- evaluate: Calculate the value of a mathematical expression\n- solve: Find solutions to an equation or system of equations\n- derive: Calculate derivatives of an expression\n- integrate: Find the indefinite integral of an expression\n- limit: Evaluate the limit of an expression at a point\n- series: Generate series expansion of an expression\n- matrix: Perform matrix operations\n\nCommon Usage Scenarios:\n---------------------\n- Basic calculations: Evaluating arithmetic expressions\n- Equation solving: Finding roots of polynomials or systems of equations\n- Calculus: Computing derivatives and integrals for analysis\n- Engineering analysis: Working with scientific notations and constants\n- Mathematics education: Visualizing step-by-step solutions\n- Data science: Matrix operations and statistical calculations\n\nReturns:\n    Dict containing status and response content in the format:\n    {\n        \"status\": \"success|error\",\n        \"content\": [{\"text\": \"Result: <calculated_result>\"}]\n    }\n\n    Success case: Returns the calculation result with appropriate formatting\n    Error case: Returns information about what went wrong during calculation\n\nNotes:\n    - For equation solving, set the expression equal to zero implicitly (x**2 + 1 means x**2 + 1 = 0)\n    - Use 'pi' and 'e' for mathematical constants\n    - The 'wrt' parameter is required for differentiation and integration\n    - Matrix expressions use Python-like syntax: [[1, 2], [3, 4]]\n    - Precision control impacts display only, internal calculations use higher precision\n    - Symbolic results are returned when possible unless force_numeric=True",
      "id": "calculator",
      "name": "calculator",
      "tags": []
    }
  ],
  "url": "http://127.0.0.1:9000/",
  "version": "0.0.1"
}
Agent Cardが返却されました!
ツールの説明(docstring)を丁寧に書いておくと、それがそのままA2Aクライアントに公開される能力情報になります。A2Aクライアントはこの情報を見て、このエージェントは微分積分もできるのか、行列演算もサポートしているのかと判断する仕組みです。
最初に大量の情報が返却されてどういうこと・・・?と思いましたが、組み込みのツールの説明が全て含まれていただけなんですね。
エージェントへのメッセージ送信
JSON-RPCフォーマットでメッセージを送信してみます。
curl -X POST http://localhost:9000 \
  -H "Content-Type: application/json" \
  -d '{
    "jsonrpc": "2.0",
    "id": "req-001",
    "method": "message/send",
    "params": {
      "message": {
        "role": "user",
        "parts": [
          {
            "kind": "text",
            "text": "what is 101 * 11?"
          }
        ],
        "messageId": "12345678-1234-1234-1234-123456789012"
      }
    }
  }' | jq .
レスポンスが返ってきました。こちらも何やら大量ですね。
{
  "id": "req-001",
  "jsonrpc": "2.0",
  "result": {
    "artifacts": [
      {
        "artifactId": "f5d3aef1-f914-40c5-a6db-caff80ca4e6c",
        "name": "agent_response",
        "parts": [
          {
            "kind": "text",
            "text": "101 * 11 = 1111\n"
          }
        ]
      }
    ],
    "contextId": "584a8626-1cc5-45ac-9e87-22ea758c007f",
    "history": [
      {
        "contextId": "584a8626-1cc5-45ac-9e87-22ea758c007f",
        "kind": "message",
        "messageId": "12345678-1234-1234-1234-123456789012",
        "parts": [
          {
            "kind": "text",
            "text": "what is 101 * 11?"
          }
        ],
        "role": "user",
        "taskId": "75018576-695b-4e86-919a-2db4f277c23a"
      },
      {
        "contextId": "584a8626-1cc5-45ac-9e87-22ea758c007f",
        "kind": "message",
        "messageId": "ad5f78f5-b9ba-4f6e-b57e-3a10e80ef930",
        "parts": [
          {
            "kind": "text",
            "text": "101 * 11 = "
          }
        ],
        "role": "agent",
        "taskId": "75018576-695b-4e86-919a-2db4f277c23a"
      },
      {
        "contextId": "584a8626-1cc5-45ac-9e87-22ea758c007f",
        "kind": "message",
        "messageId": "417d0a84-00c6-41d1-b59d-f1b85c384c3c",
        "parts": [
          {
            "kind": "text",
            "text": "1111"
          }
        ],
        "role": "agent",
        "taskId": "75018576-695b-4e86-919a-2db4f277c23a"
      }
    ],
    "id": "75018576-695b-4e86-919a-2db4f277c23a",
    "kind": "task",
    "status": {
      "state": "completed",
      "timestamp": "2026-01-28T12:49:50.490302+00:00"
    }
  }
}
レスポンスの構造を見てみると、単純な回答だけでなくかなりリッチな情報が返ってきていることがわかります。それぞれのフィールドを整理してみます。
| フィールド | 説明 |
|---|---|
| result.artifacts | 最終的な回答。parts 配列内に text として結果が格納されている |
| result.history | 会話履歴。ユーザーのメッセージとエージェントの応答が時系列で記録される |
| result.status | タスクの状態。state が completed であれば処理完了 |
| result.contextId | コンテキストID。同じ会話を継続する際に使用 |
| result.id | タスクID。個々のタスクを識別する |
こういった構造でレスポンスが返却されるんだと勉強になりました。自前でレスポンスを処理する際はこの構造を意識して取り扱いたいですね。
ローカルでの動作確認はこれで完了です!
AgentCoreへのデプロイ
ここからはAmazon Bedrock AgentCore Runtimeにデプロイしていきます。
デプロイ設定
agentcore configure コマンドでデプロイ設定を行います。
--protocolは A2Aを指定しておきましょう。
uv run agentcore configure -e my_a2a_server.py --protocol A2A
基本的に対話形式でそのまま設定を進めていけばOKですが、今回はコンテナデプロイを採用します。
認証は一番シンプルにデフォルトのIAMにします。
デプロイ実行
deployコマンドでデプロイします。
uv run agentcore deploy
デプロイ完了後、Agent Runtime ARNが表示されます。
Agent Runtime ARN: arn:aws:bedrock-agentcore:us-west-2:123456789012:runtime/my_a2a_server-xyz123
このARNは後で使用するので控えておきます。
動作確認(AgentCore)
早速デプロイしたA2Aサーバーを呼び出してみます。
agentcore invoke コマンド(IAM認証)
agentcore invoke コマンドでもJSON-RPC形式のペイロードを送信すれば呼び出せます。
uv run agentcore invoke '{"jsonrpc": "2.0", "id": "req-001", "method": "message/send", "params": {"message": {"role": "user", "parts": [{"kind": "text", "text": "what is 101 * 11?"}], "messageId": "12345678-1234-1234-1234-123456789012"}}}'
呼び出した結果は下記のように返却されました。
{
  "id": "req-001",
  "jsonrpc": "2.0",
  "result": {
    "artifacts": [
      {
        "artifactId": "19989fb9-05e9-4b3e-9342-8bfd6aaf9020",
        "name": "agent_response",
        "parts": [
          {"kind": "text", "text": "I'll calculate 101 * "},
          {"kind": "text", "text": "11 for you."},
          {"kind": "text", "text": "101"},
          {"kind": "text", "text": " * 11 "},
          {"kind": "text", "text": "= 1111"}
        ]
      }
    ],
    "status": {"state": "completed"}
  }
}
無事に呼び出せましたね!ローカルで動かした時と同じJSON-RPCレスポンスが返ってきています。
これでA2A理解した!とはならないですよね。。。
なぜかというとシンプルにリクエストを送って、呼び出しているだけなので、Agent Cardなども出てきませんので・・・
IAM 認証でも Agent Card を取得して discovery すること自体は可能ですが、A2Aクライアント実装側で SigV4 署名が必要になり、一般的なA2Aクライアント(Bearer前提)より少しだけ手間が増えます。
そこで今回はどういったことを理解することを重視してJWT認証で外部クライアントから呼びやすい構成に変えてみます。
一旦今まで作ったものは削除します。
# デプロイしたエージェントを削除
uv run agentcore destroy
削除が完了したらJWT認証でのデプロイを実施します。
JWT認証でのデプロイ
ここからは、Cognito User Poolを作成してJWT認証でエージェントをデプロイする方法を解説します。JWT認証を使えば、外部のA2Aクライアントからシンプルなベアラートークンでエージェントを呼び出せるようになります。
Cognito User Poolの作成
まずはCognito User Poolを作成するスクリプトを実行します。setup_cognito.sh というファイルを作成してください。
#!/bin/bash

REGION="us-west-2"

# User Pool作成
export POOL_ID=$(aws cognito-idp create-user-pool \
  --pool-name "A2AAgentUserPool" \
  --policies '{"PasswordPolicy":{"MinimumLength":8}}' \
  --region $REGION | jq -r '.UserPool.Id')

# App Client作成(クライアントシークレットなし)
export CLIENT_ID=$(aws cognito-idp create-user-pool-client \
  --user-pool-id $POOL_ID \
  --client-name "A2AAgentClient" \
  --no-generate-secret \
  --explicit-auth-flows "ALLOW_USER_PASSWORD_AUTH" "ALLOW_REFRESH_TOKEN_AUTH" \
  --region $REGION | jq -r '.UserPoolClient.ClientId')

# テストユーザー作成
aws cognito-idp admin-create-user \
  --user-pool-id $POOL_ID \
  --username "testuser" \
  --region $REGION \
  --message-action SUPPRESS > /dev/null

# パスワード設定(本番環境では安全なパスワードを使用してください)
aws cognito-idp admin-set-user-password \
  --user-pool-id $POOL_ID \
  --username "testuser" \
  --password "TestPassword123!" \
  --region $REGION \
  --permanent > /dev/null

# Bearerトークン取得
export BEARER_TOKEN=$(aws cognito-idp initiate-auth \
  --client-id "$CLIENT_ID" \
  --auth-flow USER_PASSWORD_AUTH \
  --auth-parameters USERNAME='testuser',PASSWORD='TestPassword123!' \
  --region $REGION | jq -r '.AuthenticationResult.AccessToken')

# Discovery URL
export DISCOVERY_URL="https://cognito-idp.$REGION.amazonaws.com/$POOL_ID/.well-known/openid-configuration"

# 結果出力
echo "=========================================="
echo "Pool ID: $POOL_ID"
echo "Client ID: $CLIENT_ID"
echo "Discovery URL: $DISCOVERY_URL"
echo "Bearer Token: $BEARER_TOKEN"
echo "=========================================="
スクリプトを実行します。
source setup_cognito.sh
実行結果の Discovery URL、Client ID、Bearer Token はこの後の設定で使用するので控えておきます。
JWT認証でのデプロイ設定
JWT認証用のエージェントを設定します。既存のエージェントとは別に、新しい名前で設定することをお勧めします。
uv run agentcore configure -e my_a2a_server.py --name my_a2a_server_oauth --protocol A2A
対話形式で設定を進めていきます。
Configure OAuth authorizer instead: Yes を選択して下記を入力します。
- Discovery URL: Cognitoの
Discovery URLを入力 - Allowed clients: Cognitoの
Client IDを入力
デプロイ方法は、先ほど同様にコンテナによるデプロイを選択して、それ以外はデフォルトの値を選択します。
デプロイ実行
uv run agentcore deploy
デプロイが完了すると、RuntimeのARNが表示されるのでメモに控えておきましょう。
ベアラートークンでの呼び出し
JWT認証を設定したエージェントは、--bearer-token オプションで取得したアクセストークンを使って呼び出せます。
uv run agentcore invoke '{"jsonrpc": "2.0", "id": "req-001", "method": "message/send", "params": {"message": {"role": "user", "parts": [{"kind": "text", "text": "what is 101 * 11?"}], "messageId": "12345678-1234-1234-1234-123456789012"}}}' --bearer-token $BEARER_TOKEN
呼び出したらしっかりレスポンス返ってきましたね!
Response:
{"id":"req-001","jsonrpc":"2.0","result":{"artifacts":[{"artifactId":"362349e7-309b-4b28-836c-3fe0f669225e","name":"agent_response","parts":[{"kind
":"text","text":"I"},{"kind":"text","text":"'ll calculate 101 "},{"kind":"text","text":"* 11 for"},{"kind":"text","text":"
you."},{"kind":"text","text":"The result"},{"kind":"text","text":" of"},{"kind":"text","text":" 101 * "},{"kind":"text","text":"11 is
**1"},{"kind":"text","text":"111**."}]}],"contextId":"7c2f7cce-0af6-4ea9-b85a-fc57c47033db","history":[{"contextId":"7c2f7cce-0af6-4ea9-b85a-fc57c4
7033db","kind":"message","messageId":"12345678-1234-1234-1234-123456789012","parts":[{"kind":"text","text":"what is 101 *
11?"}],"role":"user","taskId":"6ff8b0c0-ed8d-4084-bff6-3dcc38adbd16"}],"id":"6ff8b0c0-ed8d-4084-bff6-3dcc38adbd16","kind":"task","status":{"state":
"completed","timestamp":"2026-02-01T00:49:17.845839+00:00"}}}
ローカルでの呼び出しやIAM認証とほぼ変わらないレスポンスが返却されました。
A2Aクライアントからの呼び出し
JWT認証が設定されていると、A2Aクライアントライブラリから呼ぶことも可能です。ここではAgent Cardを事前に取得して、取得した情報を使ってエージェントを呼び出す処理にしています。
import asyncio
import os
from uuid import uuid4
import httpx
from a2a.client import A2ACardResolver, ClientConfig, ClientFactory
from a2a.types import Message, Part, Role, TextPart

async def send_message(message: str):
    # 環境変数から設定を取得
    runtime_url = os.environ.get('AGENTCORE_RUNTIME_URL')
    bearer_token = os.environ.get('BEARER_TOKEN')
    session_id = str(uuid4())

    # JWT認証ヘッダーを設定
    headers = {
        "Authorization": f"Bearer {bearer_token}",
        "X-Amzn-Bedrock-AgentCore-Runtime-Session-Id": session_id
    }

    async with httpx.AsyncClient(timeout=300, headers=headers) as httpx_client:
        # Agent Cardを取得
        resolver = A2ACardResolver(httpx_client=httpx_client, base_url=runtime_url)
        agent_card = await resolver.get_agent_card()
        print(f"Agent: {agent_card.name}")
        print(f"Skills: {[s.name for s in agent_card.skills]}")

        # クライアントを作成してメッセージ送信
        config = ClientConfig(httpx_client=httpx_client, streaming=False)
        factory = ClientFactory(config)
        client = factory.create(agent_card)

        msg = Message(
            kind="message",
            role=Role.user,
            parts=[Part(TextPart(kind="text", text=message))],
            message_id=uuid4().hex,
        )

        async for event in client.send_message(msg):
            if isinstance(event, Message):
                print(f"Response: {event.model_dump_json(exclude_none=True, indent=2)}")
                return event

if __name__ == "__main__":
    asyncio.run(send_message("what is 101 * 11?"))
取得したAgent Cardでクライアントを作成できるんですね。
事前に環境変数を設定して呼び出してみます。URLはARNをURLエンコードする必要があるので注意が必要です。
ARNからURLエンコードする方法は下記の通りです。: を %3A に、/ を %2F に変換します。
# 元のARN
arn:aws:bedrock-agentcore:us-west-2:123456789012:runtime/my_a2a_server_oauth-xxxxxxxx

# URLエンコード後
arn%3Aaws%3Abedrock-agentcore%3Aus-west-2%3A123456789012%3Aruntime%2Fmy_a2a_server_oauth-xxxxxxxx
Pythonで変換する場合は urllib.parse.quote を使用します。
from urllib.parse import quote

arn = "arn:aws:bedrock-agentcore:us-west-2:123456789012:runtime/my_a2a_server_oauth-xxxxxxxx"
encoded_arn = quote(arn, safe='')
print(encoded_arn)
# 出力: arn%3Aaws%3Abedrock-agentcore%3Aus-west-2%3A123456789012%3Aruntime%2Fmy_a2a_server_oauth-xxxxxxxx
それでは環境変数を設定して実行してみます。
export AGENTCORE_RUNTIME_URL="https://bedrock-agentcore.us-west-2.amazonaws.com/runtimes/arn%3Aaws%3Abedrock-agentcore%3Aus-west-2%3A123456789012%3Aruntime%2Fmy_a2a_server_oauth-xxxxxxxx/invocations/"
export BEARER_TOKEN="<Bearer Token>"
uv run a2a_oauth_client.py
呼び出してみると下記のようにレスポンスが返ってきました。
Agent: Calculator Agent
Skills: ['calculator']

Sending message: what is 101 * 11?

Task status: completed
Response: I'll calculate 101 * 11 for you.The result of 101 * 11 is **1111**.
しっかりと計算してくれましたね!!
いよいよAgent同士で疎通させてみましょうか。
ローカルでAIエージェントをStrands Agentsで作成して呼び出してみます。
Strandsエージェントからの呼び出し(A2AClientToolProvider)
Strands Agentsには A2AClientToolProvider というツールが用意されています。
これを使うと、Strands AgentsからA2Aサーバーをツールとして呼び出せるようになります。
まずは追加のパッケージをインストールします。
uv add 'strands-agents-tools[a2a_client]'
次に、A2AClientToolProviderを使ってリモートエージェントを呼び出すコードを作成します。
import os
from strands import Agent
from strands_tools.a2a_client import A2AClientToolProvider

# 環境変数から設定を取得
runtime_url = os.environ.get('AGENTCORE_RUNTIME_URL')
bearer_token = os.environ.get('BEARER_TOKEN')

# JWT認証ヘッダーを設定
httpx_client_args = {
    "headers": {
        "Authorization": f"Bearer {bearer_token}",
    },
    "timeout": 300
}

# A2AClientToolProviderを作成
# known_agent_urls にリモートエージェントのURLを指定
provider = A2AClientToolProvider(
    known_agent_urls=[runtime_url],
    httpx_client_args=httpx_client_args
)

# オーケストレーターエージェントを作成
# A2AClientToolProviderが提供するツールを渡す
orchestrator = Agent(
    name="Orchestrator Agent",
    description="リモートのA2Aエージェントと連携するオーケストレーター",
    tools=provider.tools
)

# オーケストレーターに指示を出す
# 内部でA2Aサーバーを呼び出して計算してくれる
response = orchestrator("リモートの計算エージェントを使って、256 * 16 を計算してください")
オーケストレーターエージェントは、A2AClientToolProviderを使って自動的にリモートエージェントを発見し、適切なエージェントにタスクを委譲します。認証が設定されているので、httpx_client_args でベアラートークンを渡すだけで認証が通ります。
作成できたので実行してみます。
uv run orchestrator_agent.py
実行したら結果が返ってきました!
リモートの計算エージェントを使って256 × 16を計算いたします。まず、利用可能なエージェントを確認してから計算を実行します。
Tool #1: a2a_list_discovered_agents
計算エージェントが利用可能です。それでは256 × 16を計算してもらいます。
Tool #2: a2a_send_message
リモートの計算エージェントを使って計算した結果、**256 × 16 = 4096** です。

計算エージェントが正確に計算を実行し、結果を返してくれました。リモートの計算エージェントを使って計算した結果、**256 × 16 = 4096** です。
おお、連携できていますね!!
実行結果をみるに、まずは連携可能なエージェントの情報を取得して何ができるかを理解し、リモートのエージェントに計算処理を実行してくれました。
先ほど自前でAgent Cardの取得して、対象のAIエージェントを呼び出す部分はA2AClientToolProviderが処理をラップしているので、細かく連携用の処理を書かなくてもある程度よしなにやって連携できるのは嬉しいポイントですね。
クリーンアップ
不要になったリソースを削除します。
uv run agentcore destroy
これでAgentCore Runtime、ECRリポジトリ、IAMロールなどが削除されます。
Cognitoのクリーンアップ
不要になったCognito User Poolを削除する場合は下記を実行します。
aws cognito-idp delete-user-pool --user-pool-id $POOL_ID --region us-west-2
おわりに
今回はA2Aプロトコルを使ってAgentCoreにAIエージェントをデプロイおよび疎通の確認をしてみました。
実際に動かすと理解が深まりますね。Strands Agentsに便利なライブラリ群があるので、A2AのAgentをホストするのもクライアントとしてリクエストするのもそこまで難しい処理はない印象でした。
AgentCoreとStrands Agentsで実装する場合、Agent As ToolやSwarmなどでAgent同士の協調はできるので、あえてA2Aで連携する必要はないかもしれませんが、すでにA2Aサーバーが使われていて連携したい場合など思い返してみたいですね。
今回はサーバー側はAWS、クライアントはローカルといった組み合わせでしたが、次回はどちらもAWSでマルチエージェント構成も確認できたらと思います!どういった認証スキームが連携しやすいのかなども検証したいです。
本記事が少しでも参考になりましたら幸いです!
最後までご覧いただきありがとうございましたー!!
補足
A2Aプロトコルを使ってAgentCore Runtimeにエージェントをホストする場合は公式ドキュメントに要件が記載されているので、必要に応じて参照したいですね。
翻訳した説明も記載いたします。
Amazon Bedrock AgentCoreのA2A(Agent-to-Agent)プロトコル対応は、透過的なプロキシレイヤーとして機能することで、A2Aサーバーとのシームレスな統合を実現します。
A2A用に設定された場合、AgentCoreはコンテナがポート9000のルートパス(0.0.0.0:9000/)でステートレスかつストリーミング可能なHTTPサーバーを実行することを前提としています。これはA2Aサーバーのデフォルト設定に準拠したものです。本サービスは、プロトコルの透過性を維持しつつ、エンタープライズグレードのセッション分離機能を提供します。
InvokeAgentRuntime APIからのJSON-RPCペイロードは、変更を加えることなくA2Aコンテナへ直接渡されます。
このアーキテクチャにより、「/.well-known/agent-card.json」を通じたエージェントカードによる標準的なエージェント検出機能やJSON-RPC通信といったA2Aプロトコルの特徴を維持しながら、エンタープライズ向けの認証(SigV4/OAuth 2.0)やスケーラビリティを付加することができます。他のプロトコルとの主な違いは、ポート番号(HTTPの8080に対して9000)、マウントパス(/invocationsに対して/)、および標準化されたエージェント検出メカニズムにあります。
これらの特徴により、Amazon Bedrock AgentCoreは、本番環境におけるA2Aエージェントの展開に最適なプラットフォームとなっています。他のプロトコルとの主な違い:
■ ポート
A2Aサーバーはポート9000で動作します(HTTPは8080、MCPは8000)。■ パス
A2Aサーバーはルート「/」にマウントされます(HTTPは「/invocations」、MCPは「/mcp」)。■ エージェントカード
「/.well-known/agent-card.json」にあるエージェントカードを通じて、組み込みのエージェント検出機能を提供します。■ プロトコル
エージェント間の通信にはJSON-RPCを使用します。■ 認証
SigV4およびOAuth 2.0の両方の認証スキームをサポートしています。