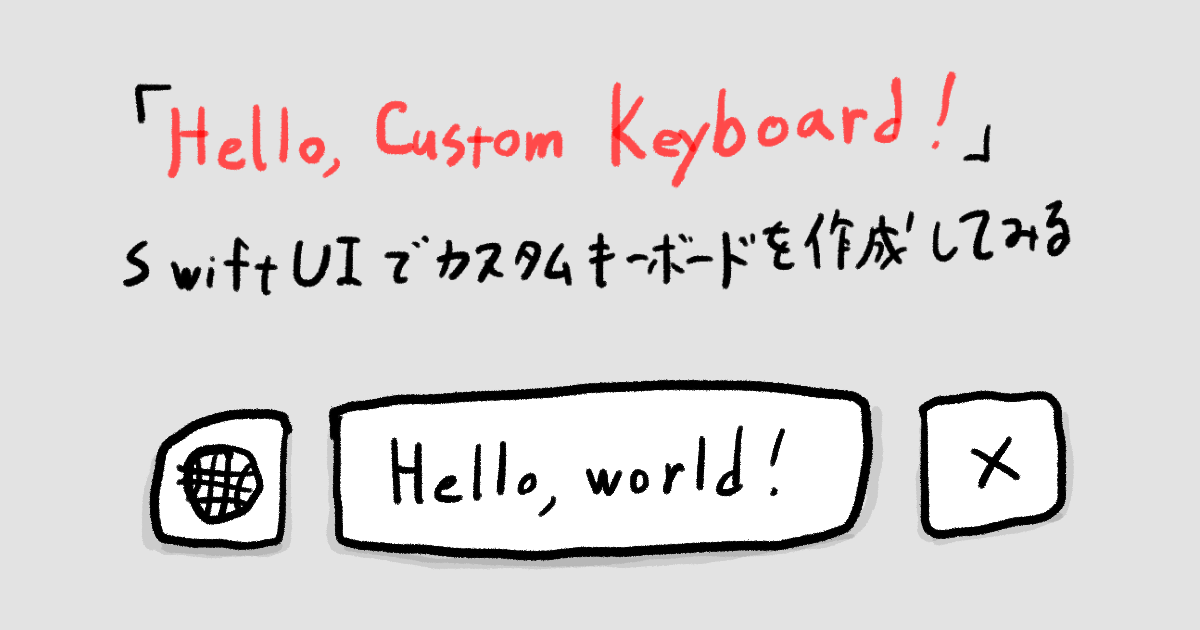
「Hello, Custom Keyboard!」SwiftUIでカスタムキーボードを作成してみる
この記事は公開されてから1年以上経過しています。情報が古い可能性がありますので、ご注意ください。
ふと、カスタムキーボードが作成したいと思ったのでカスタムキーボード作成の第一歩に踏み出してみることにしました。 カスタムXibでキーボードのViewを作成する記事はあったのですが、SwiftUIでViewを作成しているものはあまりなかったので記事にしてみることにしました。
環境
- Xcode 14.1
- iOS 16.1
準備
まずはXcodeで新規プロジェクトを立ち上げます。
最初はAppのテンプレートを選択します。

オプション設定では任意のプロジェクト名を設定し、Interfaceは、SwiftUIとStorybaordのどちらでも問題ありません。

プロジェクトが作成できたら、次はプロジェクト > TARGET の下部分にある+ボタンからカスタムキーボード用のエクステンションを追加します。

+ボタンを押すと、ターゲット追加用のポップアップが表示されます。Custom Keybaord Extensionを選択し、Nextを押します。

ターゲットのオプション設定画面が表示されるので、任意の名前を設定します。

今回作成したターゲットのスキームをアクティベートするかどうかを問われるので、Activateを押します。

プロジェクトにカスタムキーボード用の新しいターゲットが追加され、スキームを今回作成したターゲットに切り替わっているのが確認出来ます。

カスタムキーボードのターゲットの作成が出来ました。
KeyboardViewController
キーボードのターゲットを追加すると、KeybaordViewControllerというファイルも追加されており、これがカスタムキーボードのUIInputViewControllerになり、ここでカスタムキーボードに関する処理を記述します。UIInputViewControllerはUIViewControllerを継承しています。
@MainActor class UIInputViewController : UIViewController
デフォルトのコード
KeyboardViewControllerのデフォルトのコードは下記にようになっています。
import UIKit

class KeyboardViewController: UIInputViewController {

    @IBOutlet var nextKeyboardButton: UIButton!

    override func updateViewConstraints() {
        super.updateViewConstraints()

        // Add custom view sizing constraints here
    }

    override func viewDidLoad() {
        super.viewDidLoad()

        // カスタムUIのセットアップをここで行う
        self.nextKeyboardButton = UIButton(type: .system)

        self.nextKeyboardButton.setTitle(NSLocalizedString("Next Keyboard", comment: "Title for 'Next Keyboard' button"), for: [])
        self.nextKeyboardButton.sizeToFit()
        self.nextKeyboardButton.translatesAutoresizingMaskIntoConstraints = false

        self.nextKeyboardButton.addTarget(self, action: #selector(handleInputModeList(from:with:)), for: .allTouchEvents)

        self.view.addSubview(self.nextKeyboardButton)

        self.nextKeyboardButton.leftAnchor.constraint(equalTo: self.view.leftAnchor).isActive = true
        self.nextKeyboardButton.bottomAnchor.constraint(equalTo: self.view.bottomAnchor).isActive = true
    }

    override func viewWillLayoutSubviews() {
        self.nextKeyboardButton.isHidden = !self.needsInputModeSwitchKey
        super.viewWillLayoutSubviews()
    }

    override func textWillChange(_ textInput: UITextInput?) {
        // ドキュメントのコンテンツが変更される直前に呼ばれる。変更前に行いたい処理をここで行う
    }

    override func textDidChange(_ textInput: UITextInput?) {
        // ドキュメントのコンテンツが変更された時に呼ばれる。

        var textColor: UIColor
        let proxy = self.textDocumentProxy
        if proxy.keyboardAppearance == UIKeyboardAppearance.dark {
            textColor = UIColor.white
        } else {
            textColor = UIColor.black
        }
        self.nextKeyboardButton.setTitleColor(textColor, for: [])
    }

}
カスタムキーボードを追加
Custom Keyboard Extensionのスキームでビルドしようとすると、ビルドするアプリを選択する必要があるのでキーボード入力があるアプリを選択します。今回はシミュレータに入っているSafariを選択しました。

最初はまだカスタムキーボードが追加されていない為、設定からカスタムキーボードを追加する必要があります。
設定 > 一般 > キーボード > キーボード > 新しいキーボードを追加を押すと、キーボードを選択する画面が表示されるので今回作成しているキーボードを選択します。
追加が成功するとキーボードの項目に今回作成しているキーボードが追加されます。

シミュレータで確認
上記の設定でシミュレータ上でキーボードを表示させて、キーボードを切り替えるとカスタムキーボードが表示されます。ホームボタンのあるアプリだと、Next Keyboardボタンだけがあるキーボードが表示されました。

※ただし、下部にノッチがあるデバイス(ホームボタンのないデバイス)のシミュレータでは、needsInputModeSwitchKeyがfalseになっている為、デフォルトのコードではNext Keybaordのボタンが表示されないようになっています。利用としては、ノッチ部分にキーボードを切り替えボタンがあり、重複したボタンが存在するのを避ける為です。
SwiftUIでキーボードを作成する
実際にカスタムキーボードのViewを作成していきます。
カスタムキーボードエクステンションのターゲットの中にSwiftUIのファイルを追加して作成していきます。

SwiftUIファイルを追加すると、プレビューが正常に表示されないのを確認出来ます。
エラーを表示すると、下記のエラーが表示されます。
UnsupportedAppExtensionTypeError: HelloWorldKeyboard.appex is unsupported
Previews cannot be hosted inside "com.apple.keyboard-service" app extensions
このエラーはターゲットにメインアプリを含めると、解決出来ます。

NextKeyboardButtonを作成
次のキーボードに切り替えるボタンを作成します。次のコードを呼び出すにはUIInputViewControllerのインスタンスメソッドhandleInputModeList(from:with:)を呼び出す必要があります。
`
デフォルトのコードでは、UIButtonにaddTargetで設定しています。
self.nextKeyboardButton.addTarget(self, action: #selector(handleInputModeList(from:with:)), for: .allTouchEvents)
今回は、UIViewRepresentableで作成したUIButtonにセレクターを渡す方法で対応しました。
struct NextKeyboardButton: View {
    let systemName: String
    let action: Selector

    var body: some View {
        Image(systemName: systemName)
            .overlay {
                NextKeyboardButtonOverlay(action: action)
            }
    }
}

struct NextKeyboardButtonOverlay: UIViewRepresentable {
    let action: Selector

    func makeUIView(context: Context) -> UIButton {
        // UIButtonを生成し、セレクターをactionに設定
        let button = UIButton()
        button.addTarget(nil,
                         action: action,
                         for: .allTouchEvents)
        return button
    }

    func updateUIView(_ button: UIButton, context: Context) {}
}
受け取ったセレクターをactionに設定したUIButtonをラベルとなるImageに被せて、SwiftUIで使えるNextKeyboardButtonを作成しました。
KeyboardViewを作成する
今回はHello, world!と入力できるボタンと削除ボタン、Next Keyboardボタンを配置したキーボードを作成しました。
struct KeyboardView: View {

    let needsInputModeSwitchKey: Bool
    let nextKeyboardAction: Selector
    let inputTextAction: (String) -> Void
    let deleteTextAction: () -> Void

    private let helloWorldText = "Hello, world!"

    var body: some View {

        HStack {

            Group {

                // Next Keybaord
                if needsInputModeSwitchKey {

                    NextKeyboardButton(systemName: "globe",
                                       action: nextKeyboardAction)
                    .frame(width: 44, height: 44)
                }

                // Input Text
                Button(helloWorldText) {
                    inputTextAction(helloWorldText)
                }
                .frame(height: 44)
                .padding(.horizontal)

                // Delete Text
                Button {
                    deleteTextAction()
                } label: {
                    Image(systemName: "xmark")
                        .frame(width: 44, height: 44)
                }
            }
            .background(Color(uiColor: .systemBackground))
            .clipShape(RoundedRectangle(cornerRadius: 8))
            .shadow(radius: 8)
        }
        .foregroundColor(Color(uiColor: .label))
        .frame(height: 160)
    }
}
needsInputModeSwitchKeyがtrueの場合のみ、NextKeyboardButtonは表示するようにしました。
プレビュー

KeyboardViewControllerにSwiftUIのカスタムViewを追加する
KeyboardViewControllerのviewに作成したKeyboardViewを追加します。
import UIKit
import SwiftUI

class KeyboardViewController: UIInputViewController {

    override func viewDidLoad() {
        setup()
    }

    private func setup() {

        let nextKeyboardAction = #selector(self.handleInputModeList(from:with:))
        // カスタムUIのセットアップをここで行う
        let keyboardView = KeyboardView(needsInputModeSwitchKey: needsInputModeSwitchKey,
                                        nextKeyboardAction: nextKeyboardAction,
                                        inputTextAction: { [weak self] text in
            guard let self else { return }
            self.textDocumentProxy.insertText(text)

        }, deleteTextAction: { [weak self] in
            guard let self,
                  self.textDocumentProxy.hasText else { return }

            self.textDocumentProxy.deleteBackward()
        })

        // keyboardViewのSuperViewのSuperView(UIHostingController)の背景を透明にする
        let hostingController = UIHostingController(rootView: keyboardView.backgroundClearSheet())

        self.addChild(hostingController)
        self.view.addSubview(hostingController.view)
        hostingController.didMove(toParent: self)

        hostingController.view.translatesAutoresizingMaskIntoConstraints = false
        NSLayoutConstraint.activate([
            hostingController.view.leftAnchor.constraint(equalTo: view.leftAnchor),
            hostingController.view.topAnchor.constraint(equalTo: view.topAnchor),
            hostingController.view.rightAnchor.constraint(equalTo: view.rightAnchor),
            hostingController.view.bottomAnchor.constraint(equalTo: view.bottomAnchor)
        ])
    }
}
カスタムUIのセットアップ
作成したKeybaordViewのそれぞれのアクションを設定します。
let nextKeyboardAction = #selector(self.handleInputModeList(from:with:))
// カスタムUIのセットアップをここで行う
let keyboardView = KeyboardView(needsInputModeSwitchKey: needsInputModeSwitchKey,
                                nextKeyboardAction: nextKeyboardAction,
                                inputTextAction: { [weak self] text in
    guard let self else { return }
    self.textDocumentProxy.insertText(text)

}, deleteTextAction: { [weak self] in
    guard let self,
          self.textDocumentProxy.hasText else { return }

    self.textDocumentProxy.deleteBackward()
})
nextKeyboardActionには、self.handleInputModeList(from:with:)を実行する為のセレクターを渡します。
textDocumentProxy.insertText(_ text: String)にテキストを渡すことで文字を挿入出来るので、inputTextAction内で記述しています。
textDocumentProxy.deleteBackward()で一つ前の文字が削除出来るので、テキストがある場合のみ実行するようにdeleteTextAction内に記述しています。
KeyboardViewの背景色を透明にする
UIHostingControllerからViewを使用する場合、UIHostingControllerのデフォルトの背景色が反映されている為、背景色を透明にしたい場合はUIHostingController側の背景色を変更する必要があります。
今回はこのようなViewエクステンションを作成し、使用しました。
extension View {

    func BackgroundColor(_ color: UIColor) -> some View {
        background(BackgroundColorView(color: color))
    }
}

struct BackgroundColorView: UIViewRepresentable {

    let color: UIColor

    func makeUIView(context: Context) -> UIView {
        let view = UIView()
        Task {
            view.superview?.superview?.backgroundColor = color
        }
        return view
    }

    func updateUIView(_ uiView: UIView, context: Context) {}
}
以前、記事にしたので今回は詳細は割愛させていただきます。
カスタムViewを追加し、レイアウトの設定
あとは、UIHostingControllerとUIHostingController.viewを追加し、レイアウトを設定すると完成です。
self.addChild(hostingController)
self.view.addSubview(hostingController.view)
hostingController.didMove(toParent: self)

hostingController.view.translatesAutoresizingMaskIntoConstraints = false
NSLayoutConstraint.activate([
    hostingController.view.leftAnchor.constraint(equalTo: view.leftAnchor),
    hostingController.view.topAnchor.constraint(equalTo: view.topAnchor),
    hostingController.view.rightAnchor.constraint(equalTo: view.rightAnchor),
    hostingController.view.bottomAnchor.constraint(equalTo: view.bottomAnchor)
])
デモ

Hello, world!とだけ入力出来る需要のないキーボードを作成することが出来ました!
コードはGitHubに載せております。
おわりに
簡単ではありますが、カスタムキーボードを作ることが出来ました。カスタムキーボードで出来ることはまだまだあるので今後試して行けたら面白いなと感じました。
メモ帳付きキーボードとかTODOリスト付きキーボードとか出来たら面白いかも?とか思ったりしたので機会があれば試してみようと思います。
素敵なカスタムキーボードライフをお楽しみください。