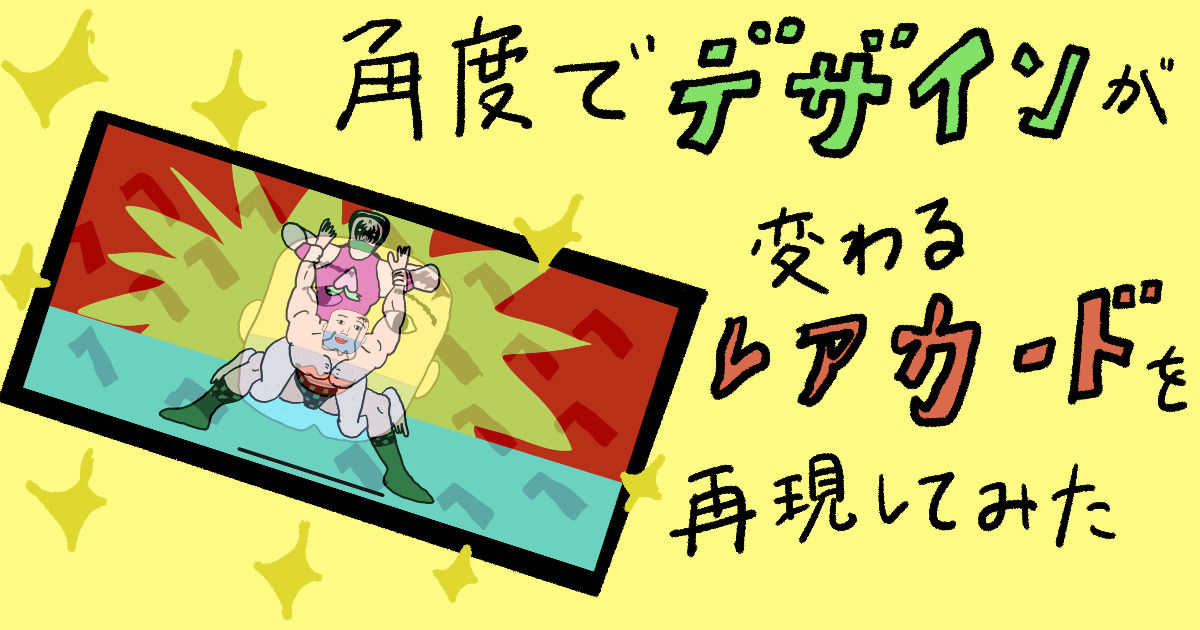
【SwiftUI】角度でデザインが変わるレアカードを再現してみた
この記事は公開されてから1年以上経過しています。情報が古い可能性がありますので、ご注意ください。
これは娘と私の壮絶な戦いの話です。
ことの発端は、子どもが角度によってデザインが変わるカードを自慢してきたことでした。

「く、くそ、、キラキラしているし、見る角度でデザインが変わってカッコいい、、」
これが正直な感想でした。
自慢されて悔しかったのでiOSエンジニアらしくアプリを作って対抗してみることにしました。
作ったもの

環境
- Xcode 13.3
レンチキュラーカード
今回調べて知ったのですが、見る角度でデザインが変わるカードのことを、レンチキュラーカードと言います。
どうアプリで再現するか
ARKitのFaceTrackingで目の角度が変わる度に画像を変更するという方針でも良かったですが、FaceTrackingは最近触れたので今回はCoreMotionのCMAttributeで取得したデバイスの姿勢情報を用いて再現する方向にしました。
画像の透過度を変更して表現する
画像を3枚並べて、その画像の不透過度を変更してなんちゃってレンチキュラーな表現をする方法を思いつきました。

後ろから順に、
- back
- middle
- front
としました。
あとはデバイスの姿勢とリンクさせて画像の不透過度を変更する処理を行います。
デバイスの姿勢を取得する
Core MotionのCMAttitudeでデバイスの姿勢情報としてオイラー角を取得することが出来ます。
オイラー角の情報として、roll角、pitch角、yaw角の3つの角度がそれぞれのプロパティにラジアン単位の値で格納されています。
- roll
- デバイス上部から下部方向への垂直方向の軸を中心とした回転角度
- pitchi
- デバイス左右を通る水平方向の軸を中心とした回転角度
- yaw
- デバイス前面から背面へと通る軸を中心とした回転角度
イラストにするとこんな感じです。

今回はデバイスの向きをlandscape left固定で使用することを前提で進めていくのでinfo.plistのSupported interface orientationsのキーをlandscape leftのみに設定しました。
また、今回はroll角の回転角度だけをみて、その角度に応じてImageのopacityの値を変化させます。

LenticulationManager
レンチキュラーカードっぽく表現する為のクラスを作成しました。
class LenticulationManager: ObservableObject {

    @Published var middleImageOpacity: CGFloat = 1
    @Published var frontImageOpacitry: CGFloat = 0

    private let motionManager = CMMotionManager()

    ///  基準にする角度
    private let baseDegrees: CGFloat = 60

    init() {
        if motionManager.isDeviceMotionAvailable {
            startUpdatingLenticulation()
        }
    }

    private func startUpdatingLenticulation() {
        // 1秒間に60回アップデートする
        motionManager.deviceMotionUpdateInterval = 1.0 / 60.0
        motionManager.startDeviceMotionUpdates(to: OperationQueue.current!) { (deviceMotion, error) in
            guard let deviceMotion = deviceMotion,
                  error == nil
            else { return }

            // ラジアンを角度に変換
            let degree = deviceMotion.attitude.roll.convertedRadianToDegree()
            // 角度から姿勢状態に変換
            let attitudeState = DeviceAttitudeState(degree)
            // 姿勢の状態に応じてImageOpacityの値を更新
            self.updateImageOpacity(with: attitudeState)
        }
    }

    /// デバイスの姿勢状態に応じてImageOpacityの値を更新
    private func updateImageOpacity(with attributeState: DeviceAttitudeState) {

        switch attributeState {
        case .flat:
            update(middleImageOpacity: 1, andFrontImageOpacity: 0)
        case .forward(let degree):
            let frontOpacity = degree >= baseDegrees ?  1 : degree / baseDegrees
            update(middleImageOpacity: 1, andFrontImageOpacity: frontOpacity)
        case .backward(let degree):
            let middleOpacity = degree >= baseDegrees ?  0 : (baseDegrees - degree) / baseDegrees
            update(middleImageOpacity: middleOpacity, andFrontImageOpacity: 0)
        }
    }

    private func update(middleImageOpacity: CGFloat,
                        andFrontImageOpacity frontImageOpacty: CGFloat) {
        self.middleImageOpacity = middleImageOpacity
        self.frontImageOpacitry = frontImageOpacty
    }
}
上から説明していきます。
Published Properties
@Published var middleImageOpacity: CGFloat = 1
@Published var frontImageOpacitry: CGFloat = 0
View側のImageのopacityを変更したいのでパブリッシュしています。
CMMotionManager
private let motionManager = CMMotionManager()
デバイスモーションを取得する為には、CMMotionManagerの力が不可欠なのでインスタンスを生成しています。
baseDegrees
今回基準にする角度です。
private let baseDegrees: CGFloat = 60
正直、この基準にする角度の数値は個人の好みかなと思いますが、個人的に60度を基準にするくらいがレンチキュラー風な見え方として理想に近かったのでこの値にしました。
init()
init() {
    if motionManager.isDeviceMotionAvailable {
        startUpdatingLenticulation()
    }
}
DeviceMotionが使用出来ない端末ではそもそも姿勢情報を取得出来ない為、使用可能かを確認します。
使用できるなら、レンチキュラーっぽい表現を開始します。
startUpdatingLenticulation
private func startUpdatingLenticulation() {
    // 1秒間に60回アップデートする
    motionManager.deviceMotionUpdateInterval = 1.0 / 60.0
    motionManager.startDeviceMotionUpdates(to: OperationQueue.current!) { (deviceMotion, error) in
        guard let deviceMotion = deviceMotion,
              error == nil
        else { return }

        // ラジアンを角度に変換
        let degree = deviceMotion.attitude.roll.convertedRadianToDegree()
        // 角度から姿勢状態に変換
        let attitudeState = DeviceAttitudeState(degree)
        // 姿勢の状態に応じてImageOpacityの値を更新
        self.updateImageOpacity(with: attitudeState)
    }
}
motionManager.deviceMotionUpdateInterval
motionManager.deviceMotionUpdateInterval = 1.0 / 60.0
デバイスモーションの更新間隔を指定しています。
今回は、1秒間に60回アップデートするように指定しました。
motionManager.startDeviceMotionUpdates(to:, withHandler:)
func startDeviceMotionUpdates(to queue: OperationQueue,
                              withHandler handler: @escaping CMDeviceMotionHandler)
第一引数のqueueで操作を開始するキューを設定して、CMDeviceMotionHandlerにはデバイスモーションが更新される度に実行したい処理を記述します。
CMDeviceMotionHandler
typealias CMDeviceMotionHandler = (CMDeviceMotion?, Error?) -> Void
CMDeviceMotionHandlerから更新されたCMDeviceMotionのCMAttributeを取得出来るので、そこから最新のデバイス姿勢(オイラー角)を取得します。
ラジアンから角度に変換
deviceMotion.attribute.rollはラジアンの値なので角度に変換します。
// ラジアンを角度に変換
let degree = deviceMotion.attitude.roll.convertedRadianToDegree()
ラジアンから角度へ変換する公式
角度 = 180/π*ラジアン
こちらの式に合わせたextenisonを作成しました。
extension Double {
    func convertedRadianToDegree() -> Double {
        return self * 180 / Double.pi
    }
}
角度から姿勢状態に変換
角度から扱いやすいようにDeviceAttitudeStateというenumを用意してデバイス姿勢状態に変換します。
let attitudeState = DeviceAttitudeState(degree)
DeviceAttitudeState
extension LenticulationManager {

    enum DeviceAttitudeState {
        case flat  // 平な状態
        case forward(degree: Double) // 前方に傾いている状態
        case backward(degree: Double) // 後方に傾いている状態

        init(_ degree: Double) {

            switch degree {
            case 1...180:
                self = .forward(degree: degree)
            case -180 ... -1:
                let positiveDegree = degree * -1
                self = .backward(degree: positiveDegree)
            default:
                self = .flat
            }
        }
    }
}
DeviceAttitudeState.init(_:)時に渡された角度の値を見て、それぞれの状態に振り分けています。
後ろに傾くと値がネガティブになるので、.backwardの場合は、マイナスを消しています。また、今回はflatと言いながら、1未満-1より大きい状態なので厳密にはフラットではないですが、flatの出番が少なくなってしまうので今回はこういう形にしました。
姿勢の状態に応じてImageOpacityの値を更新
変換したDeviceAttitudeStateの状態に応じて、ImageOpacityの値を更新します。
self.updateImageOpacity(with: attitudeState)
updateImageOpacity(with:)
private func updateImageOpacity(with attributeState: DeviceAttitudeState) {

    switch attributeState {
    case .flat:
        update(middleImageOpacity: 1, andFrontImageOpacity: 0)
    case .forward(let degree):
        let frontOpacity = degree >= baseDegrees ?  1 : degree / baseDegrees
        update(middleImageOpacity: 1, andFrontImageOpacity: frontOpacity)
    case .backward(let degree):
        let middleOpacity = degree >= baseDegrees ?  0 : (baseDegrees - degree) / baseDegrees
        print(middleOpacity)
        update(middleImageOpacity: middleOpacity, andFrontImageOpacity: 0)
    }
}
.flatの場合は、frontImageOpacityを0、middleImageOpacityを1にしています。.forwordの場合は、角度が今回個人的に設定した基準となる角度baseDegreesの60以上ならば、1として、そうでないなら、60を100%とした時の角度の割合値をfrontImageOpacityとしています。middleImageOpacityは1にしています。.backwordの場合も、基準となる角度から不透過度を算出するのは同じなのですが、middleImageOpacityの値を減らしていきたいので、60以上ではない場合は、(baseDegrees - degree)で減らしたい不透過度を算出しています。また60以上の場合を0にしています。
60度以上の場合は、一律で1または0の不透過度にしており、60より上の値を拾っていないのでデバイスがひっくり返るところまで不透過度を反映したい場合はそこの考慮も必要となります。
今回はそこまでこだわらなかったので省くことにしました。
update(middleImageOpacity:, andFrontImageOpacity:)
各ケース内で呼ばれているupdate(middleImageOpacity:, andFrontImageOpacity:)はこのようになっています。
private func update(middleImageOpacity: CGFloat,
                    andFrontImageOpacity frontImageOpacty: CGFloat) {
    self.middleImageOpacity = middleImageOpacity
    self.frontImageOpacitry = frontImageOpacty
}
クラス側は完了したので、View側を見ていきましょう。
ContentView
import SwiftUI

struct ContentView: View {

    @StateObject var lenticulationManager = LenticulationManager()

    var body: some View {
        ZStack {
            Image("back")
                .resizable()
                .ignoresSafeArea()
            Image("middle")
                .resizable()
                .ignoresSafeArea()
                .opacity(lenticulationManager.middleImageOpacity)
            Image("front")
                .resizable()
                .ignoresSafeArea()
                .opacity(lenticulationManager.frontImageOpacitry)
        }
    }
}
各Imageにそれぞれ画像を割り当てて、opacityにはlenticulationManagerで更新されるImageOpacityを設定しています。
以上で完成になります。
コードはGitHubに置いております。
娘が驚く顔が楽しみだ!
おわりに
全然、娘が喜んでくれませんでした。