MotherDuckのMCP Serverを使ってCursorでのdbt ローカル開発を試してみた
はじめに
データ事業本部ビッグデータチームのkasamaです。
今回は以下の記事を参考に、MotherDuckが公開しているMCP Serverを用いて、dbt coreのローカル開発を試してみたいと思います。
前提
MotherDuckのMCP Serverの利点
MotherDuckのMCP Serverは、自然言語でローカルのDuckDBやクラウド上のMotherDuckデータベースにアクセスできるサービスです。
MCP ServerがなくともCursorによる自然言語での開発は可能ですが、以下の問題点は残ります。
- AI(Cursor 等)に「users と orders を結合してユーザーごとの合計金額 mart を作って」と自然言語指示しても、データのカラム名・型・内容を正確に把握できない
- 推測で SQL/dbt モデルを作るため、ミス(typo, 型不一致, 結合条件ミス等)が頻発
- 結局、ユーザーが手動で「データの中身確認 → 修正 → 再生成」を繰り返す羽目に
- AI のアウトプットを検証しながら何度もやりとりが必要(フィードバックループが遅い)
自然言語でデータにアクセスできるMCP Serverを活用することで、AI が「実際のデータ内容」をリアルタイムで参照して、SQL/dbt モデルを生成できます。またAIが対話的にDuckDBに対してdbt run、dbt testができるので、フィードバックループが早くなります。
事前準備
今回活用する資産は以下のGithubリポジトリに格納しています。
@MacBookPro 57_motherduck_mcp_test_with_dbt %
tree -a
.
├── .cursor
│   └── rules
│       └── dbt_rule.mdc
├── create_pq.py
├── README.md
└── requirements.txt

3 directories, 5 files
Agentの指示を出す際に渡すdbtのruleです。このmdcファイル自体もdbtの公式ドキュメントなどを参考にAIに生成してもらいました。。
.cursor/rules/dbt_rule.mdc
# dbt SQL Style Guide (Best Practices)

## Principles
- Prioritize readability and maintainability.
- Use only SELECT statements for transformations (no INSERT/UPDATE/DELETE).
- Always reference tables with `ref` or `source` (e.g., `ref('core_users')`).

---

## Style & Formatting
- Use snake_case for all names (e.g., `user_id`, `order_amount`).
- SQL keywords in UPPERCASE, table/column names in lowercase.
- Indent with 2 or 4 spaces, consistently.
- One column per line in SELECT.
- Use CTEs (WITH) for complex logic, keep nesting shallow.
- Add clear comments for intent and caveats.
- Never nest Jinja curly braces (`{{ }}`).
- Do not add a semicolon at the end of dbt SQL files.

---

## Naming
- Use snake_case for tables, models, and columns.
- Use clear suffixes for aggregates (e.g., `_count`, `_sum`, `_avg`).
- Boolean columns start with `is_` or `has_` (e.g., `is_active`).

---

## Best Practices
- Always use `ref`/`source`, never hardcode table names.
- Minimize CTEs; avoid unnecessary intermediate tables.
- Handle NULLs explicitly (e.g., `coalesce`, `ifnull`).
- Use `distinct` only when needed for deduplication.
- Always pair aggregate functions with `group by`.
- Avoid excessive subqueries; use CTEs for clarity.

---

## Tests & Documentation
- Add `description` to all models and columns.
- Define tests like `not_null` and `unique` in YAML for key columns.

---

# Rules for CTE (Common Table Expression)

- Always break down complex queries using CTEs (WITH clause), and give each CTE a descriptive name indicating its role.
- Recommended structure: "import (external reference) → logical (transformation/aggregation) → final (output)".
- Each CTE should have a single responsibility to maximize reusability and readability.
- Use snake_case for CTE names, and make the purpose clear in the name.
- When using multiple CTEs, add a brief comment before each CTE.
- Avoid deep nesting or excessive dependencies between CTEs.
- If logic is reused, make it a CTE; if used across models, consider making it a separate model.
- Use dbt's {{ ref('...') }} in import CTEs at the top.

---

## Example

with import_orders as (
  select * from {{ ref('orders') }}
),
aggregate_orders as (
  select
    user_id,
    count(order_id) as order_count
  from import_orders
  where status = 'completed'
  group by 1
),
final as (
  select
    user_id,
    order_count,
    case when order_count >= 3 then 'super_buyer'
         when order_count = 2 then 'regular_buyer'
         else 'single_buyer' end as buyer_type
  from aggregate_orders
)
select * from final

- Be conscious of the order, naming, and responsibility of each CTE.
テスト用のParquetファイルを作成する実装です。Usersデータは異常値・型揺らぎありの状態で、Ordersデータは正常値のみです。parquetファイルにしたのは、CSVだとMCP ServerなくともCursorファイルが参照できるので、あまり良さが伝わらないと思ったためです。また、異常値を混ぜることでどのようにデータを参照してロジックを組んでくれるか試したいと思います。
create_pq.py
import pandas as pd
import numpy as np

# usersデータ(異常値・型揺らぎあり)
users_data = {
    "user_id": [1, 2, 3, 4, 5, 6],
    "name": ["Alice", "Bob", None, "Eve", "Mallory", "Oscar"],
    "age": [25, "thirty", 40.5, None, 28, 22],
    "is_active": [True, False, "yes", None, False, True],
    "signup_date": [
        "2023-01-01",
        "2023-02-15",
        None,
        "not_a_date",
        "2023-05-20",
        "2023-06-01",
    ],
    "comment": ["Good", None, "Bad", "Average", "", "Excellent"],
    "extra_col": [np.nan, 123, "text", True, 0.5, None],
}
users_df = pd.DataFrame(users_data)
users_df["age"] = users_df["age"].astype(str)
users_df["is_active"] = users_df["is_active"].astype(str)
users_df["extra_col"] = users_df["extra_col"].astype(str)
users_df.to_parquet("users.parquet", engine="pyarrow")
print("users.parquet 作成完了")

# ordersデータ(正常値のみ)
orders_data = {
    "order_id": [101, 102, 103, 104, 105, 106],
    "user_id": [1, 2, 1, 4, 5, 6],  # usersに存在するuser_idのみ
    "amount": [120.5, 90.0, 30.0, 200.0, 50.0, 60.0],  # floatのみ
    "order_date": [
        "2024-03-01",
        "2024-03-02",
        "2024-03-05",
        "2024-03-10",
        "2024-03-11",
        "2024-03-12",
    ],
    "status": ["completed", "cancelled", "completed", "completed", "completed", "completed"],
    "coupon_used": [True, False, False, False, True, False],
    "extra_info": ["", "gift", "", "", "", ""],
}
orders_df = pd.DataFrame(orders_data)
orders_df.to_parquet("orders.parquet", engine="pyarrow")
print("orders.parquet 作成完了")
requirements.txtには、先ほどのPythonファイルを実行する際に使用するライブラリとdbtとDuckDBでの開発に使用するライブラリを記載しています。
dbt-duckdb
duckdb
pandas
pyarrow
前提としてMacとCursorでの手順となります。まずは、以下のコマンドで必要なライブラリをinstallしていきます。
curl https://install.duckdb.org | sh
brew install uv

# 仮想環境の作成とアクティベート
uv venv
source .venv/bin/activate
# 必要なパッケージのインストール(uvを使用)
uv pip install -r requirements.txt
pythonファイルを実行してParquetファイルを生成します。
(motherduck-mcp-test) @MacBookPro motherduck-mcp-test % python create_pq.py
users.parquet 作成完了
orders.parquet 作成完了
(motherduck-mcp-test) @MacBookPro motherduck-mcp-test %
次にdbtプロジェクトのセットアップを行います。databaseはDuckDBを使用するのでそのまま1を選択します。
(motherduck-mcp-test) @MacBookPro motherduck-mcp-test % dbt init mcp_demo
22:33:09  Running with dbt=1.9.4
22:33:09
Your new dbt project "mcp_demo" was created!

For more information on how to configure the profiles.yml file,
please consult the dbt documentation here:

  https://docs.getdbt.com/docs/configure-your-profile

One more thing:

Need help? Don't hesitate to reach out to us via GitHub issues or on Slack:

  https://community.getdbt.com/

Happy modeling!

22:33:09  Setting up your profile.
Which database would you like to use?
[1] duckdb

(Don't see the one you want? https://docs.getdbt.com/docs/available-adapters)

Enter a number: 1
作成ができたらdbt initで作成された不要フォルダの削除、ディレクトリ構成の追加、データ移動します。
rm -r mcp_demo/models/example

# ディレクトリ構造の作成
mkdir -p mcp_demo/models/staging
mkdir -p mcp_demo/models/mart
mkdir -p mcp_demo/data

# Parquetファイルをdata/ディレクトリに配置
mv ./users.parquet ./orders.parquet mcp_demo/data/
dbt_project.ymlのexampleの記載も削除します。
models:
  mcp_demo:
-    # Config indicated by + and applies to all files -under models/example/
-    example:
-      +materialized: view
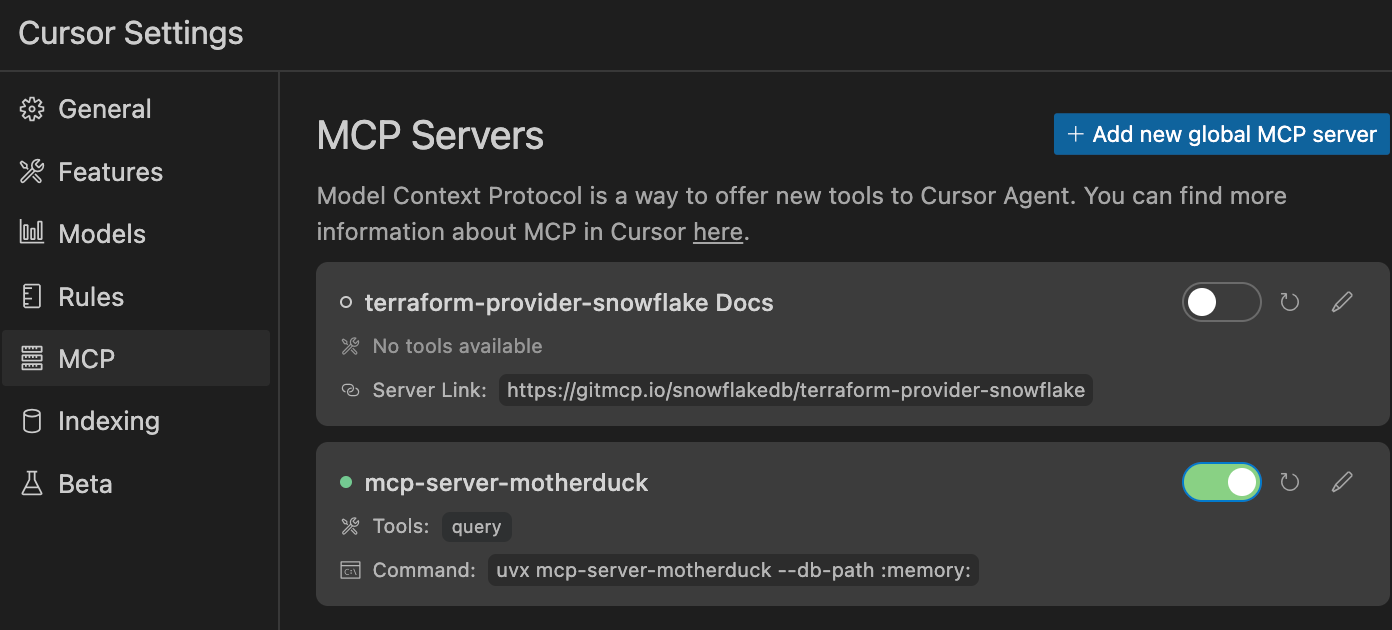
Cursor > Settings > MCP > Add new grobal MCP serverからMotherDuckのMCPを設定します。
{
  "mcpServers": {
    "mcp-server-motherduck": {
      "command": "uvx",
      "args": [
        "mcp-server-motherduck",
        "--db-path",
        ":memory:"
      ]
    }
  }
}
設定したら緑色の接続状態になっていることを確認します。
ここまでできたら事前準備は完了です。
試してみた
それでは、バイブコーディングで開発を進めていきたいと思います。
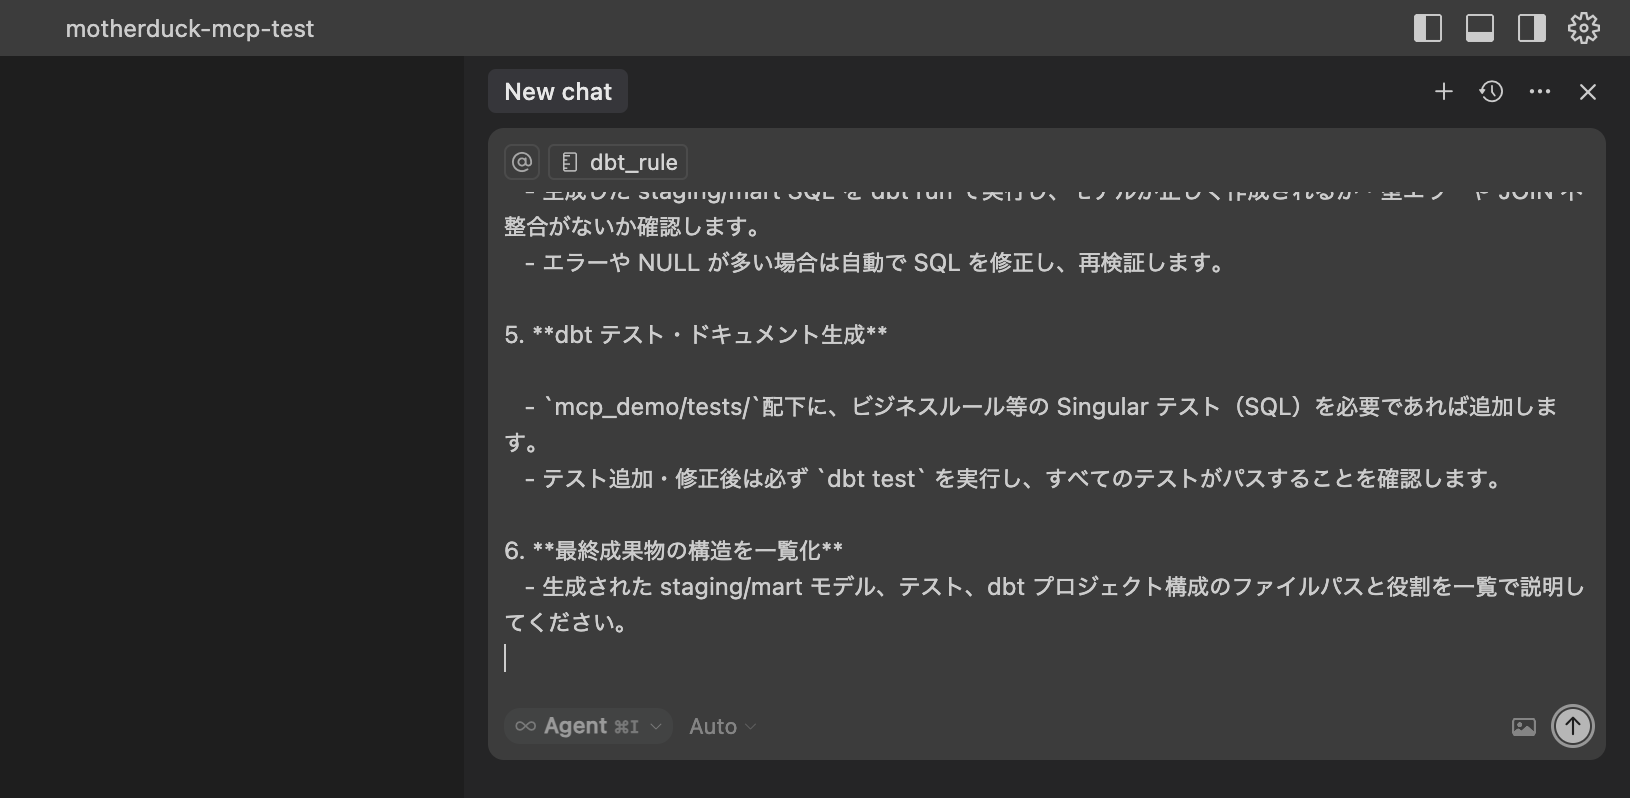
Cursorのチャットに今回用に作成した以下のpromptを与えます。@dbt_rule.mdcはCursorでメンションします。promptは今回用に作成したものなので、参考程度にしていただければと思います。
@dbt_rule.mdc

Cursor Rulesと以下の手順をもとに開発を開始してください。

### Workflow

- DuckDB/MotherDuck MCP server(`mcp-server-duckdb`)を使い、Parquet データの構造やサンプルをプレビューしてください。
- 目標は「異常値や型揺らぎを含むユーザーデータと、正常な注文データを JOIN し、ユーザーごとの購入集計 mart を dbt モデルで作成・検証」することです。
- 既存の dbt プロジェクトは `mcp_demo` サブフォルダにあります。
- SQL や YAML の実装・修正時は、必ず `.cursor/rules/model_sql.mdc` ファイルのルールに従ってください。

---

### Tasks

1. **データ構造・内容の確認**

   - MCP サーバー(`mcp-server-duckdb`)を使い、`<projects>/data/users.parquet`と`<projects>/data/orders.parquet`について
     - `DESCRIBE SELECT * FROM read_parquet('<absolute_path>')`(必ず絶対パスで指定してください。例: `/Users/yourname/projects/mcp_demo/data/users.parquet`)
     - `SELECT * FROM read_parquet('<absolute_path>') LIMIT 1000`(必ず絶対パスで指定してください。例: `/Users/yourname/projects/mcp_demo/data/orders.parquet`)
       を実行してスキーマ・サンプルを取得し、出力を見せてください。

2. **staging モデルの提案・生成**

- stg_xxx.sql(staging モデル)の作成
  - 上記で定義した source を使って、staging モデル(stg_users.sql や stg_orders.sql)を書きます。
  - stg では、DuckDB の read_parquet 関数で絶対パス で指定した Parquet ファイルを参照します。
  - データの型揺らぎやクリーニングもこのタイミングで行います。
- mcp_demo/models/staging/schema.yml に models:を追加します。
  - stg モデルの SQL ができたら、その内容に合わせて schema.yml の models:セクションにカラム説明やテスト(not_null, unique など)を追加します。

3. **mart モデル(集計)の設計・生成**

   - `mcp_demo/models/mart/mart_user_sales.sql`として、staging users/orders を user_id で JOIN し、ユーザーごとの合計購入金額・注文回数を集計する SQL を作成してください。
   - mart ディレクトリ(mcp_demo/models/mart/)に schema.yml を作成
     - schema.yml の models: セクションで mart モデルの説明・カラム・テストを定義

4. **MCP 経由で SQL 検証**

   - 生成した staging/mart SQL を dbt run で実行し、モデルが正しく作成されるか・型エラーや JOIN 不整合がないか確認します。
   - エラーや NULL が多い場合は自動で SQL を修正し、再検証します。

5. **dbt テスト・ドキュメント生成**

   - `mcp_demo/tests/`配下に、ビジネスルール等の Singular テスト(SQL)を必要であれば追加します。
   - テスト追加・修正後は必ず `dbt test` を実行し、すべてのテストがパスすることを確認します。

6. **最終成果物の構造を一覧化**
   - 生成された staging/mart モデル、テスト、dbt プロジェクト構成のファイルパスと役割を一覧で説明してください。
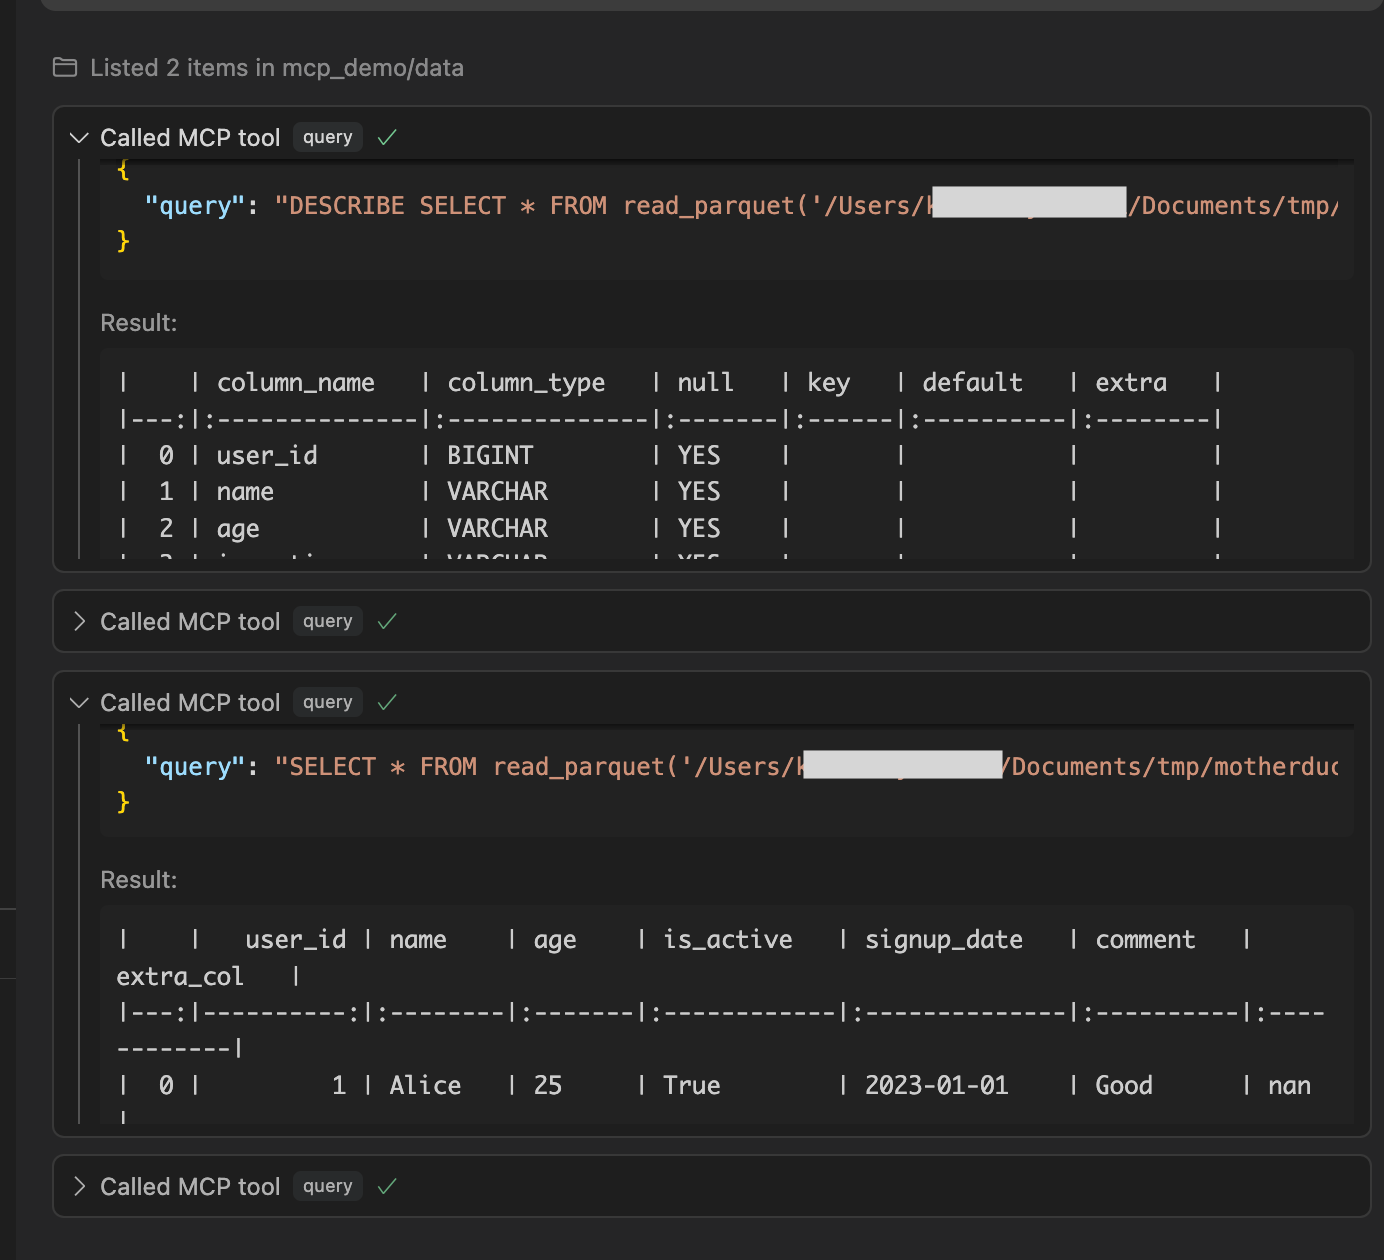
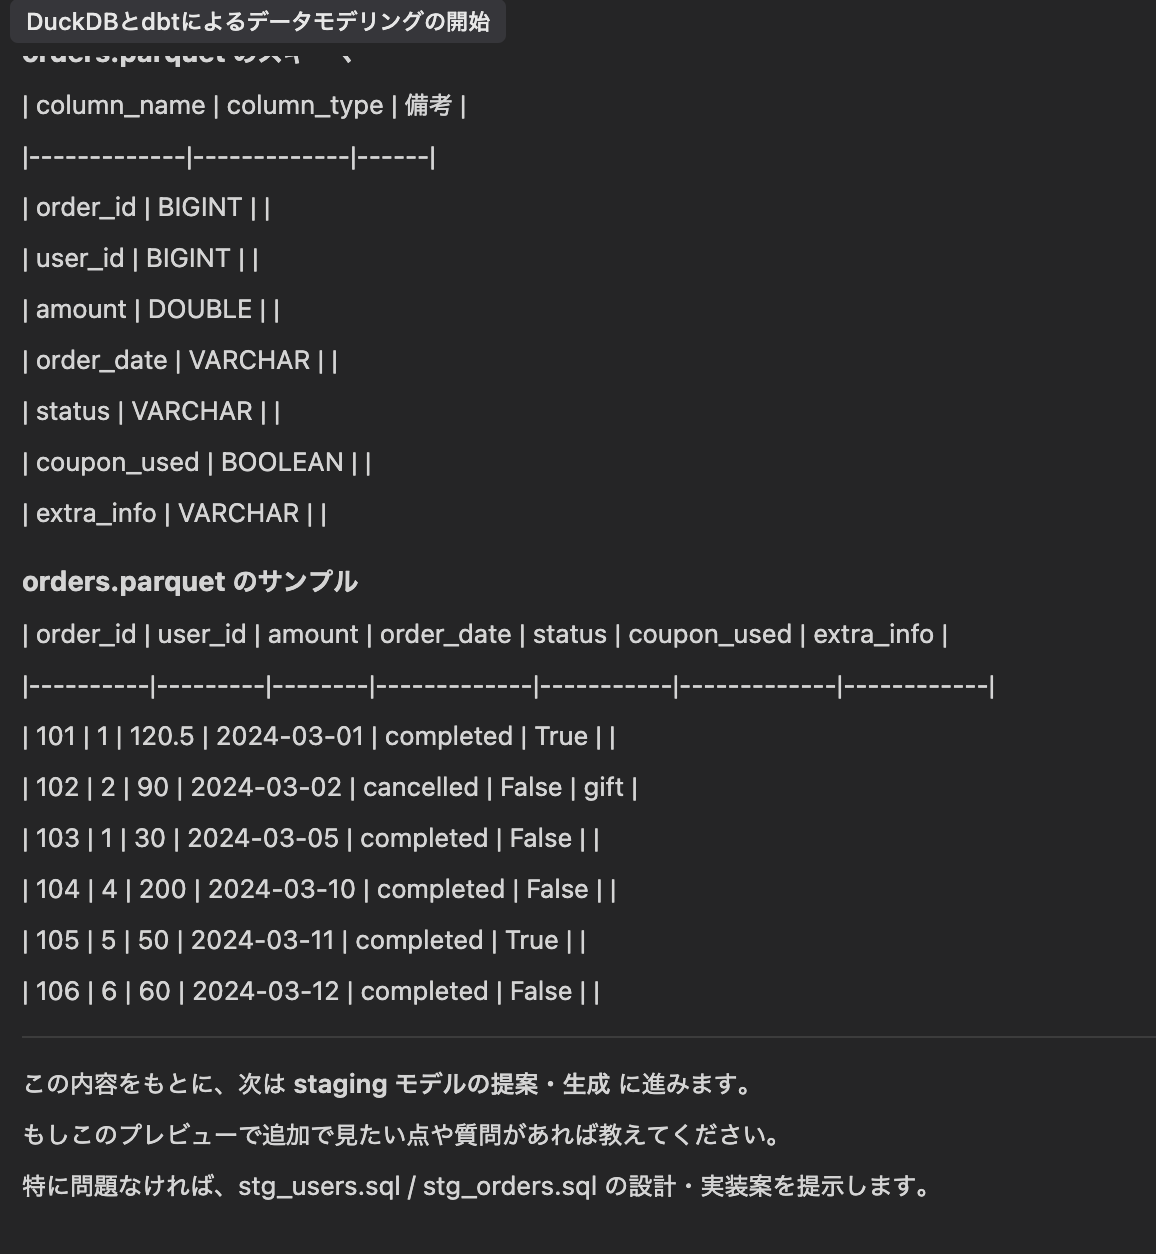
DESCRIBEでメタデータ、SELECTでデータの中身を確認しています。
確認が終わると次はstagingモデルを作成してくれるので、そのまま進めてくださいと入力しました。
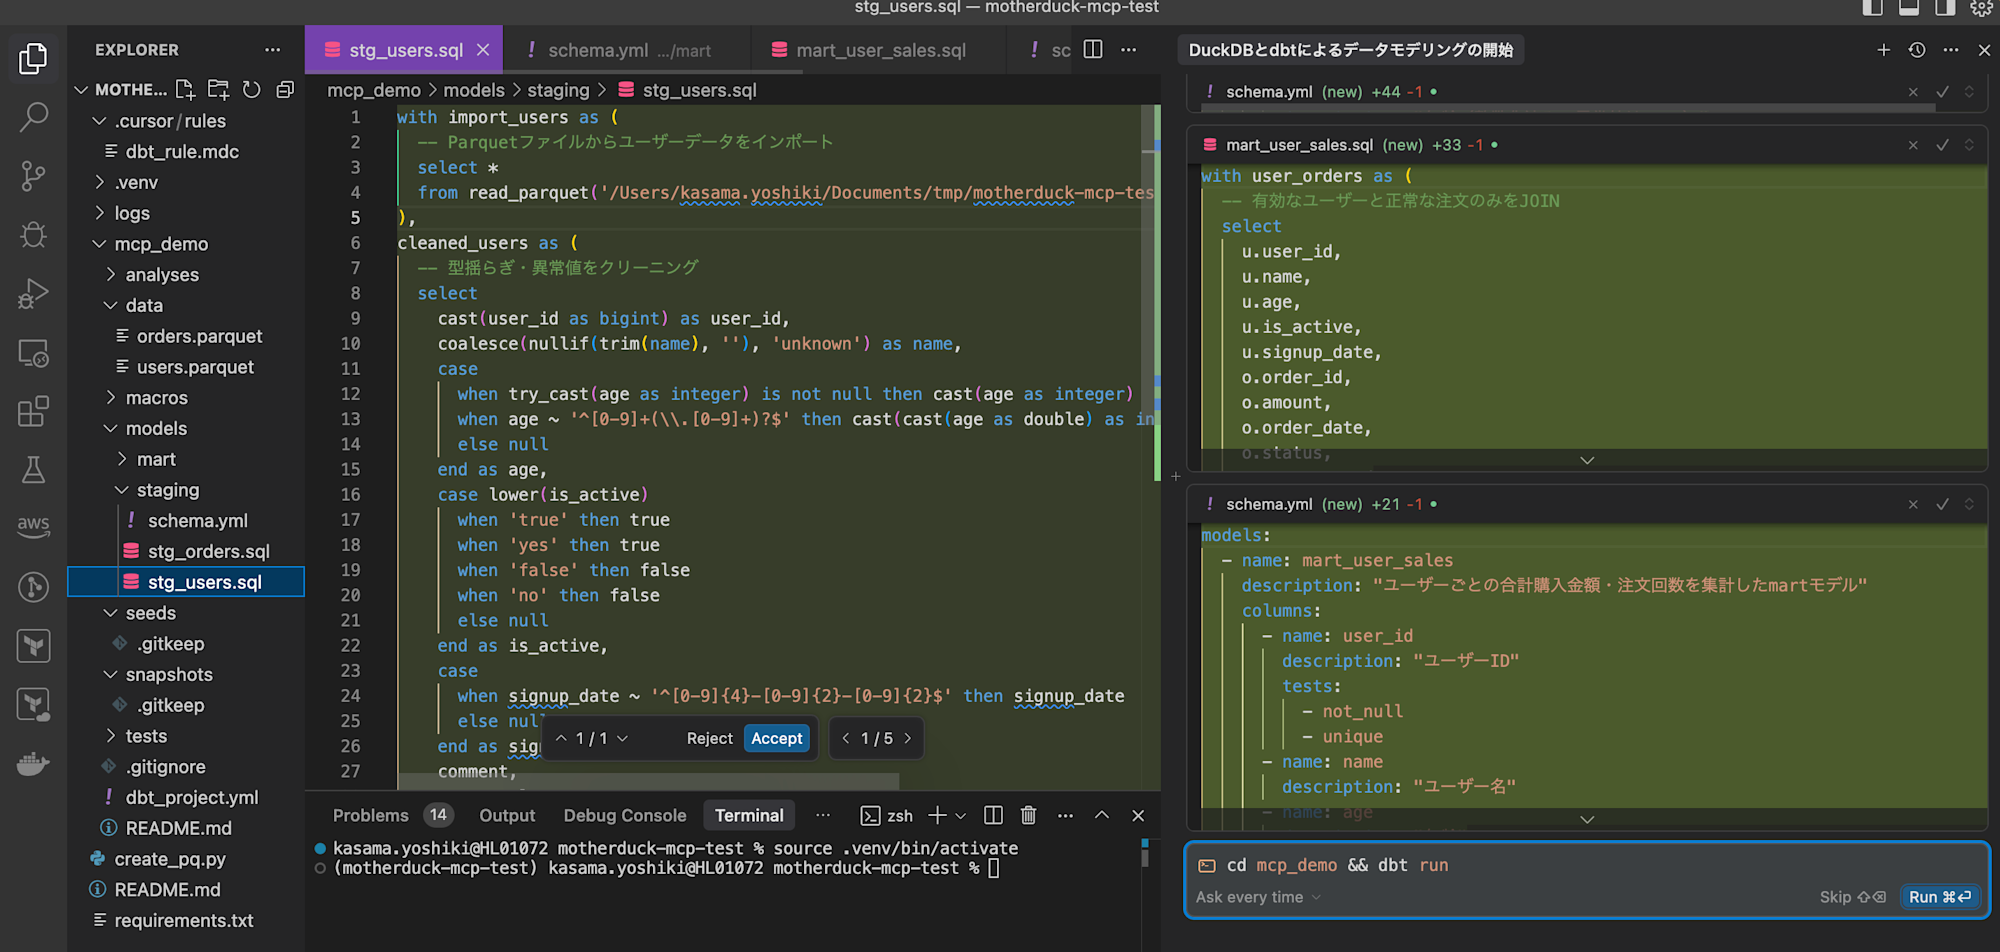
staging modelからmartまでファイルを作成してくれました。一つずつ確認し、Acceptします。その後にdbtコマンドもそのまま実行してくれるようなので進めます。
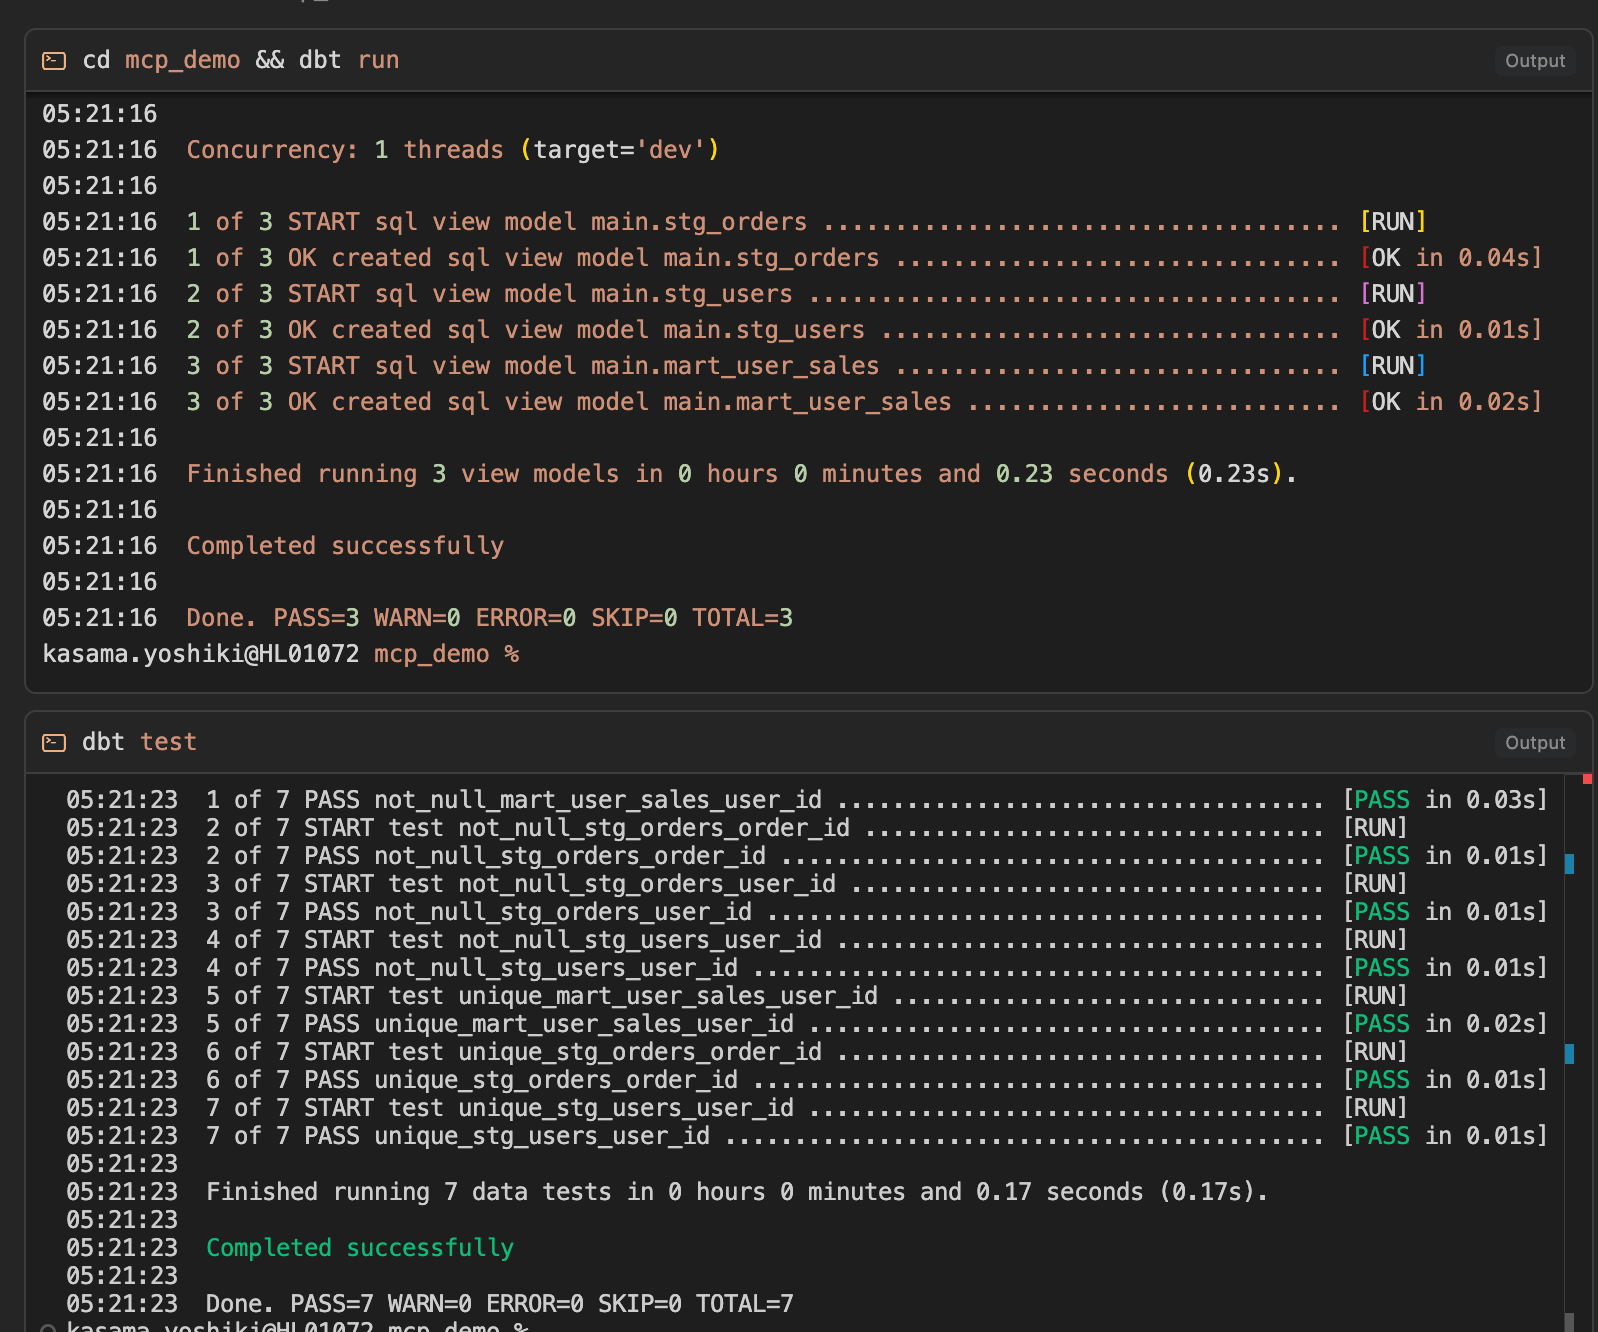
dbt run、dbt testコマンドが問題なく通りました。
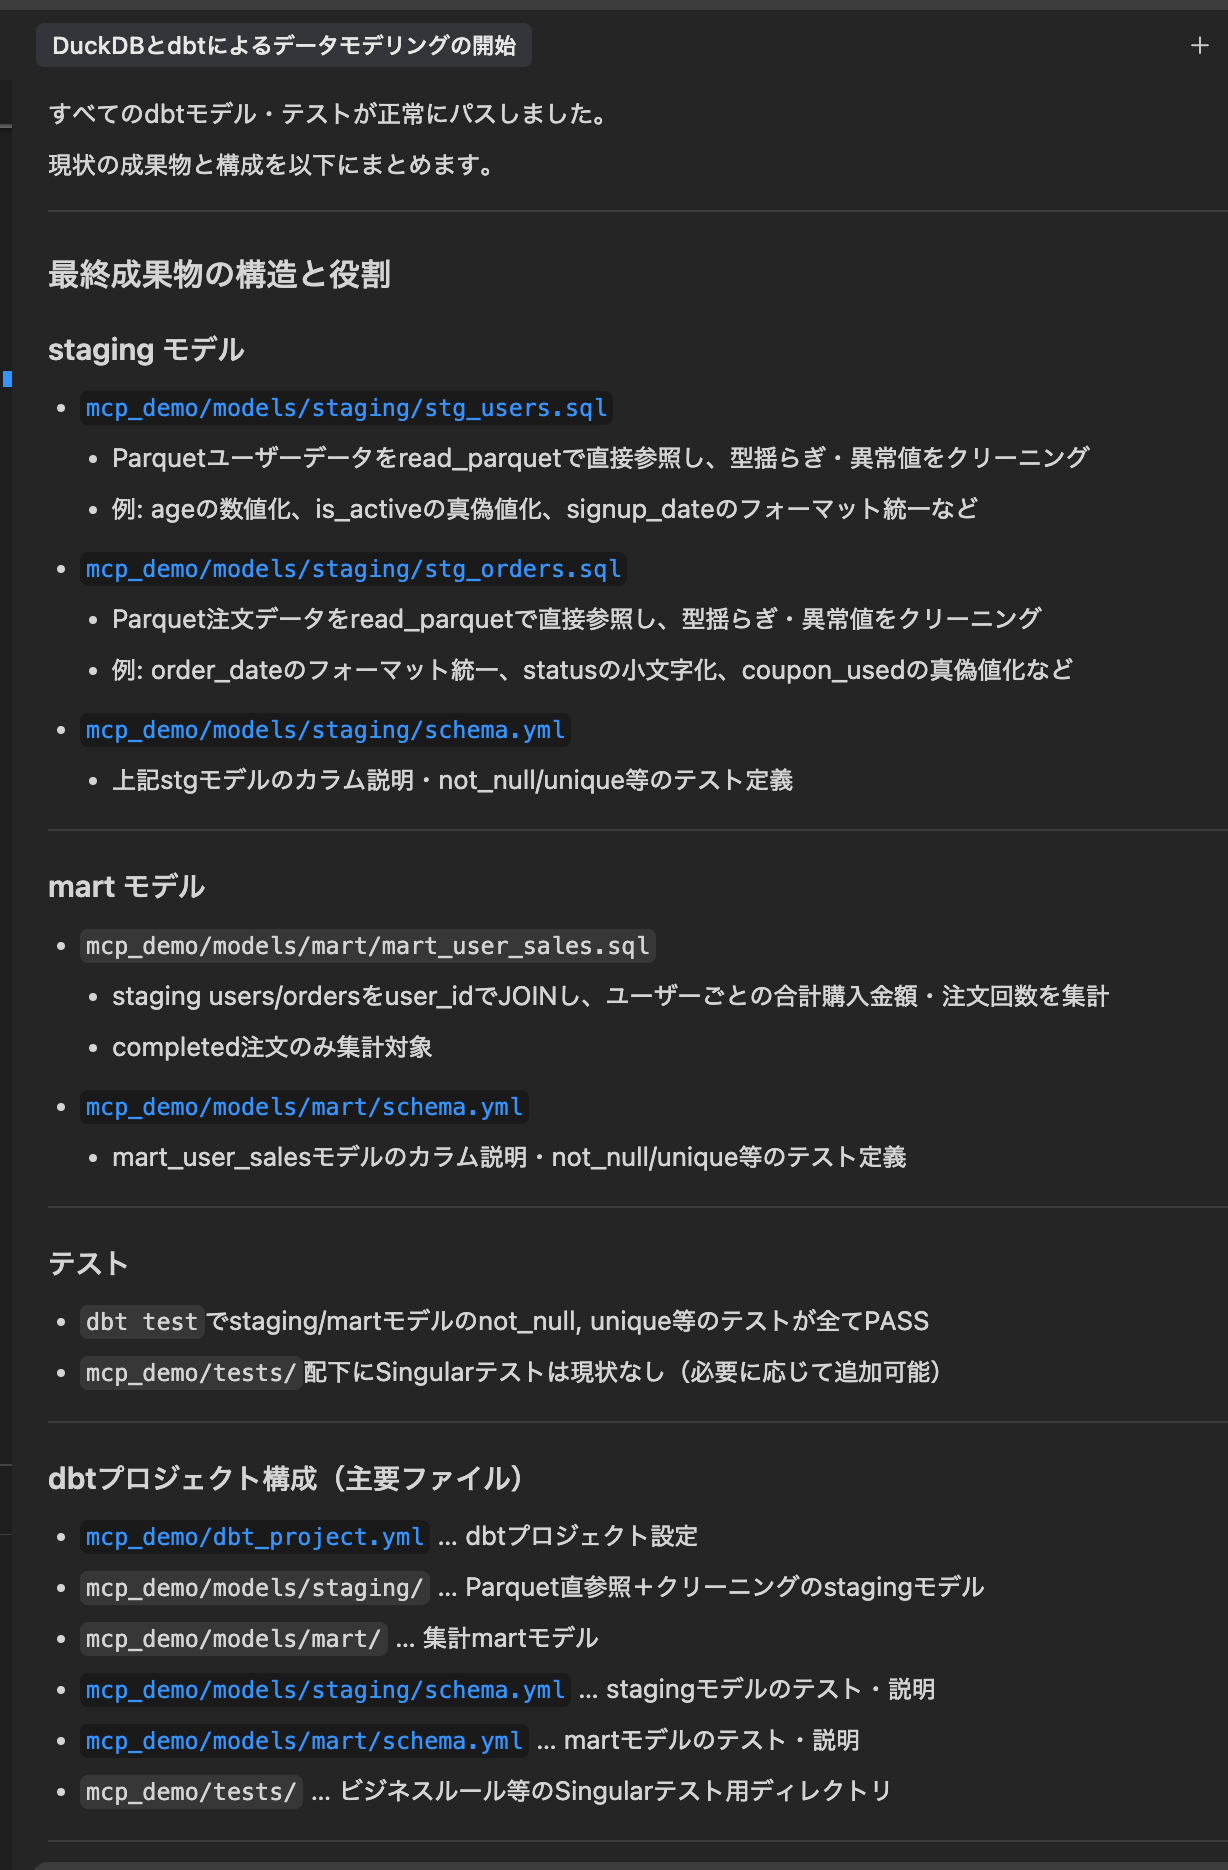
最後に作成したリソースの説明をしてくれています。
作成してくれたリソースを参考までに載せておきます。今回はとりあえず試してみたブログなので、生成物を修正するみたいなことはしていません。コードに手を加えることなく実装を行いました。
AI Agent作成リソース
with user_orders as (
  -- 有効なユーザーと正常な注文のみをJOIN
  select
    u.user_id,
    u.name,
    u.age,
    u.is_active,
    u.signup_date,
    o.order_id,
    o.amount,
    o.order_date,
    o.status,
    o.coupon_used
  from {{ ref('stg_users') }} u
  left join {{ ref('stg_orders') }} o
    on u.user_id = o.user_id
  where u.user_id is not null
    and o.status = 'completed'
),
user_sales_agg as (
  -- ユーザーごとの購入集計
  select
    user_id,
    name,
    age,
    is_active,
    signup_date,
    count(order_id) as order_count,
    coalesce(sum(amount), 0) as total_amount
  from user_orders
  group by user_id, name, age, is_active, signup_date
)
select * from user_sales_agg
models:
  - name: mart_user_sales
    description: "ユーザーごとの合計購入金額・注文回数を集計したmartモデル"
    columns:
      - name: user_id
        description: "ユーザーID"
        tests:
          - not_null
          - unique
      - name: name
        description: "ユーザー名"
      - name: age
        description: "年齢"
      - name: is_active
        description: "アクティブフラグ"
      - name: signup_date
        description: "会員登録日"
      - name: order_count
        description: "注文回数"
      - name: total_amount
        description: "合計購入金額"
with import_orders as (
  -- Parquetファイルから注文データをインポート
  select *
  from read_parquet('<絶対パス>/motherduck-mcp-test/mcp_demo/data/orders.parquet')
),
cleaned_orders as (
  -- 型揺らぎ・異常値をクリーニング
  select
    cast(order_id as bigint) as order_id,
    cast(user_id as bigint) as user_id,
    cast(amount as double) as amount,
    case
      when order_date ~ '^[0-9]{4}-[0-9]{2}-[0-9]{2}$' then order_date
      else null
    end as order_date,
    lower(status) as status,
    coalesce(cast(coupon_used as boolean), false) as coupon_used,
    extra_info
  from import_orders
)
select * from cleaned_orders
with import_users as (
  -- Parquetファイルからユーザーデータをインポート
  select *
  from read_parquet('<絶対パス>/motherduck-mcp-test/mcp_demo/data/users.parquet')
),
cleaned_users as (
  -- 型揺らぎ・異常値をクリーニング
  select
    cast(user_id as bigint) as user_id,
    coalesce(nullif(trim(name), ''), 'unknown') as name,
    case
      when try_cast(age as integer) is not null then cast(age as integer)
      when age ~ '^[0-9]+(\\.[0-9]+)?$' then cast(cast(age as double) as integer)
      else null
    end as age,
    case lower(is_active)
      when 'true' then true
      when 'yes' then true
      when 'false' then false
      when 'no' then false
      else null
    end as is_active,
    case
      when signup_date ~ '^[0-9]{4}-[0-9]{2}-[0-9]{2}$' then signup_date
      else null
    end as signup_date,
    comment,
    extra_col
  from import_users
)
select * from cleaned_users
models:
  - name: stg_users
    description: "Parquetユーザーデータの型揺らぎ・異常値をクリーニングしたstagingモデル"
    columns:
      - name: user_id
        description: "ユーザーID"
        tests:
          - not_null
          - unique
      - name: name
        description: "ユーザー名"
      - name: age
        description: "年齢(整数化済み、異常値はNULL)"
      - name: is_active
        description: "アクティブフラグ(真偽値化済み)"
      - name: signup_date
        description: "会員登録日(YYYY-MM-DD形式のみ)"
      - name: comment
        description: "コメント"
      - name: extra_col
        description: "追加カラム(用途不明)"

  - name: stg_orders
    description: "Parquet注文データの型揺らぎ・異常値をクリーニングしたstagingモデル"
    columns:
      - name: order_id
        description: "注文ID"
        tests:
          - not_null
          - unique
      - name: user_id
        description: "ユーザーID(stg_usersとJOIN可能)"
        tests:
          - not_null
      - name: amount
        description: "注文金額"
      - name: order_date
        description: "注文日(YYYY-MM-DD形式のみ)"
      - name: status
        description: "注文ステータス(小文字化済み)"
      - name: coupon_used
        description: "クーポン利用有無(真偽値)"
      - name: extra_info
        description: "追加情報(用途不明)"
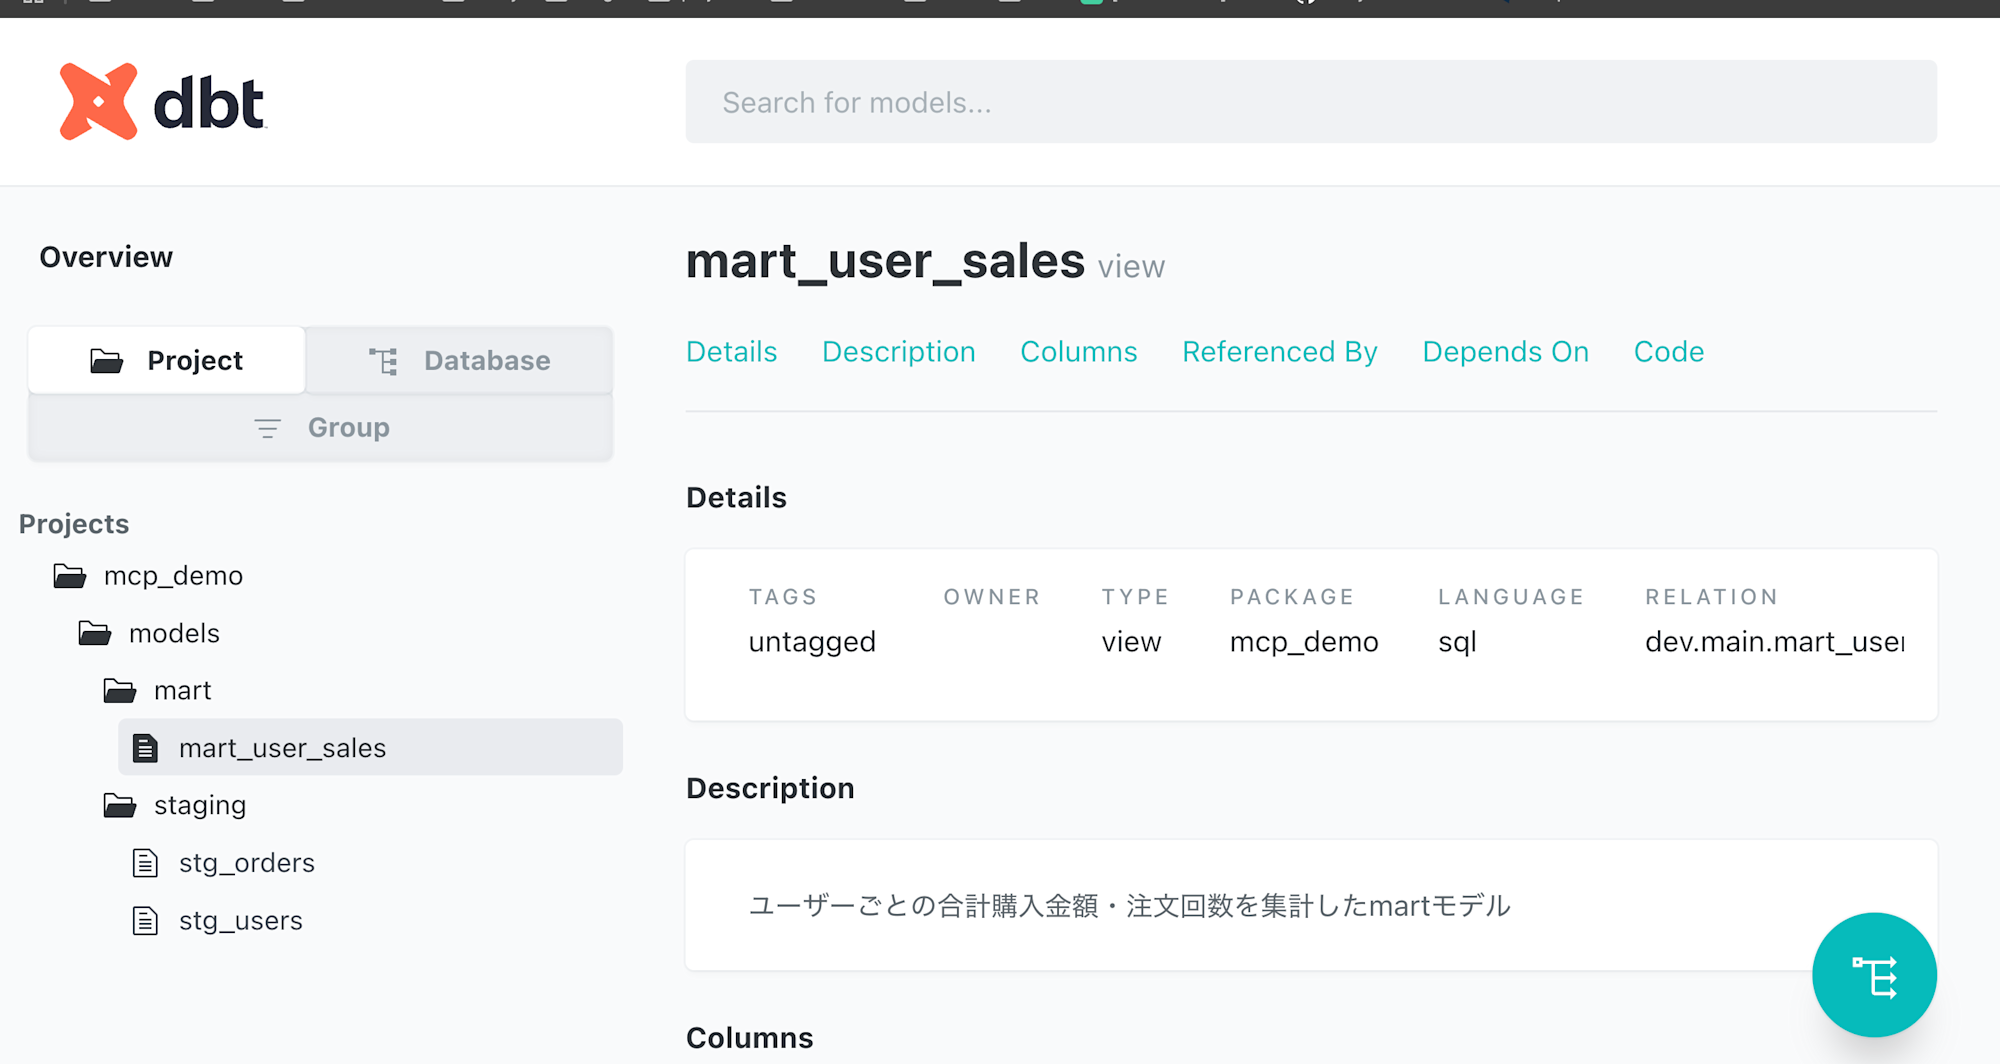
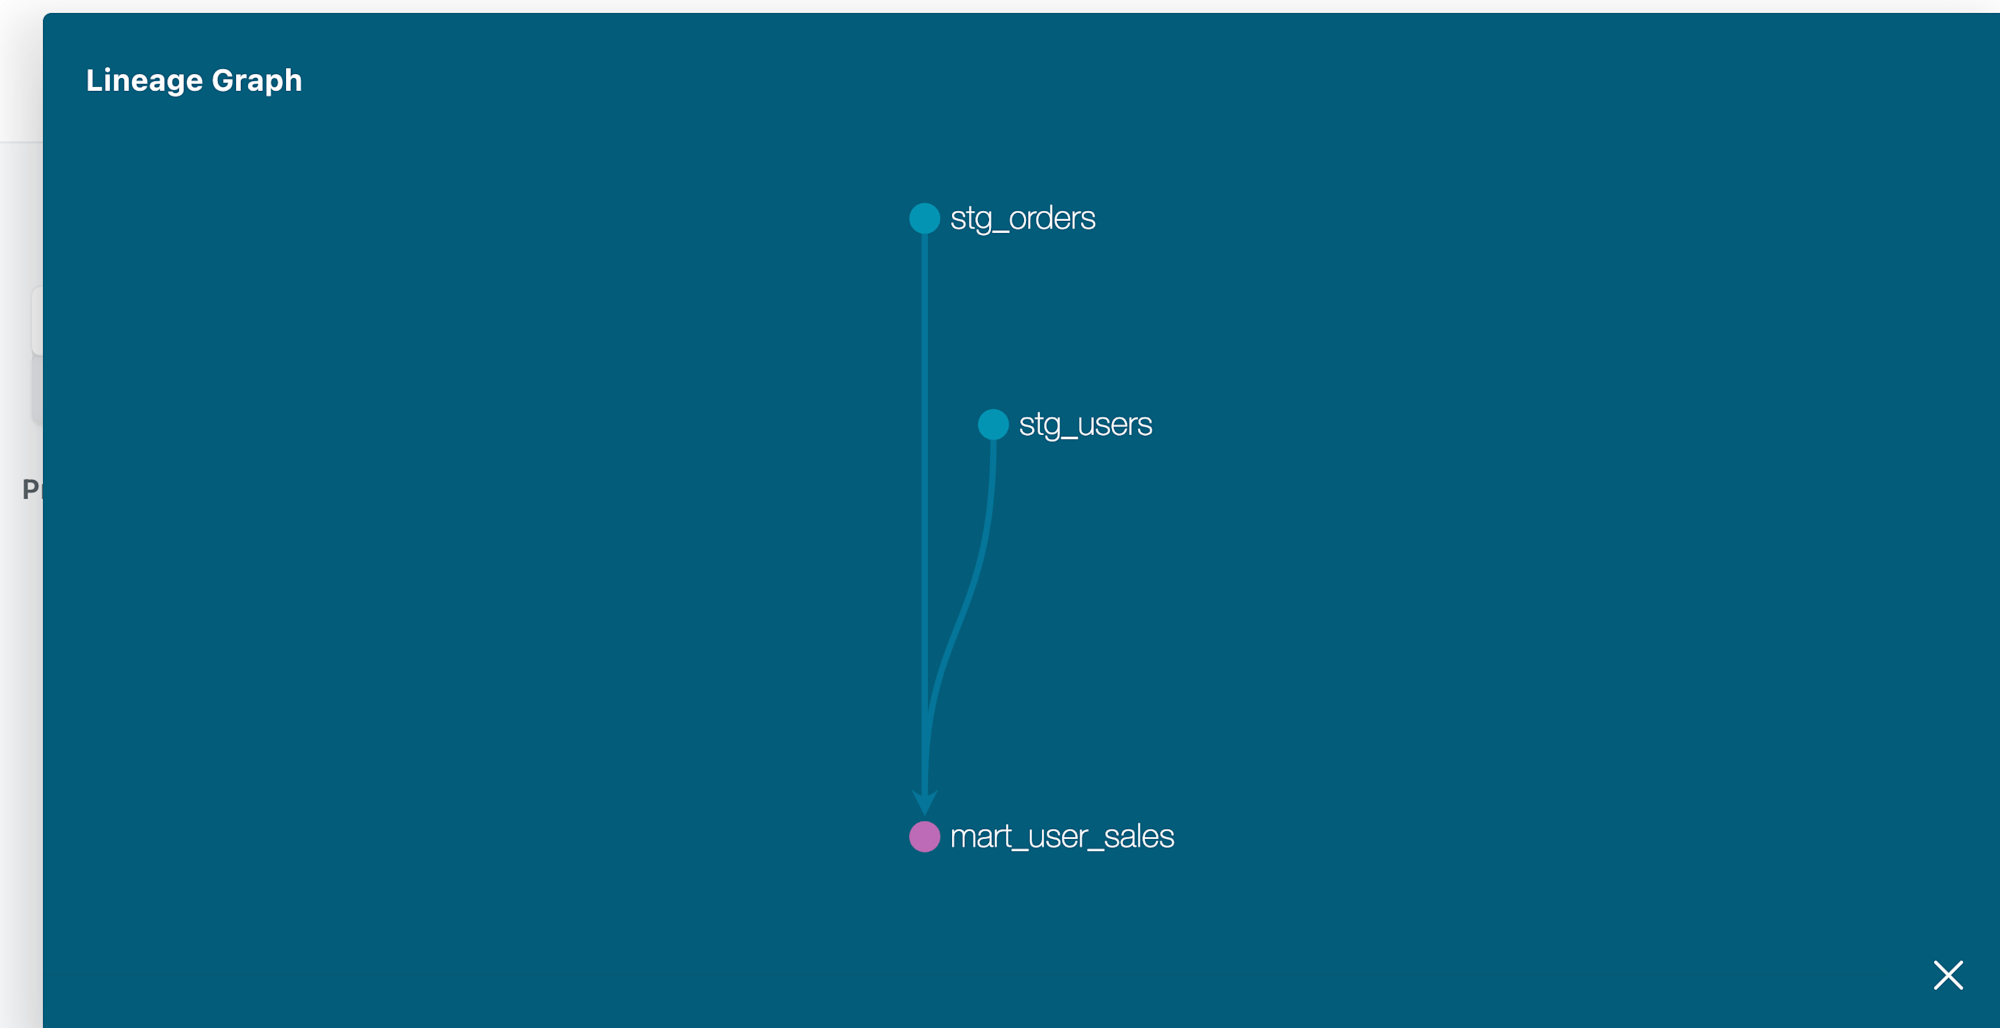
最後にdocumentも生成できるか確認しておきます。
dbt docs generate
dbt docs serve
正常に参照できました。
最後に
確かにこの実装方法だと実装→テスト→エラー調査→実装のフィードバックループが早く回せて開発速度も上がりそうだと感じました。Cursor Rulesの使い方や、promptなどまだまだ改善点はありますし、dbt MCP Serverと一緒に使うともっと楽できるのかなと想像しています。また試してみたいと思います。