
Twilio ConversationRelay で作る代替現実ゲーム (ARG) - 現実世界の電話でゲーム世界の主人公と会話してみた
はじめに
本記事では、Twilio の ConversationRelay 機能 を活用し、現実世界の電話からの通話がゲーム内にリアルタイムで反映される代替現実ゲーム (ARG: Alternate Reality Game) 体験のモックを構築してみた手順を紹介します。具体的には、ゲーム画面に表示されたスマートフォンの電話番号に現実世界から電話をかけると、ゲーム内のキャラクターが電話に応答し、互いの発話内容が映画字幕風表示 & 現実の電話から音声が流れる仕組みを、Godot ゲームエンジン で実装します。 ConversationRelay により、まるでゲーム世界が現実に存在しているような、新しいゲーム体験を非常に簡単に導入できます。
Twilio ConversationRelay とは
Twilio ConversationRelay は、電話音声をリアルタイムに WebSocket 経由でアプリケーションに中継する機能です。従来の TwiML <Gather> 要素とは異なり、音声認識 (STT) 、テキスト生成、音声合成 (TTS) を一連のフローとして処理できるため、自然な会話体験を実現できます。従来の音声通話 API では難易度が高かった「自然な会話の流れ」を、より簡潔に実装できるようになりました。
対象読者
- WebSocket 通信の基本的な知識がある方
- 新しいゲーム体験の創出に興味がある方
- Twilio の基本的な使用経験がある方
参考
作ったもの
完成品の動作
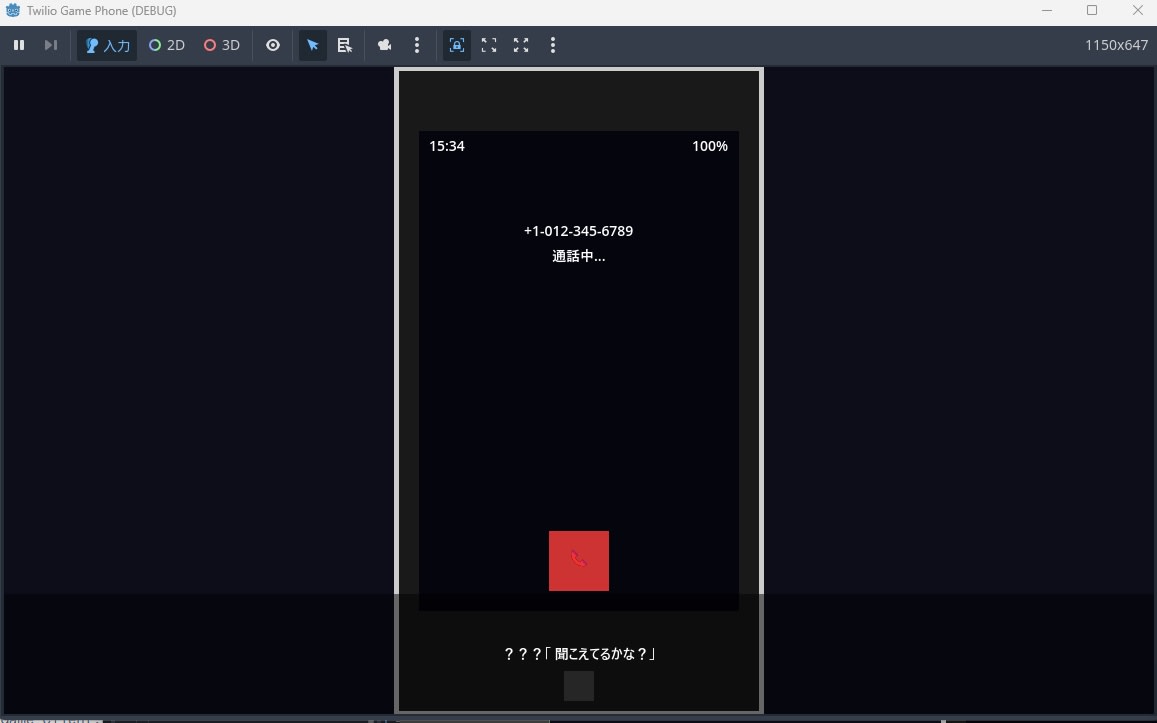
- ゲーム画面の表示
スマートフォン風の UI が表示され、電話番号が確認できます。

- リアルタイム音声認識
表示された Twilio 番号に現実世界から電話をかけると、音声認識が行われて文字列化され、ゲームに送信されます。送信された文字列は映画字幕風に表示されます。

- 応答生成
ゲーム内のロジックに基づいて応答内容を決定します。あなたは誰ですか?と問うと主人公「私はこのゲームの主人公だ」として字幕に表示されます。

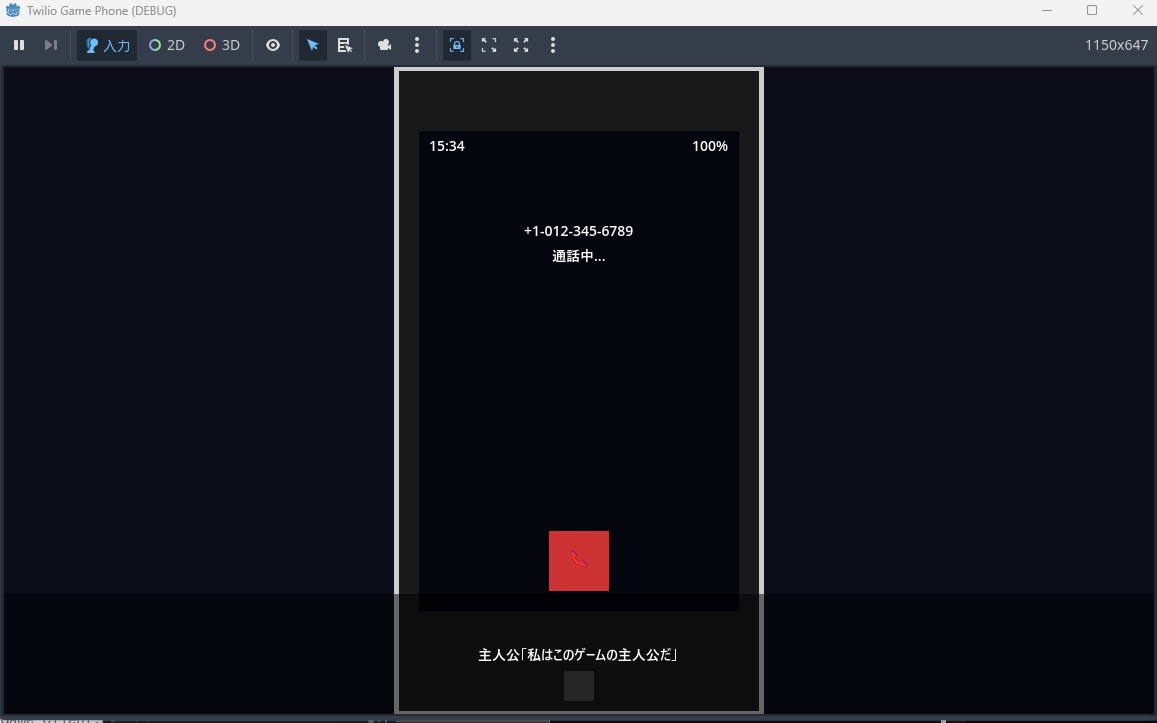
- 音声合成
ゲーム主人公が応答した内容「私はこのゲームの主人公だ」が現実世界の電話から音声で再生されます。
ゲームデザインへの応用例
- 謎解き・アドベンチャーゲーム
- ゲーム内で発見した電話番号に実際に電話をかけて手がかりを入手
- 時間限定で特定の番号が有効になる緊急性のある演出
- ホラーゲーム
- 深夜に鳴る不気味な電話への応答体験
- プレイヤーの発言内容に反応して変化するホラー演出
- 現実とゲームの境界を曖昧にする没入体験
- 教育・シミュレーション
- 接客業務のトレーニング (電話応対の練習)
- 語学学習での実践的な会話練習
- 緊急時対応のシミュレーション訓練
全体の構成
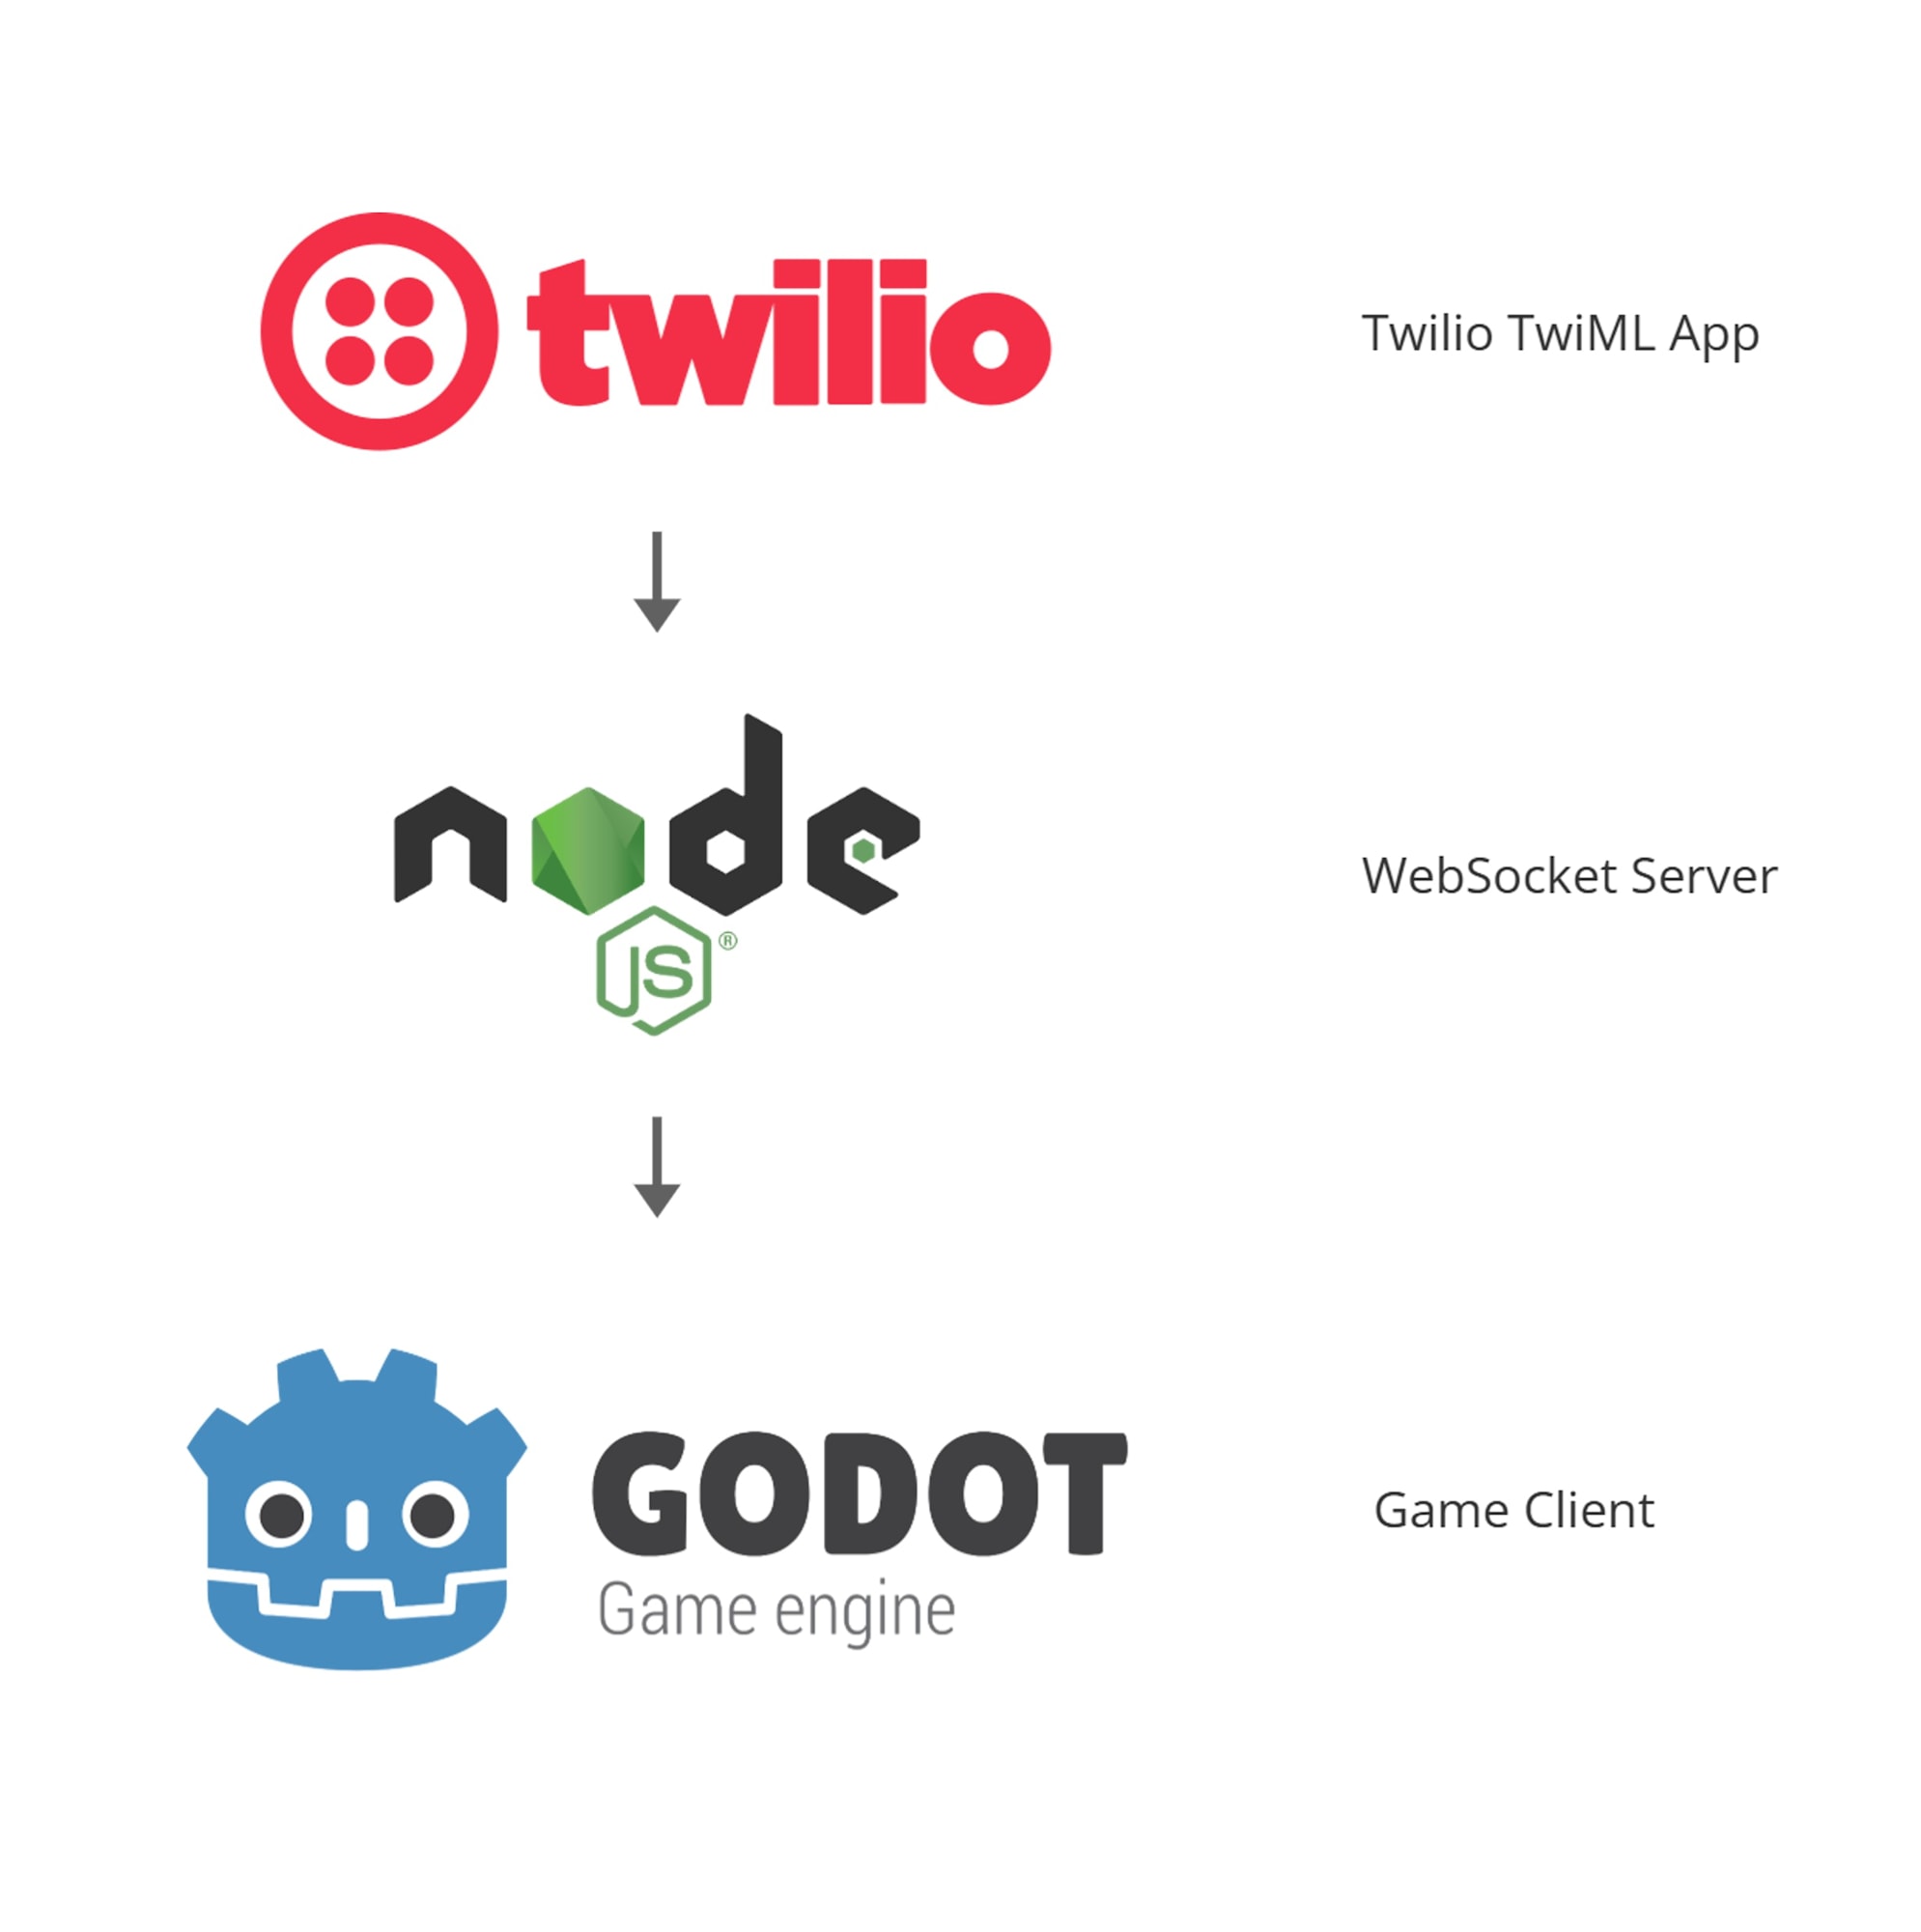
- Twilio TwiML App: ConversationRelay で音声認識・音声合成を処理
- WebSocket Server: Twilio とゲームクライアント間の通信を中継
- Game Client: ゲーム画面の表示と字幕表示、応答ロジック
なぜこの構成か
Twilio ConversationRelay は WebSocket サーバーとの通信を前提としており、ゲームクライアントから直接 Twilio に接続することはできません。そのため、EC2 上の Node.js サーバーを中継地点として配置しています。また、ゲームエンジンとして Godot を採用したのは、こちらの記事 にあるように LLM を活用したテキストベース開発が容易であるためです。
Twilio 側の実装
AI/ML Addendum の有効化
Conversation Relay を利用するには、Twilio の「Predictive and Generative AI/ML Features Addendum」の有効化が必要です。
- Twilio Console にログイン
- 左メニューより Voice > Settings > General を開く
- Predictive and Generative AI/ML Features Addendum を Enabled にする

Twilio Function の作成
TwiML を動的に生成するため、Twilio Function を作成します。
- Functions and Assets > Services に移動
- Create Service をクリックしてサービスを作成(例:
conversation-relay-game) - 作成したサービス内で Add + → Add Function を選択
- Function パス
/twimlで以下のコードを作成// /twiml exports.handler = function (context, event, callback) { // Twilio Response オブジェクトを作成 const response = new Twilio.Response(); response.appendHeader('Content-Type', 'text/xml'); // ConversationRelay を使用する TwiML を生成 response.setBody(` <?xml version="1.0" encoding="UTF-8"?> <Response> <Connect> <ConversationRelay url="wss://your-domain.com" language="ja-JP" /> </Connect> </Response> `.trim()); // TwiML レスポンスを返す callback(null, response); };- Save で保存し、Deploy All で公開
/twimlのメニューの Copy URL でエンドポイント URL を控える

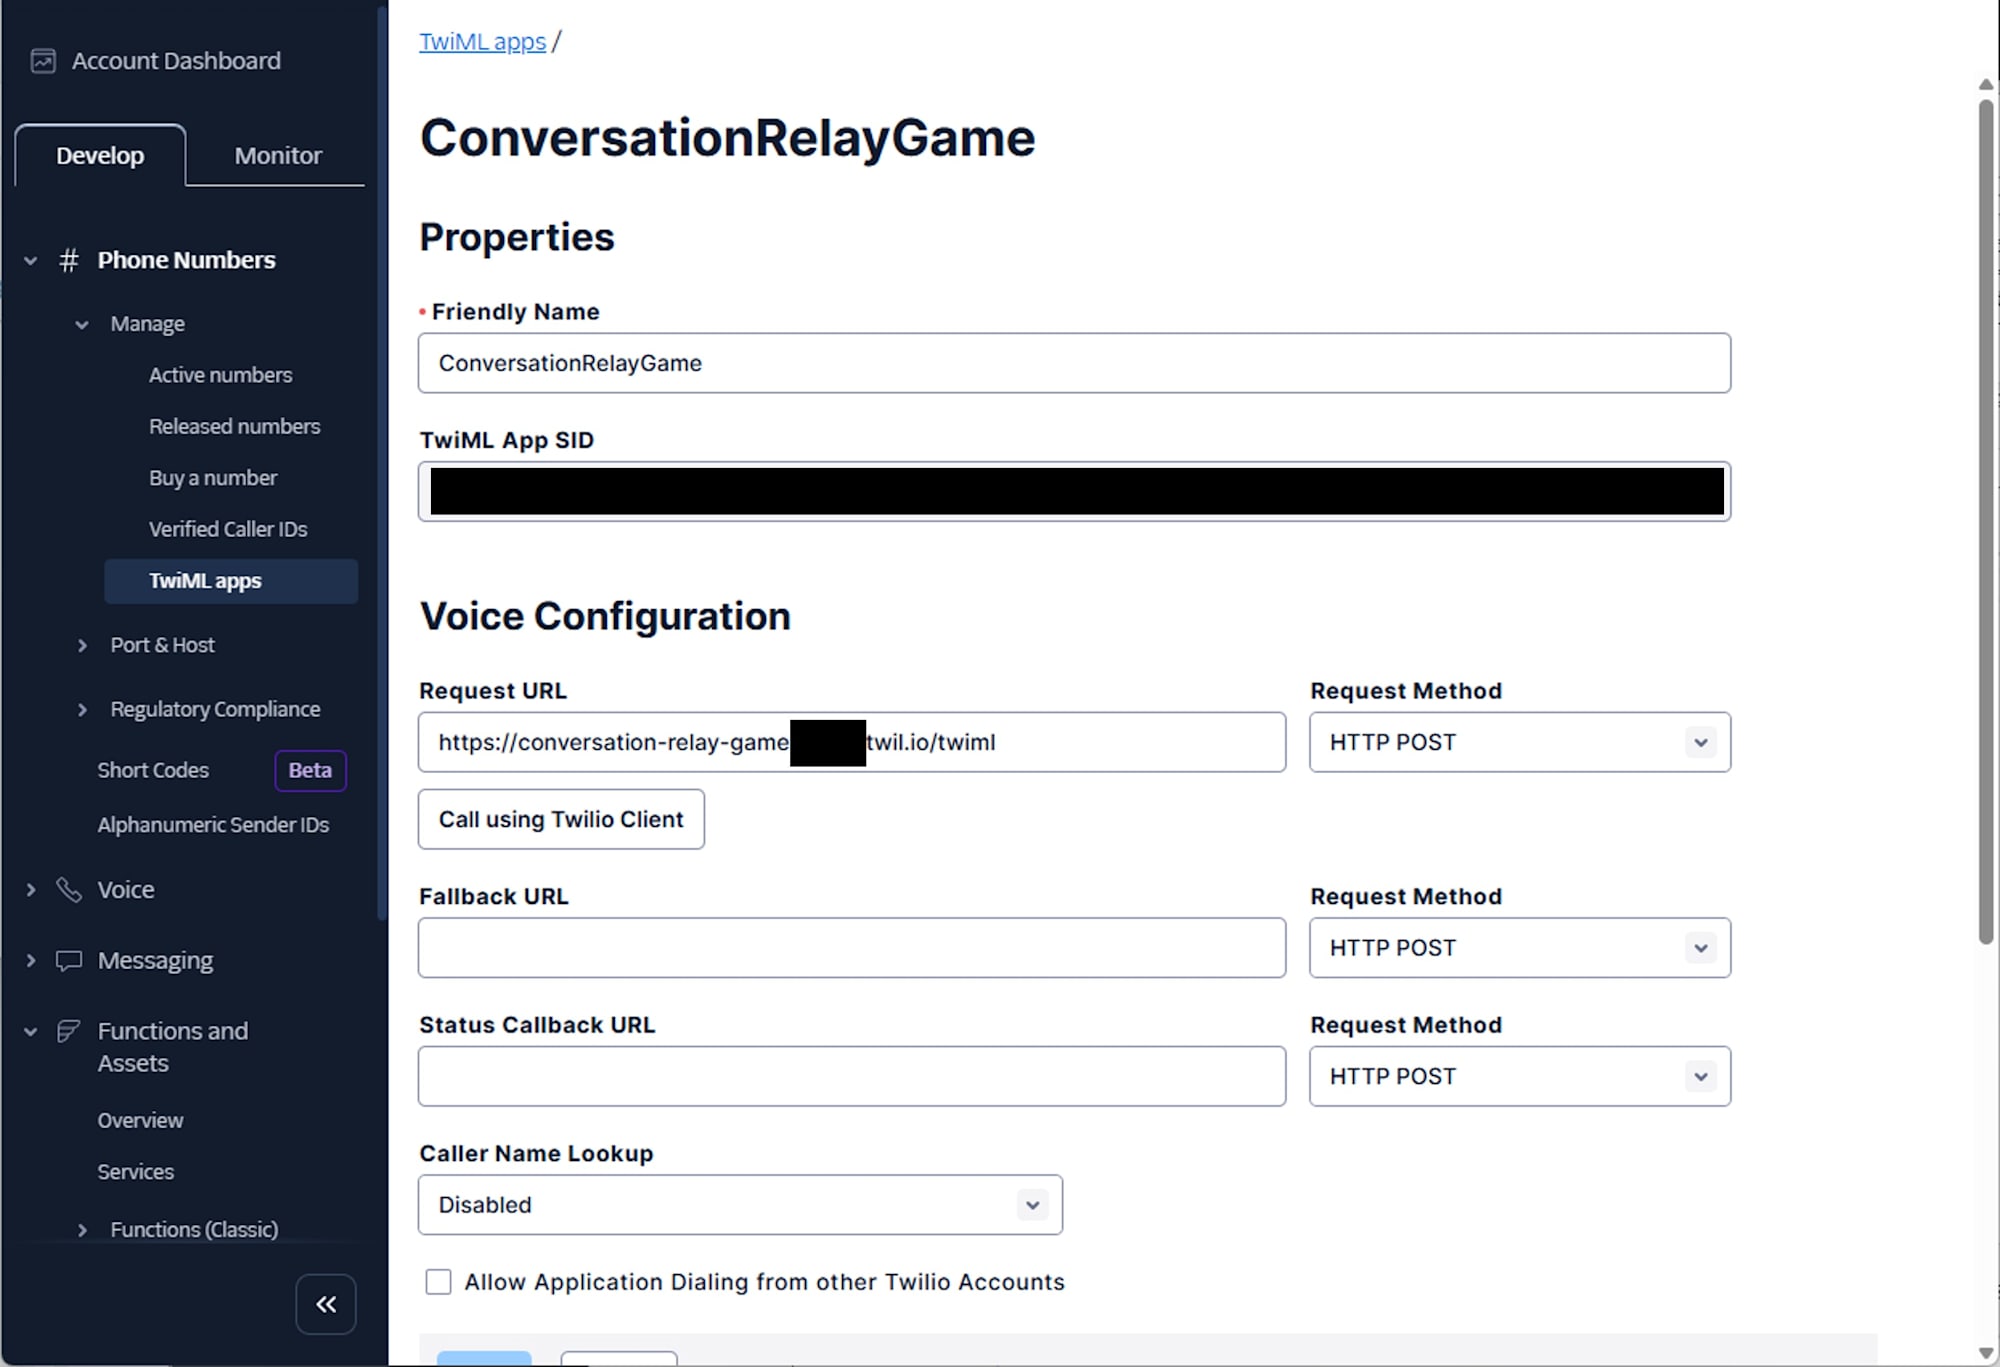
TwiML App の設定
- Phone Numbers > Manage > TwiML Apps に移動
- Create new TwiML App をクリック
- 以下の情報を入力
- Friendly Name: 任意 (例:
ConversationRelayGame) - Request URL: 上記で作成した Function パスの エンドポイント URL
- HTTP Method:
POST
- Friendly Name: 任意 (例:
- Save ボタンを押して保存
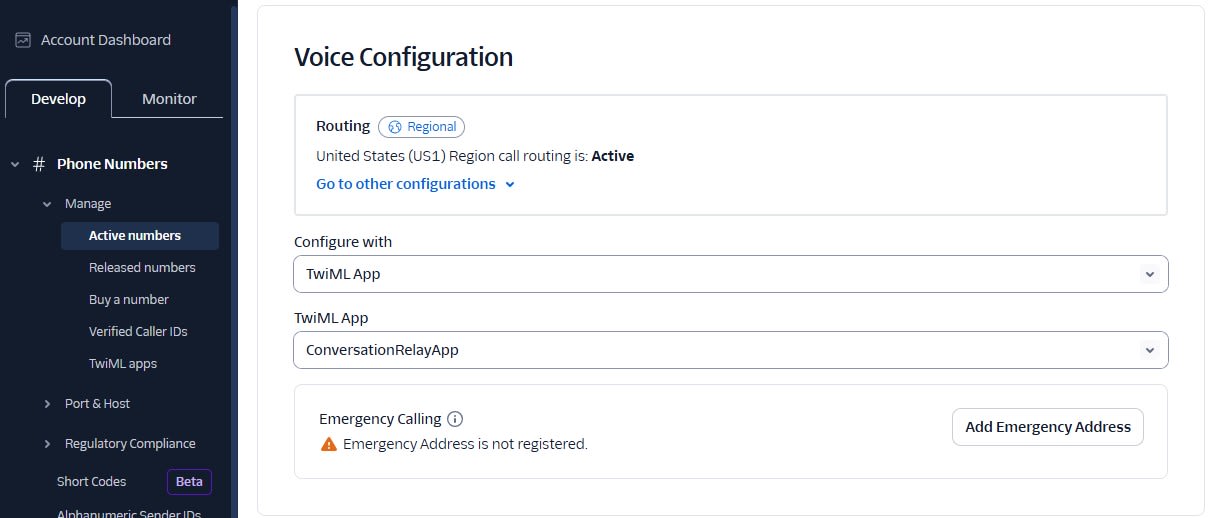
電話番号の設定
- Phone Numbers > Manage > Active Numbers に移動
- 使用する電話番号を選択
- Voice Configuration で以下を設定
- Configure with:
TwiML App - TwiML App: 上記で作成した App を選択
- Configure with:
- Save configuration ボタンを押して保存
WebSocket サーバーの実装
環境準備
EC2 インスタンスに Node.js 環境を構築し、SSL 証明書を設定します。
# Node.js のインストール
curl -o- https://raw.githubusercontent.com/nvm-sh/nvm/v0.39.7/install.sh | bash
source ~/.bashrc
nvm install --lts

# プロジェクトディレクトリの作成
mkdir twilio-game-server
cd twilio-game-server
npm init -y
npm install ws
SSL 証明書の設定
ConversationRelay は wss:// 接続を要求するため、今回は検証用途として Let's Encrypt を使用した SSL 証明書の取得を行います。
# Certbot のインストール
sudo yum install -y certbot

# 証明書の取得(ドメインは適宜変更)
sudo certbot certonly --standalone -d your-domain.com
WebSocket サーバーの実装
以下の内容で server.js を作成します。
server.js の実装
// server.js
const https = require('https');
const fs = require('fs');
const WebSocket = require('ws');

// SSL 証明書を使用した HTTPS サーバーを作成
const server = https.createServer({
  cert: fs.readFileSync('/etc/letsencrypt/live/your-domain.com/fullchain.pem'),
  key: fs.readFileSync('/etc/letsencrypt/live/your-domain.com/privkey.pem')
});

// WebSocket サーバーを HTTPS サーバー上に構築
const wss = new WebSocket.Server({ server });

// 接続されたクライアントを管理する変数
let gameClients = new Set(); // ゲームクライアントのセット
let twilioClient = null;     // Twilio ConversationRelay クライアント

// WebSocket 接続時の処理
wss.on('connection', (ws, req) => {
  const url = req.url || '';

  // URL パスでクライアントの種類を判定
  if (url.includes('/game')) {
    // Godot ゲームクライアントからの接続
    console.log('[Game Client Connected]');
    gameClients.add(ws);

    // ゲームクライアントからのメッセージ処理
    ws.on('message', raw => {
      let msg;
      try {
        msg = JSON.parse(raw.toString());
      } catch (e) {
        console.warn('[Invalid JSON from Game]', raw.toString());
        return;
      }

      console.log('[Received from Game]', msg);

      // ゲームからの応答を Twilio に転送
      if (msg.type === 'response' && twilioClient) {
        twilioClient.send(JSON.stringify({
          type: 'text',        // Twilio への応答メッセージタイプ
          token: msg.text,     // 音声合成するテキスト
          last: true           // 最後のメッセージであることを示す
        }));
        console.log('[Sent to Twilio]', msg.text);
      }
    });

    // ゲームクライアント切断時の処理
    ws.on('close', () => {
      console.log('[Game Client Disconnected]');
      gameClients.delete(ws);
    });

    return; // ゲームクライアント処理はここで終了
  }

  // Twilio ConversationRelay からの接続
  console.log('[Twilio Connected]');
  twilioClient = ws;

  // Twilio からのメッセージ処理
  ws.on('message', raw => {
    let msg;
    try {
      msg = JSON.parse(raw.toString());
    } catch (e) {
      console.warn('[Invalid JSON]', raw.toString());
      return;
    }

    console.log('[Received from Twilio]', msg);

    // 音声認識結果(prompt)を受信した場合
    if (msg.type === 'prompt') {
      // ゲームクライアントに音声認識結果を送信
      broadcastToGameClients({
        type: 'user_speech',
        text: msg.voicePrompt
      });
    }
  });

  // Twilio クライアント切断時の処理
  ws.on('close', () => {
    console.log('[Twilio Disconnected]');
    twilioClient = null;
  });
});

// 接続中の全ゲームクライアントにメッセージをブロードキャスト
function broadcastToGameClients(message) {
  const messageStr = JSON.stringify(message);
  gameClients.forEach(client => {
    // 接続が有効なクライアントのみに送信
    if (client.readyState === WebSocket.OPEN) {
      client.send(messageStr);
    }
  });
  console.log('[Sent to Game Clients]', message);
}

// HTTPS サーバーをポート 443 で起動
server.listen(443, () => {
  console.log('✅ wss://your-domain.com is ready!');
  console.log('  - Game Client: wss://your-domain.com/game');
});
動作確認
サーバーを起動して動作確認を行います。
sudo node server.js
正常に起動すると以下のような出力が表示されます。
✅ wss://your-domain.com is ready!
  - Game Client: wss://your-domain.com/game
この時点で、Twilio Function の url パラメータを実際のドメインに更新し、再度 Deploy してください。
Godot によるゲームクライアントの実装
以下の構成でプロジェクトを作成します。
main.tscn
project.godot
scripts
 └── TwilioGamePhone.gd
main.tscn
[gd_scene load_steps=3 format=3 uid="uid://bxqvw8n4qkxhj"]

[ext_resource type="Script" uid="uid://cmjki0vx1eonj" path="res://scripts/TwilioGamePhone.gd" id="1_2k3l4"]

[sub_resource type="LabelSettings" id="LabelSettings_1"]
font_size = 14

[node name="Main" type="Node"]

[node name="TwilioGamePhone" type="Node" parent="."]
script = ExtResource("1_2k3l4")

[node name="UI" type="Control" parent="."]
layout_mode = 3
anchors_preset = 15
anchor_right = 1.0
anchor_bottom = 1.0
grow_horizontal = 2
grow_vertical = 2

[node name="Background" type="ColorRect" parent="UI"]
z_index = -2
layout_mode = 1
anchors_preset = 15
anchor_right = 1.0
anchor_bottom = 1.0
grow_horizontal = 2
grow_vertical = 2
color = Color(0.05, 0.05, 0.1, 1)

[node name="Phone" type="Control" parent="UI"]
layout_mode = 1
anchors_preset = 8
anchor_left = 0.5
anchor_top = 0.5
anchor_right = 0.5
anchor_bottom = 0.5
offset_left = -180.0
offset_top = -320.0
offset_right = 180.0
offset_bottom = 320.0
grow_horizontal = 2
grow_vertical = 2

[node name="PhoneBorder" type="ColorRect" parent="UI/Phone"]
z_index = -1
layout_mode = 1
anchors_preset = 15
anchor_right = 1.0
anchor_bottom = 1.0
offset_left = -5.0
offset_top = -5.0
offset_right = 5.0
offset_bottom = 5.0
grow_horizontal = 2
grow_vertical = 2
color = Color(0.8, 0.8, 0.8, 1)

[node name="PhoneBody" type="ColorRect" parent="UI/Phone"]
layout_mode = 1
anchors_preset = 15
anchor_right = 1.0
anchor_bottom = 1.0
grow_horizontal = 2
grow_vertical = 2
color = Color(0.1, 0.1, 0.1, 1)

[node name="Screen" type="ColorRect" parent="UI/Phone"]
layout_mode = 1
anchors_preset = 15
anchor_right = 1.0
anchor_bottom = 1.0
offset_left = 20.0
offset_top = 60.0
offset_right = -20.0
offset_bottom = -100.0
grow_horizontal = 2
grow_vertical = 2
color = Color(0.02, 0.02, 0.05, 1)

[node name="StatusBar" type="Control" parent="UI/Phone/Screen"]
layout_mode = 1
anchors_preset = 10
anchor_right = 1.0
offset_bottom = 30.0
grow_horizontal = 2

[node name="Time" type="Label" parent="UI/Phone/Screen/StatusBar"]
layout_mode = 1
anchors_preset = 4
anchor_top = 0.5
anchor_bottom = 0.5
offset_left = 10.0
offset_top = -10.0
offset_right = 60.0
offset_bottom = 10.0
grow_vertical = 2
text = "12:34"
label_settings = SubResource("LabelSettings_1")

[node name="Battery" type="Label" parent="UI/Phone/Screen/StatusBar"]
layout_mode = 1
anchors_preset = 6
anchor_left = 1.0
anchor_top = 0.5
anchor_right = 1.0
anchor_bottom = 0.5
offset_left = -50.0
offset_top = -10.0
offset_right = -10.0
offset_bottom = 10.0
grow_horizontal = 0
grow_vertical = 2
text = "100%"
label_settings = SubResource("LabelSettings_1")
horizontal_alignment = 2

[node name="CallInterface" type="Control" parent="UI/Phone/Screen"]
layout_mode = 1
anchors_preset = 15
anchor_right = 1.0
anchor_bottom = 1.0
offset_top = 40.0
grow_horizontal = 2
grow_vertical = 2

[node name="CallerInfo" type="VBoxContainer" parent="UI/Phone/Screen/CallInterface"]
layout_mode = 1
anchors_preset = 5
anchor_left = 0.5
anchor_right = 0.5
offset_left = -100.0
offset_top = 50.0
offset_right = 100.0
offset_bottom = 150.0
grow_horizontal = 2

[node name="PhoneNumber" type="Label" parent="UI/Phone/Screen/CallInterface/CallerInfo"]
layout_mode = 2
text = "+1-012-345-6789"
label_settings = SubResource("LabelSettings_1")
horizontal_alignment = 1

[node name="StatusLabel" type="Label" parent="UI/Phone/Screen/CallInterface/CallerInfo"]
layout_mode = 2
text = "通話中..."
label_settings = SubResource("LabelSettings_1")
horizontal_alignment = 1

[node name="CallButtons" type="HBoxContainer" parent="UI/Phone/Screen/CallInterface"]
layout_mode = 1
anchors_preset = 7
anchor_left = 0.5
anchor_top = 1.0
anchor_right = 0.5
anchor_bottom = 1.0
offset_left = -30.0
offset_top = -80.0
offset_right = 30.0
offset_bottom = -20.0
grow_horizontal = 2
grow_vertical = 0
alignment = 1

[node name="EndCallButton" type="ColorRect" parent="UI/Phone/Screen/CallInterface/CallButtons"]
custom_minimum_size = Vector2(60, 60)
layout_mode = 2
color = Color(0.8, 0.2, 0.2, 1)

[node name="EndCallIcon" type="Label" parent="UI/Phone/Screen/CallInterface/CallButtons/EndCallButton"]
layout_mode = 1
anchors_preset = 15
anchor_right = 1.0
anchor_bottom = 1.0
grow_horizontal = 2
grow_vertical = 2
text = "📞"
horizontal_alignment = 1
vertical_alignment = 1

[node name="HomeButton" type="ColorRect" parent="UI/Phone"]
layout_mode = 1
anchors_preset = 7
anchor_left = 0.5
anchor_top = 1.0
anchor_right = 0.5
anchor_bottom = 1.0
offset_left = -15.0
offset_top = -40.0
offset_right = 15.0
offset_bottom = -10.0
grow_horizontal = 2
grow_vertical = 0
color = Color(0.3, 0.3, 0.3, 1)

[node name="SubtitleOverlay" type="Control" parent="UI"]
z_index = 10
layout_mode = 1
anchors_preset = 15
anchor_right = 1.0
anchor_bottom = 1.0
grow_horizontal = 2
grow_vertical = 2

[node name="SubtitleBackground" type="ColorRect" parent="UI/SubtitleOverlay"]
layout_mode = 1
anchors_preset = 12
anchor_top = 1.0
anchor_right = 1.0
anchor_bottom = 1.0
offset_top = -120.0
grow_horizontal = 2
grow_vertical = 0
color = Color(0, 0, 0, 0.5)

[node name="SubtitleLabel" type="Label" parent="UI/SubtitleOverlay"]
layout_mode = 1
anchors_preset = 12
anchor_top = 1.0
anchor_right = 1.0
anchor_bottom = 1.0
offset_left = 40.0
offset_top = -100.0
offset_right = -40.0
offset_bottom = -20.0
grow_horizontal = 2
grow_vertical = 0
label_settings = SubResource("LabelSettings_1")
horizontal_alignment = 1
vertical_alignment = 1
autowrap_mode = 2
project.godot
config_version=5

[application]

config/name="Twilio Game Phone"
run/main_scene="res://main.tscn"
config/features=PackedStringArray("4.4", "GL Compatibility")
config/icon="res://icon.svg"

[rendering]

renderer/rendering_method="gl_compatibility"
renderer/rendering_method.mobile="gl_compatibility"
scripts/TwilioGamePhone.gd
# TwilioGamePhone.gd
extends Node

# UI ノードの参照
var subtitle_label: Label
var status_label: Label
var time_label: Label
var caller_name_label: Label

# WebSocket 設定
var websocket_url = "wss://your-domain.com/game"

# WebSocket クライアント
var socket = WebSocketPeer.new()

func _ready():
    print("[DEBUG] _ready() called")

    # UI ノードの参照を安全に取得
    get_ui_references()

    # UI の初期化
    initialize_ui()
    # WebSocket 接続を開始
    connect_to_websocket()
    # 時刻表示を更新
    update_time()

    print("[DEBUG] _ready() completed")

func get_ui_references():
    print("[DEBUG] Getting UI references...")

    # 各 UI 要素のノードパスを定義
    var subtitle_path = "../UI/SubtitleOverlay/SubtitleLabel"
    var status_path = "../UI/Phone/Screen/CallInterface/CallerInfo/StatusLabel"
    var time_path = "../UI/Phone/Screen/StatusBar/Time"
    var caller_name_path = "../UI/Phone/Screen/CallInterface/CallerInfo/CallerName"

    # 字幕ラベルの取得
    if has_node(subtitle_path):
        subtitle_label = get_node(subtitle_path)
        print("[DEBUG] SubtitleLabel found")
    else:
        print("[ERROR] SubtitleLabel not found at: ", subtitle_path)

    # ステータスラベルの取得
    if has_node(status_path):
        status_label = get_node(status_path)
        print("[DEBUG] StatusLabel found")
    else:
        print("[ERROR] StatusLabel not found at: ", status_path)

    # 時刻ラベルの取得
    if has_node(time_path):
        time_label = get_node(time_path)
        print("[DEBUG] TimeLabel found")
    else:
        print("[ERROR] TimeLabel not found at: ", time_path)

    # 発信者名ラベルの取得
    if has_node(caller_name_path):
        caller_name_label = get_node(caller_name_path)
        print("[DEBUG] CallerNameLabel found")
    else:
        print("[ERROR] CallerNameLabel not found at: ", caller_name_path)

func initialize_ui():
    print("[DEBUG] Initializing UI...")

    # 通話ステータスの初期設定
    if status_label:
        status_label.text = "電話を待機中..."
        print("[DEBUG] Status set")

    # 字幕の初期化(空文字)
    if subtitle_label:
        subtitle_label.text = ""
        print("[DEBUG] Subtitle cleared")

    # 発信者名の初期設定
    if caller_name_label:
        caller_name_label.text = "不明な発信者"
        print("[DEBUG] Caller name set")

func update_time():
    print("[DEBUG] Updating time...")

    # システム時刻を取得して表示
    if time_label:
        var time = Time.get_datetime_dict_from_system()
        var hour = str(time.hour).pad_zeros(2)
        var minute = str(time.minute).pad_zeros(2)
        time_label.text = hour + ":" + minute
        print("[DEBUG] Time updated to: ", time_label.text)

func connect_to_websocket():
    print("[DEBUG] Connecting to WebSocket: ", websocket_url)

    # WebSocket サーバーへの接続を試行
    var error = socket.connect_to_url(websocket_url)
    if error != OK:
        print("[ERROR] WebSocket connection failed with error: ", error)
        update_status("接続に失敗しました")
        return

    print("[DEBUG] WebSocket connection initiated")
    update_status("サーバーに接続中...")

func _process(_delta):
    # WebSocket の状態を監視
    socket.poll()

    var state = socket.get_ready_state()

    if state == WebSocketPeer.STATE_OPEN:
        # 初回接続完了時の処理
        if status_label and status_label.text == "サーバーに接続中...":
            update_status("通話待機中...")
            print("[DEBUG] WebSocket connected successfully")

        # 受信メッセージの処理
        while socket.get_available_packet_count():
            var packet = socket.get_packet()
            var message_text = packet.get_string_from_utf8()
            handle_websocket_message(message_text)

    elif state == WebSocketPeer.STATE_CONNECTING:
        # 接続中は何もしない
        pass

    elif state == WebSocketPeer.STATE_CLOSED:
        # 接続が切断された場合の処理
        var code = socket.get_close_code()
        var reason = socket.get_close_reason()
        print("[DEBUG] WebSocket closed. Code: ", code, ", Reason: ", reason)
        update_status("接続が切断されました")

func handle_websocket_message(message_text: String):
    print("[DEBUG] WebSocket message received: ", message_text)

    # JSON メッセージを解析
    var json = JSON.new()
    var parse_result = json.parse(message_text)

    if parse_result != OK:
        print("[ERROR] JSON parse failed: ", message_text)
        return

    var message = json.data
    print("[DEBUG] Parsed message: ", message)

    # 音声認識結果(user_speech)を受信した場合
    if message.get("type", "") == "user_speech":
        var user_text = message.get("text", "")
        print("[DEBUG] Processing user speech: ", user_text)

        # 通話状態を「通話中」に更新
        update_status("通話中...")

        # 電話からの発話を字幕として表示
        update_subtitle("???「" + user_text + "」")
        print("[DEBUG] Subtitle updated with user speech")

        # ゲーム内ロジックで応答を生成
        var response = generate_response(user_text)
        if response != "":
            print("[DEBUG] Generated response: ", response)

            # 生成した応答をサーバーに送信
            send_response_to_server(response)

            # 1.5秒待ってから主人公の応答を字幕表示
            await get_tree().create_timer(1.5).timeout
            update_subtitle("主人公「" + response + "」")
            print("[DEBUG] Protagonist response displayed")

func generate_response(input_text: String) -> String:
    print("[DEBUG] Generating response for: ", input_text)

    # 入力テキストを小文字に変換して判定
    var text = input_text.to_lower()

    # 「誰」に関する質問への応答パターン
    if text.contains("あなたは誰") or text.contains("だれ") or text.contains("誰"):
        var response = "私はこのゲームの主人公だ"
        print("[DEBUG] Response generated: ", response)
        return response

    # 該当する応答パターンがない場合
    print("[DEBUG] No response generated")
    return ""

func send_response_to_server(response_text: String):
    print("[DEBUG] Sending response to server: ", response_text)

    # WebSocket が接続中の場合のみ送信
    if socket.get_ready_state() == WebSocketPeer.STATE_OPEN:
        var message = {
            "type": "response",    # メッセージタイプ
            "text": response_text  # 応答テキスト
        }
        var message_str = JSON.stringify(message)
        socket.send_text(message_str)
        print("[DEBUG] Response sent successfully")
    else:
        print("[ERROR] Cannot send response - WebSocket not open")

func update_subtitle(text: String):
    print("[DEBUG] Updating subtitle: ", text)

    # 字幕ラベルのテキストを更新
    if subtitle_label:
        subtitle_label.text = text
        print("[DEBUG] Subtitle updated successfully")
    else:
        print("[ERROR] Cannot update subtitle - label is null")

func update_status(text: String):
    print("[DEBUG] Updating status: ", text)

    # ステータスラベルのテキストを更新
    if status_label:
        status_label.text = text
        print("[DEBUG] Status updated successfully")
    else:
        print("[ERROR] Cannot update status - label is null")

func _exit_tree():
    print("[DEBUG] _exit_tree() called")

    # アプリケーション終了時に WebSocket 接続を閉じる
    if socket:
        socket.close()
        print("[DEBUG] WebSocket closed")
動作確認
- F5 キーでゲームを実行
- ゲーム画面にスマートフォン風 UI が表示されることを確認
- 電話番号と
通話待機中...ステータスが表示される
- WebSocket 接続の確認
- WebSocket サーバーのコンソールに接続ログが表示されることを確認
✅ wss://your-domain.com is ready!
  - Game Client: wss://your-domain.com/game
[Game Client Connected]
- WebSocket サーバーのコンソールに接続ログが表示されることを確認
- Twilio 番号に電話をかけてテスト
- 電話をかけ発話すると
通話中...ステータスに変更される - 発話内容が
???「発話内容」として字幕表示される - 電話で「あなたは誰ですか?」と聞くと 1.5 秒後に
主人公「応答内容」として字幕表示される - 電話に音声で応答が返される
- 電話をかけ発話すると
考察
実装を通じて見えた ConversationRelay の可能性
本モックの実装を通じて、Twilio ConversationRelay がゲーム開発において持つ可能性を実感できました。特に印象的だったのは、音声認識から音声合成までの一連の処理が非常にスムーズだったことです。音声認識結果のゲーム画面への反映 & 応答内容の電話からの再生 の 2 つがリアルタイムで行われるようにするには、従来の電話 API では難易度が高かったです。ConversationRelay によって非常に簡単に、現実世界とゲーム世界の境界をまたいだ自然な対話体験が得られることが分かりました。
ゲームデザインへの活用
没入感の新しい次元
電話という身近なデバイスを通じてゲーム世界にアクセスする体験は、従来のコントローラーやタッチ操作とは全く異なる没入感を提供します。特に代替現実ゲーム (ARG) の文脈では、現実世界の行動がゲーム進行に直接影響する仕組みとして非常に有効です。
アクセシビリティの向上
音声による操作は、視覚や手の動きに制約があるプレイヤーにとって重要なアクセシビリティ機能となり得ます。スマートフォンの操作に慣れていない高齢者でも、電話をかけるという慣れ親しんだ行動でゲームに参加できます。
今後の課題
応答パターンの拡張
現在の実装では、シンプルなキーワードマッチングによる応答生成を行っていますが、より高度な自然言語処理や LLM との連携によって豊かな表現ができると考えています。
セキュリティとプライバシー
電話番号という個人情報を扱うため、本格的な運用では適切なセキュリティ対策とプライバシー保護が不可欠です。また、通話料金の負担についても考慮が必要です。
スケーラビリティ
現在の実装は単一の電話番号での検証ですが、大規模なゲームでは複数の電話番号や地域対応、同時接続数の制限なども考慮する必要があります。
まとめ
本記事では、Twilio ConversationRelay と Godot ゲームエンジンを組み合わせて、現実世界の電話通話がゲーム内にリアルタイムで反映される代替現実ゲーム体験を構築しました。ConversationRelay により自然な音声通話フローを簡潔に実装でき、音声認識から応答生成までの一連の処理を低遅延で実現できました。
ConversationRelay そのものは、問合せシステムや教育コンテンツなど様々な分野での応用が期待されますが、今回は特に代替現実ゲーム (ARG) 分野での活用に焦点を当てました。 ConversationRelay のゲーム分野への応用によって、現実世界との直接的な接点を持つ新しいエンターテインメント体験を容易に導入できます。LLM との連携や大規模展開により、ゲーム業界に新たな表現手法をもたらす技術として今後注目されていくでしょう。


