![[iOS 10] Notification Service app extension を使用してリモート通知のペイロードを編集する #wwdc](https://devio2023-media.developers.io/wp-content/uploads/2016/06/wwdc16.png)
[iOS 10] Notification Service app extension を使用してリモート通知のペイロードを編集する #wwdc
この記事は公開されてから1年以上経過しています。情報が古い可能性がありますので、ご注意ください。
はじめに
こんにちは。モバイルアプリサービス部の平屋です。前回の記事に引き続き、iOS 10 で追加された「User Notifications framework」のクラスを使用した実装を紹介します。
本記事では、「Notification Service app extension」を使用してリモート通知のペイロードを編集する方法を紹介します。
本記事は Apple からベータ版として公開されているドキュメントを情報源としています。 そのため、正式版と異なる情報になる可能性があります。ご留意の上、お読みください。
検証環境
- Xcode Version 8.0 beta 3 (8S174q)
- iPhone 6s
- iOS 10.0 (14A5309d)
Notification Service app extension とは
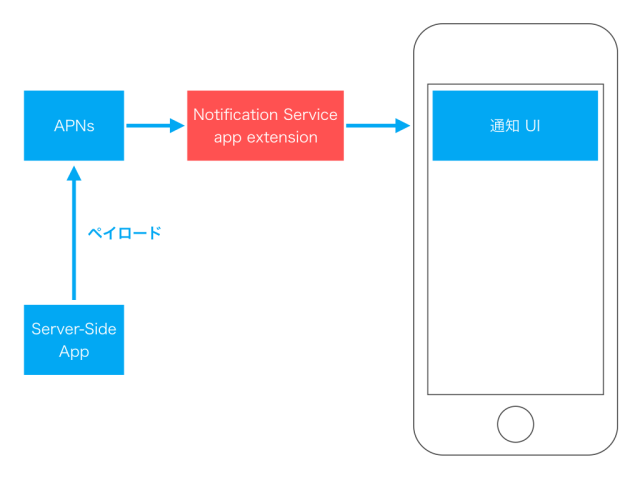
Notification Service app extension は iOS 10 で新規追加されたリモート通知のための app extension です。
この app extension は UI を提供しないタイプの app extension であり、バックグラウンドで動作します。ユーザーに通知を見せる前に、リモート通知のペイロードを編集することができます。
この app extension の用途としては、以下のようなものが挙げられます。
- リモート通知のペイロードの制限を超えるサイズの添付ファイルをダウンロードし、通知に添付する
- 暗号化された通知の本文を復号化し、復号化した文字列を通知に表示するようにする
実装
Notification Service app extension の機能を利用するには、既存のアプリに app extension を追加します。app extension を追加すると、必要最低限のコードが自動生成されます。
app extension を追加する
既存のアプリに Notification Service app extension を追加する手順は以下のとおりです。
- Xcode のメニューバーの 「File」 -> 「New」 -> 「Target」 をクリックし、Target 追加用の画面を表示
- 「iOS」タブの「Application Extension」グループの中の「Notification Service Extension」を選択して「Next」をクリック
- 「Product Name」などを入力し「Finish」をクリック (今回は Product Name を「NotificationService」とした)
- 「Activate "NotificationService" scheme?」というダイアログが出るので「Activate」をクリック
以上での操作を行うと、app extension 用のターゲットと scheme が作成され、プロジェクトのツリー上の「NotificationService」グループの中に以下の 2 つのファイルが追加されます。
- NotificationService.swift
- Info.plist
自動生成されるコードについて
app extension 追加時に自動追加されるクラス (今回の場合は NotificationService) は以下のような実装になっています。
このクラスは UNNotificationServiceExtension のサブクラスであり、2 つのメソッドが実装してあります。
class NotificationService: UNNotificationServiceExtension {

    var contentHandler: ((UNNotificationContent) -> Void)?
    var bestAttemptContent: UNMutableNotificationContent?

    // (1)
    override func didReceive(_ request: UNNotificationRequest,
                             withContentHandler contentHandler:(UNNotificationContent) -> Void) {
        ...
    }

    // (2)
    override func serviceExtensionTimeWillExpire() {
        ...
    }

}
(1) didReceive(_:withContentHandler:) メソッドについて
このメソッドは「リモート通知が端末に届いた後」かつ「ユーザーに通知を見せる前」のタイミングで呼ばれます。
引数の request から UNNotificationContent を取り出して通知の内容を編集し、編集後の UNNotificationContent を contentHandler に渡すことで、通知の内容を編集することができます。
以下の実装では、UNNotificationContent の title プロパティの末尾に文字列 [modified] を追加しています。最終的にユーザーに向けて表示するタイトルは <オリジナルのタイトル> [modified] という文字列になります。subtitle や body プロパティなども同様の手順で編集できます。
override func didReceive(_ request: UNNotificationRequest,
                         withContentHandler contentHandler:(UNNotificationContent) -> Void) {
    self.contentHandler = contentHandler
    bestAttemptContent = (request.content.mutableCopy() as? UNMutableNotificationContent)

    if let bestAttemptContent = bestAttemptContent {
        bestAttemptContent.title = "\(bestAttemptContent.title) [modified]"

        contentHandler(bestAttemptContent)
    }
}
(2) serviceExtensionTimeWillExpire() メソッドについて
Notification Service app extension が処理を実行できる時間には限りがあります。(API Reference によると、30 秒程度)
このメソッドは、時間切れになった場合に app extension がターミネートされる前に呼ばれます。引数 contentHandler に UNNotificationContent を渡すことによって、その時点でのベストな処理結果をシステム側に提供することができます。
override func serviceExtensionTimeWillExpire() {
    if let contentHandler = contentHandler, let bestAttemptContent =  bestAttemptContent {
        contentHandler(bestAttemptContent)
    }
}
編集可能なリモート通知を送信する
「Notification Service app extension による編集が可能なリモート通知」を送信する手順は以下のとおりです。
- app extension をビルドする
- 「app extension を追加する」の作業を行った時に追加された scheme を使用する
- 任意の方法で APNs にペイロードを送信する
- 以下の例のように
apsディクショナリの中にmutable-contentキーと 値1を入れておく
- 以下の例のように
{
  "aps": {
    "alert": {
      "title": "Introduction to Notifications",
      "subtitle": "Session 707",
      "body": "Woah! These new notifications look amazing! Don’t you agree?"
    },
    "badge": 1,
    "mutable-content" : 1
  }
}
さいごに
本記事では、「Notification Service app extension」を使用してリモート通知のペイロードを編集する方法を紹介しました。
Notification Service app extension を使用する際の参考になれば幸いです!