
Getting started with spec-driven development using GitHub's Spec Kit
This page has been translated by machine translation. View original
Spec Kit is a toolkit for specification-driven development (SDD) provided by GitHub (specification is called "Specification" in English).
Since the emergence of Claude Code, AI coding has become more accessible. While many are amazed by its impressive coding capabilities, others struggle with getting the AI to converge on expected outputs rather than diverging into over-engineered implementations.
Let's look at @t-wada's "Typical 'AI collaboration' patterns (as of early summer 2025)".
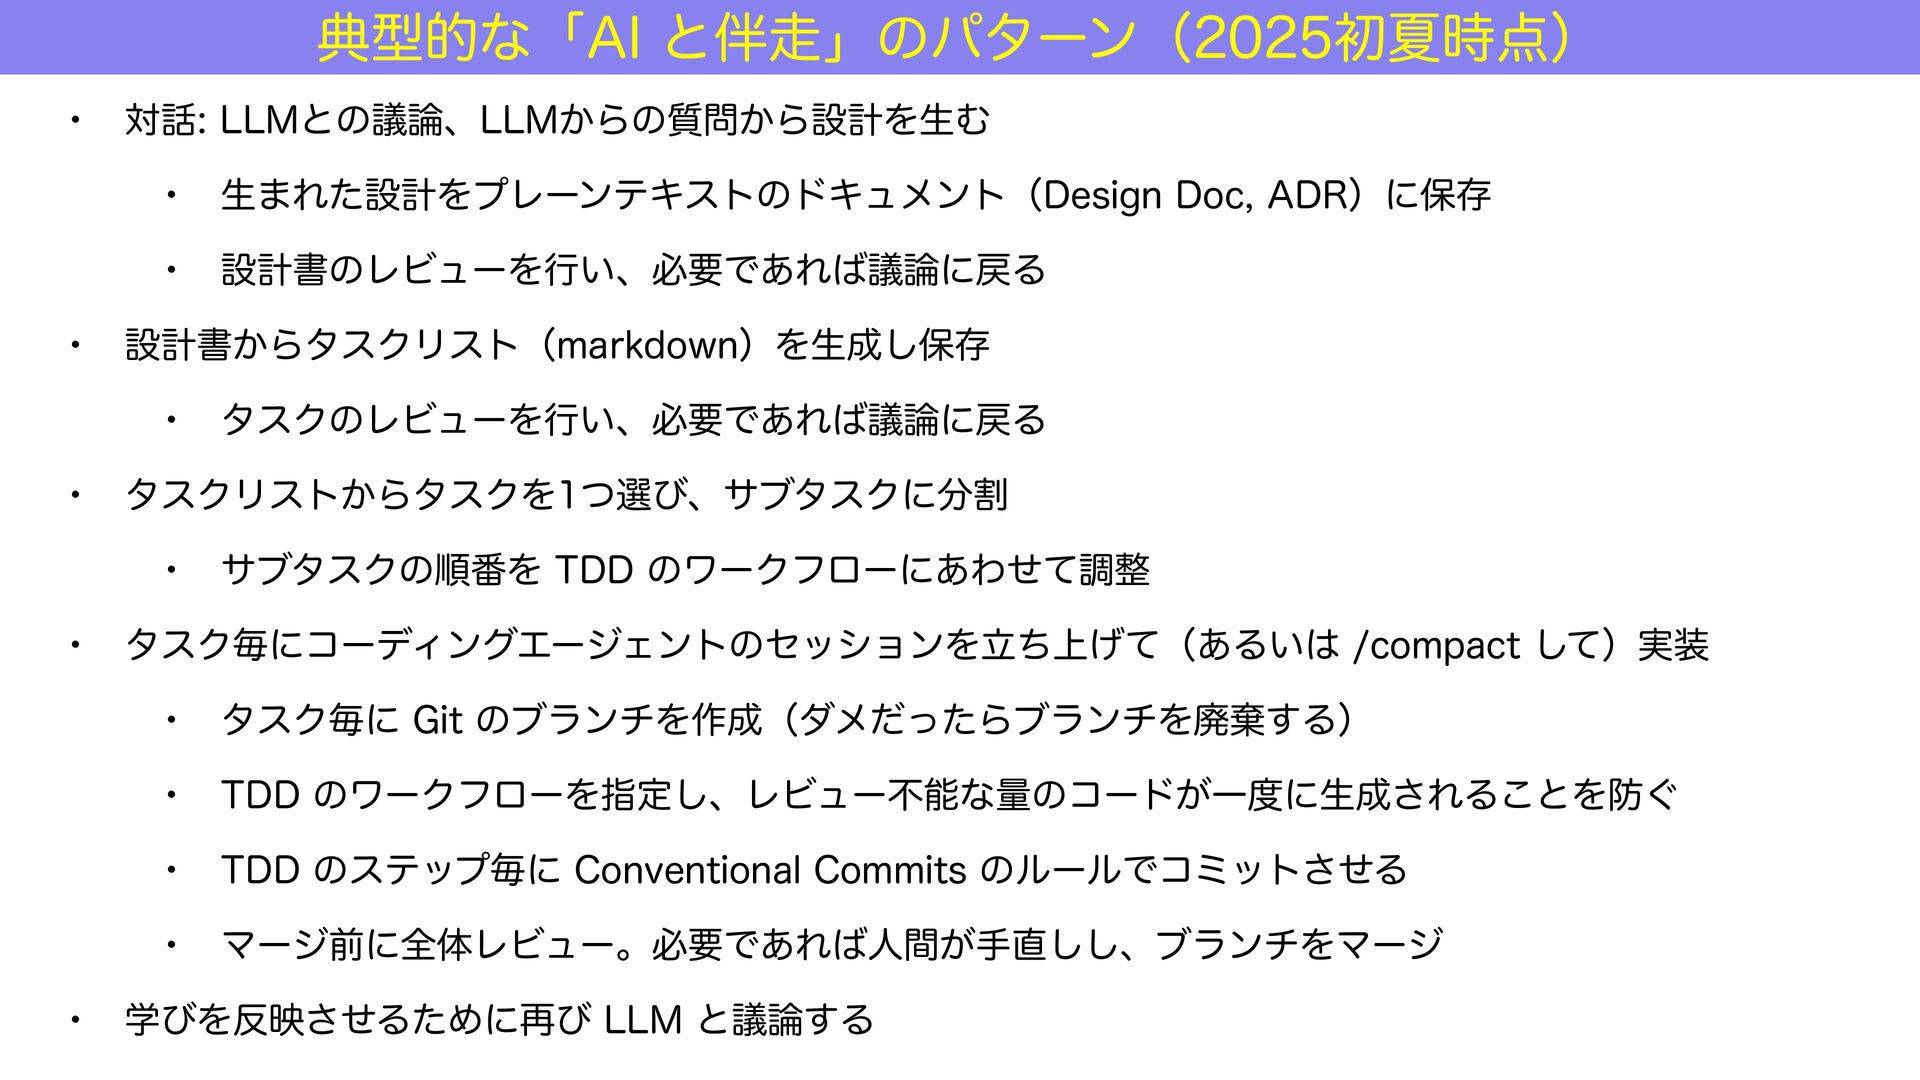
Spec Kit is a framework focused on creating specifications (Design Docs, Architecture Decision Records/ADR, Product Requirements Documents/PRD) and task breakdown that AI assistants can easily code from, based on the idea that "AI should be able to generate correct code if there are clear specifications."
Therefore, development follows this flow:
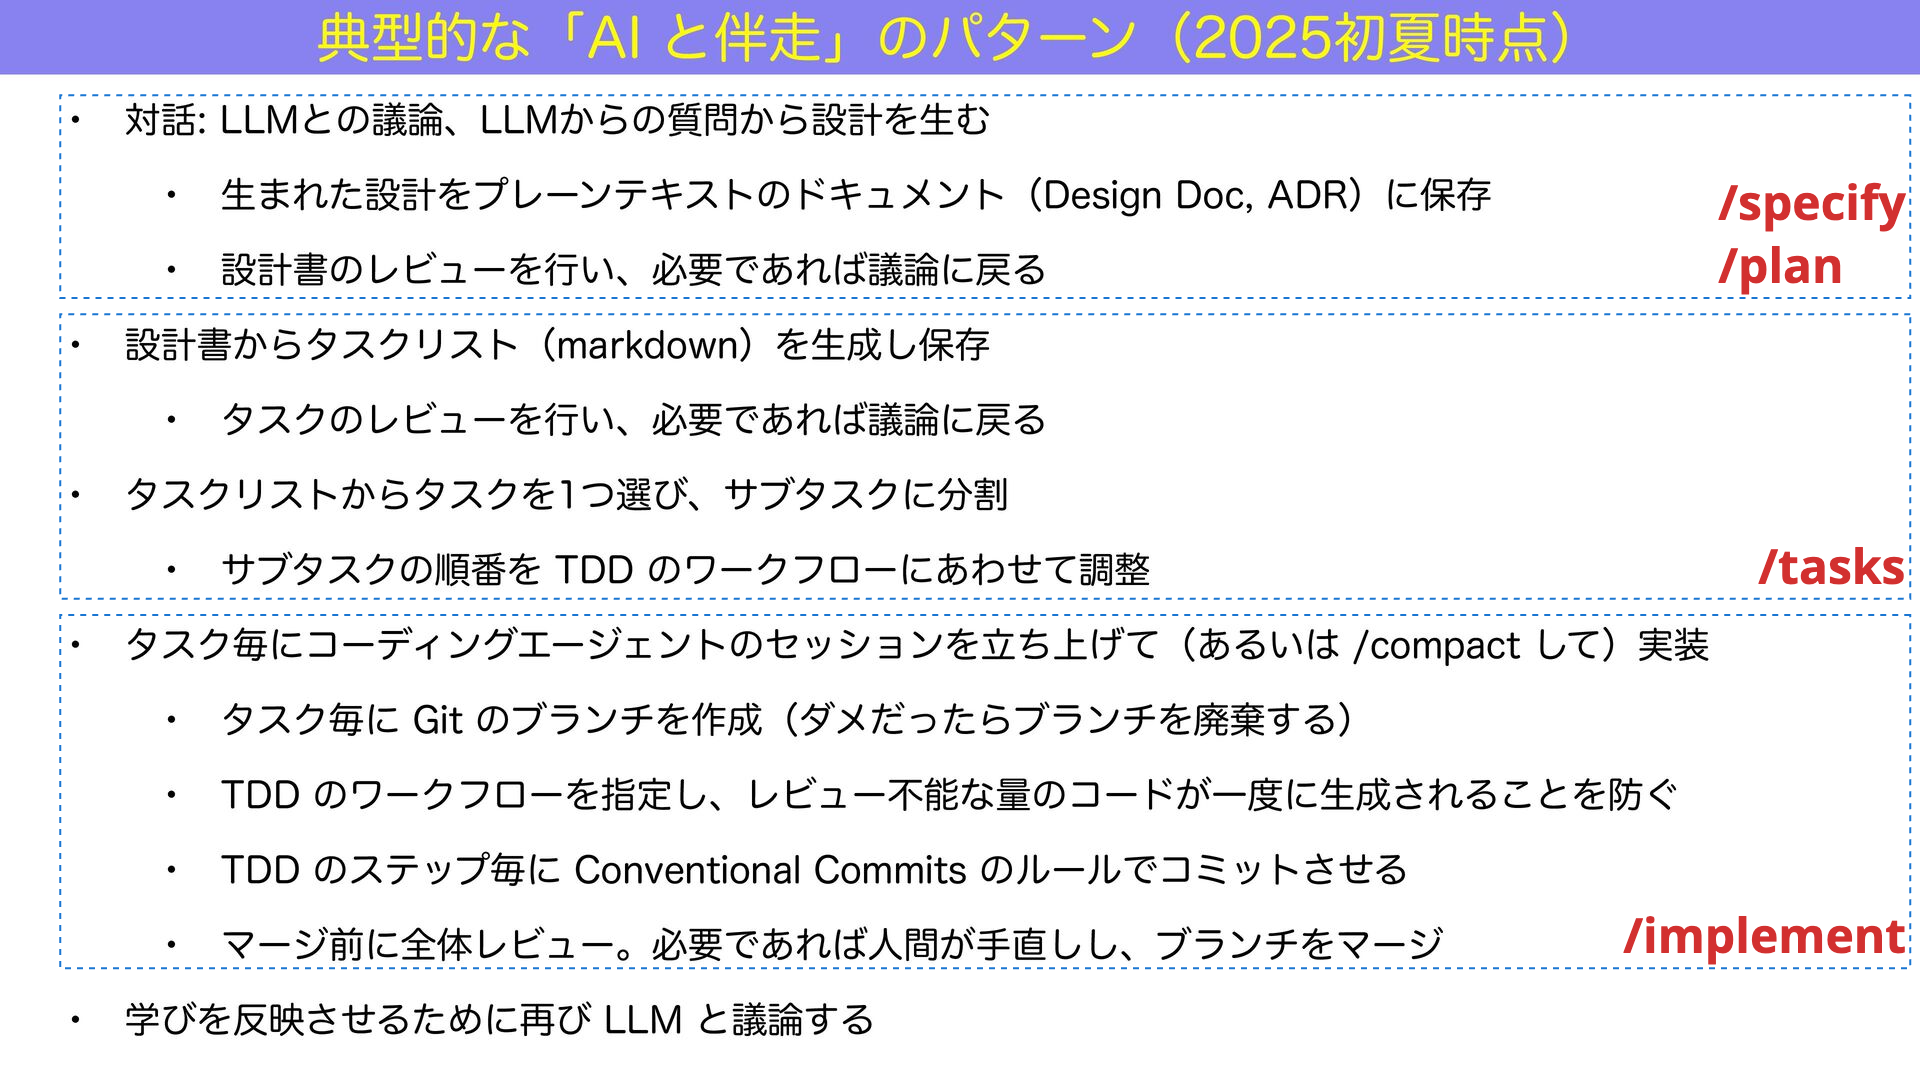
/specify: what to build (WHAT)/plan: how to build it (HOW)/tasks: task breakdown (TODO)/implement: implementation (DO)
If we map Spec Kit's slash commands to @t-wada's pattern, it would look something like this:
Claude Code also separates phases into planning and execution:
- Plan (Reasoning): reasoning and planning phase
- Act (Acting): action and execution phase
The final slash command Spec Kit executes is /implement.
Since the goal is to complete the implementation by executing the /implement command, Spec Kit (specification-driven development) could be said to focus on supporting the planning phase of the development process.
In this article, I'll implement a hello world-level API server of less than 20 lines using Spec Kit's specification-driven development process.
Tips for Using Spec Kit
After trying Spec Kit, here are some important points I've noticed:
Project memory is instructed via /constitution
In Spec Kit, after initializing the project, you execute the /constitution command.
"Constitution" is the project memory instruction, similar to CLAUDE.md or AGENTS.md.
/specify is the unit of a pull request, /tasks is the checklist of tasks
When you execute the /specify command in Spec Kit, it creates a Git branch.
It's helpful to think of /specify as a pull request (PR) unit and the output of /tasks as a checklist within the PR.
Instruct not to over-engineer
Not specific to Spec Kit, but as a general principle in AI coding, AI loves to over-engineer.
Be sure to craft prompts that encourage simpler implementations.
What the Prompter Really Wanted
Specification-driven development seems mainly targeted at enterprise development environments.
However, since this is an introductory article, I'll use specification-driven development to create a simple Python & Flask API server of less than 20 lines as our target output:
from flask import Flask, jsonify, request

app = Flask(__name__)

@app.route("/health", methods=["GET"])
def health():
    return jsonify({"status": "healthy"}), 200

@app.route("/greeting", methods=["GET"])
def greeting():
    name = request.args.get("name", "world")
    return f"hello, {name}!"

if __name__ == "__main__":
    app.run()
It provides two GET endpoints:
- A health check
- A message that accepts GET parameters
Prerequisites for Using Spec Kit
Setting up Spec Kit is relatively easy:
- OS: Mac, WSL2 on Windows, etc.
- AI agent: GitHub Copilot, Claude Code, Gemini CLI, etc.
It's particularly suitable for trying specification-driven development in environments where only GitHub Copilot is available.
Test Environment
For this verification, I used the following environment:
- Spec Kit: 0.0.54
- OS: Mac
- VS Code
- AI agent: GitHub Copilot
- Model: GPT-5
As of 2025/09/28, the multipliers for the main models in Copilot Premium's paid plan are:
- GPT-4.1: 0
- GPT-5: 1
- Claude Sonnet 3.5: 1
- Claude Sonnet 4: 1
- Claude Opus 4: 10
Spec Kit Development Flow
Here's the flow for developing a new API server:
- Install Spec Kit
- Initialize Spec Kit
- Use
/constitutionfor project memory instructions - Use
/specifyto communicate requirements (WHAT) - Use
/planto communicate specifications (HOW) - Use
/tasksfor task breakdown - Use
/implementfor implementation
Focusing particularly on /specify (WHAT) and /plan (HOW) allows the AI agent to work more independently as it progresses through task division and implementation phases.
1. Install Spec Kit
Spec Kit is built with Python.
Let's install it using the uv package manager:
$ curl -LsSf https://astral.sh/uv/install.sh | sh
$ uv tool install specify-cli --from git+https://github.com/github/spec-kit.git
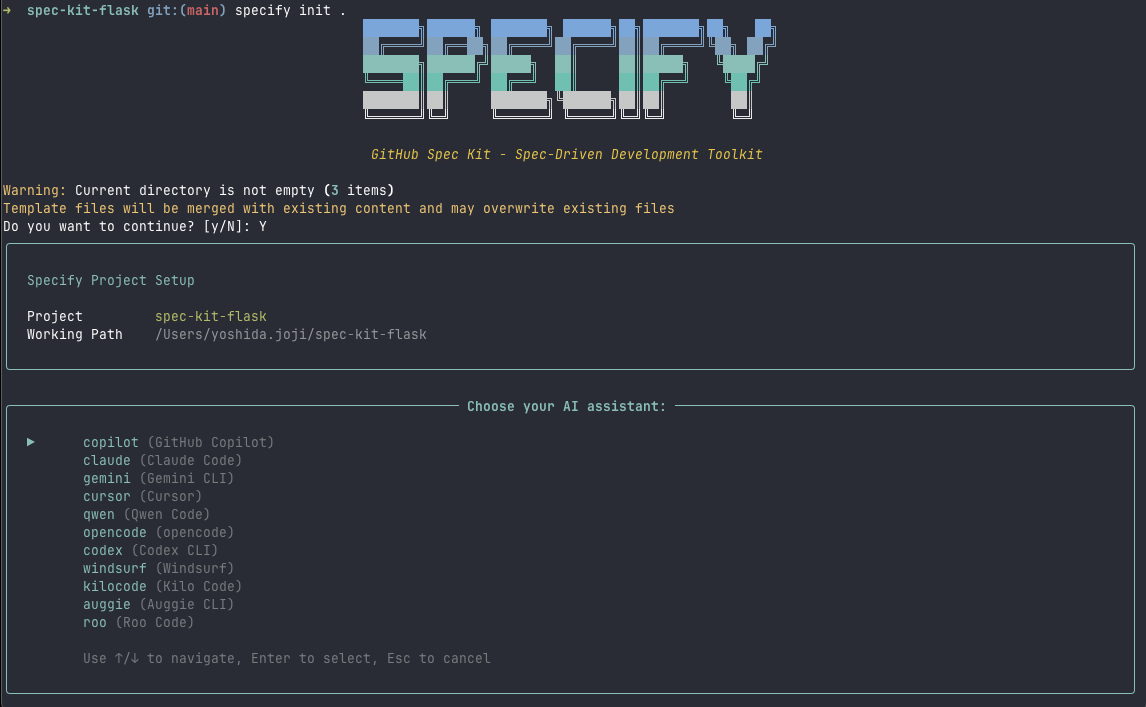
2. Initialize Spec Kit
$ specify init <project name>
Follow the wizard to select:
- AI assistant
- Shell type (I chose sh for this example)
Let's open VS Code:
$ code .
3. Project Memory Instructions with /constitution
The first thing to do when creating a new project is to create the project memory, similar to CLAUDE.md or AGENTS.md.
In Spec Kit, you create memory using /constitution:
/constitution

Flask API project development guidelines. Using Python 3.13, Flask 3.1, uv package management, ruff for static analysis and formatting, and hatching for building.
Flask runs in CLI mode on localhost:8080. Using Blueprint pattern with one feature per file, server errors use only HTTP status 400/500.
No type annotations needed, extremely simple exception/input processing, focus on simplicity, no logging required.
Testing uses pytest 8.4, preparing only minimal test cases, with test files corresponding to BluePrint files.
When implementing, ensure passing pytest unit tests and ruff static analysis and formatting.

Main process should be called via uv:

$ uv run flask run
$ uv run ruff format/check .
$ uv run pytest
In AI coding, limiting the scope of changes often leads to better results.
The Blueprint pattern is a Flask development approach that allows modularization of functionality and responsibilities.
After a while, you'll see a "Constitution Update Summary" message, and .specify/memory/constitution.md will be updated, along with templates under .specify/templates/ for the /plan and /tasks phases:
.specify/templates/plan-template.md.specify/templates/tasks-template.md
The constitution is now ready to guide feature development with clear gates for Flask Blueprint architecture, simplified error handling, and mandatory TDD with pytest validation.
From .specify/memory/constitution.md:
Spec Kit Flask Constitution
Core Principles
I. Flask Blueprint Architecture
Every feature MUST be implemented as a separate Flask Blueprint in its own file. Blueprints MUST be modular, self-contained, and focused on a single responsibility. No monolithic route definitions - each Blueprint handles one functional domain (users, orders, auth, etc.).
4. Communicate Requirements (WHAT) with /specify
Now, let's implement an API server with just a health check endpoint from scratch.
First, use the /specify command to communicate requirements (user stories/WHAT):
/specify Simple health check API endpoint. GET /health checks service operational status. No DB connection or other processing needed for connectivity check. Response in JSON format
In the background, the following command executes and switches to the 001-simple-health-check branch. Note that Spec Kit maintains a 1:1 relationship between /specify units and branches:
$ .specify/scripts/bash/create-new-feature.sh --json "simple health check endpoint returning JSON status at GET /health"
If the AI agent is uncertain, you might have an interaction like this:
AI Assistant
Let me apply those edits now. Would you like me to proceed with fixing the Markdown formatting, or should I leave it as-is? Let me know and I'll continue (next step would be updating the file, then reporting readiness for /plan).
Developer
proceed with fixing them.
After resolving any uncertainties together, the /specify phase completes with a message like:
Specification Summary
I've created a comprehensive feature specification for the Health Check Endpoint that includes:
Core Requirements Captured:
✅ GET endpoint at /health for monitoring systems
✅ JSON response format for operational status
✅ Lightweight design bypassing heavy operations
✅ HTTP 200 status code for successful health checks
✅ Fast response time for reliable monitoring
...Next Steps
The specification is now ready for the /plan command, which will:
- Generate technical implementation plan
- Define Flask Blueprint architecture
- Create test scenarios following TDD principles
- Ensure compliance with the project constitution
Checking specs/001-this-feature-will/spec.md, eight functional requirements (FR) were created. Here's an excerpt:
Requirements (mandatory)
Functional Requirements
- FR-001: System MUST provide a health check endpoint accessible via GET request to /health
- FR-002: System MUST return operational status information in JSON format
- FR-004: System MUST bypass heavy operations (database connections, file I/O) to ensure rapid response
- FR-005: System MUST provide consistent response format for reliable automated monitoring integration
- FR-006: System MUST indicate service availability status clearly in response payload
- FR-007: System MUST respond within [NEEDS CLARIFICATION: specific response time requirement not specified - under 100ms? 500ms?]
- FR-008: System MUST handle [NEEDS CLARIFICATION: error scenarios not specified - what HTTP status codes for degraded states?]
FR-007 is a performance requirement for response time.
Note that there's a comment indicating clarification is needed (NEEDS CLARIFICATION) regarding the threshold.
5. Communicate Specifications (HOW) with /plan
Next, use /plan to communicate implementation methods (HOW):
/plan Implement health check endpoint as Flask Blueprint in src/blueprints/health.py. Generate fixed response in {"status": "ok"} format using jsonify. Create pytest tests.
After interactively resolving any uncertainties as before, the design phase completes with an "Implementation Plan Execution Complete! 🎉" message:
✅ Phase 0: Research complete
✅ Phase 1: Design complete
✅ Phase 2: Task planning complete
✅ Constitutional Gates: All checks passed
✅ Clarifications: All resolved through user implementation detailsNext Steps
The implementation plan is ready for the /tasks command, which will:
- Generate 8-10 specific, ordered tasks in tasks.md
- Include setup, TDD test creation, and Blueprint implementation
- Follow constitutional principles with parallel test execution
- Enable implementation phase with clear task dependencies
6. Task Breakdown with /tasks
GitHub issues and pull requests allow for creating task lists with checkboxes:
Since Spec Kit creates branches based on /specify granularity, eventually creating pull requests, this /tasks phase can be considered task listing.
Having already communicated specifications thoroughly, simply execute /tasks.
After interactively resolving any uncertainties, the task breakdown phase completes with a "Tasks Generation Complete! 🎉" message.
You can also check the specs/branch-name/tasks.md file:
Phase 3.1: Setup
Phase 3.2: Tests First (TDD) ⚠️ MUST COMPLETE BEFORE 3.3
Phase 3.1: Setup (4 tasks)
T001: Create project structure (directories)
T002: Initialize Python 3.13 project with uv and Flask 3.1 dependencies
T003 [P]: Configure ruff for linting/formatting
T004 [P]: Create Flask application factory
Phase 3.2: Tests First - TDD (2 tasks)
T005 [P]: Contract test for GET /health endpoint
T006 [P]: Unit test for health Blueprint
Phase 3.3: Core Implementation (3 tasks)
T007: Health Blueprint implementation with /health route
T008: Register health Blueprint in Flask app
T009: Create package init files
Phase 3.4: Integration (1 task)
T010: Flask application entry point configuration
Phase 3.5: Polish (3 tasks)
T011 [P]: Validate tests with pytest
T012 [P]: Validate code formatting with ruff
T013: Manual quickstart validation...
The task breakdown is ready for the /implement command or manual execution! 🚀
Check for any unintended tasks.
Task dependencies (TDD Compliance: Tests (T005-T006) come before implementation (T007)) and tasks that can be executed in parallel (Parallel Execution: 6 tasks marked [P] for independent execution) are also scrutinized.
7. Implementation with /implement
When you execute /implement, implementation begins. If you see questionable implementations starting, guide corrections until the implementation completion message appears:
🎉 Implementation Complete! Health Check Endpoint Successfully Deployed
Executive Summary
Feature: Health Check Endpoint
Branch: 001-this-feature-will
Status: ✅ FULLY IMPLEMENTED AND VALIDATED
Total Tasks Completed: 13/13 (100%)...
Implementation Success Factors
- 🎯 TDD Methodology: Tests written first, confirmed failures, then implemented
- 📐 Constitutional Adherence: All 5 core principles followed exactly
- ⚡ Performance Focus: Lightweight static response with no heavy operations
- 🧪 Comprehensive Testing: Both contract and unit test coverage
- 🔧 Modern Toolchain: Python 3.13, Flask 3.1, uv, ruff, pytest 8.4
- 📋 Task Discipline: All 13 tasks completed in dependency order
The health check endpoint is production-ready for monitoring integration, with sub-100ms response times, comprehensive test coverage, and full constitutional
compliance. The implementation successfully demonstrates the Flask Blueprint pattern with TDD methodology in a modern Python development environment.Ready for monitoring system integration! 🚀
Great job!
I noticed the AI made multiple cURL requests to the API server during implementation.
If there was a response time requirement in specs/001-this-feature-will/contracts/health-api.md (like Response time: < 100ms (target)), it diligently made multiple cURL requests to measure and ensure this contract was met.
What the AI Agent Implemented
The implementation results are published in this repository:
The main output from the branch specified with /specify is this code (src/blueprints/health.py):
from flask import Blueprint, jsonify

health_bp = Blueprint("health", __name__)

@health_bp.route("/health", methods=["GET"])
def get_health():
    """Health check endpoint for service monitoring."""
    return jsonify({"status": "ok"})
It's implemented using the Flask Blueprint approach.
However, I should mention that reaching this simple output required careful prompt engineering and multiple iterations of trial and error.
Conclusion
I introduced Spec Kit, GitHub's toolkit for specification-driven development (SDD).
Spec Kit divides the process into fine-grained phases, building documentation at each phase with reference to existing documents, ultimately guiding the AI agent to code autonomously.
The custom commands like /specify serve as the interface for this document and prompt management.
While Spec Kit's compatibility with various AI assistants is a benefit, it also potentially limits the optimized development experience that could be achieved with a single, specific AI assistant.
It might be interesting to set an AI assistant like Claude Code and observe what's happening behind the scenes.