EC2(Amazon Linux 2023) に Fluentd を導入してS3バケットにログを配信
この記事は公開されてから1年以上経過しています。情報が古い可能性がありますので、ご注意ください。
Fluentd はオープンソースのデータ収集ソフトウェアです。 ログの収集やフィルタリング、バッファリング、出力などの ログデータにまつわる処理を統合できます。

画像引用: What is Fluentd? | Fluentd
今回は Fluentd を Amazon Linux 2023 に導入してみます。 導入後、簡易なテストとしてS3バケットへログデータを送信してみます。
なお、本ブログは以下 公式ページに沿って進めたものになります。
前提条件を確認する
インストール前の確認項目は以下にまとまっています。
Set Up NTP
AWSの場合は AWS-hosted NTP server を使うことが推奨されています
ローカル Amazon Time Sync Service の IPv4エンドポイントである 169.254.169.123 が設定されていることを、以下コマンドで確認しました。
$ chronyc tracking
Reference ID    : A9FEA97B (169.254.169.123)
Stratum         : 4
Ref time (UTC)  : Wed Sep 25 22:54:31 2024
System time     : 0.000004096 seconds fast of NTP time
Last offset     : +0.000002514 seconds
RMS offset      : 0.000014786 seconds
Frequency       : 5.553 ppm slow
Residual freq   : +0.003 ppm
Skew            : 0.167 ppm
Root delay      : 0.000409242 seconds
Root dispersion : 0.000399270 seconds
Update interval : 16.3 seconds
Leap status     : Normal
Increase the Maximum Number of File Descriptors
プロセスが保持できるファイル数の上限を ulimit -n コマンドで確認します。
$ ulimit -n
65535
上記表示は特に問題ないです。 1024 といった値である場合は不十分なので、設定を更新する必要があります。
Optimize the Network Kernel Parameters
こちらは多くの Fluentdインスタンスを稼働させるような 高負荷環境での最適化項目です。 /etc/sysctl.conf を更新します。
今回は設定しませんでした。
Use sticky bit symlink/hardlink protection
/etc/sysctl.d/10-link-restrictions.conf もしくは /usr/lib/sysctl.d/50-default.conf に 以下設定が入っているか確認します。
$ cat /usr/lib/sysctl.d/50-default.conf | grep -e fs.protected_symlinks -e fs.protected_hardlinks
fs.protected_hardlinks = 1
fs.protected_symlinks = 1
これはシンボリックリンク攻撃(Symlink Attack)への対策になります。
導入する
以下に従って Fluentd を導入していきます。
インストール
fluent-package をインストールしていきます。 fluent-package は Fluentd の安定したディストリビューションです。 以前は td-agent として呼ばれていました。
以下コマンドを実行して fluent-package 5 (LTS: Long Term Support) をダウンロード + インストールします。
curl -fsSL https://toolbelt.treasuredata.com/sh/install-amazon2023-fluent-package5-lts.sh | sh
コマンドの出力例
==============================
 fluent-package Installation Script
==============================
This script requires superuser access to install rpm packages.
You will be prompted for your password by sudo.
Fluentd Project                                                                                                 2.6 MB/s | 314 kB     00:00
Last metadata expiration check: 0:00:02 ago on Fri Sep 20 01:54:21 2024.
Dependencies resolved.
================================================================================================================================================
 Package                           Architecture              Version                                Repository                             Size
================================================================================================================================================
Installing:
 fluent-package                    x86_64                    5.0.4-1.amzn2023                       fluent-package-lts                     14 M

Transaction Summary
================================================================================================================================================
Install  1 Package

Total download size: 14 M
Installed size: 65 M
Downloading Packages:
fluent-package-5.0.4-1.amzn2023.x86_64.rpm                                                                      110 MB/s |  14 MB     00:00
------------------------------------------------------------------------------------------------------------------------------------------------
Total                                                                                                           107 MB/s |  14 MB     00:00
Running transaction check
Transaction check succeeded.
Running transaction test
Transaction test succeeded.
Running transaction
  Preparing        :                                                                                                                        1/1
  Running scriptlet: fluent-package-5.0.4-1.amzn2023.x86_64                                                                                 1/1
  Installing       : fluent-package-5.0.4-1.amzn2023.x86_64                                                                                 1/1
  Running scriptlet: fluent-package-5.0.4-1.amzn2023.x86_64                                                                                 1/1
Failed to get unit file state for td-agent.service: No such file or directory
inactive

  Verifying        : fluent-package-5.0.4-1.amzn2023.x86_64                                                                                 1/1

Installed:
  fluent-package-5.0.4-1.amzn2023.x86_64

Complete!

Installation completed. Happy Logging!
とりあえず起動
Fluentd サービスを起動します。
sudo systemctl start fluentd.service
以下ステータスの確認結果です。
$ sudo systemctl status fluentd.service
● fluentd.service - fluentd: All in one package of Fluentd
     Loaded: loaded (/usr/lib/systemd/system/fluentd.service; disabled; preset: disabled)
     Active: active (running) since Fri 2024-09-20 01:56:05 UTC; 5s ago
       Docs: https://docs.fluentd.org/
    Process: 30395 ExecStart=/opt/fluent/bin/fluentd --log $FLUENT_PACKAGE_LOG_FILE --daemon /var/run/fluent/fluentd.pid $FLUENT_PACKAGE_OPTION>
   Main PID: 30401 (fluentd)
      Tasks: 9 (limit: 1059)
     Memory: 103.6M
        CPU: 1.800s
     CGroup: /system.slice/fluentd.service
             ├─30401 /opt/fluent/bin/ruby /opt/fluent/bin/fluentd --log /var/log/fluent/fluentd.log --daemon /var/run/fluent/fluentd.pid
             └─30404 /opt/fluent/bin/ruby -Eascii-8bit:ascii-8bit /opt/fluent/bin/fluentd --log /var/log/fluent/fluentd.log --daemon /var/run/f>

Sep 20 01:56:04 ip-10-0-31-153.ap-northeast-1.compute.internal systemd[1]: Starting fluentd.service - fluentd: All in one package of Fluentd...
Sep 20 01:56:05 ip-10-0-31-153.ap-northeast-1.compute.internal systemd[1]: Started fluentd.service - fluentd: All in one package of Fluentd.
動作確認
デフォルトの設定ファイルは /etc/fluent/fluentd.conf にあります。
/etc/fluent/fluentd.conf
####
## Output descriptions:
##

# Treasure Data (http://www.treasure-data.com/) provides cloud based data
# analytics platform, which easily stores and processes data from td-agent.
# FREE plan is also provided.
# @see http://docs.fluentd.org/articles/http-to-td
#
# This section matches events whose tag is td.DATABASE.TABLE
<match td.*.*>
  @type tdlog
  @id output_td
  apikey YOUR_API_KEY

  auto_create_table
  <buffer>
    @type file
    path /var/log/fluent/buffer/td
  </buffer>

  <secondary>
    @type secondary_file
    directory /var/log/fluent/failed_records
  </secondary>
</match>

## match tag=debug.** and dump to console
<match debug.**>
  @type stdout
  @id output_stdout
</match>

####
## Source descriptions:
##

## built-in TCP input
## @see http://docs.fluentd.org/articles/in_forward
<source>
  @type forward
  @id input_forward
</source>

## built-in UNIX socket input
#<source>
#  type unix
#</source>

# HTTP input
# POST http://localhost:8888/<tag>?json=<json>
# POST http://localhost:8888/td.myapp.login?json={"user"%3A"me"}
# @see http://docs.fluentd.org/articles/in_http
<source>
  @type http
  @id input_http
  port 8888
</source>

## live debugging agent
<source>
  @type debug_agent
  @id input_debug_agent
  bind 127.0.0.1
  port 24230
</source>

####
## Examples:
##

## File input
## read apache logs continuously and tags td.apache.access
#<source>
#  @type tail
#  @id input_tail
#  <parse>
#    @type apache2
#  </parse>
#  path /var/log/httpd-access.log
#  tag td.apache.access
#</source>

## File output
## match tag=local.** and write to file
#<match local.**>
#  @type file
#  @id output_file
#  path /var/log/fluent/access
#</match>

## Forwarding
## match tag=system.** and forward to another fluentd server
#<match system.**>
#  @type forward
#  @id output_system_forward
#
#  <server>
#    host 192.168.0.11
#  </server>
#  # secondary host is optional
#  <secondary>
#    <server>
#      host 192.168.0.12
#    </server>
#  </secondary>
#</match>

## Multiple output
## match tag=td.*.* and output to Treasure Data AND file
#<match td.*.*>
#  @type copy
#  @id output_copy
#  <store>
#    @type tdlog
#    apikey API_KEY
#    auto_create_table
#    <buffer>
#      @type file
#      path /var/log/fluent/buffer/td
#    </buffer>
#  </store>
#  <store>
#    @type file
#    path /var/log/fluent/td-%Y-%m-%d/%H.log
#  </store>
#</match>
以下コマンドでサンプルログの記録を確認します。
$ curl -X POST -d 'json={"json":"message"}' http://localhost:8888/debug.test
$ sudo tail -n 1 /var/log/fluent/fluentd.log
2024-09-25 23:20:09.791902684 +0000 debug.test: {"json":"message"}
細かいチューニング
Fluentd サービスの自動起動を有効化します。
$ sudo systemctl enable fluentd.service
Created symlink /etc/systemd/system/td-agent.service → /usr/lib/systemd/system/fluentd.service.
Created symlink /etc/systemd/system/multi-user.target.wants/fluentd.service → /usr/lib/systemd/system/fluentd.service.
また、 Fluentd をルートユーザーで起動するようにします。 /etc/systemd/system/td-agent.service の [Service] 記述を以下のように更新します。
1,2c1,2
< User=fluentd
< Group=fluentd
---
> User=root
> Group=root
最後にサービスを再起動します。
sudo systemctl restart fluentd.service
S3へ送信する
以下 How-to Guide をベースに、S3バケットに Apache ログを送信してみます。
Fluentd の拡張プラグインとして out_s3 が必要ですが、 このプラグインは最新版の deb/rpm パッケージには既に含まれています。
S3バケットの準備
ログ送信先のS3バケットを事前に作成しておきます。
IAMロールの準備
EC2インスタンス用のIAMロールに以下権限を付与しておきます。 (参考元: docs/howto.md | fluent/fluent-plugin-s3 · GitHub)
{
  "Version": "2012-10-17",
  "Statement": [
    {
      "Effect": "Allow",
      "Action": [
        "s3:ListBucket"
      ],
      "Resource": "arn:aws:s3:::${先ほど作成したバケット}"
    },
    {
      "Effect": "Allow",
      "Action": [
        "s3:PutObject",
        "s3:GetObject"
      ],
      "Resource": "arn:aws:s3:::${先ほど作成したバケット}/*"
    }
  ]
}
設定ファイルの更新(Tail Input)
in_tail プラグインを使って、 テキストファイルの末尾からログを読み取ります。
以下設定を /etc/fluent/fluentd.conf に追加しました。
<source>
  @type tail
  path /var/log/httpd/access_log
  pos_file /var/log/fluent/apache2.access_log.pos
  <parse>
    @type apache2
  </parse>
  tag s3.apache.access
</source>
/var/log/httpd/access_log を読み取り、 apache2 parser プラグインを使ってパースします。
タグ( s3.apache.access ) は後述の match 指示にて活用します。
設定ファイルの更新(S3 Output)
out_s3 を使って S3バケットにログを送信します。
以下設定を /etc/fluent/fluentd.conf に追加しました。
<match s3.*.*>
  @type s3

  s3_bucket ${先ほど作成したバケット}
  path logs/

  <buffer>
    @type file
    path /var/log/fluent/s3
    timekey 60
    timekey_wait 10s
    chunk_limit_size 256m
  </buffer>

  time_slice_format %Y%m%d%H
</match>
s3.*.* タグにマッチしたイベントに対して処理を実施します。 つまり、先程の s3.apache.access です。
送信先は ${先ほど作成したバケット}/logs/ です。
設定ファイルの更新後、サービスを再起動します。
sudo systemctl restart fluentd.service
テスト
事前に httpd をインストールして起動しておきます。
sudo dnf install httpd
sudo systemctl start httpd.service
ab (Apache Bench) コマンドを使って自サーバーへアクセスし、ログ( /var/log/httpd/access_log )を生成します。
ab -n 100 -c 10 http://localhost/
abコマンドの出力サンプル
This is ApacheBench, Version 2.3 <$Revision: 1913912 $>
Copyright 1996 Adam Twiss, Zeus Technology Ltd, http://www.zeustech.net/
Licensed to The Apache Software Foundation, http://www.apache.org/

Benchmarking localhost (be patient).....done

Server Software:        Apache/2.4.62
Server Hostname:        localhost
Server Port:            80

Document Path:          /
Document Length:        45 bytes

Concurrency Level:      10
Time taken for tests:   0.030 seconds
Complete requests:      100
Failed requests:        0
Non-2xx responses:      100
Total transferred:      31900 bytes
HTML transferred:       4500 bytes
Requests per second:    3336.56 [#/sec] (mean)
Time per request:       2.997 [ms] (mean)
Time per request:       0.300 [ms] (mean, across all concurrent requests)
Transfer rate:          1039.42 [Kbytes/sec] received

Connection Times (ms)
              min  mean[+/-sd] median   max
Connect:        0    0   0.8      0       5
Processing:     0    2   1.9      2       8
Waiting:        0    2   1.9      1       7
Total:          0    3   2.1      2       8

Percentage of the requests served within a certain time (ms)
  50%      2
  66%      4
  75%      4
  80%      5
  90%      7
  95%      8
  98%      8
  99%      8
 100%      8 (longest request)
確認
S3バケットにログが送信されていることを確認しました。
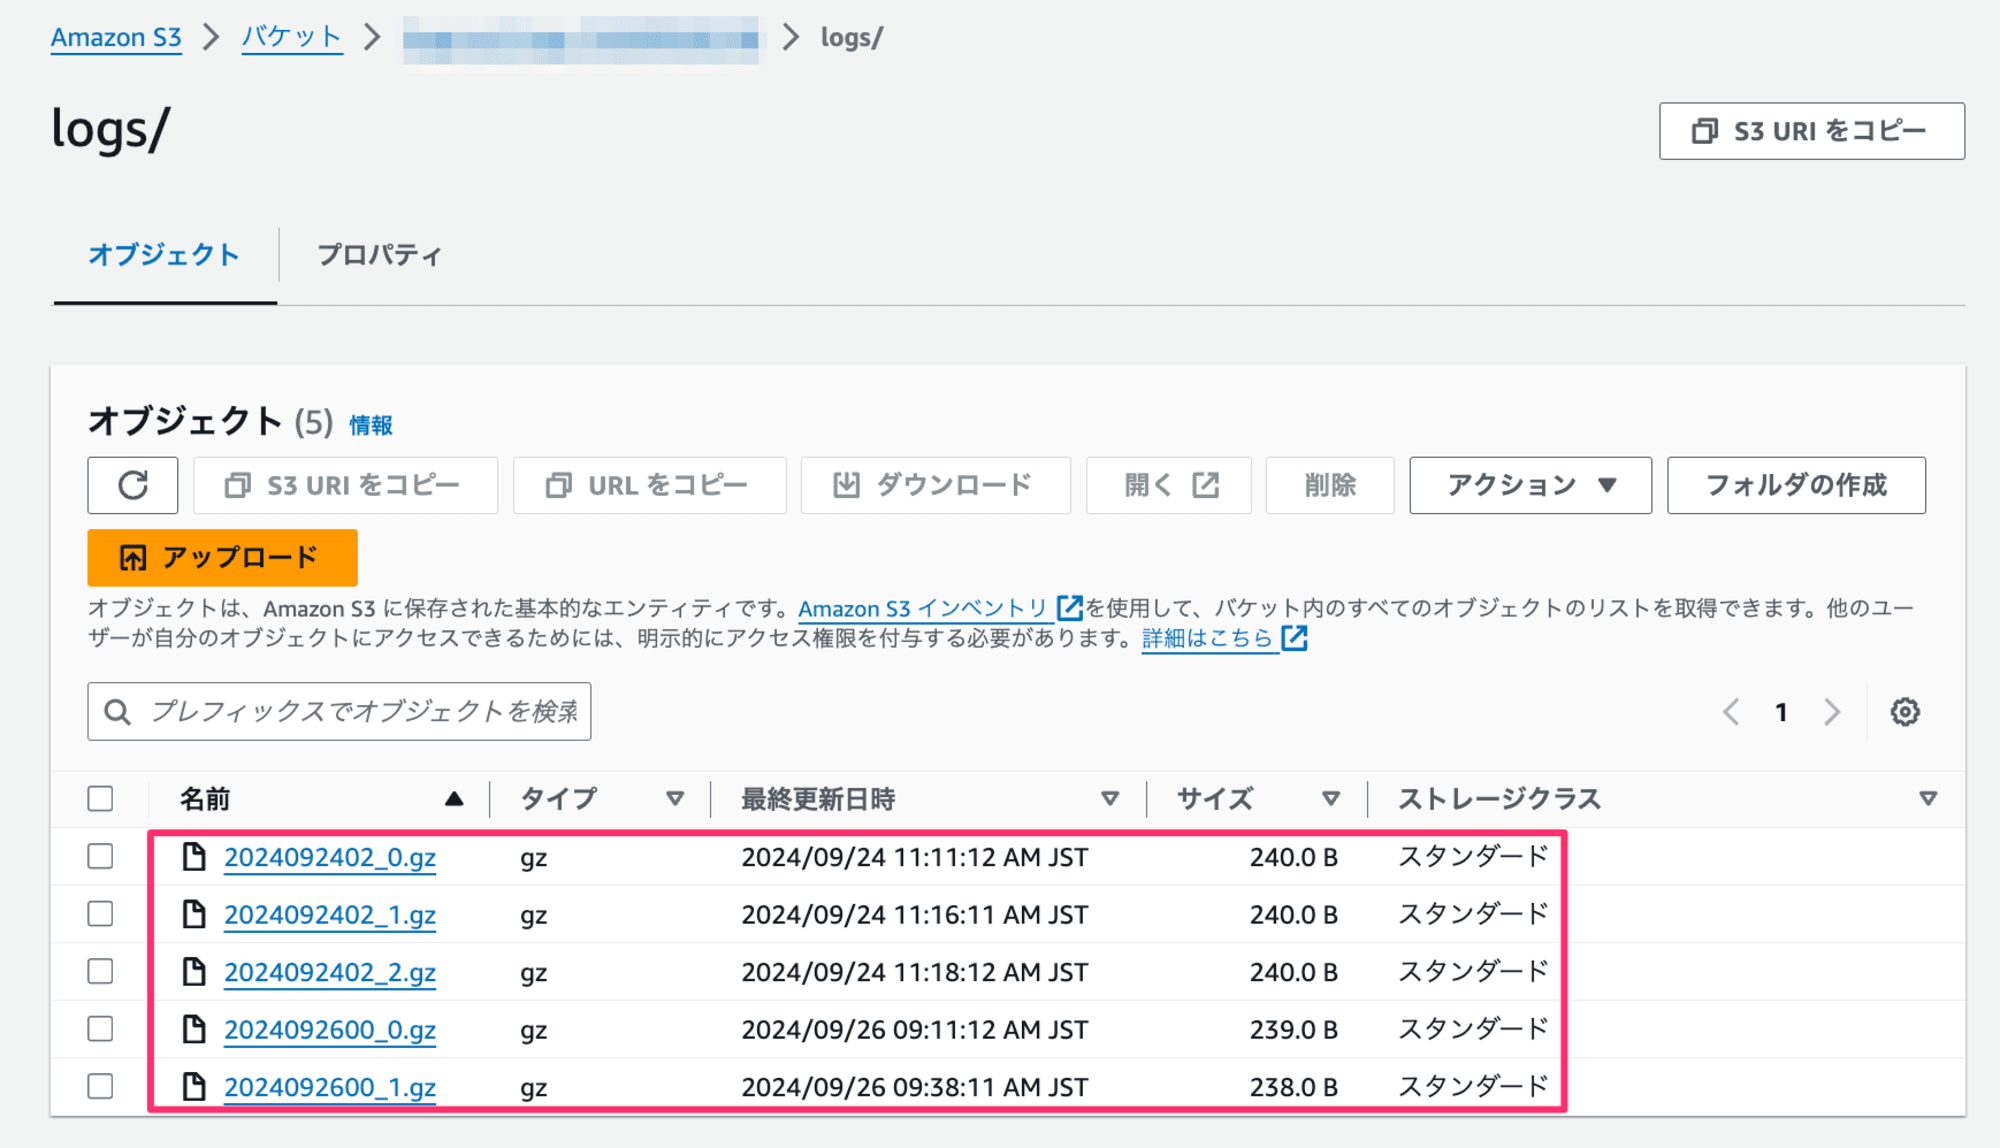
1オブジェクトをダウンロードして中身を見てみます。
$ gunzip 2024092600_1.gz
$ tail -n 5 2024092600_1
2024-09-26T00:37:22+00:00   s3.apache.access    {"host":"127.0.0.1","user":null,"method":"GET","path":"/","code":403,"size":45,"referer":null,"agent":"ApacheBench/2.3"}
2024-09-26T00:37:22+00:00   s3.apache.access    {"host":"127.0.0.1","user":null,"method":"GET","path":"/","code":403,"size":45,"referer":null,"agent":"ApacheBench/2.3"}
2024-09-26T00:37:22+00:00   s3.apache.access    {"host":"127.0.0.1","user":null,"method":"GET","path":"/","code":403,"size":45,"referer":null,"agent":"ApacheBench/2.3"}
2024-09-26T00:37:22+00:00   s3.apache.access    {"host":"127.0.0.1","user":null,"method":"GET","path":"/","code":403,"size":45,"referer":null,"agent":"ApacheBench/2.3"}
2024-09-26T00:37:22+00:00   s3.apache.access    {"host":"127.0.0.1","user":null,"method":"GET","path":"/","code":403,"size":45,"referer":null,"agent":"ApacheBench/2.3"}
3列目にパースされたJSONが確認できます。 jq コマンドで整形した結果がこちら。
# tail -n 1 2024092600_1 | cut -f 3 | jq
{
  "host": "127.0.0.1",
  "user": null,
  "method": "GET",
  "path": "/",
  "code": 403,
  "size": 45,
  "referer": null,
  "agent": "ApacheBench/2.3"
}
おわりに
Amazon Linux 2023 に fluentd を導入してS3バケットにログを送信してみました。 長期保存目的でログを格納していきたい際に活用できると思います。
以上、参考になれば幸いです。
参考
補足
実行環境
- AMI: Amazon Linux 2023 AMI 2023.5.20240916.0 x86_64 HVM kernel-6.1
- fluentd: fluent-package 5.0.4 fluentd 1.16.5
- fluentd s3 plugin: fluent-plugin-s3 (1.7.2)
- httpd: Apache/2.4.62