![[新機能] Amazon Aurora PostgreSQL と Amazon Redshift の Zero-ETL 統合の試してみました](https://images.ctfassets.net/ct0aopd36mqt/wp-thumbnail-63f1274931b942e9a92e601c1127ad73/cfe87ec6d62fa2fc3c474ed4cb2f6c2e/amazon-redshift?w=3840&fm=webp)
[新機能] Amazon Aurora PostgreSQL と Amazon Redshift の Zero-ETL 統合の試してみました
この記事は公開されてから1年以上経過しています。情報が古い可能性がありますので、ご注意ください。
AWS事業本部コンサルティング部の石川です。Amazon Aurora PostgreSQL と Amazon Redshift の Zero-ETL 統合の一般提供を開始しました。プレビュー版とはZero-ETLの設定画面やその流れがかなり変わっています。本日はこの新機能が動作する環境を構築し、データがニアリアルタイムで同期される事を検証しました。
Amazon Aurora PostgreSQLのAmazon RedshiftとZero-ETL統合
この新機能は、複雑なETL(抽出・変換・ロード)パイプラインを構築・管理することなく、Aurora PostgreSQLのトランザクションデータをAmazon Redshiftで簡単にデータを連携できるようになるサービスです。
Zero-ETL統合の主な利点
- ETLパイプラインの構築・管理が不要
- ソースデータが自動的にAmazon Redshiftにレプリケーション
- ニアリアルタイムでデータが更新され、タイムリーな分析が可能
- 複数のデータソースを単一のデータウェアハウスに統合
一般提供で追加された主な機能
- 拡張DDLイベントサポート
- データベース、スキーマ、テーブルの作成、変更、削除、名前変更に対応
- カスケード操作を含む高度な関係性のサポート
- データタイプサポートの拡張
- Aurora PostgreSQL互換で対応しているほとんどのデータタイプと値をサポート
- TOASTを使用した大きなデータ値の対応
- 複数論理データベースのレプリケーション
- 単一のZero-ETL統合で複数の論理データベースからのデータレプリケーションが可能
- セキュリティとコスト最適化
- レプリケーションするデータの選択的指定が可能
事前準備
一般提供開始となった Zero-ETL 統合は、Aurora PostgreSQL互換バージョン16.4以上で利用可能です。今回は、同じAWSアカウント上のAmazon Aurora PostgreSQLとAmazon Redshift Provisionedを Zero-ETL 統合します。プレビュー版とはZero-ETLの設定画面やその流れがかなり変わっています。
Zero-ETLの要件のAmazon Aurora PostgreSQLとAmazon Redshift Provisionedの構築
Zero-ETLの要件のAmazon Aurora PostgreSQLとAmazon Redshift Provisionedの構築までをCDKでサクッと作成します。実際のコードはAppendex Ⅰをご覧ください。**CDKで実行しますが、15分30秒(930秒)**と結構時間がかかります。
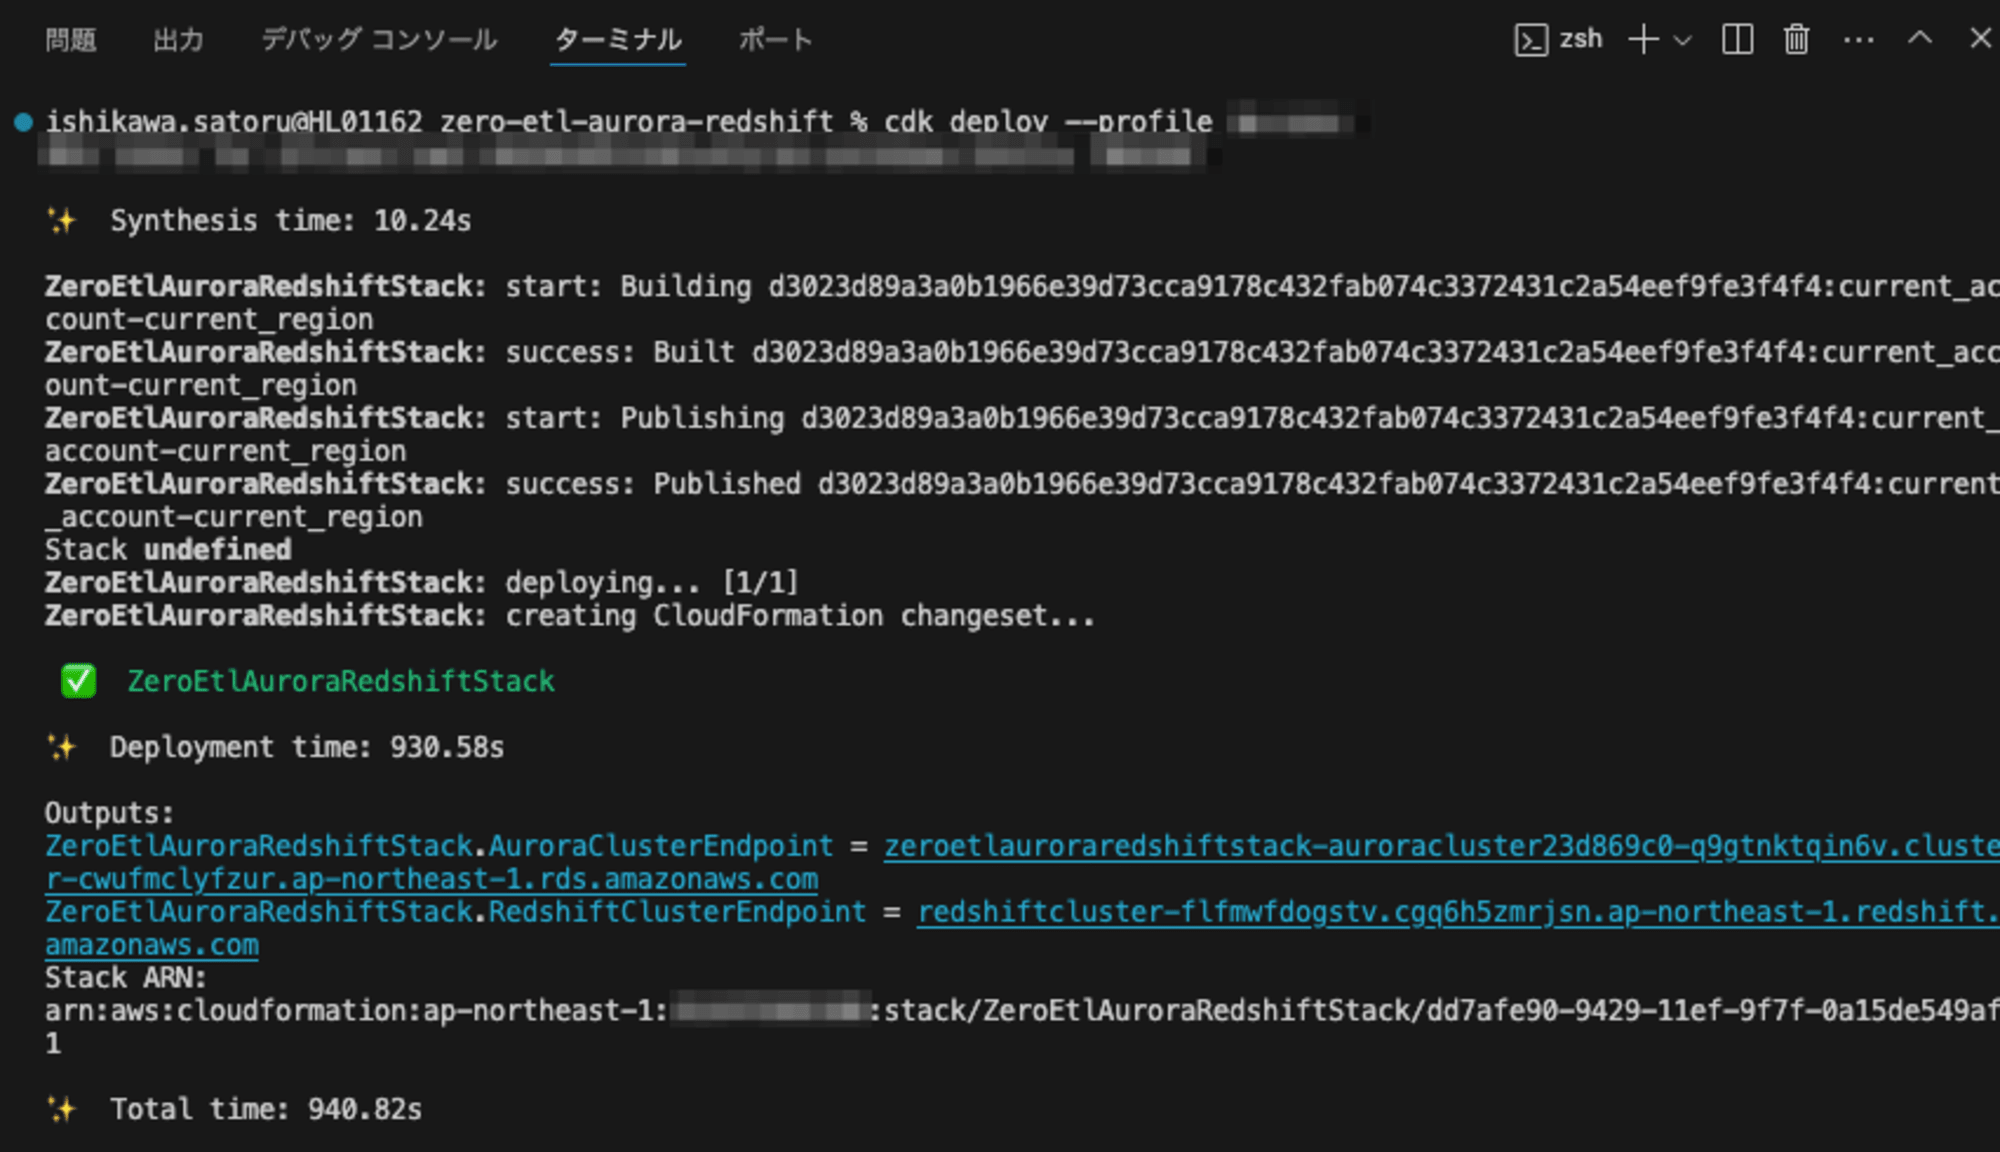
当初は、CDKですべて構築を試みたのですが、Zero-ETLそのものの設定は、現時点では対応していないためマネジメントコンソールから設定します。
CDKのコードの中では、Amazon Aurora PostgreSQLとAmazon Redshift Provisionedの構築と下記のZero-ETLの要件を設定しています。
Amazon Aurora PostgreSQLのバージョン16.4以上
- Aurora PostgreSQL互換バージョン16.4以上で利用可能
Amazon Aurora PostgreSQLのクラスターパラメータ設定
rds.logical_replication=1aurora.enhanced_logical_replication=1aurora.logical_replication_backup=0aurora.logical_replication_globaldb=0
Amazon Redshift クラスタのDBパラメータ設定
enable_case_sensitive_identifierをture
Amazon Aurora PostgreSQLのテーブルを作成する
事前準備として、postgreデータベースのpublicスキーマにdevices1、devices2、devices3を作成します。(不覚にも、最初はテーブルに対して、プライマリキーを設定していなかったため、同期が取れずエラーになります。後ほど、トラブルシューティングします。)
$ psql -h zeroetlauroraredshiftstac-auroraclusterwriteraa1ab-wz0ssq9a2c6t.cwufmclyfzur.ap-northeast-1.rds.amazonaws.com -U postgres -d postgres -p 5432
Password for user postgres:
psql (15.8, server 16.4)
WARNING: psql major version 15, server major version 16.
         Some psql features might not work.
SSL connection (protocol: TLSv1.3, cipher: TLS_AES_256_GCM_SHA384, compression: off)
Type "help" for help.

postgres=> \d
Did not find any relations.
postgres=>
postgres=>
postgres=> \dl
      Large objects
 ID | Owner | Description
----+-------+-------------
(0 rows)

postgres=> create table devices1 (id varchar(16), data_ts varchar(32));
CREATE TABLE
postgres=> create table devices2 (id varchar(16), data_ts varchar(32));
CREATE TABLE
postgres=> create table devices3 (id varchar(16), data_ts varchar(32));
CREATE TABLE
postgres=> \d
          List of relations
 Schema |   Name   | Type  |  Owner
--------+----------+-------+----------
 public | devices1 | table | postgres
 public | devices2 | table | postgres
 public | devices3 | table | postgres
(3 rows)
Zero-ETL integrations の設定
マネジメントコンソールから設定します。
Amazon Aurora PostgreSQLからZero-ETL統合を作成する
準備が整いましたので、早速作成します。ナビゲーションペインで[ゼロETL統合]を選択し、 [Create zero-ETL integration]を選択。
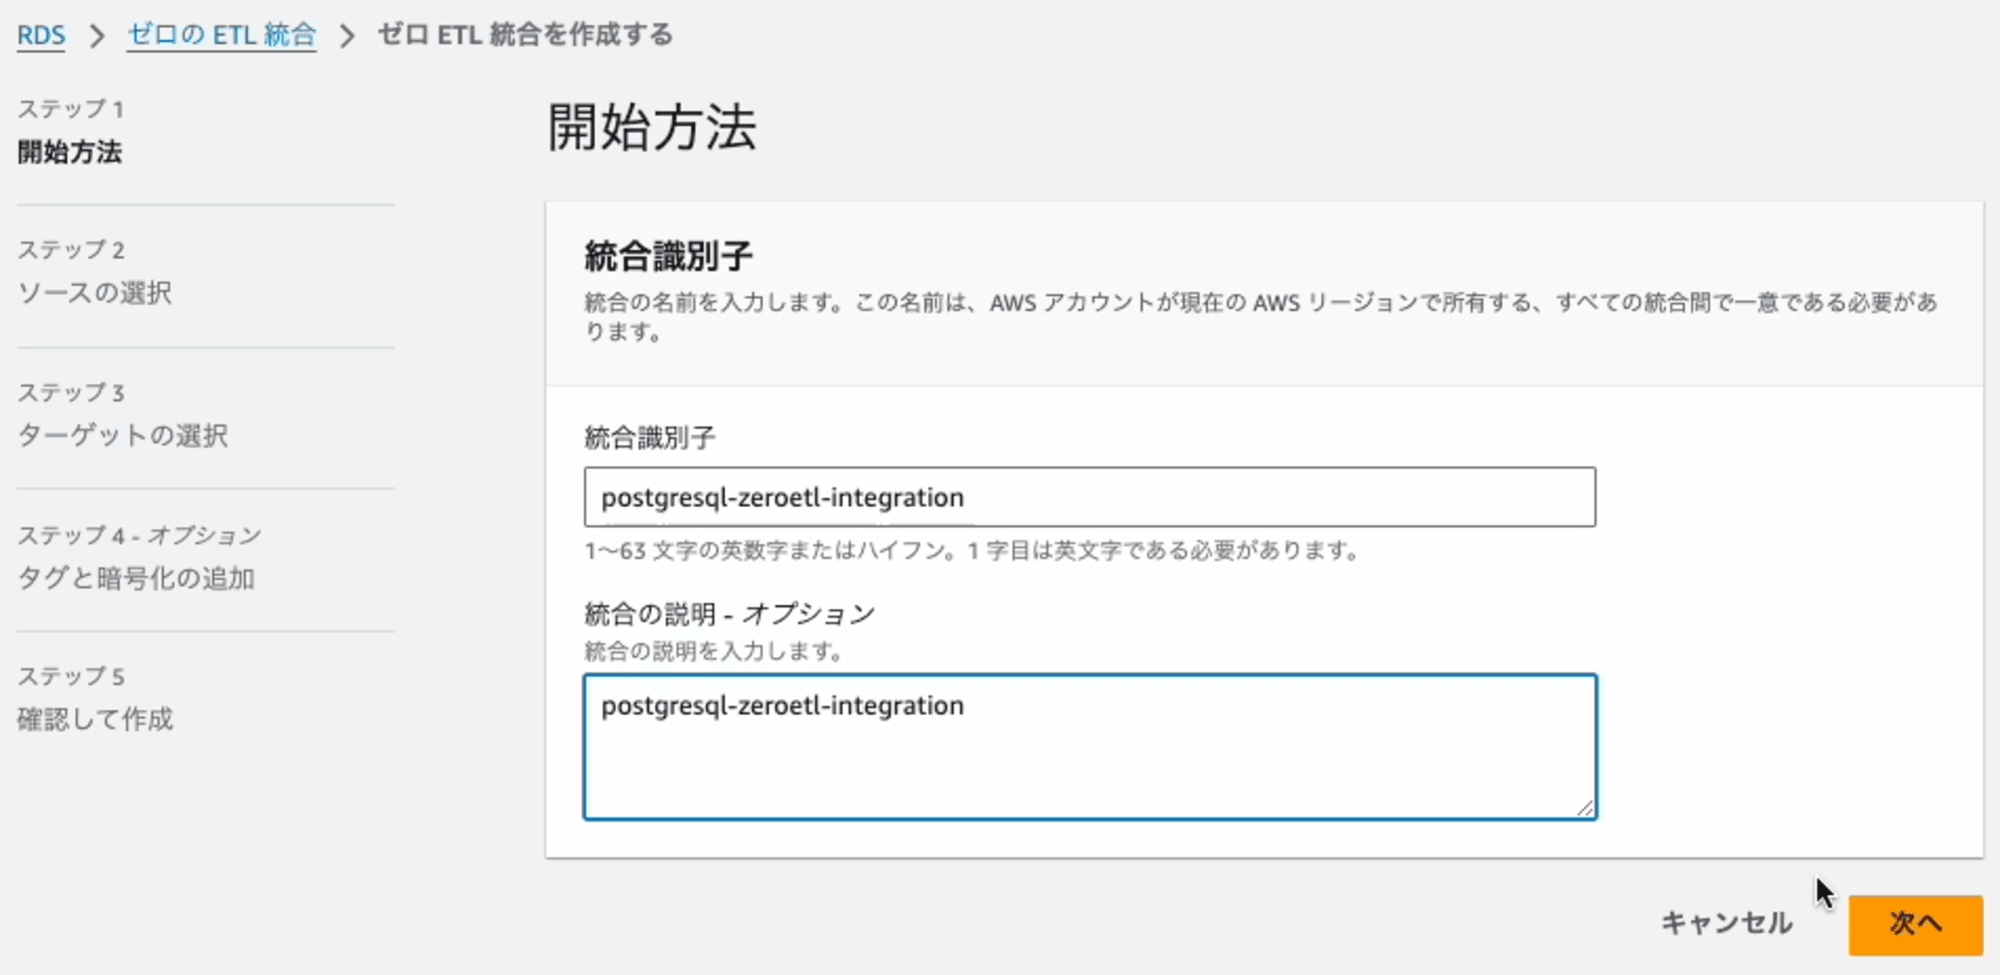
Step1: 開始方法
Integration nameを入力します。
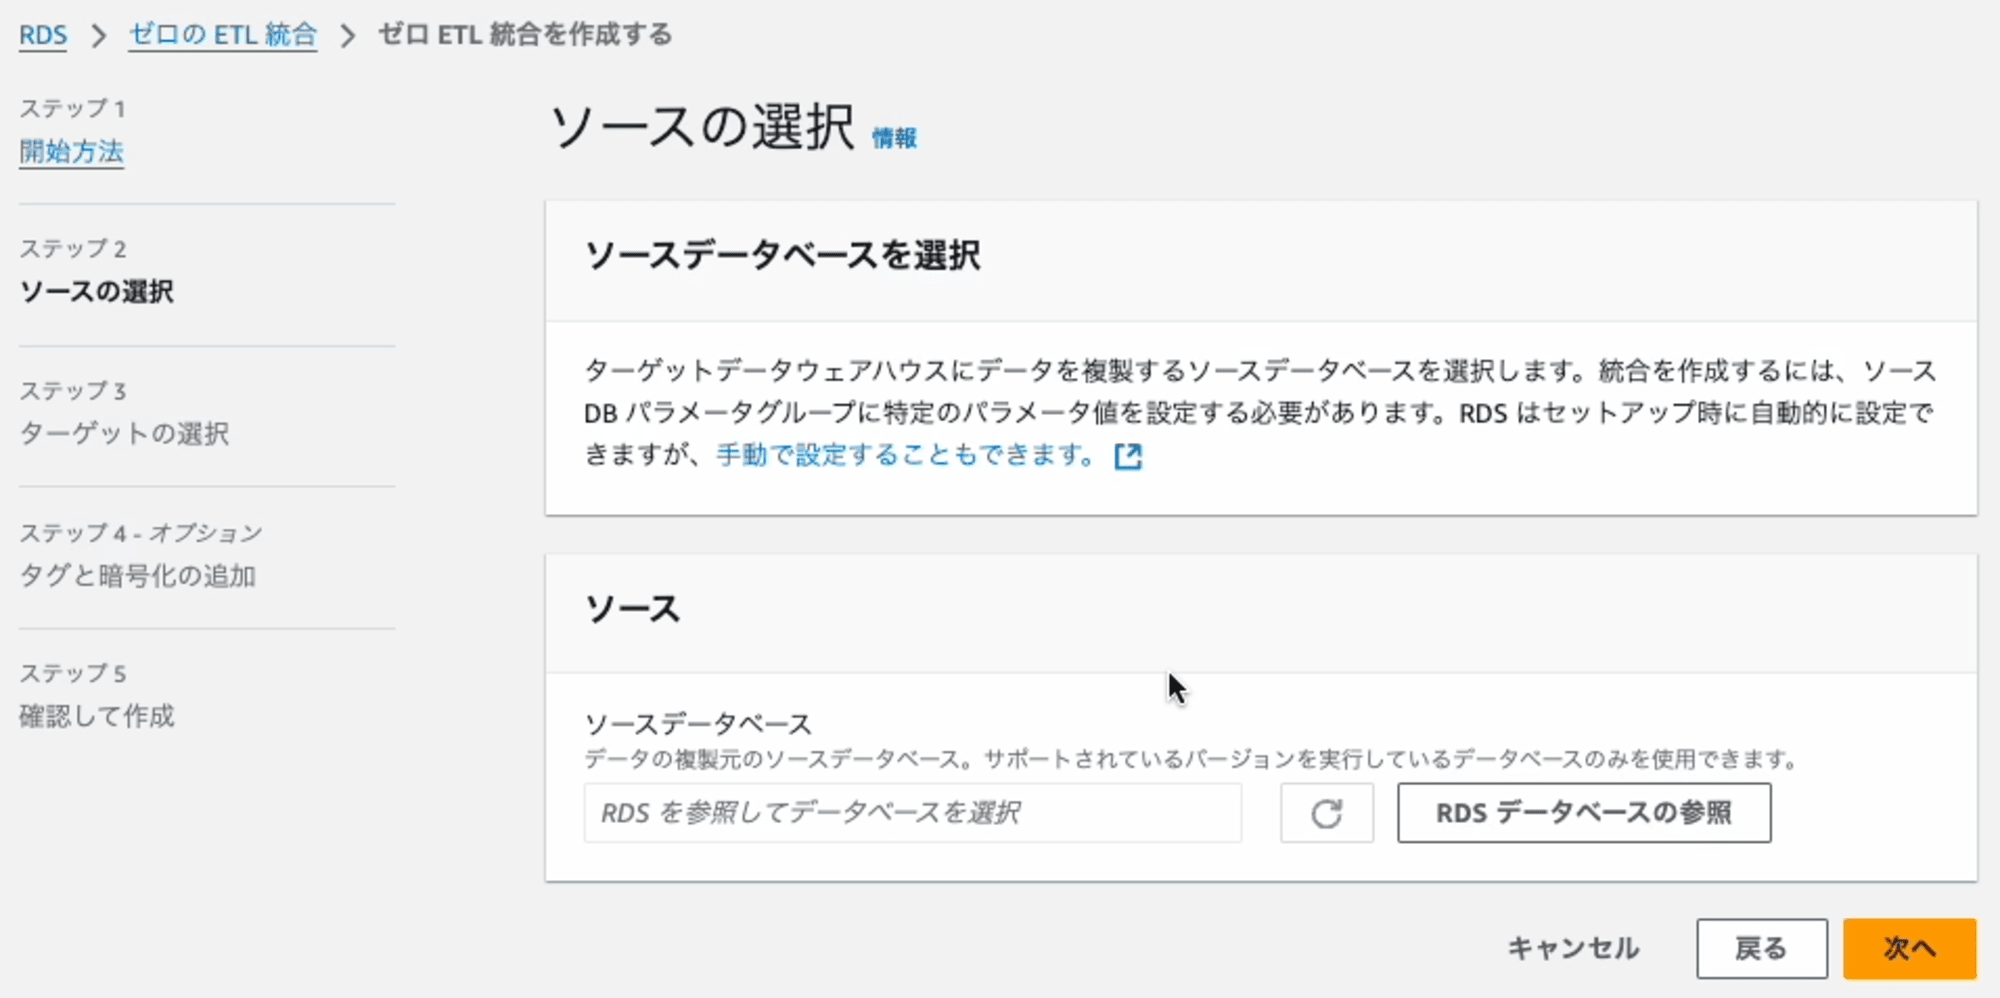
Step2: ソースの選択
連携元となるDynamoDBのテーブルを指定します。[RDS データベースの参照]を押します。
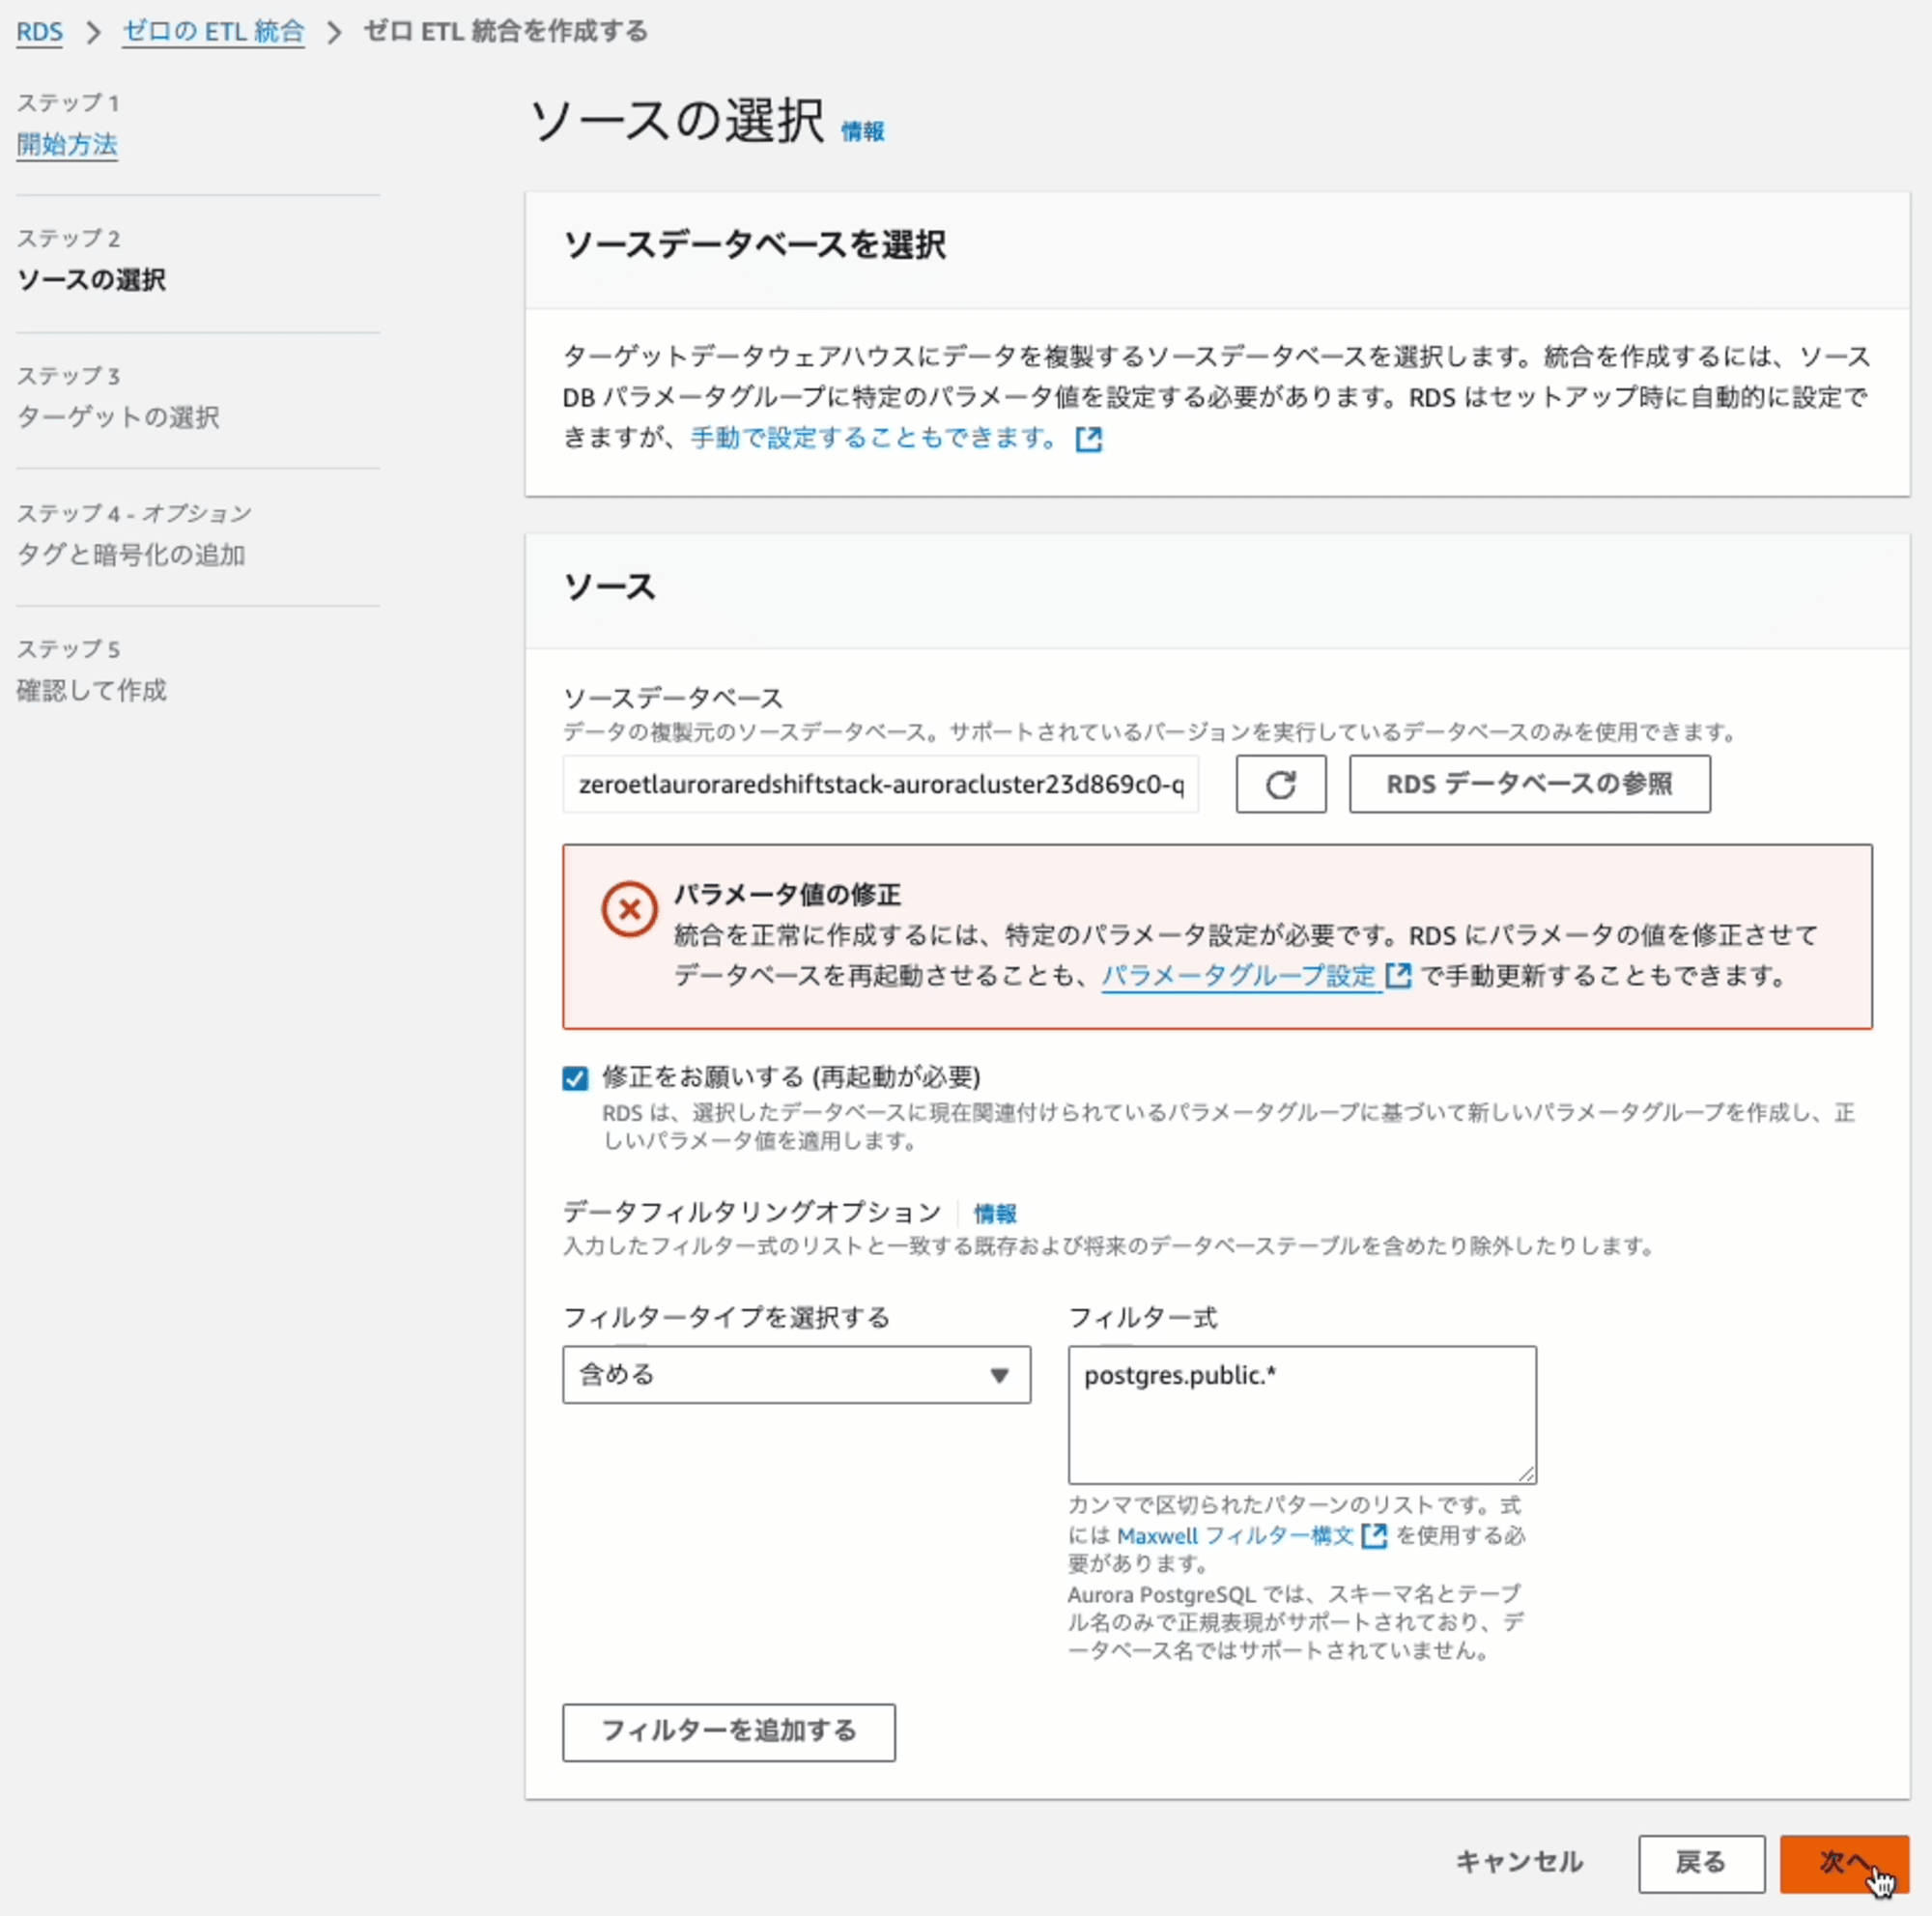
ダイアログに表示されたDB識別子の一覧の中からいずれかを選択します。

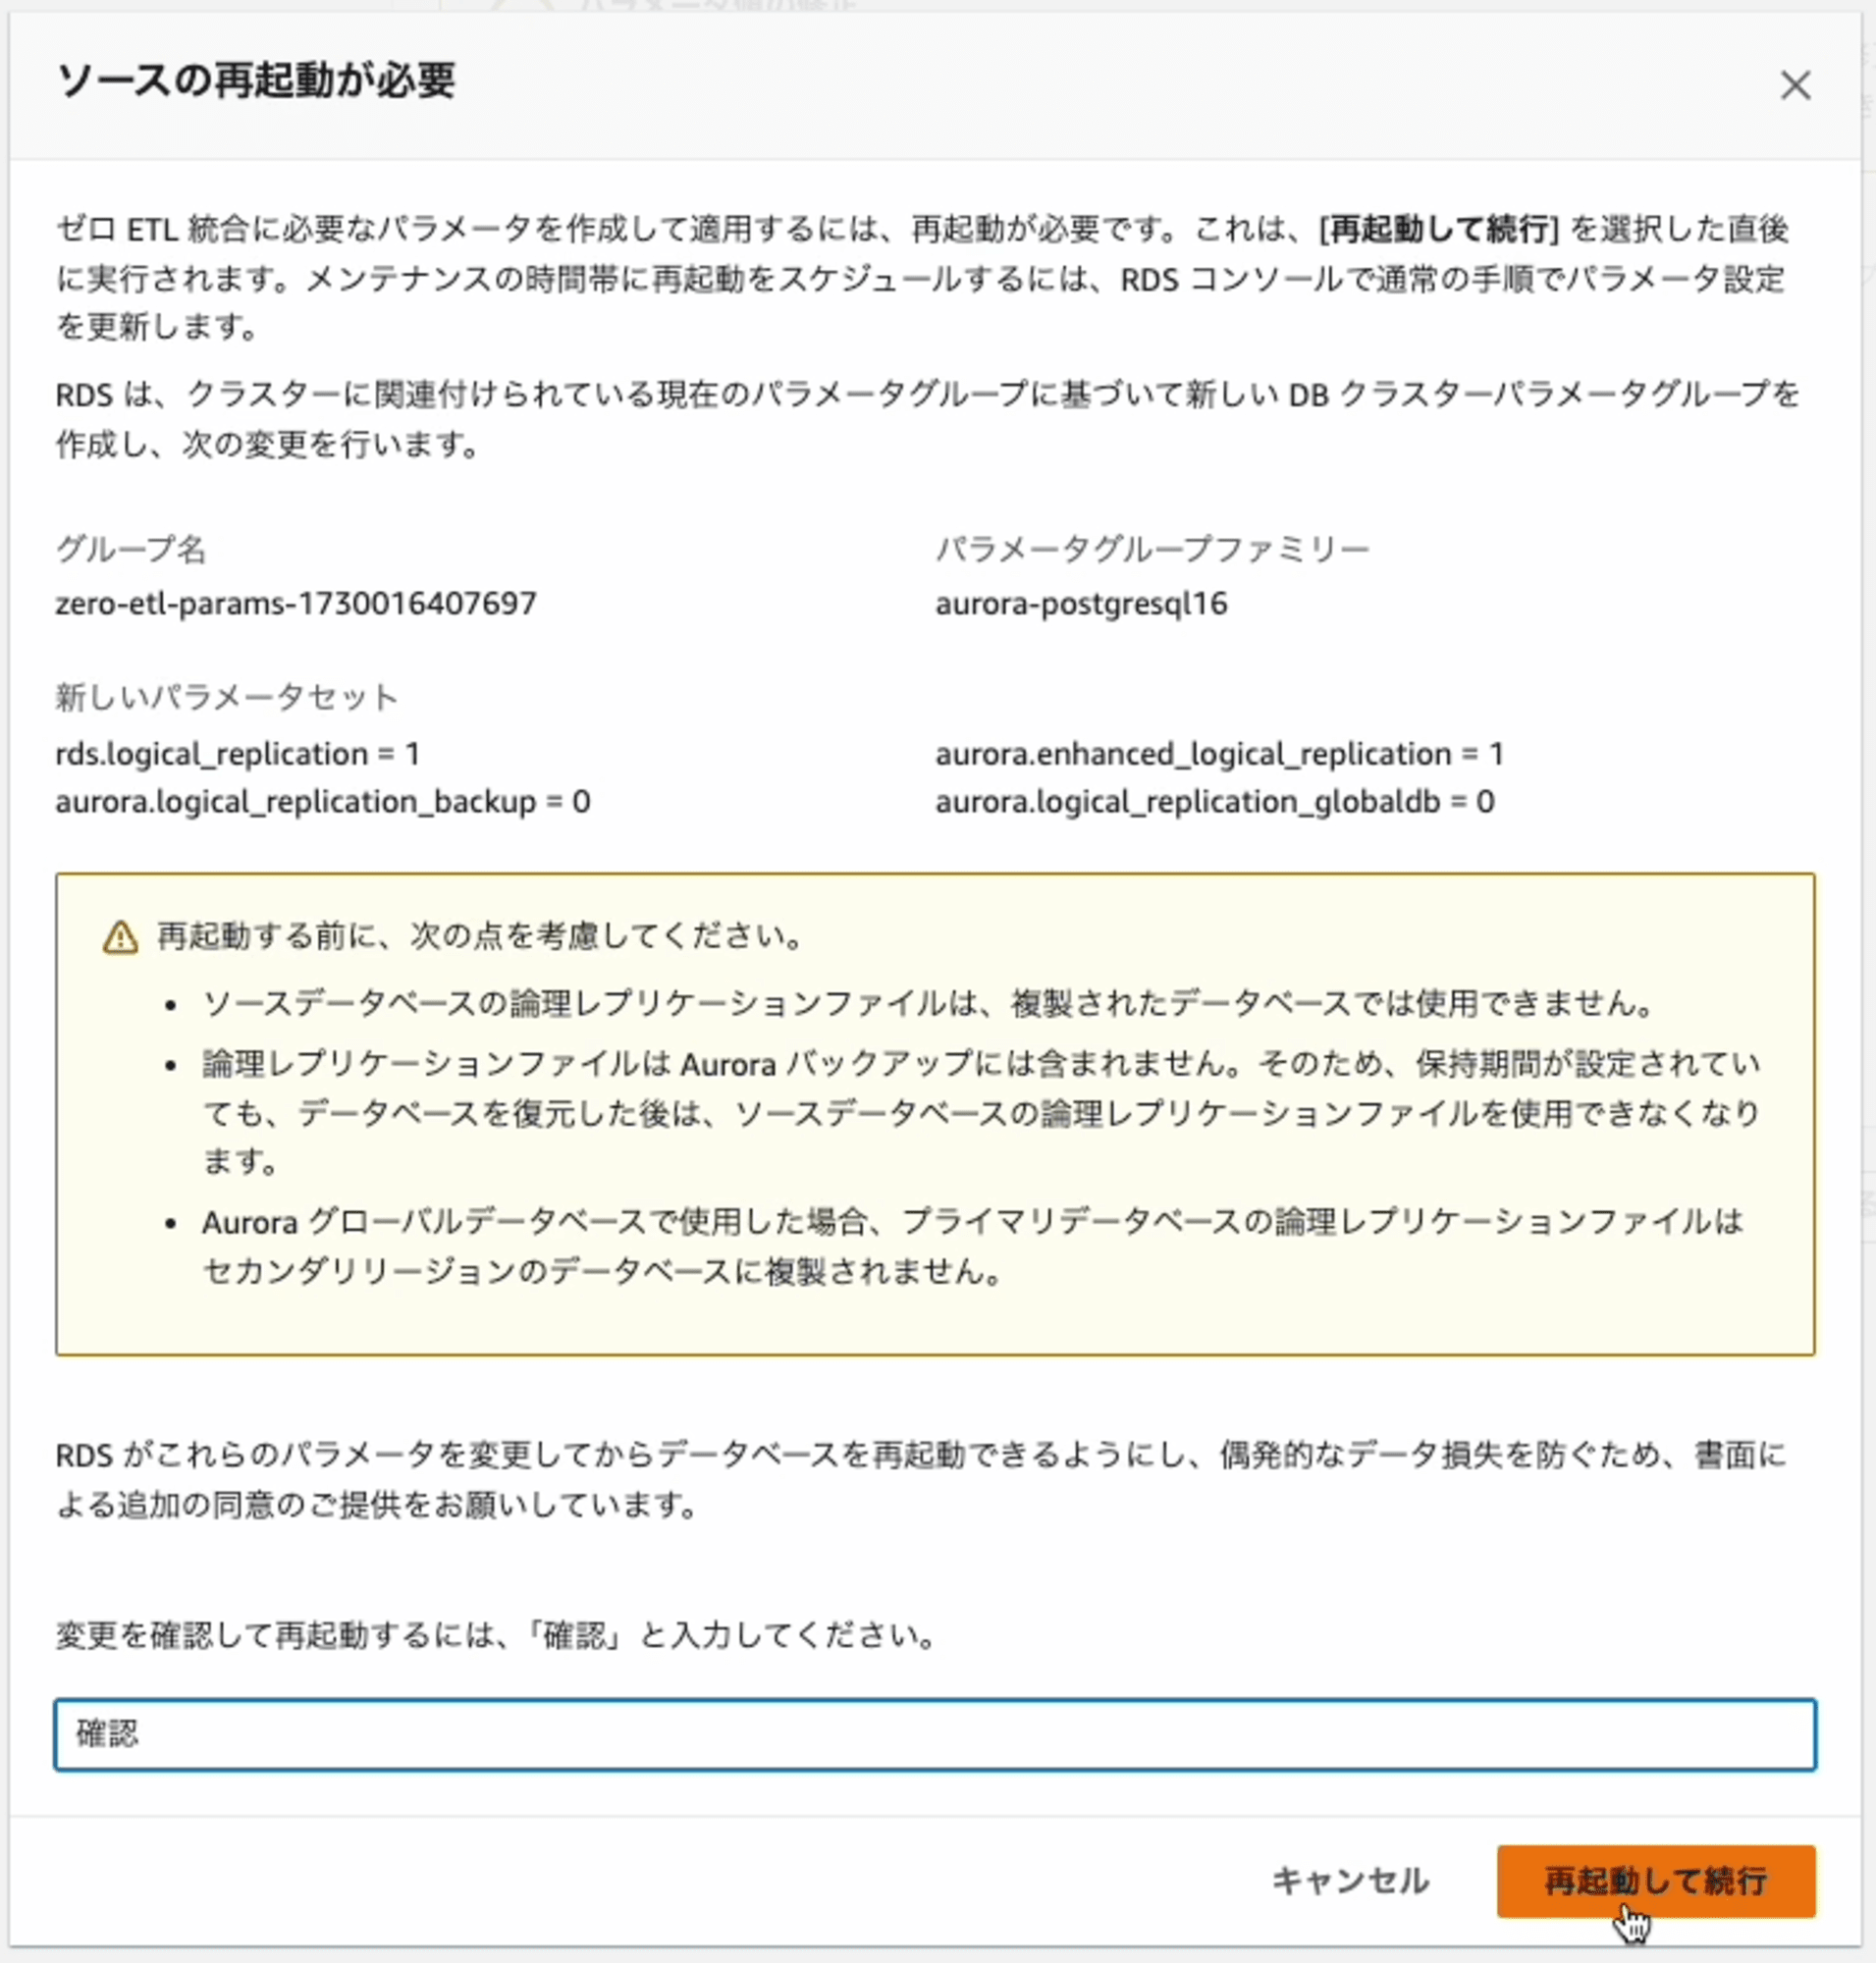
元の画面に戻ると、エラーメッセージ(パラメータ値の修正)と[修正をお願いする(再起動が必要)]オプションが表示されます。このオプションには、チェックを入れます。
その理由は、Zero-ETL 統合を設定するには、選択したAuroraクラスタが適切なパラメータ値になっている必要があります。[修正をお願いする(再起動が必要)] オプションを選択すると、自動的に設定してくれます。
次に進むとどのような変更を加えるのかの解説が表示されます。
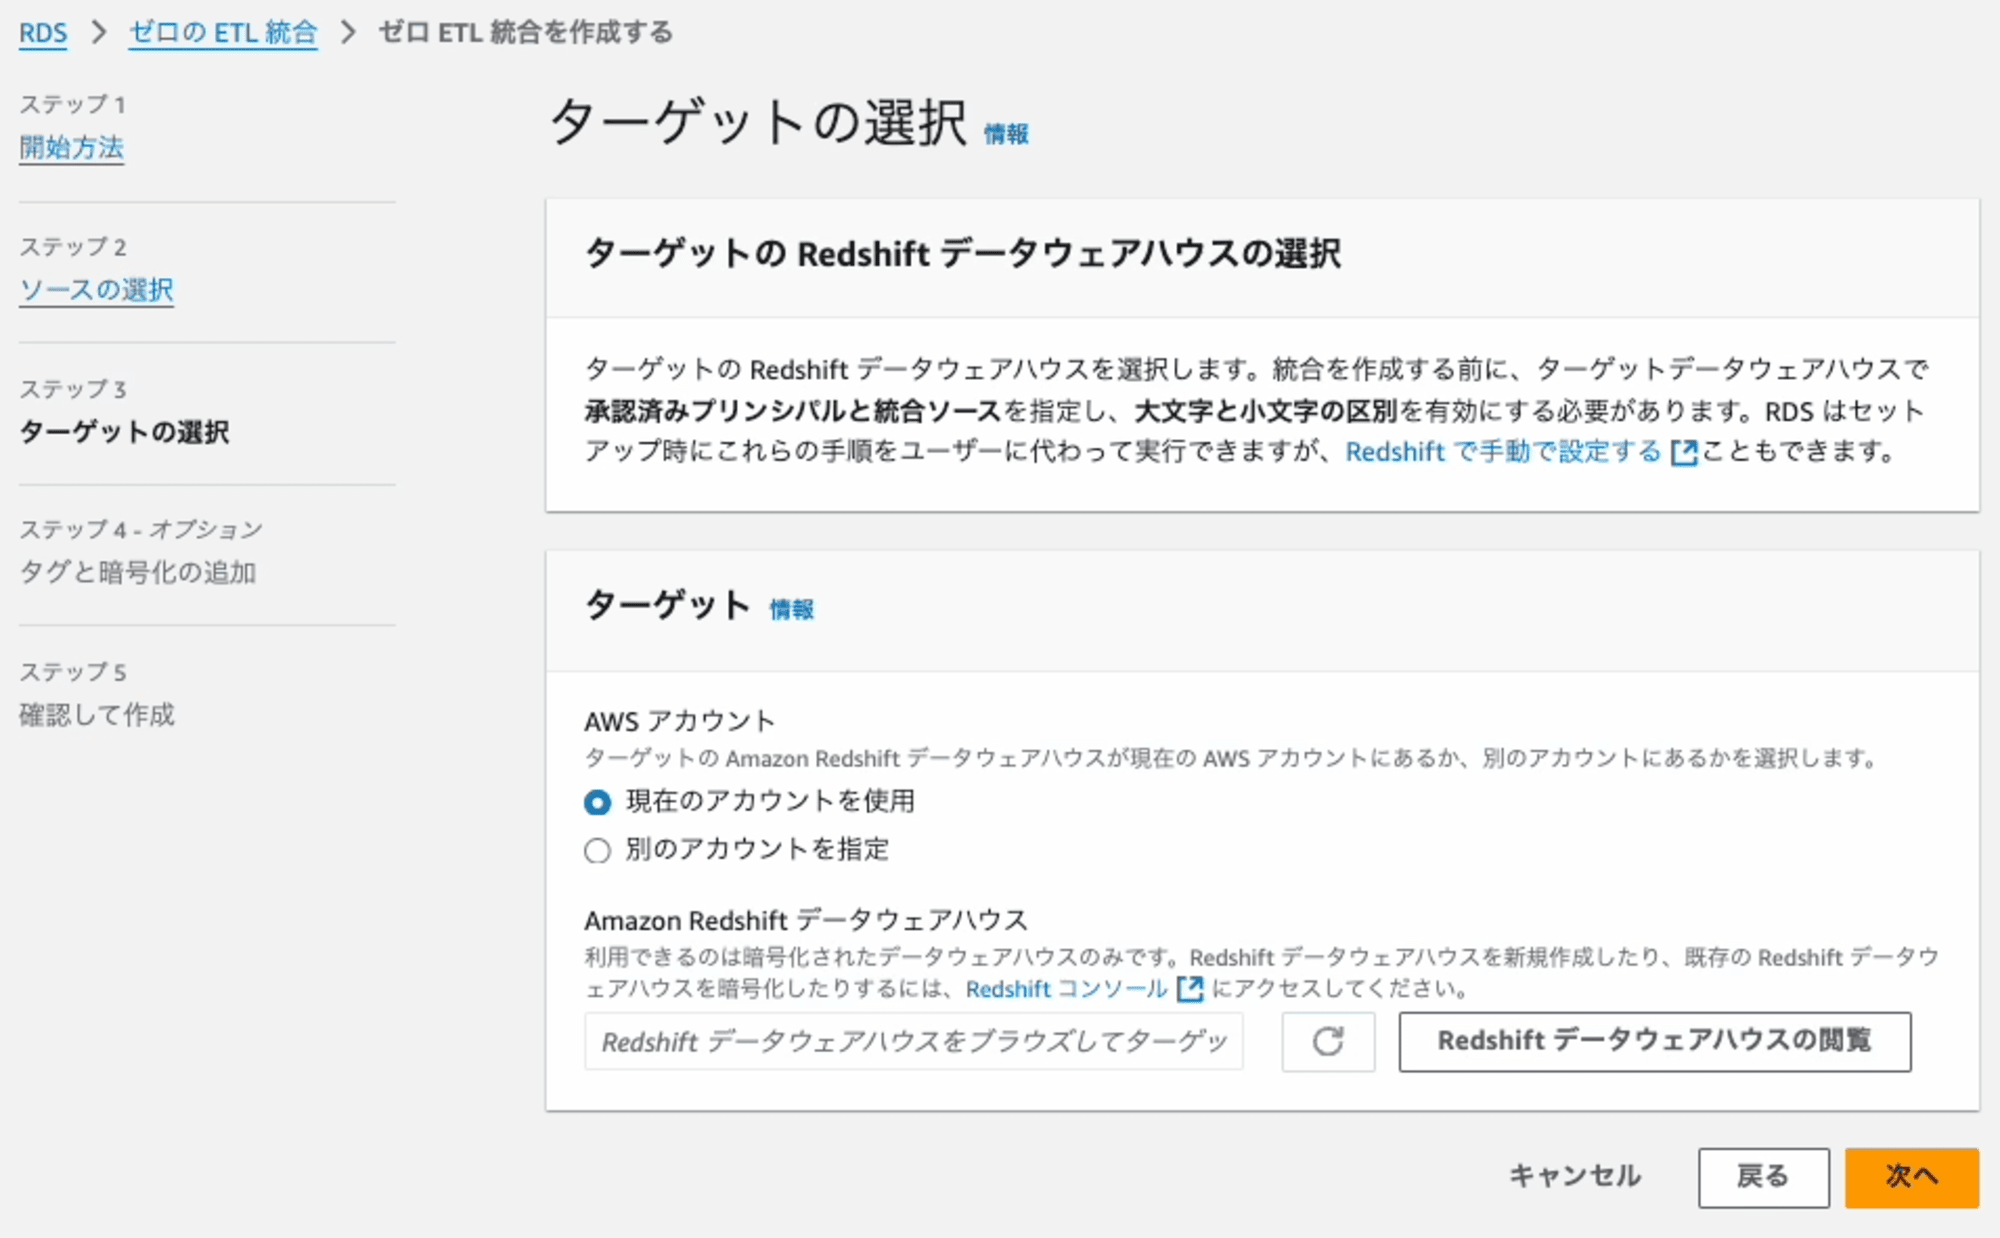
Step3: ターゲットの選択
連携先となるRedshiftを指定します。[Redshift データウェアハウスの閲覧]を押します。
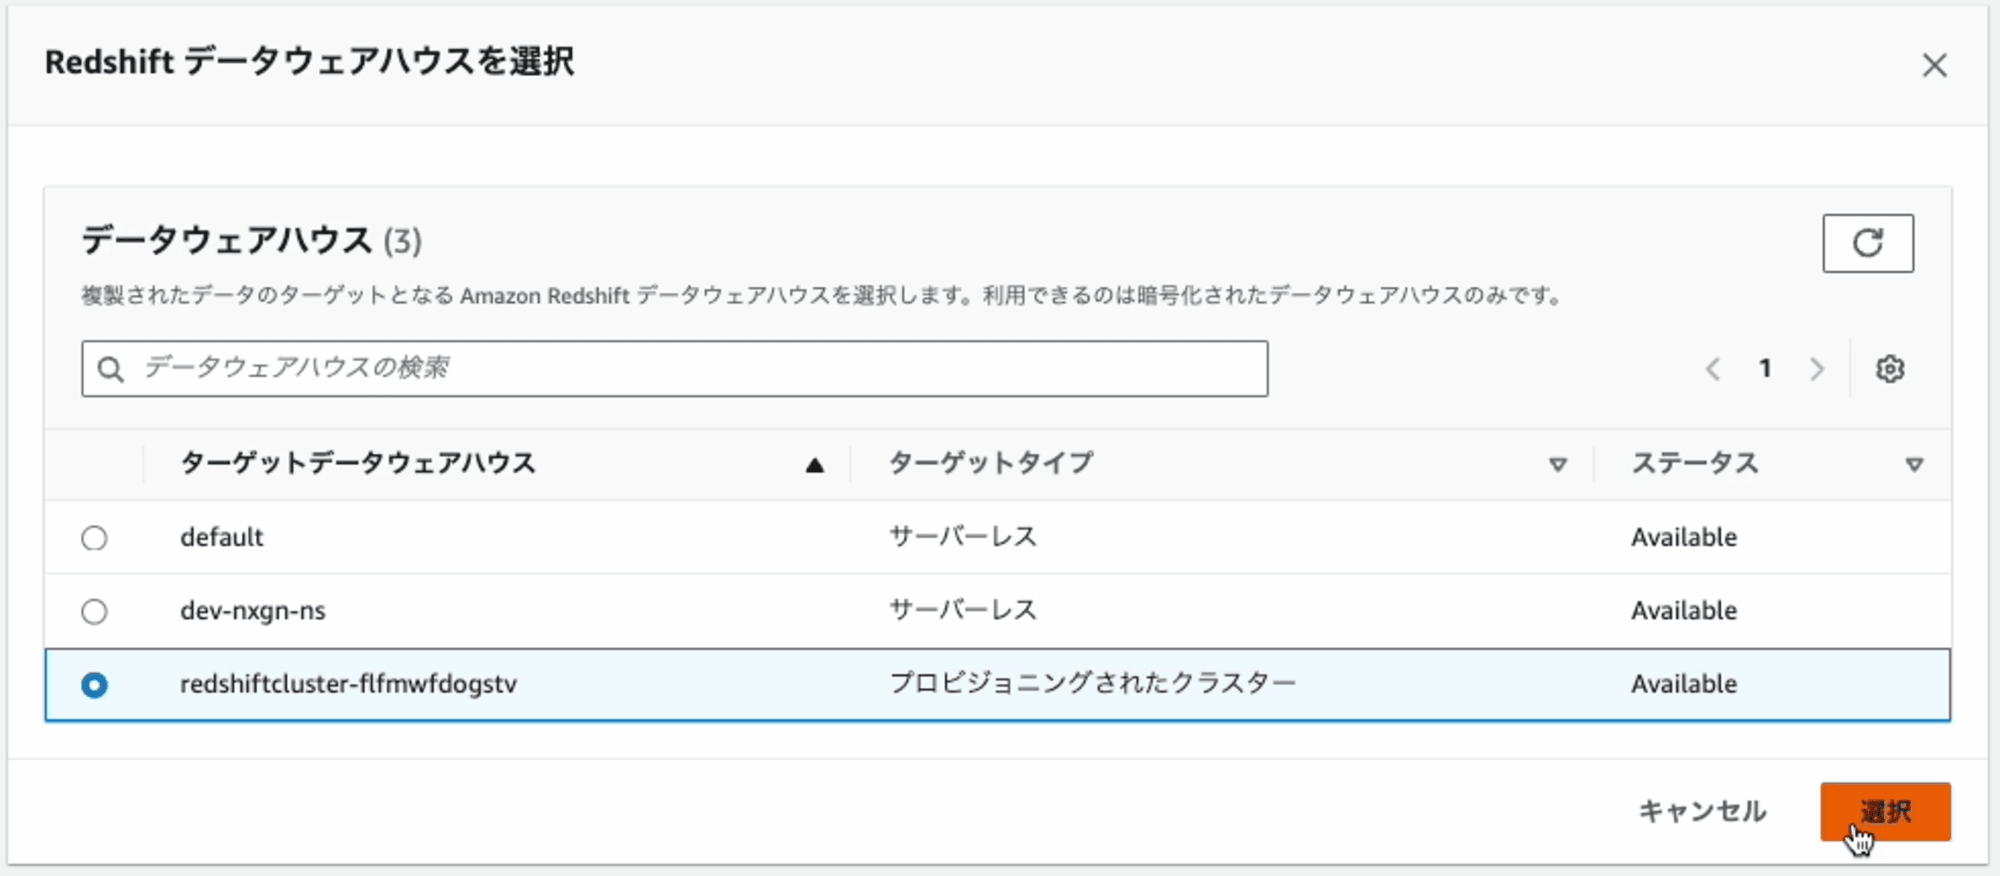
ダイアログに表示されたRedshiftの一覧の中からRedshiftを選択します。
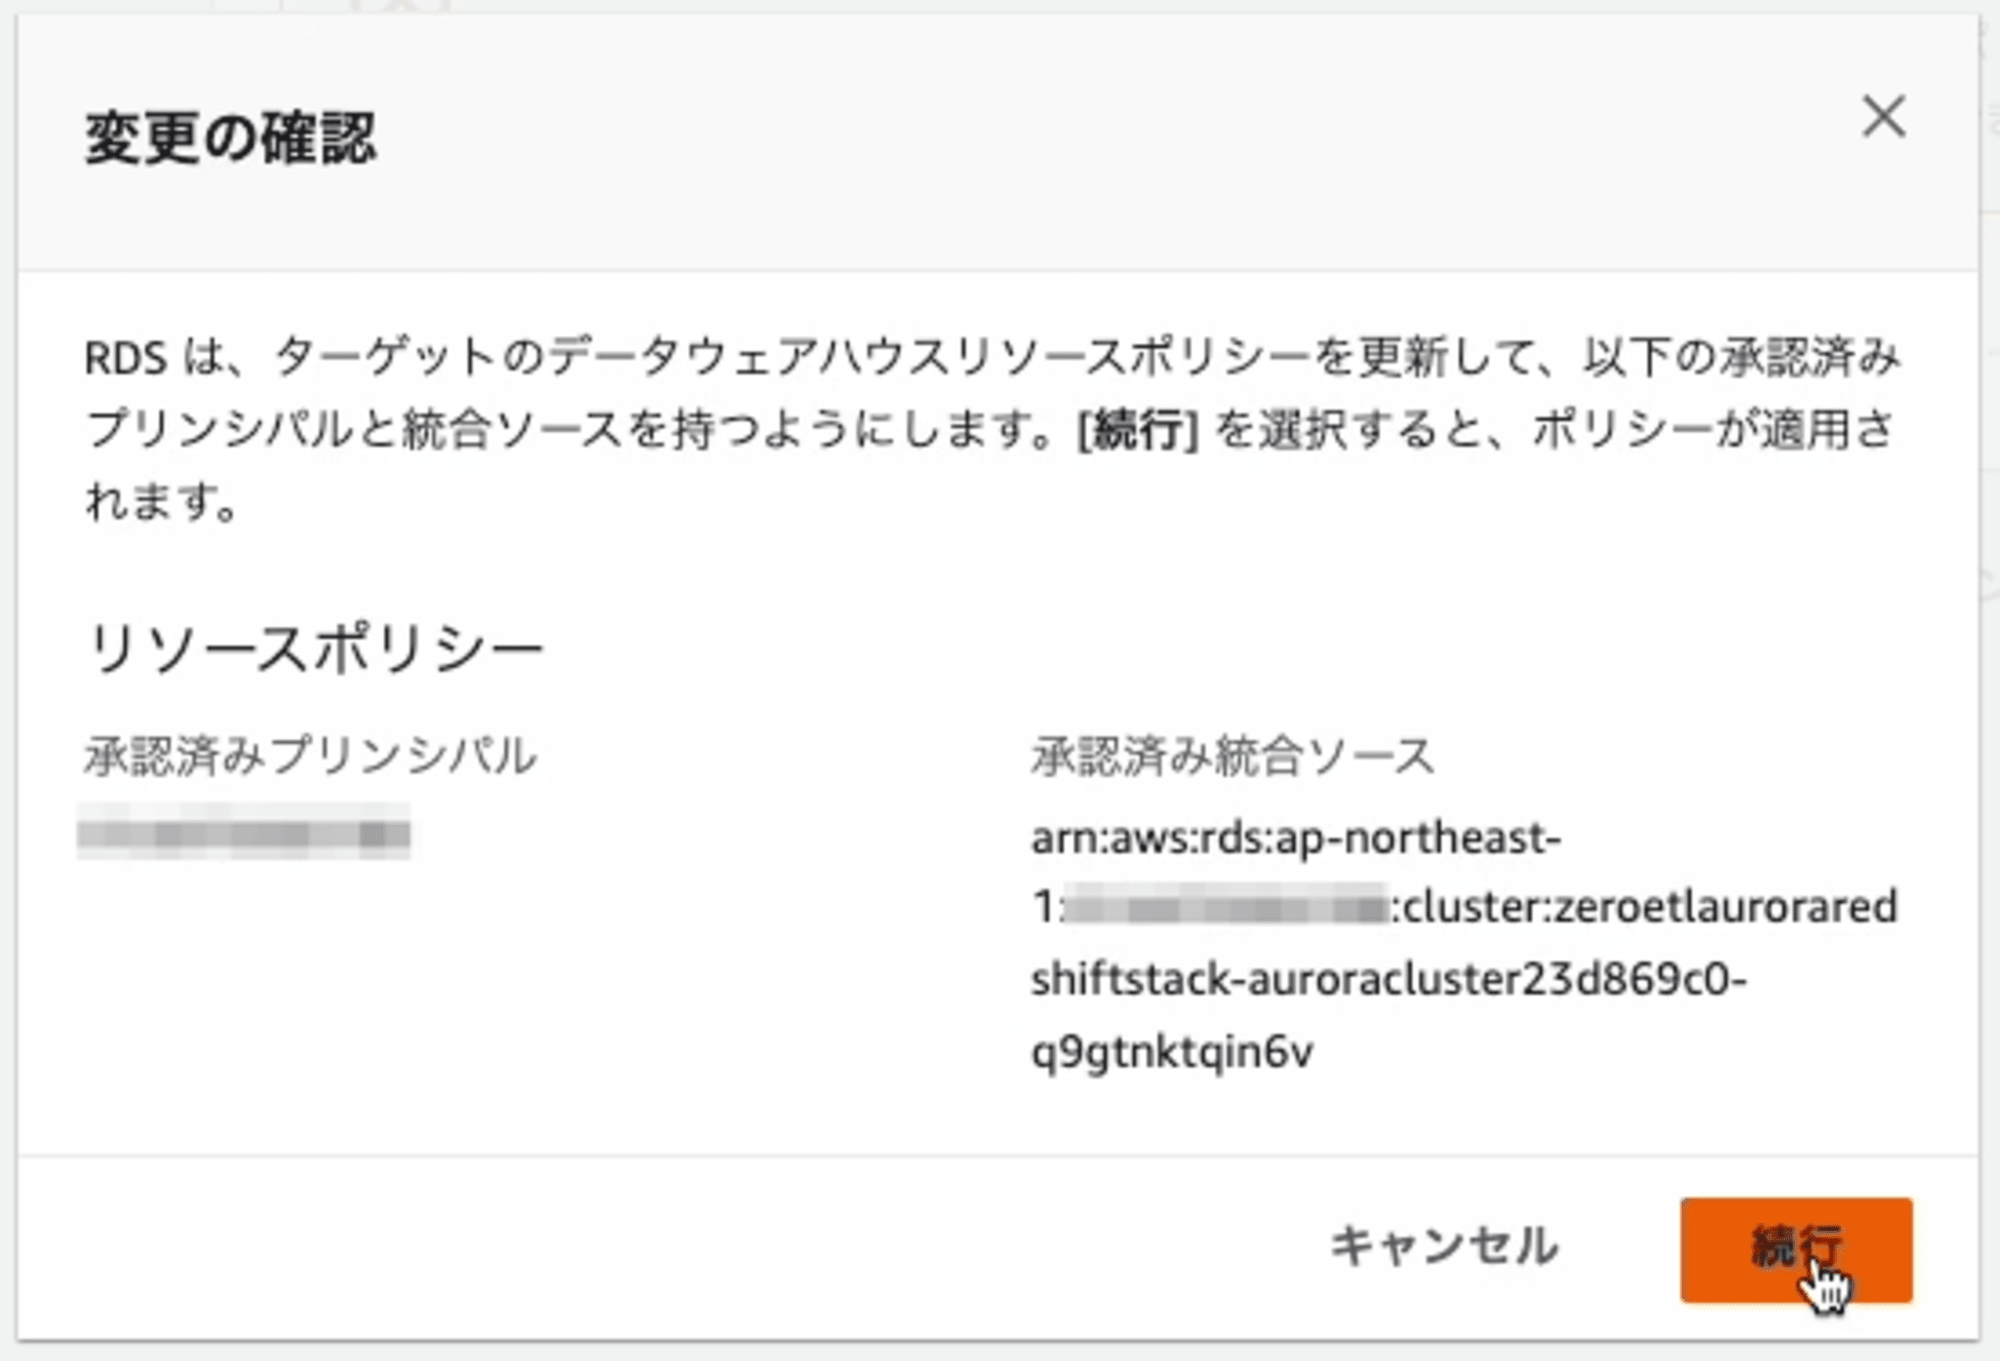
元の画面に戻ると、エラーメッセージ(リソースポリシーの修正)と[修正をお願いする]オプションが表示されます。このオプションには、チェックを入れます。
その理由は、Zero-ETL 統合を設定するには、選択したRedshiftに適切なリソースポリシーが有効になっている必要があります。[修正をお願いする] オプションを選択すると、自動的に設定してくれます。
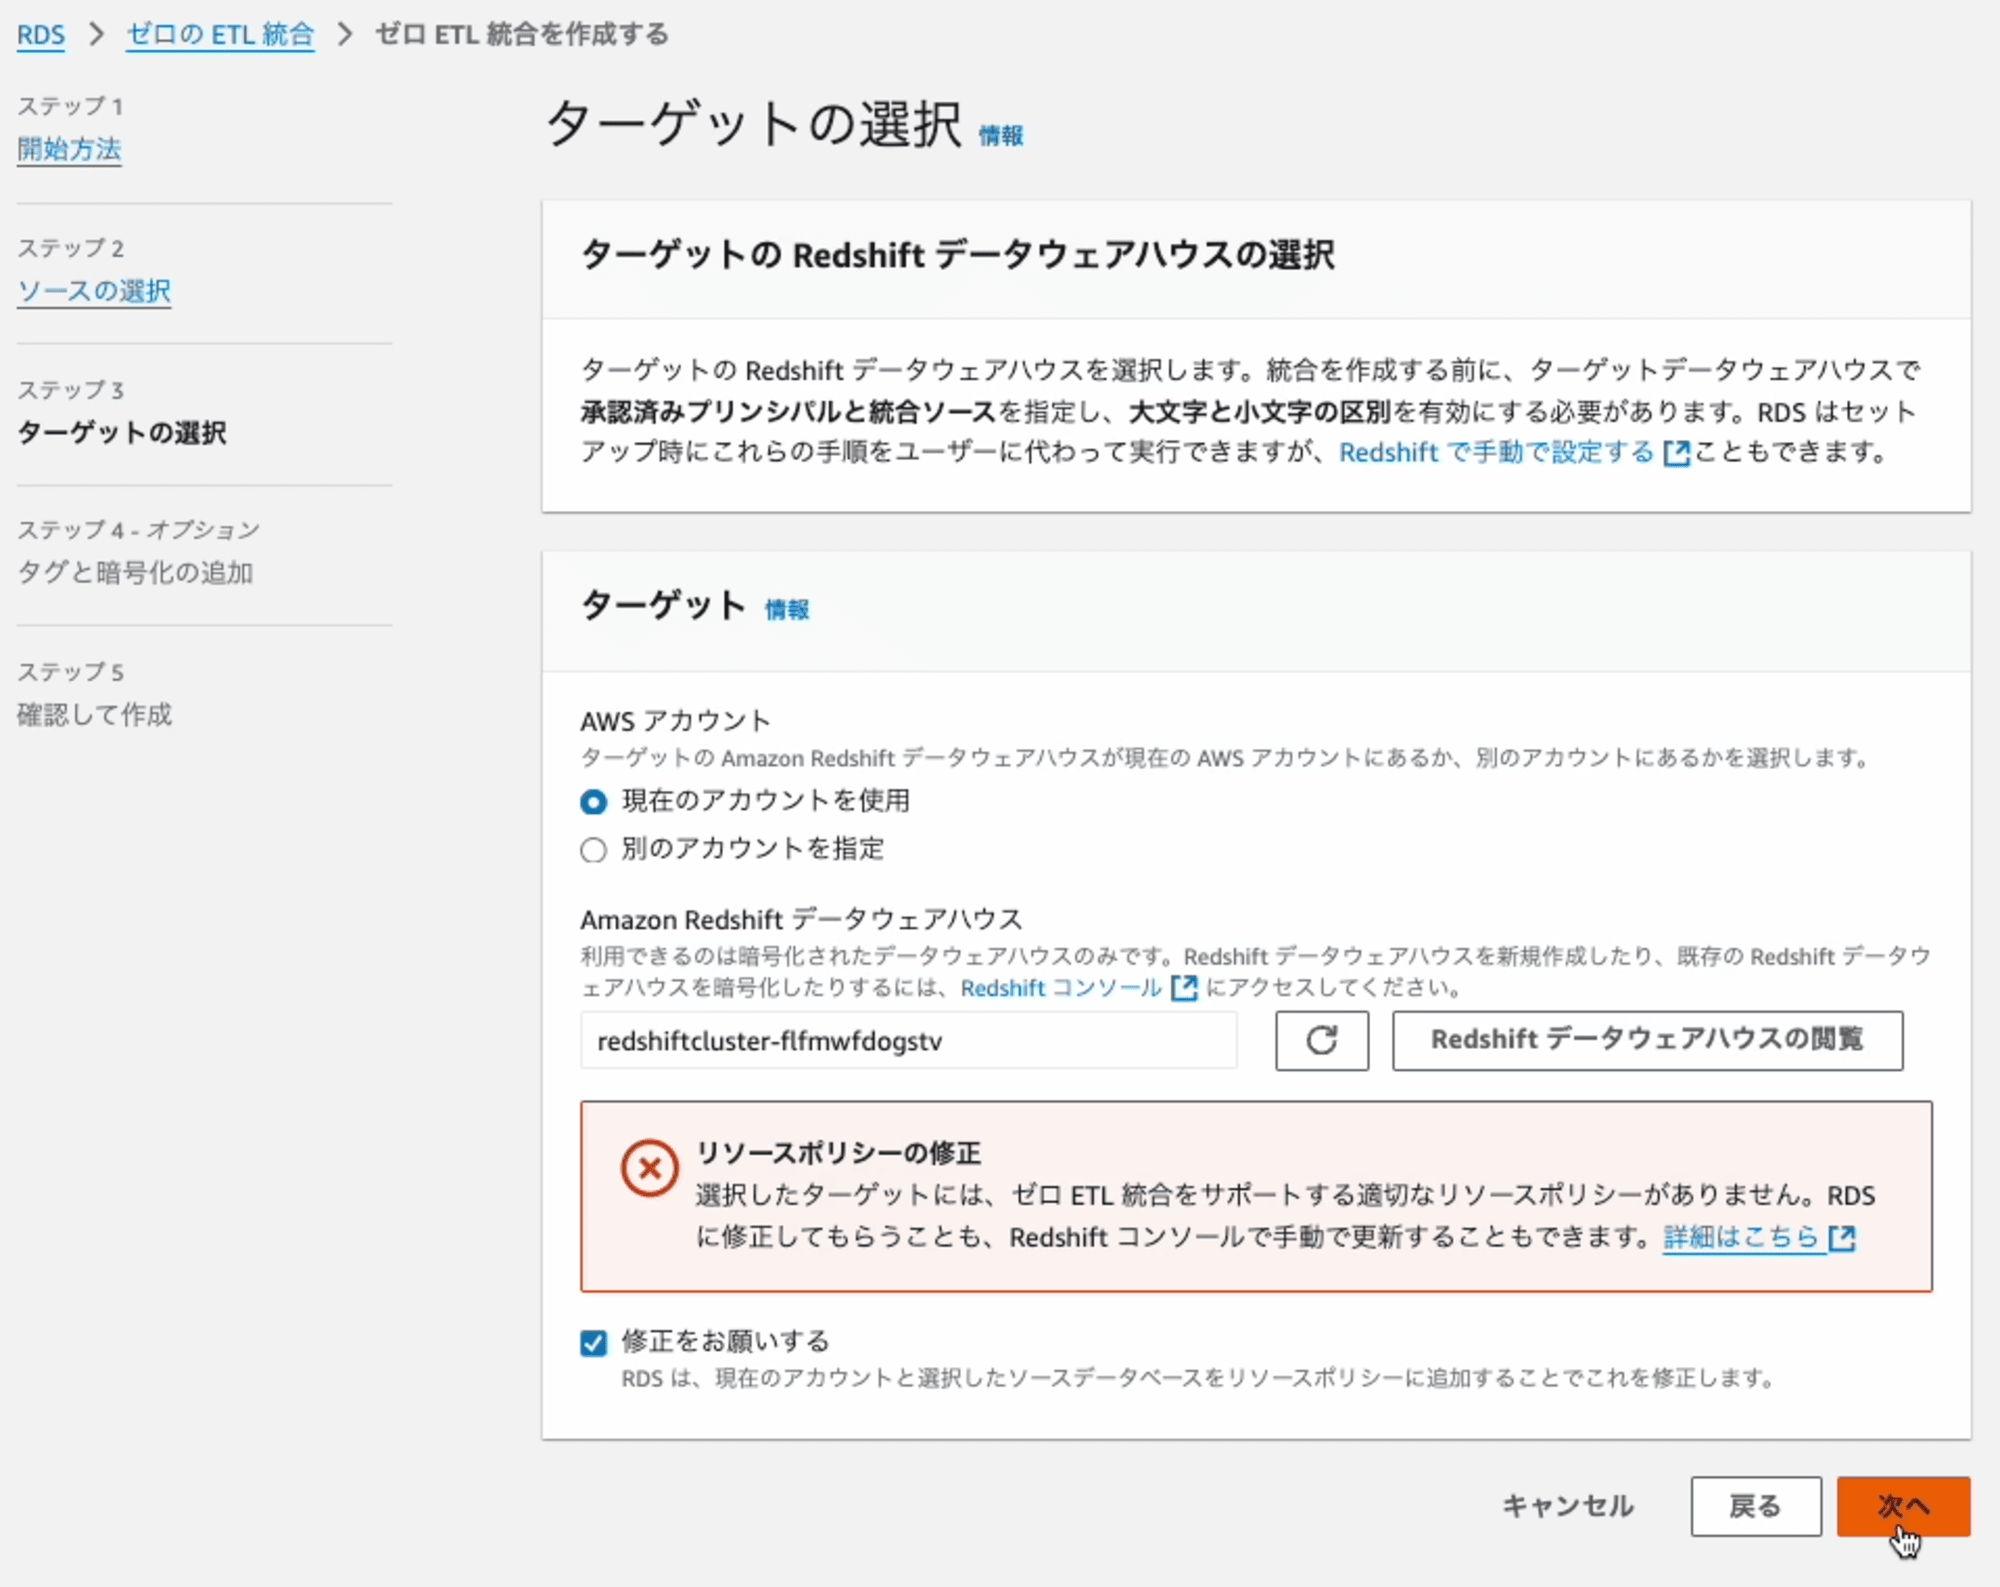
次に進むとどのような変更を加えるのかの解説が表示されます。
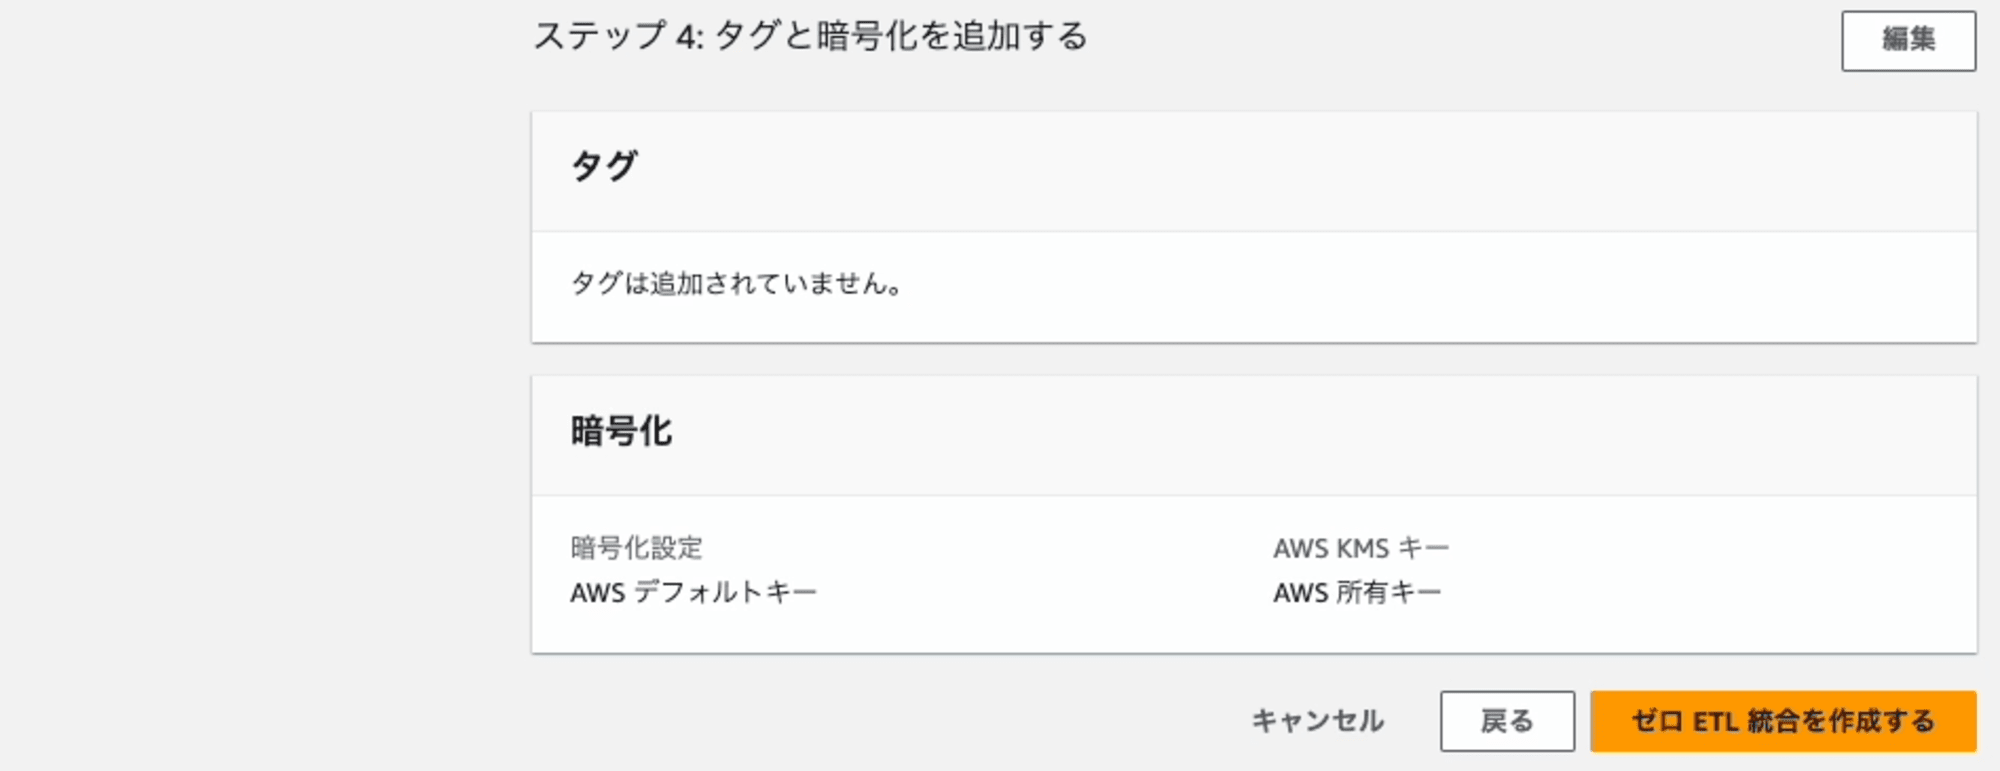
Step4: タグと暗号化の追加
そのままで構いません。

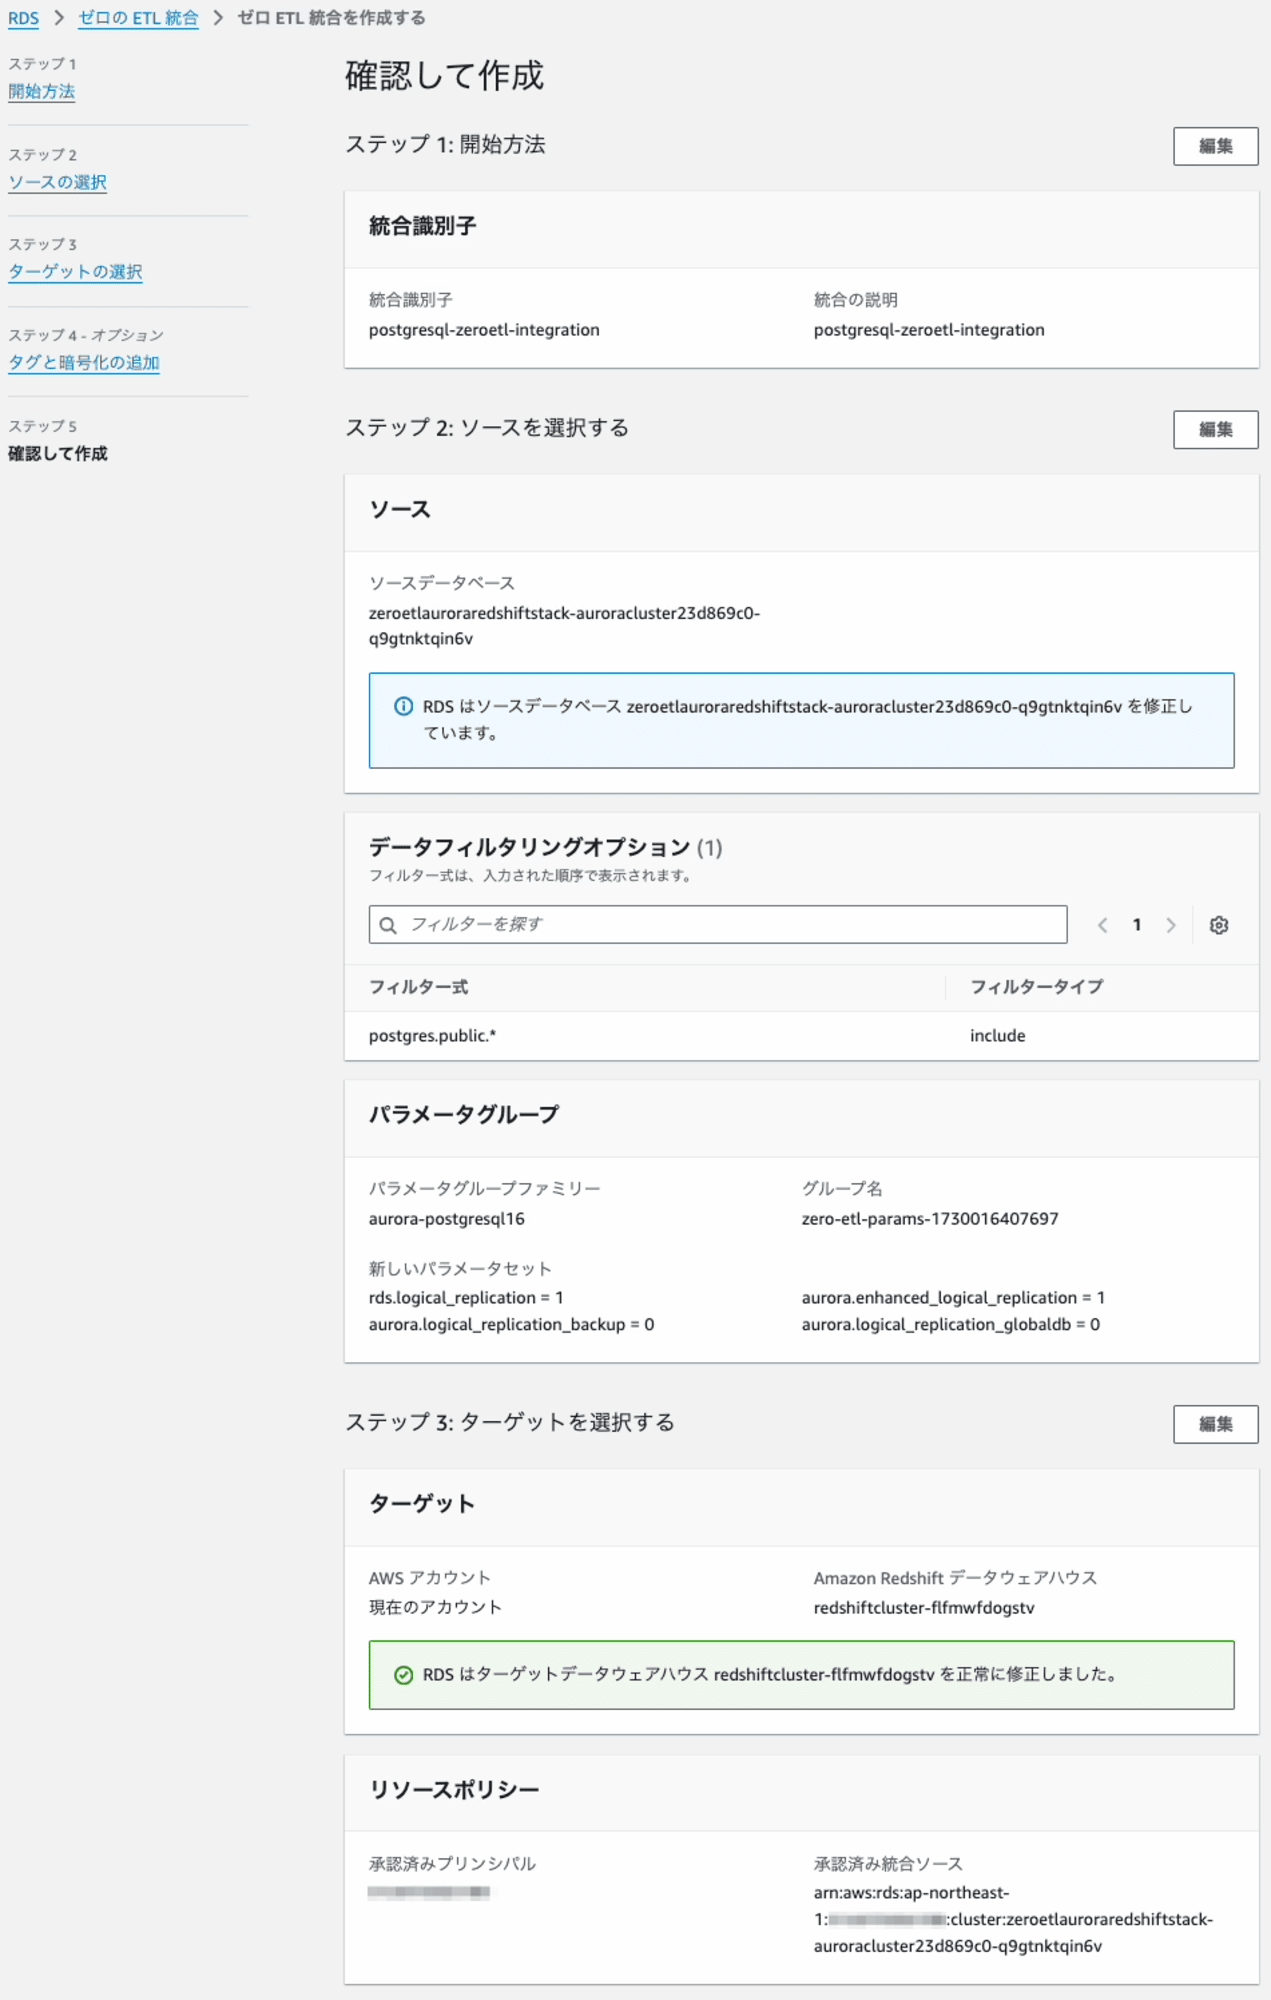
Step5: 確認して作成
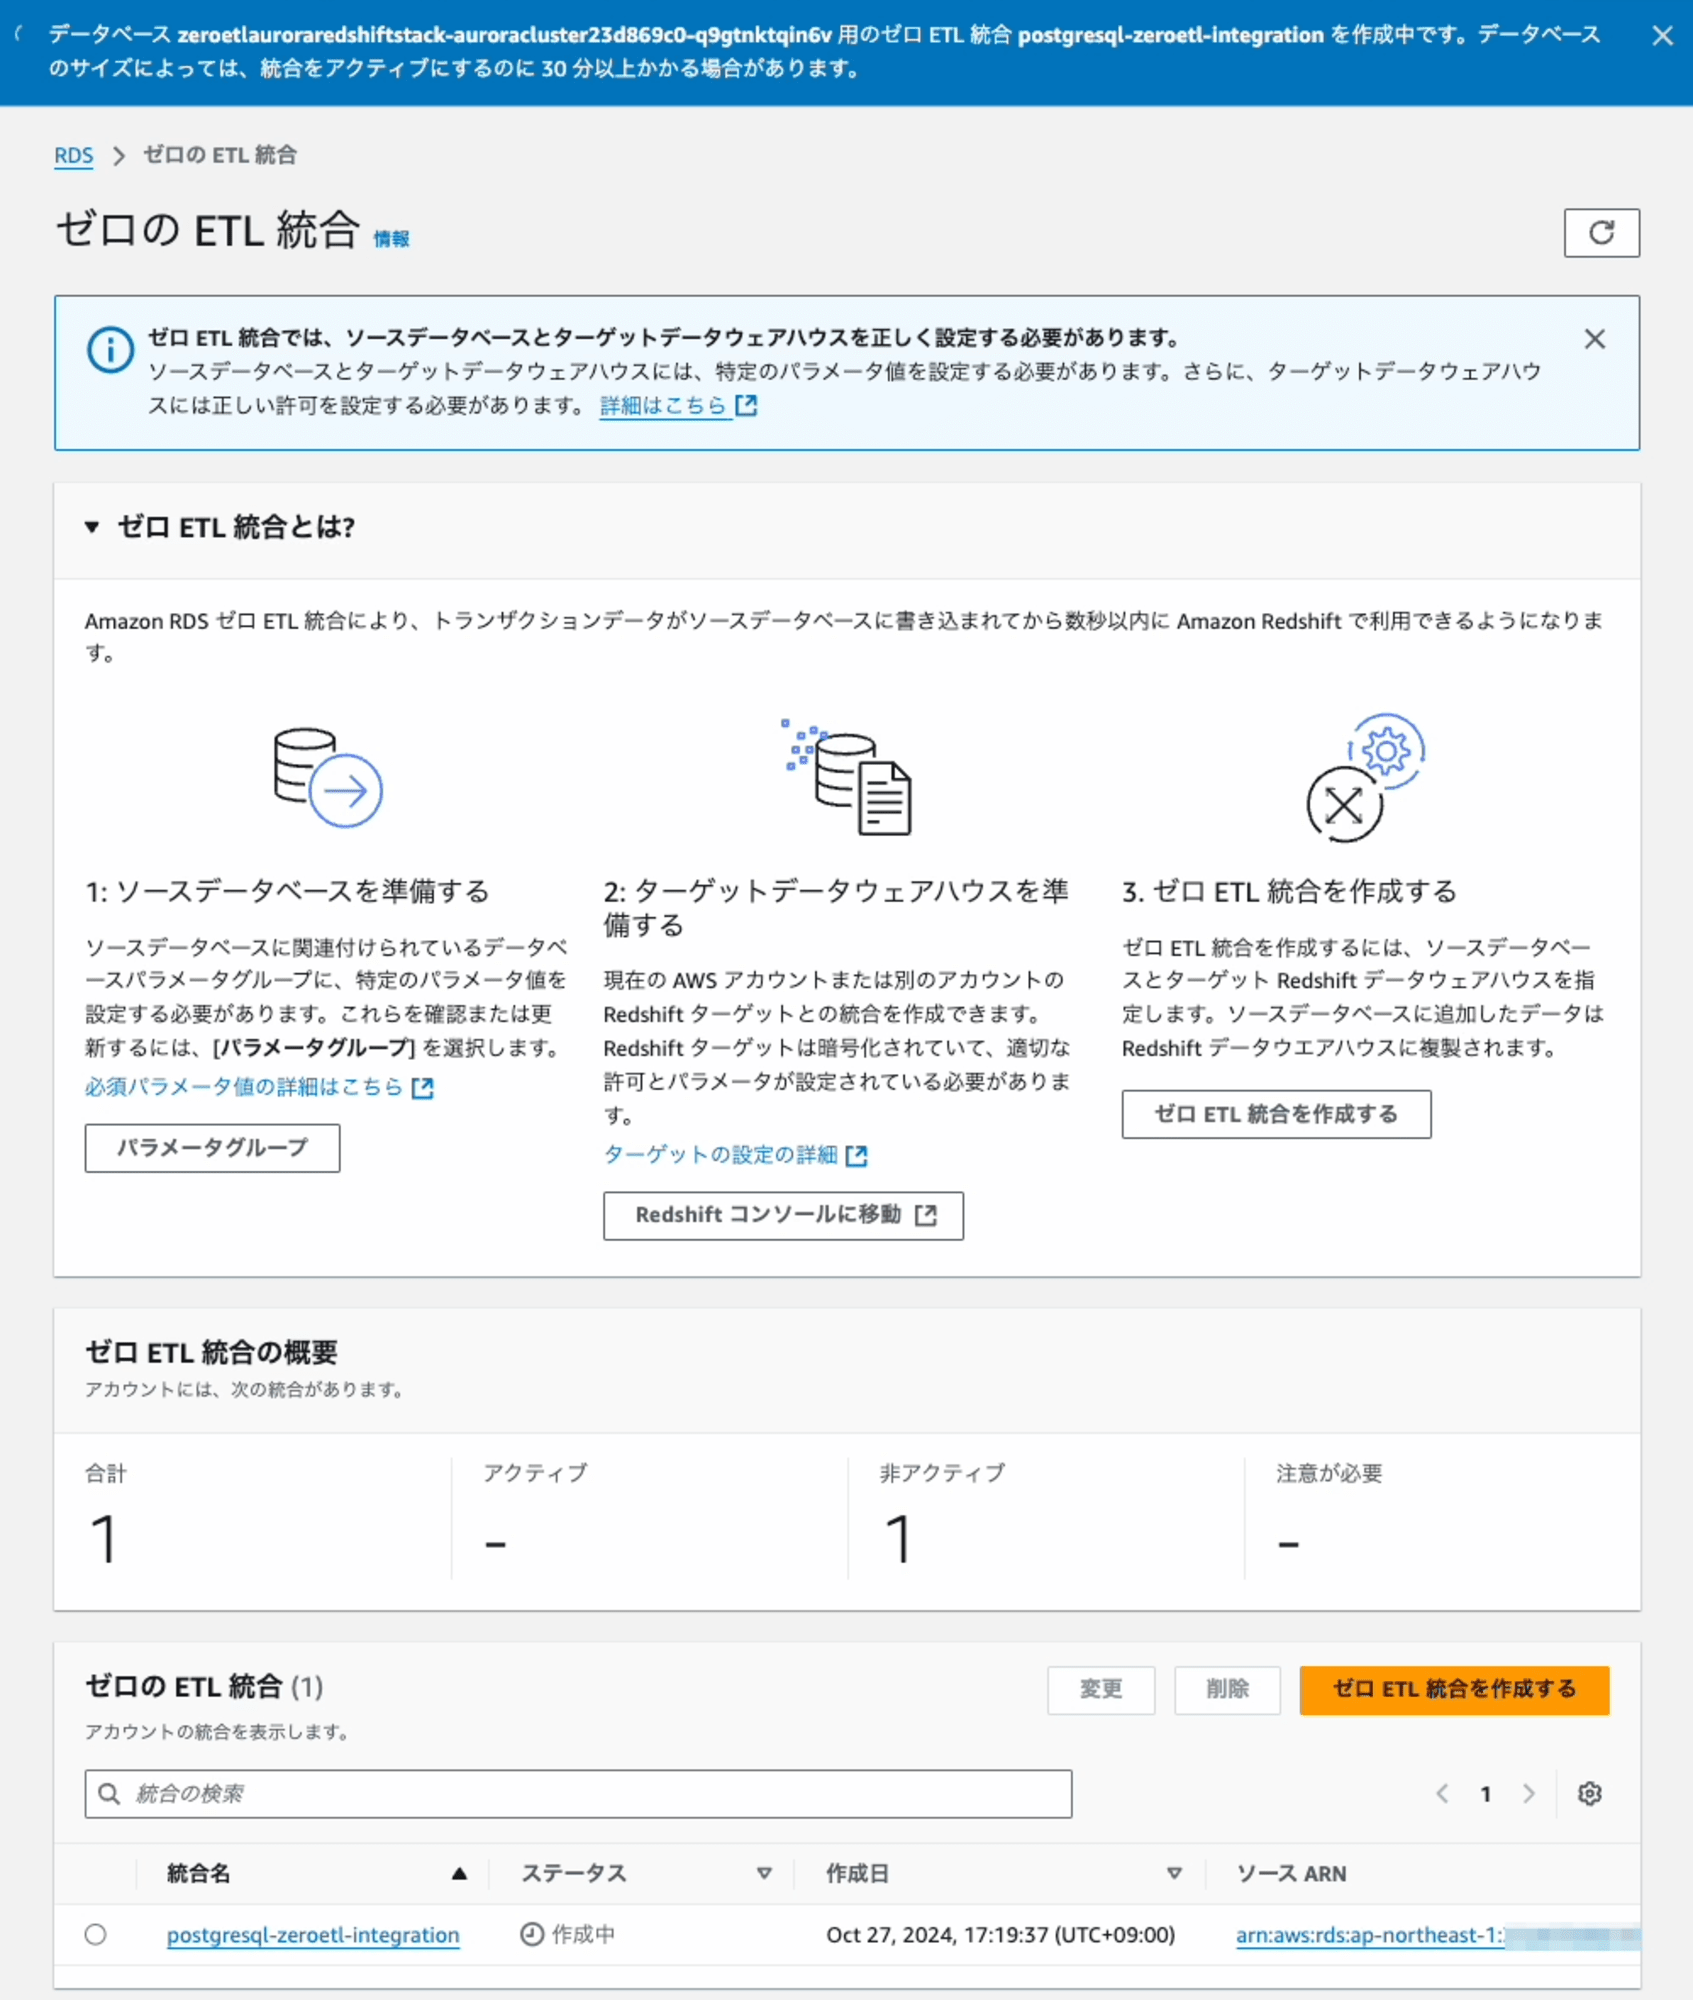
内容を確認して、進むとZero-ETL 統合の作成します。
ステータスが「作成中」 となりました。
Zero-ETL 統合の作成が完了すると、ステータスが「アクティブ」 になります。
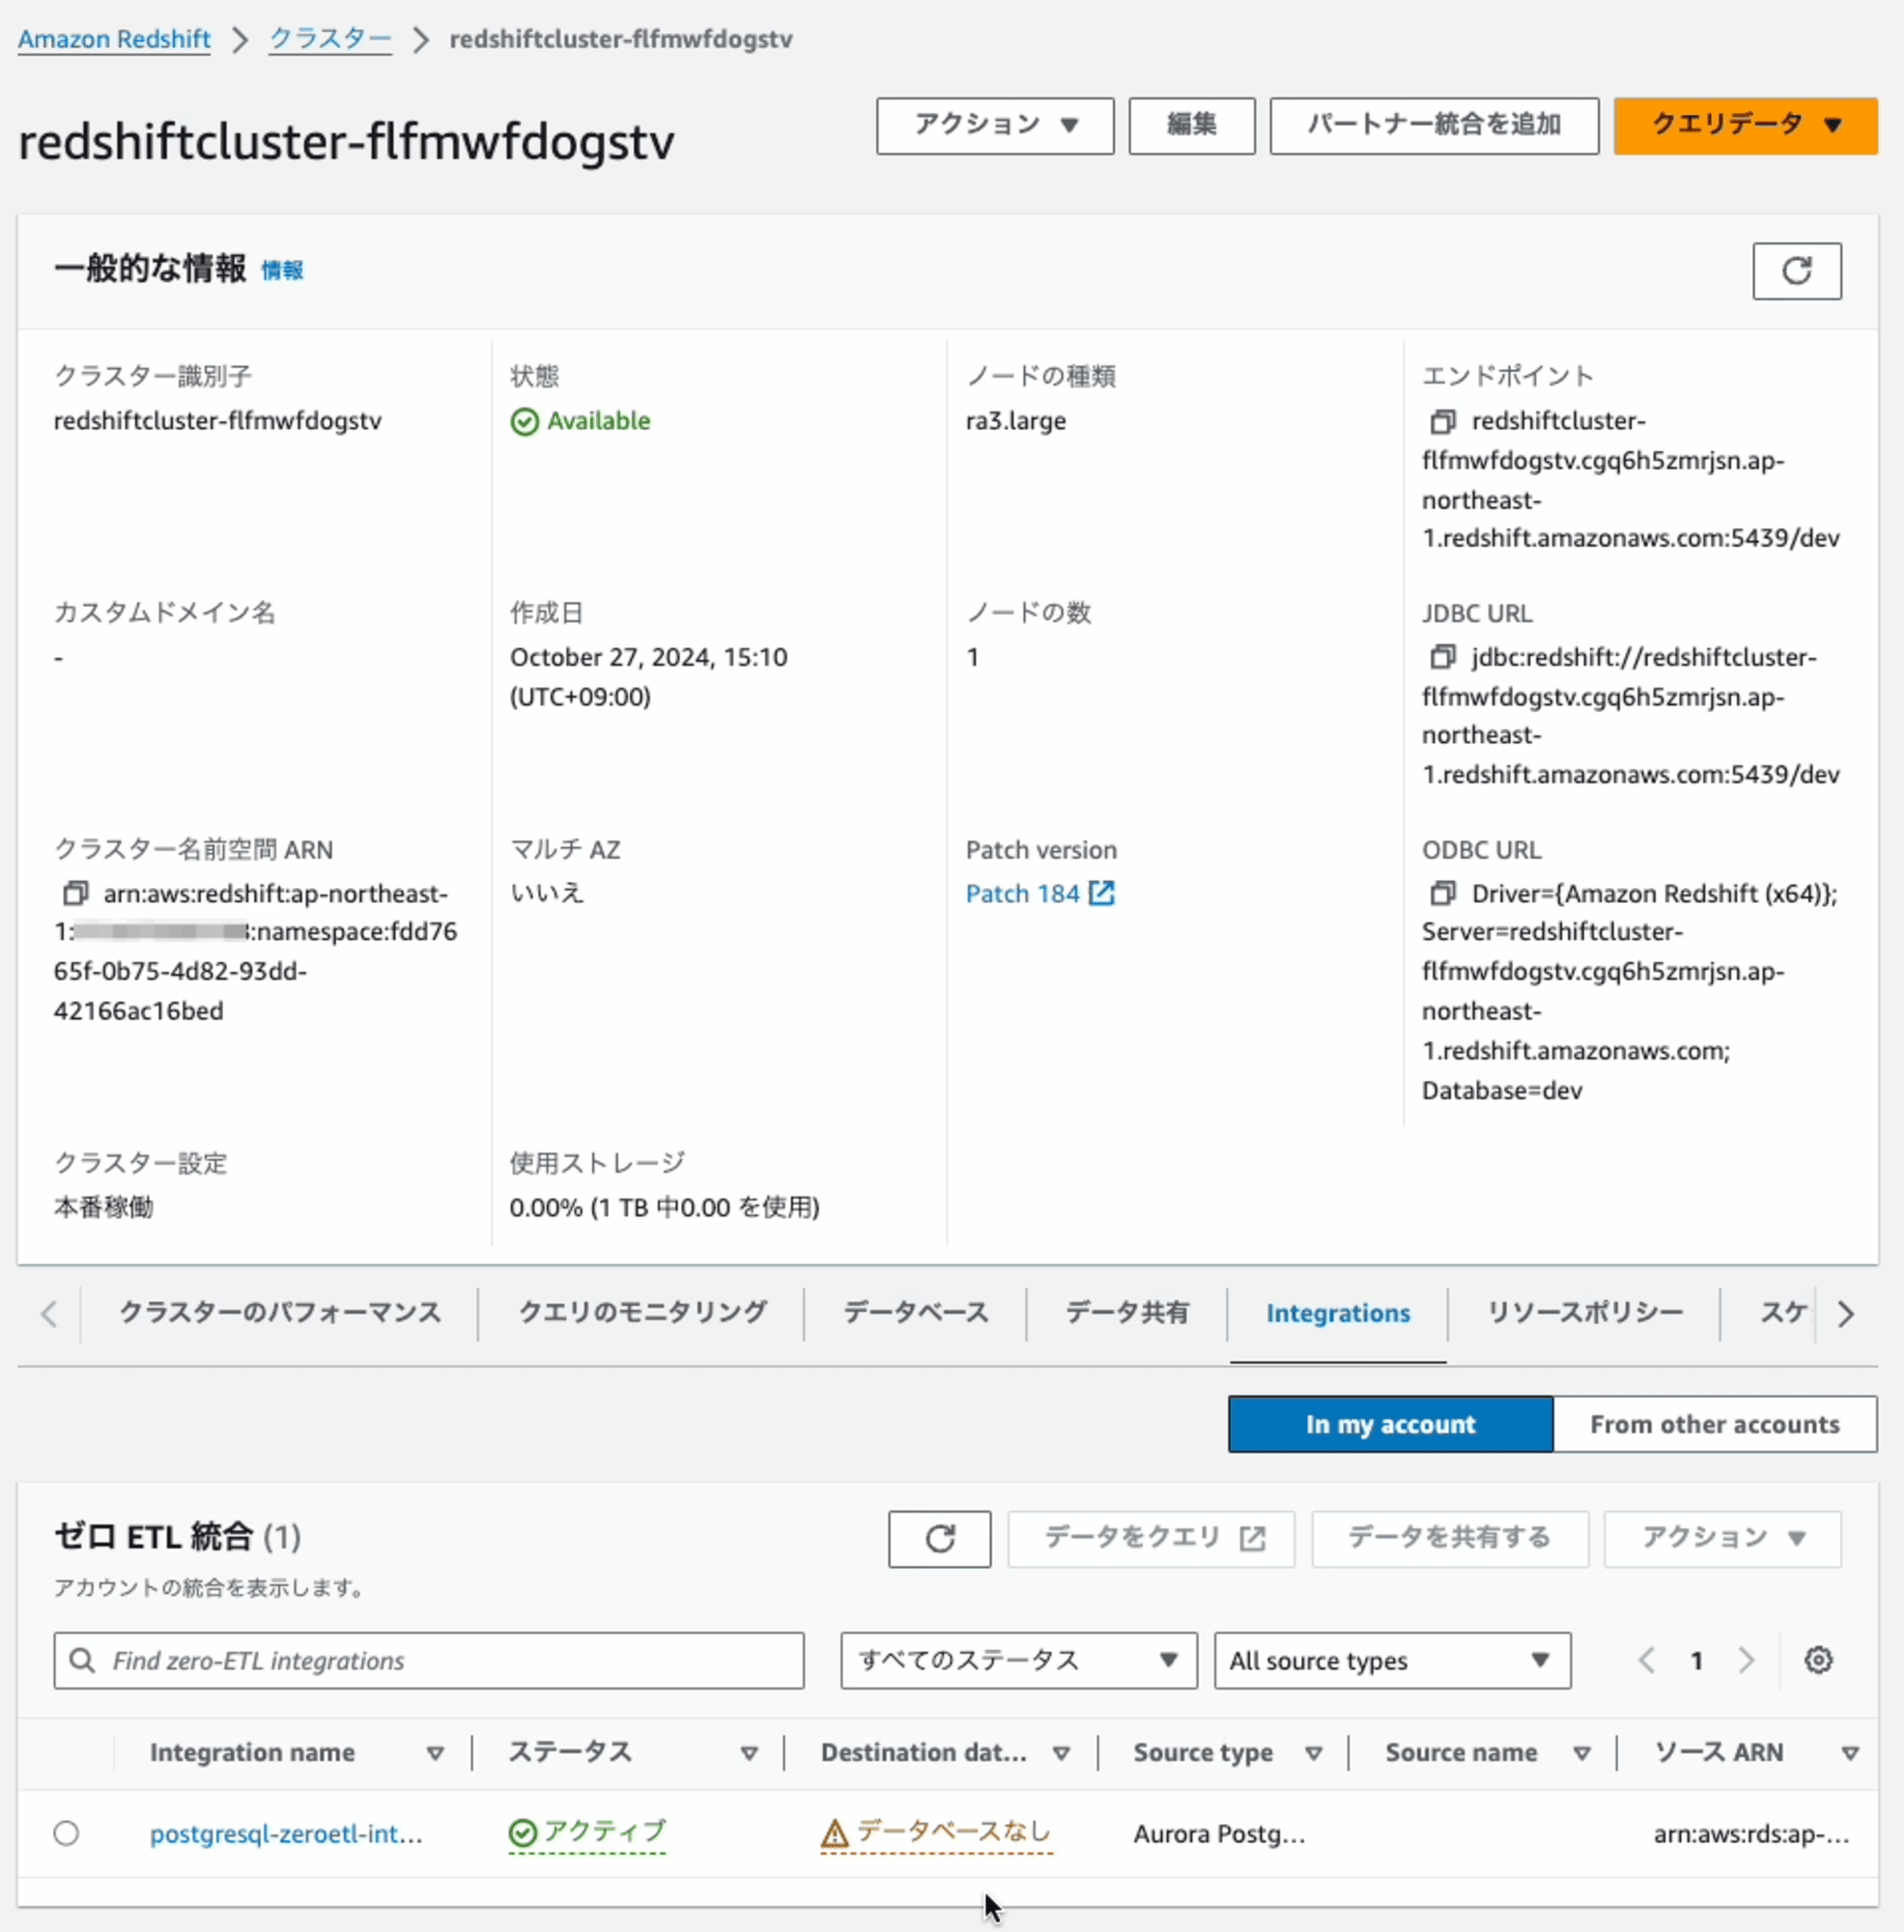
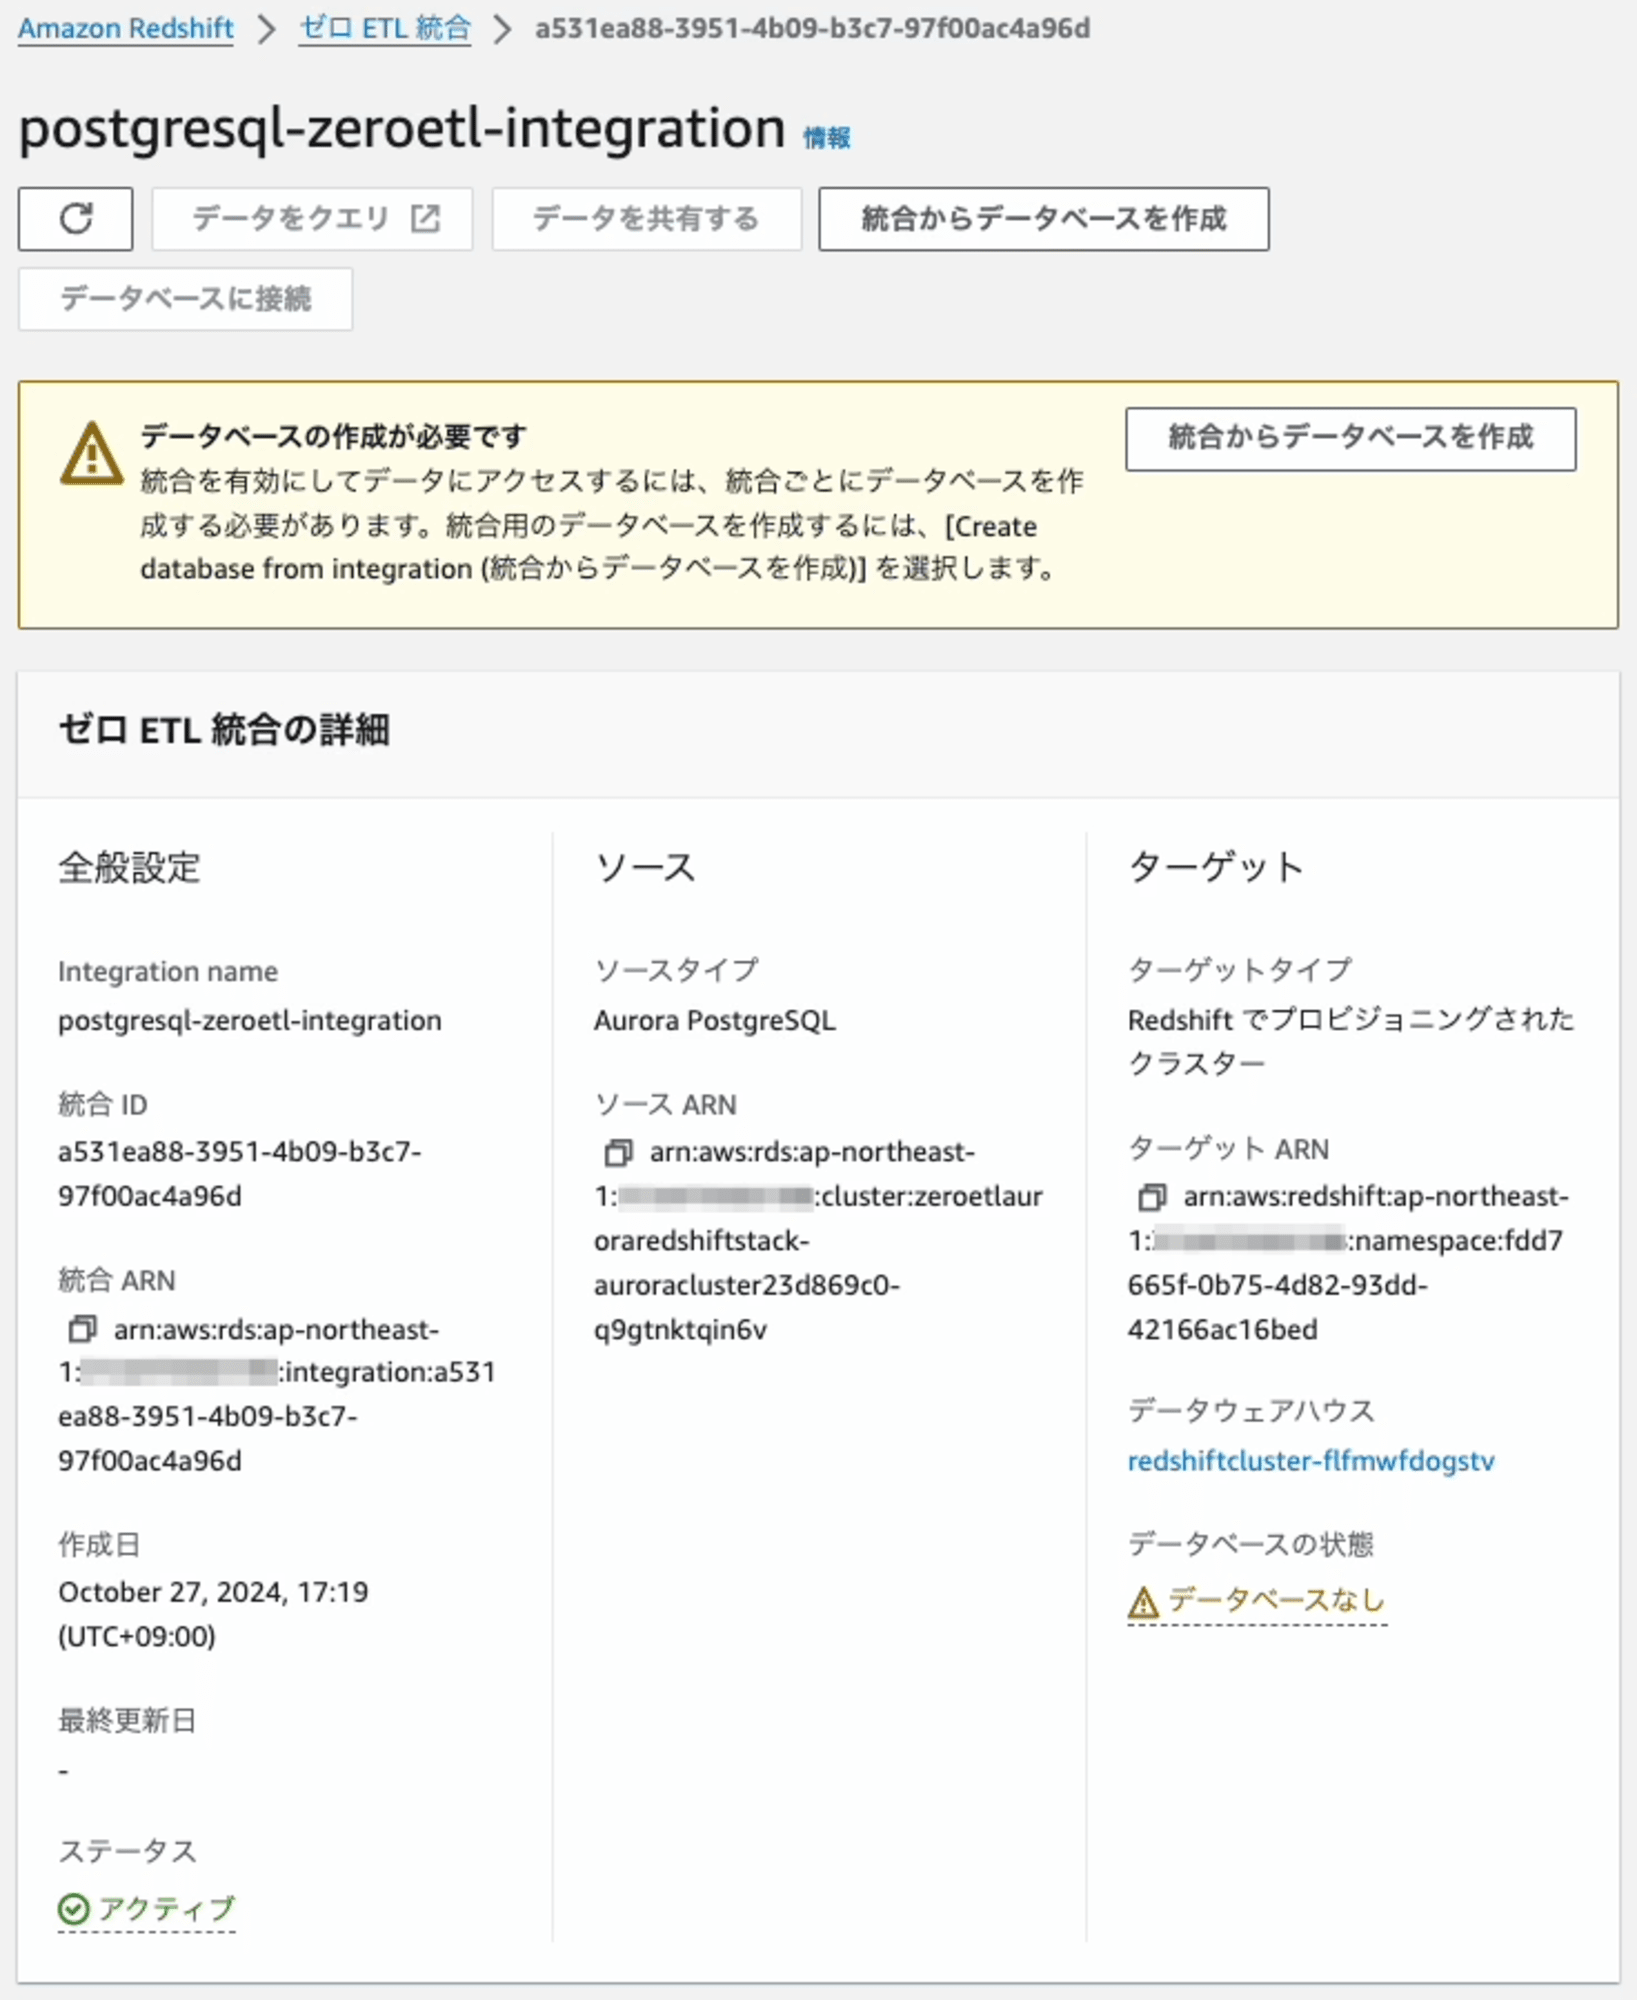
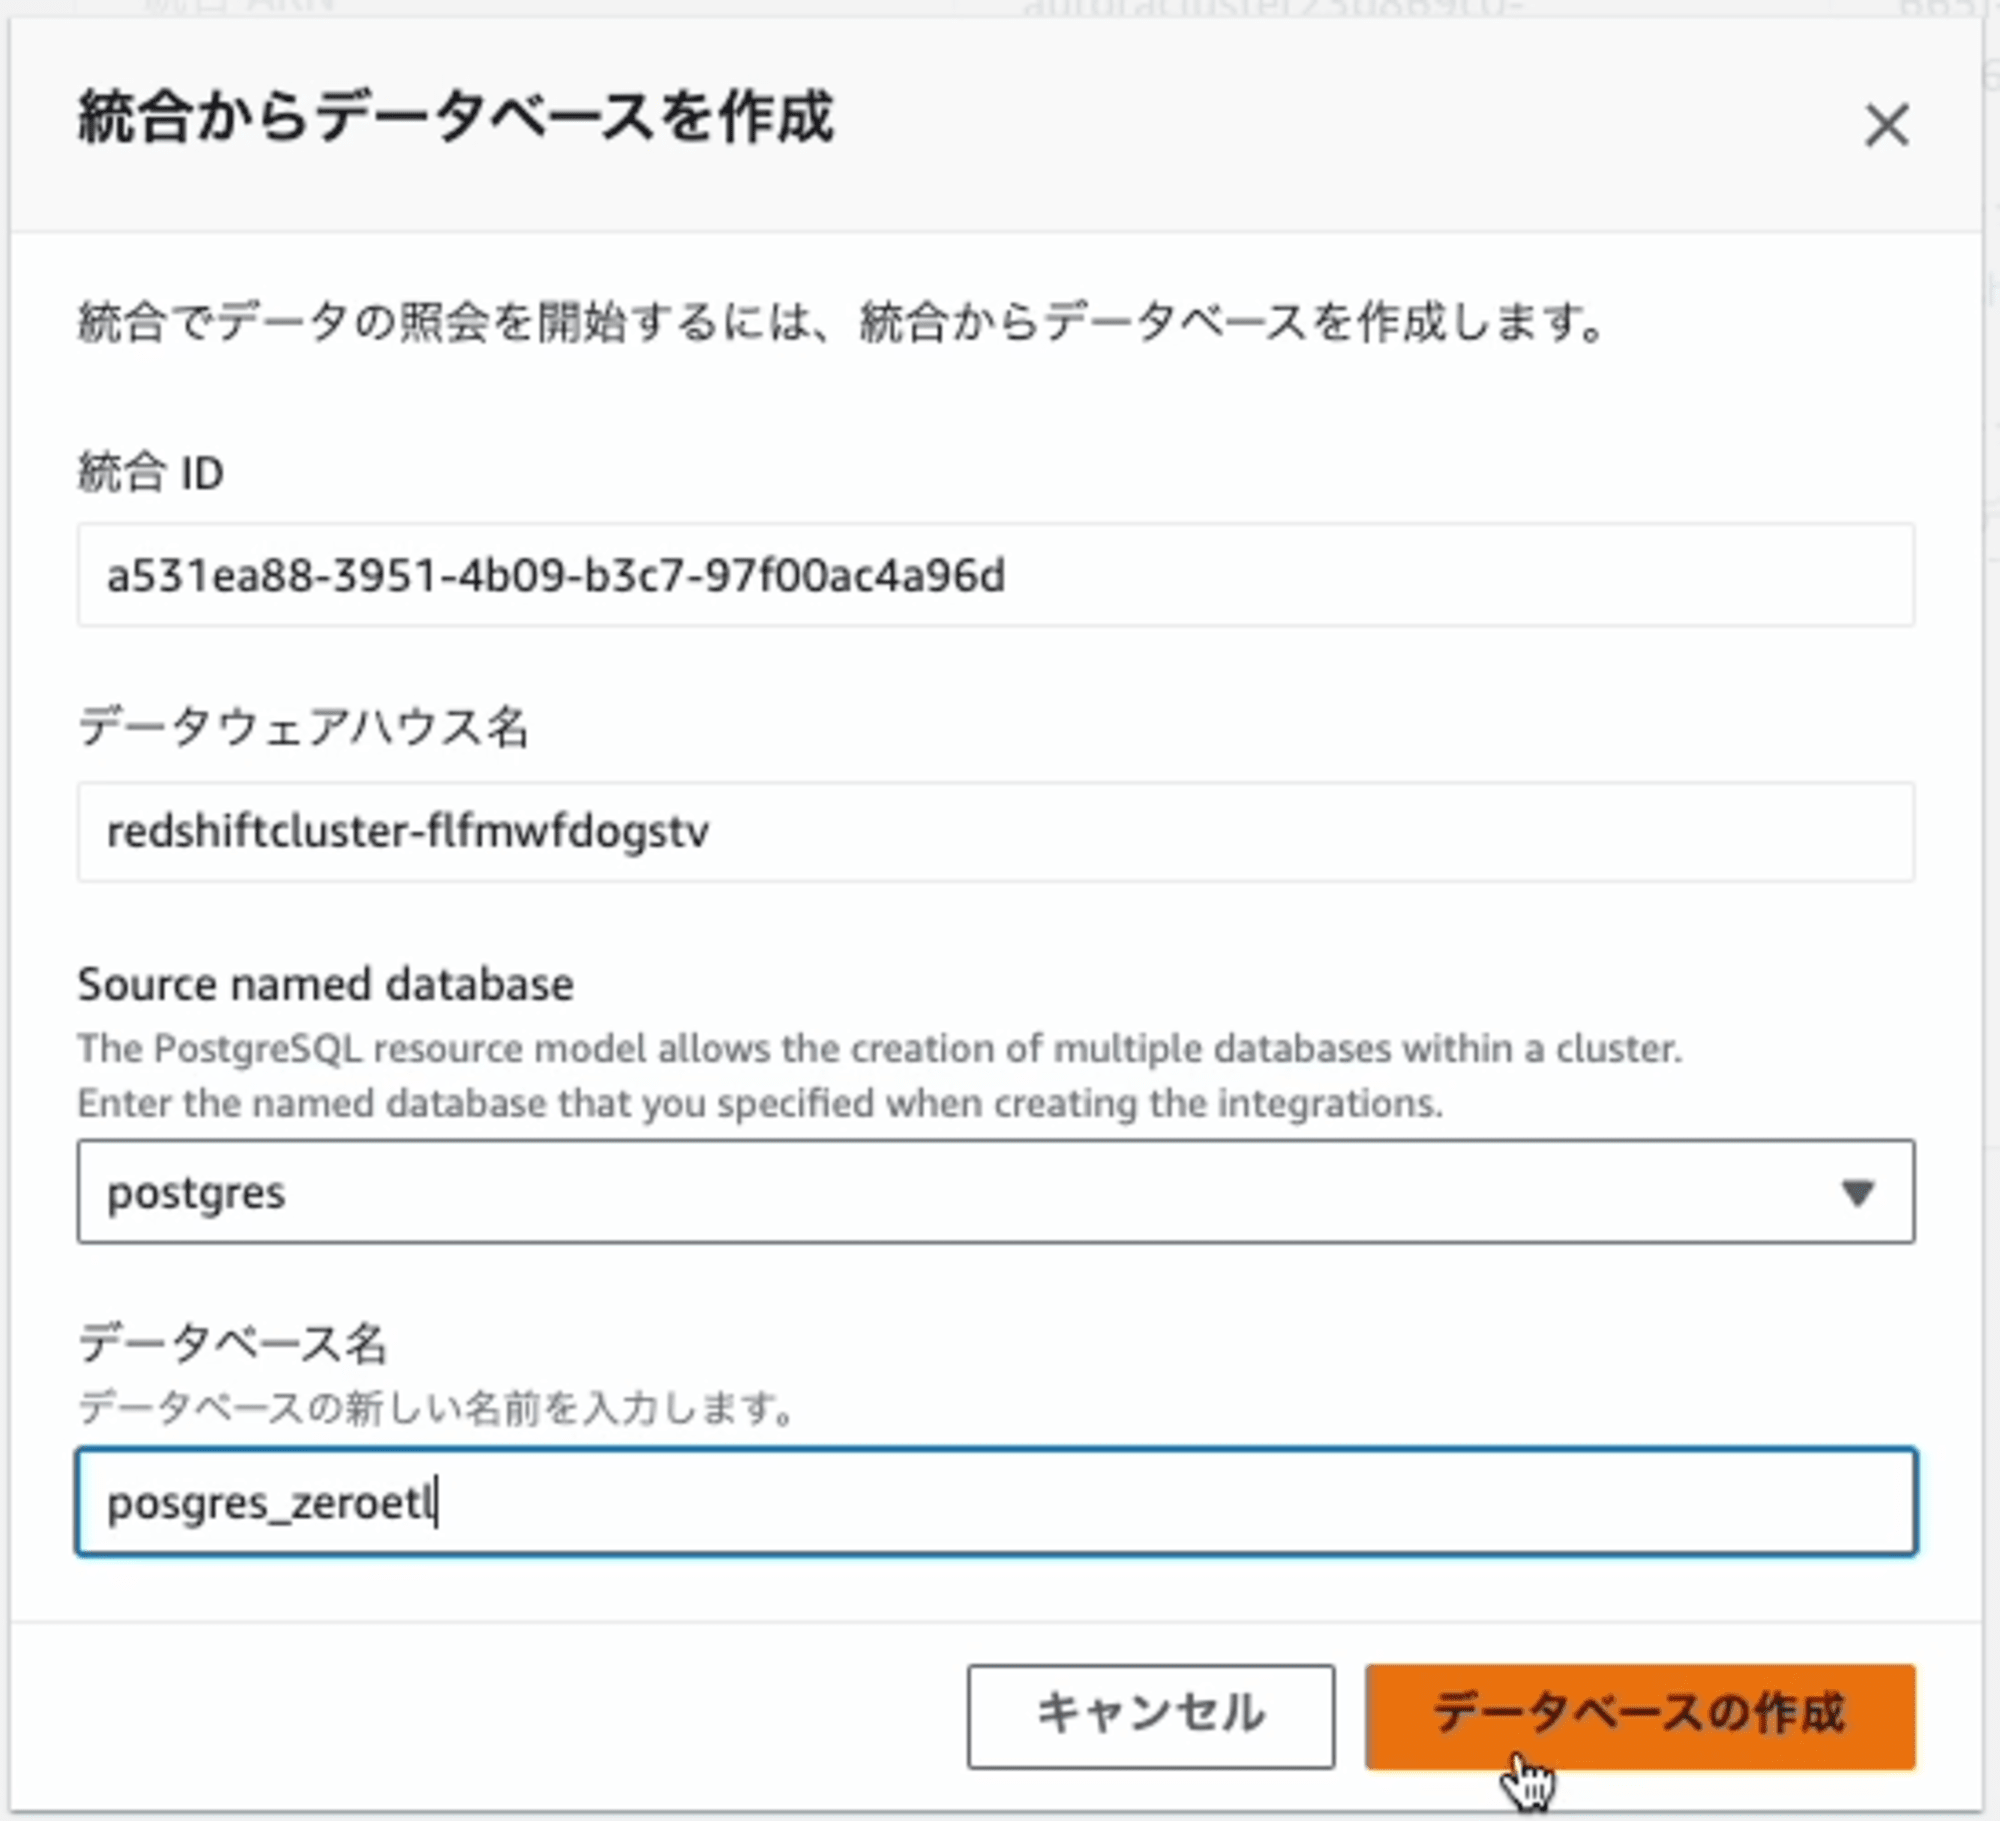
Zero-ETL 統合からデータベースの作成
Zero-ETL 統合が作成できたら、次はZero-ETL 統合からRedshiftのデータベースを作成します。データベースを作成するとその中にpublicスキーマがあり更にその下に連携したテーブルが作成され、そのテーブルにデータが連携されます。
Redshiftに作成したいデータベース名を指定します。
データベースを作成した直後から、データの連携が開始します。初期状態ですので、Table row countは、0件です。これで設定は完了です。
トラブルシューティング&動作確認
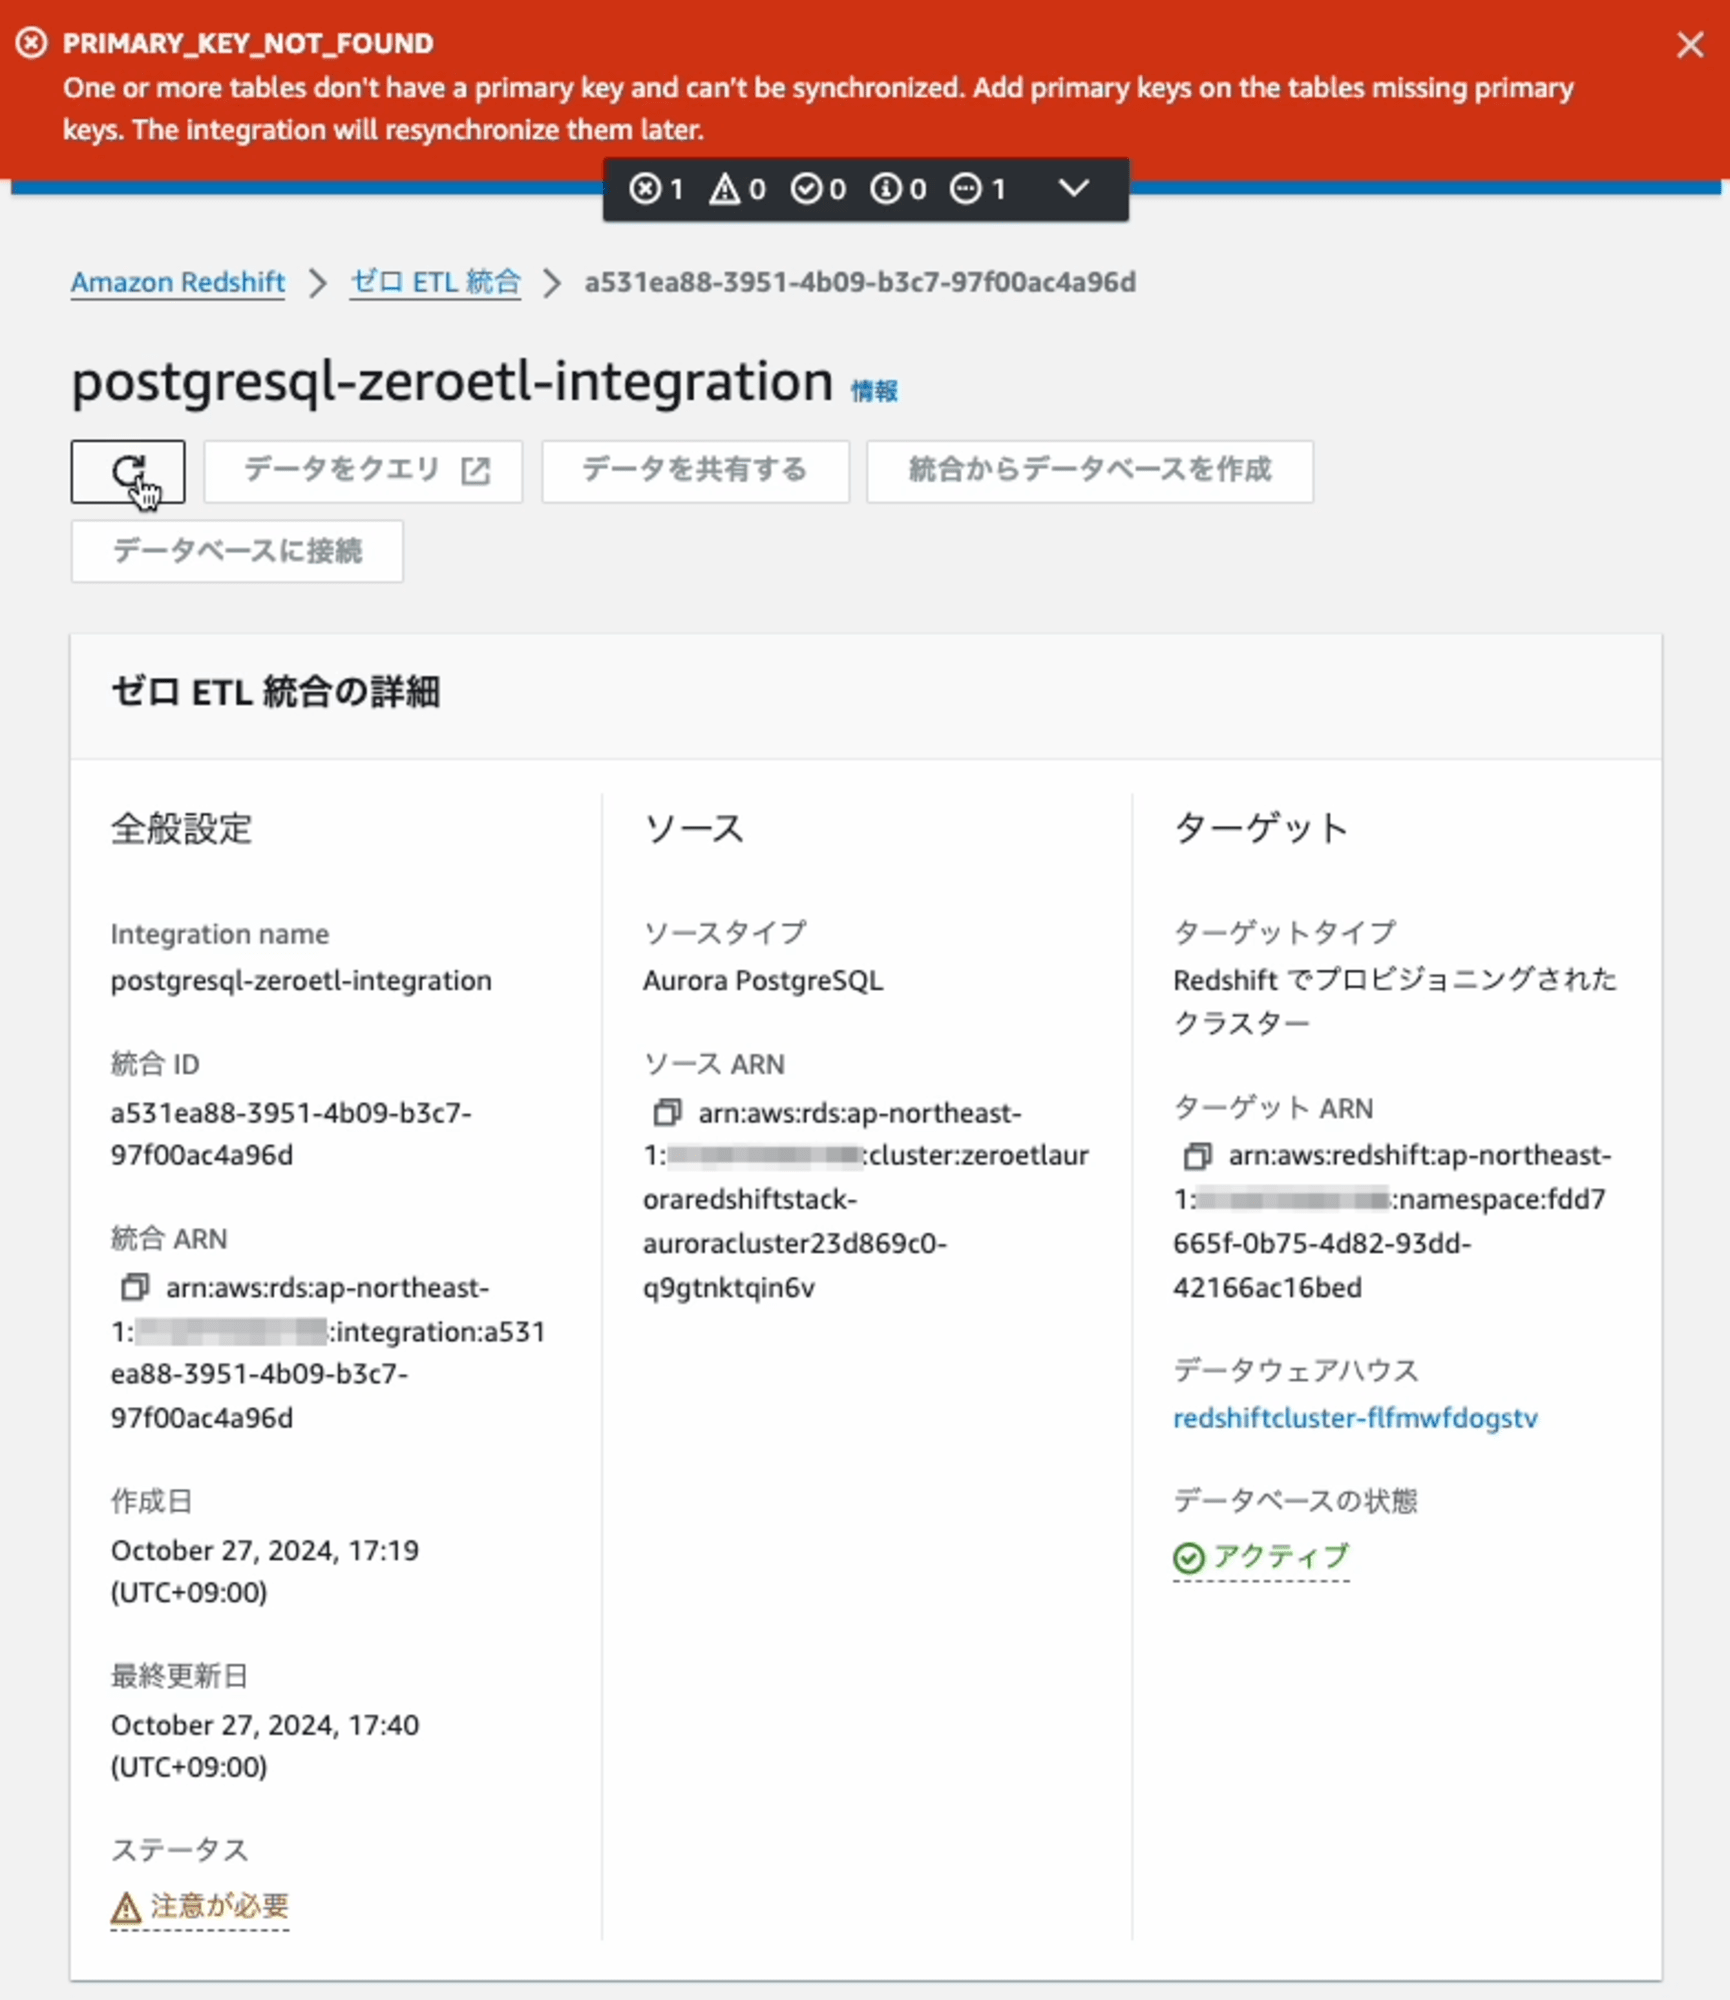
トラブル発生
いきなり、トラブルです。ステータスは「注意が必要」 、画面上部には 「PRIMARY_KEY_NOT_FOUND」 です。不覚にも、最初はテーブルに対して、プライマリキーを設定していなかったため、同期が取れずエラーになっていました。
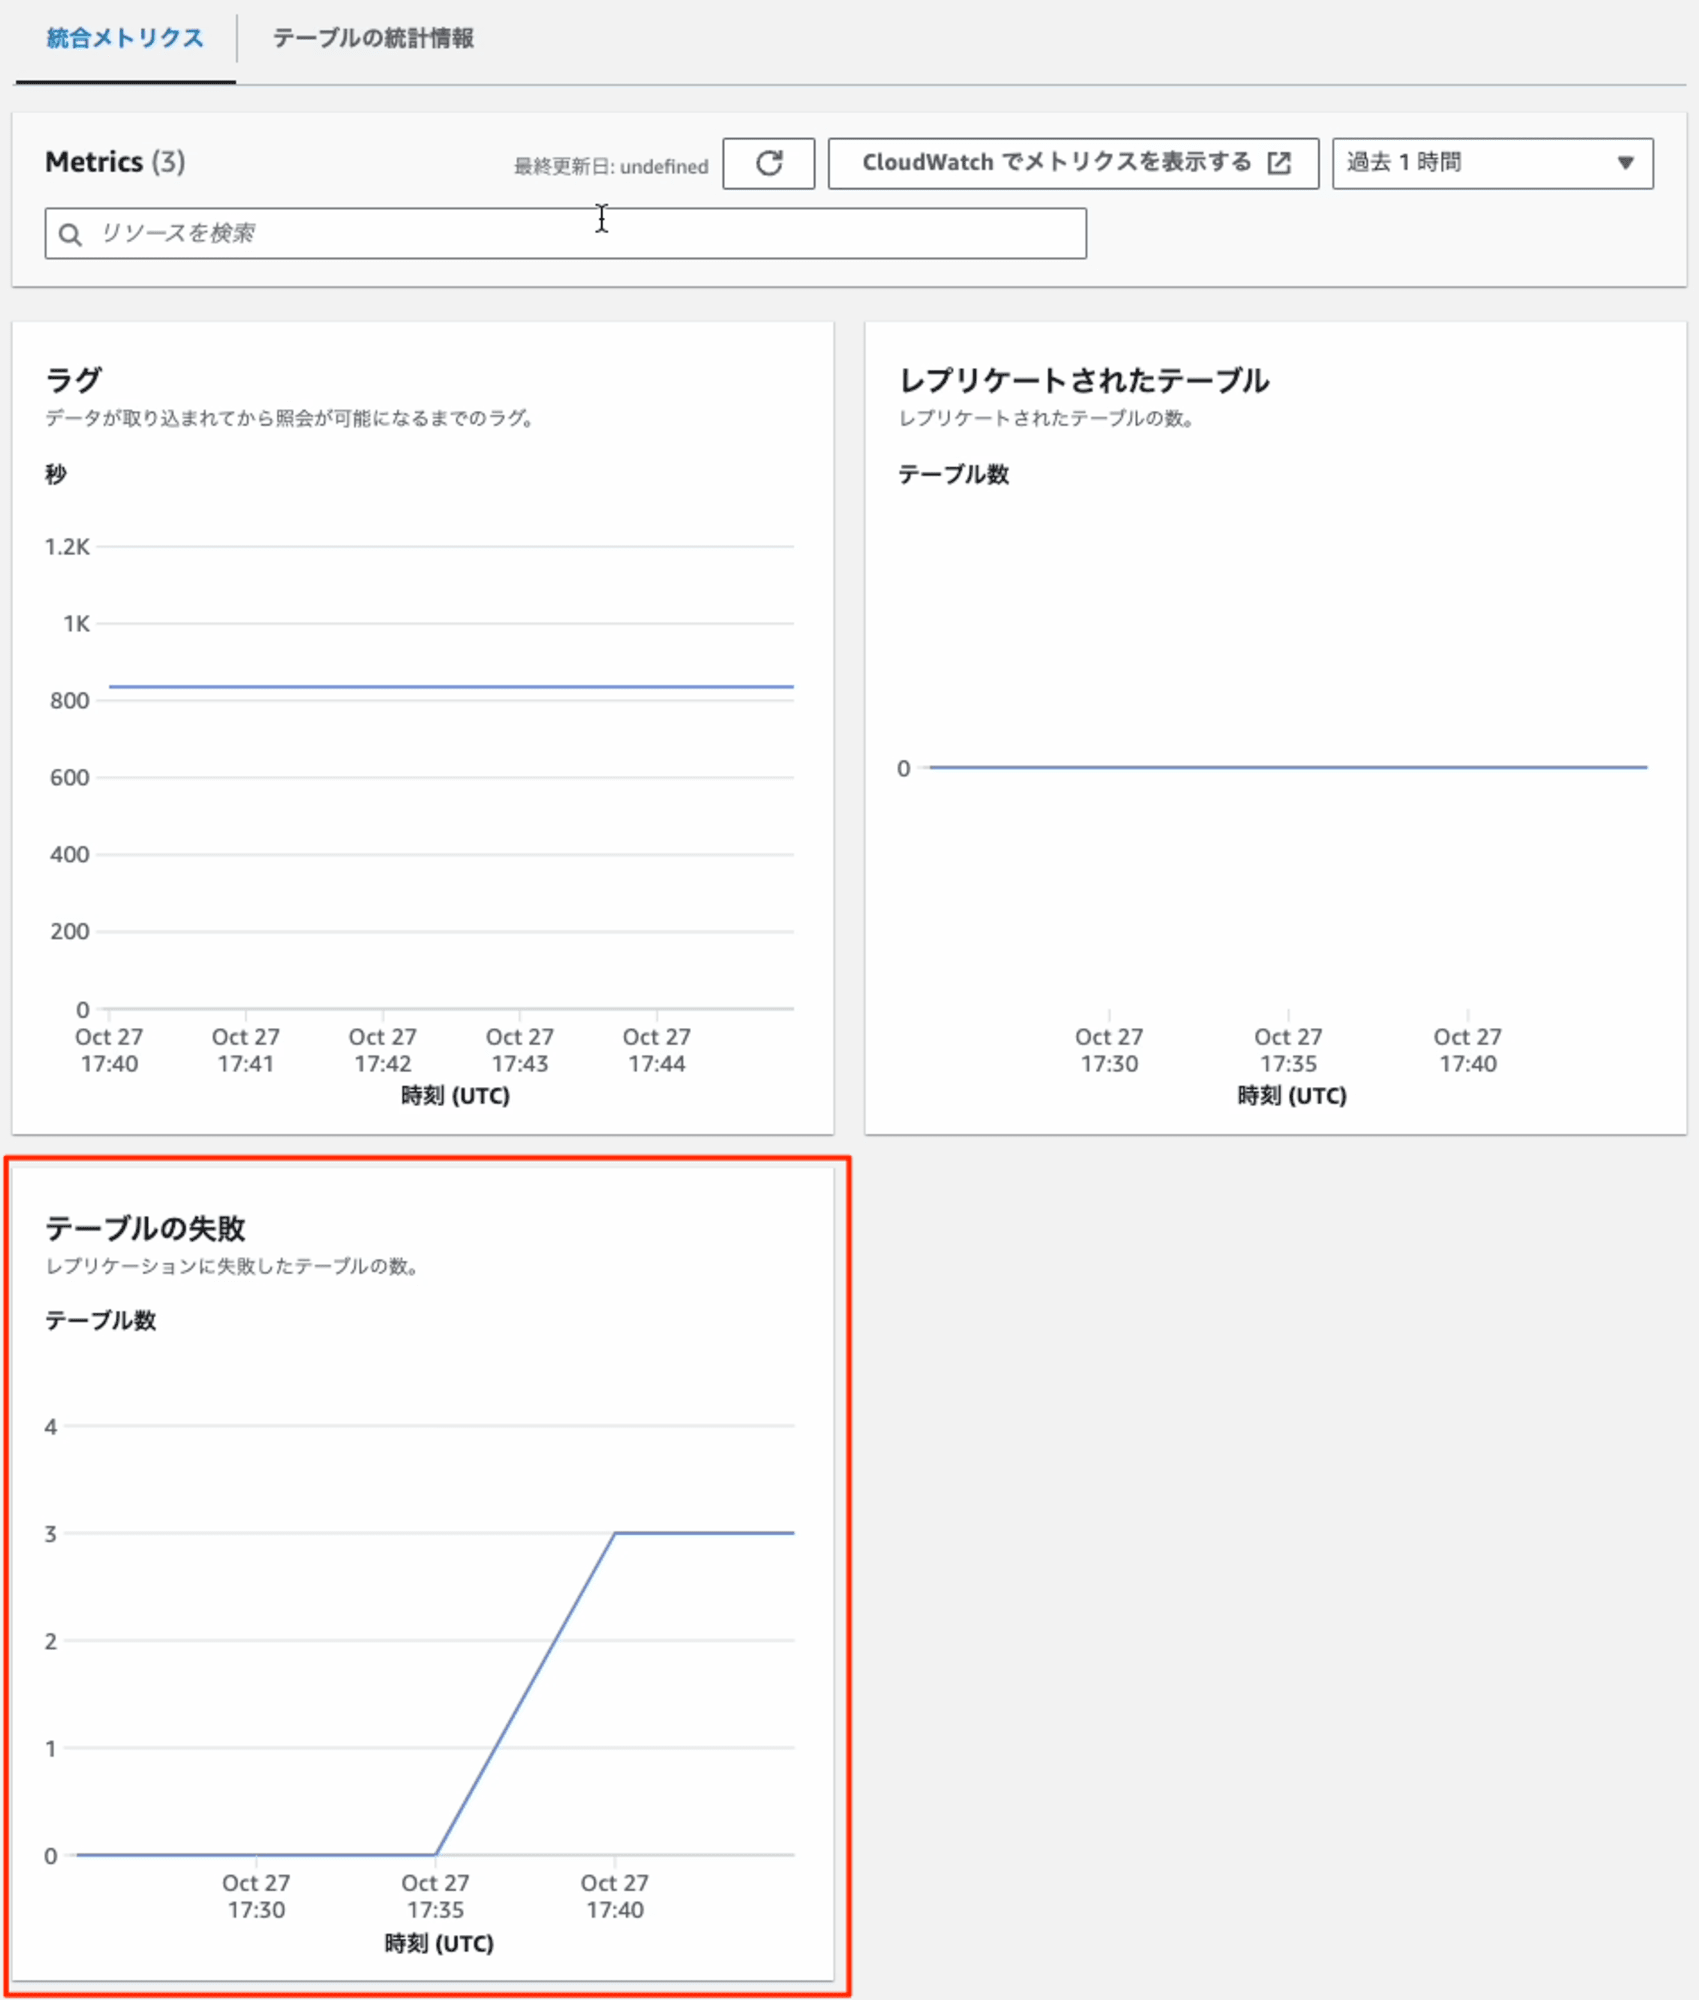
統合メトリクスからもエラーを確認できます。
トラブルシューティング
まずは、Aurora PostgreSQLのテーブルにプライマリキーを設定して再作成します。
postgres=> create table devices1 (id varchar(16), data_ts varchar(32) PRIMARY KEY);
CREATE TABLE
postgres=> create table devices2 (id varchar(16), data_ts varchar(32) PRIMARY KEY);
CREATE TABLE
postgres=> create table devices3 (id varchar(16), data_ts varchar(32) PRIMARY KEY);
CREATE TABLE
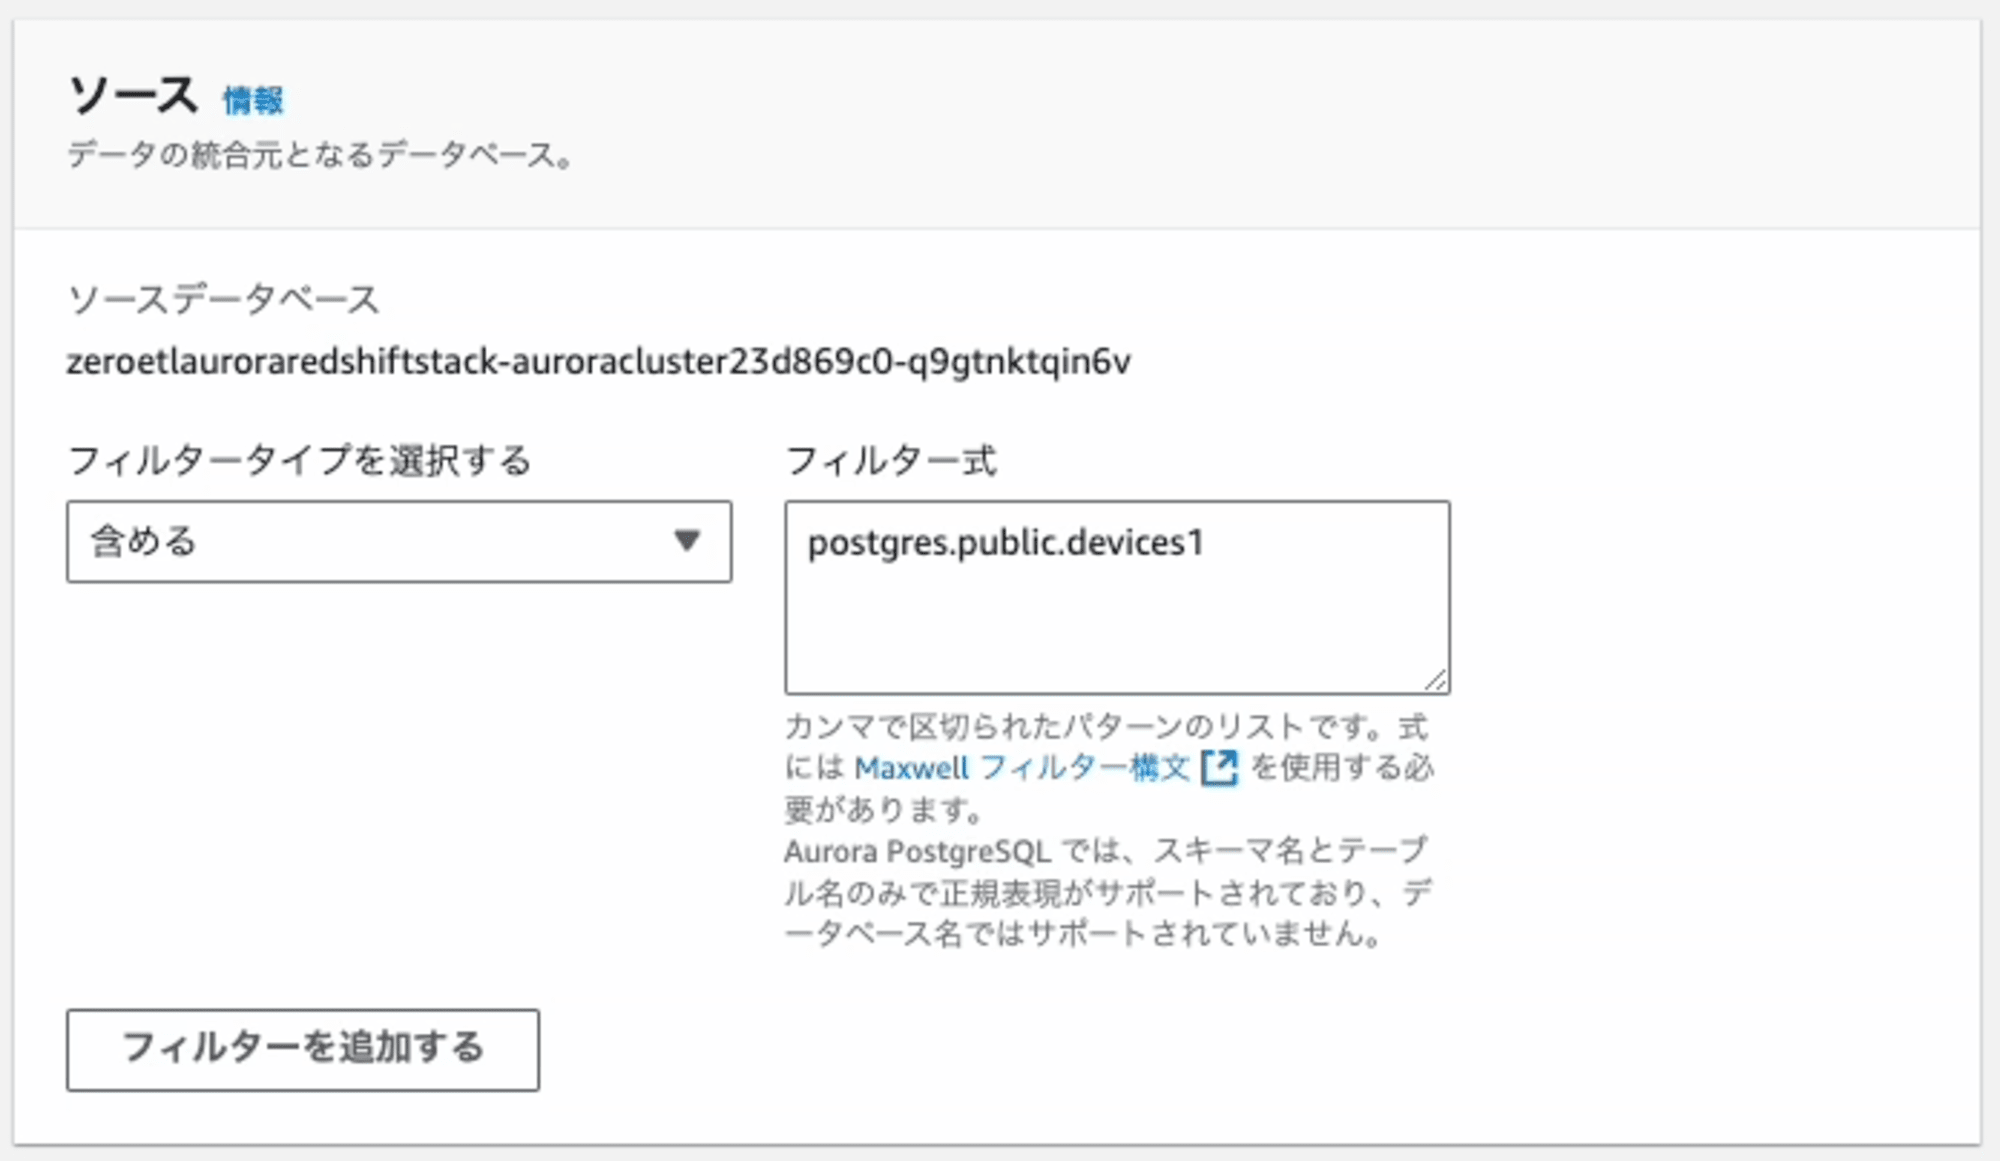
新機能のフィルタ機能を使って、デバックしやすいようにdevices1テーブルのみを連携するように再設定します。
動作確認
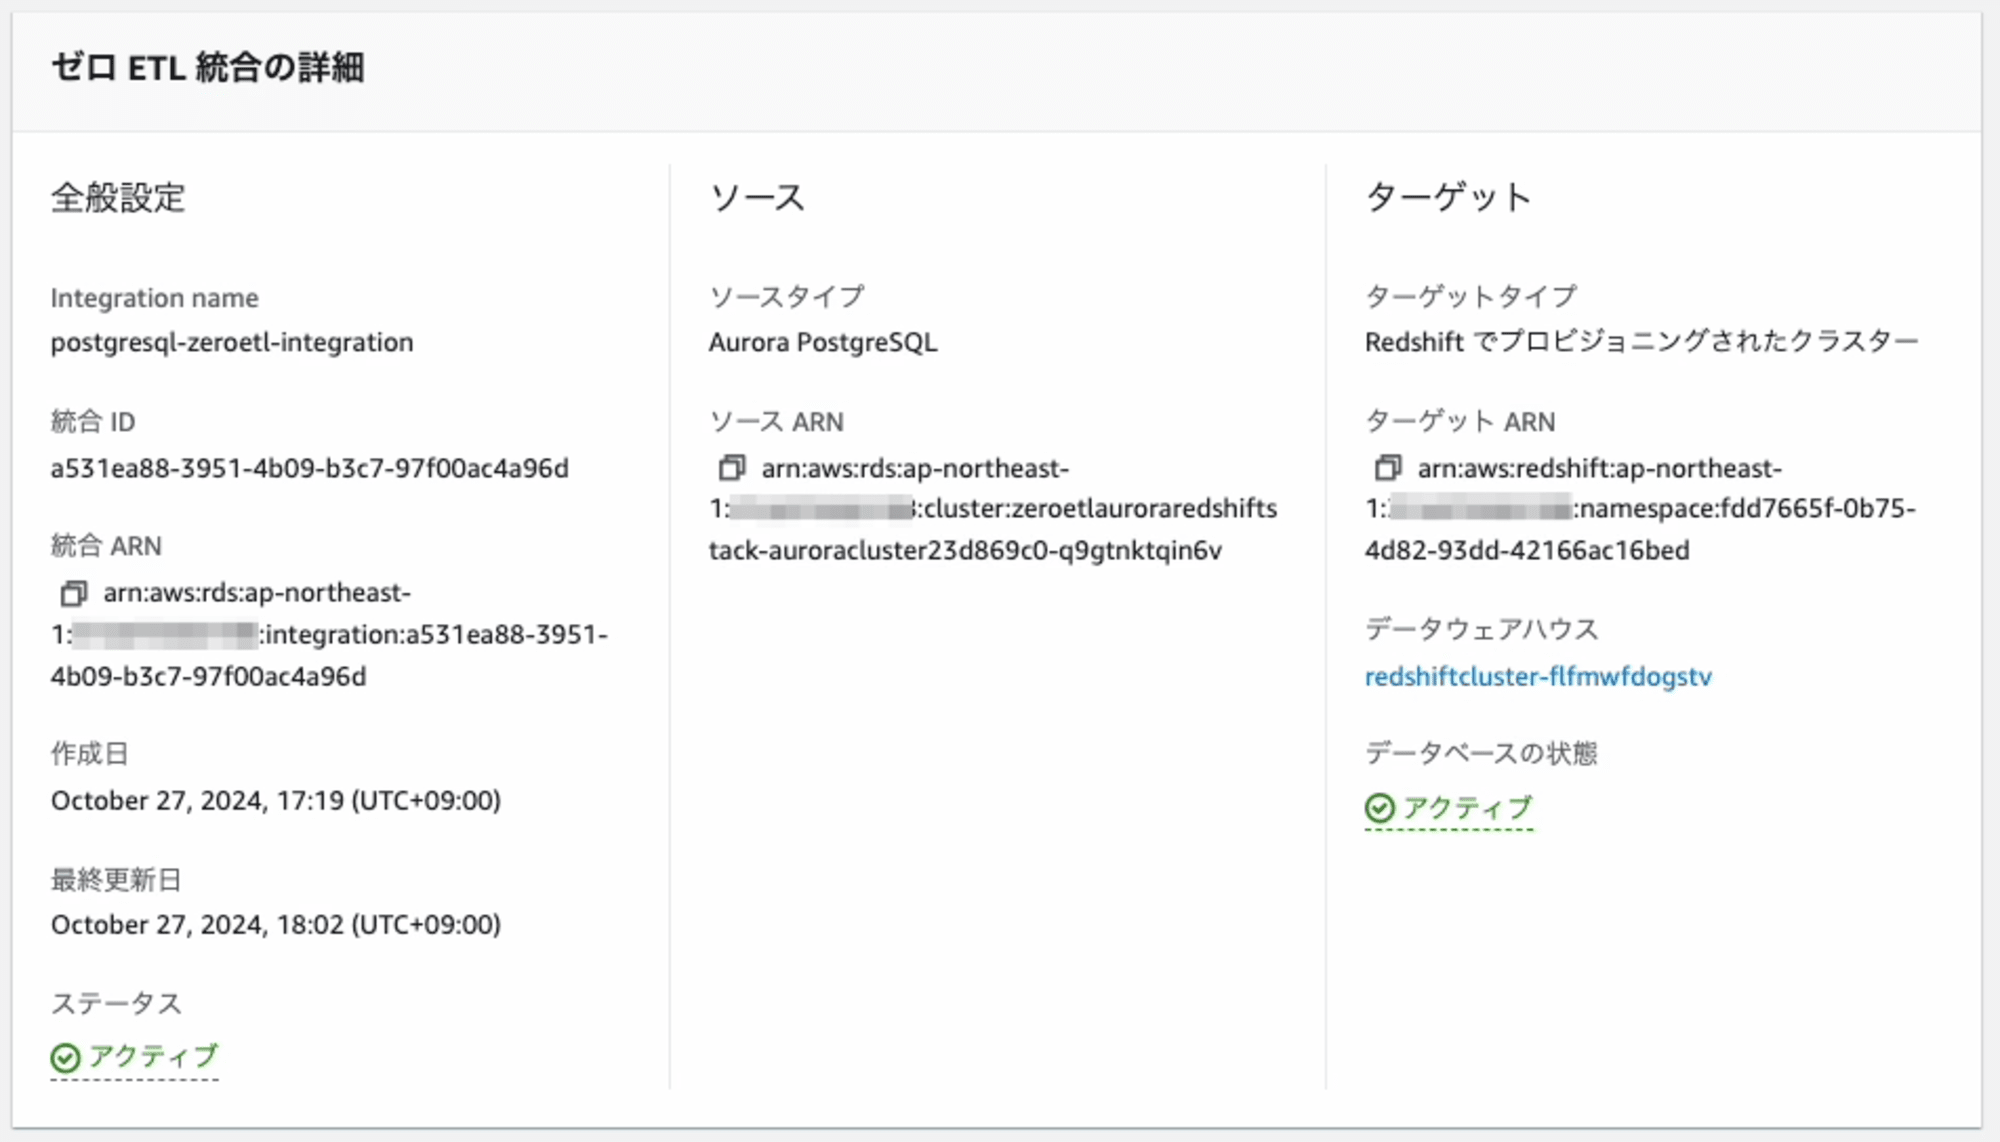
Zero-ETL 統合の作成が完了すると、ステータスが「アクティブ」 になります。
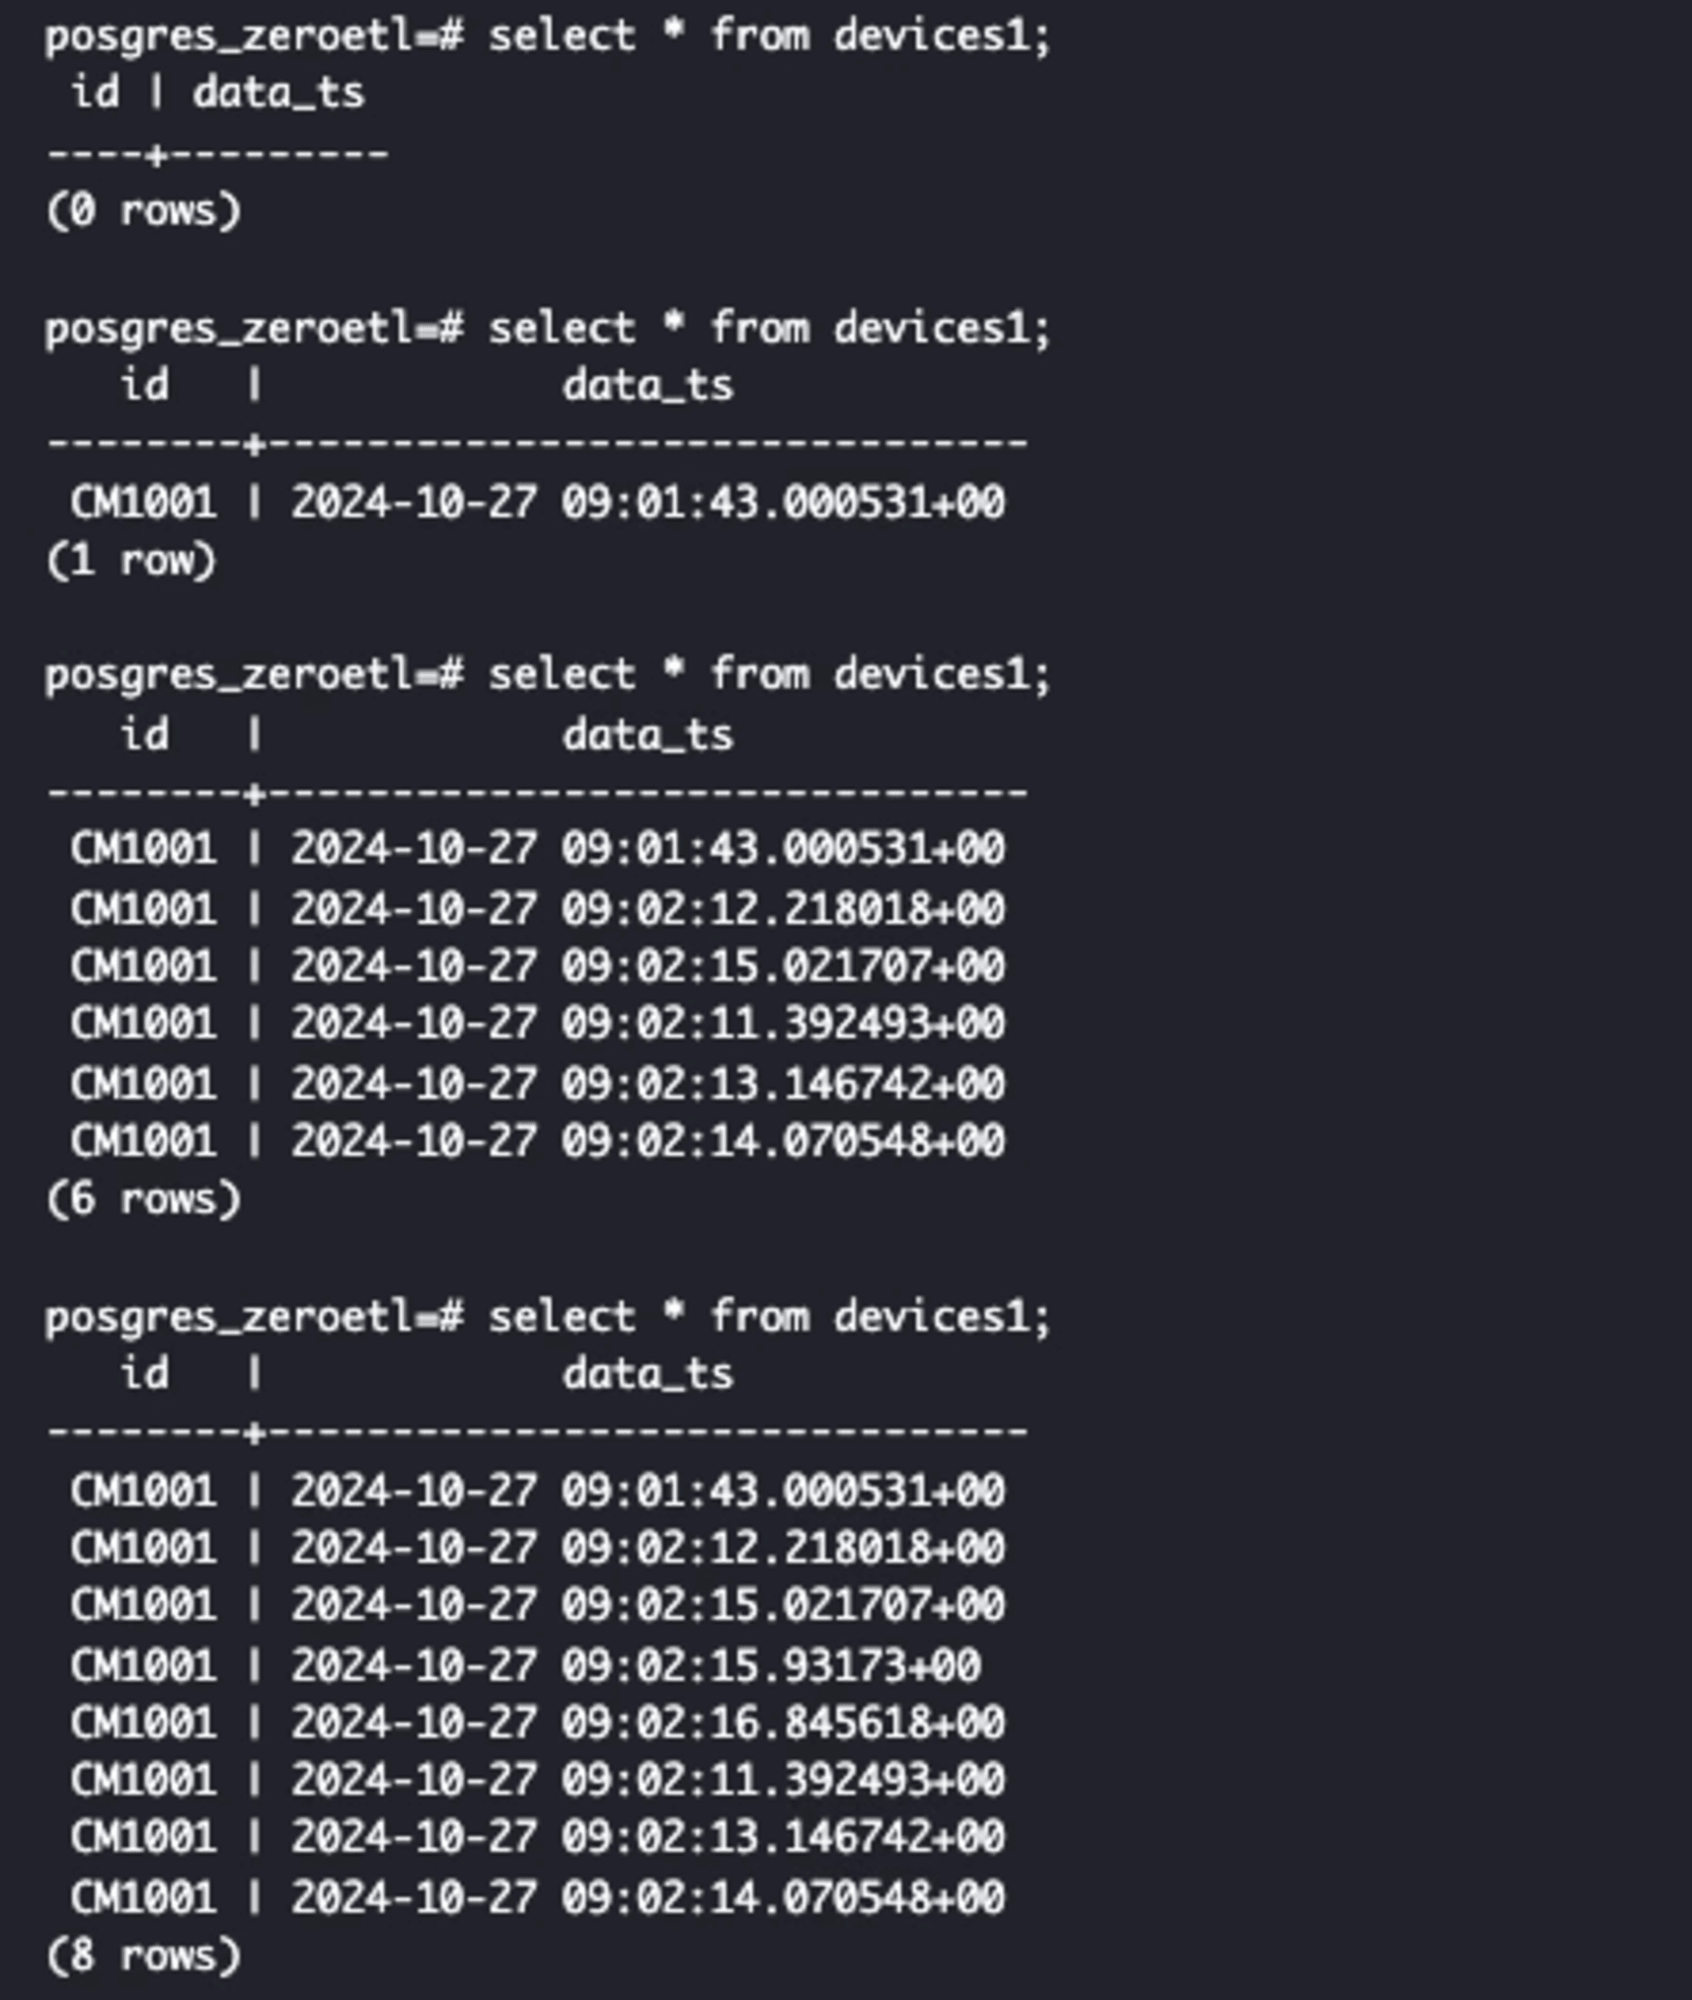
Aurora PostgreSQLのテーブル(devices1)にレコードをINSERTします。

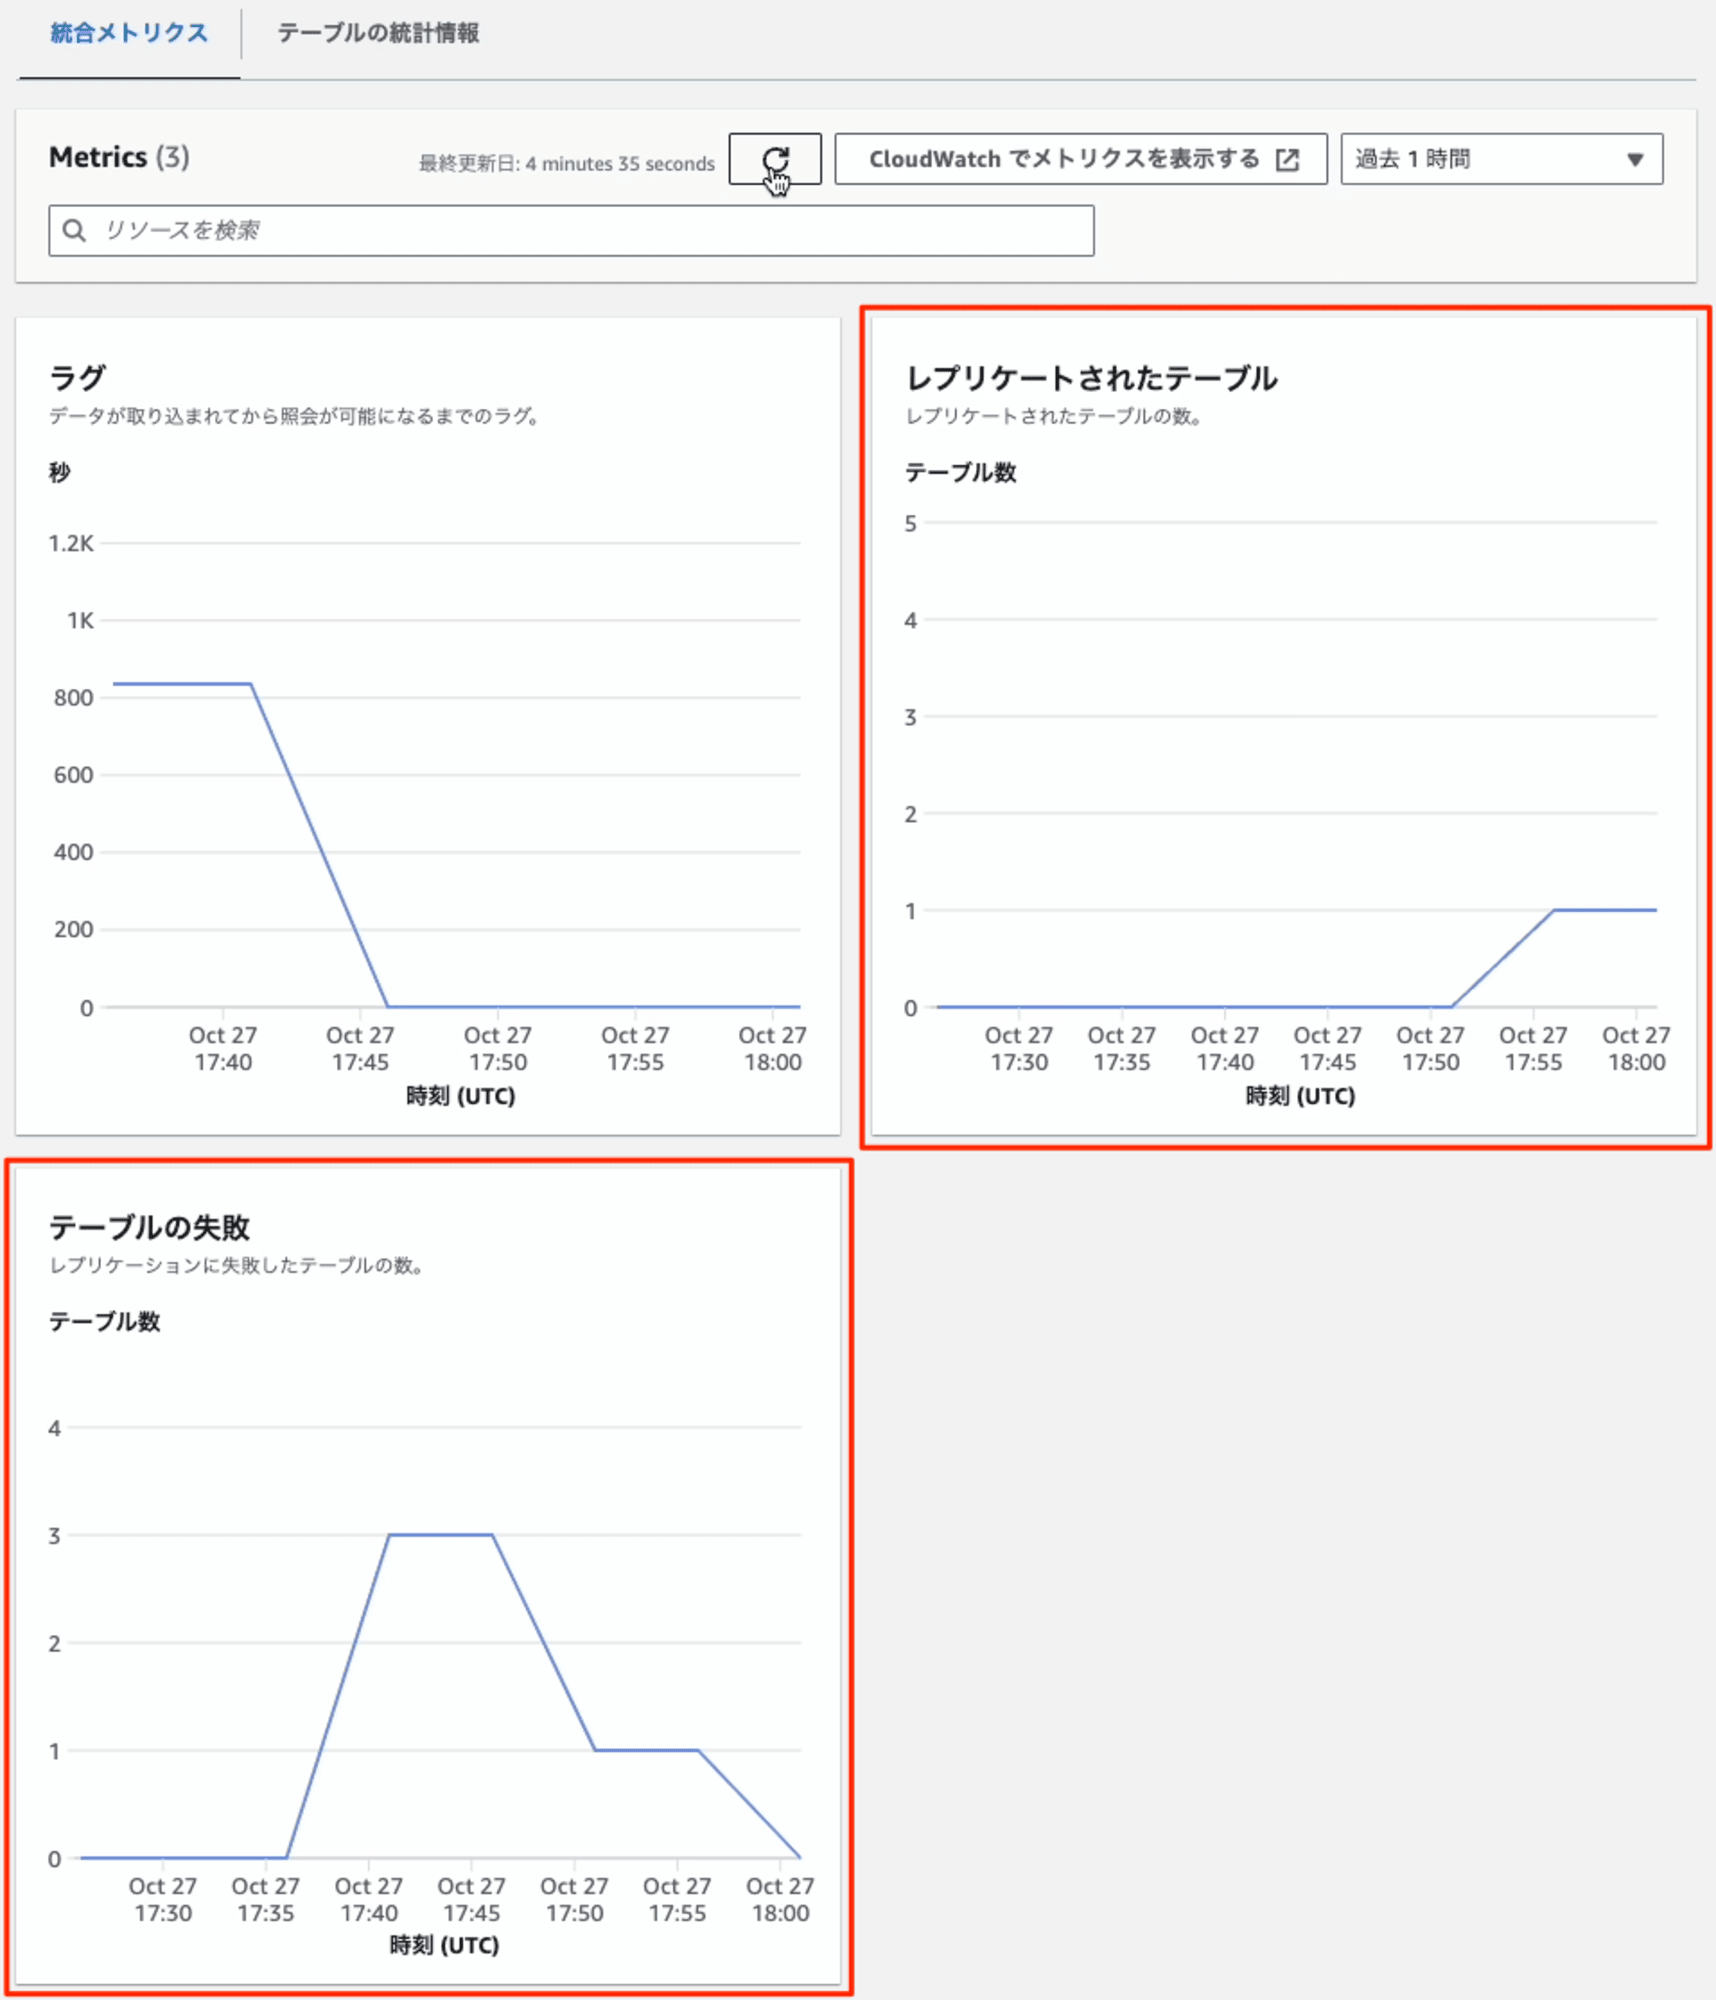
遅れること、数秒程度で、Redshiftから参照できました。
統合メトリクスからも 「テーブルの失敗」が0、「レプリケートされたテーブル」が1になり、エラーが解消されたことを確認できます。また、新機能の連携対象テーブルのフィルタリングで、指定した1テーブルのみが連携されていることも確認できました。
最後に
手抜きをしたつもりのCDK化も、結局全部できないのかよって事が後でわかり、Zero-ETL統合のトラブルシューティングも経験して、良い検証になったと思います。CDK化しなかったら、かなり長いブログになったので良しとしよう。プレビューの機能で検証したことがある方も、今一度試してみると良いかもしれません。
この新機能により、企業はデータ分析プロセスを大幅に効率化し、リアルタイムに近いデータ分析を実現できます。Aurora PostgreSQLの拡張された論理レプリケーション機能を活用することで、従来のPostgreSQLレプリケーションの課題を克服し、優れたパフォーマンスと柔軟性を提供します。
合わせて読みたい
Appendex Ⅰ
AWS CDKによるZero-ETL環境の構築
import * as cdk from 'aws-cdk-lib';
import * as ec2 from 'aws-cdk-lib/aws-ec2';
import * as rds from 'aws-cdk-lib/aws-rds';
import * as redshift from 'aws-cdk-lib/aws-redshift';
import * as iam from 'aws-cdk-lib/aws-iam';
import * as secretsmanager from 'aws-cdk-lib/aws-secretsmanager';
import { Construct } from 'constructs';

export class ZeroEtlAuroraRedshiftStack extends cdk.Stack {
  constructor(scope: Construct, id: string, props?: cdk.StackProps) {
    super(scope, id, props);

    // VPCの作成
    const vpc = new ec2.Vpc(this, 'ZeroEtlVpc', {
      maxAzs: 2,
    });

    // Redshift用のセキュリティグループを作成
    const redshiftSecurityGroup = new ec2.SecurityGroup(this, 'RedshiftSecurityGroup', {
      vpc,
      description: 'Security group for Redshift cluster',
      allowAllOutbound: true,
    });

    // Aurora PostgreSQLのパラメータグループの作成
    const auroraParamGroup = new rds.ParameterGroup(this, 'AuroraParamGroup', {
      engine: rds.DatabaseClusterEngine.auroraPostgres({ version: rds.AuroraPostgresEngineVersion.VER_16_4 }),
      parameters: {
        'rds.logical_replication': '1',
        'aurora.enhanced_logical_replication': '1',
        'aurora.logical_replication_backup': '0',
        'aurora.logical_replication_globaldb': '0',
      },
    });

    // Aurora PostgreSQLクラスターの作成
    const auroraCluster = new rds.DatabaseCluster(this, 'AuroraCluster', {
      engine: rds.DatabaseClusterEngine.auroraPostgres({ version: rds.AuroraPostgresEngineVersion.VER_16_4 }),
      vpc,
      vpcSubnets: { subnetType: ec2.SubnetType.PRIVATE_WITH_EGRESS },
      writer: rds.ClusterInstance.provisioned('Writer', {
        instanceType: ec2.InstanceType.of(ec2.InstanceClass.BURSTABLE3, ec2.InstanceSize.MEDIUM),
      }),
      readers: [
        rds.ClusterInstance.provisioned('Reader1', {
          instanceType: ec2.InstanceType.of(ec2.InstanceClass.BURSTABLE3, ec2.InstanceSize.MEDIUM),
        }),
      ],
    });

    // Redshiftのパラメータグループの作成
    const redshiftParamGroup = new redshift.CfnClusterParameterGroup(this, 'RedshiftParamGroup', {
      description: 'Parameter group for Redshift',
      parameterGroupFamily: 'redshift-1.0',
      parameters: [
        {
          parameterName: 'enable_case_sensitive_identifier',
          parameterValue: 'true',
        },
      ],
    });

    // Redshift用のIAMロールの作成
    const redshiftRole = new iam.Role(this, 'RedshiftRole', {
      assumedBy: new iam.ServicePrincipal('redshift.amazonaws.com'),
      managedPolicies: [
        iam.ManagedPolicy.fromAwsManagedPolicyName('AmazonRedshiftAllCommandsFullAccess'),
        iam.ManagedPolicy.fromAwsManagedPolicyName('AmazonS3FullAccess'),
      ],
    });

    redshiftRole.addToPolicy(new iam.PolicyStatement({
      actions: ['sts:AssumeRole'],
      resources: [auroraCluster.clusterArn],
    }));

    // Redshift用のシークレットの作成
    const excludeRedshiftPasswordCharacters = '/@"\'\\:'
    const redshiftSecret = new secretsmanager.Secret(this, 'RedshiftSecret', {
      generateSecretString: {
        excludeCharacters: excludeRedshiftPasswordCharacters,
        generateStringKey: 'password',
        passwordLength: 32,
        requireEachIncludedType: true,
        secretStringTemplate: JSON.stringify({
          engine: 'redshift',
          username: 'root',
          port: 5439,
          dbname: 'dev'
        }),
        excludePunctuation: true,
        includeSpace: false,
      },
    });

    // Redshiftクラスターの作成
    const redshiftCluster = new redshift.CfnCluster(this, 'RedshiftCluster', {
      clusterType: 'single-node',
      nodeType: 'ra3.large',
      masterUsername: 'root',
      masterUserPassword: redshiftSecret.secretValueFromJson('password').unsafeUnwrap(),
      dbName: 'dev',
      vpcSecurityGroupIds: [redshiftSecurityGroup.securityGroupId],
      clusterParameterGroupName: redshiftParamGroup.ref,
      iamRoles: [redshiftRole.roleArn],
      encrypted: true,
      publiclyAccessible: false,
      clusterSubnetGroupName: new redshift.CfnClusterSubnetGroup(this, 'RedshiftSubnetGroup', {
        description: 'Subnet group for Redshift cluster',
        subnetIds: vpc.selectSubnets({ subnetType: ec2.SubnetType.PRIVATE_WITH_EGRESS }).subnetIds,
      }).ref,
    });

    // 出力
    new cdk.CfnOutput(this, 'AuroraClusterEndpoint', {
      value: auroraCluster.clusterEndpoint.hostname,
      description: 'Aurora Cluster Endpoint',
    });

    new cdk.CfnOutput(this, 'RedshiftClusterEndpoint', {
      value: redshiftCluster.attrEndpointAddress,
      description: 'Redshift Cluster Endpoint',
    });
  }
}


