Amazon Bedrock AgentCore Identityでユーザー委任型認可(3LO)を実装してGoogle Driveにアクセスしてみた
はじめに
こんにちは、スーパーマーケットが大好きなコンサル部の神野です。
AI エージェントが外部サービス(Google Drive、Calendar など)にアクセスする際、ユーザーの代わりに認可を得る必要があります。これを実現するのが 3LO(Three-Legged OAuth)です。
Amazon Bedrock AgentCore Identityを活用すると、この 3LO フローを実装できます。
AWS公式のサンプルも提供されています。
ただ、フローも複雑かつ登場する用語が多くて最初は混乱しました・・・
例えば、Token Vault、Credential Provider 、Workload Identity、Session Binding などの用語が登場しますが、それぞれどういった意味か理解するのに時間がかかりました・・・
本記事では、これらの用語やフローを整理しつつ、実際に Google Drive へのアクセスを実装して理解を深めていきたいと思います!
前提
環境
- Python 3.12
- uv
- パッケージマネージャーとして使用します
- Google Cloud プロジェクト作成済み
- Google DriveのAPIが有効になっている
使用するもの
- Amazon Bedrock AgentCore(Runtime / Identity)
- Amazon Cognito(ユーザー認証)
- Google OAuth 2.0(Google Drive API)
今回はuvで環境を作成していきます。
# プロジェクト初期化
uv init

# 必要なライブラリを追加
uv add bedrock-agentcore boto3 pyjwt strands-agents bedrock-agentcore-starter-toolkit google-api-python-client google-auth-httplib2 google-auth-oauthlib fastapi uvicorn pyyaml
用語整理
実装に入る前に、AgentCore Identity の主要コンポーネントを整理します。
今回3つのコンポーネントが登場します。
- Workload Identity
- Credential Provider
- Token Vault
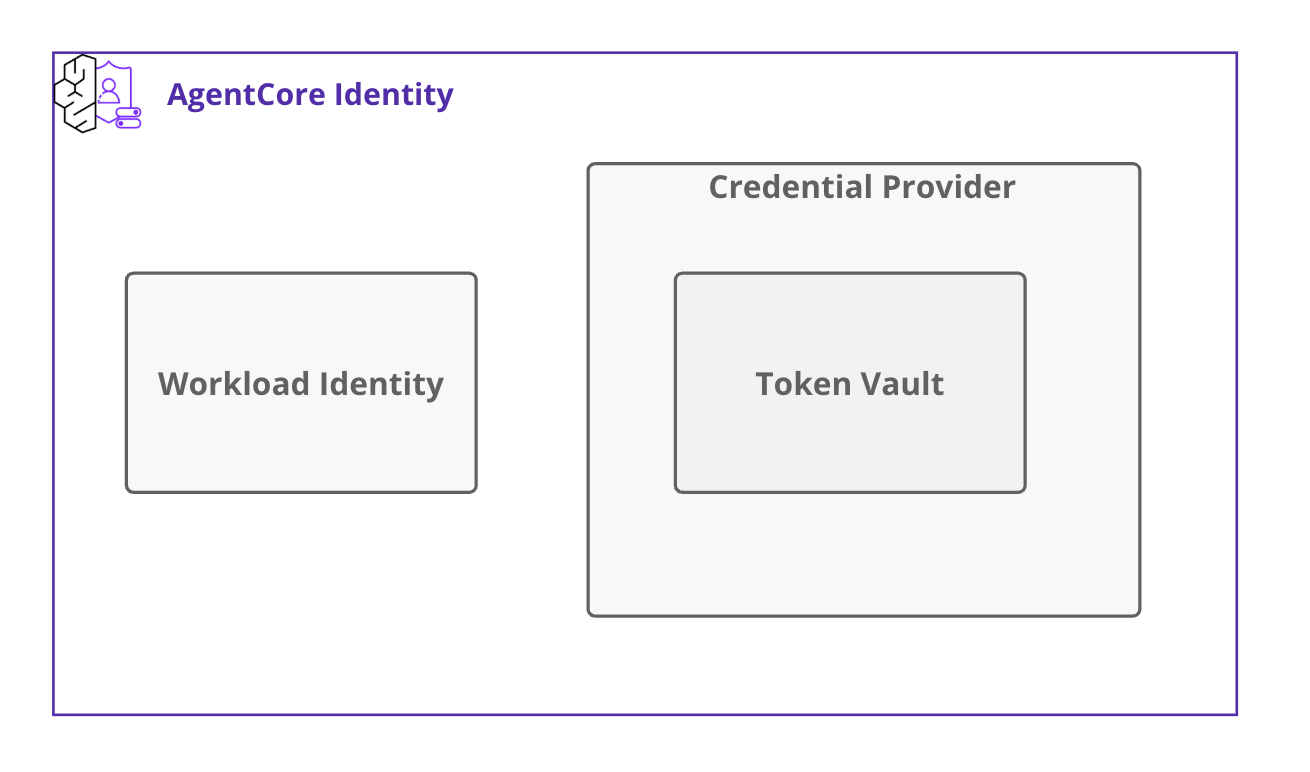
それぞれの役割を整理してきます。
Workload Identity
エージェントの身分証明書のようなものです。

Runtime にエージェントをデプロイすると、自動的に Workload Identity が作成され紐付けられます。
Workload Identity には以下の情報が含まれます。
- ID
- エージェント名をベースにした一意の識別子(例:
agent_server-ABC)
- エージェント名をベースにした一意の識別子(例:
- ARN
- allowedResourceOauth2ReturnUrls: OAuth 認証後の Callback URL
エージェントが Token Vault にアクセスする際、
Workload Identity を使ってJWTやユーザーIDと引き換えにWorkload Access Token を取得します。
SDK 内部では以下の API が呼び出されてWorkload Access Token取得しています。
# boto3 クライアント経由で AWS API を呼び出し
dp_client.get_workload_access_token_for_jwt(workloadName, userToken)  # JWT を使う場合
dp_client.get_workload_access_token_for_user_id(workloadName, userId) # user_id を使う場合
また連携先のサービスで認証された場合の Callback URL も保持しています。ここで許可されていない URL 以外はコールバックできないので注意しましょう。
補足:ローカル内での挙動
かなり細かいポイントですが、デプロイ先がローカルかRuntimeでも挙動が変わってきます。
ローカルの場合だと初回実行時にWorkload Identityを作成し、.agentcore.jsonというファイルにworkload_identity_nameとuser_idを保持します。
2回目以降は既存のWorkload Identityを再利用します。Workload Access Token自体は毎回APIを呼び出して取得します。
Runtimeの場合はデプロイ時に自動作成されたWorkload IdentityからWorkload Access Tokenを取得できます。
Token Vault
ユーザーのアクセストークンを安全に保管する金庫みたいなものです。
ここでのトークンは先述したWorkload Access Tokenではなく、Googleなどの連携先APIを使用できるアクセストークンを指します。ちょっと色々なトークン出てきてややこしいですね・・・
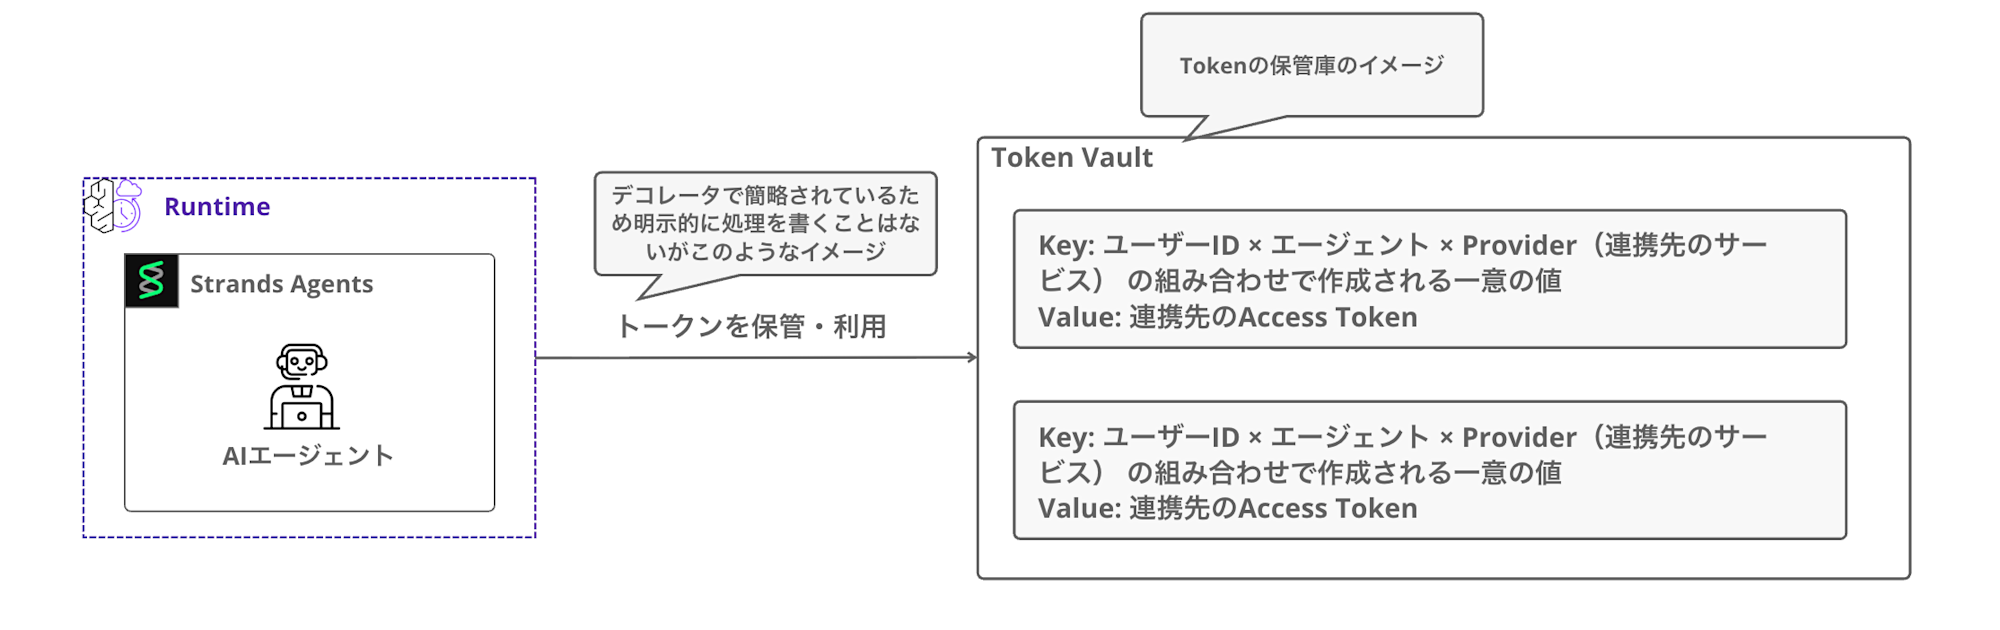
Token Vault はどのユーザーID × エージェント × Provider(連携先のサービス) の組み合わせで作成されたトークンを区別して保管します。
これにより、同じエージェントでも異なるユーザーのトークンを区別できます。
エージェントは直接トークンを保持せず、@requires_access_token デコレータを使うことで、
必要な時に Token Vault から自動的にトークンを取得します。
前述したWorkload Access Tokenを用いてVaultにアクセスする形となります。
@requires_access_token(
      provider_name="my-google-provider",
      scopes=["..."],
      auth_flow="USER_FEDERATION",
      callback_url="http://localhost:9090/callback",
 )
Credential Provider
外部サービスへの接続設定を管理します。
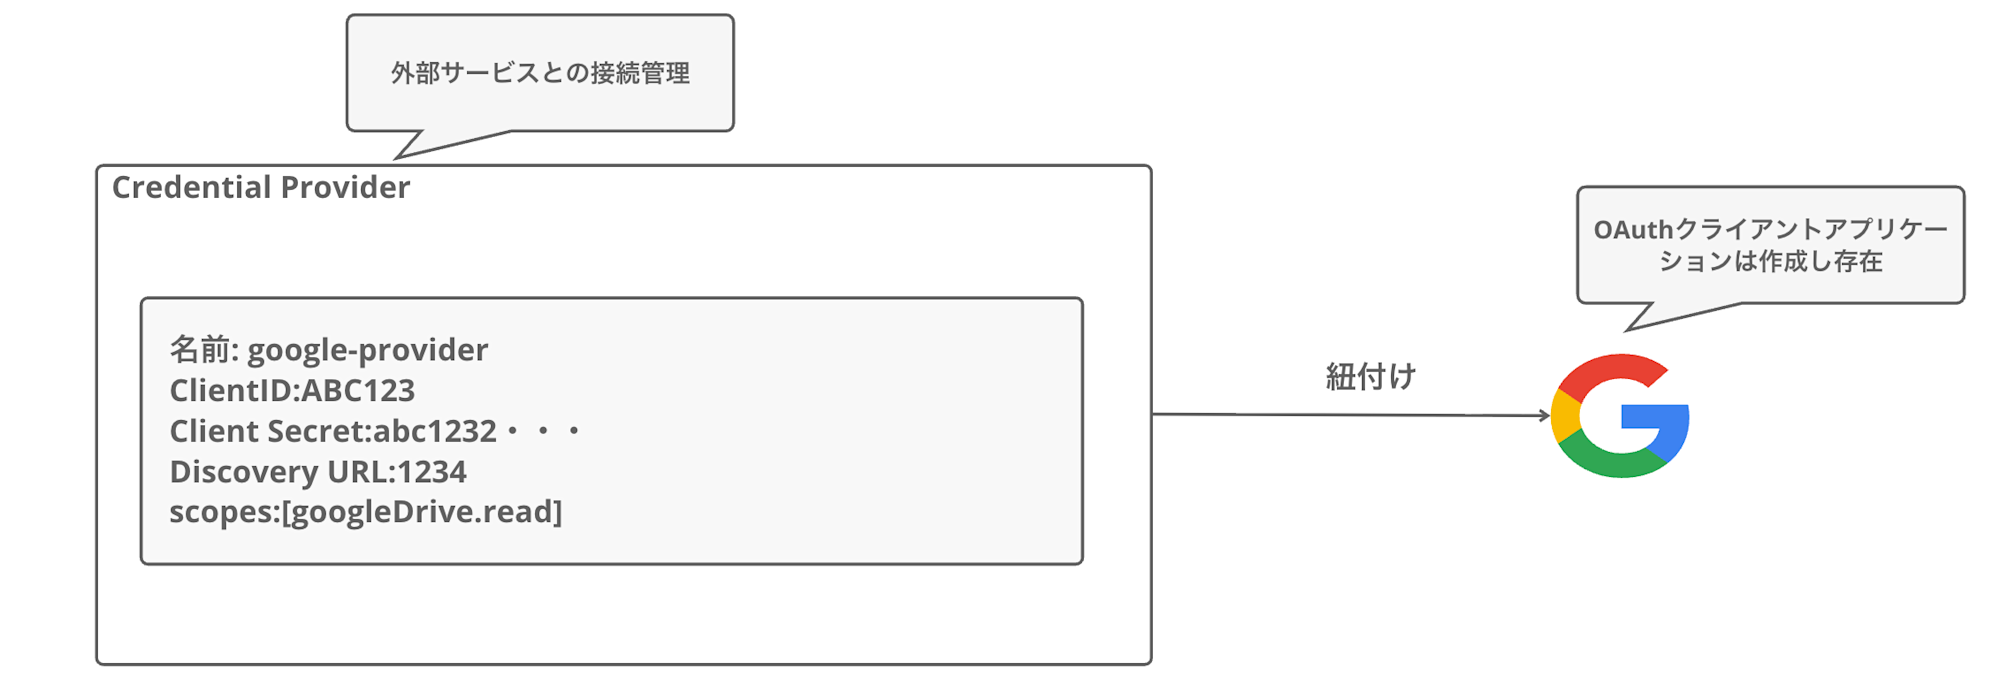
事前に Google Cloud Console で OAuth クライアントアプリケーションを作成し、
その情報を Credential Provider に登録します。(もちろんGoogle以外も作成できます)
Credential Provider には以下の情報を設定します。
| 項目 | 説明 |
|---|---|
| 名前 | Provider の識別名(例: google-provider) |
| Client ID | Google OAuth クライアント ID |
| Client Secret | Google OAuth クライアントシークレット |
| Discovery URL | OpenID Connect の設定 URL |
| Scopes | アクセスするリソースの範囲(例: https://www.googleapis.com/auth/drive.metadata.readonly) |
Google への接続方法を登録しておく場所、と考えるとわかりやすいですね。
AgentCore は Credential Provider の情報を使って、OAuth 認証 URL の生成やトークンの取得を行います。
Session Binding(セッション紐付け)
OAuth 完了後、どのユーザーの認証かを Token Vault に紐付ける処理です。
3LO フローでは、ユーザーがブラウザで Google 認証を行います。
この認証はエージェントの起動とは別のコンテキストで行われます。つまり、Google から認可コードが返ってきた時点ではどのユーザーが認証したかがわかりません。
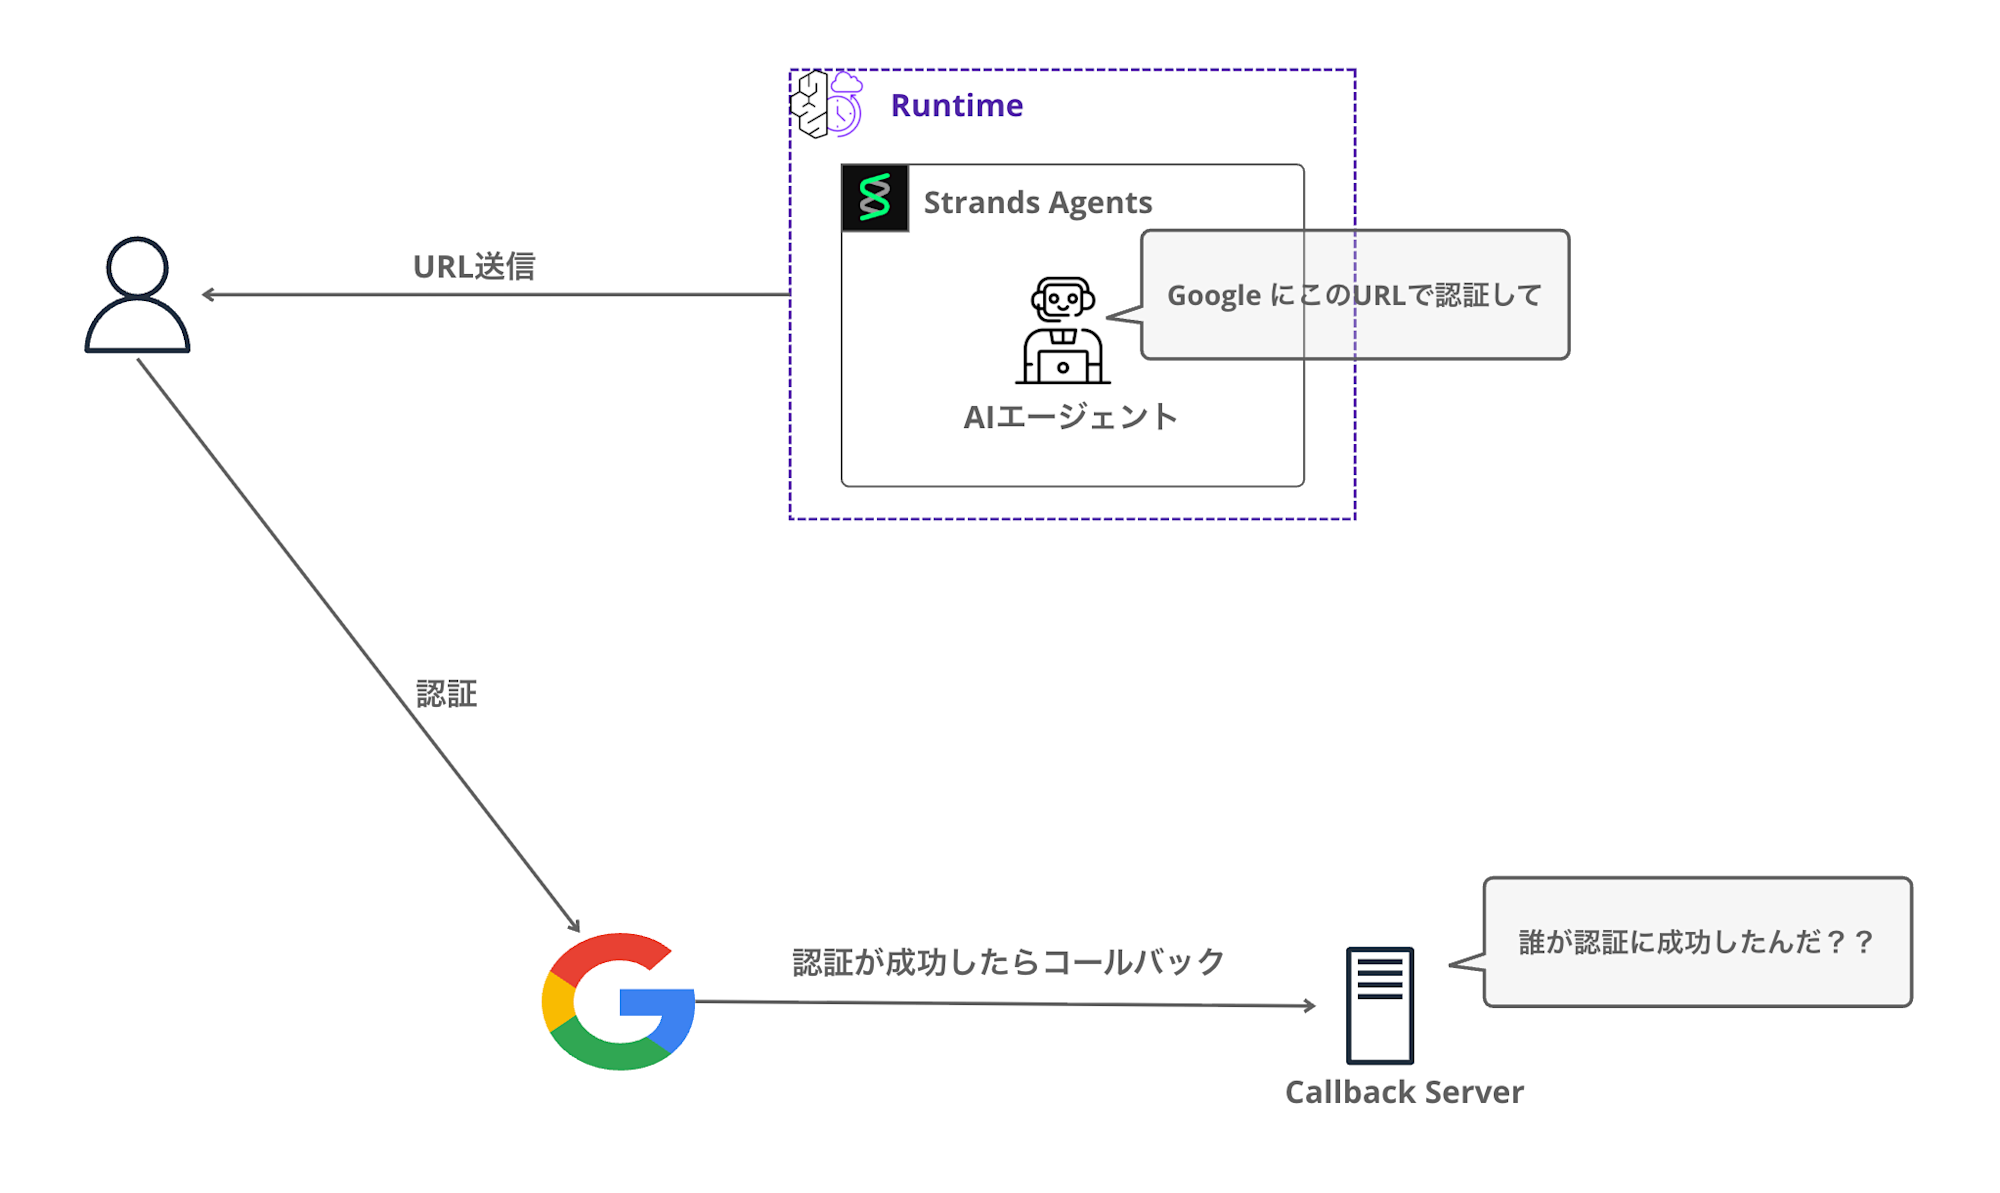
そこでSDKで用意されているCompleteResourceTokenAuth API で、
セッションとユーザーを紐付けることでアクセストークンをVaultに格納することを可能にします。(逆に言うとこの処理が成功しないとトークンは保存されません)
identity_client.complete_resource_token_auth(
    session_uri=session_id,
    user_identifier=UserTokenIdentifier(user_token=cognito_access_token)
)
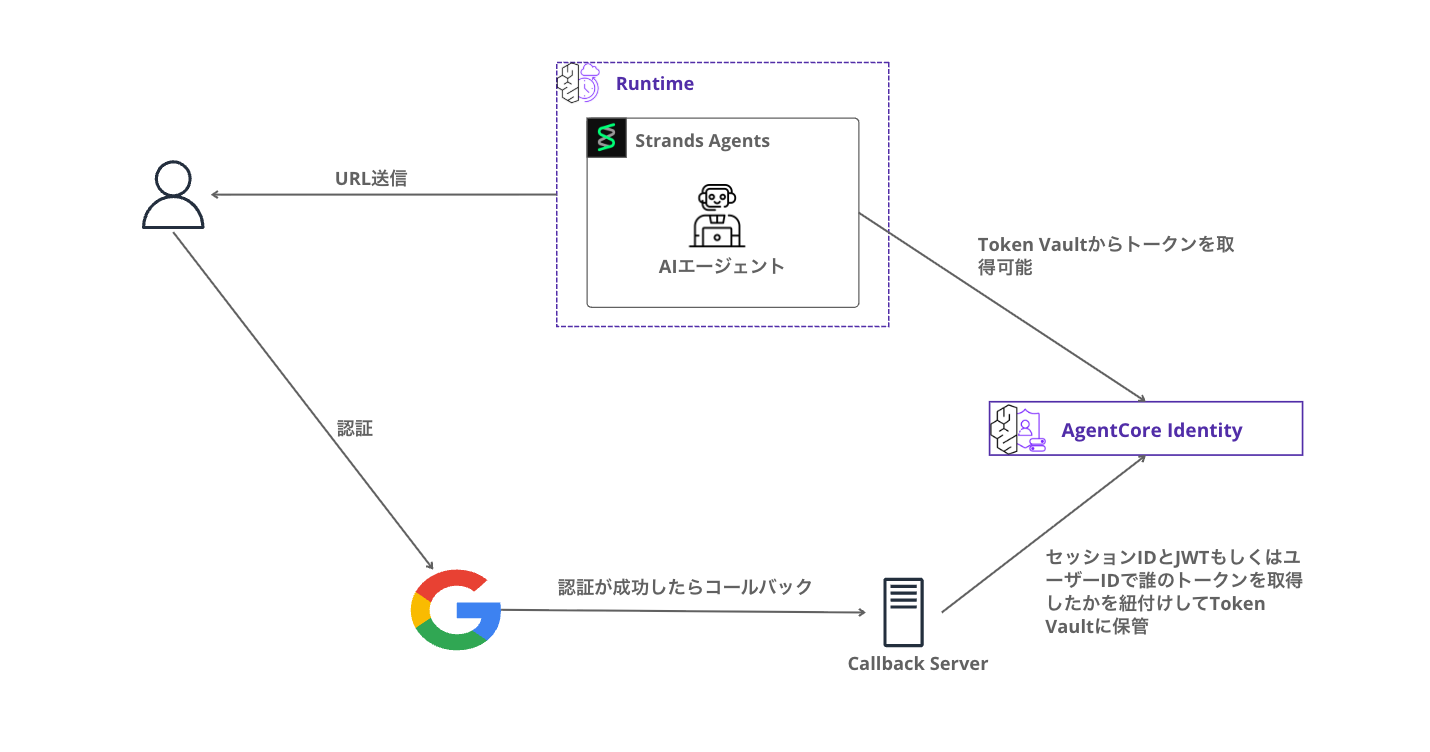
Token Vaultにトークンが格納されているため、以後AIエージェントはVaultからトークンを取得できます。
3LO フローの全体像
今回作るシステムの流れを ざっくりとMermaid でシーケンス図を書くとこんな感じです。
かなりステップが多いですね・・・
初回は認証 URL を返し、認証完了後に再度 invoke するというアプローチにしました。
実際にはブラウザを開いてリダイレクトしたり、シームレスな連携を・・・としたいところですが、1つずつ試して理解を深めていきたくこのステップにしています。実装を進めながら詳細について説明してきます。
手を動かすことで曖昧な理解を深めていきましょう!
実装
ここからは実際に実装していきます!
Google Cloud Console でアプリ作成
まず Google Cloud Console で OAuth 2.0 クライアントを作成します。
Google Cloud Console にアクセスしてAPI とサービス > 認証情報 を選択します。
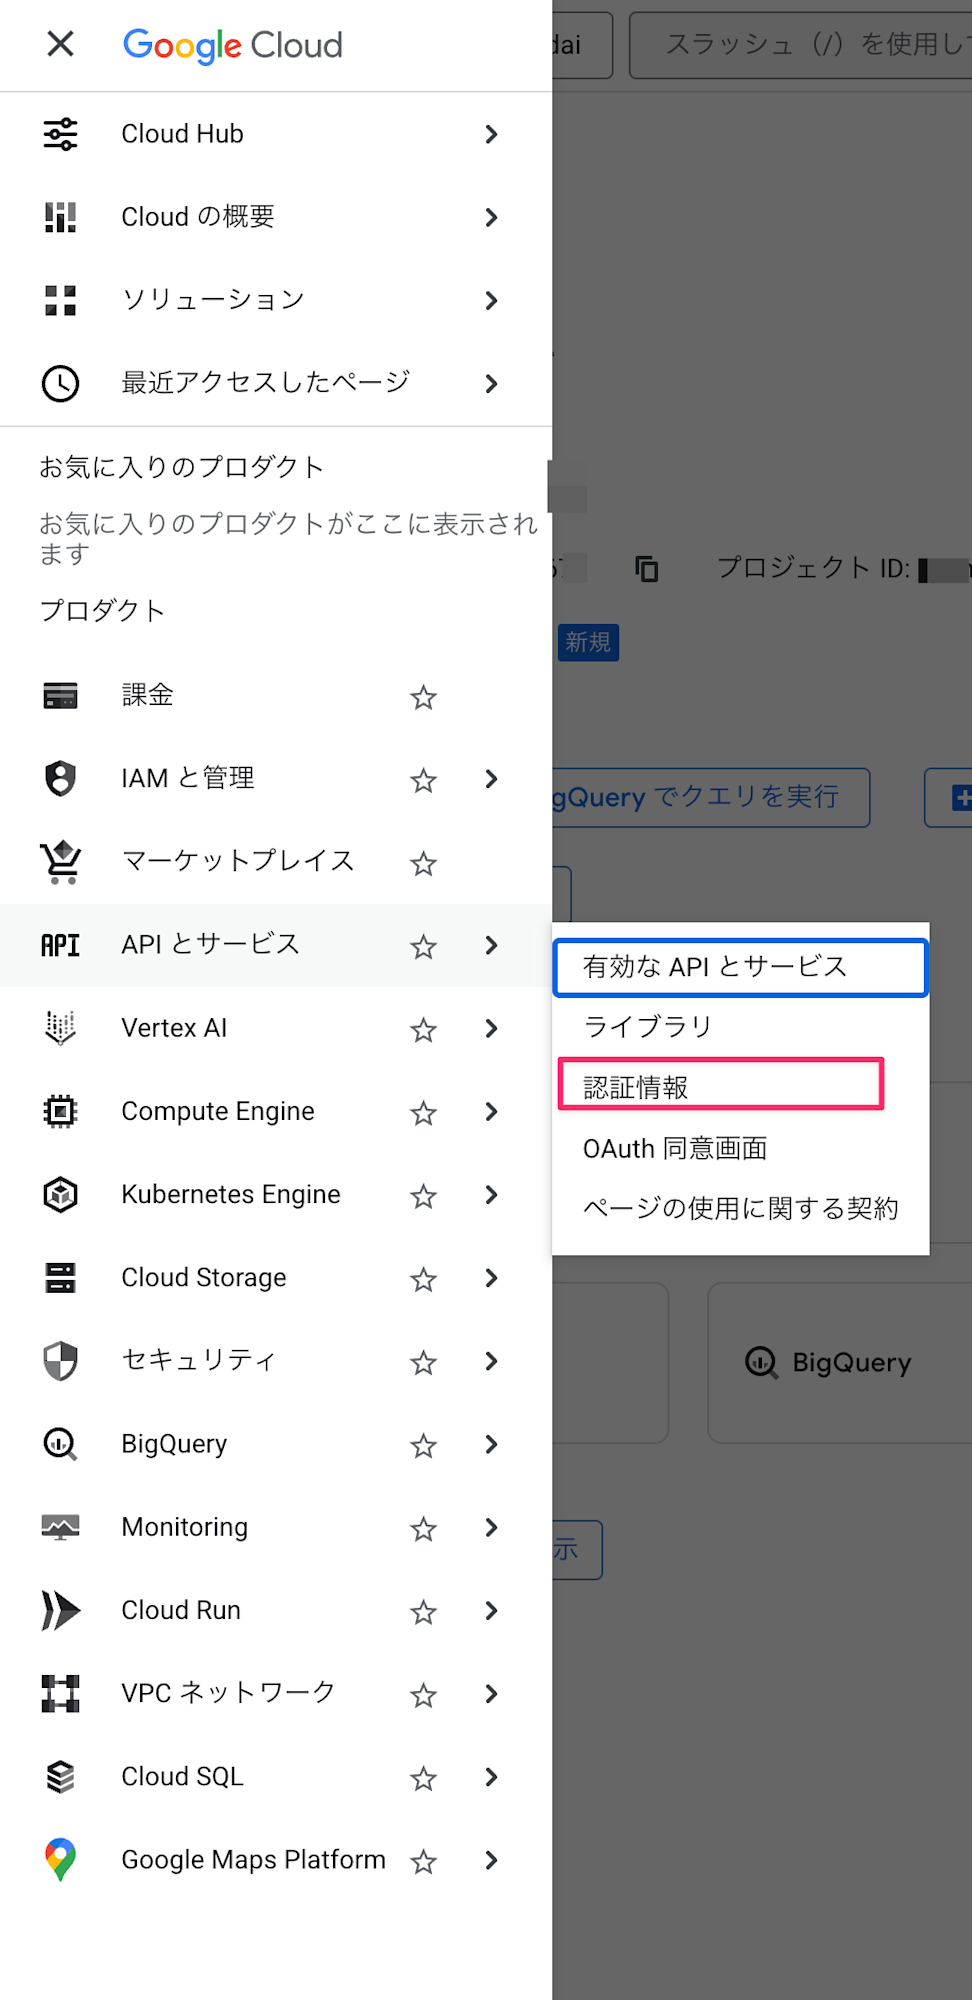
認証情報を作成 > OAuth クライアントIDを選択します。
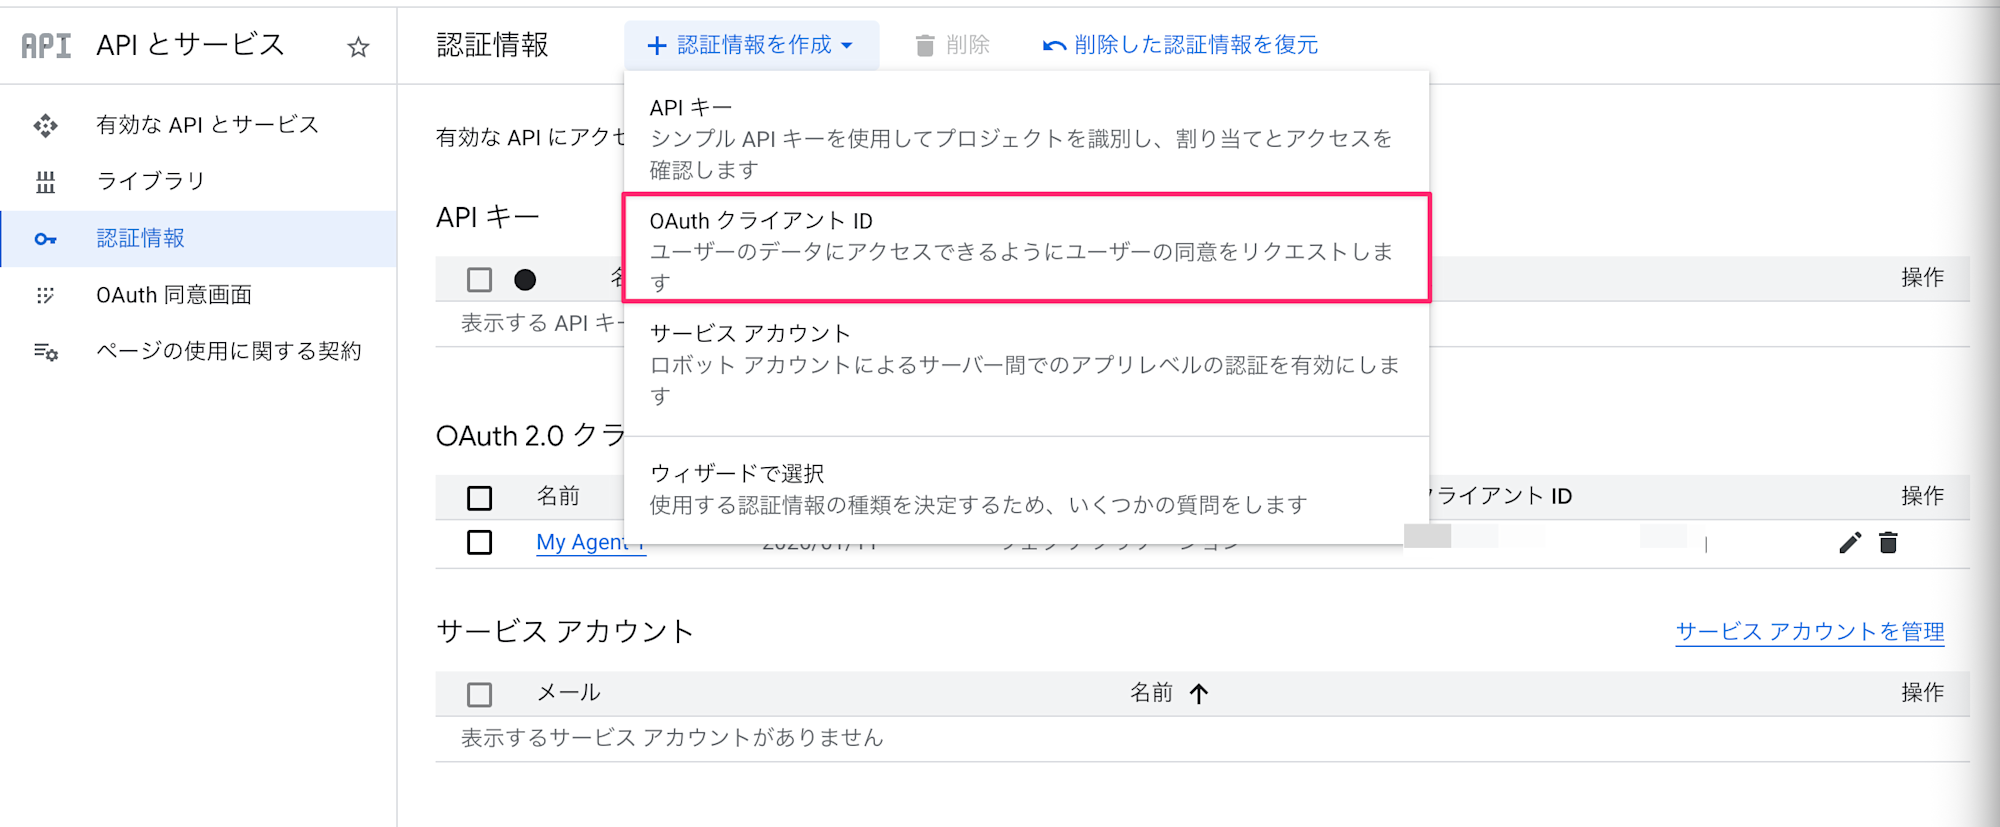
アプリケーションの種類は「ウェブ アプリケーション」は選択し、名前は任意でOKです。(例:agentcore-3lo-demo)
承認済みのリダイレクト URIはあとで追加します。
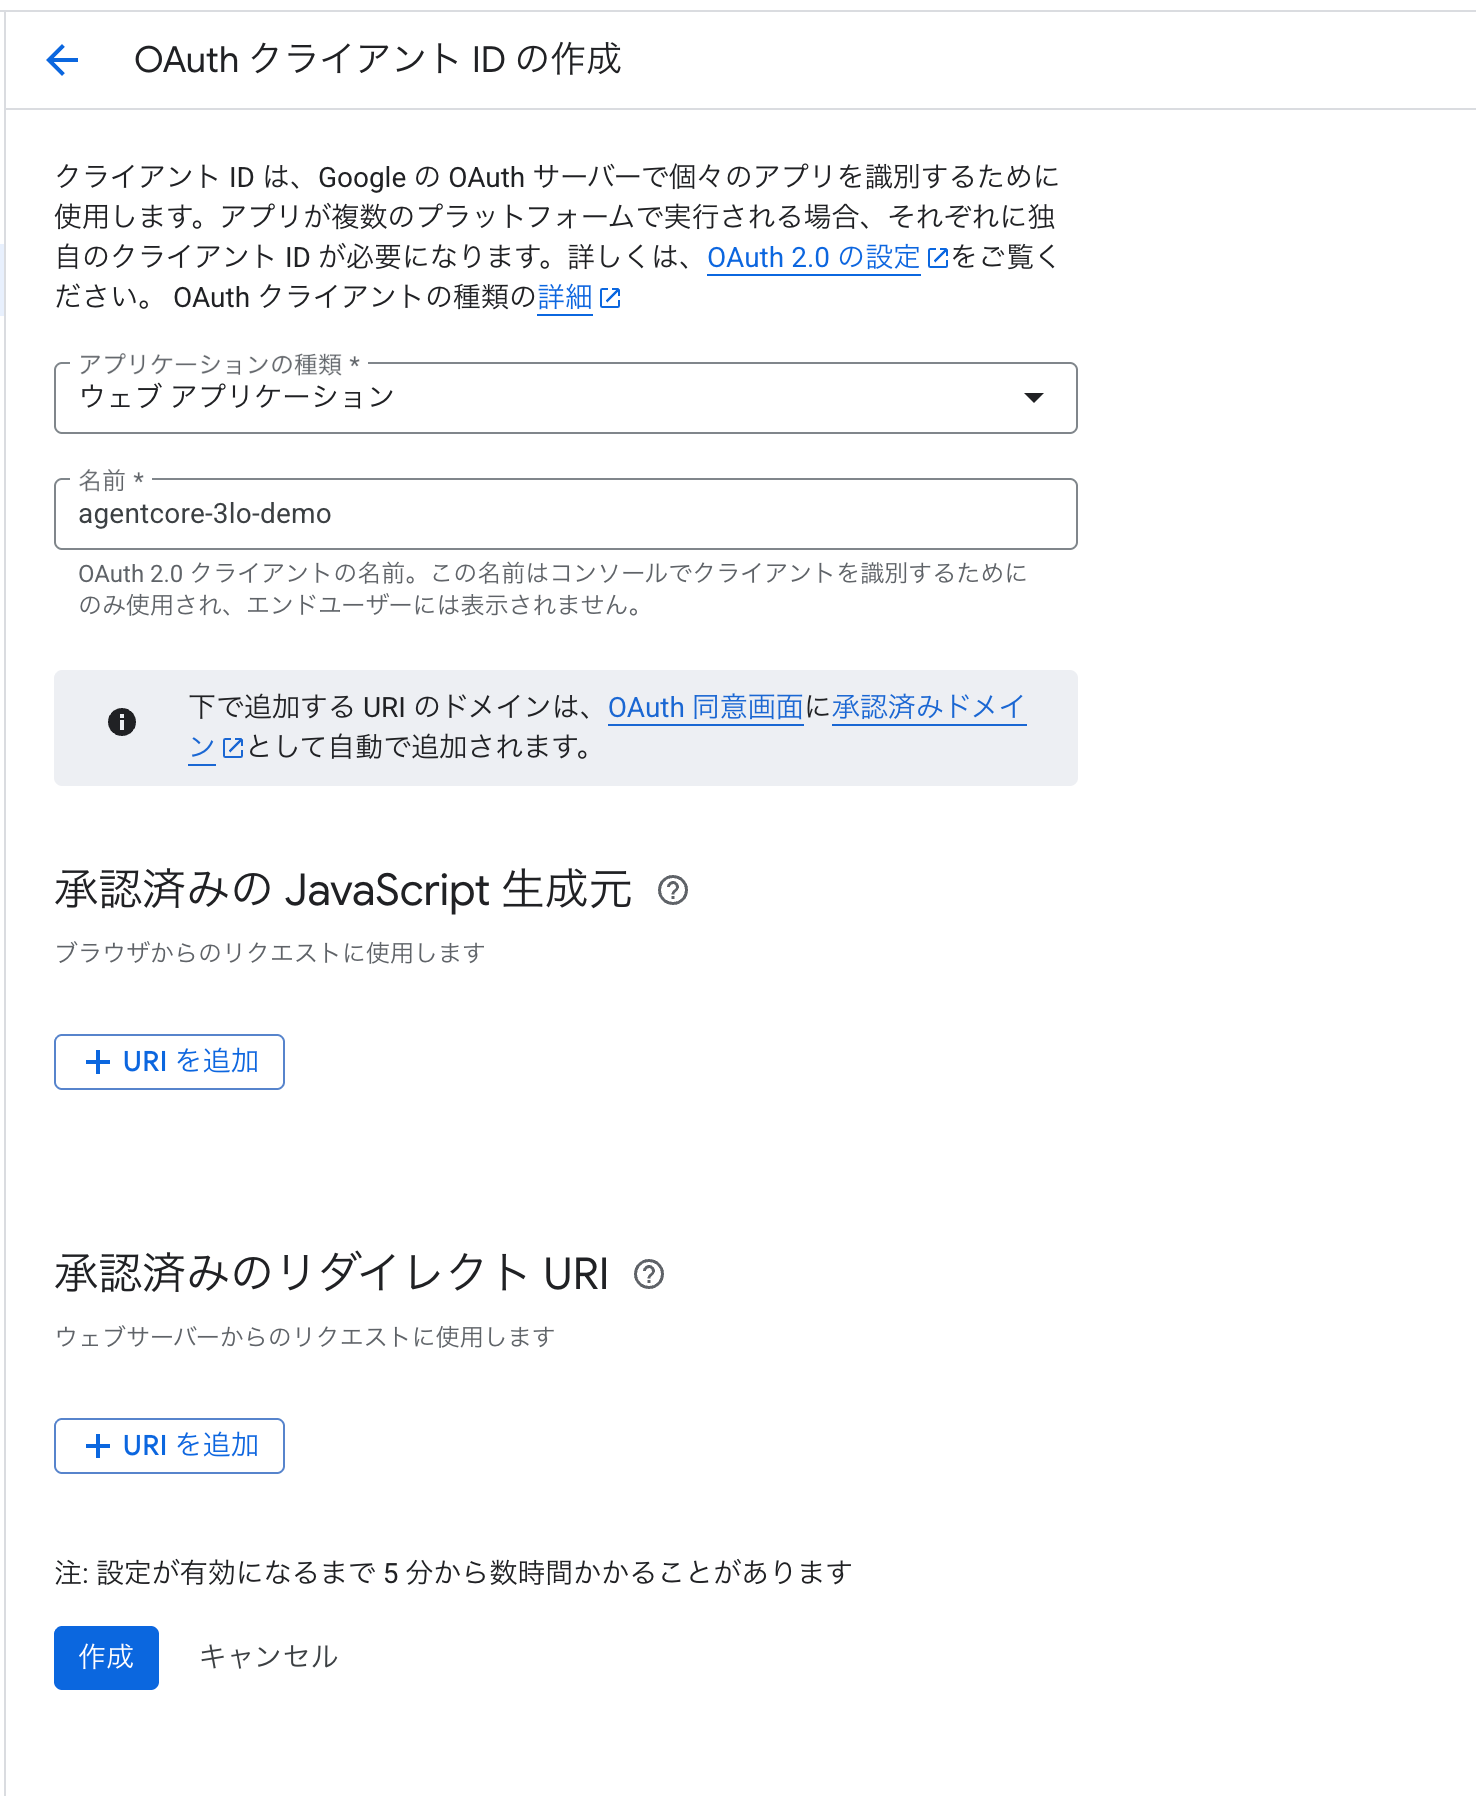
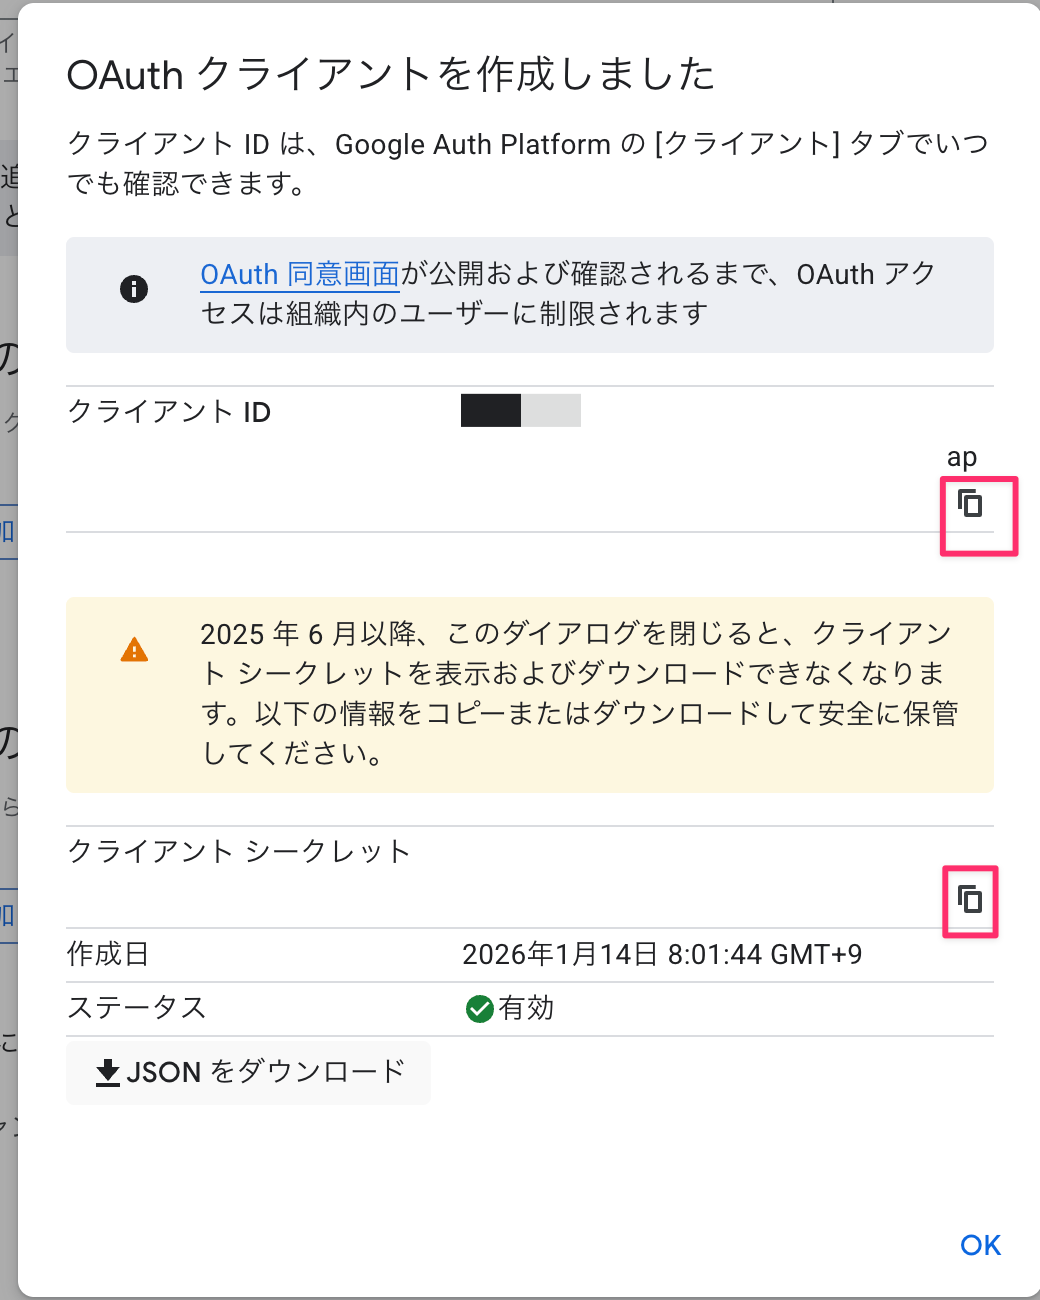
作成後、クライアント ID と クライアント シークレットをメモしておきます。
Credential Provider 作成(Python)
AgentCore に Google OAuth の接続設定を登録します。
先ほどメモしたクライアント ID と クライアント シークレットをGOOGLE_CLIENT_ID とGOOGLE_CLIENT_SECRETに記載します。登録が終わったらベタガキのところは削除しておきましょう。
import boto3

REGION = "us-west-2"
PROVIDER_NAME = "google-drive-provider"
GOOGLE_CLIENT_ID = "your-client-id.apps.googleusercontent.com"
GOOGLE_CLIENT_SECRET = "your-client-secret"

def create_google_provider():
    """Google OAuth Credential Provider を作成"""
    client = boto3.client("bedrock-agentcore-control", region_name=REGION)

    try:
        response = client.create_oauth2_credential_provider(
            name=PROVIDER_NAME,
            credentialProviderVendor="GoogleOauth2",
            oauth2ProviderConfigInput={
                "googleOauth2ProviderConfig": {
                    "clientId": GOOGLE_CLIENT_ID,
                    "clientSecret": GOOGLE_CLIENT_SECRET
                }
            },
        )
        print(f"Created provider: {PROVIDER_NAME}")
        print(f"Callback URL: {response.get('callbackUrl', '')}")
        return response

    except client.exceptions.ConflictException:
        # 既に存在する場合は取得
        response = client.get_oauth2_credential_provider(name=PROVIDER_NAME)
        print(f"Provider already exists: {PROVIDER_NAME}")
        print(f"Callback URL: {response.get('callbackUrl', '')}")
        return response

if __name__ == "__main__":
    create_google_provider()
コードが書けたら実行します。
python create_credential_provider.py
Created provider: google-drive-provider
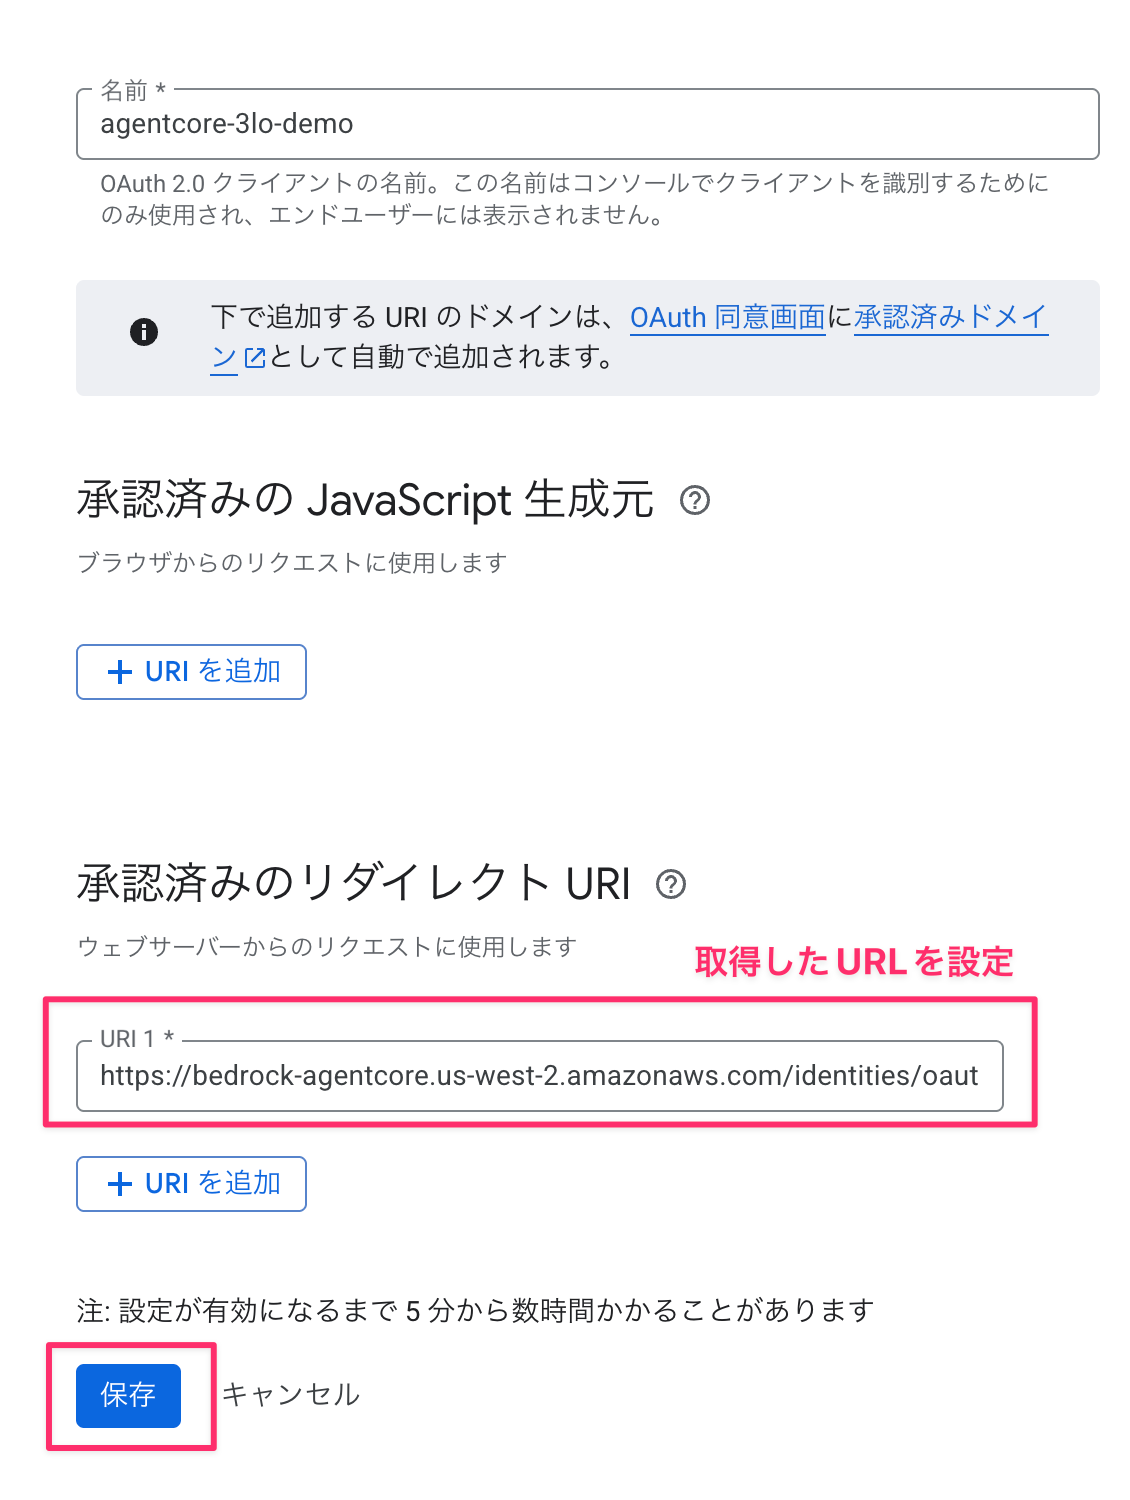
Callback URL: https://identity.agentcore.us-west-2.amazonaws.com/oauth2/callback/xxxxxxxx-xxxx-xxxx-xxxx-xxxxxxxxxxxx
作成できましたね!
この Callback URL を Google Cloud Console の承認済みのリダイレクト URIに追加します。
Cognito User Pool のセットアップ
ユーザー認証用の Cognito を作成します。
import secrets
import string
import boto3

REGION = "us-west-2"
POOL_NAME = "AgentCore3LODemoPool"
CLIENT_NAME = "AgentCore3LOClient"

def generate_password(length: int = 16) -> str:
    """パスワードを生成"""
    alphabet = string.ascii_letters + string.digits + "!@#$%^&*"
    password = "".join(secrets.choice(alphabet) for _ in range(length))
    password += secrets.choice(string.digits)
    return password

def create_cognito_resources():
    """Cognito リソースを作成"""
    client = boto3.client("cognito-idp", region_name=REGION)

    # 1. User Pool 作成
    pool_response = client.create_user_pool(
        PoolName=POOL_NAME,
        AutoVerifiedAttributes=["email"],
        UsernameAttributes=["email"],
    )
    user_pool_id = pool_response["UserPool"]["Id"]

    # 2. User Pool Client 作成
    client_response = client.create_user_pool_client(
        UserPoolId=user_pool_id,
        ClientName=CLIENT_NAME,
        GenerateSecret=True,
        ExplicitAuthFlows=["ALLOW_USER_PASSWORD_AUTH", "ALLOW_REFRESH_TOKEN_AUTH"],
    )
    client_id = client_response["UserPoolClient"]["ClientId"]
    client_secret = client_response["UserPoolClient"]["ClientSecret"]

    # テストユーザー作成
    username = f"testuser{secrets.randbelow(10000):04d}@example.com"
    password = generate_password()

    client.admin_create_user(
        UserPoolId=user_pool_id, Username=username, MessageAction="SUPPRESS"
    )
    client.admin_set_user_password(
        UserPoolId=user_pool_id, Username=username, Password=password, Permanent=True
    )

    # 出力
    discovery_url = f"https://cognito-idp.{REGION}.amazonaws.com/{user_pool_id}/.well-known/openid-configuration"

    print(f"Client ID: {client_id}")
    print(f"Client Secret: {client_secret}")
    print(f"Discovery URL: {discovery_url}")
    print(f"Test Username: {username}")
    print(f"Test Password: {password}")

    print("\n# 環境変数として設定:")
    print(f"export USER_POOL_ID='{user_pool_id}'")
    print(f"export CLIENT_ID='{client_id}'")
    print(f"export CLIENT_SECRET='{client_secret}'")
    print(f"export COGNITO_USERNAME='{username}'")
    print(f"export COGNITO_PASSWORD='{password}'")

if __name__ == "__main__":
    create_cognito_resources()
実行すると Client ID、Discovery URL、テストユーザー情報が出力されます。
python create_cognito.py
Client ID: xxxxxxxxxxxxxxxxxxxxxxxxxx
Client Secret: xxxxxxxxxxxxxxxxxxxxxxxxxx
Discovery URL: https://cognito-idp.us-west-2.amazonaws.com/us-west-2_XXXXXX/.well-known/openid-configuration
Test Username: testuser1234@example.com
Test Password: xxxxxxxxxxxxxxxx

# 環境変数として設定:
export USER_POOL_ID='us-west-2_XXXXXX'
...
出力された環境変数を設定しておきます。
Access Token の取得
エージェント呼び出し時に Bearer Token として使用する Access Token を取得するスクリプトも用意します。
import os
import hmac
import hashlib
import base64
import boto3

REGION = "us-west-2"

def get_access_token(
    user_pool_id: str,
    client_id: str,
    client_secret: str,
    username: str,
    password: str,
) -> dict:
    """Cognito から Access Token を取得"""
    # SECRET_HASH の計算
    message = username + client_id
    dig = hmac.new(
        client_secret.encode("utf-8"),
        message.encode("utf-8"),
        hashlib.sha256,
    ).digest()
    secret_hash = base64.b64encode(dig).decode()

    client = boto3.client("cognito-idp", region_name=REGION)

    response = client.initiate_auth(
        ClientId=client_id,
        AuthFlow="USER_PASSWORD_AUTH",
        AuthParameters={
            "USERNAME": username,
            "PASSWORD": password,
            "SECRET_HASH": secret_hash,
        },
    )

    return response["AuthenticationResult"]

if __name__ == "__main__":
    result = get_access_token(
        user_pool_id=os.environ["USER_POOL_ID"],
        client_id=os.environ["CLIENT_ID"],
        client_secret=os.environ["CLIENT_SECRET"],
        username=os.environ["COGNITO_USERNAME"],
        password=os.environ["COGNITO_PASSWORD"],
    )

    access_token = result["AccessToken"]
    print(f"Access Token: {access_token[:50]}...")

    # ファイルに保存
    with open(".access_token.txt", "w") as f:
        f.write(access_token)
    print("Saved to .access_token.txt")
python refresh_cognito_token.py
Access Token は .access_token.txt に保存されます。環境変数に設定しておきましょう。
export ACCESS_TOKEN=$(cat .access_token.txt)
エージェントの処理
エージェント本体の処理を実装します。
"""
Google Drive 3LO Agent

AgentCore Runtime にデプロイするエージェント。
BedrockAgentCoreApp を使用して Runtime コンテキストを受け取ります。
"""

import json
from typing import Any, AsyncGenerator, Dict

from bedrock_agentcore.identity.auth import requires_access_token
from bedrock_agentcore.runtime import BedrockAgentCoreApp
from google.oauth2.credentials import Credentials
from googleapiclient.discovery import build
from googleapiclient.errors import HttpError

# クライアントアプリケーションの名前を設定
PROVIDER_NAME = "google-drive-provider"
SCOPES = ["https://www.googleapis.com/auth/drive.metadata.readonly"]
CALLBACK_URL = "http://localhost:9090/callback"  # 後で設定

# BedrockAgentCoreApp を使用
app = BedrockAgentCoreApp()

class AuthRequiredException(Exception):
    """認証が必要な場合にスローされる例外"""
    def __init__(self, auth_url: str):
        self.auth_url = auth_url
        super().__init__(f"認証が必要です: {auth_url}")

def raise_auth_required(url: str):
    """認証 URL を受け取ったら例外をスロー"""
    raise AuthRequiredException(url)

@requires_access_token(
    provider_name=PROVIDER_NAME,
    scopes=SCOPES,
    auth_flow="USER_FEDERATION",
    on_auth_url=raise_auth_required,
    force_authentication=False,
    callback_url=CALLBACK_URL,
)
async def access_google_drive(*, access_token: str) -> dict:
    """Google Drive にアクセスしてファイル一覧を取得"""
    creds = Credentials(token=access_token, scopes=SCOPES)

    try:
        service = build("drive", "v3", credentials=creds)
        results = (
            service.files()
            .list(pageSize=10, fields="nextPageToken, files(id, name, mimeType)")
            .execute()
        )
        return {"status": "success", "files": results.get("files", [])}

    except HttpError as error:
        return {"status": "error", "message": str(error)}

@app.entrypoint
async def agent_invocation(payload: Dict[str, Any]) -> AsyncGenerator[str, None]:
    """エージェントのエントリーポイント"""

    try:
        result = await access_google_drive(access_token="")
        yield json.dumps(result, ensure_ascii=False)

    except AuthRequiredException as e:
        response = {
            "status": "auth_required",
            "auth_url": e.auth_url,
            "message": "以下の URL をブラウザで開いて Google 認証を完了してください",
        }
        yield json.dumps(response, ensure_ascii=False)

    except Exception as e:
        yield json.dumps({"status": "error", "message": str(e)}, ensure_ascii=False)

if __name__ == "__main__":
    app.run()
ポイントとしては初回でトークンが取得できなければ認証用のURLを送信します。
初回はToken Vaultにアクセストークンが存在しないので、まずはトークンを取得します。
response = {
            "status": "auth_required",
            "auth_url": e.auth_url,
            "message": "以下の URL をブラウザで開いて Google 認証を完了してください",
}
トークン取得後に再度リクエストを送信すると、Google Driveにリクエストを送ってドライブのファイル情報を取得可能です。
async def access_google_drive(*, access_token: str) -> dict:
    """Google Drive にアクセスしてファイル一覧を取得"""
    creds = Credentials(token=access_token, scopes=SCOPES)

    try:
        service = build("drive", "v3", credentials=creds)
        results = (
            service.files()
            .list(pageSize=10, fields="nextPageToken, files(id, name, mimeType)")
            .execute()
        )
        return {"status": "success", "files": results.get("files", [])}

    except HttpError as error:
        return {"status": "error", "message": str(error)}
デプロイと Callback URL の設定
まずはconfigureコマンドでデプロイの設定を行います。
uv run agentcore configure -e agent.py
基本的には推奨設定ですが、認証のところですがJWTに切り替えるようにします。
Configuring Bedrock AgentCore...
✓ Using file: agent.py

🏷️  Inferred agent name: agent
Press Enter to use this name, or type a different one (alphanumeric without '-')
Agent name [agent]: agent_sample_test_0123
✓ Using agent name: agent_sample_test_0123

🔍 Detected dependency file: pyproject.toml
Press Enter to use this file, or type a different path (use Tab for autocomplete):
Path or Press Enter to use detected dependency file: pyproject.toml
✓ Using requirements file: pyproject.toml

🚀 Deployment Configuration
Select deployment type:
  1. Direct Code Deploy (recommended) - Python only, no Docker required
  2. Container - For custom runtimes or complex dependencies
Choice [1]: 1

Select Python runtime version:
  1. PYTHON_3_10
  2. PYTHON_3_11
  3. PYTHON_3_12
  4. PYTHON_3_13
Choice [3]: 3
✓ Deployment type: Direct Code Deploy (python.3.12)

🔐 Execution Role
Press Enter to auto-create execution role, or provide execution role ARN/name to use existing
Execution role ARN/name (or press Enter to auto-create):
✓ Will auto-create execution role

🏗️  S3 Bucket
Press Enter to auto-create S3 bucket, or provide S3 URI/path to use existing
S3 URI/path (or press Enter to auto-create):
✓ Will auto-create S3 bucket

🔐 Authorization Configuration
By default, Bedrock AgentCore uses IAM authorization.
Configure OAuth authorizer instead? (yes/no) [no]: yes

📋 OAuth Configuration
Enter OAuth discovery URL: https://cognito-idp.us-west-2.amazonaws.com/us-west-2_XXXXXXXXX/.well-known/openid-configuration
Enter allowed OAuth client IDs (comma-separated): xxxxxxxxxxxxxxxxxxxxxxxxxx
Enter allowed OAuth audience (comma-separated):
Enter allowed OAuth allowed scopes (comma-separated):
Enter allowed OAuth custom claims as JSON string (comma-separated):
✓ OAuth authorizer configuration created

🔒 Request Header Allowlist
Configure which request headers are allowed to pass through to your agent.
Common headers: Authorization, X-Amzn-Bedrock-AgentCore-Runtime-Custom-*
Configure request header allowlist? (yes/no) [no]: no
✓ Using default request header configuration
Configuring BedrockAgentCore agent: agent_sample_test_0123
エージェントをデプロイします。
agentcore deploy
デプロイ後、Workload IdentityにCallback URL を登録します。
from bedrock_agentcore.services.identity import IdentityClient

# agent_id を知っている場合
agent_id = "agent_sample_test_0123-5PWohQFJ8u"

identity_client = IdentityClient(region="us-west-2")

# Workload Identity を取得
workload_identity = identity_client.get_workload_identity(name=agent_id)
print(workload_identity)

print("=== Workload Identity ===")
print(f"Name: {workload_identity.get('name')}")
print(f"ARN: {workload_identity.get('arn')}")
print(
    f"Allowed Callback URLs: {workload_identity.get('allowedResourceOauth2ReturnUrls')}"
)

identity_client.update_workload_identity(
    name=agent_id,
    allowed_resource_oauth_2_return_urls=["http://localhost:9090/callback"],
)
2回実行すると更新されているのがわかります。
=== Workload Identity ===
Name: my-agent-XXXXXXXXXX
ARN: arn:aws:bedrock-agentcore:us-west-2:123456789012:workload-identity-directory/default/workload-identity/my-agent-XXXXXXXXXX
Allowed Callback URLs: []
=== Workload Identity ===
Name: my-agent-XXXXXXXXXX
ARN: arn:aws:bedrock-agentcore:us-west-2:123456789012:workload-identity-directory/default/workload-identity/my-agent-XXXXXXXXXX
Allowed Callback URLs: ['http://localhost:9090/callback']
Callback Server の実装
OAuth 認証完了後のコールバックを受け取り、セッションの紐付けを行うサーバーです。
"""
OAuth2 Callback Server
Google 認証完了後、AgentCore Identity の CompleteResourceTokenAuth を呼び出して
Session Binding を完了します。
"""
import os
import uvicorn
from fastapi import FastAPI
from fastapi.responses import HTMLResponse
from bedrock_agentcore.services.identity import IdentityClient, UserTokenIdentifier
PORT = 9090
REGION = "us-west-2"
app = FastAPI()
identity_client = IdentityClient(region=REGION)
@app.get("/callback")
async def oauth2_callback(session_id: str):
"""OAuth2 コールバック処理"""
# 環境変数から Cognito Access Token を取得
token = os.environ.get("ACCESS_TOKEN", "")
if not token:
return HTMLResponse(
content="<h1>Error</h1><p>ACCESS_TOKEN not set</p>",
status_code=500
)
try:
# Session Binding を完了
identity_client.complete_resource_token_auth(
session_uri=session_id,
user_identifier=UserTokenIdentifier(user_token=token)
)
html = """
<!DOCTYPE html>
<html>
<head><title>認証完了</title></head>
<body>
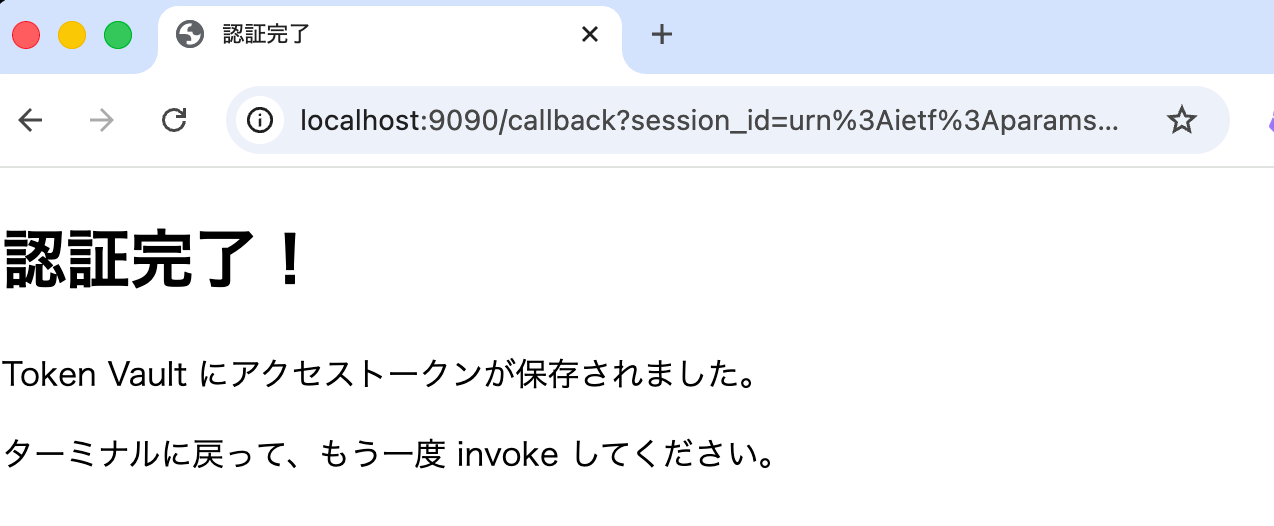
<h1>認証完了!</h1>
<p>Token Vault にアクセストークンが保存されました。</p>
<p>ターミナルに戻って、もう一度 invoke してください。</p>
</body>
</html>
"""
return HTMLResponse(content=html, status_code=200)
except Exception as e:
return HTMLResponse(
content=f"<h1>Error</h1><pre>{str(e)}</pre>",
status_code=500
)
if __name__ == "__main__":
print(f"Callback Server running on http://localhost:{PORT}/callback")
uvicorn.run(app, host="127.0.0.1", port=PORT)
ポイントとしてはセッションの紐付けを行うところが一番大事です。JWTとセッションIDをそのまま渡すことで完了します。
identity_client.complete_resource_token_auth(
            session_uri=session_id,
            user_identifier=UserTokenIdentifier(user_token=token)
)
これで実装が完了しました!!確認を進めていきましょう!
動作確認
Callback Server を起動
まずはCallback Serverを起動しておきます。アクセストークンも使用するので環境変数に設定しておきます。
export ACCESS_TOKEN=$(cat .access_token.txt)
python callback_server.py

# ログ
Callback Server running on http://localhost:9090/callback
INFO:     Started server process [77981]
INFO:     Waiting for application startup.
INFO:     Application startup complete.
INFO:     Uvicorn running on http://127.0.0.1:9090 (Press CTRL+C to quit)
エージェントを invoke(初回)
uv run agentcore invoke --agent agent_sample_test_0123 --bearer-token $ACCESS_TOKEN {"prompt": ""}
Using bearer token for OAuth authentication
Using JWT authentication
{"status": "auth_required", "auth_url":
"https://bedrock-agentcore.us-west-2.amazonaws.com/identities/oauth2/authorize?request_uri=urn%3Aietf%3Apa
rams%3Aoauth%3Arequest_uri%sample", "message": "以下の URL
をブラウザで開いて Google 認証を完了してください"}
初回なので認証用のURLが返却されましたね!
ブラウザで認証
返された auth_url をブラウザで開き、Google 認証を完了します。
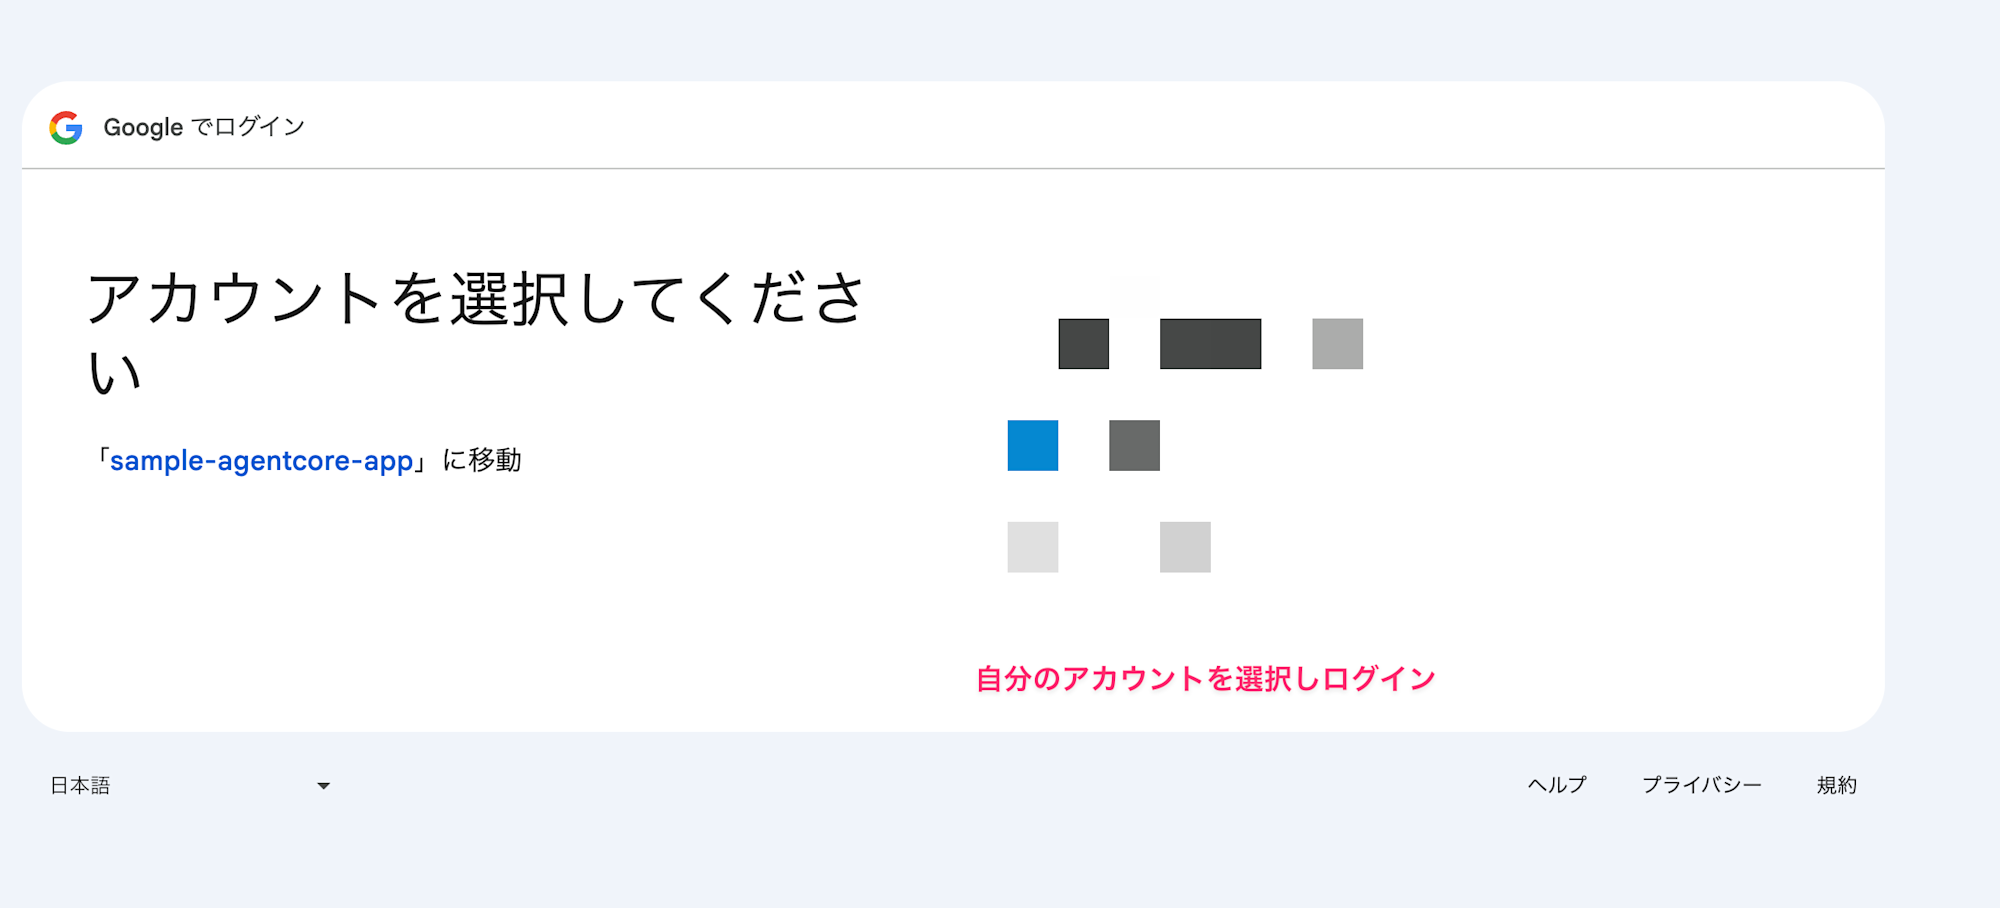
認証完了後、Callback Server にリダイレクトされ、セッションの紐付けが完了します。
この状態でToken VaultにGoogleから発行されたアクセストークンが保存されているので再度invokeしてみます。
エージェントを invoke(2回目)
agentcore invoke --agent agent_sample_test_0123 --bearer-token $ACCESS_TOKEN
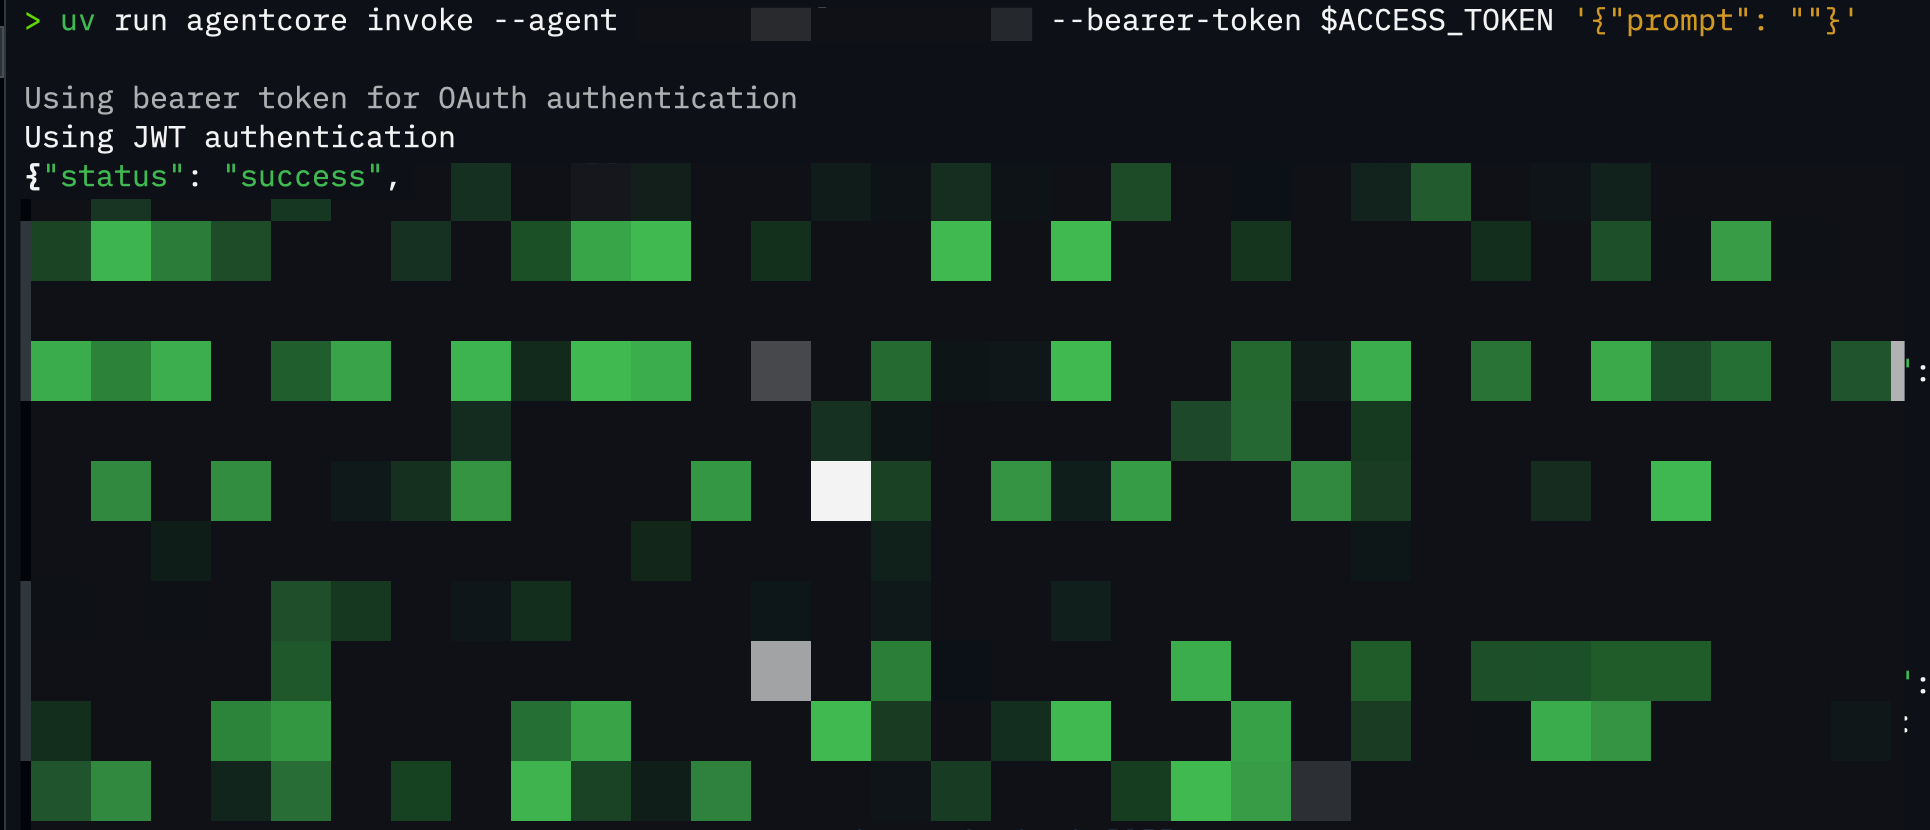
{
  "status": "success",
  "files": [
    {"id": "1abc...", "name": "サンプル1", "mimeType": "application/vnd.google-apps.document"},
    {"id": "2def...", "name": "サンプル2", "mimeType": "application/vnd.google-apps.spreadsheet"},
    {"id": "3ghi...", "name": "サンプル3", "mimeType": "application/vnd.google-apps.presentation"},
    ...
  ]
}
おおお、Google Drive のファイル一覧が取得できましたね!!
Token Vault にトークンが保存されているため、再認証なしでアクセスできています。
ハマりポイント
実装中にハマったポイントを共有します。
BedrockAgentCoreApp を使わなかった
# NG: BedrockAgentCoreApp を使わない
async def main():
    result = await access_google_drive(access_token="")

# OK: BedrockAgentCoreApp を使う
app = BedrockAgentCoreApp()

@app.entrypoint
async def agent_invocation(payload):
    ...
BedrockAgentCoreApp を使わないと、SDK が独自の Workload Identity を作成し、
Callback ServerでJWTで検証しようとしてもユーザーIDの不一致が発生します。
アクセストークンで取得したJWTで検証しているはずなのになぜ・・・?となったのですが意外にシンプルな理由でした。サクッと作ったつもりのサーバー処理が逆に仇になりました。
Workload Identity の Callback URL の登録忘れ
Workload Identity の allowedResourceOauth2ReturnUrls が空だと全て許可されますが、明示的に値が一つでも設定されていればそれ以外は拒否される仕組みとなっております。
本番運用では必ず設定したいですね。
# 全てOK
allowed_resource_oauth_2_return_urls=[]

# 指定したURLのみ許可
# http://localhost:9090/callbackのみ許可
allowed_resource_oauth_2_return_urls=["http://localhost:9090/callback"]
今回の手順は煩雑ですが、本番運用ならIaCで合わせて作成および設定するのが良いかと思います。TerraformだとWorkload Identityを作成してRuntimeに紐付け可能でした。
本番環境での考慮点
今回のサンプルでは、ローカル環境で JWT を保持している前提で Callback Server を実装しているため考慮不要だったのですが、本番環境で全てサーバーサイドで動作する場合、認証用のURLが流出した場合は攻撃者が自分のトークンを他のユーザーに紐付けるリスクがあります。
Cookie などを使って正規ユーザーのブラウザでしか持っていない情報で検証する方法が考えられます。
あくまで一例ですので、本番環境で実装する際は、このあたりのセキュリティ対策も検討したいですね!
おわりに
正直、用語が多くて最初は混乱しましたが、整理してみると少しずつ理解が進んできました。
今回はローカルとRuntimeにデプロイしたハイブリットな形で1つずつ認証・認可フローを実装した形になりますが、全てクラウド上でシームレスな認証フローを実装したいですね。
本記事が少しでも参考になりましたら幸いです。最後までご覧いただきありがとうございました!
参考文献
下記ブログが大変わかりやすく参考になりました。ありがとうございます・・!!