Amazon CognitoでGoogle認証をして、Lambda Authorizerで都度検証してみた
こんにちは、ゲームソリューション部のsoraです。
今回は、Amazon CognitoでGoogle認証をして、Lambda Authorizerで都度検証してみたことについて書いていきます。
背景
前回の以下記事では、JWT Authorizerを使ったGoogle認証を実装しました。
上記記事のJWT Authorizerでは署名検証のみのため、高速で低コストですが以下の課題があります。
| 観点 | JWT Authorizer | Lambda Authorizer + Cognito |
|---|---|---|
| 認証方式 | 署名検証(ローカル) | Cognito API問い合わせ |
| レイテンシ | 高速 | JWT Authorizerと比較して遅い |
| トークン | 有効期限まで使用可能 | 即座に無効化検知 |
| ユーザー属性 | 発行時点の情報 | 最新情報を取得 |
例えば、ユーザーのプラン属性を「free」から「premium」に変更しても、JWT Authorizerではトークンの有効期限が切れるまで古い情報のままとなります。
Lambda Authorizerを使って、Cognitoに問い合わせることで、最新のユーザー属性を取得できます。
これを今回実装して、理解を深めてみようと思います。
構成
今回構築したのは以下の構成です。
Flutterで作ったテストアプリから、JWT AuthorizerとLambda Authorizerの2種類の認証方式を比較検証する構成です。
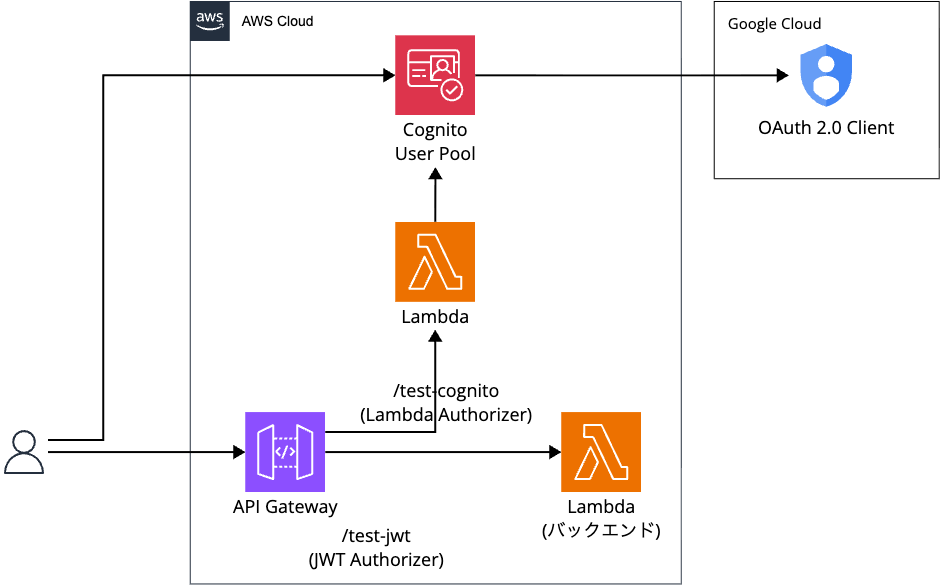
テストアプリ側では、Googleで認証後に2つのボタンでそれぞれの認証方式をテストします。
Cognitoでユーザーのcustom:plan属性を変更した際に、各認証方式で結果がどう変わるかを比較します。
AWS構築
AWSはTerraformで構築します。
以下に今回メインとなるCognito周りについて、コメントで説明しています。
Cognito カスタム属性の追加
## ユーザープールにカスタム属性を追加
resource "aws_cognito_user_pool" "main" {
  name = "${var.project}-${var.env}-user-pool"
  auto_verified_attributes = ["email"]

  schema {
    name                = "email"
    attribute_data_type = "String"
    required            = true
    mutable             = true
  }

  ## プラン属性を追加(free/premium等)
  schema {
    name                     = "plan"
    attribute_data_type      = "String"
    developer_only_attribute = false
    mutable                  = true
    required                 = false

    string_attribute_constraints {
      min_length = 0
      max_length = 256
    }
  }
}

## ユーザープールクライアントの設定
resource "aws_cognito_user_pool_client" "app" {
  name         = "${var.project}-${var.env}-app-client"
  user_pool_id = aws_cognito_user_pool.main.id

  ## OAuth 2.0フローの有効化
  allowed_oauth_flows_user_pool_client = true
  allowed_oauth_flows                  = ["code"]
  ## GetUser APIを呼び出すために必要なスコープを追加
  allowed_oauth_scopes = [
    "openid",                         ## OpenID Connect必須スコープ
    "email",                          ## メールアドレス取得
    "profile",                        ## プロフィール情報取得
    "aws.cognito.signin.user.admin"   ## GetUser API呼び出しに必須
  ]

  ## コールバックURL:認証完了後のリダイレクト先
  ## Flutterアプリのカスタムスキームを指定
  callback_urls = var.callback_urls

  ## ログアウトURL:サインアウト後のリダイレクト先
  logout_urls = var.logout_urls

  ## Google IdPのみを許可(Cognito標準認証は無効)
  supported_identity_providers = ["Google"]

  ## IDトークンにカスタム属性を含める設定
  read_attributes  = ["email", "custom:plan"]
  write_attributes = ["email", "custom:plan"]
}
API Gateway Lambda Authorizer設定
## Lambda Authorizer
resource "aws_apigatewayv2_authorizer" "lambda" {
  api_id           = aws_apigatewayv2_api.main.id
  authorizer_type  = "REQUEST"
  authorizer_uri   = aws_lambda_function.authorizer.invoke_arn
  identity_sources = ["$request.header.Authorization"]
  name             = "${var.project}-${var.env}-lambda-authorizer"

  authorizer_payload_format_version = "2.0"
  enable_simple_responses           = true
}

## Lambda Authorizer用ルート
resource "aws_apigatewayv2_route" "test_cognito" {
  api_id    = aws_apigatewayv2_api.main.id
  route_key = "GET /test-cognito"
  target    = "integrations/${aws_apigatewayv2_integration.lambda.id}"

  ## Lambda Authorizerを使用
  ## Lambda経由でCognitoへ問い合わせる
  authorization_type = "CUSTOM"
  authorizer_id      = aws_apigatewayv2_authorizer.lambda.id
}

## JWT Authorizer用ルート(比較用)
resource "aws_apigatewayv2_route" "test_jwt" {
  api_id    = aws_apigatewayv2_api.main.id
  route_key = "GET /test-jwt"
  target    = "integrations/${aws_apigatewayv2_integration.lambda.id}"

  ## API GatewayのJWT Authorizerを使用
  ## トークンの署名検証のみ(Cognito API呼び出しなし)
  authorization_type = "JWT"
  authorizer_id      = aws_apigatewayv2_authorizer.jwt.id
}
動作確認
Flutterアプリを起動して、Googleでログイン後にテスト実行ボタンを押します。
まず両方のボタンを押すと、どちらも plan属性としてfree が返ります。
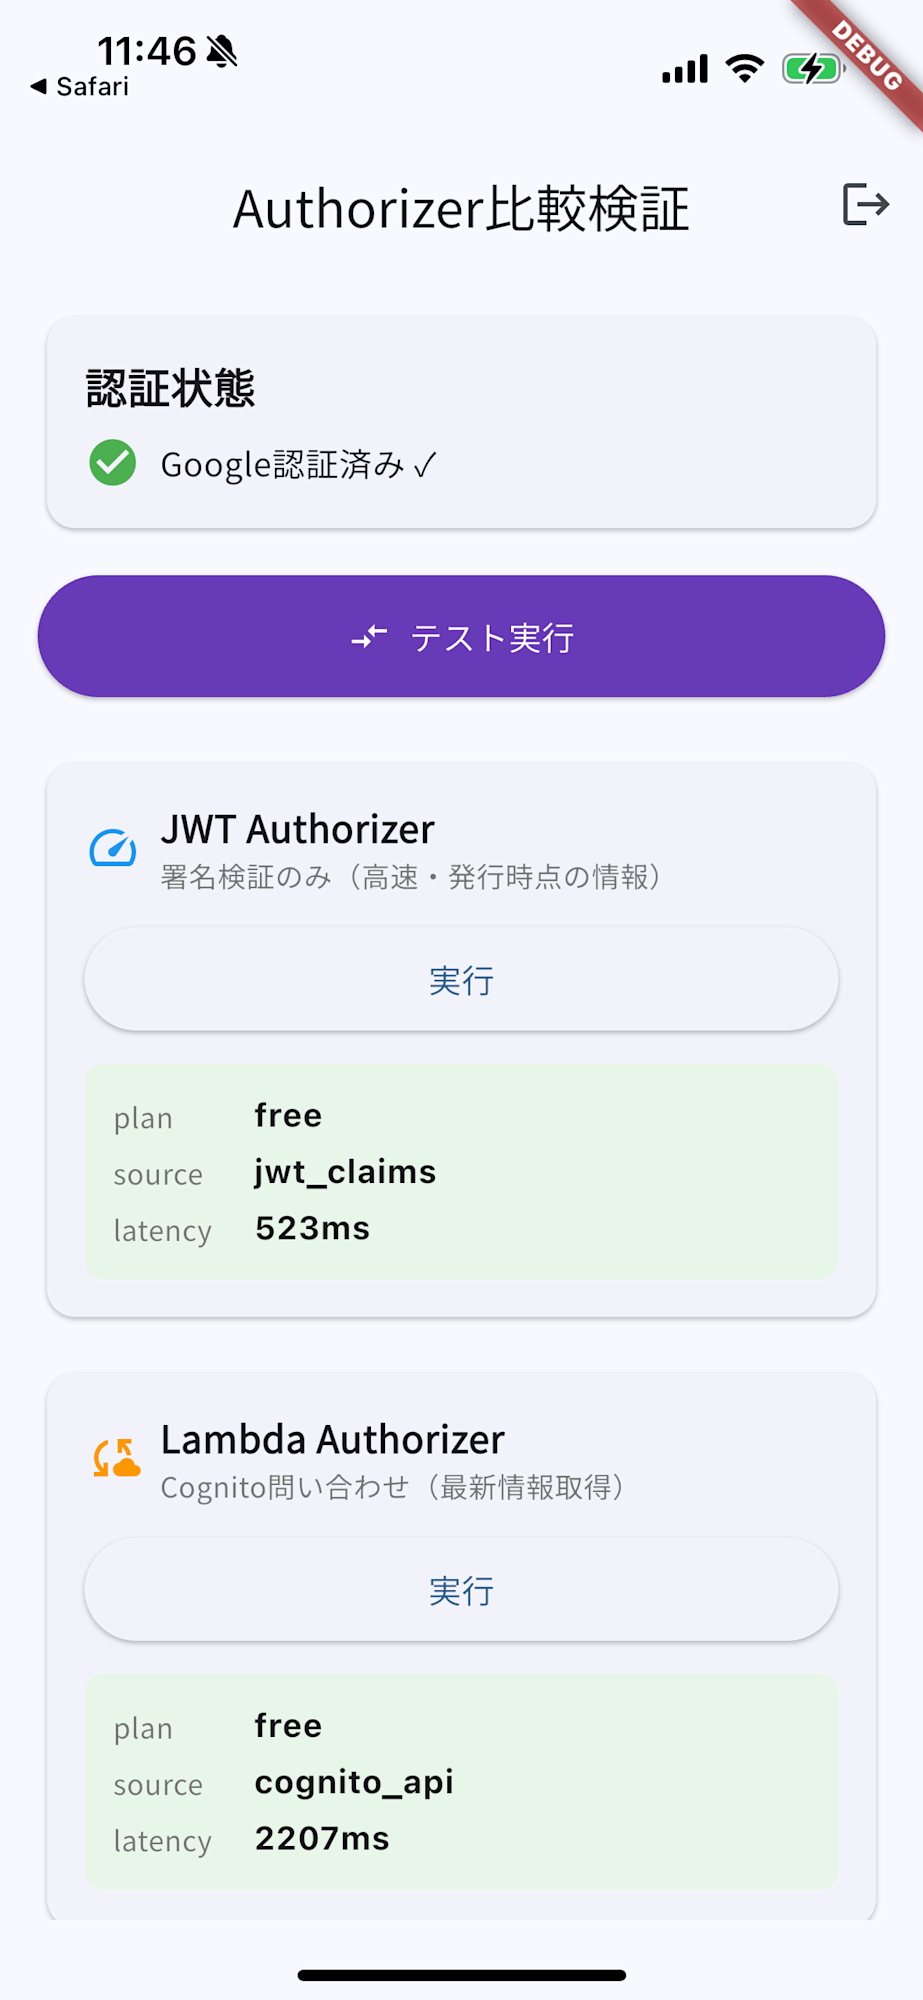
Cognitoユーザープールを開き、該当ユーザーのplan属性をpremiumに変更して、再度テスト実行ボタンを押すと、Lambda AuthorizerはCognitoに毎回確認しに行っているため、ユーザー属性の変更が即座に反映されることが確認できました。

最後に
今回は、Amazon CognitoでGoogle認証をして、Lambda Authorizerで都度検証してみたことを記事にしました。
どなたかの参考になると幸いです。