![[Android Tips] ExpandableListViewのデータをXMLで管理する](https://devio2023-media.developers.io/wp-content/uploads/2012/10/catch6.png)
[Android Tips] ExpandableListViewのデータをXMLで管理する
この記事は公開されてから1年以上経過しています。情報が古い可能性がありますので、ご注意ください。
以前のブログで、ExpandableListViewの使いかたについてご紹介しました。
上記ブログでは、ExpandableListViewに表示するデータをJavaソース上に1つずつ追加していました。
しかし、もっと大きなデータを扱う場合、管理するのが大変になってしまいます。
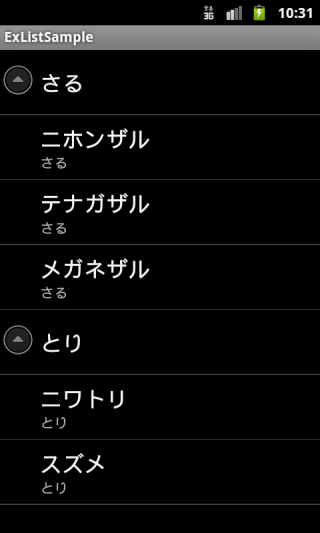
そこで今回はExpandableListViewに表示するデータをXMLを使って管理する方法を考えていきたいと思います。
1.親と子のデータをXMLでつくる
まず、valuesフォルダ内にarray.xmlファイルを作成し、<string-array>タグで作成します。
親のitemの個数ぶん、対応する子のstring-arrayを作成します。
後述するデータの取得のため、子のstring-arrayのidは"child_0, child_1, ..."など、規則的な形にしておきます。
<?xml version="1.0" encoding="utf-8"?>
<resources>
    <string-array name="parent">
    	<item>さる</item>
    	<item>とり</item>
    </string-array>
    <string-array name="child_0">
    	<item>ニホンザル</item>
    	<item>テナガザル</item>
    	<item>メガネザル</item>
    </string-array>
    <string-array name="child_1">
    	<item>ニワトリ</item>
    	<item>スズメ</item>
    </string-array>
</resources>
2.string-arrayをString配列として読み込む
次に、上記で作成したstring-arrayをString配列オブジェクトとして読み込みます。
ResourcesクラスのgetStringArray()メソッドの引数に対象のstring-arrayのリソースIDを入れて取得できます。
親のstring-arrayはひとつですのでこの方法をそのまま使えばよいのですが、
子のstring-arrayは複数(場合によって不特定多数)になるので、ひとつずつ拾っていくのは面倒です。
そこで、ResourceクラスのgetIdentifier()メソッドを使ってリソースIDを取得します。
このメソッドを使うと、特定のリソースファイルの中から指定された変数名からリソースIDを取得することができます。
getResources().getIdentifier("変数名", "リソースファイル名", "リソースファイルのパス名"); 上記で作成したchild_0, child_1, ...のように規則的な変数のリソースIDをまとめて取得できるようになります。
for文を使って、子の数だけリストを取得していきます。
for (int i = 0; i < size; i++) {
	String childId = "child_" + i;
	int arrayId = getResources().getIdentifier(childId, "array", getPackageName());
	String[] child = getResources().getStringArray(arrayId);
}
[/java]</p>
<h3>3.ExpandableListAdapterで使えるようにする</h3>
<p>最後に、上記で作ったString配列オブジェクトをExpandableListAdapterで使えるようにしていきます。<br />親はArrayList<HashMap<String, String>>の形に、<br />子はArrayList<ArrayList<HashMap<String, String>>>の形にします。</p>
<p><strong>ソース</strong>
<br />
<strong>array.xml</strong><br />

<br />
<strong>main.xml</strong><br />
<br />
<strong>ExListSample.java</strong><br />

package jp.cm.sample.exlistsample;

import java.util.ArrayList;
import java.util.HashMap;

import android.app.Activity;
import android.os.Bundle;
import android.widget.ExpandableListView;
import android.widget.SimpleExpandableListAdapter;

public class ExListSample extends Activity {

	@Override
	public void onCreate(Bundle savedInstanceState) {
		super.onCreate(savedInstanceState);

		setContentView(R.layout.main);
		ExpandableListView view = (ExpandableListView) findViewById(R.id.exlist);

		// 親リスト
		ArrayList<HashMap<String, String>> groupData = new ArrayList<HashMap<String, String>>();
		String parentName = "parent";
		// 子リスト
		ArrayList<ArrayList<HashMap<String, String>>> childData = new ArrayList<ArrayList<HashMap<String, String>>>();
		String childName = "child";

		String[] parent = getResources().getStringArray(R.array.parent);
		int size = parent.length;
		for (int i = 0; i < size; i++) {
			HashMap<String, String> group = new HashMap<String, String>();
			String item = parent[i];
	        group.put(parentName, item);
			groupData.add(group);
			String childId = "child_" + i;
			int arrayId = getResources().getIdentifier(childId, "array", getPackageName());
			String[] child = getResources().getStringArray(arrayId);
			ArrayList<HashMap<String, String>> childList = new ArrayList<HashMap<String,String>>();
			for (String childItem : child) {
				HashMap<String, String> childHash = new HashMap<String, String>();
				childHash.put(parentName, item);
				childHash.put(childName, childItem);
				childList.add(childHash);
			}
			childData.add(childList);
		}

		// 親リスト、子リストを含んだAdapterを生成
		SimpleExpandableListAdapter adapter = new SimpleExpandableListAdapter(
				getApplicationContext(), groupData,
				android.R.layout.simple_expandable_list_item_1,
				new String[] { parentName }, new int[] { android.R.id.text1 },
				childData, android.R.layout.simple_expandable_list_item_2,
				new String[] { childName, parentName }, new int[] {
						android.R.id.text1, android.R.id.text2 });

		// ExpandableListViewにAdapterをセット
		view.setAdapter(adapter);
	}
}
まとめ
今回のポイントは子のリソースIDの取得に用いたgetIdentifier()メソッドです。
このメソッドを使うことで、動的にリソースIDを取得できるようになります。
他にもいろいろな使い道があると思いますので、試してみてください!


