おうちでAWS ~Amazon EKS Anywhere 編~
はじめに
皆様こんにちは、あかいけです。
突然ですが、おうちで AWS を使っていますか?
このブログを見ているということはおそらくあなたは仕事で AWS を利用されている方だと思いますが、
おうちでも AWS を感じたくないですか?(私は感じたいです)
というわけで本シリーズでは、 「AWS をもっと身近に」 をテーマに、おうち(オンプレ)で活用できる AWS サービスを再発見していきます。
第三回目は、Amazon EKS Anywhere です。
Amazon EKS Anywhere とは?
EKS Anywhere は、AWS が開発したコンテナ管理ソフトウェアで、オンプレミスなどAWS外の環境でも Kubernetes クラスターの実行と管理を容易にしてくれます。
また EKS Anywhere は、AWSクラウドの Amazon Elastic Kubernetes Service (EKS) で使用されているものと同じ、Kubernetes ディストリビューションである EKS Distro をベースに構築されています。
つまり名前通り 「EKS を AWS 外の環境どこでも実行できるようにしたもの」ですね!
構成図
今回の構成図はこんな感じです。
EKS Anywhere を立てるだけでは芸がないので、今回は外部公開するところまでやってみます。
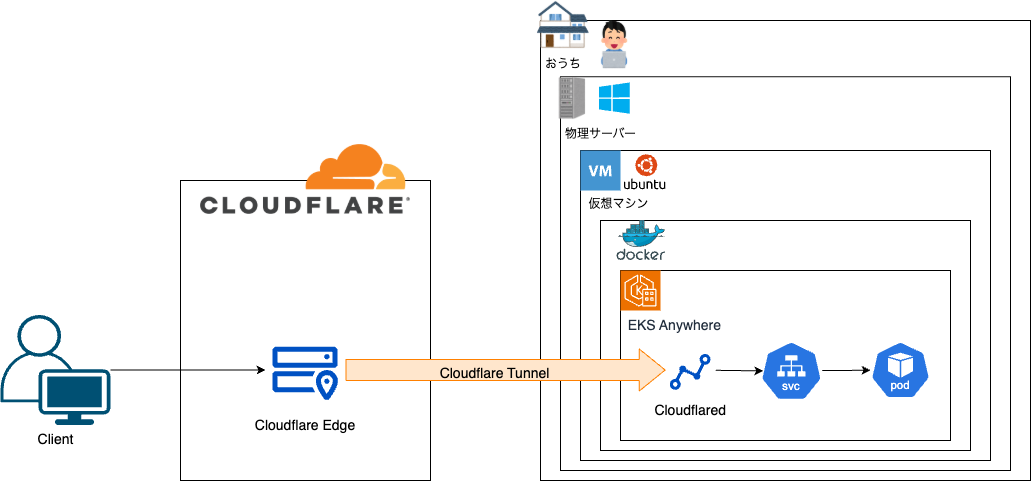
入れ子すぎて少々わかりづらい図になってしまいました…。
やっていることは単純で、Windows 上の VM に Amazon EKS Anywhere (Docker 版) をインストールして、その中の Pod を Cloudflare Tunnel を経由して外部公開しています。
実行環境と技術概要
実行環境について
- 物理サーバー
- OS:Windows 11
- CPU:AMD Ryzen 5 5600X (6 コア/12 スレッド)
- メモリ:32GB
- VM
- OS:Ubuntu 22.04
- CPU:4vCPU (2 コア/4 スレッド)
- メモリ:16GB
Multipass について
今回は VM 作成のために、multipass を利用しています。
multipass は Canonical が開発/メンテしている、Ubuntu の VM を作成できるツールです。
利用できる OS は Ubuntu のみですが、今回の用途では問題ないです。
Cloudflare Tunnel について
外部公開には Cloudflare Tunnel を利用します。
Cloudflare Tunnel は、パブリックにルーティング可能な IP アドレスなしで Cloudflare にリソースを接続する安全な方法を提供します。
Tunnel では、外部 IP にトラフィックを送信するのではなく、接続先のインフラ(cloudflared)内の軽量デーモンが Cloudflare のグローバルネットワークへのアウトバウンド専用接続を作成します。
すごい簡単に言うと、ローカルサーバーやアプリケーションをインターネットに公開するためのリバースプロキシサービスです。
なお今回は HTTP ウェブサーバーとしての用途で利用しますが、SSH サーバー、リモートデスクトップ、その他のプロトコルを利用することもできます。
Cloudflare Tunnel には他にも色々なメリットがありますが、今回の用途においては以下が特に重要です。
- インバウンドのファイアウォール穴あけ不要
- Cloudflared がアウトバウンド接続で Cloudflare と接続するため、インバウンドの穴あけが不要
- Cloudflare のリソース活用
- Cloudflare のネットワーク、また CDN を活用できる
- グローバル IP の固定化が不要
- グローバル IP 固定化の費用が不要となる
構築手順
VM 作成
まずは VM を作成します、
VM 作成に利用する Multipass は以下からインストールできます。
Multipass をインストールしたら、まずは利用できる OS を確認します。
> multipass find
Image                       Aliases           Version          Description
core                        core16            20200818         Ubuntu Core 16
core18                                        20211124         Ubuntu Core 18
core20                                        20230119         Ubuntu Core 20
core22                                        20230717         Ubuntu Core 22
22.04                       jammy             20250620         Ubuntu 22.04 LTS
24.04                       noble,lts         20250610         Ubuntu 24.04 LTS
appliance:adguard-home                        20200812         Ubuntu AdGuard Home Appliance
appliance:mosquitto                           20200812         Ubuntu Mosquitto Appliance
appliance:nextcloud                           20200812         Ubuntu Nextcloud Appliance
appliance:openhab                             20200812         Ubuntu openHAB Home Appliance
appliance:plexmediaserver                     20200812         Ubuntu Plex Media Server Appliance

Blueprint                   Aliases           Version          Description
anbox-cloud-appliance                         latest           Anbox Cloud Appliance
charm-dev                                     latest           A development and testing environment for charmers
docker                                        0.4              A Docker environment with Portainer and related tools
jellyfin                                      latest           Jellyfin is a Free Software Media System that puts you in control of managing and streaming your media.
minikube                                      latest           minikube is local Kubernetes
ros2-humble                                   0.1              A development and testing environment for ROS 2 Humble.
ros2-jazzy                                    0.1              A development and testing environment for ROS 2 Jazzy.
EKS Anywhere では Ubuntu 20.04.2 LTS or 22.04 LTS がサポートされています。
今回は 22.04 LTS を使ってみます。
また EKS Anywhere の利用にあたり、 Docker がインストールされている必要があります。
今回こういった初期設定は cloud-init を利用して設定してみます。
利用する cloud-init の設定ファイルは以下の通りで、実行するコマンドは Docker 公式のドキュメントをもとにしています。
#cloud-config

# パッケージの更新
package_update: true
package_upgrade: true

# 必要なパッケージをインストール
packages:
  - ca-certificates
  - curl
  - gnupg
  - lsb-release

# runcmdでDockerのインストールと設定を実行
runcmd:
  # Dockerの公式GPGキーを追加
  - sudo install -m 0755 -d /etc/apt/keyrings
  - sudo curl -fsSL https://download.docker.com/linux/ubuntu/gpg -o /etc/apt/keyrings/docker.asc
  - sudo chmod a+r /etc/apt/keyrings/docker.asc

  # Dockerのリポジトリを追加
  - echo "deb [arch=$(dpkg --print-architecture) signed-by=/etc/apt/keyrings/docker.asc] https://download.docker.com/linux/ubuntu $(. /etc/os-release && echo "${UBUNTU_CODENAME:-$VERSION_CODENAME}") stable" | sudo tee /etc/apt/sources.list.d/docker.list > /dev/null

  # パッケージリストを更新
  - sudo apt-get update

  # Dockerパッケージをインストール
  - sudo apt-get install -y docker-ce docker-ce-cli containerd.io docker-buildx-plugin docker-compose-plugin

  # dockerグループを作成(既に存在する場合はエラーを無視)
  - sudo groupadd docker || true

  # デフォルトユーザー(ubuntu)をdockerグループに追加
  - sudo usermod -aG docker ubuntu

  # Dockerサービスを有効化
  - sudo systemctl enable docker.service
  - sudo systemctl enable containerd.service

  # Dockerサービスを開始
  - sudo systemctl start docker.service
  - sudo systemctl start containerd.service

  # inotify設定変更
  - echo 'fs.inotify.max_user_instances=1024' | sudo tee -a /etc/sysctl.conf
  - echo 'fs.inotify.max_user_watches=524288' | sudo tee -a /etc/sysctl.conf
  - sudo sysctl -p

final_message: "Docker installation completed!"
以下のコマンドで VM を作成します。
なお CPU、メモリ、ディスクは EKS Anywhere のシステム要件に合わせて指定しています。
> multipass launch 22.04 --name eks-anywhere --cpus 4 --memory 16G --disk 30G --cloud-init cloud-config.yaml
VM 作成後にステータスを確認すると、正常に作成されていることが確認できます。
なお IPv4 が二つありますが、172.17.0.1 は Docker の デフォルトのネットワークインターフェースです。
> multipass list
Name                    State             IPv4             Image
eks-anywhere            Running           172.24.242.17    Ubuntu 22.04 LTS
                                          172.17.0.1
作成した VM へ以下のコマンドでログインできます。
> multipass shell eks-anywhere
正常に docker がインストールできていれば OK です。
$ docker -v
Docker version 28.2.2, build e6534b4
EKS Anywhere 設定
次に EKS Anywhere の設定です。
今回は開発向けの Docker プロバイダーでのデプロイを利用します。
これは Docker コンテナ上にクラスターを作成するイメージですね。
手順は以下ドキュメント通りに進めれば問題ないです。
- eksctl
まずは eksctl のインストールです。
curl "https://github.com/weaveworks/eksctl/releases/latest/download/eksctl_$(uname -s)_amd64.tar.gz" \
    --silent --location \
    | tar xz -C /tmp
sudo install -m 0755 /tmp/eksctl /usr/local/bin/eksctl
$ eksctl version
0.210.0
- eksctl-anywhere
次に eksctl-anywhere のインストールです。
これは EKS Anywhere 向けの、eksctl の追加プラグインです。
sudo snap install yq
$ yq -V
yq (https://github.com/mikefarah/yq/) version v4.44.5
RELEASE_VERSION=$(curl https://anywhere-assets.eks.amazonaws.com/releases/eks-a/manifest.yaml --silent --location | yq ".spec.latestVersion")
EKS_ANYWHERE_TARBALL_URL=$(curl https://anywhere-assets.eks.amazonaws.com/releases/eks-a/manifest.yaml --silent --location | yq ".spec.releases[] | select(.version==\"$RELEASE_VERSION\").eksABinary.$(uname -s | tr A-Z a-z).uri")
curl $EKS_ANYWHERE_TARBALL_URL \
    --silent --location \
    | tar xz ./eksctl-anywhere
sudo install -m 0755 ./eksctl-anywhere /usr/local/bin/eksctl-anywhere
$ eksctl anywhere version

Version: v0.22.6
Release Manifest URL: https://anywhere-assets.eks.amazonaws.com/releases/eks-a/manifest.yaml
Bundle Manifest URL: https://anywhere-assets.eks.amazonaws.com/releases/bundles/100/manifest.yaml
- kubectl
次は kubectl のインストールです。
export OS="$(uname -s | tr A-Z a-z)" ARCH=$(test "$(uname -m)" = 'x86_64' && echo 'amd64' || echo 'arm64')
curl -LO "https://dl.k8s.io/release/$(curl -L -s https://dl.k8s.io/release/stable.txt)/bin/${OS}/${ARCH}/kubectl"
sudo install -m 0755 ./kubectl /usr/local/bin/kubectl
$ kubectl version
Client Version: v1.33.2
Kustomize Version: v5.6.0
The connection to the server localhost:8080 was refused - did you specify the right host or port?
- EKS Cluster
最後に EKS Cluster の作成です。
クラスター用のマニフェストファイルを作成します。
CLUSTER_NAME=mgmt
eksctl anywhere generate clusterconfig $CLUSTER_NAME \
   --provider docker > $CLUSTER_NAME.yaml
このマニュフェストファイルの中身は以下の通りです。
pods と services の cidrBlocks は VM/ホストネットワーク、Docker bridge、EKS Anywhere bridge の CIDR と重複していなければなんでも大丈夫です。
今回はすべてデフォルトの設定値でクラスターを作成します。
apiVersion: anywhere.eks.amazonaws.com/v1alpha1
kind: Cluster
metadata:
  name: mgmt
spec:
  clusterNetwork:
    cniConfig:
      cilium: {}
    pods:
      cidrBlocks:
      - 192.168.0.0/16
    services:
      cidrBlocks:
      - 10.96.0.0/12
  controlPlaneConfiguration:
    count: 1
  datacenterRef:
    kind: DockerDatacenterConfig
    name: mgmt
  externalEtcdConfiguration:
    count: 1
  kubernetesVersion: "1.32"
  managementCluster:
    name: mgmt
  workerNodeGroupConfigurations:
  - count: 1
    name: md-0

---
apiVersion: anywhere.eks.amazonaws.com/v1alpha1
kind: DockerDatacenterConfig
metadata:
  name: mgmt
spec: {}

---
さて、以下のコマンドでクラスターを作成しましょう。
私の環境では、だいたい 10 分ぐらいで作成完了しました。
eksctl anywhere create cluster -f $CLUSTER_NAME.yaml
Performing setup and validations
Warning: The docker infrastructure provider is meant for local development and testing only
✅ Docker Provider setup is valid
✅ Validate OS is compatible with registry mirror configuration
✅ Validate certificate for registry mirror
✅ Validate authentication for git provider
✅ Validate cluster's eksaVersion matches EKS-A version
✅ Validate extended kubernetes version support is supported
Creating new bootstrap cluster
Provider specific pre-capi-install-setup on bootstrap cluster
Installing cluster-api providers on bootstrap cluster
Provider specific post-setup
Installing EKS-A custom components on bootstrap cluster
Installing EKS-D components
Installing EKS-A custom components (CRD and controller)
Creating new management cluster
Creating EKS-A namespace
Installing cluster-api providers on management cluster
Installing EKS-A secrets on management cluster
Moving the cluster management components from the bootstrap cluster to the management cluster
Installing EKS-A custom components on the management cluster
Installing EKS-D components
Installing EKS-A custom components (CRD and controller)
Moving cluster spec to workload cluster
Installing GitOps Toolkit on workload cluster
GitOps field not specified, bootstrap flux skipped
Writing cluster config file
Deleting bootstrap cluster
🎉 Cluster created!
--------------------------------------------------------------------------------------
The Amazon EKS Anywhere Curated Packages are only available to customers with the
Amazon EKS Anywhere Enterprise Subscription
--------------------------------------------------------------------------------------
Enabling curated packages on the cluster
Installing helm chart on cluster        {"chart": "eks-anywhere-packages", "version": "0.4.6-eks-a-100"}
次に以下のコマンドでコンテキストを設定します。
export KUBECONFIG=${PWD}/${CLUSTER_NAME}/${CLUSTER_NAME}-eks-a-cluster.kubeconfig
以下のようにリソースが参照できれば OK です。
ubuntu@eks-anywhere:~$ kubectl get node
NAME                    STATUS   ROLES           AGE     VERSION
mgmt-m54hw              Ready    control-plane   6m53s   v1.32.5-eks-98436be
mgmt-md-0-rcz94-z4x5h   Ready    <none>          6m28s   v1.32.5-eks-98436be

ubuntu@eks-anywhere:~$ kubectl get ns
NAME                                STATUS   AGE
capd-system                         Active   3m37s
capi-kubeadm-bootstrap-system       Active   3m38s
capi-kubeadm-control-plane-system   Active   3m38s
capi-system                         Active   3m39s
cert-manager                        Active   4m
default                             Active   6m55s
eksa-packages                       Active   2m16s
eksa-packages-mgmt                  Active   2m16s
eksa-system                         Active   4m12s
etcdadm-bootstrap-provider-system   Active   3m38s
etcdadm-controller-system           Active   3m38s
kube-node-lease                     Active   6m55s
kube-public                         Active   6m55s
kube-system                         Active   6m55s
念の為実際にアプリがデプロイできるか確認してみましょう。
有り難いことに公式ドキュメントでサンプルアプリが記載されていたので、
こちらをデプロイしてみます。
ubuntu@eks-anywhere:~$ kubectl apply -f "https://anywhere.eks.amazonaws.com/manifests/hello-eks-a.yaml"
deployment.apps/hello-eks-a created
service/hello-eks-a created

ubuntu@eks-anywhere:~$ kubectl get pod
NAME                           READY   STATUS    RESTARTS   AGE
hello-eks-a-5ff5b8766b-pxlvv   1/1     Running   0          15s

ubuntu@eks-anywhere:~$ kubectl get pods -l app=hello-eks-a
NAME                           READY   STATUS    RESTARTS   AGE
hello-eks-a-5ff5b8766b-pxlvv   1/1     Running   0          37s

ubuntu@eks-anywhere:~$ kubectl logs -l app=hello-eks-a
2025/06/23 16:20:42 [notice] 1#1: using the "epoll" event method
2025/06/23 16:20:42 [notice] 1#1: nginx/1.21.6
2025/06/23 16:20:42 [notice] 1#1: built by gcc 10.3.1 20211027 (Alpine 10.3.1_git20211027)
2025/06/23 16:20:42 [notice] 1#1: OS: Linux 5.15.0-142-generic
2025/06/23 16:20:42 [notice] 1#1: getrlimit(RLIMIT_NOFILE): 1073741816:1073741816
2025/06/23 16:20:42 [notice] 1#1: start worker processes
2025/06/23 16:20:42 [notice] 1#1: start worker process 43
2025/06/23 16:20:42 [notice] 1#1: start worker process 44
2025/06/23 16:20:42 [notice] 1#1: start worker process 45
2025/06/23 16:20:42 [notice] 1#1: start worker process 46

ubuntu@eks-anywhere:~$ kubectl port-forward deploy/hello-eks-a 8000:80
Forwarding from 127.0.0.1:8000 -> 80
Forwarding from [::1]:8000 -> 80
サンプルアプリにアクセスすると、くそでか EKS Anywhere が表示されます。
分かりやすくていいですね!
ubuntu@eks-anywhere:~$ curl localhost:8000
⬡⬢⬡⬢⬡⬢⬡⬢⬡⬢⬡⬢⬡⬢⬡⬢⬡⬢⬡⬢⬡⬢⬡⬢⬡⬢⬡⬢⬡⬢⬡⬢⬡⬢⬡⬢⬡⬢⬡⬢⬡⬢⬡⬢⬡⬢⬡⬢⬡⬢⬡⬢⬡⬢⬡⬢⬡⬢⬡⬢⬡⬢⬡⬢⬡⬢⬡⬢

Thank you for using

███████╗██╗  ██╗███████╗
██╔════╝██║ ██╔╝██╔════╝
█████╗  █████╔╝ ███████╗
██╔══╝  ██╔═██╗ ╚════██║
███████╗██║  ██╗███████║
╚══════╝╚═╝  ╚═╝╚══════╝

 █████╗ ███╗   ██╗██╗   ██╗██╗    ██╗██╗  ██╗███████╗██████╗ ███████╗
██╔══██╗████╗  ██║╚██╗ ██╔╝██║    ██║██║  ██║██╔════╝██╔══██╗██╔════╝
███████║██╔██╗ ██║ ╚████╔╝ ██║ █╗ ██║███████║█████╗  ██████╔╝█████╗
██╔══██║██║╚██╗██║  ╚██╔╝  ██║███╗██║██╔══██║██╔══╝  ██╔══██╗██╔══╝
██║  ██║██║ ╚████║   ██║   ╚███╔███╔╝██║  ██║███████╗██║  ██║███████╗
╚═╝  ╚═╝╚═╝  ╚═══╝   ╚═╝    ╚══╝╚══╝ ╚═╝  ╚═╝╚══════╝╚═╝  ╚═╝╚══════╝

You have successfully deployed the hello-eks-a pod hello-eks-a-5ff5b8766b-pxlvv

For more information check out
https://anywhere.eks.amazonaws.com

⬡⬢⬡⬢⬡⬢⬡⬢⬡⬢⬡⬢⬡⬢⬡⬢⬡⬢⬡⬢⬡⬢⬡⬢⬡⬢⬡⬢⬡⬢⬡⬢⬡⬢⬡⬢⬡⬢⬡⬢⬡⬢⬡⬢⬡⬢⬡⬢⬡⬢⬡⬢⬡⬢⬡⬢⬡⬢⬡⬢⬡⬢⬡⬢⬡⬢⬡⬢
Cloudflare Tunnel 設定
最後に Cloudflare Tunnel の設定です、
おおまかな手順は以下ドキュメントを参考にしています。
- Cloudflared
まず Cloudflared を EKS Anywhere 上にインストールする必要があります。
手順は以下ドキュメントの通りです。
# Add cloudflare gpg key
sudo mkdir -p --mode=0755 /usr/share/keyrings
curl -fsSL https://pkg.cloudflare.com/cloudflare-main.gpg | sudo tee /usr/share/keyrings/cloudflare-main.gpg >/dev/null

# Add this repo to your apt repositories
echo 'deb [signed-by=/usr/share/keyrings/cloudflare-main.gpg] https://pkg.cloudflare.com/cloudflared jammy main' | sudo tee /etc/apt/sources.list.d/cloudflared.list

# install cloudflared
sudo apt-get update && sudo apt-get install cloudflared
コマンドが正常に実行できれば OK です。
$ cloudflared -v
cloudflared version 2025.6.1 (built 2025-06-17-1239 UTC)
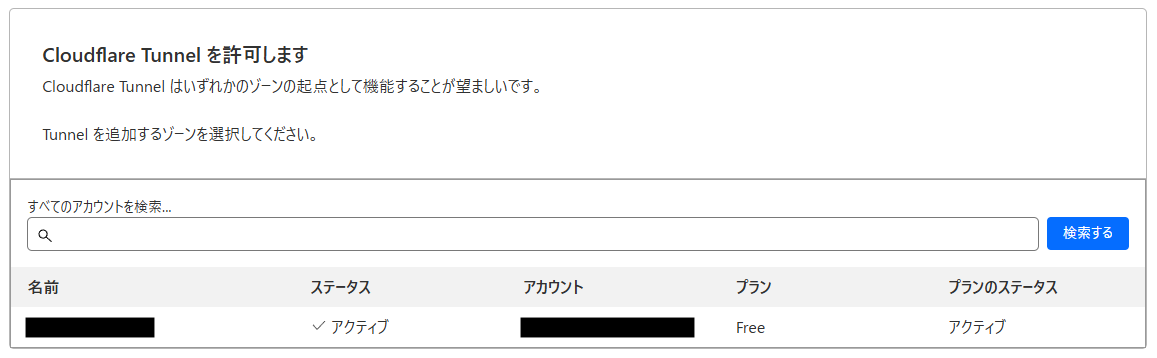
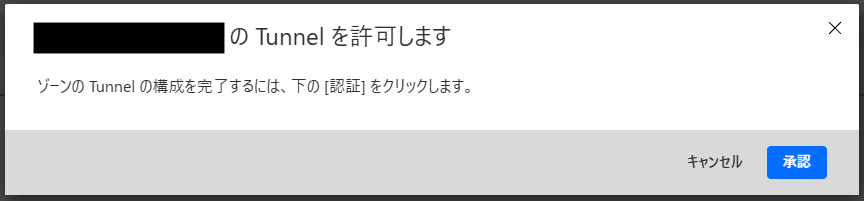
次に VM 上から CloudFlare へログインします。
cloudflared tunnel login
ブラウザ側で認証許可の画面がでるので、使いたいドメインを選択して承認します。
次に Tunnel を作成します。
cloudflared tunnel create hello-eks-a-tunnel
正常に作成できると、クレデンシャル情報がローカルに保存されます。
Tunnel credentials written to /home/ubuntu/.cloudflared/[TUNNEL_ID].json. cloudflared chose this file based on where your origin certificate was found. Keep this file secret. To revoke these credentials, delete the tunnel.

Created tunnel hello-eks-a-tunnel with id [TUNNEL_ID]
次にドメインへ Cloudflare Tunnel へのルートを追加します。
ここでは先ほど作成した tunnel 名と、利用したいドメイン名を指定します。
cloudflared tunnel route dns hello-eks-a-tunnel hello-eks-a.example.com
2025-07-01T14:01:14Z INF Added CNAME hello-eks-a.example.com which will route to this tunnel tunnelID=[TUNNEL_ID]
次に先ほど保存されたクレデンシャル情報を指定して、secret リソースを作成します。
これは後程作成する cloudflared の Deployment から参照します。
kubectl create secret generic tunnel-credentials \
--from-file=credentials.json=/home/ubuntu/.cloudflared/[TUNNEL_ID].json
最後に cloudflared の Deployment を作成します。
l このリソースが内部の Pod とインターネットを安全につなぐ中継役をしてくれています。
今回は以下のサンプルを使ってみます。
ほぼサンプル通りで問題ないのですが、
ConfigMap 内の以下の設定値だけ、実際に値に合わせて変更する必要があります。
- tunnel
- 作成した tunnel 名を指定します
- hostname
- 指定したドメイン名を指定します
- service
- ルーティング先の service を指定します
---
apiVersion: apps/v1
kind: Deployment
metadata:
  name: cloudflared
spec:
  selector:
    matchLabels:
      app: cloudflared
  replicas: 2 # You could also consider elastic scaling for this deployment
  template:
    metadata:
      labels:
        app: cloudflared
    spec:
      containers:
      - name: cloudflared
        image: cloudflare/cloudflared:2022.3.0
        args:
        - tunnel
        # Points cloudflared to the config file, which configures what
        # cloudflared will actually do. This file is created by a ConfigMap
        # below.
        - --config
        - /etc/cloudflared/config/config.yaml
        - run
        livenessProbe:
          httpGet:
            # Cloudflared has a /ready endpoint which returns 200 if and only if
            # it has an active connection to the edge.
            path: /ready
            port: 2000
          failureThreshold: 1
          initialDelaySeconds: 10
          periodSeconds: 10
        volumeMounts:
        - name: config
          mountPath: /etc/cloudflared/config
          readOnly: true
        # Each tunnel has an associated "credentials file" which authorizes machines
        # to run the tunnel. cloudflared will read this file from its local filesystem,
        # and it'll be stored in a k8s secret.
        - name: creds
          mountPath: /etc/cloudflared/creds
          readOnly: true
      volumes:
      - name: creds
        secret:
          # By default, the credentials file will be created under ~/.cloudflared/<tunnel ID>.json
          # when you run `cloudflared tunnel create`. You can move it into a secret by using:
          # ```sh
          # kubectl create secret generic tunnel-credentials \
          # --from-file=credentials.json=/Users/yourusername/.cloudflared/<tunnel ID>.json
          # ```
          secretName: tunnel-credentials
      # Create a config.yaml file from the ConfigMap below.
      - name: config
        configMap:
          name: cloudflared
          items:
          - key: config.yaml
            path: config.yaml
---
# This ConfigMap is just a way to define the cloudflared config.yaml file in k8s.
# It's useful to define it in k8s, rather than as a stand-alone .yaml file, because
# this lets you use various k8s templating solutions (e.g. Helm charts) to
# parameterize your config, instead of just using string literals.
apiVersion: v1
kind: ConfigMap
metadata:
  name: cloudflared
data:
  config.yaml: |
    # Name of the tunnel you want to run
    tunnel: example-tunnel
    credentials-file: /etc/cloudflared/creds/credentials.json
    # Serves the metrics server under /metrics and the readiness server under /ready
    metrics: 0.0.0.0:2000
    # Autoupdates applied in a k8s pod will be lost when the pod is removed or restarted, so
    # autoupdate doesn't make sense in Kubernetes. However, outside of Kubernetes, we strongly
    # recommend using autoupdate.
    no-autoupdate: true
    # The `ingress` block tells cloudflared which local service to route incoming
    # requests to. For more about ingress rules, see
    # https://developers.cloudflare.com/cloudflare-one/connections/connect-apps/configuration/ingress
    #
    # Remember, these rules route traffic from cloudflared to a local service. To route traffic
    # from the internet to cloudflared, run `cloudflared tunnel route dns <tunnel> <hostname>`.
    # E.g. `cloudflared tunnel route dns example-tunnel tunnel.example.com`.
    ingress:
    # The first rule proxies traffic to the httpbin sample Service defined in app.yaml
    - hostname: tunnel.example.com
      service: http://web-service:80
    # This rule sends traffic to the built-in hello-world HTTP server. This can help debug connectivity
    # issues. If hello.example.com resolves and tunnel.example.com does not, then the problem is
    # in the connection from cloudflared to your local service, not from the internet to cloudflared.
    - hostname: hello.example.com
      service: hello_world
    # This rule matches any traffic which didn't match a previous rule, and responds with HTTP 404.
    - service: http_status:404
外部アクセステスト
では外部からアクセスしてみましょう。
まずは別の端末から設定したドメインにアクセスすると、先ほどと同じくそでか EKS Anywhere が表示されるので、正常にアクセスできています。
$ curl https://hello-eks-a.example.com/
⬡⬢⬡⬢⬡⬢⬡⬢⬡⬢⬡⬢⬡⬢⬡⬢⬡⬢⬡⬢⬡⬢⬡⬢⬡⬢⬡⬢⬡⬢⬡⬢⬡⬢⬡⬢⬡⬢⬡⬢⬡⬢⬡⬢⬡⬢⬡⬢⬡⬢⬡⬢⬡⬢⬡⬢⬡⬢⬡⬢⬡⬢⬡⬢⬡⬢⬡⬢

Thank you for using

███████╗██╗  ██╗███████╗
██╔════╝██║ ██╔╝██╔════╝
█████╗  █████╔╝ ███████╗
██╔══╝  ██╔═██╗ ╚════██║
███████╗██║  ██╗███████║
╚══════╝╚═╝  ╚═╝╚══════╝

 █████╗ ███╗   ██╗██╗   ██╗██╗    ██╗██╗  ██╗███████╗██████╗ ███████╗
██╔══██╗████╗  ██║╚██╗ ██╔╝██║    ██║██║  ██║██╔════╝██╔══██╗██╔════╝
███████║██╔██╗ ██║ ╚████╔╝ ██║ █╗ ██║███████║█████╗  ██████╔╝█████╗
██╔══██║██║╚██╗██║  ╚██╔╝  ██║███╗██║██╔══██║██╔══╝  ██╔══██╗██╔══╝
██║  ██║██║ ╚████║   ██║   ╚███╔███╔╝██║  ██║███████╗██║  ██║███████╗
╚═╝  ╚═╝╚═╝  ╚═══╝   ╚═╝    ╚══╝╚══╝ ╚═╝  ╚═╝╚══════╝╚═╝  ╚═╝╚══════╝

You have successfully deployed the hello-eks-a pod hello-eks-a-5ff5b8766b-pxlvv

For more information check out
https://anywhere.eks.amazonaws.com

⬡⬢⬡⬢⬡⬢⬡⬢⬡⬢⬡⬢⬡⬢⬡⬢⬡⬢⬡⬢⬡⬢⬡⬢⬡⬢⬡⬢⬡⬢⬡⬢⬡⬢⬡⬢⬡⬢⬡⬢⬡⬢⬡⬢⬡⬢⬡⬢⬡⬢⬡⬢⬡⬢⬡⬢⬡⬢⬡⬢⬡⬢⬡⬢⬡⬢⬡⬢
次にブラウザからドメインにアクセスすると、カラフルなくそでか EKS Anywhereが表示されました。
これも分かりやすくていいですね!

ドメインを足したくなったら
さて、ドメインを足したい場合はどうすればいいでしょうか?
答えは単純でこれまでの流れをもう一度やるだけです。
まずは使いたいドメインを指定して、Cloudflare tunnel へのルートを追加します。
cloudflared tunnel route dns hello-eks-a-tunnel nginx-test.example.com
次にサンプルアプリとして Nginx の pod と service を用意してデプロイしておきます。
apiVersion: apps/v1
kind: Deployment
metadata:
  name: nginx-deployment
spec:
  selector:
    matchLabels:
      app: nginx
  replicas: 2
  template:
    metadata:
      labels:
        app: nginx
    spec:
      containers:
      - name: nginx
        image: nginx:latest
        ports:
        - containerPort: 80
---
apiVersion: v1
kind: Service
metadata:
  name: nginx-service
  labels:
    app: nginx
spec:
  type: NodePort
  ports:
  - port: 8080
    targetPort: 80
    nodePort: 30080
    protocol: TCP
  selector:
    app: nginx
次に cloudflared のマニュフェストファイルに、
使いたいドメイン名と、ルーティング先となる service を追加します。
このマニュフェストファイルを使ってリソースを更新しておきます。
    - hostname: nginx-test.example.com
      service: http://nginx-service:8080
ここまで完了すると、新しいドメインでアクセスできるようになっています。
超簡単ですね!
ubuntu@eks-anywhere:~$ curl nginx-test.example.com
<!DOCTYPE html>
<html>
<head>
<title>Welcome to nginx!</title>
<style>
html { color-scheme: light dark; }
body { width: 35em; margin: 0 auto;
font-family: Tahoma, Verdana, Arial, sans-serif; }
</style>
</head>
<body>
<h1>Welcome to nginx!</h1>
<p>If you see this page, the nginx web server is successfully installed and
working. Further configuration is required.</p>

<p>For online documentation and support please refer to
<a href="http://nginx.org/">nginx.org</a>.<br/>
Commercial support is available at
<a href="http://nginx.com/">nginx.com</a>.</p>

<p><em>Thank you for using nginx.</em></p>
</body>
</html>
お掃除
- Cloudflare
DNS のルートを削除して、Tunnel を削除すれば OK です。
# DNSルートを削除
cloudflared tunnel route dns --delete hello-eks-a-tunnel hello-eks-a.example.com

# nginx-testのDNSルートも削除(もし追加していた場合)
cloudflared tunnel route dns --delete hello-eks-a-tunnel nginx-test.example.com
cloudflared tunnel delete hello-eks-a-tunnel
- VM
VM は削除するだけで OK です。
> multipass stop eks-anywhere
> multipass delete eks-anywhere
> multipass purge
さいごに
以上、おうちで AWS ~Amazon EKS Anywhere 編~でした。
EKS Anywhere は何となく敷居が高いイメージでしたが、思いの外簡単にデプロイできて驚きました。
その他 Docker 上に Kubernetes クラスターを作成するツールとしては以下のものが有名ですが、
これらと同じぐらいの工数で EKS クラスターを立てれるのは中々魅力的だと思いました。
また Cloudflare Tunnel も初めて利用しましたが、設定の簡単さからは想像できないぐらい便利なサービスですね。
EKS Anywhere に限らず、自宅サーバーから外部にサービスを公開したい場合など汎用的に利用できそうで素敵です。
なお今回は検証目的での構築でしたが、実際に本番環境で EKS Anywhere を運用する場合は、少なくとも以下の点を考慮する必要があります。
この辺りを考慮したEKS クラスターの構築も、元気がある時に検証してブログにします。
セキュリティ面
- ネットワークセグメンテーションの設計
- RBACの適切な設定
- シークレット管理の強化(外部シークレット管理ツールとの連携)
可用性・運用面
- マルチノード構成での冗長化
- バックアップ・リストア戦略の策定
- モニタリング・ログ収集基盤の構築
- アップデート戦略の検討
パフォーマンス面
- リソース使用量の継続的な監視
- ストレージ性能の最適化
- ネットワーク帯域の考慮