![[アップデート] AWS Client VPN が AWS Transit Gateway とのネイティブな統合をサポートしました](https://images.ctfassets.net/ct0aopd36mqt/wp-thumbnail-78c709ce8ff80dd2872e3acdc877ccd9/b02707ee3316906a252376c916882d1c/aws-client-vpn?w=3840&fm=webp)
[アップデート] AWS Client VPN が AWS Transit Gateway とのネイティブな統合をサポートしました
送信先からClient VPNエンドポイントのIPアドレスを把握したい
こんにちは、のんピ(@non____97)です。
皆さんはAWS Client VPNを使用している状況において、送信先からClient VPNエンドポイントのIPアドレスを把握したいなと思ったことはありますか? 私はあります。
以下記事で紹介されているように、Client VPN経由で通信をした場合、送信元のIPアドレスはSNATされたIPアドレスです。
混乱しやすい部分ですが、アクセス先のサーバから見た送信元 IP はこのクライアント CIDR の IP アドレスではありません。ターゲットネットワーク 上の ENI によって送信元 IP アドレスの NAT が行われるため、アクセス先サーバから見た送信元 IP はターゲットネットワーク上の ENI が持つそれとなります。
AWS Client VPN のコンポーネントを絵に描いて理解しつつ NetworkACL や SecuriryGroup をどこまで絞れるのか試してみた | DevelopersIO
そのため、送信先から具体的にどの利用者からのIPアドレスなのか判断することができません。
Client VPNの接続ログとして以下のようなログが記録されますが、client-ipを複数人のユーザーで共有している以上、ユーザーを特定することは難しいです。
{
    "connection-log-type": "connection-attempt",
    "connection-attempt-status": "successful",
    "connection-reset-status": "NA",
    "connection-attempt-failure-reason": "NA",
    "connection-id": "cvpn-connection-abc123abc123abc12",
    "client-vpn-endpoint-id": "cvpn-endpoint-aaa111bbb222ccc33",
    "transport-protocol": "udp",
    "connection-start-time": "2020-03-26 20:37:15",
    "connection-last-update-time": "2020-03-26 20:37:15",
    "client-ip": "10.0.1.2",
    "common-name": "client1",
    "device-type": "mac",
    "device-ip": "98.247.202.82",
    "port": "50096",
    "ingress-bytes": "0",
    "egress-bytes": "0",
    "ingress-packets": "0",
    "egress-packets": "0",
    "connection-end-time": "NA",
    "username": "joe"
}
抜粋 : Connection logging for an AWS Client VPN endpoint - AWS Client VPN
今回アップデートにより、Transit GatewayとClient VPNとでネイティブな統合がサポートされました。言うなればVPCとの関連付けではなく、Transit Gatewayと関連付けをする形です。
AWS Blogsにも投稿されています。
従来Client VPNエンドポイントの関連付けをしたサブネットに生えてきたENIにSNATされていましたが、それが行われなくなりました。これにより通信の特定を簡単に行うことができるようになりました。
もちろん専用のVPCを用意していたのであれば、専用VPCも不要になります。
料金は特に変わらないので非常に嬉しいですね。
Client VPNとTransit Gatewayのネイティブ統合前提条件
Client VPNとTransit Gatewayのネイティブ統合前提条件は以下のとおりです。
- Transit Gatewayの要件
- Client VPNエンドポイントと同一リージョンであること
- クロスアカウントで関連づける場合は、RAMを使用すること
- Transit Gateway CDIRブロックが割り当てられていること
- IPv6やデュアルスタック構成を採用する場合はIPv6 CIDRブロックも割り当てること
- ネットワークの要件
- Client VPNのクライアントCIDRブロックはTransit Gatewayに接続しているVPCのCIDRブロックと重複していないこと
- Client VPNで指定するAZはTransit Gatewayでもサポートされていること
- Client VPNへのリターントラフィックを流すためには、宛先のVPCのルートテーブルに戻りのルートを定義すること
参考 : Transit Gateway integration with Client VPN - AWS Client VPN
個人的にはTransit Gateway CIDRブロックの使われ方やサイジングが気になりました。ドキュメント上では特に設計のヒントになる要素はありません。
やってみた
検証環境
実際に試してみます。
検証環境は以下のとおりです。
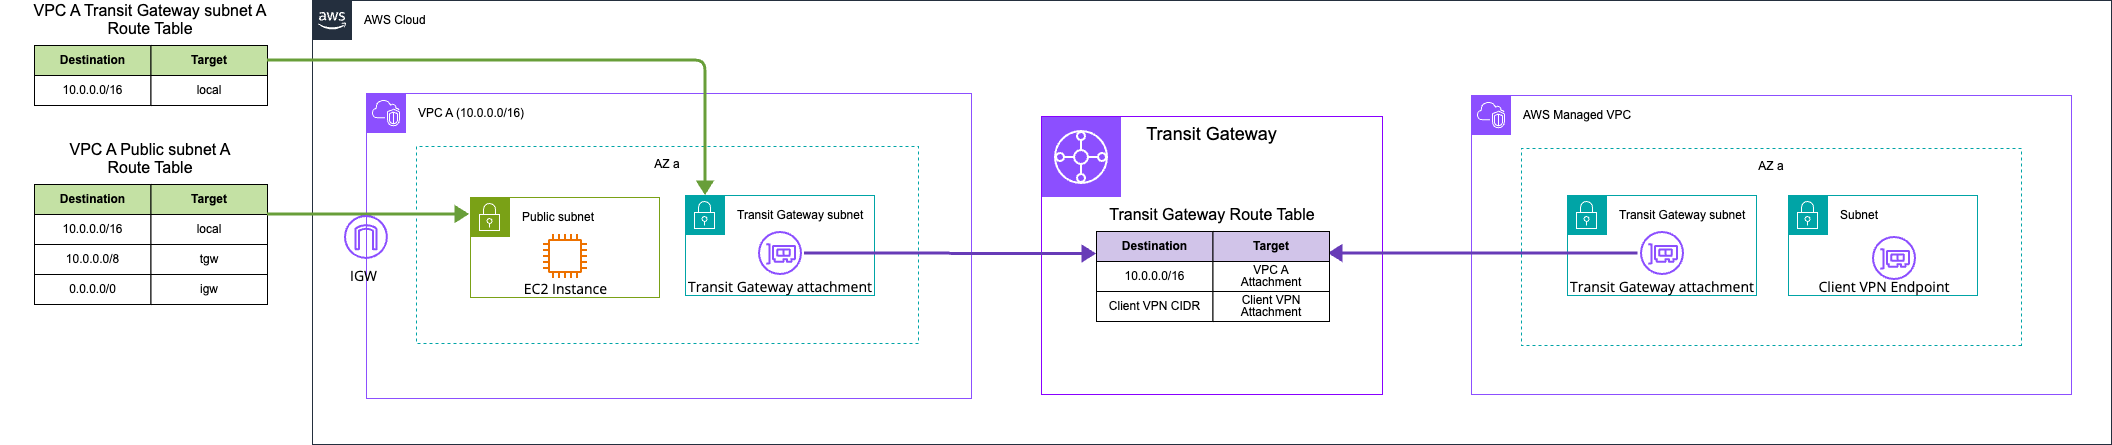
Client VPN以外は作成済みです。
Transit GatewayおよびTransit Gateway route tableは以下のとおりです。
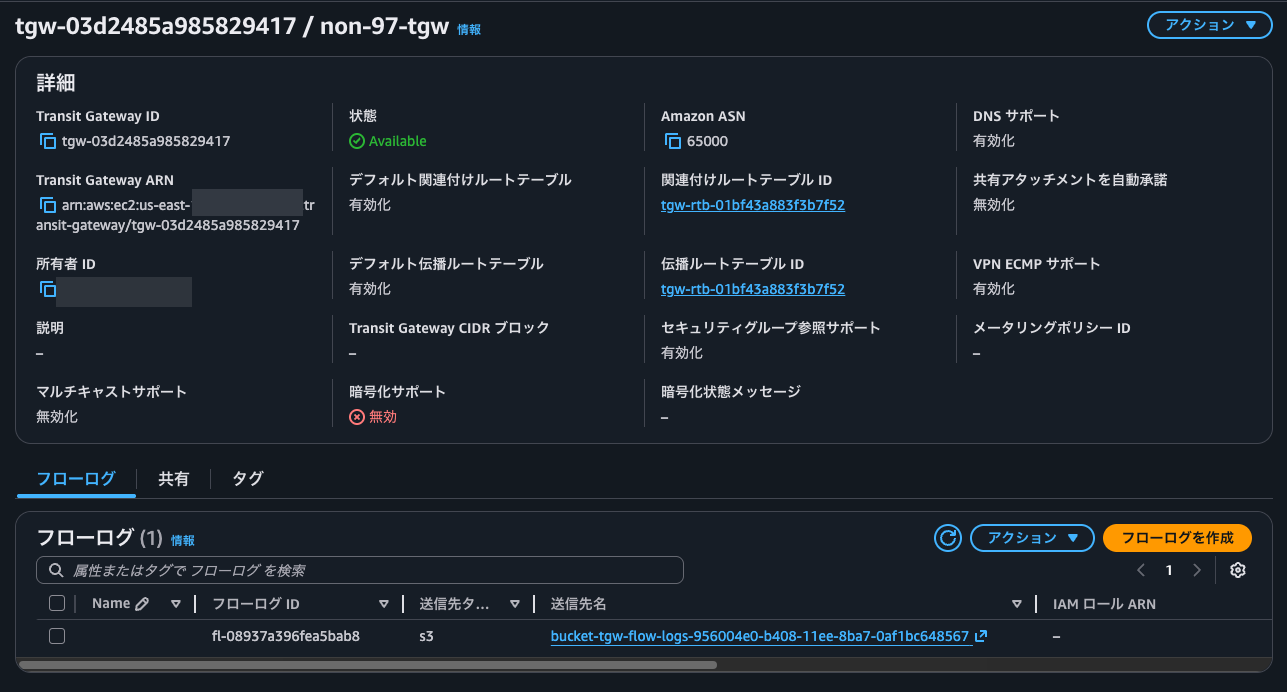
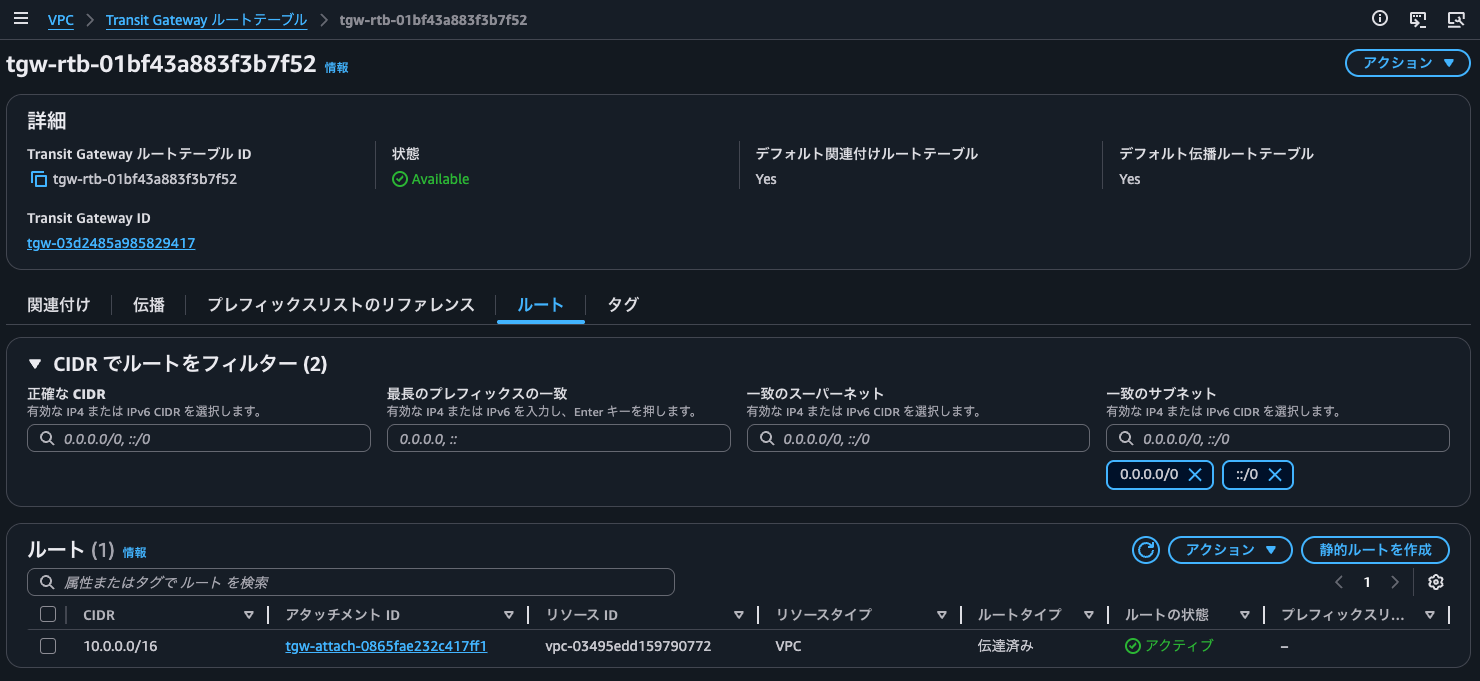
Transit Gateway CIDRブロックが未指定の場合の挙動が気になったので、こちらは一旦未指定です。
各種証明書の発行
以下AWS公式ドキュメントに従って各種証明書の発行を行います。
$ git clone https://github.com/OpenVPN/easy-rsa.git
Cloning into 'easy-rsa'...
remote: Enumerating objects: 9284, done.
remote: Counting objects: 100% (324/324), done.
remote: Compressing objects: 100% (119/119), done.
remote: Total 9284 (delta 213), reused 209 (delta 204), pack-reused 8960 (from 4)
Receiving objects: 100% (9284/9284), 69.36 MiB | 25.95 MiB/s, done.
Resolving deltas: 100% (4391/4391), done.

$ cd easy-rsa/easyrsa3

$ ./easyrsa init-pki

Notice
------
'init-pki' complete; you may now create a CA or requests.

Your newly created PKI dir is:
* /home/ssm-user/easy-rsa/easyrsa3/pki

$ ./easyrsa build-ca nopass
.........+.+..+++++++++++++++++++++++++++++++++++++++*..+.+++++++++++++++++++++++++++++++++++++++*......+.......+..+...+...+...+..........+......+.....+....+......+......+.....+..........+..+.............+...............+............+..+....+..+............+.+.....+.+.....+.+...+............+..+.+......+...+...+..+..........+..+........................................+......+..+...+...+......+...+.+.................+.......+.....+...+.............+.....................+...........+....+...........+...+....+..+..........+......+...+.....+....+...+..+...+...+..........+.....+.......+...+..+.........+..........+...+.................+...+......+......+...+.+..+...............+...............+.......+......+.........+..+......+.......+........+.......+......+..............+.......+...+..+......+....+......+...+..+.........+...+............+......+....+......+...+............+...+...........+.............+........+....+...+...........+....+.....+.+..+.......+.....+...+.............+.....+....+...+..+......+......+.+..+.......+........+............+.+.....+.........+.++++++
.......+..+.+..+++++++++++++++++++++++++++++++++++++++*....+..+...+.+......+..+.+.........+..+.+..+.+.....+++++++++++++++++++++++++++++++++++++++*....+......+.........+......++++++
You are about to be asked to enter information that will be incorporated
into your certificate request.
What you are about to enter is what is called a Distinguished Name or a DN.
There are quite a few fields but you can leave some blank
For some fields there will be a default value,
If you enter '.', the field will be left blank.
-----
Common Name (eg: your user, host, or server name) [Easy-RSA CA]:non-97 CA

Notice
------
CA creation complete. Your new CA certificate is at:
* /home/ssm-user/easy-rsa/easyrsa3/pki/ca.crt

Build-ca completed successfully.

$ ./easyrsa --san=DNS:server build-server-full server nopass
.+.........+...+..+.............+...+..+.......+.........+++++++++++++++++++++++++++++++++++++++*.....+..+....+.......................+...+++++++++++++++++++++++++++++++++++++++*.++++++
.+...+.+......+...+++++++++++++++++++++++++++++++++++++++*..+..+...+....+...+........+.+........+.+++++++++++++++++++++++++++++++++++++++*......+...+.....+...+...+....+..+..........+.....+......+...............+...+......+.........+....++++++
-----

Notice
------
Private-Key and Public-Certificate-Request files created.
Your files are:
* req: /home/ssm-user/easy-rsa/easyrsa3/pki/reqs/server.req
* key: /home/ssm-user/easy-rsa/easyrsa3/pki/private/server.key

You are about to sign the following certificate:

  Requested CN:     'server'
  Requested type:   'server'
  Valid for:        '825' days


subject=
    commonName                = server

            X509v3 Subject Alternative Name:
                DNS:server

Type the word 'yes' to continue, or any other input to abort.
  Confirm requested details: yes

Using configuration from /home/ssm-user/easy-rsa/easyrsa3/pki/5e8f7136/temp.02
Check that the request matches the signature
Signature ok
The Subject's Distinguished Name is as follows
commonName            :ASN.1 12:'server'
Certificate is to be certified until Aug  1 15:55:02 2028 GMT (825 days)

Write out database with 1 new entries
Database updated

WARNING
=======
INCOMPLETE Inline file created:
* /home/ssm-user/easy-rsa/easyrsa3/pki/inline/private/server.inline

Missing TLS Key, see 'easyrsa help gen-tls'


Notice
------
Certificate created at:
* /home/ssm-user/easy-rsa/easyrsa3/pki/issued/server.crt

$ ./easyrsa build-client-full client1.domain.tld nopass
....+.........+............+.....+....+.........+.....+.+++++++++++++++++++++++++++++++++++++++*.....+.......+...+.....+....+........+.+..+...+.......+.....+...+.+.....+...+......+.........+++++++++++++++++++++++++++++++++++++++*.........+.....+.......+...........+....+...+......+..+.......+..+.........+......+...+.+..............+.......+...+........+.......+.....+.......+..............+.+..................+.....+.+.....+.......+..+.+..+..........+.........+...........+.........+..........+.........+..+.......+........+...+....+......+...............+..+.......+..+.+............+..+.+...+..+...+......+..........+........+...+...+................+...+.....+......+.+........+.+.........+..+.+..............+.+........+.........+.......+...+..+.....................+...+.........+................+.........+........+....+.....+.............+...+..+.......+...+.....+.+.........+......++++++
...+.....................+++++++++++++++++++++++++++++++++++++++*.........+..+...+....+...+..+................+...........+.+............+......+.....+.+...+++++++++++++++++++++++++++++++++++++++*.........+....+......+..++++++
-----

Notice
------
Private-Key and Public-Certificate-Request files created.
Your files are:
* req: /home/ssm-user/easy-rsa/easyrsa3/pki/reqs/client1.domain.tld.req
* key: /home/ssm-user/easy-rsa/easyrsa3/pki/private/client1.domain.tld.key

You are about to sign the following certificate:

  Requested CN:     'client1.domain.tld'
  Requested type:   'client'
  Valid for:        '825' days


subject=
    commonName                = client1.domain.tld

Type the word 'yes' to continue, or any other input to abort.
  Confirm requested details: yes

Using configuration from /home/ssm-user/easy-rsa/easyrsa3/pki/6014a4ac/temp.02
Check that the request matches the signature
Signature ok
The Subject's Distinguished Name is as follows
commonName            :ASN.1 12:'client1.domain.tld'
Certificate is to be certified until Aug  1 15:55:15 2028 GMT (825 days)

Write out database with 1 new entries
Database updated

WARNING
=======
INCOMPLETE Inline file created:
* /home/ssm-user/easy-rsa/easyrsa3/pki/inline/private/client1.domain.tld.inline

Missing TLS Key, see 'easyrsa help gen-tls'


Notice
------
Certificate created at:
* /home/ssm-user/easy-rsa/easyrsa3/pki/issued/client1.domain.tld.crt

$ mkdir ~/custom_folder/
$ cp pki/ca.crt ~/custom_folder/
$ cp pki/issued/server.crt ~/custom_folder/
$ cp pki/private/server.key ~/custom_folder/
$ cp pki/issued/client1.domain.tld.crt ~/custom_folder
$ cp pki/private/client1.domain.tld.key ~/custom_folder/
$ cd ~/custom_folder/
$ aws acm import-certificate --certificate fileb://server.crt --private-key fileb://server.key --certificate-chain fileb://ca.crt
{
    "CertificateArn": "arn:aws:acm:us-east-1:<AWSアカウントID>:certificate/5309c0e4-a468-4689-8ab9-22b47197e261"
}

$ aws acm import-certificate --certificate fileb://client1.domain.tld.crt --private-key fileb://client1.domain.tld.key --certificate-chain fileb://ca.crt
{
    "CertificateArn": "arn:aws:acm:us-east-1:<AWSアカウントID>:certificate/5692a55a-a6e3-4687-8495-4554b29ecdb7"
}
これでACMにサーバー証明書とクライアント証明書が登録されました。
Client VPNエンドポイントの作成
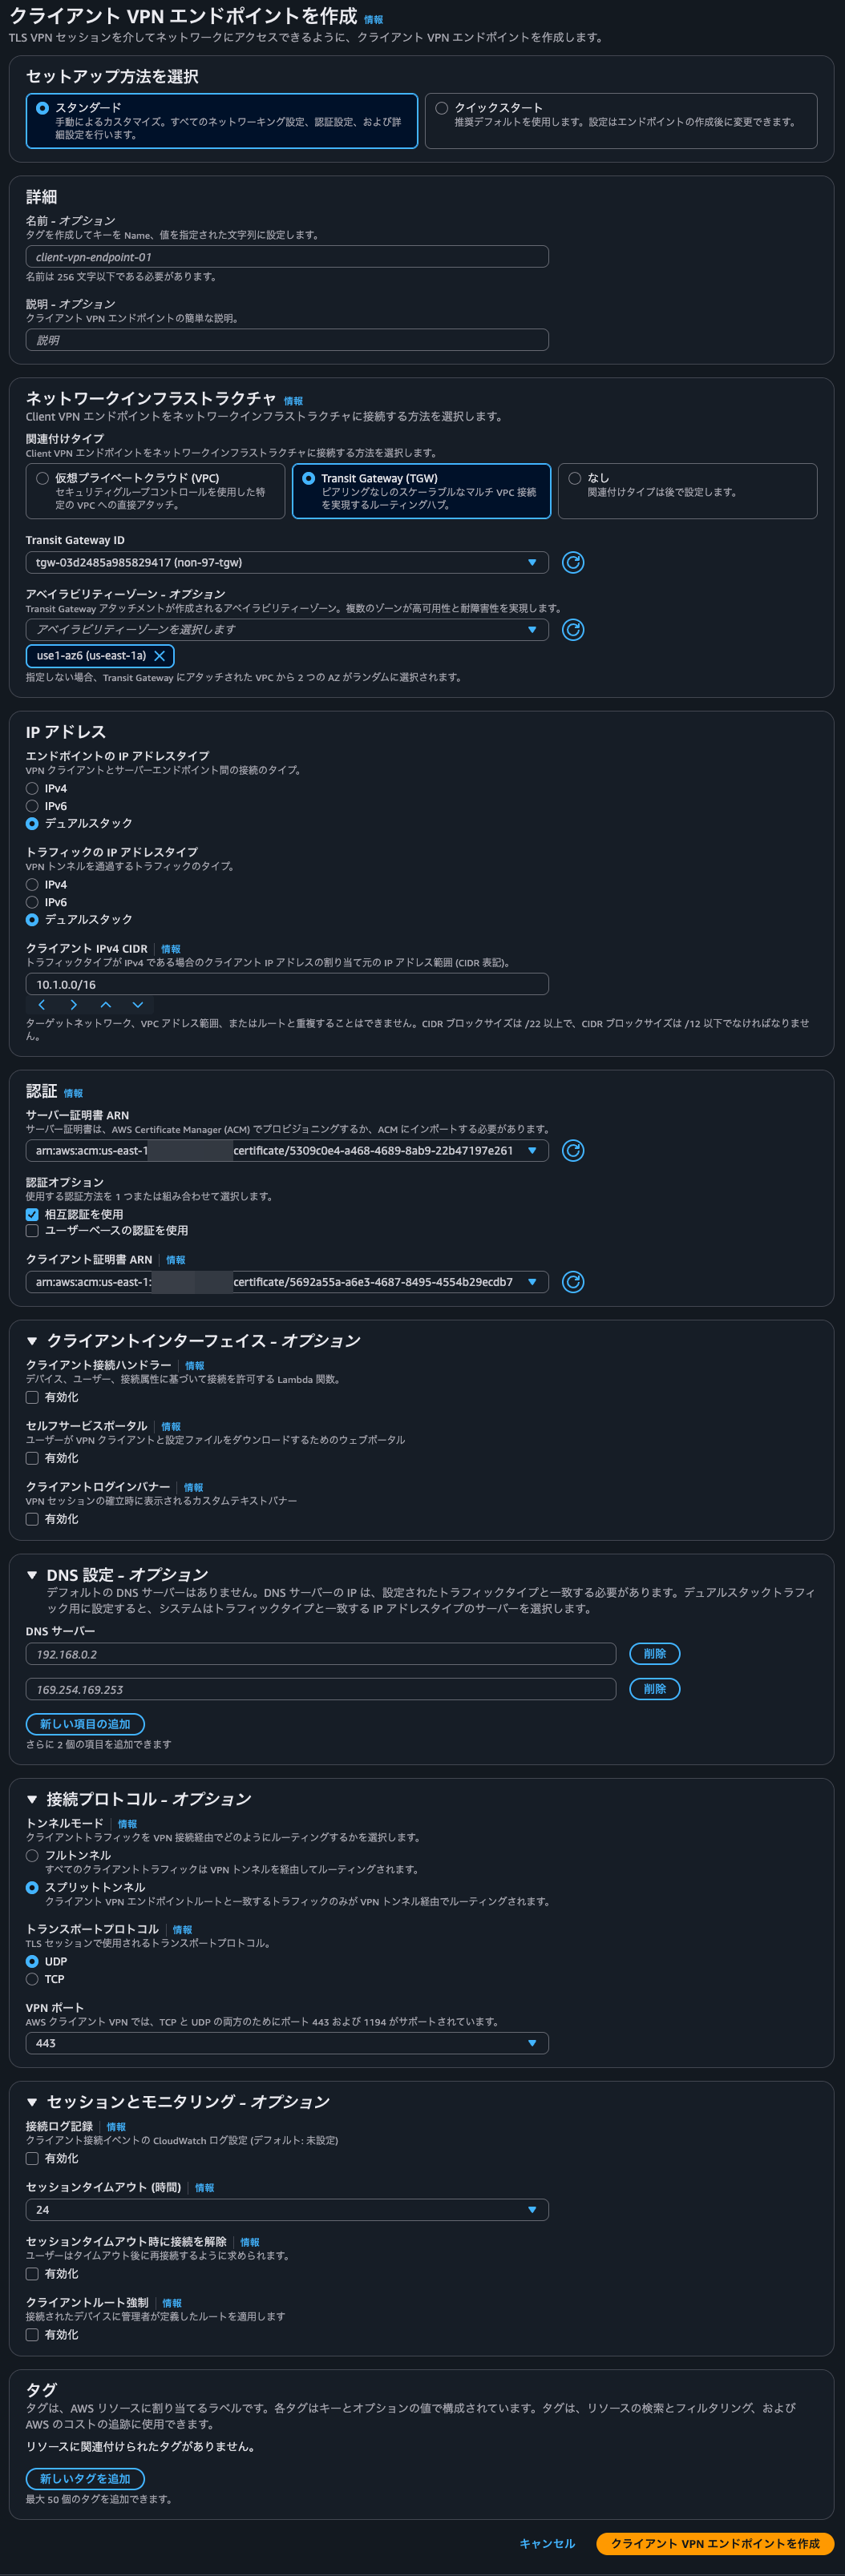
続いてClient VPNエンドポイントの作成です。
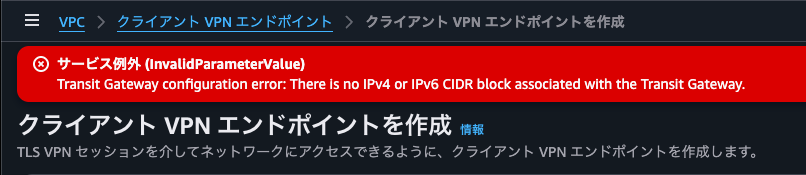
関連付け先がVPCではなく、Transit Gatewayであることと、この時点でAZを指定すること以外特に気になる点はありません。
これで作成しようとすると、Transit Gateway configuration error- There is no IPv4 or IPv6 CIDR block associated with the Transit Gateway.とエラーになりました。やはり、Transit Gateway CIDRブロックの割り当てが必須のようです。
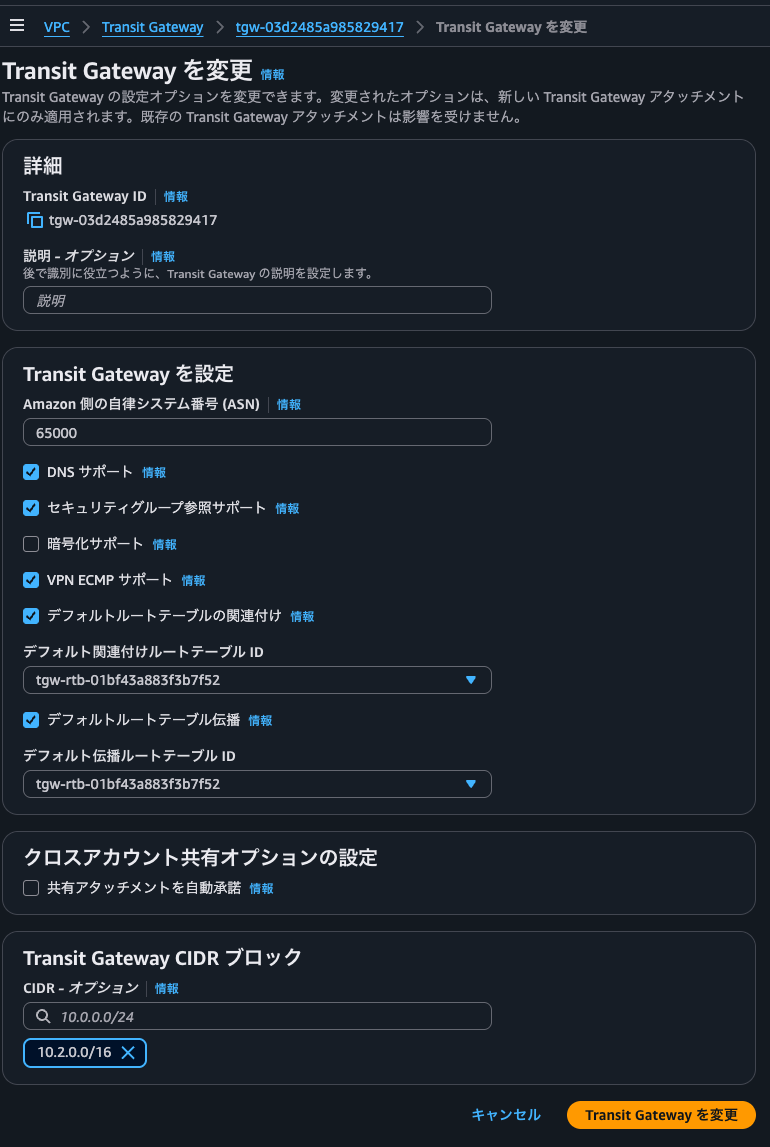
VPC CIDR、Client VPNのクライアントIPv4 CIDRブロックと被らないようにTransit Gateway CIDRブロックを指定します。
Transit Gateway CIDRブロック追加後、先ほど同じパラメーターでClient VPNエンドポイントの作成をリクエストすると、正常に受け付けられました。
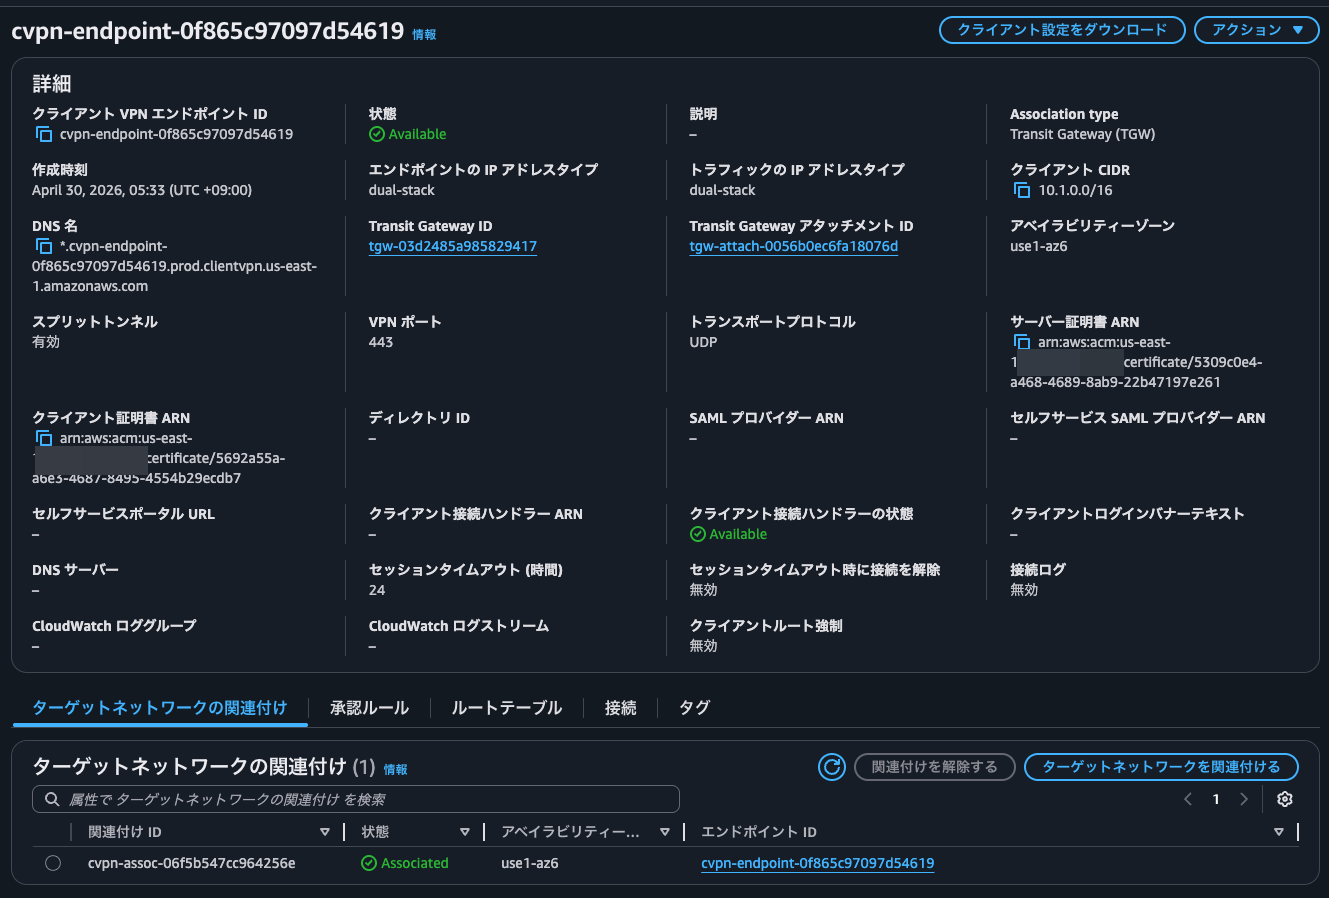
既にAZとの関連付けまで行われていますね。
Transit Gatewayと繋がるVPCと通信できるように承認ルールとルートを設定します。


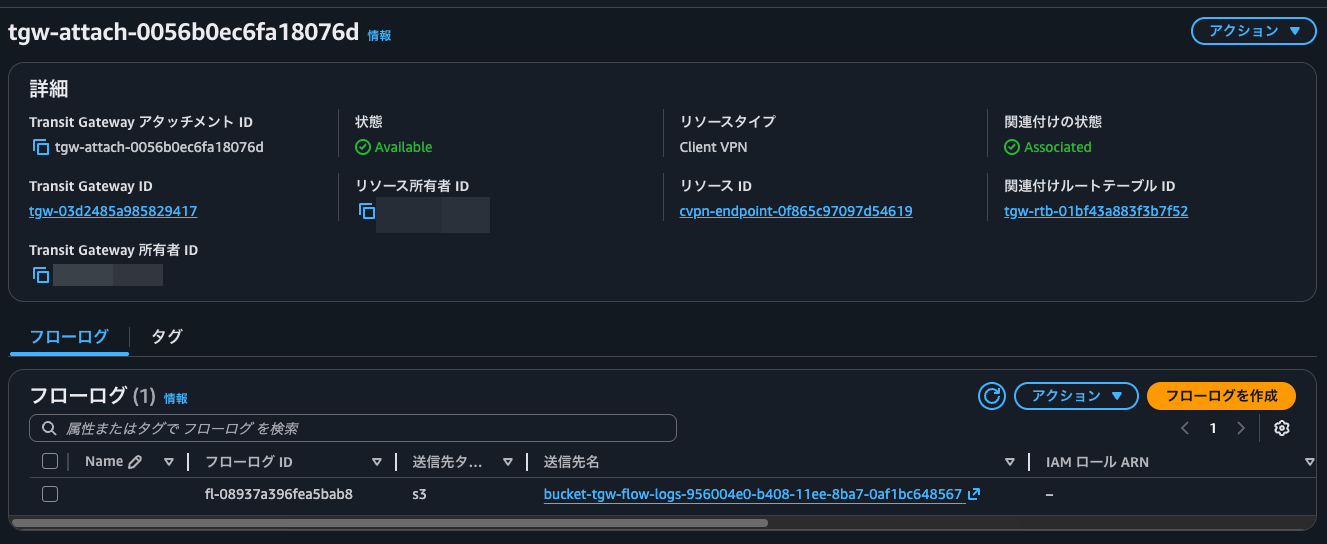
この状態でTransit Gateway attachmentを確認すると、リソースタイプがClient VPNのものが作成されていました。
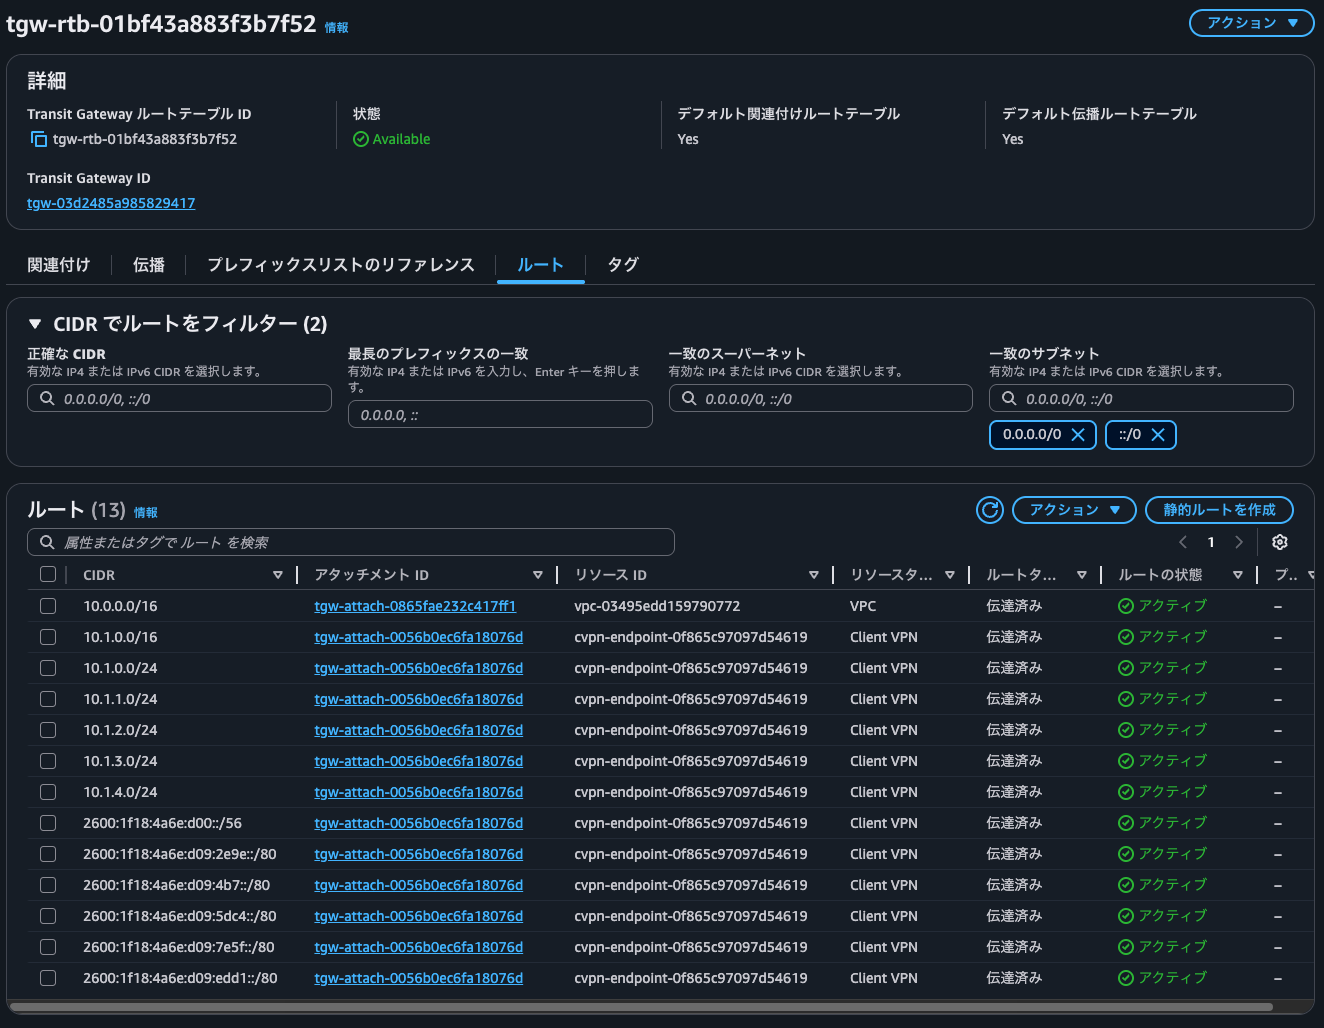
また、Transit Gateway route tableを確認すると、Client VPNのクライアントIPv4 CIDRブロックで指定したものへのルートが追加されていました。10.1.0.0/24などのClient VPNのクライアントIPv4 CIDRブロックで指定したものよりも具体的なルートがなぜ設定されているのかは謎です。
動作確認
動作確認です。
Client VPNエンドポイントのクライアント設定ファイルをダウンロードし、設定ファイル内にクライアント証明書と秘密鍵を入力します。
設定ファイルをClient VPNのプロファイルで指定し、接続します。
一連の流れは以下記事が分かりやすいと思います。
この状態で手元の端末からVPC内のEC2インスタンスにpingを叩きます。
> ping -c 4 10.0.12.144
PING 10.0.12.144 (10.0.12.144): 56 data bytes
64 bytes from 10.0.12.144: icmp_seq=0 ttl=125 time=185.791 ms
64 bytes from 10.0.12.144: icmp_seq=1 ttl=125 time=187.940 ms
64 bytes from 10.0.12.144: icmp_seq=2 ttl=125 time=187.484 ms
64 bytes from 10.0.12.144: icmp_seq=3 ttl=125 time=183.719 ms

--- 10.0.12.144 ping statistics ---
4 packets transmitted, 4 packets received, 0.0% packet loss
round-trip min/avg/max/stddev = 183.719/186.233/187.940/1.658 ms
いいですね。
VPC内のEC2インスタンスでnginxを起動し、そちらに対してcurlでアクセスします。
> curl 10.0.12.144
<!DOCTYPE html>
<html>
<head>
<title>Welcome to nginx!</title>
<style>
html { color-scheme: light dark; }
body { width: 35em; margin: 0 auto;
font-family: Tahoma, Verdana, Arial, sans-serif; }
</style>
</head>
<body>
<h1>Welcome to nginx!</h1>
<p>If you see this page, the nginx web server is successfully installed and
working. Further configuration is required.</p>

<p>For online documentation and support please refer to
<a href="http://nginx.org/">nginx.org</a>.<br/>
Commercial support is available at
<a href="http://nginx.com/">nginx.com</a>.</p>

<p><em>Thank you for using nginx.</em></p>
</body>
</html>

> curl 10.0.12.144 -I
HTTP/1.1 200 OK
Server: nginx/1.28.3
Date: Wed, 29 Apr 2026 21:33:09 GMT
Content-Type: text/html
Content-Length: 615
Last-Modified: Tue, 31 Mar 2026 20:27:53 GMT
Connection: keep-alive
ETag: "69cc2e49-267"
Accept-Ranges: bytes

> curl 10.0.12.144 -Iv
*   Trying 10.0.12.144:80...
* Connected to 10.0.12.144 (10.0.12.144) port 80
> HEAD / HTTP/1.1
> Host: 10.0.12.144
> User-Agent: curl/8.7.1
> Accept: */*
>
* Request completely sent off
< HTTP/1.1 200 OK
HTTP/1.1 200 OK
< Server: nginx/1.28.3
Server: nginx/1.28.3
< Date: Wed, 29 Apr 2026 21:33:16 GMT
Date: Wed, 29 Apr 2026 21:33:16 GMT
< Content-Type: text/html
Content-Type: text/html
< Content-Length: 615
Content-Length: 615
< Last-Modified: Tue, 31 Mar 2026 20:27:53 GMT
Last-Modified: Tue, 31 Mar 2026 20:27:53 GMT
< Connection: keep-alive
Connection: keep-alive
< ETag: "69cc2e49-267"
ETag: "69cc2e49-267"
< Accept-Ranges: bytes
Accept-Ranges: bytes
<

* Connection #0 to host 10.0.12.144 left intact
問題なくアクセスできていますね。
このとき、nginxのアクセスログを確認してみると、確かに割り当てたIPアドレスレンジ内のIPアドレスになっています。
$ sudo cat /var/log/nginx/access.log
10.1.3.2 - - [29/Apr/2026:21:28:11 +0000] "GET / HTTP/1.1" 200 615 "-" "curl/8.7.1" "-"
10.1.3.2 - - [29/Apr/2026:21:33:09 +0000] "HEAD / HTTP/1.1" 200 0 "-" "curl/8.7.1" "-"
10.1.3.2 - - [29/Apr/2026:21:33:16 +0000] "HEAD / HTTP/1.1" 200 0 "-" "curl/8.7.1" "-"
こちらのIPアドレスはClient VPNの接続履歴から確認できるクライアントIPアドレスと一致しています。これは便利ですね。

Transit Gateway Flow Logsの確認
Transit Gateway Flow logsも確認してみましょう。
Athenaでクエリをかけたいので、以下のようなDDLを実行します。
CREATE EXTERNAL TABLE `tgw_flow_logs`(
  `version` int,
  `resource_type` string,
  `account_id` string,
  `tgw_id` string,
  `tgw_attachment_id` string,
  `tgw_src_vpc_account_id` string,
  `tgw_dst_vpc_account_id` string,
  `tgw_src_vpc_id` string,
  `tgw_dst_vpc_id` string,
  `tgw_src_subnet_id` string,
  `tgw_dst_subnet_id` string,
  `tgw_src_eni` string,
  `tgw_dst_eni` string,
  `tgw_src_az_id` string,
  `tgw_dst_az_id` string,
  `tgw_pair_attachment_id` string,
  `srcaddr` string,
  `dstaddr` string,
  `srcport` int,
  `dstport` int,
  `protocol` bigint,
  `packets` bigint,
  `bytes` bigint,
  `start` bigint,
  `end` bigint,
  `log_status` string,
  `type` string,
  `packets_lost_no_route` bigint,
  `packets_lost_blackhole` bigint,
  `packets_lost_mtu_exceeded` bigint,
  `packets_lost_ttl_expired` bigint,
  `tcp_flags` int,
  `region` string,
  `flow_direction` string,
  `pkt_src_aws_service` string,
  `pkt_dst_aws_service` string)
PARTITIONED BY (
  `aws_account_id` string,
  `aws_region` string,
  `datehour` string)
ROW FORMAT SERDE
  'org.apache.hadoop.hive.ql.io.parquet.serde.ParquetHiveSerDe'
STORED AS INPUTFORMAT
  'org.apache.hadoop.hive.ql.io.parquet.MapredParquetInputFormat'
OUTPUTFORMAT
  'org.apache.hadoop.hive.ql.io.parquet.MapredParquetOutputFormat'
LOCATION
  's3://bucket-tgw-flow-logs-956004e0-b408-11ee-8ba7-0af1bc648567/AWSLogs'
TBLPROPERTIES (
  'projection.enabled'='true',
  'has_encrypted_data'='true',
  'classification'='parquet',
  'projection.aws_account_id.type'='enum',
  'projection.aws_account_id.values'='<AWSアカウントID>',
  'projection.aws_region.type'='enum',
  'projection.aws_region.values'='us-east-1',
  'projection.datehour.format'='yyyy/MM/dd/HH',
  'projection.datehour.interval'='1',
  'projection.datehour.interval.unit'='HOURS',
  'projection.datehour.range'='NOW-1YEARS,NOW',
  'projection.datehour.type'='date',
  'projection.enabled'='true',
  'skip.header.line.count'='1',
  'storage.location.template'='s3://bucket-tgw-flow-logs-956004e0-b408-11ee-8ba7-0af1bc648567/AWSLogs/${aws_account_id}/vpcflowlogs/${aws_region}/${datehour}',
  'transient_lastDdlTime'='1705373737')
疎通確認時の通信のログを抽出します。
SELECT
    *
FROM
    "default"."tgw_flow_logs"
WHERE
    datehour='2026/04/29/21' AND
    (
        srcaddr='10.0.12.144' OR
        dstaddr='10.0.12.144'
    )
;
実行結果は以下のとおりです。
version,resource_type,account_id,tgw_id,tgw_attachment_id,tgw_src_vpc_account_id,tgw_dst_vpc_account_id,tgw_src_vpc_id,tgw_dst_vpc_id,tgw_src_subnet_id,tgw_dst_subnet_id,tgw_src_eni,tgw_dst_eni,tgw_src_az_id,tgw_dst_az_id,tgw_pair_attachment_id,srcaddr,dstaddr,srcport,dstport,protocol,packets,bytes,start,end,log_status,type,packets_lost_no_route,packets_lost_blackhole,packets_lost_mtu_exceeded,packets_lost_ttl_expired,tcp_flags,region,flow_direction,pkt_src_aws_service,pkt_dst_aws_service,aws_account_id,aws_region,datehour
6,TransitGateway,<AWSアカウントID>,tgw-03d2485a985829417,tgw-attach-0056b0ec6fa18076d,<AWSアカウントID>,<AWSアカウントID>,'-,vpc-03495edd159790772,'-,subnet-078545a6acad5a157,'-,eni-0c845bf8606c21517,use1-az6,use1-az6,tgw-attach-0865fae232c417ff1,10.1.3.2,10.0.12.144,58760,80,6,6,398,1777498091,1777498091,OK,IPv4,0,0,0,0,,us-east-1,ingress,'-,'-,<AWSアカウントID>,us-east-1,2026/04/29/21
6,TransitGateway,<AWSアカウントID>,tgw-03d2485a985829417,tgw-attach-0865fae232c417ff1,<AWSアカウントID>,<AWSアカウントID>,'-,vpc-03495edd159790772,'-,subnet-078545a6acad5a157,'-,eni-0c845bf8606c21517,use1-az6,use1-az6,tgw-attach-0056b0ec6fa18076d,10.1.3.2,10.0.12.144,58760,80,6,6,398,1777498091,1777498091,OK,IPv4,0,0,0,0,,us-east-1,egress,'-,'-,<AWSアカウントID>,us-east-1,2026/04/29/21
6,TransitGateway,<AWSアカウントID>,tgw-03d2485a985829417,tgw-attach-0865fae232c417ff1,<AWSアカウントID>,<AWSアカウントID>,vpc-03495edd159790772,'-,subnet-078545a6acad5a157,'-,eni-0c845bf8606c21517,'-,use1-az6,use1-az6,tgw-attach-0056b0ec6fa18076d,10.0.12.144,10.1.3.2,80,58760,6,4,1069,1777498091,1777498091,OK,IPv4,0,0,0,0,0,us-east-1,ingress,'-,'-,<AWSアカウントID>,us-east-1,2026/04/29/21
6,TransitGateway,<AWSアカウントID>,tgw-03d2485a985829417,tgw-attach-0056b0ec6fa18076d,<AWSアカウントID>,<AWSアカウントID>,vpc-03495edd159790772,'-,subnet-078545a6acad5a157,'-,eni-0c845bf8606c21517,'-,use1-az6,use1-az6,tgw-attach-0865fae232c417ff1,10.0.12.144,10.1.3.2,80,58760,6,4,1069,1777498091,1777498091,OK,IPv4,0,0,0,0,0,us-east-1,egress,'-,'-,<AWSアカウントID>,us-east-1,2026/04/29/21
6,TransitGateway,<AWSアカウントID>,tgw-03d2485a985829417,tgw-attach-0865fae232c417ff1,<AWSアカウントID>,<AWSアカウントID>,vpc-03495edd159790772,'-,subnet-078545a6acad5a157,'-,eni-0c845bf8606c21517,'-,use1-az6,use1-az6,tgw-attach-0056b0ec6fa18076d,10.0.12.144,10.1.3.2,0,0,1,4,336,1777498375,1777498378,OK,IPv4,0,0,0,0,0,us-east-1,ingress,'-,'-,<AWSアカウントID>,us-east-1,2026/04/29/21
6,TransitGateway,<AWSアカウントID>,tgw-03d2485a985829417,tgw-attach-0056b0ec6fa18076d,<AWSアカウントID>,<AWSアカウントID>,vpc-03495edd159790772,'-,subnet-078545a6acad5a157,'-,eni-0c845bf8606c21517,'-,use1-az6,use1-az6,tgw-attach-0865fae232c417ff1,10.0.12.144,10.1.3.2,0,0,1,4,336,1777498375,1777498378,OK,IPv4,0,0,0,0,0,us-east-1,egress,'-,'-,<AWSアカウントID>,us-east-1,2026/04/29/21
6,TransitGateway,<AWSアカウントID>,tgw-03d2485a985829417,tgw-attach-0056b0ec6fa18076d,<AWSアカウントID>,<AWSアカウントID>,'-,vpc-03495edd159790772,'-,subnet-078545a6acad5a157,'-,eni-0c845bf8606c21517,use1-az6,use1-az6,tgw-attach-0865fae232c417ff1,10.1.3.2,10.0.12.144,58926,80,6,6,399,1777498389,1777498389,OK,IPv4,0,0,0,0,,us-east-1,ingress,'-,'-,<AWSアカウントID>,us-east-1,2026/04/29/21
6,TransitGateway,<AWSアカウントID>,tgw-03d2485a985829417,tgw-attach-0865fae232c417ff1,<AWSアカウントID>,<AWSアカウントID>,'-,vpc-03495edd159790772,'-,subnet-078545a6acad5a157,'-,eni-0c845bf8606c21517,use1-az6,use1-az6,tgw-attach-0056b0ec6fa18076d,10.1.3.2,10.0.12.144,58926,80,6,6,399,1777498389,1777498389,OK,IPv4,0,0,0,0,,us-east-1,egress,'-,'-,<AWSアカウントID>,us-east-1,2026/04/29/21
6,TransitGateway,<AWSアカウントID>,tgw-03d2485a985829417,tgw-attach-0865fae232c417ff1,<AWSアカウントID>,<AWSアカウントID>,vpc-03495edd159790772,'-,subnet-078545a6acad5a157,'-,eni-0c845bf8606c21517,'-,use1-az6,use1-az6,tgw-attach-0056b0ec6fa18076d,10.0.12.144,10.1.3.2,80,58930,6,4,454,1777498395,1777498396,OK,IPv4,0,0,0,0,0,us-east-1,ingress,'-,'-,<AWSアカウントID>,us-east-1,2026/04/29/21
6,TransitGateway,<AWSアカウントID>,tgw-03d2485a985829417,tgw-attach-0056b0ec6fa18076d,<AWSアカウントID>,<AWSアカウントID>,'-,vpc-03495edd159790772,'-,subnet-078545a6acad5a157,'-,eni-0c845bf8606c21517,use1-az6,use1-az6,tgw-attach-0865fae232c417ff1,10.1.3.2,10.0.12.144,58930,80,6,6,399,1777498395,1777498396,OK,IPv4,0,0,0,0,,us-east-1,ingress,'-,'-,<AWSアカウントID>,us-east-1,2026/04/29/21
6,TransitGateway,<AWSアカウントID>,tgw-03d2485a985829417,tgw-attach-0865fae232c417ff1,<AWSアカウントID>,<AWSアカウントID>,'-,vpc-03495edd159790772,'-,subnet-078545a6acad5a157,'-,eni-0c845bf8606c21517,use1-az6,use1-az6,tgw-attach-0056b0ec6fa18076d,10.1.3.2,10.0.12.144,58930,80,6,6,399,1777498395,1777498396,OK,IPv4,0,0,0,0,,us-east-1,egress,'-,'-,<AWSアカウントID>,us-east-1,2026/04/29/21
6,TransitGateway,<AWSアカウントID>,tgw-03d2485a985829417,tgw-attach-0056b0ec6fa18076d,<AWSアカウントID>,<AWSアカウントID>,vpc-03495edd159790772,'-,subnet-078545a6acad5a157,'-,eni-0c845bf8606c21517,'-,use1-az6,use1-az6,tgw-attach-0865fae232c417ff1,10.0.12.144,10.1.3.2,80,58930,6,4,454,1777498395,1777498396,OK,IPv4,0,0,0,0,0,us-east-1,egress,'-,'-,<AWSアカウントID>,us-east-1,2026/04/29/21
6,TransitGateway,<AWSアカウントID>,tgw-03d2485a985829417,tgw-attach-0056b0ec6fa18076d,<AWSアカウントID>,<AWSアカウントID>,vpc-03495edd159790772,'-,subnet-078545a6acad5a157,'-,eni-0c845bf8606c21517,'-,use1-az6,use1-az6,tgw-attach-0865fae232c417ff1,10.0.12.144,10.1.3.2,80,58926,6,4,454,1777498389,1777498389,OK,IPv4,0,0,0,0,0,us-east-1,egress,'-,'-,<AWSアカウントID>,us-east-1,2026/04/29/21
6,TransitGateway,<AWSアカウントID>,tgw-03d2485a985829417,tgw-attach-0865fae232c417ff1,<AWSアカウントID>,<AWSアカウントID>,vpc-03495edd159790772,'-,subnet-078545a6acad5a157,'-,eni-0c845bf8606c21517,'-,use1-az6,use1-az6,tgw-attach-0056b0ec6fa18076d,10.0.12.144,10.1.3.2,80,58926,6,4,454,1777498389,1777498389,OK,IPv4,0,0,0,0,0,us-east-1,ingress,'-,'-,<AWSアカウントID>,us-east-1,2026/04/29/21
6,TransitGateway,<AWSアカウントID>,tgw-03d2485a985829417,tgw-attach-0865fae232c417ff1,<AWSアカウントID>,<AWSアカウントID>,'-,vpc-03495edd159790772,'-,subnet-078545a6acad5a157,'-,eni-0c845bf8606c21517,use1-az6,use1-az6,tgw-attach-0056b0ec6fa18076d,10.1.3.2,10.0.12.144,0,0,1,4,336,1777498375,1777498378,OK,IPv4,0,0,0,0,0,us-east-1,egress,'-,'-,<AWSアカウントID>,us-east-1,2026/04/29/21
6,TransitGateway,<AWSアカウントID>,tgw-03d2485a985829417,tgw-attach-0056b0ec6fa18076d,<AWSアカウントID>,<AWSアカウントID>,'-,vpc-03495edd159790772,'-,subnet-078545a6acad5a157,'-,eni-0c845bf8606c21517,use1-az6,use1-az6,tgw-attach-0865fae232c417ff1,10.1.3.2,10.0.12.144,0,0,1,4,336,1777498375,1777498378,OK,IPv4,0,0,0,0,0,us-east-1,ingress,'-,'-,<AWSアカウントID>,us-east-1,2026/04/29/21
こちらも送信元/送信先のIPアドレスは先ほど確認したClient VPNエンドポイントに割り当てたIPアドレスレンジ内のIPアドレスとなっていますね。
なお、以下のようにTransit Gateway CIDRブロックに割り当てた範囲内のIPアドレスがTransit Gateway Flow Logsに記録されるか確認しましたが、結果は0件でした。
SELECT
    *
FROM
    "default"."tgw_flow_logs"
WHERE
    datehour='2026/04/29/21' AND
    (
        srcaddr LIKE '10.2.%' OR
        dstaddr LIKE '10.2.%'
    )
;
これではどのように使われているのか分かりませんね。
Transit Gatewayを使用している環境なのであれば、これからはTransit Gatewayとのネイティブ統合機能を使いそう
AWS Client VPN が AWS Transit Gateway とのネイティブな統合をサポートしたアップデートを紹介しました。
Transit Gatewayを使用している環境なのであれば、これからはTransit Gatewayとのネイティブ統合機能を使いそうですね。
この記事が誰かの助けになれば幸いです。
以上、クラウド事業本部 コンサルティング部の のんピ(@non____97)でした!


