I created AWS DocumentDb and inserted queries
この記事は公開されてから1年以上経過しています。情報が古い可能性がありますので、ご注意ください。
Introduction AWS DocumentDB
Amazon DocumentDB is a scalable, highly durable, and fully managed database service for operating mission-critical MongoDB workloads.
Amazon DocumentDB is compatible with MongoDB compatibility. It is a fast, scalable, highly available, and fully managed document database service that supports MongoDB workloads and makes storing, querying, and indexing JSON data simple.
Step 1: Create an AWS Cloud9 environment
- From the AWS Management Console navigate to the AWS Cloud9 console and choose to Create environment .


Step 2: Create a security group
This security group will enable you to connect to your Amazon DocumentDB cluster from your AWS Cloud9 environment.
- On the Amazon EC2 Management Console , under Network and Security , choose Security groups .

- For the Security group name , enter the Name.
- Enter a Description
- For the VPC, accept the default VPC
- Choose Add rule and enter a port range

Step 3: create DocumentDB cluster
- On the Amazon DocumentDB management console, under Clusters , choose Create .
- Choose 1 for the Number of instances . Choosing one instance helps minimize costs. If this were a production system, it is recommended to provision 3 instances for high availability.
- In the Authentication section, enter a username and password.
- In the Network Settings section, for VPC security groups , choose demoDocDB .
- Choose Create cluster .


Step 4: Install the mongo shell
You will now install the mongo shell in your AWS Cloud9 environment that you created in Step 1. The mongo shell is a command-line utility that you use to connect and query your Amazon DocumentDB cluster.
At the command prompt, create the repository file with the following command:
echo -e "[mongodb-org-4.0] \nname=MongoDB Repository\nbaseurl=https://repo.mongodb.org/yum/amazon/2013.03/mongodb-org/4.0/x86_64/\ngpgcheck=1 \nenabled=1 \ngpgkey=https://www.mongodb.org/static/pgp/server-4.0.asc" | sudo tee /etc/yum.repos.d/mongodb-org-4.0.repo
When it is complete, install the mongo shell with the following command:
sudo yum install -y mongodb-org-shell
To encrypt data in transit, download the public key for Amazon DocumentDB.
wget https://s3.amazonaws.com/rds-downloads/rds-combined-ca-bundle.pem
Step 5: Connect to your Amazon DocumentDB cluster
On the Amazon DocumentDB management console, under Clusters, locate your cluster. Choose the cluster you created by clicking on the cluster identifier.

In the Connectivity and Security tab, under Connect to this cluster with the mongo shell , copy the connection string provided. Omit copying <insertYourPassword> so that you are prompted for the password by the mongo shell when you connect.

Paste the code in the AWS Cloud9 environment

Step 6: Insert and query data
Let's insert and query data
To insert a single document, enter the following:
db.collection.insert({"hello":"DocumentDB"})
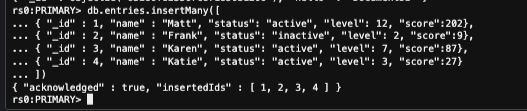
entries.db.entries.insertMany([
{ "_id" : 1, "name" : "Matt", "status": "active", "level": 12, "score":202},
{ "_id" : 2, "name" : "Frank", "status": "inactive", "level": 2, "score":9},
{ "_id" : 3, "name" : "Karen", "status": "active", "level": 7, "score":87},
{ "_id" : 4, "name" : "Katie", "status": "active", "level": 3, "score":27}
])