AWS Global Accelerator: Hands-On and Overview
この記事は公開されてから1年以上経過しています。情報が古い可能性がありますので、ご注意ください。
AWS Global Accelerator
Step by step Tutorial to Set UP Global Accelerator for your workload.
Today, I'll go through the operation of Global Accelerator, one of the AWS networking components. This allows you to increase application availability and performance. This service is also a part of the AWS Advanced Networking Speciality Exam.
AWS Global Accelerator is a networking solution that assists you in increasing the availability and performance of the apps you provide to your global consumers. The AWS Global Accelerator service is simple to set up, configure, and maintain. It provides static IP addresses, which give a consistent entry point for your applications and remove the hassle of managing numerous IP addresses for different AWS Regions and Availability Zones.
AWS Global Accelerator constantly sends user traffic to the best and optimal endpoint, reacting quickly to changes in application health, your user's location, and policies that you define.

Image reference: https://aws.amazon.com/global-accelerator/
Accessing Web Applications
Without the use of AWS Global Accelerator, Many networks may be required to reach the application. The paths to and from the application may vary. Each hop has an effect on performance and might create risks.
Using AWS Global Accelerator eliminates these inefficiencies. It makes use of the Global AWS Network, which improves performance.
Features:
- Global Edge Network
- Static anycast IP addresses.
- Fault tolerance using network zones.
- Global performance-based routing.
- TCP Termination at the Edge.
- Bring your own IP (BYOIP).
- Fine-grained traffic control.
- Continuous availability monitoring.
- Client affinity.
- Distributed denial of service (DDoS) resiliency at the edge.
Note: Since AWS Global Accelerator is a global service, it's not associated with any region.
Without further ado, let's get started with Hands-On of AWS Global Accelerator.
Step by Step Hands-On to setup AWS Global Accelerator:
Step 1: Select Global Accelerator in AWS Management Console.
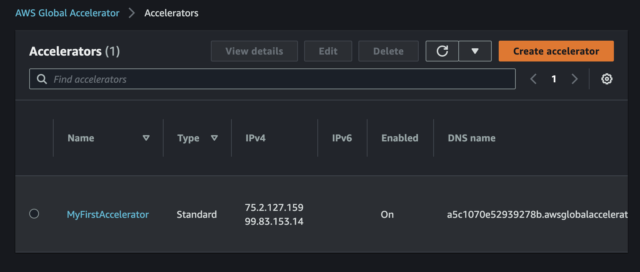
Step 2: Click on "Create Accelerator" and enter the appropriate name for Accelerator.

Step 3: Add a listener port, I selected port 80 and TCP Protocol.

Step 4: Add regions and traffic dial for required regions.
Traffic Dial: Traffic dial is an option to increase or decrease the traffic to the endpoint, 100 is 100%.

Step 5: Configure the health check.

Step 6: Add endpoint groups.
By choosing the AWS Regions to which you wish to distribute traffic, you can select one or more regional endpoint groups to associate with your accelerator's listener.
Testing
In order to test if the accelerator is working you can configure a custom message for each region and use VPN to each region to test if the accelerator is pointing you to the right endpoint in the selected region.
Deleting the Global Accelerator.
If you are creating it just to practice, make sure to delete the Global Accelerator and the associated endpoints to prevent unnecessary bills.
Conclusion
In this blog, I successfully demonstrated the step-by-step implementation of Global Accelerator. Along with the summary, it also includes a list of its features and benefits.
Reference: