【AWS IoT Core】 JITR(Just-In-Time Registration)でデバイス証明書のホワイトリスティングを実装してみた
はじめに
こんにちは、コンサルティング部の神野です。
今回は、AWS IoT Coreの「JITR(Just-In-Time Registration)」機能を活用して、デバイス証明書に埋め込まれた情報に基づくホワイトリスティングの実装方法について詳しく解説したいと思います。
JITRを使うと、デバイスが初めて接続した時に自動的に証明書の登録処理を行うことができます。これに Lambda 関数と DynamoDB を組み合わせることで、許可されたデバイスのみを自動的に登録するホワイトリスティングの仕組みも構築できます。
今回はこの仕組みをAWS CDK (Cloud Development Kit) でAWS環境を作成しつつ、ステップバイステップで実装していきます!
実現したいこと
今回実装するシステムでは、以下のことを実現する想定です。
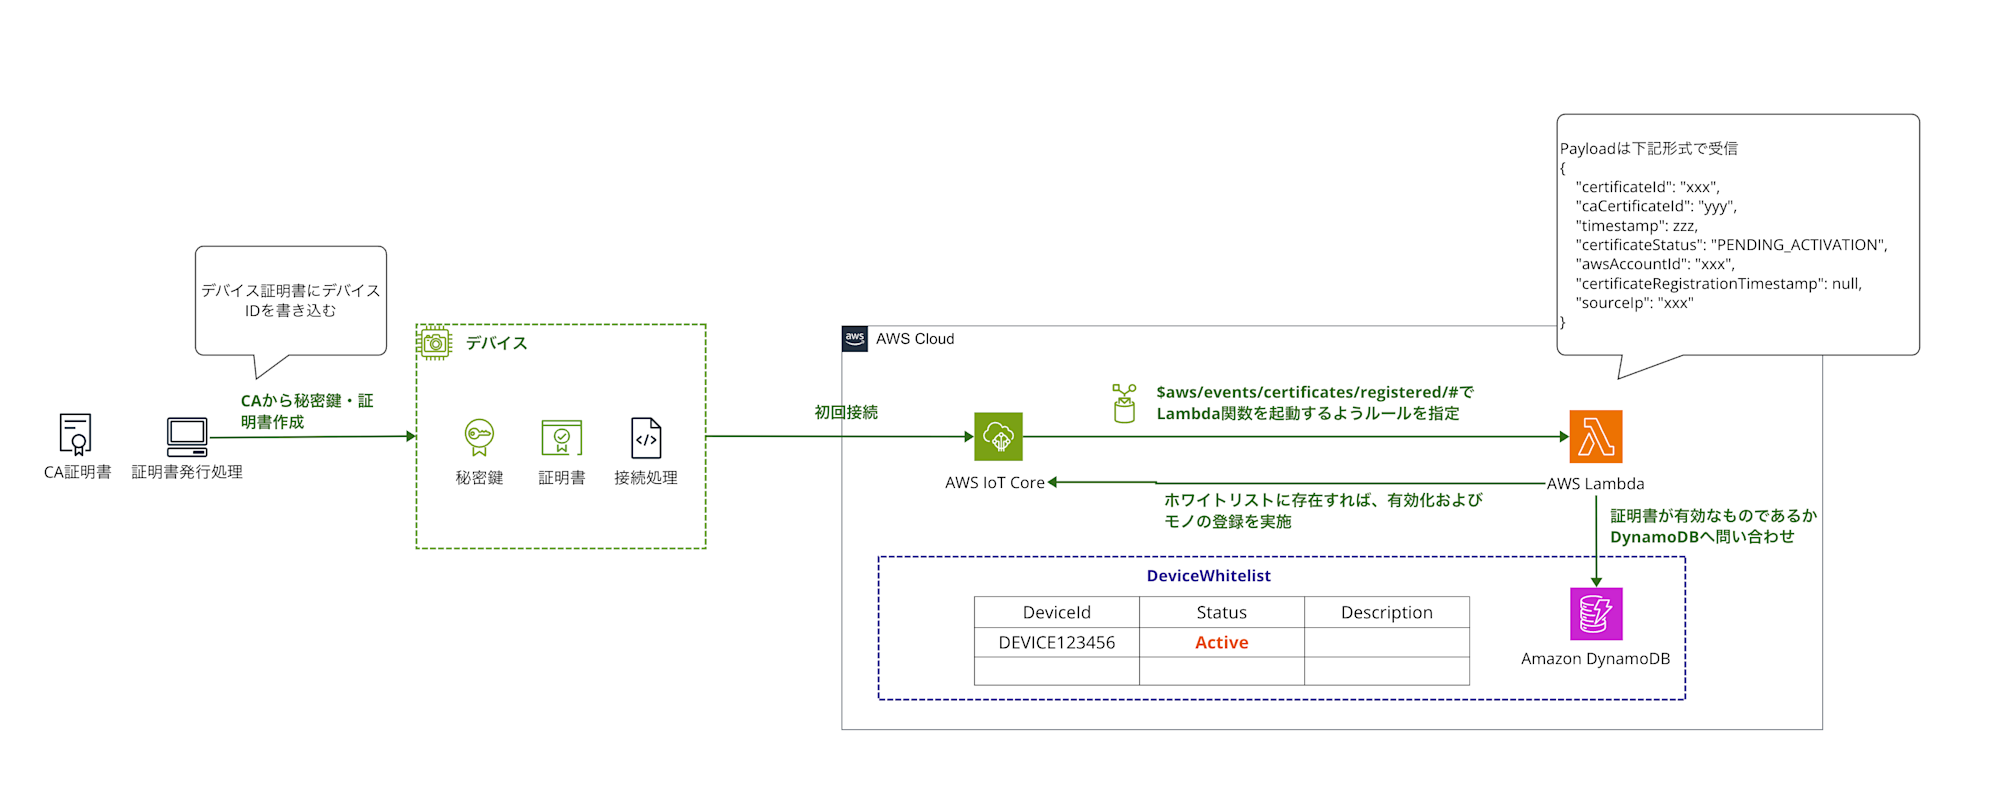
- 独自のCA証明書を元に、デバイス証明書を作成しデバイス証明書には自身のデバイスIDを書き込む
- デバイスが初めてIoT Coreに接続したタイミングで
$aws/events/certificates/registeredトピックにメッセージが送信されるため、IoT ruleでモノの紐付けを行うためのLambda関数を指定し起動する - Lambda関数でDynamoDBに問い合わせして、証明書に記載されたデバイスIDがホワイトリスト内で有効なものかチェック
- チェックが問題なければ、自動的にアクティブ化
これにより、工場出荷時に埋め込まれた証明書情報に基づいて、正規のデバイスのみをAWS IoT Coreに接続できる仕組みを構築します。ホワイトリストへは証明書発行のタイミングで情報を登録しておくようなイメージです。今回は検証としてCDKのカスタムリソースを利用して初期データを登録していますが、実際の運用で行う際はホワイトリストへの登録は証明書発行のタイミングで同時に情報を登録しておくようなイメージかと思います。
前提
本記事では環境構築はCDKを作成して、検証を行います。CDKのインストールおよび基本的なセットアップやプロジェクト作成は完了しているものとします。
構築手順
それでは、実際にシステムを構築していきましょう。手順は大きく分けて以下のステップに分けて進めていきます。
- CDKによるAWSリソースの定義 (DynamoDBテーブル、Lambda関数、IoTルール)
- Lambda関数のコード実装
- CA証明書作成とAWS IoT Core JITRのためのCA証明書設定
- デバイス証明書の作成
- デバイスのシミュレーションと動作確認
CDKコードの全容は下記レポジトリに格納しているので、必要に応じてご参照ください。
CDKによるAWSリソースの定義
まずは、許可するデバイスIDを管理するためのDynamoDBテーブル、証明書を検証するLambda関数、そしてJITRイベントをトリガーするIoTルールをCDKで定義します。
DynamoDBテーブルの作成
以下のCDKコードでDeviceWhitelistという名前のDynamoDBテーブルを作成します。パーティションキーはDeviceId(文字列型)とし、オンデマンドキャパシティモードを使用します。
import * as cdk from 'aws-cdk-lib';
import { Construct } from 'constructs';
import * as dynamodb from 'aws-cdk-lib/aws-dynamodb';
// ... 他のimport文

export class AwsIotJitrLambdaCdkStack extends cdk.Stack {
  constructor(scope: Construct, id: string, props?: cdk.StackProps) {
    super(scope, id, props);

    const deviceWhitelistTable = new dynamodb.Table(this, 'DeviceWhitelistTable', {
      tableName: 'DeviceWhitelist',
      partitionKey: { name: 'DeviceId', type: dynamodb.AttributeType.STRING },
      billingMode: dynamodb.BillingMode.PAY_PER_REQUEST,
      removalPolicy: cdk.RemovalPolicy.DESTROY, //検証用のためDESTROY。本番では適切なポリシーに変更してください。
    });

    // ... 以降のリソース定義
  }
}
このCDKコードをデプロイすると、DeviceWhitelistテーブルが作成されます。
テスト用のデバイスIDは、CDKのカスタムリソースを使用して、スタック作成時に自動的に登録するようにします。
import * as cr from 'aws-cdk-lib/custom-resources';
import * as iam from 'aws-cdk-lib/aws-iam'; // iamのimportが必要な場合

// ... deviceWhitelistTable の定義の後

    new cr.AwsCustomResource(this, 'InitDeviceWhitelistData', {
      onCreate: {
        service: 'DynamoDB',
        action: 'putItem',
        parameters: {
          TableName: deviceWhitelistTable.tableName,
          Item: {
            DeviceId: { S: 'DEVICE123456' },
            Status: { S: 'ACTIVE' },
            Description: { S: 'Test Device' },
          },
        },
        physicalResourceId: cr.PhysicalResourceId.of('InitDeviceWhitelistData'),
      },
      policy: cr.AwsCustomResourcePolicy.fromStatements([
        new iam.PolicyStatement({
          actions: ['dynamodb:PutItem'],
          resources: [deviceWhitelistTable.tableArn],
        }),
      ]),
    });
これにより、DEVICE123456というデバイスIDがテストデータとして登録されます。
手動で追加する場合は、AWSマネジメントコンソールのDynamoDBサービスから、「項目」タブで「項目の作成」を選択し、以下のような項目を追加します。
{
  "DeviceId": "DEVICE-OTHER",
  "Status": "ACTIVE",
  "Description": "Another Test Device"
}
Lambda関数のコード実装とCDKによる定義
次に、証明書が登録された時に実行されるLambda関数をCDKで定義し、そのコードを実装します。
Lambda関数のCDK定義
以下のCDKコードでIoTCertificateValidatorという名前のLambda関数を作成します。
ランタイムはPython 3.11、アーキテクチャはARM64とし、必要なIAM権限も付与します。
Lambda関数のコードは lambda/IoTCertificateValidator ディレクトリに配置し、requirements.txt に記載された依存ライブラリ (PyOpenSSL など) と共にバンドルします。
import * as lambda from 'aws-cdk-lib/aws-lambda';
import * as iam from 'aws-cdk-lib/aws-iam'; // 既にimportされていれば不要
import * as path from 'path'; // 既にimportされていれば不要

// ... deviceWhitelistTable, InitDeviceWhitelistData の定義の後

    const certificateValidatorLambda = new lambda.Function(this, 'IoTCertificateValidatorFunction', {
      functionName: 'IoTCertificateValidator',
      runtime: lambda.Runtime.PYTHON_3_11,
      handler: 'handler.lambda_handler', // Pythonファイル名(handler.py)と関数名
      code: lambda.Code.fromAsset(path.join(__dirname, '..', 'lambda', 'IoTCertificateValidator'), {
        bundling: {
          image: lambda.Runtime.PYTHON_3_11.bundlingImage,
          command: [
            'bash', '-c',
            'pip install -r requirements.txt -t /asset-output && cp -au . /asset-output'
          ],
        },
      }),
      environment: {
        DEVICE_WHITELIST_TABLE: deviceWhitelistTable.tableName,
      },
      timeout: cdk.Duration.seconds(30),
      memorySize: 256,
      architecture: lambda.Architecture.ARM_64,
    });

    // Lambda関数にDynamoDBテーブルへの読み取り権限を付与
    deviceWhitelistTable.grantReadData(certificateValidatorLambda);

    // Lambda関数に必要なIoT関連の権限を付与
    certificateValidatorLambda.addToRolePolicy(new iam.PolicyStatement({
      actions: [
        'iot:DescribeCertificate',
        'iot:UpdateCertificate',
        'iot:CreatePolicy',
        'iot:AttachPolicy',
        'iot:GetPolicy',
        'iot:CreateThing',
        'iot:DescribeThing',
        'iot:AttachThingPrincipal',
      ],
      resources: ['*'], // 本番環境では最小権限に絞ることを推奨
    }));
Lambda関数コード (Python)
Lambda関数のPythonコード (lambda/IoTCertificateValidator/handler.py) は以下の通りです。
このコードは、JITRイベントを受け取り、証明書からデバイスIDを抽出し、DynamoDBのホワイトリストと照合して、証明書のアクティベーションやモノの登録を行います。
デバイスIDがホワイトリストに存在しない場合は、証明書を無効にします。
import boto3
import json
import os
import logging
from OpenSSL import crypto
import time # timeモジュールをインポート

# ロガーの設定
logger = logging.getLogger()
logger.setLevel(logging.INFO)

# AWS SDKクライアント
iot_client = boto3.client('iot')
dynamodb = boto3.resource('dynamodb')
# DEVICE_WHITELIST_TABLE環境変数はCDKによって設定される
device_table_name = os.environ['DEVICE_WHITELIST_TABLE']
device_table = dynamodb.Table(device_table_name)

def lambda_handler(event, context):
    """
    JITR証明書登録イベントを処理するLambda関数
    """
    logger.info(f"Received event: {json.dumps(event)}")

    # 証明書IDを取得
    certificate_id = event['certificateId']
    logger.info(f"Processing certificate ID: {certificate_id}")

    try:
        # AWS IoT Coreから証明書情報を取得
        response = iot_client.describe_certificate(
            certificateId=certificate_id
        )

        certificate_pem = response['certificateDescription']['certificatePem']
        certificate_arn = response['certificateDescription']['certificateArn']

        # 証明書からデバイスIDを抽出
        device_id = extract_device_id_from_certificate(certificate_pem)
        logger.info(f"Extracted device ID: {device_id}")

        # DynamoDBでデバイスIDの有効性を確認
        device_response = device_table.get_item(
            Key={
                'DeviceId': device_id
            }
        )

        # デバイスがホワイトリストに存在するか確認
        if 'Item' in device_response:
            # デバイスが有効なので証明書をアクティブ化
            iot_client.update_certificate(
                certificateId=certificate_id,
                newStatus='ACTIVE'
            )

            # デバイス用のIoTポリシーを作成して付与
            policy_name = f"DevicePolicy_{device_id}"
            create_and_attach_policy(policy_name, certificate_arn)

            # モノを登録して証明書と関連付け
            thing_name = f"Device_{device_id}"
            register_thing(thing_name, certificate_arn)

            logger.info(f"Successfully registered device {device_id}")
            return {
                'statusCode': 200,
                'body': f"Device {device_id} successfully registered"
            }
        else:
            # デバイスが無効なので証明書を無効化
            iot_client.update_certificate(
                certificateId=certificate_id,
                newStatus='REVOKED'
            )

            logger.warning(f"Device {device_id} not found in whitelist. Certificate revoked.")
            return {
                'statusCode': 403,
                'body': f"Device {device_id} is not authorized"
            }

    except Exception as e:
        logger.error(f"Error processing certificate: {str(e)}")
        # JITRのLambdaがエラーを返すと、証明書はINACTIVEのままになる
        # 必要に応じてiot:UpdateCertificateで明示的にREVOKEDやINACTIVEにすることも検討
        return {
            'statusCode': 500,
            'body': f"Error: {str(e)}"
        }

def extract_device_id_from_certificate(cert_pem):
    """証明書からデバイスIDを抽出する関数"""
    try:
        # 証明書をパース
        x509 = crypto.load_certificate(crypto.FILETYPE_PEM, cert_pem)

        # Subject DNからSerialNumberを抽出
        subject = x509.get_subject()
        components = dict(subject.get_components())

        # serialNumberフィールドからデバイスIDを取得
        if b'serialNumber' in components:
            return components[b'serialNumber'].decode('utf-8')

        # Common NameからデバイスIDを取得(代替手段)
        if b'CN' in components:
            return components[b'CN'].decode('utf-8')

        raise ValueError("No device ID found in certificate")
    except Exception as e:
        logger.error(f"Error extracting device ID: {str(e)}")
        raise

def create_and_attach_policy(policy_name, certificate_arn):
    """IoTポリシーを作成して証明書に付与する関数"""
    try:
        # ポリシーが存在するか確認
        try:
            iot_client.get_policy(policyName=policy_name)
            logger.info(f"Policy {policy_name} already exists")
        except iot_client.exceptions.ResourceNotFoundException:
            # ポリシーが存在しない場合は作成
            logger.info(f"Creating new policy: {policy_name}")
            aws_region = os.environ.get('AWS_REGION')
            aws_account_id = boto3.client('sts').get_caller_identity().get('Account')

            policy_document = {
                "Version": "2012-10-17",
                "Statement": [
                    {
                        "Effect": "Allow",
                        "Action": ["iot:Connect"],
                        # クライアントIDに基づいて接続を制限する場合など、より詳細な指定が可能
                        "Resource": [f"arn:aws:iot:{aws_region}:{aws_account_id}:client/${{iot:ClientId}}"]
                    },
                    {
                        "Effect": "Allow",
                        "Action": ["iot:Publish", "iot:Receive"],
                        "Resource": [f"arn:aws:iot:{aws_region}:{aws_account_id}:topic/devices/*"]
                    },
                    {
                        "Effect": "Allow",
                        "Action": ["iot:Subscribe"],
                        "Resource": [f"arn:aws:iot:{aws_region}:{aws_account_id}:topicfilter/devices/*"]
                    }
                ]
            }

            iot_client.create_policy(
                policyName=policy_name,
                policyDocument=json.dumps(policy_document)
            )

        # ポリシーを証明書に付与
        iot_client.attach_policy(
            policyName=policy_name,
            target=certificate_arn
        )
        logger.info(f"Policy {policy_name} attached to certificate")
    except Exception as e:
        logger.error(f"Error creating/attaching policy: {str(e)}")
        raise

def register_thing(thing_name, certificate_arn):
    """モノを登録して証明書に関連付ける関数"""
    try:
        # モノが存在するか確認
        try:
            iot_client.describe_thing(thingName=thing_name)
            logger.info(f"Thing {thing_name} already exists")
        except iot_client.exceptions.ResourceNotFoundException:
            # モノが存在しない場合は作成
            logger.info(f"Creating new thing: {thing_name}")
            iot_client.create_thing(
                thingName=thing_name,
                attributePayload={
                    'attributes': {
                        'source': 'jitr_registration',
                        'registration_date': time.strftime('%Y-%m-%d') # 現在の日付を設定
                    }
                }
            )

        # 証明書をモノに関連付け
        iot_client.attach_thing_principal(
            thingName=thing_name,
            principal=certificate_arn
        )
        logger.info(f"Certificate attached to thing {thing_name}")
    except Exception as e:
        logger.error(f"Error registering thing: {str(e)}")
        raise
CDKでデプロイ (cdk deploy) を実行すると、Lambda関数が作成され、必要な依存関係と共にデプロイされます。便利ですね・・・!!
AWS IoT CoreのJITR設定
次に、AWS IoT CoreでJITRを有効にするための設定を行います。これには、証明書登録イベントをトリガーするIoTルールの作成と、デバイス証明書の署名に使用するCA証明書の登録・設定が含まれます。
IoTルールの作成 (CDK)
まず、証明書登録イベント ($aws/events/certificates/registered/#) をトリガーに、先ほど作成したLambda関数 (IoTCertificateValidator) を呼び出すためのIoTルールをCDKで定義します。
import * as iot from 'aws-cdk-lib/aws-iot';
import * as iam from 'aws-cdk-lib/aws-iam';

// ... certificateValidatorLambda の定義の後

    const certificateRegistrationRule = new iot.CfnTopicRule(this, 'CertificateRegistrationRule', {
      ruleName: 'CertificateRegistrationRule', // ルール名を指定
      topicRulePayload: {
        sql: "SELECT * FROM '$aws/events/certificates/registered/#'",
        actions: [{
          lambda: {
            functionArn: certificateValidatorLambda.functionArn,
          },
        }],
        ruleDisabled: false,
        awsIotSqlVersion: '2016-03-23', // 必要に応じてバージョン確認
        description: 'Triggers the IoTCertificateValidator Lambda function when a certificate is registered via JITR.',
      },
    });

    // Lambda関数にIoTルールからの呼び出し許可を付与
    certificateValidatorLambda.addPermission('IoTRulePermission', {
      principal: new iam.ServicePrincipal('iot.amazonaws.com'),
      sourceArn: certificateRegistrationRule.attrArn, // CfnTopicRuleからARNを取得
    });
このCDKコードをデプロイすると、指定したSQLステートメントでイベントを監視し、Lambda関数をアクションとして実行するIoTルールが作成されます。
全てコードが書けたら、デプロイ時はcdk deployコマンドを実行して環境を作成します。
cdk deploy
AWS IoT CA証明書の設定とJITRの有効化
次に、デバイス証明書の署名に使用する独自のCA証明書をAWS IoT Coreに登録し、JITR機能を有効化します。
コンソール上ではできない箇所なので、OpenSSL、AWS CLIを使って独自のCA証明書を登録します。
公式ドキュメントにも登録手順があるので、必要に応じてご参照ください。
CA証明書の作成 (手動)
まずはCA証明書を作成します。
# CA証明書用のディレクトリを作成
mkdir -p ~/aws-iot-jitr/ca
cd ~/aws-iot-jitr/ca

# CAプライベートキーの生成
openssl genrsa -out rootCA.key 2048

# CA証明書の作成 (例: Common Name を MyDeviceRootCA とする場合)
openssl req -x509 -new -nodes -key rootCA.key -sha256 -days 1024 -out rootCA.pem -subj "/CN=MyDeviceRootCA"
CA証明書の登録とJITR有効化 (手動)
作成したCA証明書 (rootCA.pem) をAWS IoT Coreに登録します。
-
get-registration-codeコマンドを実行して、登録コードを取得します。このコードは後で検証証明書を作成するタイミングで使用します。登録コード取得aws iot get-registration-code{ "registrationCode": "xxxxxxxxxxxxxxxxxxxxxxxxxxxxxxxxxxxxxxxxxxxxxxxxxxxxxxxxxxxxxxxx" } -
検証証明書のキーペアを作成します。
検証証明書のキーペア作成openssl genrsa -out verification_cert.key 2048 -
検証証明書のCSRを作成します。その際に、
Common Nameは先ほどの登録コードを指定します。検証証明書のCSR作成openssl req -new \ -key verification_cert.key \ -out verification_cert.csr入力例You are about to be asked to enter information that will be incorporated into your certificate request. What you are about to enter is what is called a Distinguished Name or a DN. There are quite a few fields but you can leave some blank For some fields there will be a default value, If you enter '.', the field will be left blank. ----- Country Name (2 letter code) [AU]: State or Province Name (full name) [Some-State]: Locality Name (eg, city) []: Organization Name (eg, company) [Internet Widgits Pty Ltd]: Organizational Unit Name (eg, section) []: Common Name (e.g. server FQDN or YOUR name) []: <1.で取得した登録コード> Email Address []: Please enter the following 'extra' attributes to be sent with your certificate request A challenge password []: An optional company name []: -
検証証明書を作成します。
 openssl x509 -req \
  -in verification_cert.csr \
  -CA rootCA.pem \
  -CAkey rootCA.key \
  -CAcreateserial \
  -out verification_cert.pem \
  -days 500 -sha256
実行結果の例
  Signature ok
  subject=C = AU, ST = Some-State, O = Internet Widgits Pty Ltd, CN = <1.で取得した登録コード>
  Getting CA Private Key
-
作成したCA証明書を登録します。
CA証明書を登録aws iot register-ca-certificate \ --ca-certificate file://rootCA.pem \ --verification-cert file://verification_cert.pem実行結果の例
{ "certificateArn": "arn:aws:iot:ap-northeast-1:ACCOUNT_ID:cacert/CERTIFICATE_ID", "certificateId": "CERTIFICATE_ID" } -
登録したCA証明書をActiveにします。
<CERTIFICATE_ID>の部分は、上記コマンドで出力されたcertificateIdに置き換えてください。CA証明書を有効化aws iot update-ca-certificate \ --certificate-id <CERTIFICATE_ID> \ --new-status ACTIVE
コンソール上でも登録されているか確認してみます。
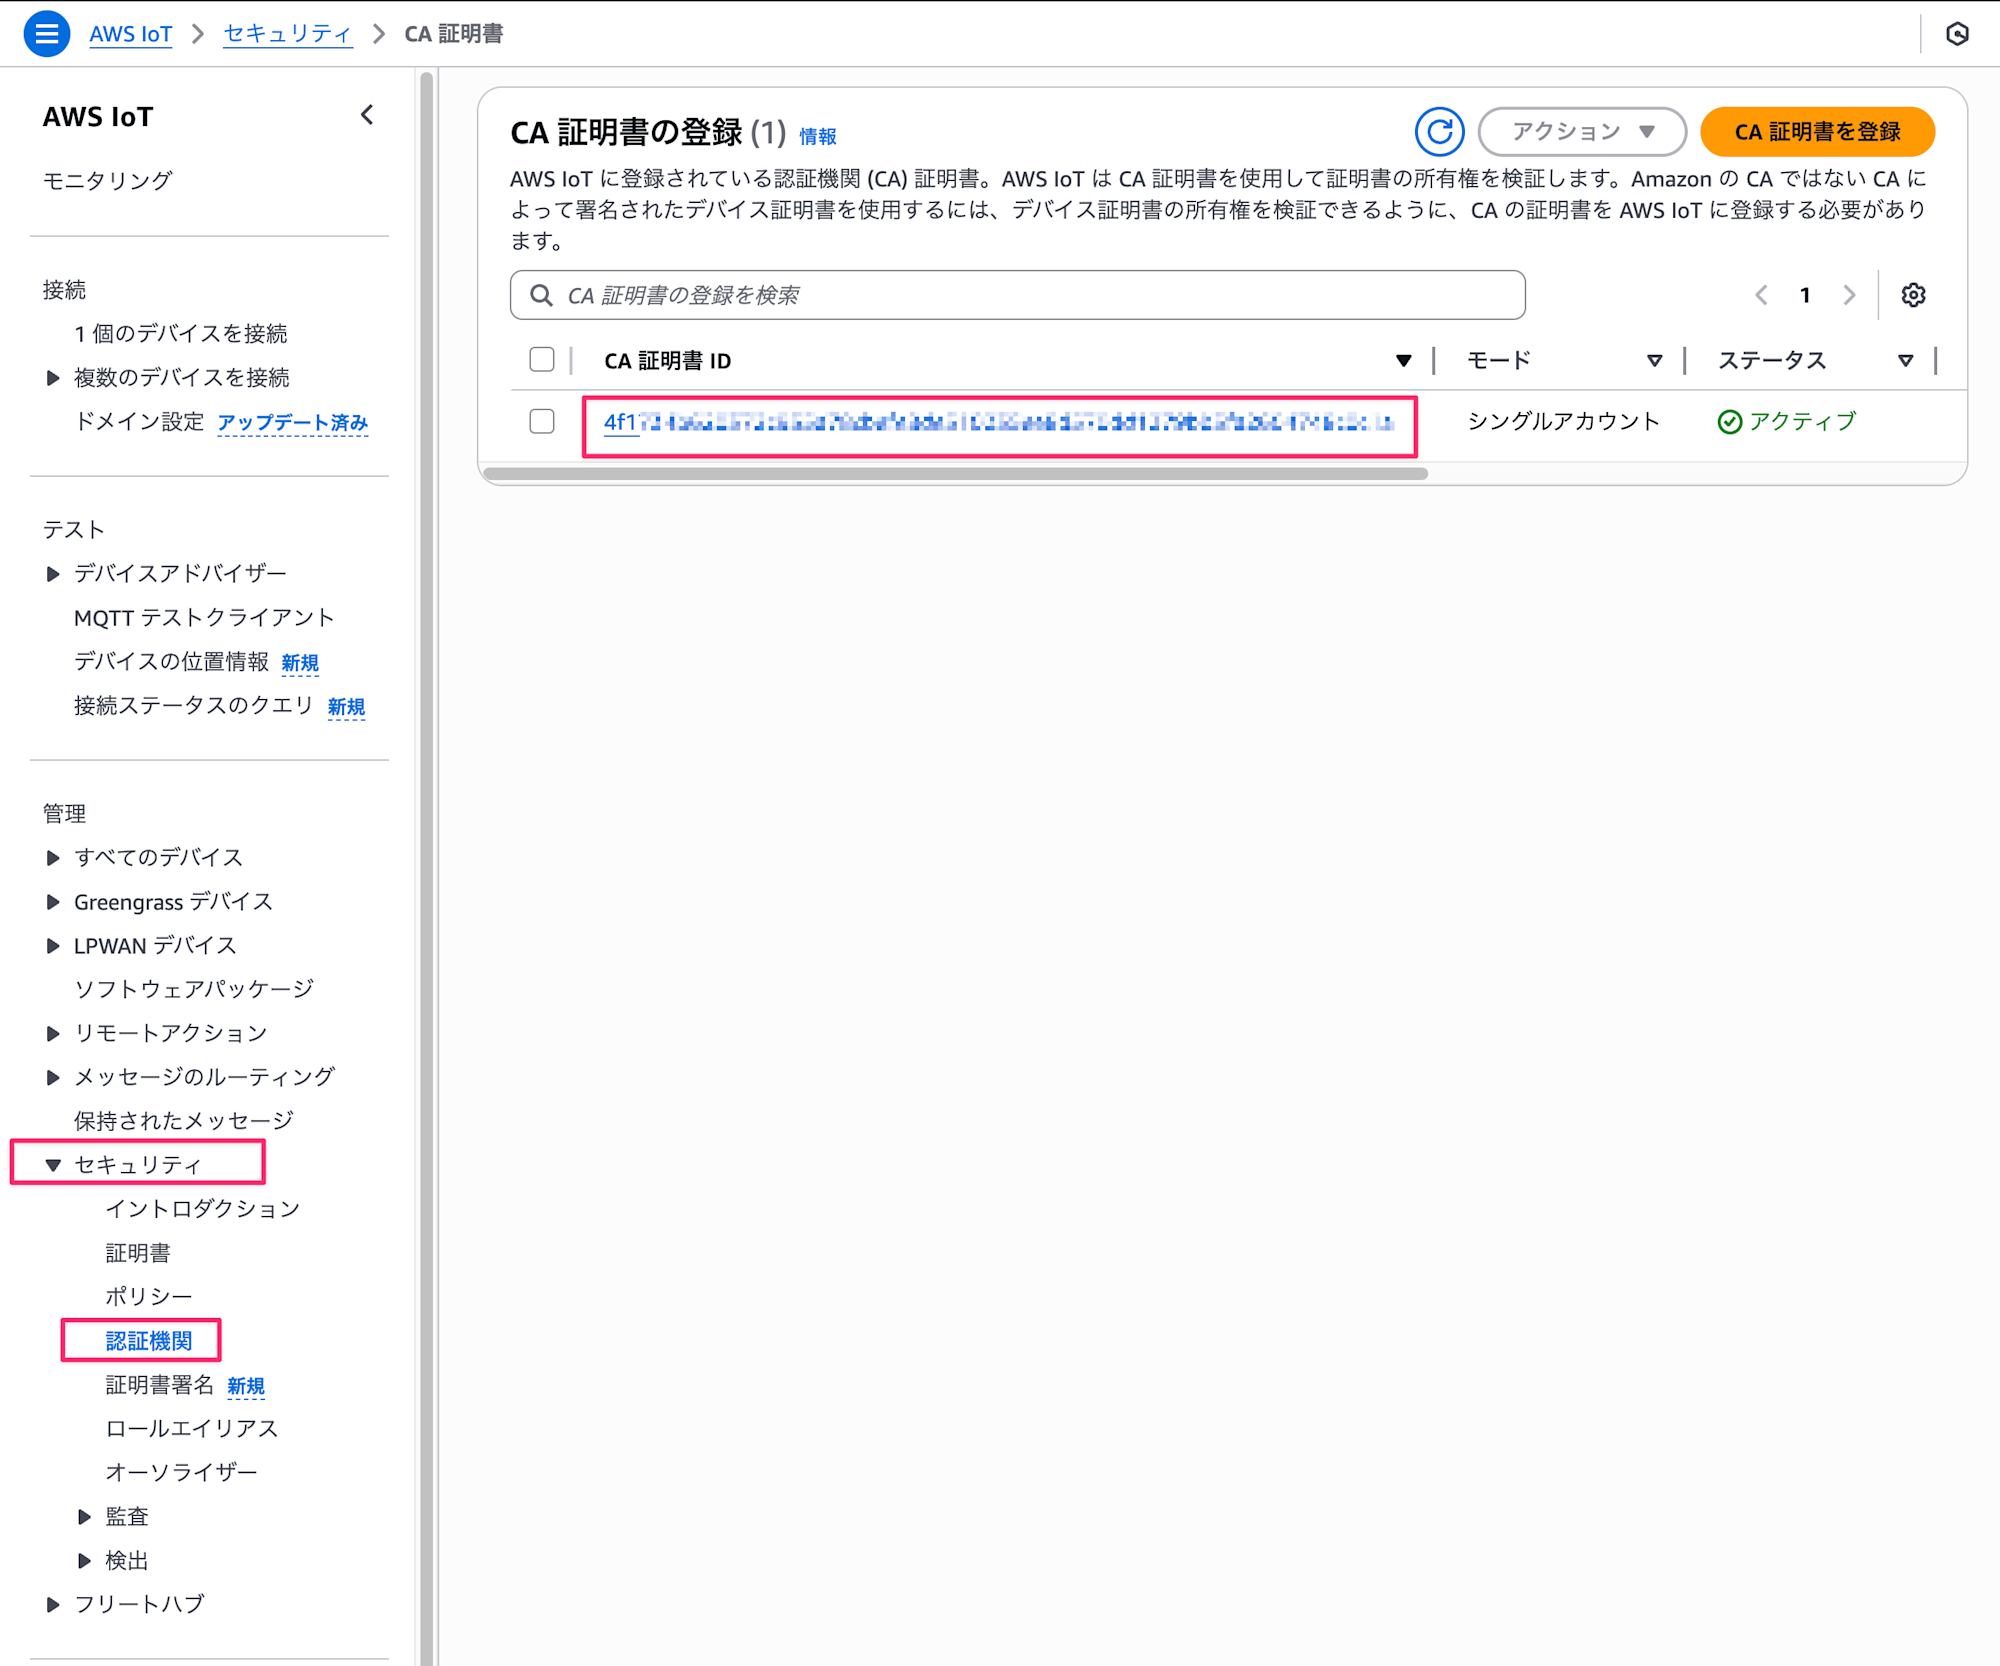
無事登録されていましたね!!
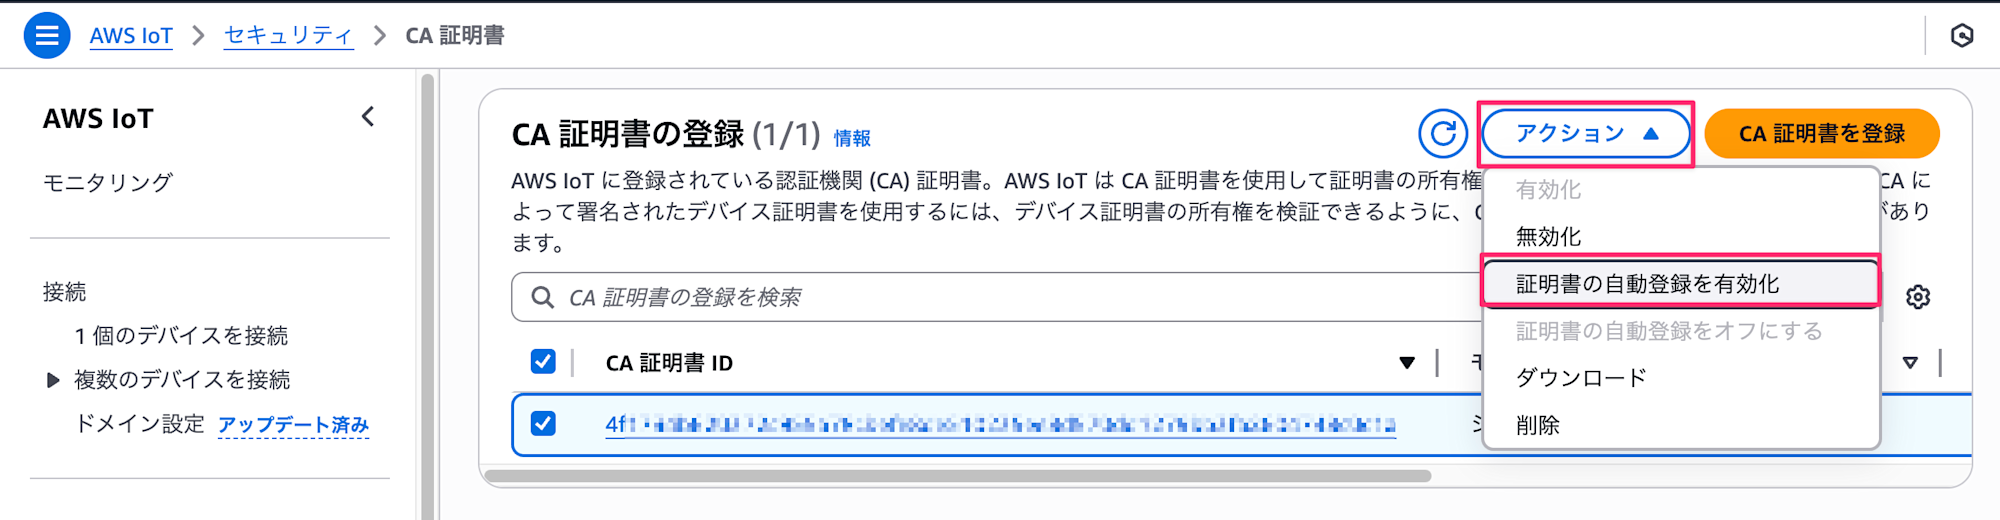
初回接続時に証明書が自動登録されるように、証明書の自動登録を有効化ボタンを押下して有効化しておきます。
デバイス証明書の作成
次に、デバイス証明書を作成します。デバイス証明書には、デバイスIDをシリアル番号として埋め込みます。
# デバイス証明書用のディレクトリを作成
mkdir -p ~/aws-iot-jitr/device
cd ~/aws-iot-jitr/device

# 有効なデバイス(ホワイトリストにCDKカスタムリソースまたは手動で登録済み)の証明書を作成
# デバイスプライベートキーの生成
openssl genrsa -out validDevice.key 2048

# 証明書署名要求(CSR)の作成(デバイスIDを埋め込む)
# "DEVICE123456" はCDKのカスタムリソースで登録したDeviceIdと一致させる
openssl req -new -key validDevice.key -out validDevice.csr -subj "/CN=ValidDevice/serialNumber=DEVICE123456"

# CSRをCA証明書で署名 (rootCA.pem と rootCA.key は事前に作成したものを参照)
openssl x509 -req -in validDevice.csr -CA ~/aws-iot-jitr/ca/rootCA.pem -CAkey ~/aws-iot-jitr/ca/rootCA.key -CAcreateserial -out validDevice.crt -days 365 -sha256

# 有効なデバイスの証明書とCA証明書を結合
cat validDevice.crt ~/aws-iot-jitr/ca/rootCA.pem > validDeviceAndCA.crt

# 無効なデバイス(ホワイトリストに未登録)の証明書も作成してみます
openssl genrsa -out invalidDevice.key 2048
openssl req -new -key invalidDevice.key -out invalidDevice.csr -subj "/CN=InvalidDevice/serialNumber=INVALID999999"
openssl x509 -req -in invalidDevice.csr -CA ~/aws-iot-jitr/ca/rootCA.pem -CAkey ~/aws-iot-jitr/ca/rootCA.key -CAcreateserial -out invalidDevice.crt -days 365 -sha256

# 無効なデバイスの証明書とCA証明書を結合
cat invalidDevice.crt ~/aws-iot-jitr/ca/rootCA.pem > invalidDeviceAndCA.crt
これで、以下の2種類のデバイス証明書が作成されました。
- 有効なデバイス証明書(シリアル番号: DEVICE123456)- DynamoDBの
DeviceWhitelistテーブルに登録済み (CDKまたは手動) - 無効なデバイス証明書(シリアル番号: INVALID999999)- DynamoDBに未登録
動作確認
最後に、作成したシステムが正しく動作するか確認してみましょう。CDKスタック (cdk deploy) が正常にデプロイされ、CA証明書がJITR有効で登録されていることを確認してから進めてください。
AWS IoT Core接続情報の取得
まず、AWS IoT Coreのエンドポイント情報を取得します。これはCDKスタックの Outputs などからも取得可能ですが、AWS CLIでも確認できます。
aws iot describe-endpoint --endpoint-type iot:Data-ATS
実行結果の例
{
    "endpointAddress": "xxxxxxxxxxxxxx-ats.iot.ap-northeast-1.amazonaws.com"
}
出力された endpointAddress をメモしておきます。
AWS のルートCA証明書をダウンロード
AWSのルートCA証明書をダウンロードします。接続時にはこのルートCA証明書を使用します。
curl -o ~/aws-iot-jitr/AmazonRootCA1.pem https://www.amazontrust.com/repository/AmazonRootCA1.pem
MQTTクライアントを使った接続テスト
Python用のAWS IoT SDKを使って、作成したデバイス証明書で接続してみます。
以下のPythonスクリプト (device_test.py) を作成します。
import time
import json
import argparse
import AWSIoTPythonSDK.MQTTLib as AWSIoTPyMQTT

# 引数の解析
parser = argparse.ArgumentParser()
parser.add_argument("--endpoint", required=True, help="AWS IoT Core endpoint")
parser.add_argument("--cert", required=True, help="Path to certificate file")
parser.add_argument("--key", required=True, help="Path to private key file")
parser.add_argument("--ca", required=True, help="Path to CA certificate file (rootCA.pem)")
parser.add_argument("--device-id", required=True, help="Device ID (used as client ID)")
args = parser.parse_args()

# MQTT クライアントの設定
client_id = args.device_id
mqtt_client = AWSIoTPyMQTT.AWSIoTMQTTClient(client_id)
mqtt_client.configureEndpoint(args.endpoint, 8883)
mqtt_client.configureCredentials(args.ca, args.key, args.cert)

# MQTT 接続パラメータの設定
mqtt_client.configureAutoReconnectBackoffTime(1, 32, 20)
mqtt_client.configureOfflinePublishQueueing(-1)
mqtt_client.configureDrainingFrequency(2)
mqtt_client.configureConnectDisconnectTimeout(10)
mqtt_client.configureMQTTOperationTimeout(5)

# 接続コールバック関数
def simple_on_online_callback():
    print("Client is online.")

# onOnlineイベントに関数を割り当て(接続成功時に呼び出される)
mqtt_client.onOnline = simple_on_online_callback

# 接続試行
print(f"Attempting to connect to AWS IoT Core as device {args.device_id}...")
try:
    if mqtt_client.connect(10): # 接続タイムアウト10秒
        print("Connection successful.")
        # メッセージ発行
        topic = f"devices/{args.device_id}/status"
        message = {
            "message": f"Hello from device {args.device_id}",
            "timestamp": time.time()
        }
        print(f"Publishing message to topic: {topic}")
        mqtt_client.publish(topic, json.dumps(message), 1) # QoS 1

        # メッセージが送信され、コールバックが処理されるのを少し待つ
        # 実際のアプリケーションではこのような固定待機ではなく、適切なイベント処理を行う
        time.sleep(5)
        print("Disconnecting...")
        mqtt_client.disconnect()
        print("Disconnected.")
    else:
        # connect()がFalseを返した場合 (タイムアウトまたは即時接続失敗)
        print("Connect attempt failed or timed out.")
except Exception as e:
    print(f"An error occurred: {str(e)}")
AWS IoT Python SDK をインストールします。
pip install AWSIoTPythonSDK
スクリプトを実行して、有効なデバイスで接続を試みます。
# 有効なデバイスでの接続テスト
python device_test.py \
  --endpoint <YOUR_IOT_ENDPOINT> \
  --cert ~/aws-iot-jitr/device/validDeviceAndCA.crt \
  --key ~/aws-iot-jitr/device/validDevice.key \
  --ca ~/aws-iot-jitr/AmazonRootCA1.pem \
  --device-id DEVICE123456
初回接続時はタイムアウトで返ってくるかと思います。これは、JITRのプロセス(Lambda実行、ポリシー作成、モノの作成など)が実行されますが、接続自体はできないためです。初回接続がタイムアウトになっても、裏側で登録処理が進んでいるはずですので、2回目は成功するため再度実行してみましょう。
Attempting to connect to AWS IoT Core as device DEVICE123456...
Connect timed out
An error occurred:
もう一度実行してみます。
Attempting to connect to AWS IoT Core as device DEVICE123456...
Client is online.
Connection successful.
Publishing message to topic: devices/DEVICE123456/status
Disconnecting...
Disconnected.
おお無事つながりました!!
ここのリトライは実際の処理では考えてあげる必要がありそうですね・・・
コンソール上でも自動登録された証明書が確認できます!
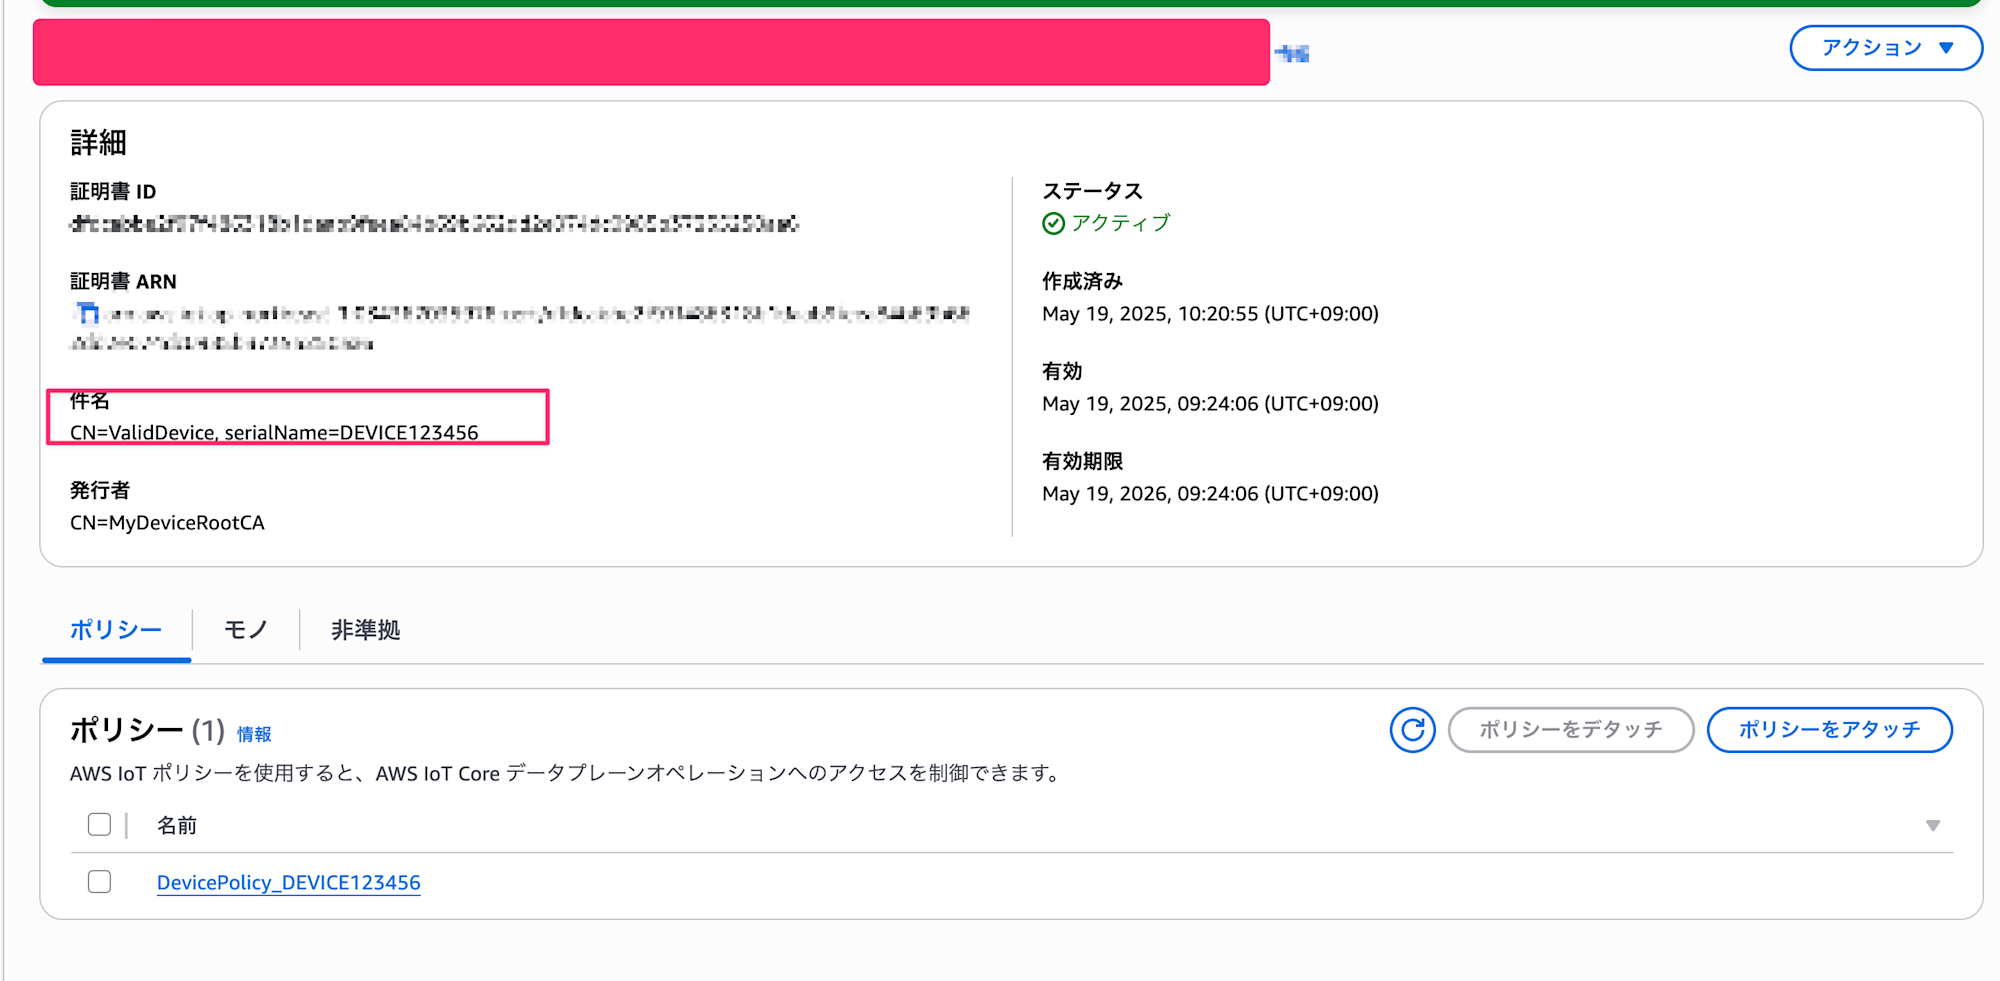
証明書とモノとの紐付け
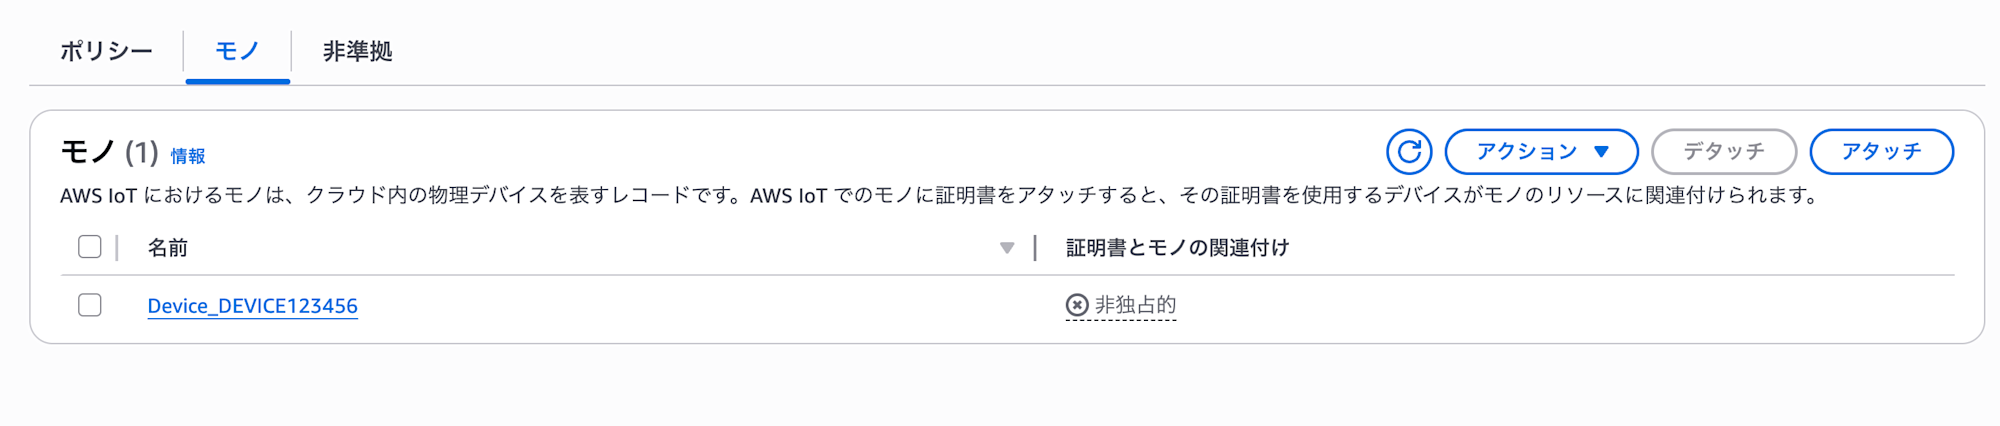
モノも自動作成されて証明書と紐づいていますね!
次に、無効なデバイスで接続を試みます。
# 無効なデバイスでの接続テスト
python device_test.py \
  --endpoint <YOUR_IOT_ENDPOINT> \
  --cert ~/aws-iot-jitr/device/invalidDeviceAndCA.crt \
  --key ~/aws-iot-jitr/device/invalidDevice.key \
  --ca ~/aws-iot-jitr/AmazonRootCA1.pem \
  --device-id INVALID999999
Attempting to connect to AWS IoT Core as device INVALID999999...
Connect timed out
An error occurred:
こちらもコンソール上から確認してみます。


不正なデバイスはステータスが有効ではなく、取消済みとなっていますね!
どちらも期待通りに動きました!!
おわりに
実際のプロジェクトでは、ここで紹介した基本的な仕組みをベースに、より具体的な要件に合わせてカスタマイズすることになると思います。特に証明書の更新やデバイスのライフサイクル管理、より詳細な権限設定など、長期的な運用を見据えた機能を追加することを検討されると良いかと思います!
この記事が、皆さんのIoTプロジェクトでの参考になれば幸いです!
最後までご覧いただきありがとうございましたー!!