![[アップデート] AWS Secrets Manager Agent がリリースされていたので Amazon Linux 2023 にインストールして使ってみた](https://images.ctfassets.net/ct0aopd36mqt/wp-thumbnail-9e5f20a2043f90ff381c154268f3bdd5/49f6ce675de75d82f2fa3e07b74ef055/aws-secrets-manager?w=3840&fm=webp)
[アップデート] AWS Secrets Manager Agent がリリースされていたので Amazon Linux 2023 にインストールして使ってみた
この記事は公開されてから1年以上経過しています。情報が古い可能性がありますので、ご注意ください。
いわさです。
先日、AWS Secrets Manager の Secrets Manager Agent というものがリリースされました。
これどういうものかと言うと、EC2 や Lambda あるいは ECS などのコンピューティング環境上でシークレットの管理・キャッシュなどを行ってくれるエージェントです。
通常はアプリケーションなどから SDK を使って AWS API 経由で Secrets Manager にアクセスし、都度シークレットを取得することが多いと思います。
Secrets Manager は呼び出し回数に応じて料金が発生するのでコスト削減のため、あるいはレイテンシー削減のためにシークレットのキャッシュ戦略を取ることが重要です。
多くのランタイムの AWS SDK では Secrets Manager 向けのキャッシュ機能が提供されていたりするのですが、一部の SDK ではまだ提供されていなかったり、あるいはプロセスを跨いでキャッシュを使いたい場合などに困るシーンが稀にありました。
WordPress の DB 接続情報などは構成ファイルにハードコードされていることが多く、Secrets Manager に切り出しをしたかったのですが構成の問題で従来はデメリットが色々とありました。
今回の Secrets Manager を使うことでこういったケースでも簡単にシークレットのキャッシュレイヤーを導入してセキュリティの向上をしつつデメリットにも対処することが出来そうです。
本日はまずは Amazon Linux 2023 でセットアップまで行ってみましたので紹介します。
セットアップ手順が用意されてなくて試行錯誤したので苦労しました。
ビルドする
パッケージマネージャー経由で直接完成品を取得することは出来ないようなので私も手順に従ってビルドすることに。
手順は以下を参考に進めます。この手順に従うとネイティブバイナリのビルドまではいけます。
概要としては git クローンして、Rust (Cargo の構成ファイルが提供されている) でビルドします。
以降は実行ログみたいなものをつらつらと残しておきます。
対して意味はないですが、もし問題が生じた際には参考にしてもらえると。
git インストールとクローンまで
ec2-user@ip-10-0-0-37 bin]$ sudo dnf install git -y
Last metadata expiration check: 0:09:11 ago on Sat Jul 13 22:26:22 2024.
Dependencies resolved.

:

Installed:
  git-2.40.1-1.amzn2023.0.3.x86_64               git-core-2.40.1-1.amzn2023.0.3.x86_64    git-core-doc-2.40.1-1.amzn2023.0.3.noarch      perl-Error-1:0.17029-5.amzn2023.0.2.noarch
  perl-File-Find-1.37-477.amzn2023.0.6.noarch    perl-Git-2.40.1-1.amzn2023.0.3.noarch    perl-TermReadKey-2.38-9.amzn2023.0.2.x86_64    perl-lib-0.65-477.amzn2023.0.6.x86_64

Complete!

[ec2-user@ip-10-0-0-37 bin]$ sudo git clone https://github.com/aws/aws-secretsmanager-agent.git
Cloning into 'aws-secretsmanager-agent'...
remote: Enumerating objects: 85, done.
remote: Counting objects: 100% (30/30), done.
remote: Compressing objects: 100% (29/29), done.
remote: Total 85 (delta 13), reused 3 (delta 1), pack-reused 55
Receiving objects: 100% (85/85), 83.47 KiB | 4.64 MiB/s, done.
Resolving deltas: 100% (15/15), done.
開発ツールと Rust インストールまで
[ec2-user@ip-10-0-0-37 bin]$ cd aws-secretsmanager-agent/
[ec2-user@ip-10-0-0-37 aws-secretsmanager-agent]$ sudo dnf -y groupinstall "Development Tools"
Last metadata expiration check: 0:11:49 ago on Sat Jul 13 22:26:22 2024.

:

  urw-base35-z003-fonts-20200910-6.amzn2023.0.2.noarch                                    utf8proc-2.6.1-2.amzn2023.0.2.x86_64
  xml-common-0.6.3-56.amzn2023.0.2.noarch                                                 xorg-x11-fonts-ISO8859-1-100dpi-7.5-31.amzn2023.0.2.noarch
  xz-devel-5.2.5-9.amzn2023.0.2.x86_64                                                    zlib-devel-1.2.11-33.amzn2023.0.5.x86_64

Complete!

[ec2-user@ip-10-0-0-37 aws-secretsmanager-agent]$ curl --proto '=https' --tlsv1.2 -sSf https://sh.rustup.rs | sh
. "$HOME/.cargo/env"
info: downloading installer

Welcome to Rust!

:

1) Proceed with standard installation (default - just press enter)
2) Customize installation
3) Cancel installation
>

info: profile set to 'default'
info: default host triple is x86_64-unknown-linux-gnu
info: syncing channel updates for 'stable-x86_64-unknown-linux-gnu'
info: latest update on 2024-06-13, rust version 1.79.0 (129f3b996 2024-06-10)
info: downloading component 'cargo'
info: downloading component 'clippy'
info: downloading component 'rust-docs'
info: downloading component 'rust-std'
info: downloading component 'rustc'
info: downloading component 'rustfmt'
info: installing component 'cargo'
info: installing component 'clippy'
info: installing component 'rust-docs'
 15.3 MiB /  15.3 MiB (100 %)   1.5 MiB/s in 11s ETA:  0s
info: installing component 'rust-std'
 24.4 MiB /  24.4 MiB (100 %)   9.3 MiB/s in  2s ETA:  0s
info: installing component 'rustc'
 63.8 MiB /  63.8 MiB (100 %)  10.6 MiB/s in  6s ETA:  0s
info: installing component 'rustfmt'
info: default toolchain set to 'stable-x86_64-unknown-linux-gnu'

  stable-x86_64-unknown-linux-gnu installed - rustc 1.79.0 (129f3b996 2024-06-10)

Rust is installed now. Great!

To get started you may need to restart your current shell.
This would reload your PATH environment variable to include
Cargo's bin directory ($HOME/.cargo/bin).

To configure your current shell, you need to source
the corresponding env file under $HOME/.cargo.

This is usually done by running one of the following (note the leading DOT):
. "$HOME/.cargo/env"            # For sh/bash/zsh/ash/dash/pdksh
source "$HOME/.cargo/env.fish"  # For fish
[ec2-user@ip-10-0-0-37 aws-secretsmanager-agent]$
Cargo でビルドする
[ec2-user@ip-10-0-0-37 aws-secretsmanager-agent]$ cargo build --release
   Compiling proc-macro2 v1.0.86
   Compiling unicode-ident v1.0.12
   Compiling quote v1.0.36
   Compiling syn v2.0.70
   Compiling libc v0.2.155

:

   Compiling pretty_env_logger v0.5.0
   Compiling aws_secretsmanager_agent v1.0.0 (/usr/bin/aws-secretsmanager-agent/aws_secretsmanager_agent)
    Finished `release` profile [optimized] target(s) in 8m 47s
[ec2-user@ip-10-0-0-37 aws-secretsmanager-agent]$

[ec2-user@ip-10-0-0-37 aws-secretsmanager-agent]$ ls target/release/ -l
total 14836
-rwxrwxr-x.  2 ec2-user ec2-user 14692984 Jul 13 22:54 aws_secretsmanager_agent
-rw-rw-r--.  1 ec2-user ec2-user     1168 Jul 13 22:54 aws_secretsmanager_agent.d
drwxrwxr-x. 45 ec2-user ec2-user    16384 Jul 13 22:45 build
drwxrwxr-x.  2 ec2-user ec2-user    32768 Jul 13 22:54 deps
drwxrwxr-x.  2 ec2-user ec2-user        6 Jul 13 22:45 examples
drwxrwxr-x.  2 ec2-user ec2-user        6 Jul 13 22:45 incremental
-rw-rw-r--.  1 ec2-user ec2-user      515 Jul 13 22:54 libaws_secretsmanager_caching.d
-rw-rw-r--.  2 ec2-user ec2-user   417300 Jul 13 22:53 libaws_secretsmanager_caching.rlib
はい、ここまででまずはaws_secretsmanager_agentのバイナリが作成されました。
これをそのまま実行してもトークンが無いなど怒られます。ましてや都度コマンド実行したいわけでもない。
[ec2-user@ip-10-0-0-37 release]$ ./aws_secretsmanager_agent
Could not read SSRF token variable(s) ["AWS_TOKEN", "AWS_SESSION_TOKEN"]: environment variable not found
ではこれを...これをどうするんだ?
インストールする
ここからがわからない困ったなぁ。という感じだったのですが、最終的にはリポジトリの以下にインストールスクリプトを発見しまして、こいつでサービス作成まで行うことが出来ました。
そして、このスクリプトで参照しているバイナリ名とかも作成したものとちょっと違ったので少し直しています。
先ほどネイティブバイナリがtarget/releaseに作成されていましたが、これを install スクリプトが存在するフォルダにコピーしました。
そして、aws_secretsmanager_agentという名称をインストールスクリプトにあわせてaws-secrets-manager-agentに変更しました。
で、installスクリプトを実行します。
[root@ip-10-0-0-37 configuration]# ls
aws_secretsmanager_agent  awssmaseedtoken  awssmaseedtoken.service  awssmastartup.service  config_file_empty.toml  install  logs  uninstall
[root@ip-10-0-0-37 configuration]# mv aws_secretsmanager_agent aws-secrets-manager-agent
[root@ip-10-0-0-37 configuration]# ls
aws-secrets-manager-agent  awssmaseedtoken  awssmaseedtoken.service  awssmastartup.service  config_file_empty.toml  install  logs  uninstall
[root@ip-10-0-0-37 configuration]# bash install
Created symlink /etc/systemd/system/multi-user.target.wants/awssmaseedtoken.service → /etc/systemd/system/awssmaseedtoken.service.
Created symlink /etc/systemd/system/multi-user.target.wants/awssmastartup.service → /etc/systemd/system/awssmastartup.service.
いけたかもしれない?
インストールスクリプトに記述されているインストール先のディレクトリを見てみるとログが出力されています。
見てみましょう。
/opt/aws/secretsmanageragent/logs
[root@ip-10-0-0-37 logs]# cat secrets_manager_agent.log
2024-07-14T00:32:09.093036914+00:00 INFO aws_secretsmanager_agent::logging - Logger initialized at `Info` log level.
2024-07-14T00:32:09.160877093+00:00 INFO aws_secretsmanager_agent - Agent/1.0.0 listening on http://127.0.0.1:2773
[root@ip-10-0-0-37 logs]# cd ../bin/
[root@ip-10-0-0-37 bin]# ls
aws-secrets-manager-agent  awssmaseedtoken
なんか良さそうでは?
シークレットを取得してみる
さて、では実際にシークレットを取得してみましょう。
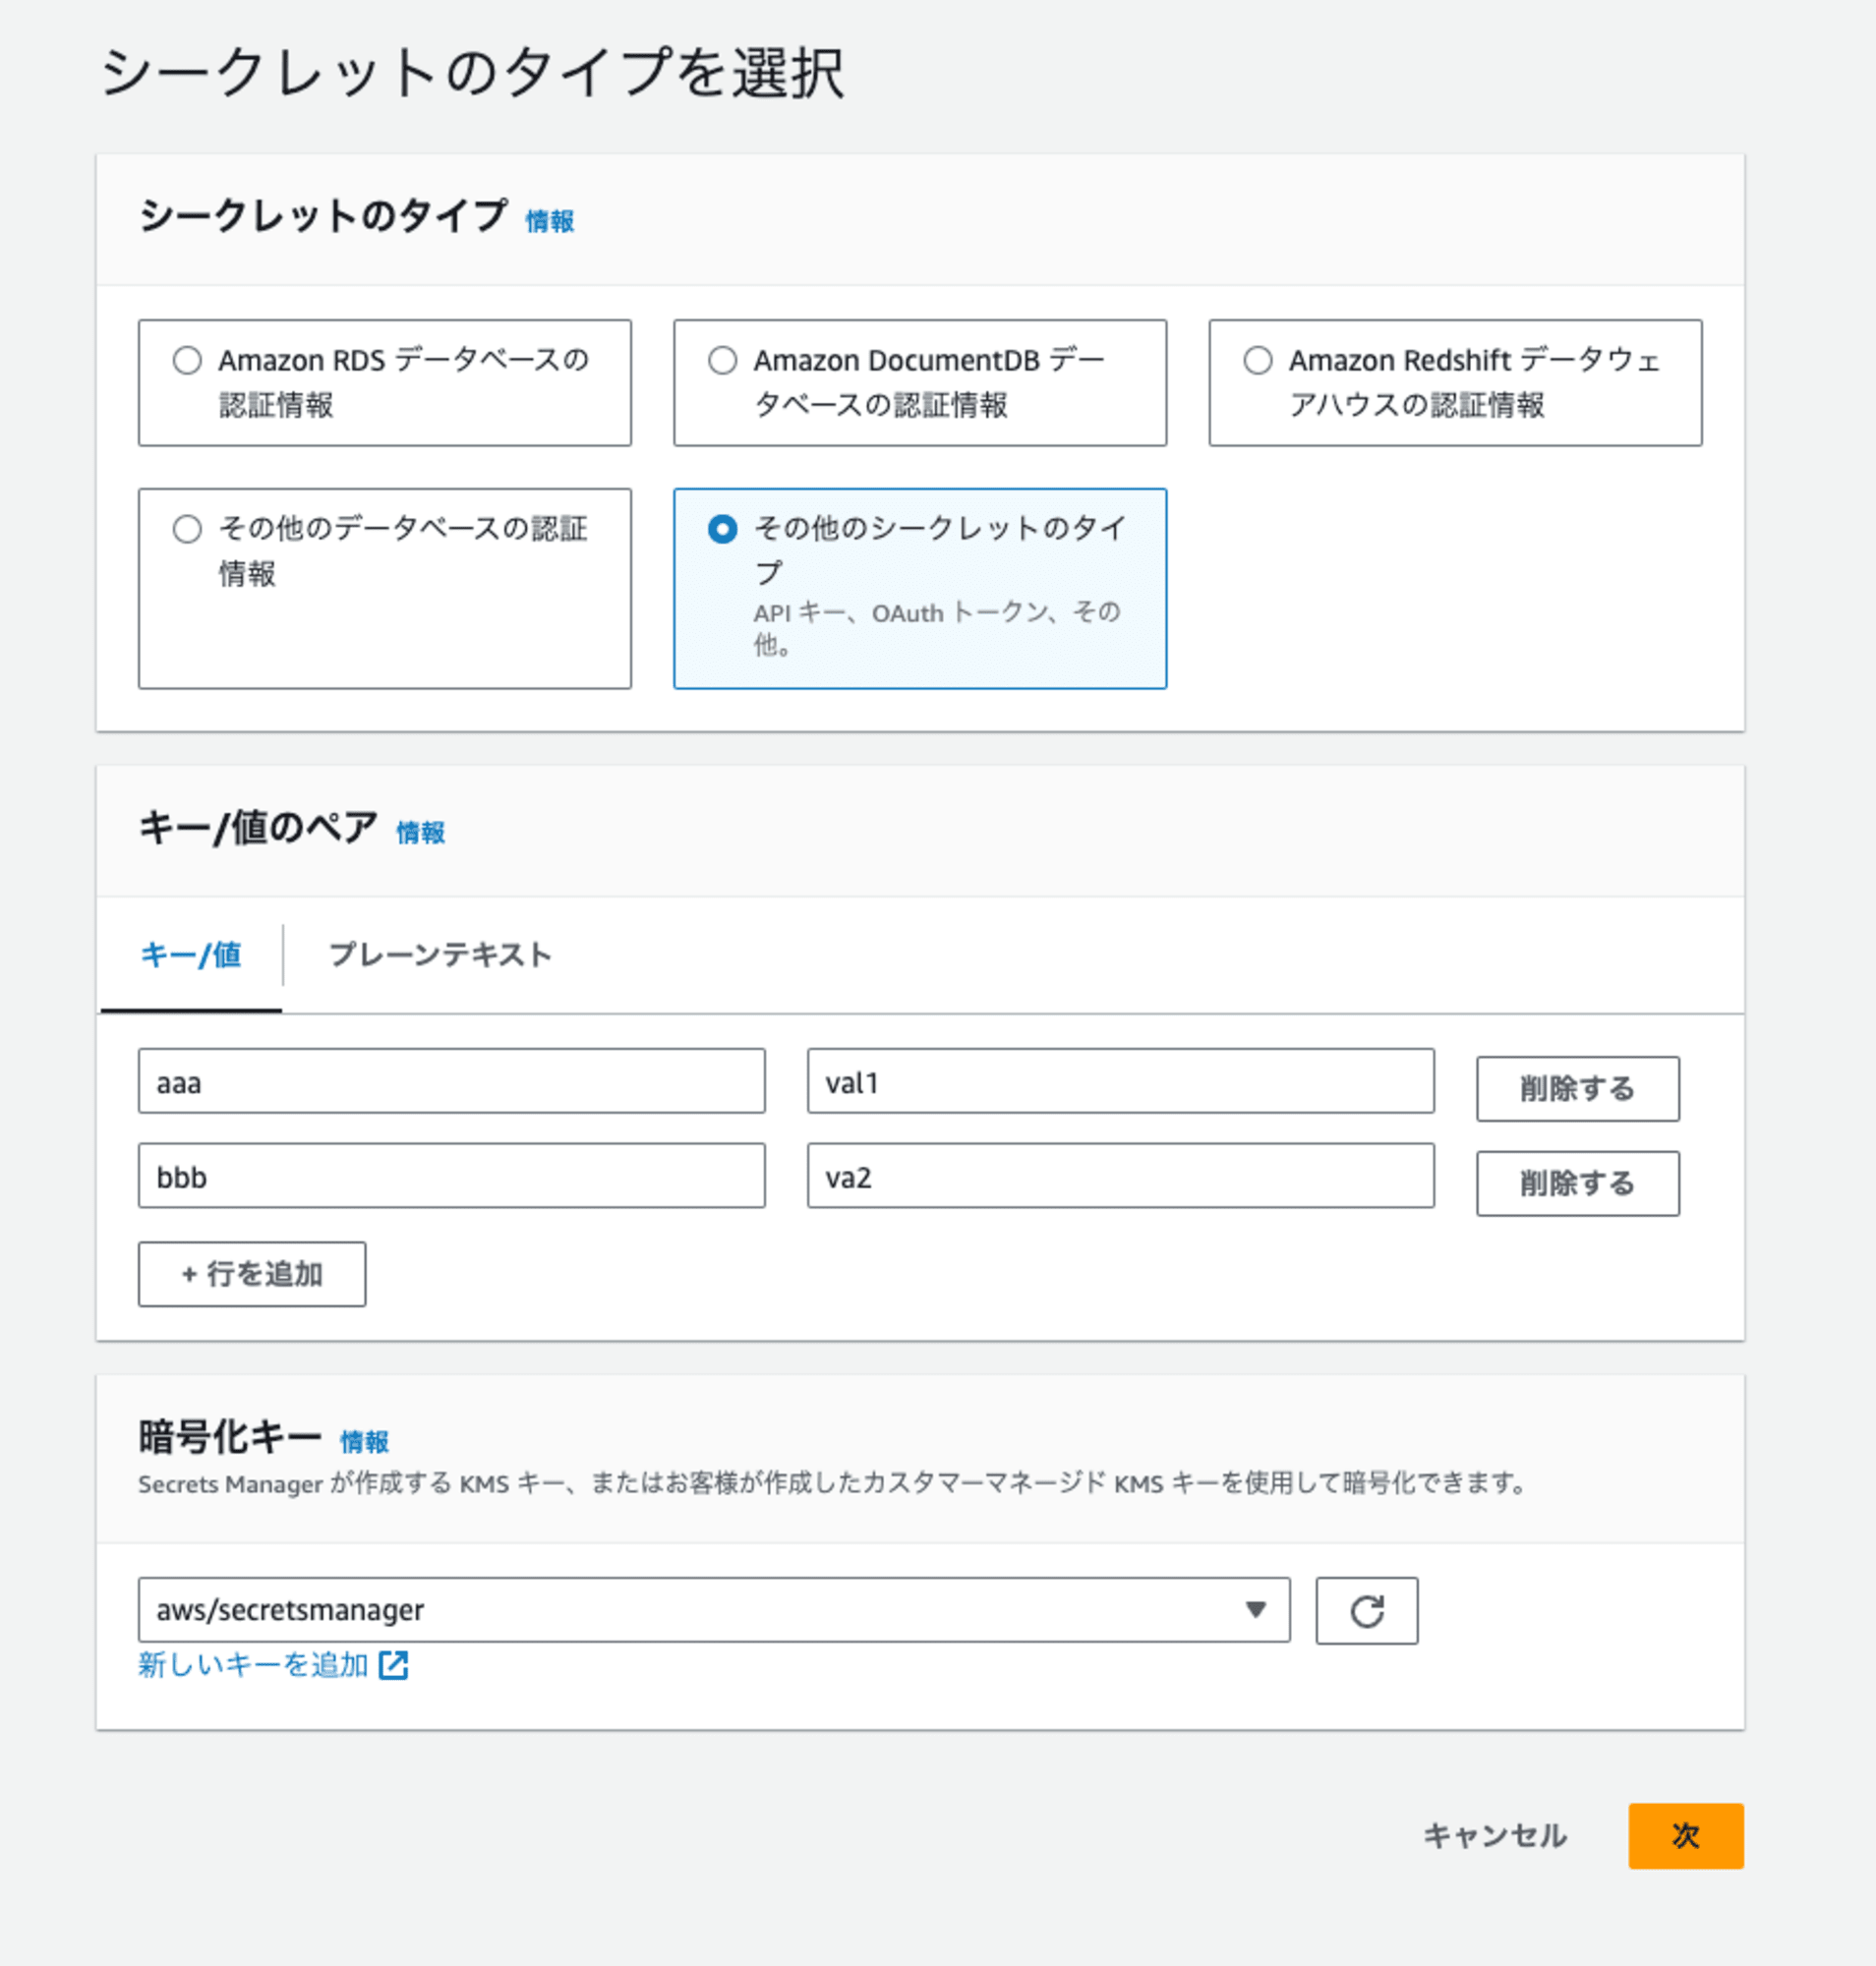
Secrets Manager 上で適当なシークレットを作成しておきました。
使ってみましょう。
ログにも出力されていましたがhttp://127.0.0.1:2773に、シークレット名を指定してアクセスすれば良いようです。
ちなみにローカルポートやキャッシュ TTL などについてはカスタムも可能です。また別途紹介しますね。
[root@ip-10-0-0-37 bin]# curl 'http://127.0.0.1:2773/secretsmanager/get?secretId=hoge0714secret'
Bad Token
アクセスしてみると Bad Token となりました。
なるほど?トークンの指定が必要か。
インストールスクリプトではaws-secrets-manager-agent以外にawssmatokenreaderもセットアップされています。
以下がそのスクリプトなんですが、どうやら/var/run/awssmatokenにトークンファイルを作成してくれるようです。
[root@ip-10-0-0-37 bin]# cat /var/run/awssmatoken
02a58495e5f93fecbd2f22e2b9fc8975c60aaa052002b07158efb4d1187b272e
ありましたね。
あとは git の README に記載されているように直接参照してみます。
[root@ip-10-0-0-37 bin]# curl -H "X-Aws-Parameters-Secrets-Token: $(</var/run/awssmatoken)" 'http://localhost:2773/secretsmanager/get?secretId=hoge0714secret'
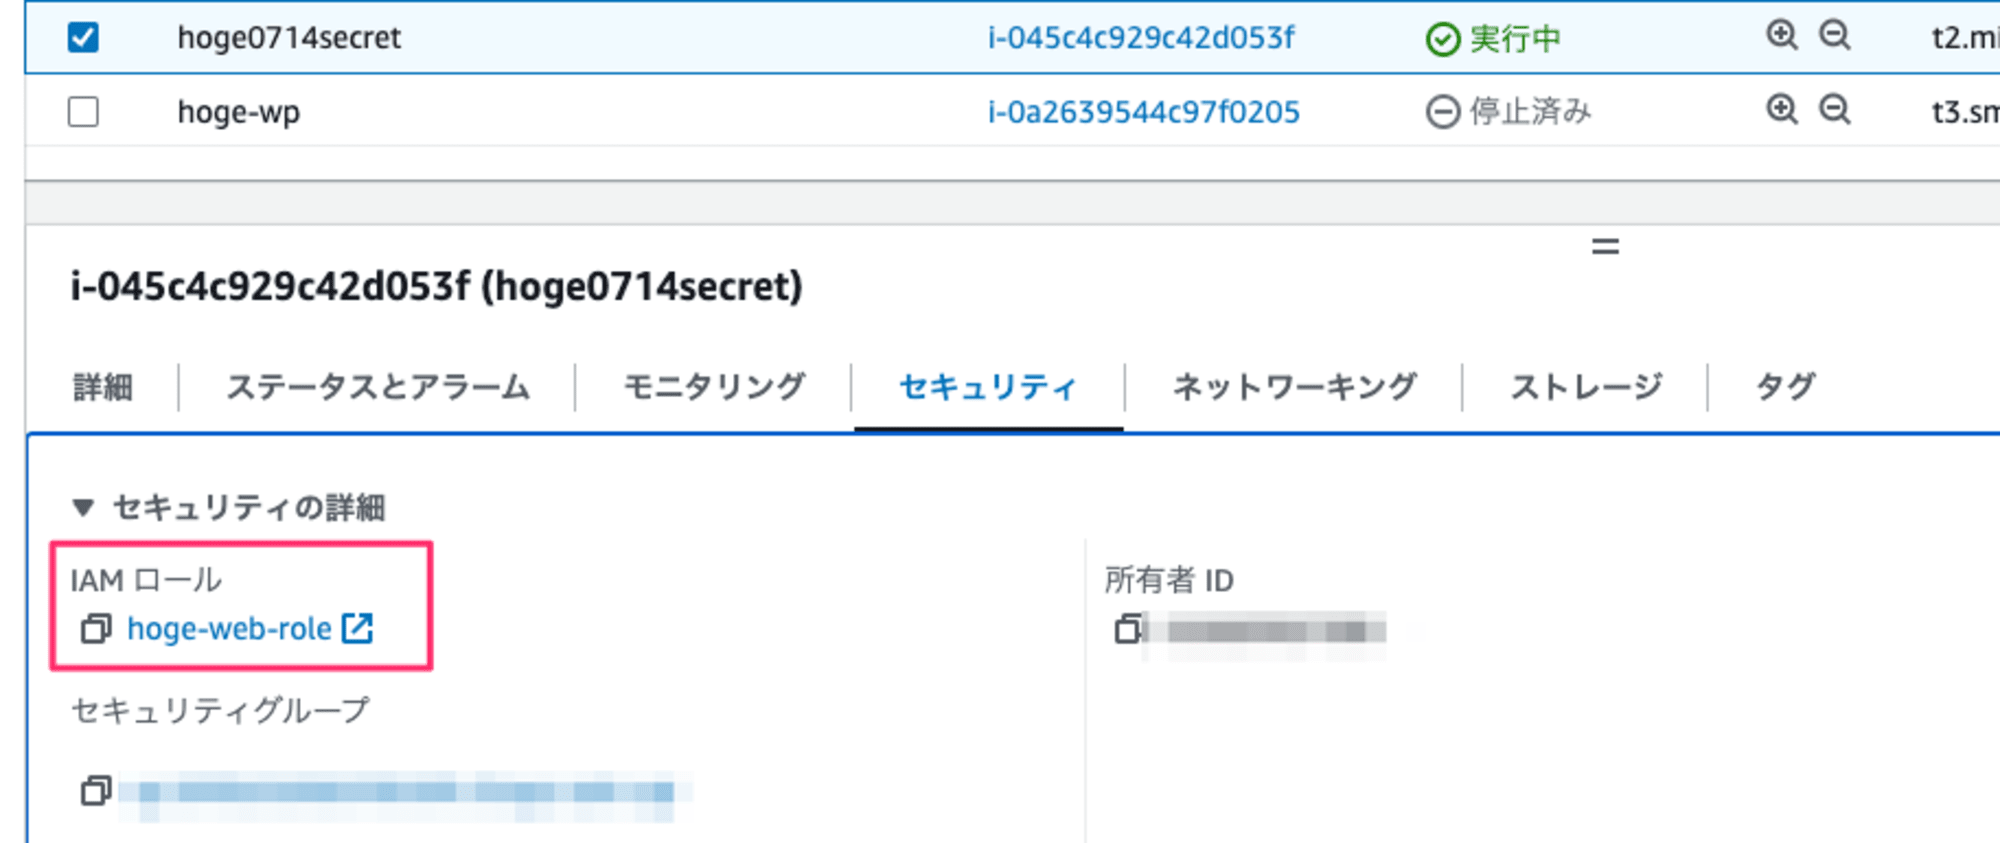
{"__type":"AccessDeniedException", "message":"User: arn:aws:sts::123456789012:assumed-role/hoge-web-role/i-045c4c929c42d053f is not authorized to perform: secretsmanager:GetSecretValue on resource: hoge0714secret because no identity-based policy allows the secretsmanager:GetSecretValue action"}[
権限がないと怒られました。
これは EC2 のインスタンスプロファイルですね。ロールのポリシーに権限を追加しましょう。
もう一度試してみます。
[root@ip-10-0-0-37 bin]# curl -H "X-Aws-Parameters-Secrets-Token: $(</var/run/awssmatoken)" 'http://localhost:2773/secretsmanager/get?secretId=hoge0714secret' | jq
  % Total    % Received % Xferd  Average Speed   Time    Time     Time  Current
                                 Dload  Upload   Total   Spent    Left  Speed
100   278  100   278    0     0  34312      0 --:--:-- --:--:-- --:--:-- 34750
{
  "ARN": "arn:aws:secretsmanager:ap-northeast-1:123456789012:secret:hoge0714secret-n1HfDS",
  "Name": "hoge0714secret",
  "VersionId": "6050a66e-d120-4b46-a03f-2728f69f9a54",
  "SecretString": "{\"aaa\":\"val1\",\"bbb\":\"va2\"}",
  "VersionStages": [
    "AWSCURRENT"
  ],
  "CreatedDate": "1720910985.834"
}
おお、SecretString が取得出来ました。
さいごに
本日は AWS Secrets Manager Agent を Amazon Linux 2023 にインストールして使ってみました。
ちょっと苦労しましたが、まずは導入することが出来ました。
次回は WordPress の DB 接続情報を Secrets Manager 経由で取得しつつ、エージェントでキャッシュさせる仕組みを導入してみます。
プロトコルが HTTP のやつって面倒だなって前は思っていたのですが、SDK 対応が進んでいないランタイムとか、あるいはプロセスやネットワークが別の環境を考えると逆にありがたいですね。


