
AWS Step FunctionsとDynamoDBで、アカウントごとにTeamsでのメンション対象者を動的に変えてみた
この記事は公開されてから1年以上経過しています。情報が古い可能性がありますので、ご注意ください。
はじめに
以前、AWS Step Functionsを使ってMicrosoft Teamsに通知する方法について紹介しました。
今回は、ステートマシンにアカウントIDを渡すことで、通知先のメンション対象者を動的に変更する方法をご紹介します。
ステートマシンに加え、アカウントIDとメンション対象者をデータとして保存するため、Amazon DynamoDBを利用することで、実現可能です。
システム構成は以下の通りです。
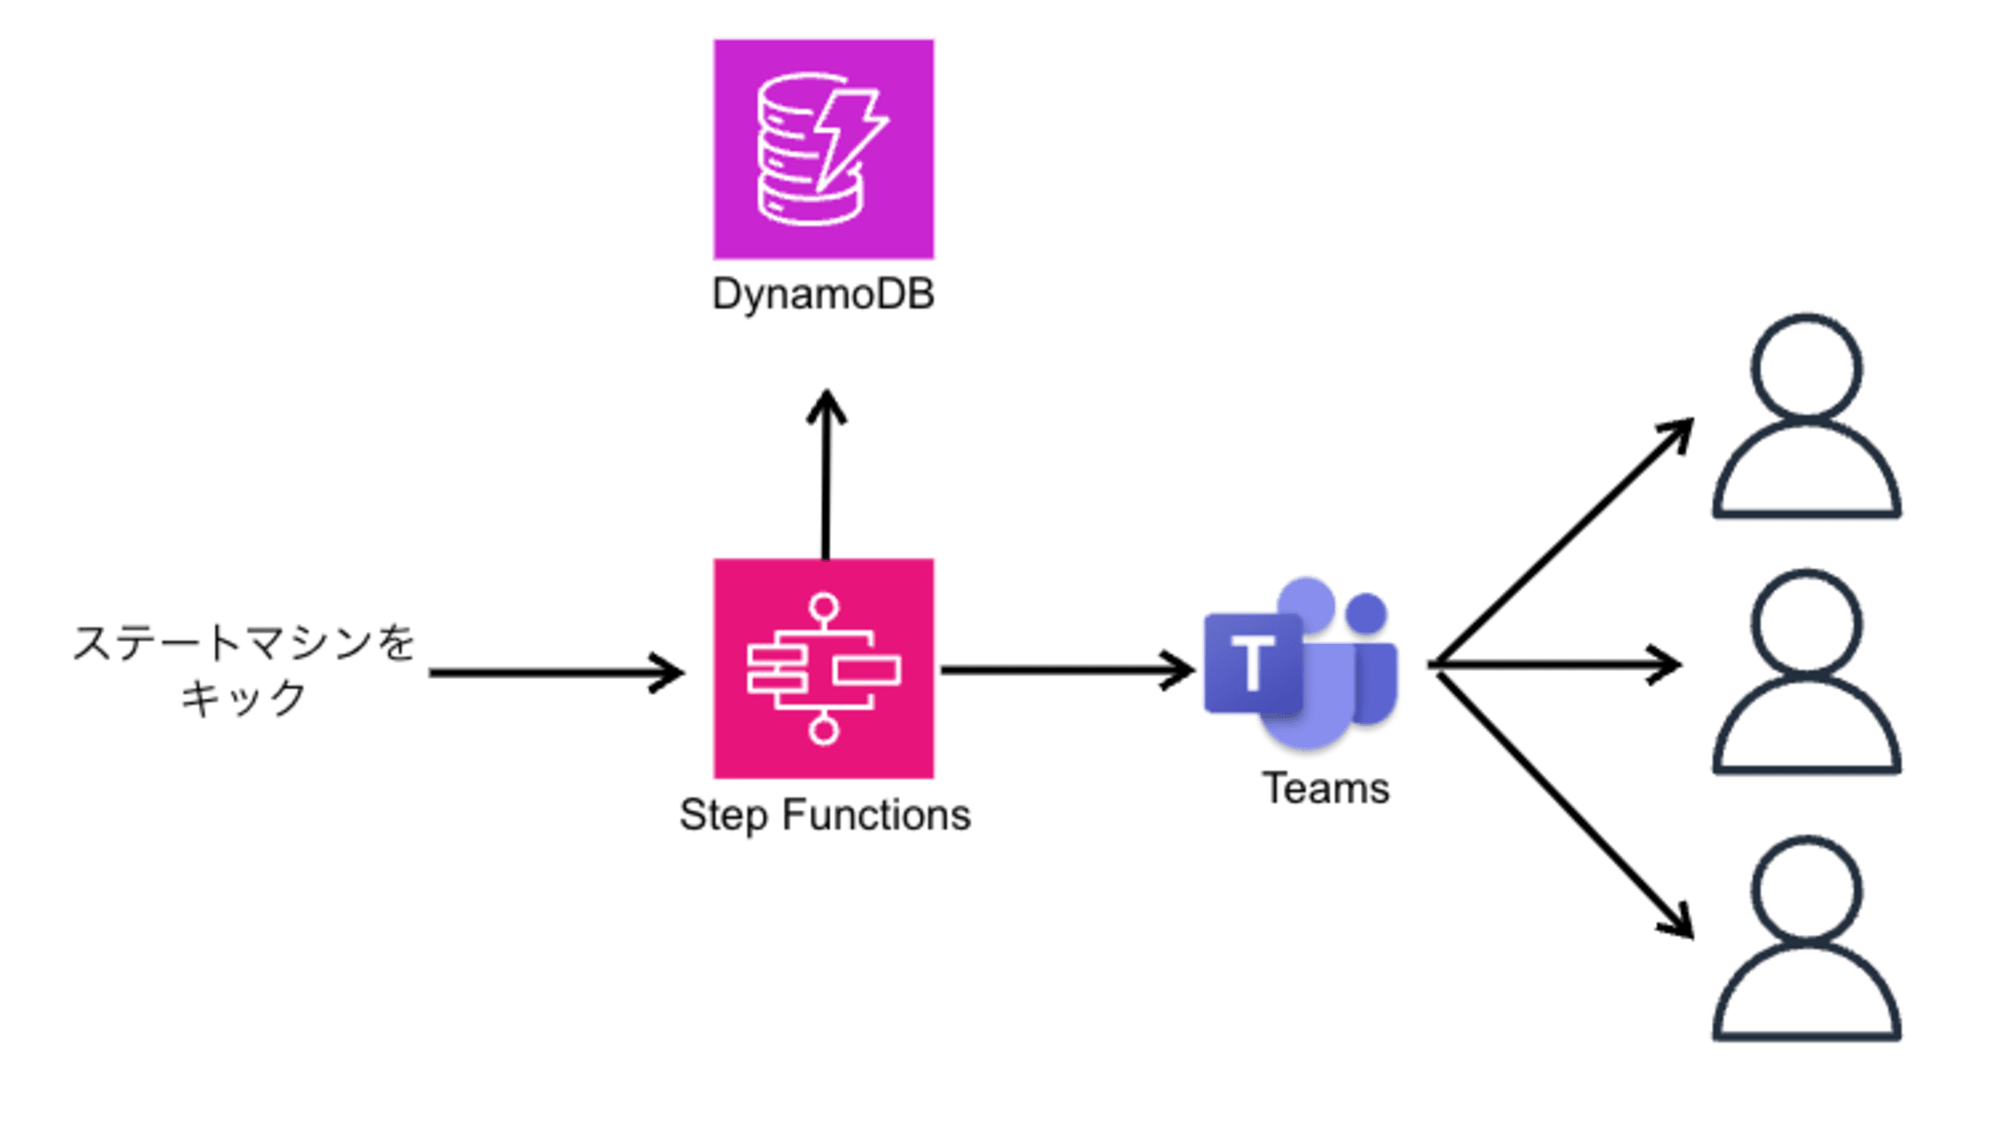
Step Functionsを使うことで、柔軟なワークフローを組み立てながら、Teams通知を組み込めるところが利点です。
利用ケースとしては、AWS Secuirty Hub管理アカウントでアラート時、Teamsでアカウント管理者にメンションを飛ばして通知する、などが考えられます。
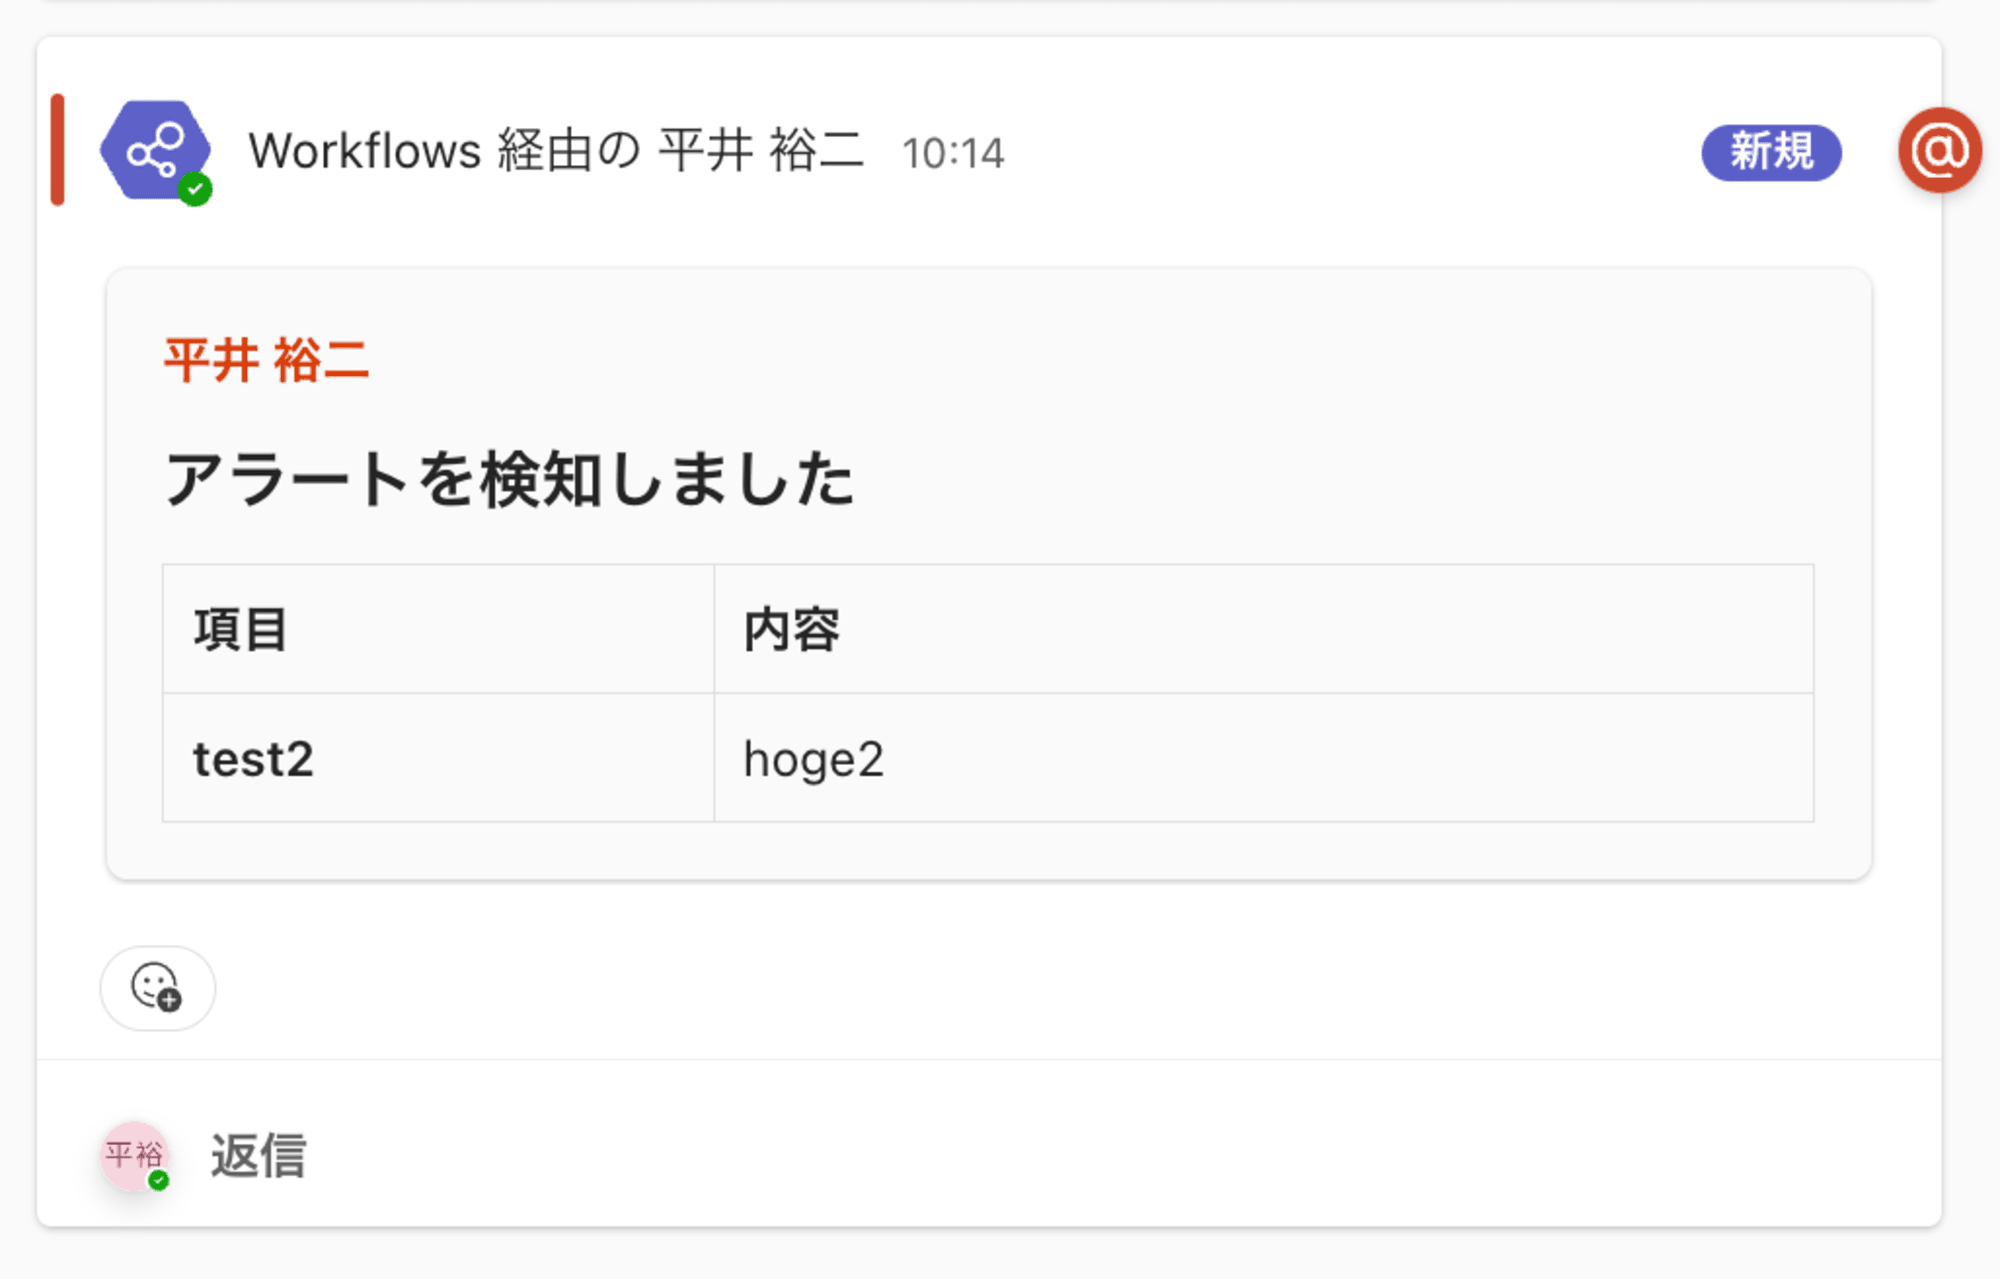
通知画面は以下のイメージです。メンションを飛ばしています。
TeamsのWebhookURL
Microsoft Teams内のOffice365コネクタが廃止されることが発表されたため、以下の記事を参考にワークフローからWebhookURLを発行しておく必要があります。
以下のようなURLです。
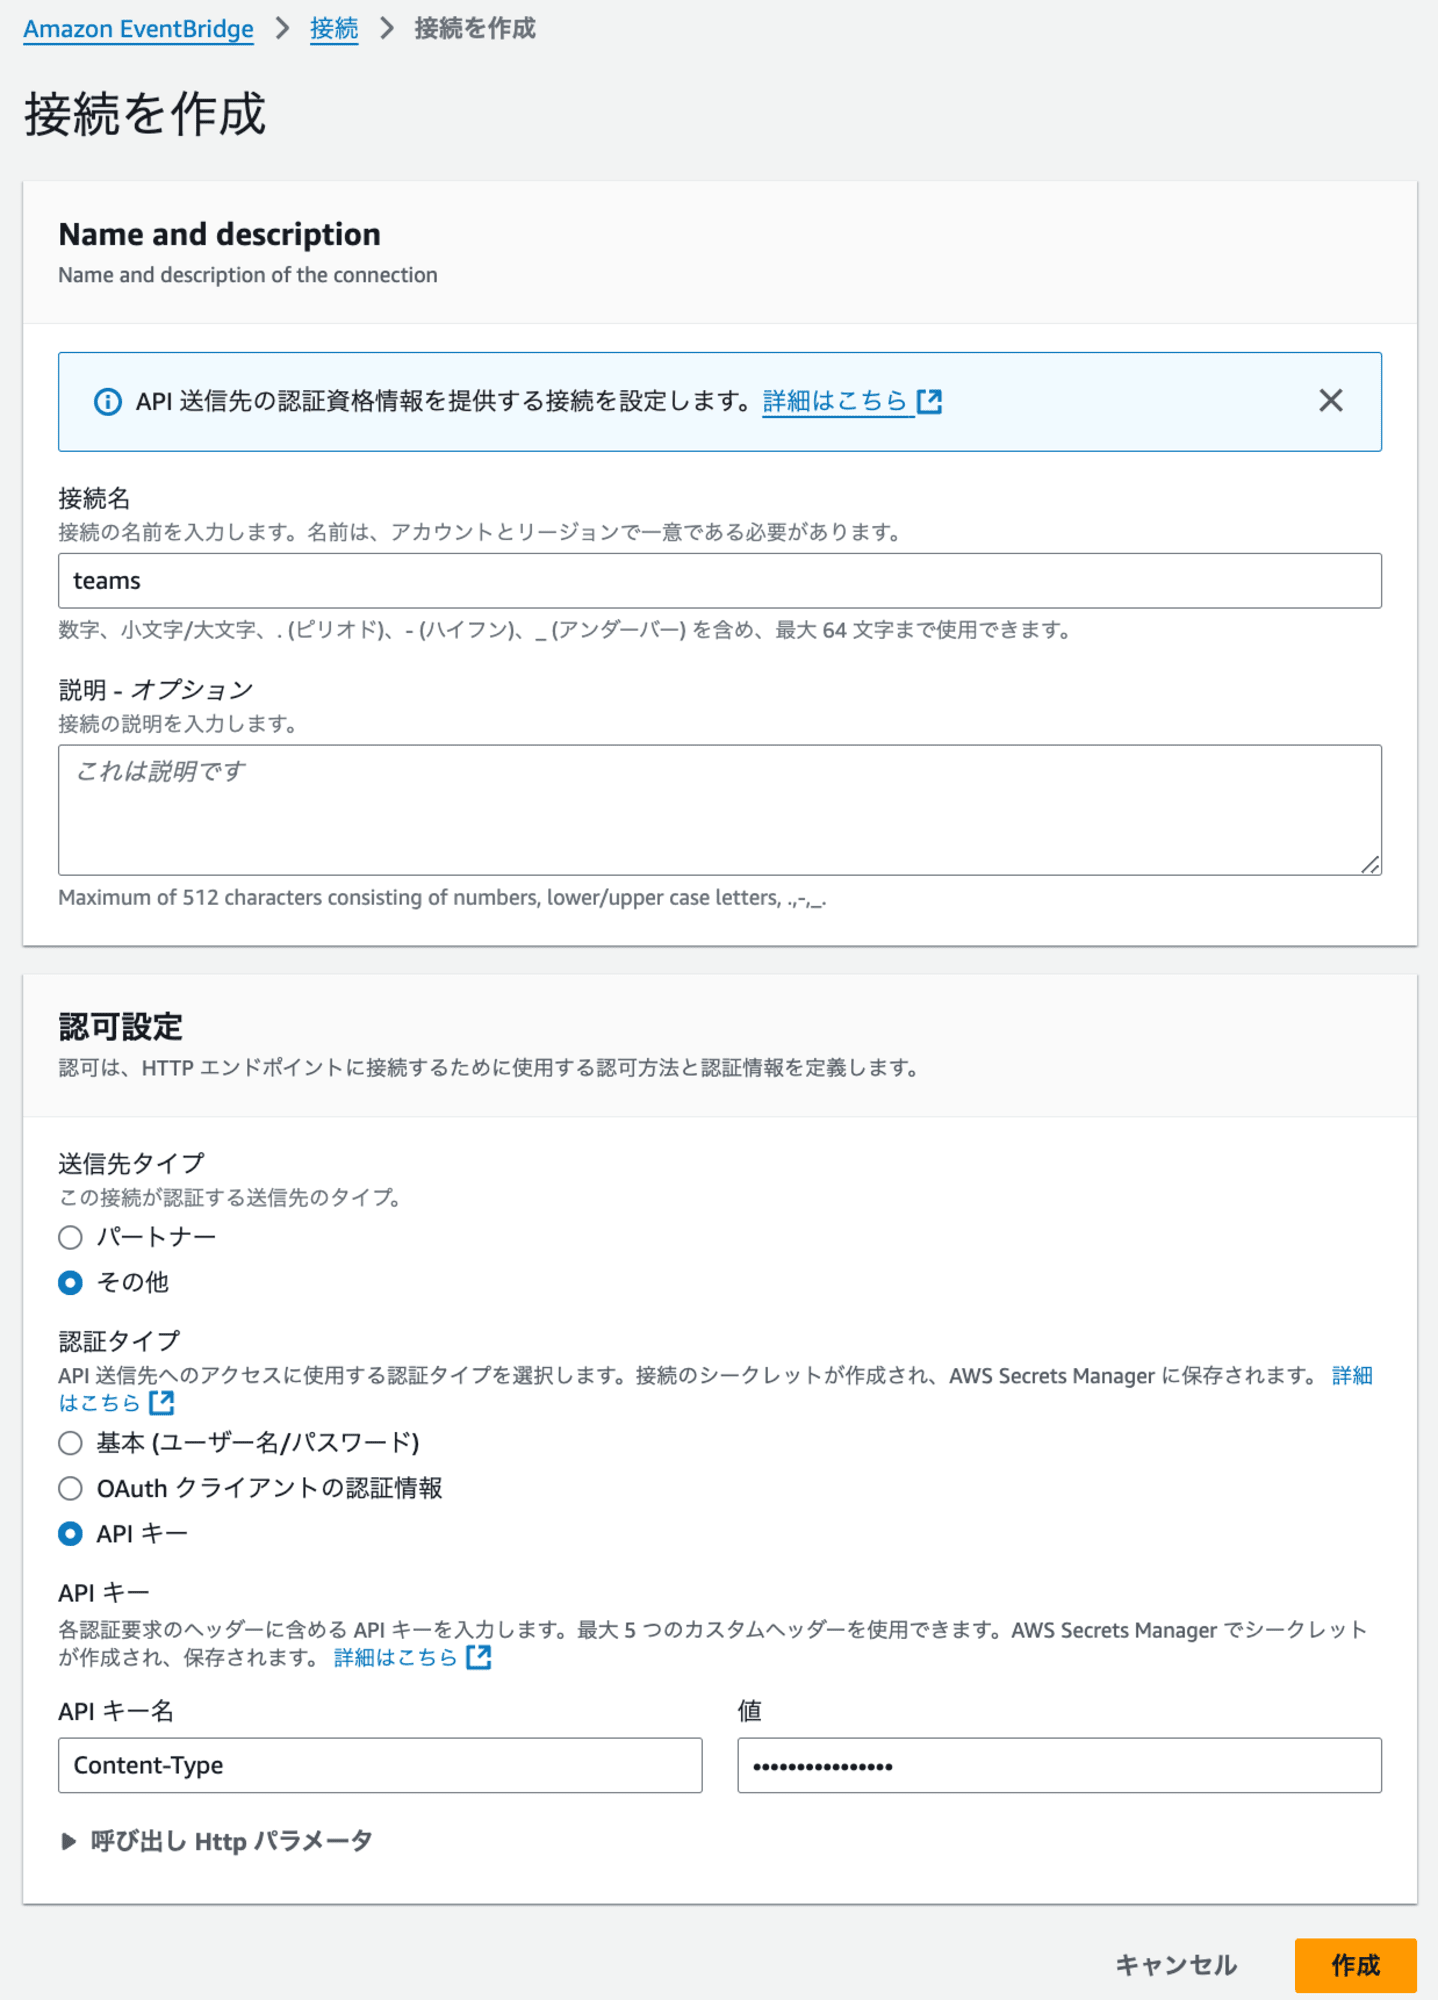
EventBridge 接続を作成
以下の設定でEventBridge接続を作成します。
- 接続タイプ:「API KEY」を選択
- API キーの設定
- キー名:Content-Type
- キー値:application/json
DynamoDB
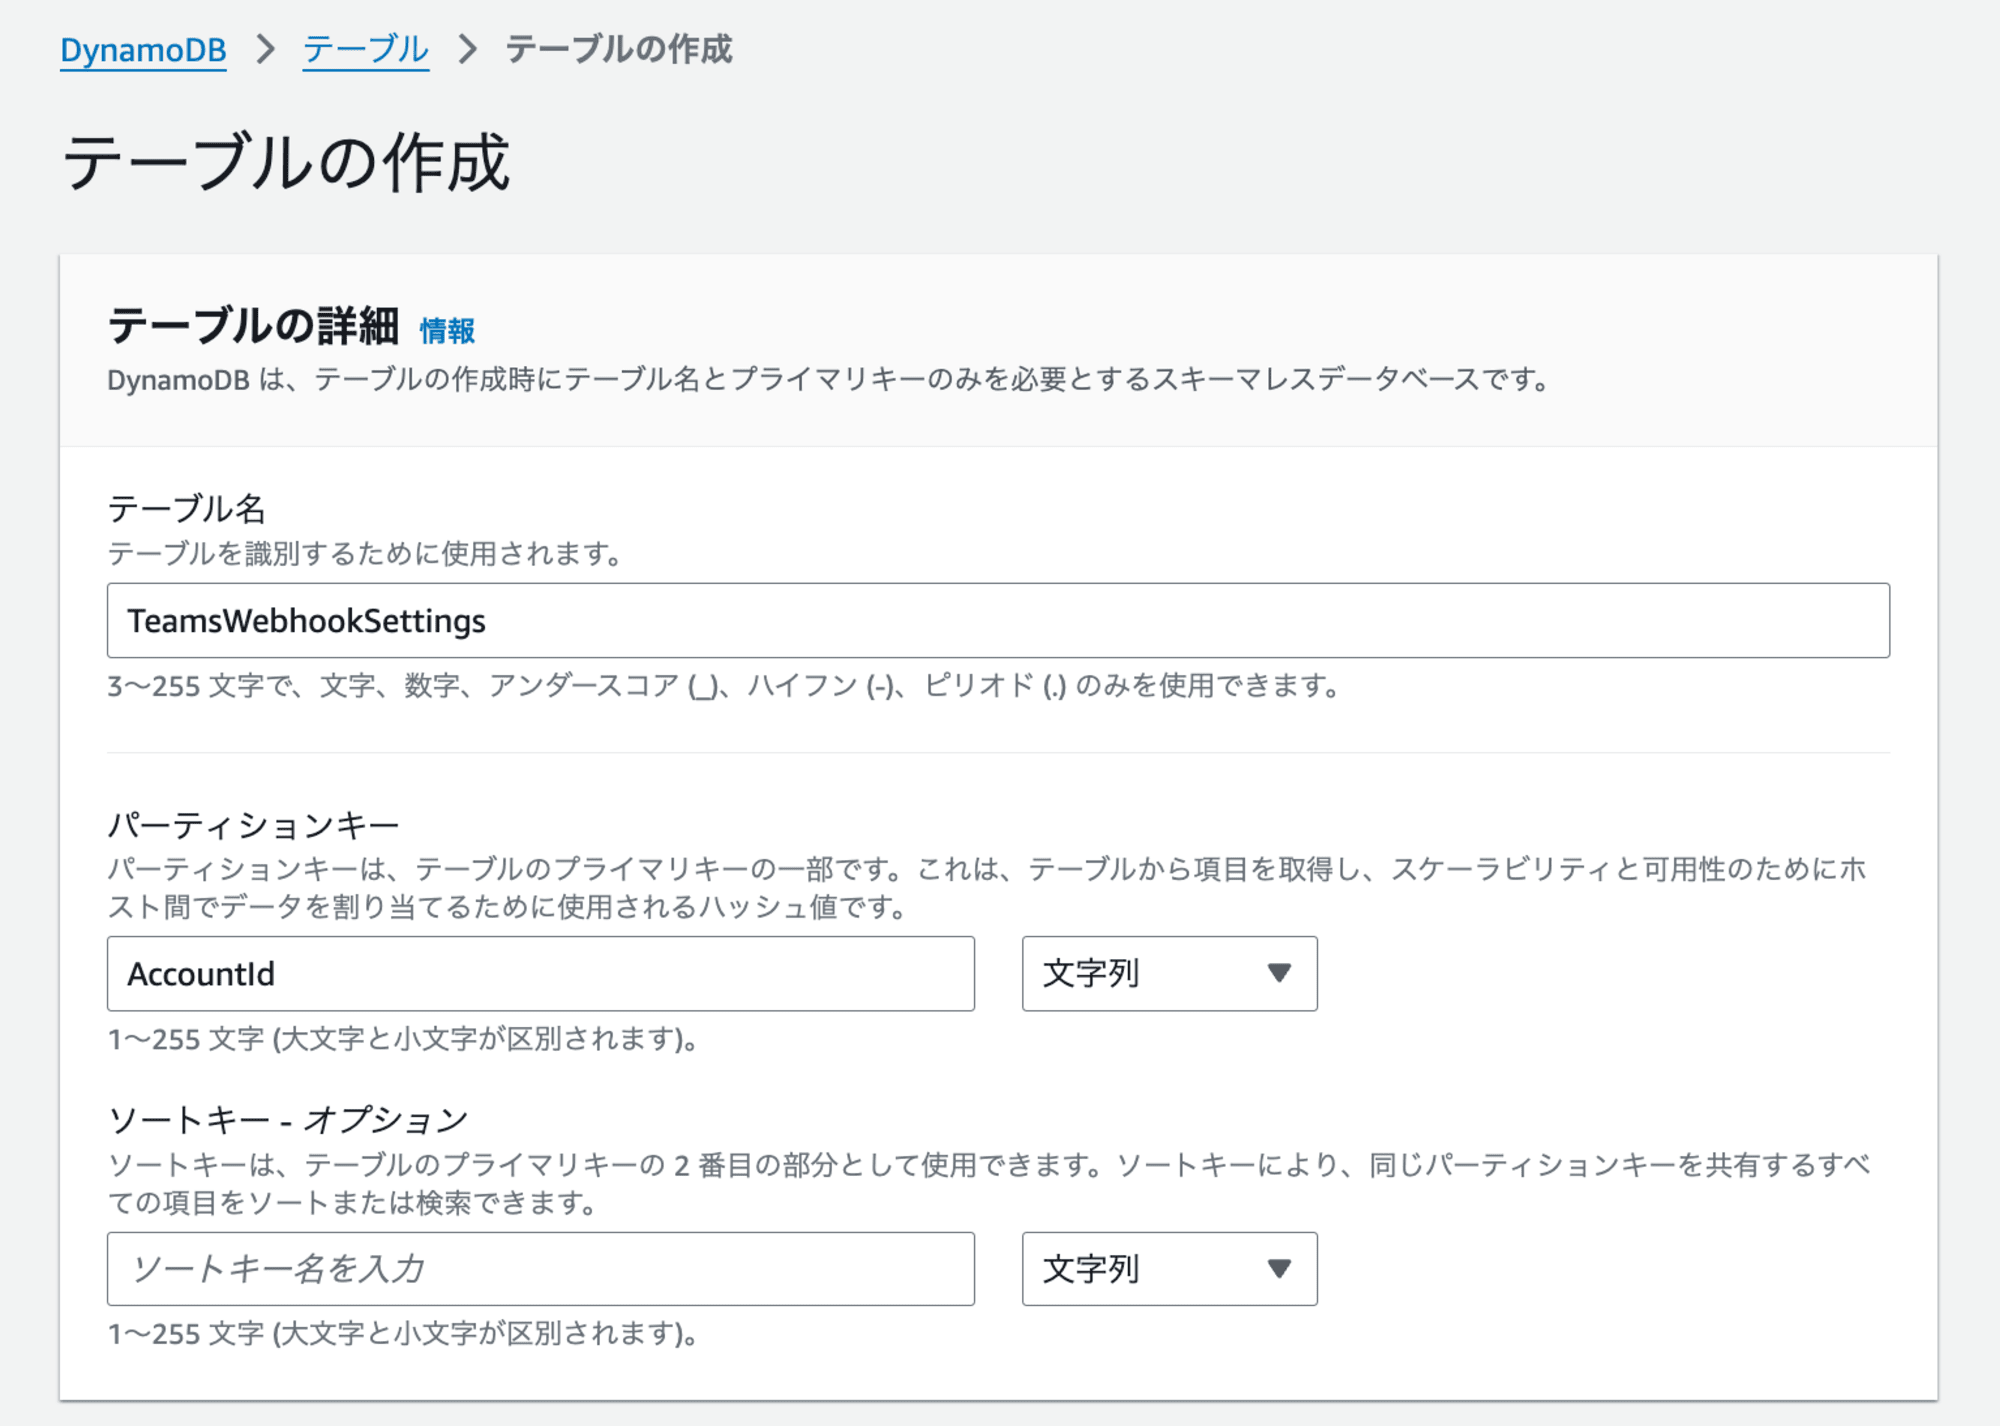
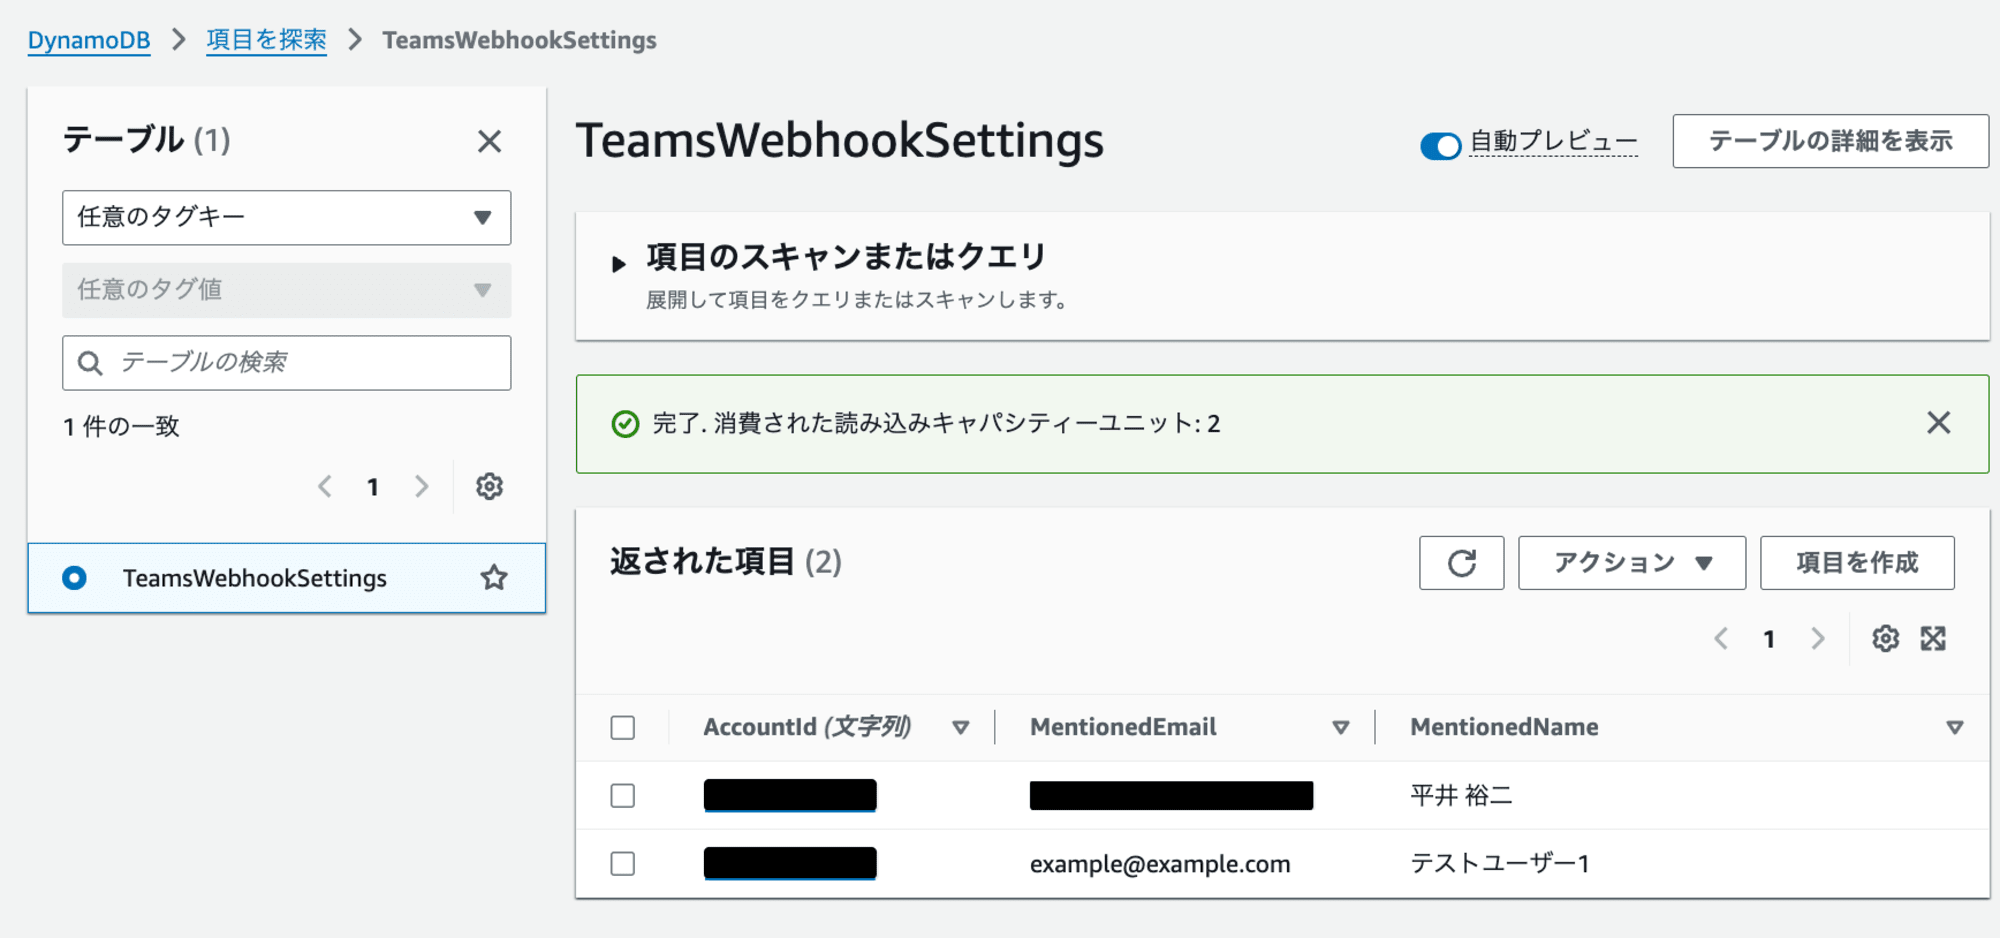
DynamoDBテーブルを以下の設定で作成します。
- テーブル名:TeamsWebhookSettings
- パーティションキー:AccountId(文字列型)
項目は以下の通り作成します。
{
  "AccountId": {
    "S": "111111111111"
  },
  "MentionedEmail": {
    "S": "example@example.com"
  },
  "MentionedName": {
    "S": "テストユーザー1"
  }
}
ステートマシンを作成
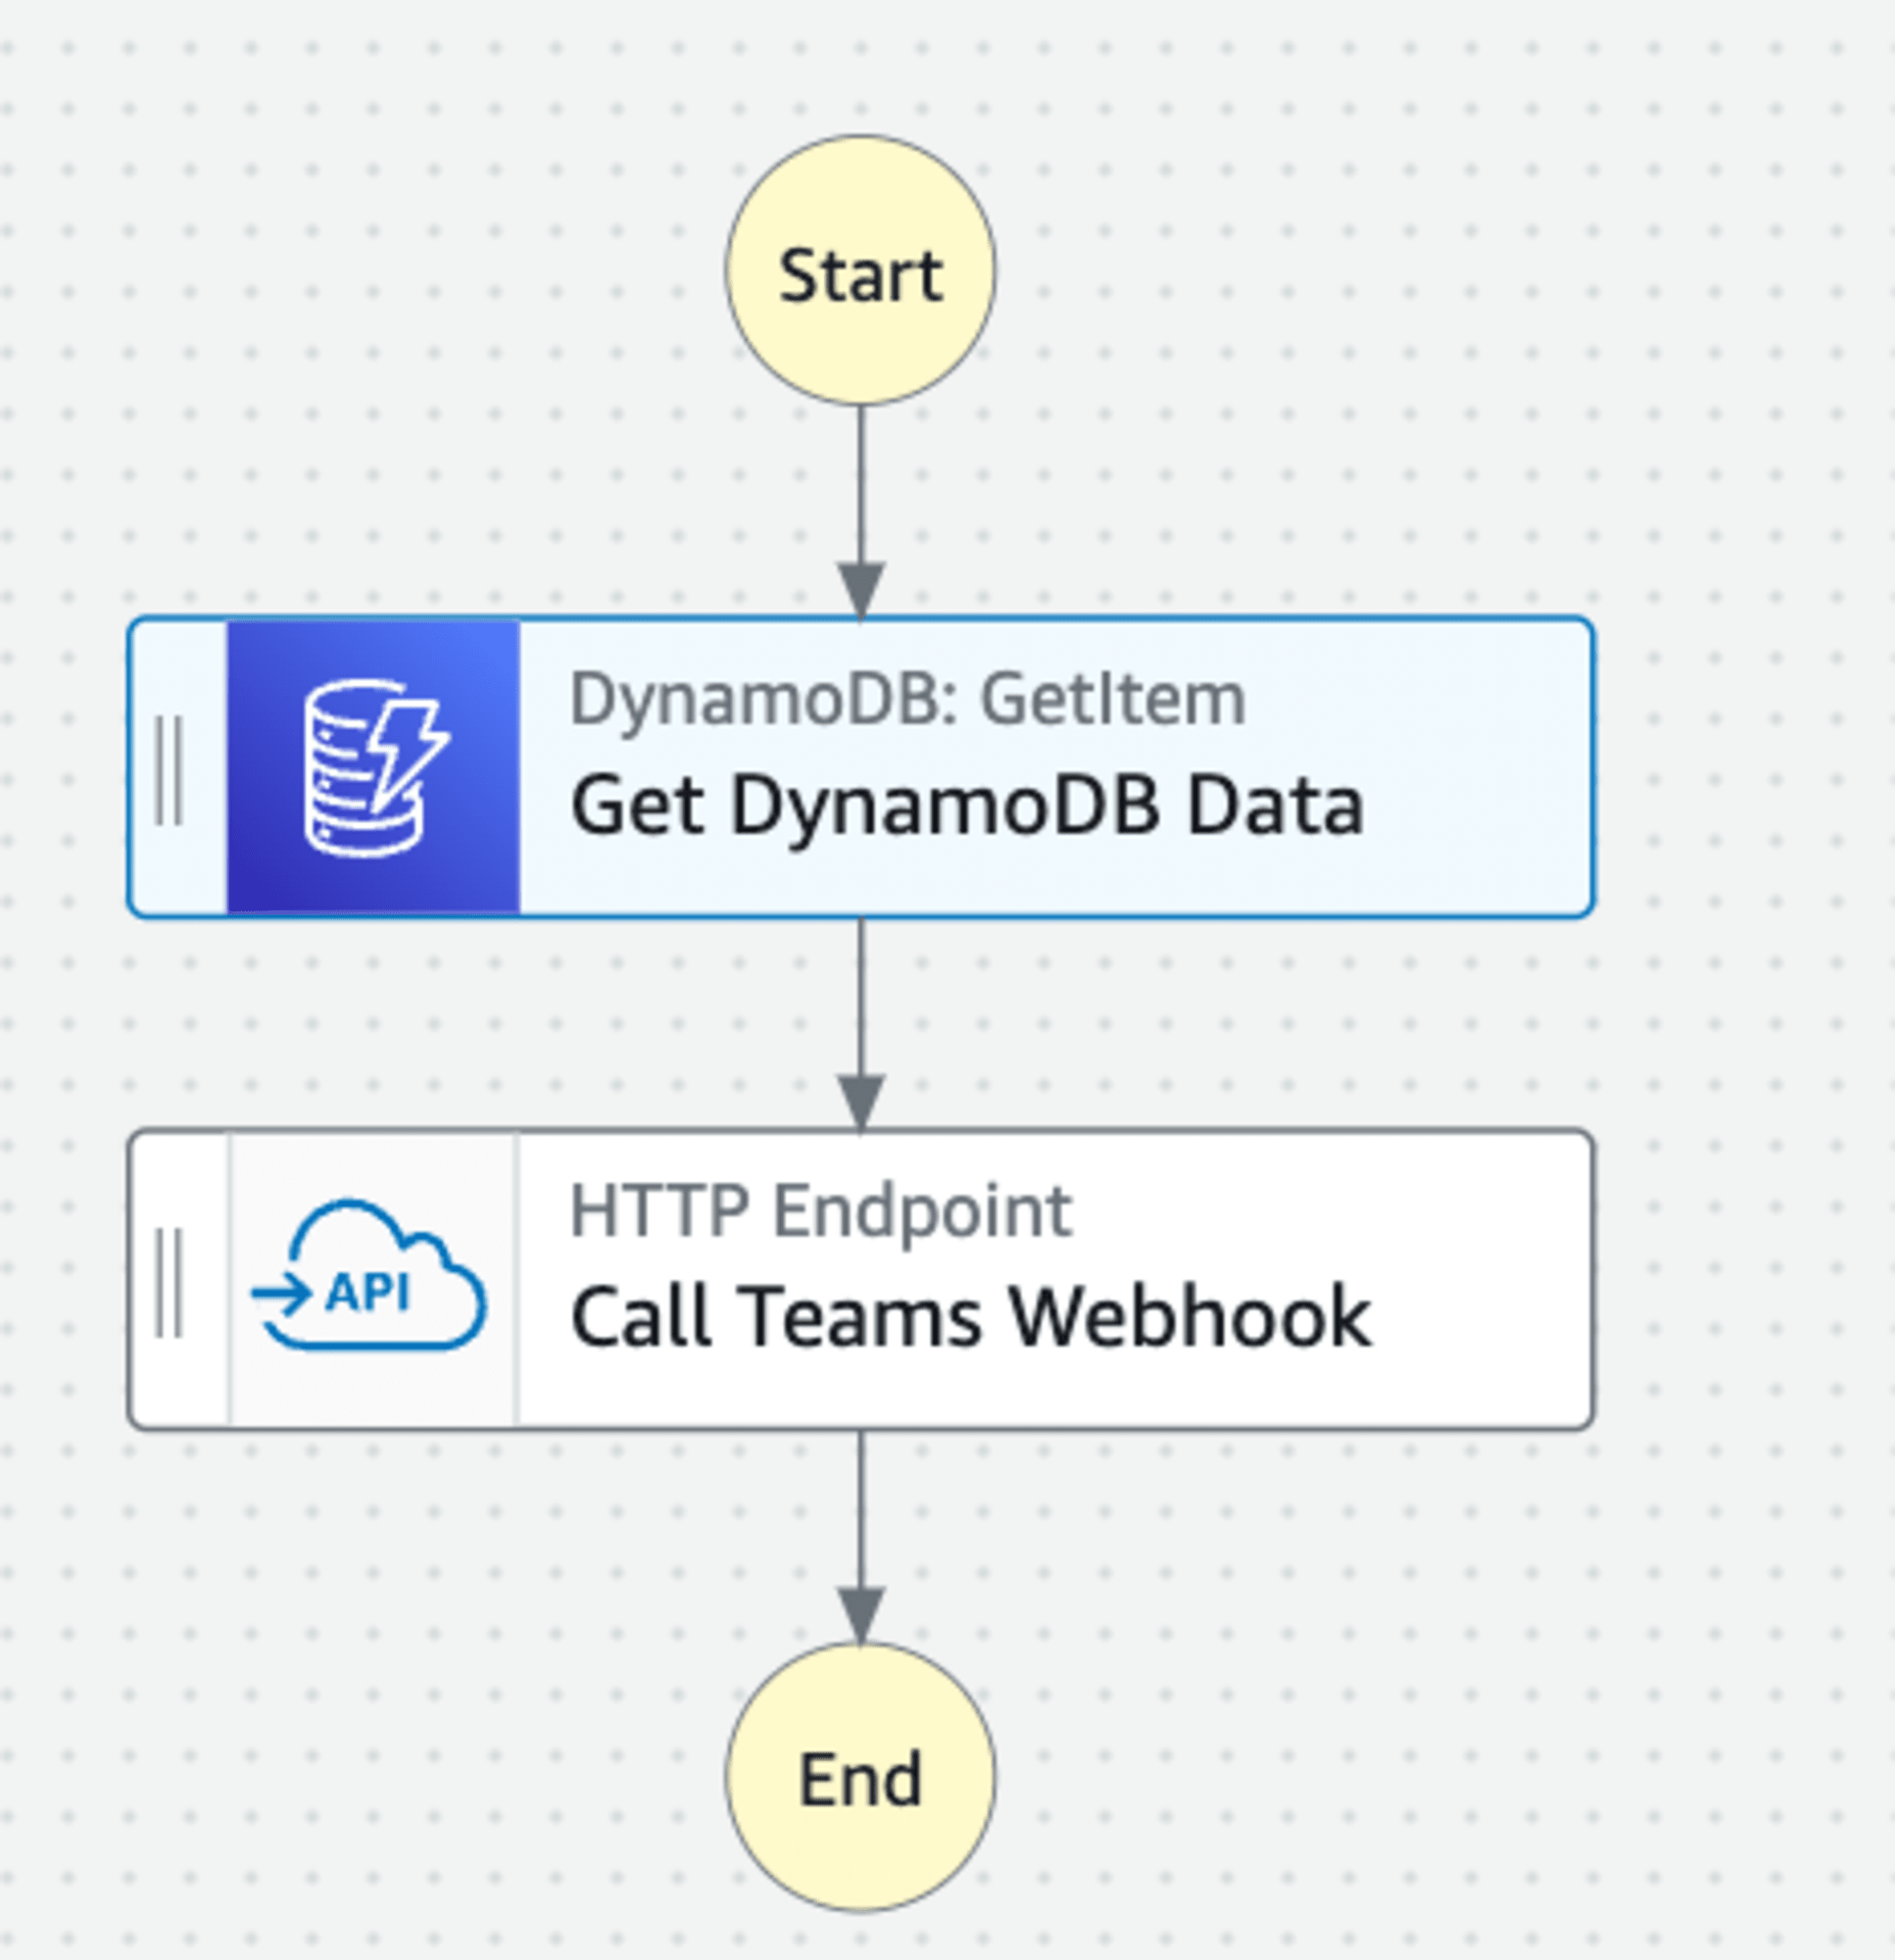
ステートマシンのフローには、以下の2つのステートを追加します。
DynamoDB GetItem:DynamoDBからデータを取得Call third-party API:Teamsへの通知を実行
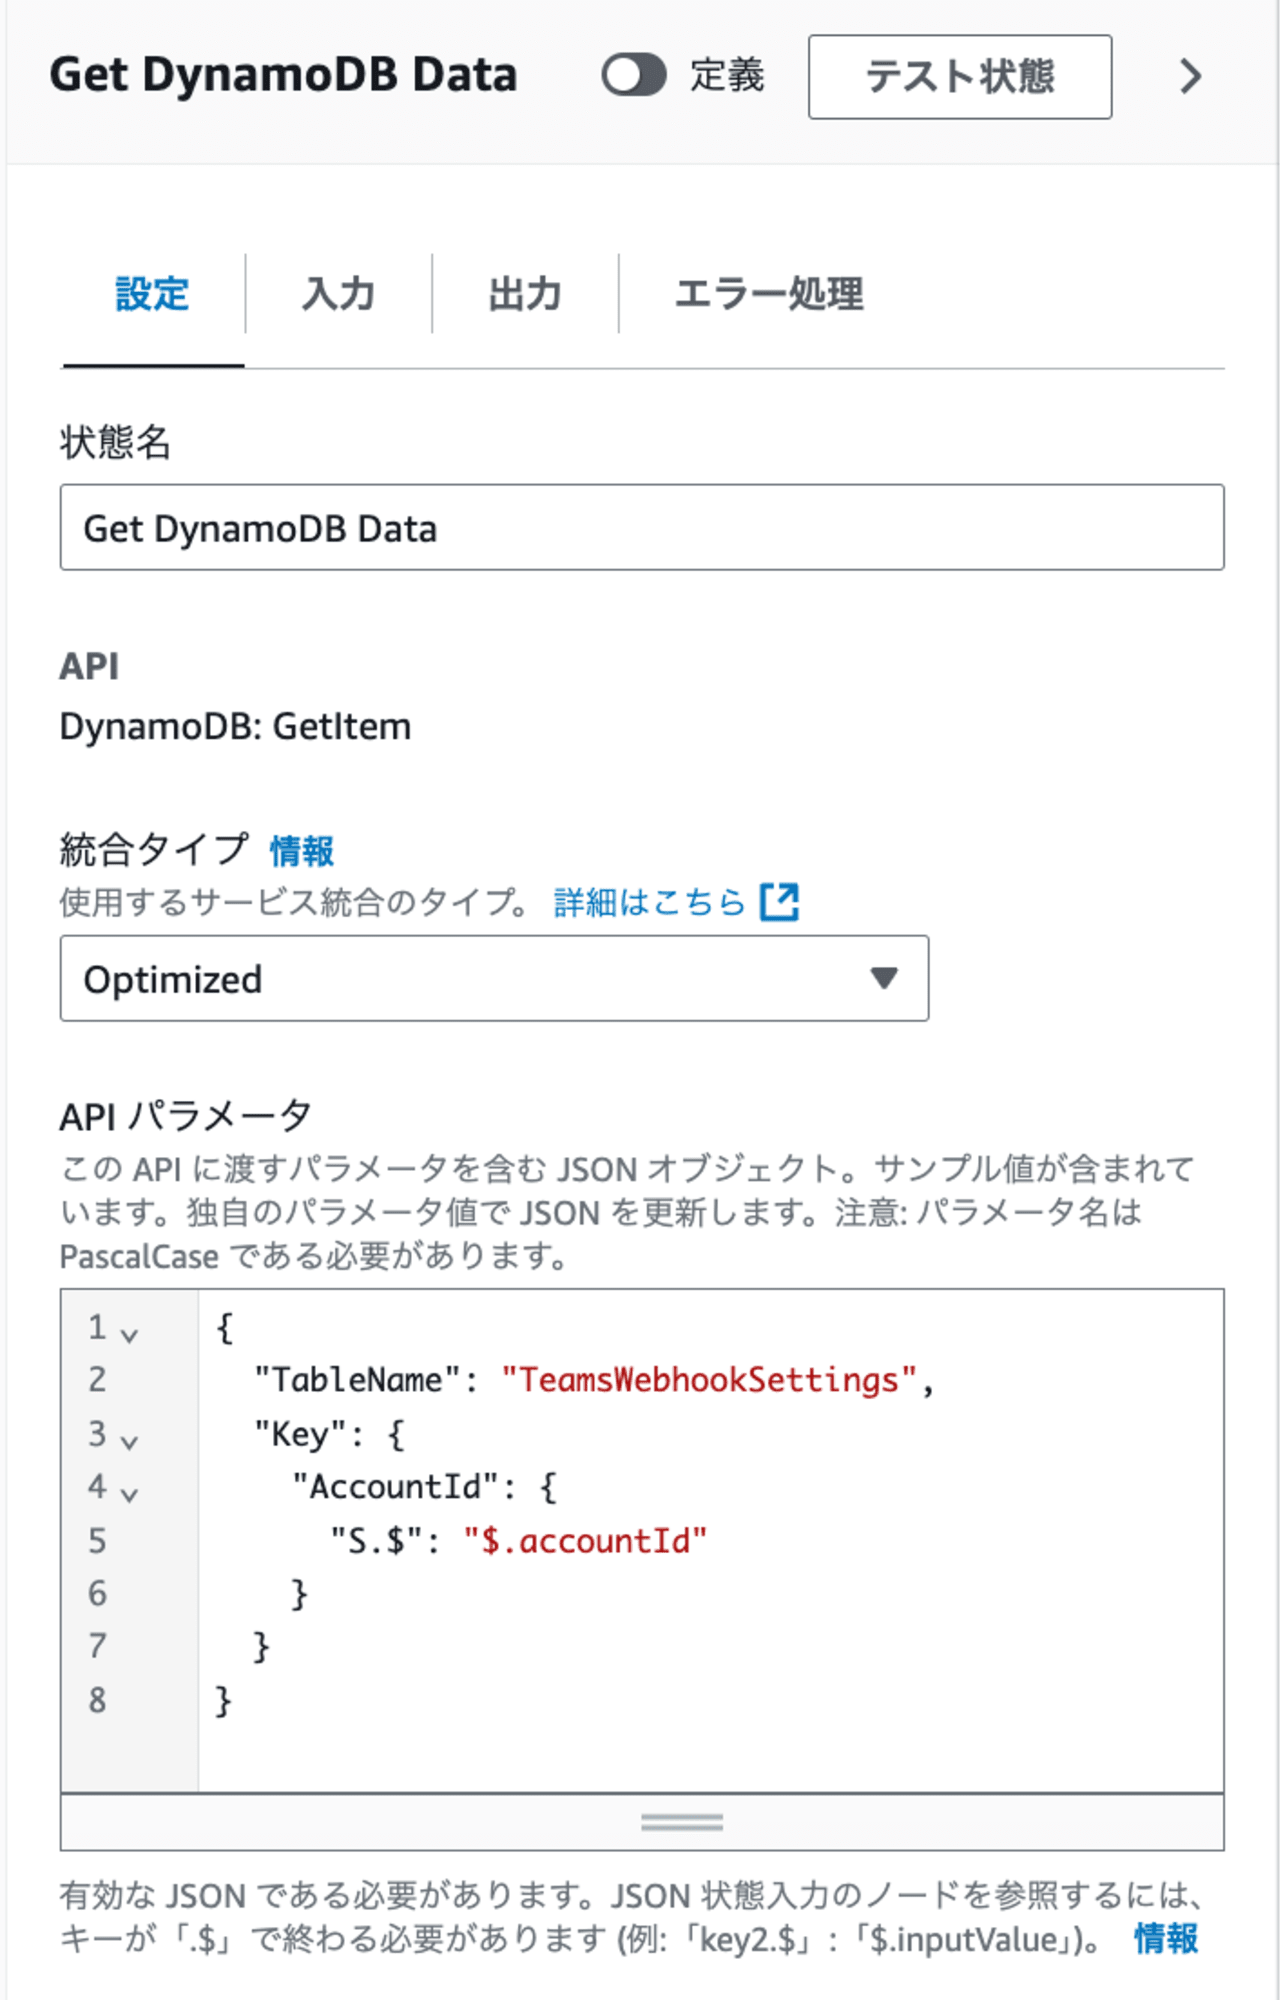
DynamoDB GetItemは、以下の通り設定します。
- 状態名:Get DynamoDB Data
- 統合タイプ:Optimized
- API パラメータ:以下の通り
{
  "TableName": "TeamsWebhookSettings",
  "Key": {
    "AccountId": {
      "S.$": "$.accountId"
    }
  }
}
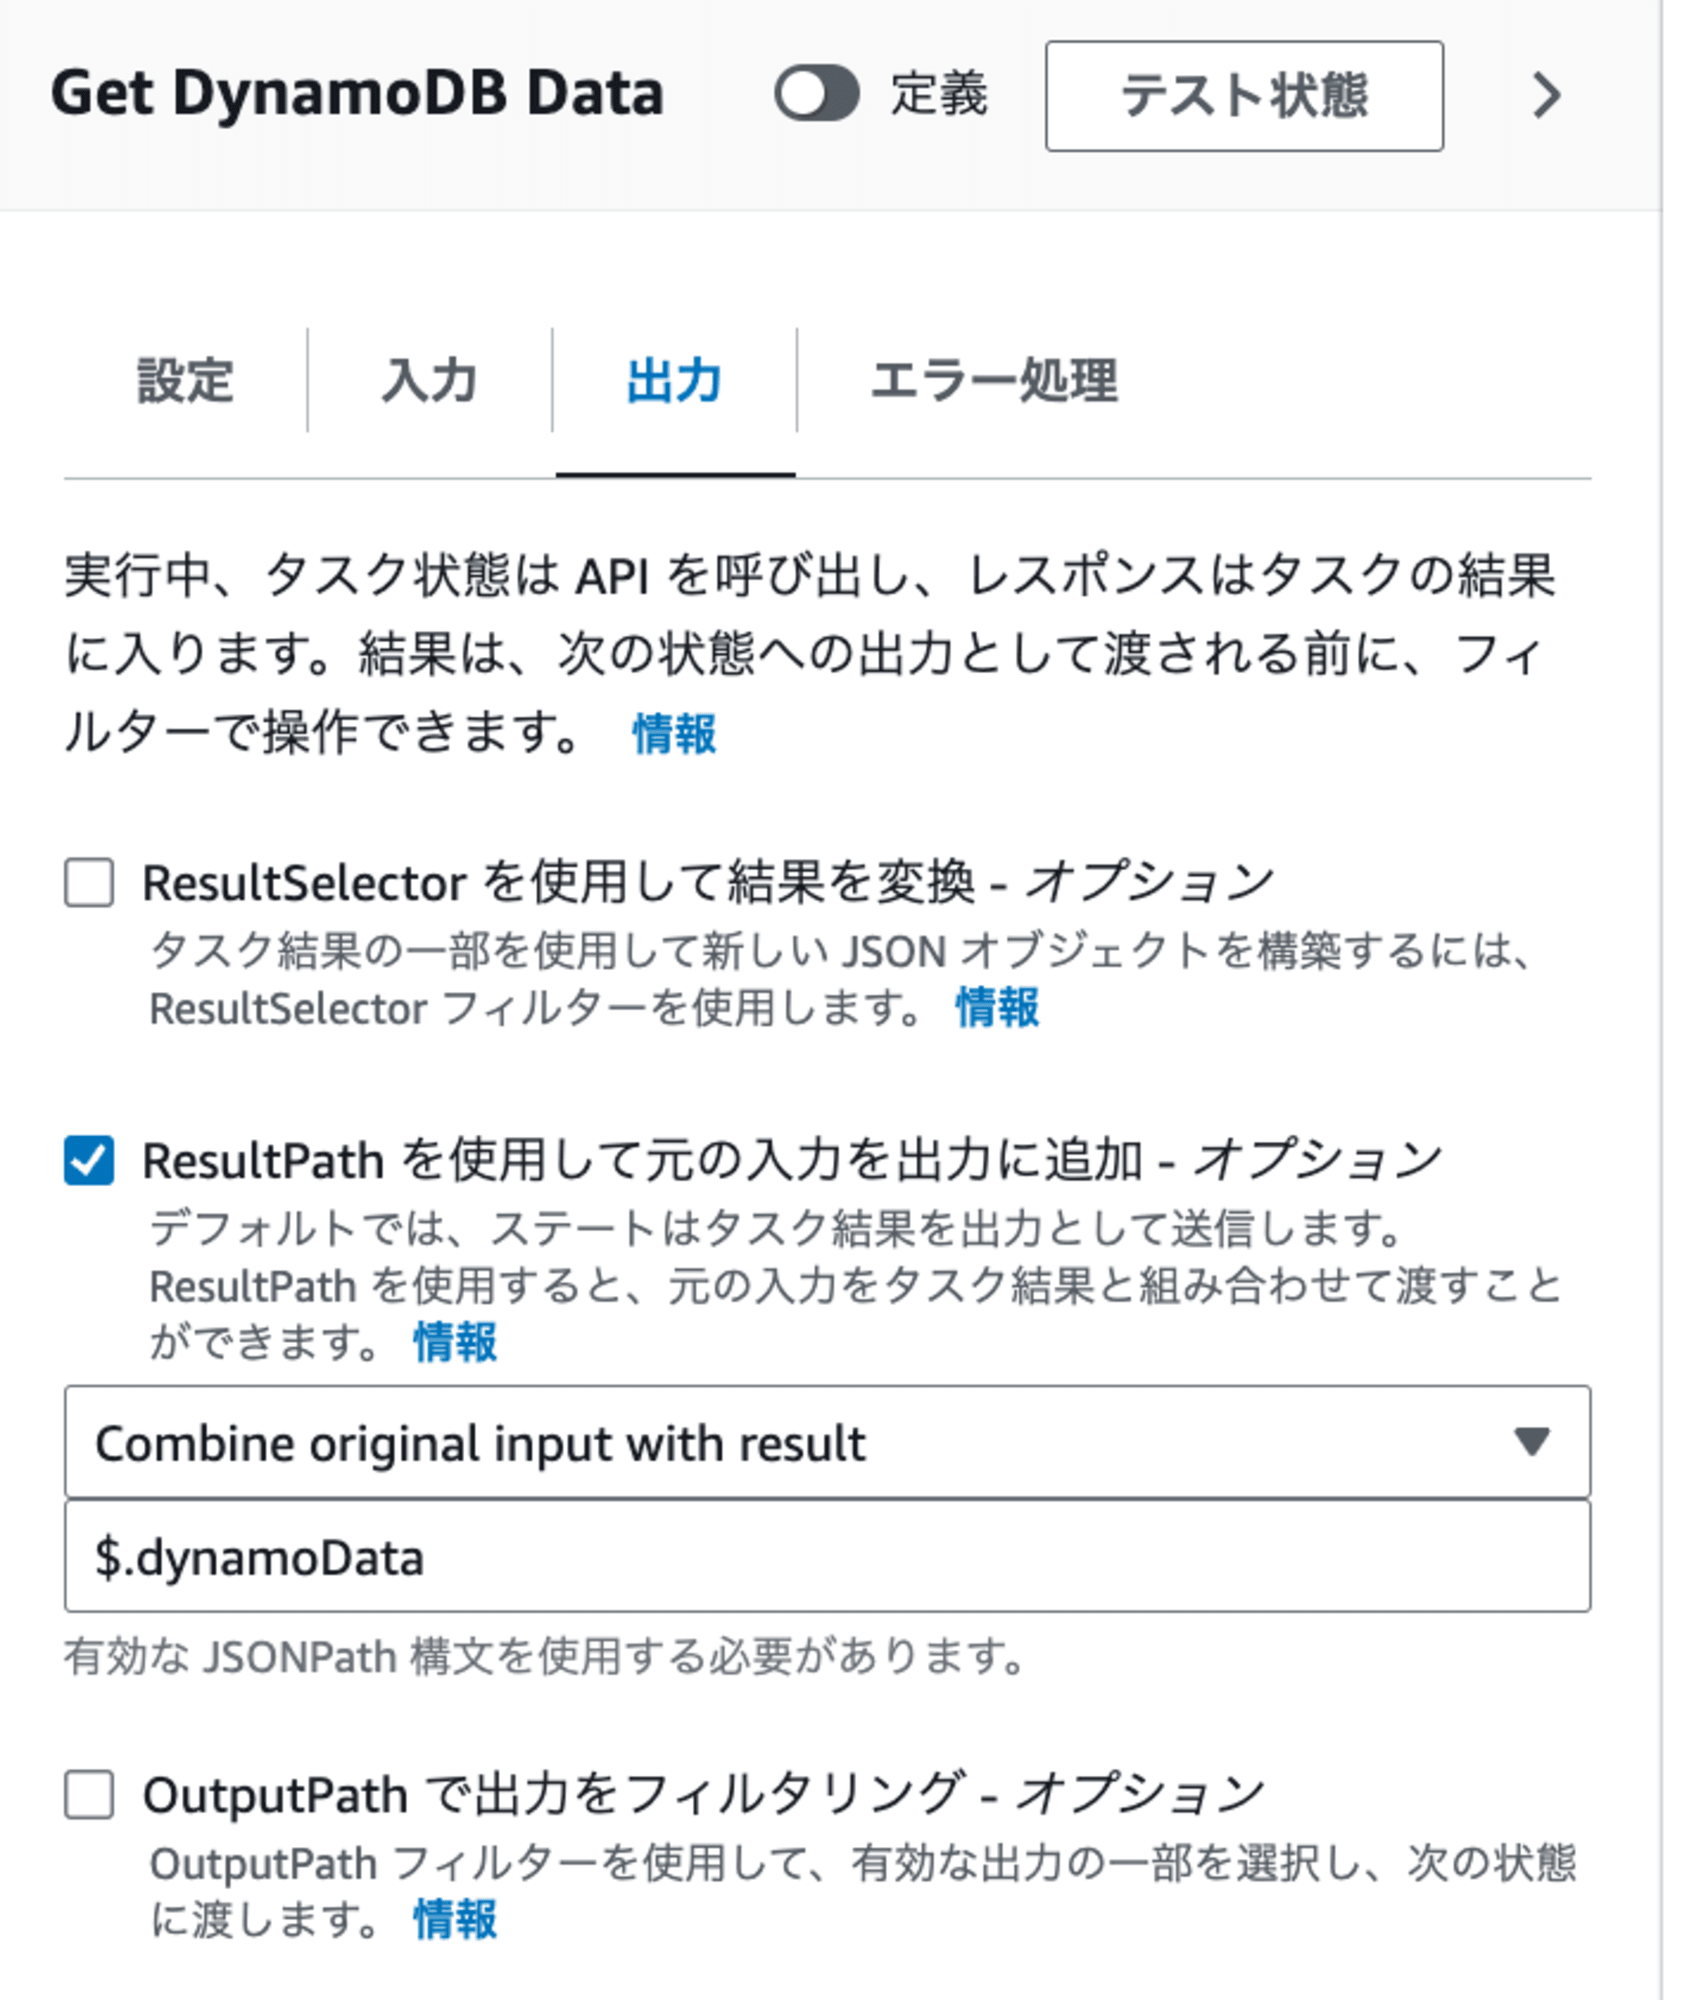
取得したDynamoDBデータを次のフローに渡します。
- ResultPath を使用して元の入力を出力に追加
- Combine original input with result:
$.dynamoData
- Combine original input with result:
続いてCall third-party APIを設定します。
- メソッド:POST
- 認証:先ほど作成したEventBridge接続
- リクエスト本文
{
  "type": "message",
  "attachments": [
    {
      "contentType": "application/vnd.microsoft.card.adaptive",
      "content": {
        "type": "AdaptiveCard",
        "body": [
          {
            "type": "TextBlock",
            "text.$": "States.Format('<at>{}</at>', $.dynamoData.Item.MentionedName.S)",
            "weight": "bolder",
            "size": "medium"
          },
          {
            "type": "TextBlock",
            "text": "アラートを検知しました",
            "size": "Large",
            "weight": "Bolder"
          },
          {
            "type": "Table",
            "columns": [
              {
                "width": 1
              },
              {
                "width": 2
              }
            ],
            "rows": [
              {
                "type": "TableRow",
                "cells": [
                  {
                    "type": "TableCell",
                    "items": [
                      {
                        "type": "TextBlock",
                        "text": "項目",
                        "weight": "Bolder"
                      }
                    ]
                  },
                  {
                    "type": "TableCell",
                    "items": [
                      {
                        "type": "TextBlock",
                        "wrap": true,
                        "text": "内容"
                      }
                    ]
                  }
                ]
              },
              {
                "type": "TableRow",
                "cells": [
                  {
                    "type": "TableCell",
                    "items": [
                      {
                        "type": "TextBlock",
                        "text.$": "$.item",
                        "weight": "Bolder"
                      }
                    ]
                  },
                  {
                    "type": "TableCell",
                    "items": [
                      {
                        "type": "TextBlock",
                        "wrap": true,
                        "text.$": "$.content"
                      }
                    ]
                  }
                ]
              }
            ]
          }
        ],
        "$schema": "http://adaptivecards.io/schemas/adaptive-card.json",
        "version": "1.4",
        "msteams": {
          "width": "full",
          "entities": [
            {
              "type": "mention",
              "text.$": "States.Format('<at>{}</at>', $.dynamoData.Item.MentionedName.S)",
              "mentioned": {
                "id.$": "$.dynamoData.Item.MentionedEmail.S",
                "name.$": "$.dynamoData.Item.MentionedName.S"
              }
            }
          ]
        }
      }
    }
  ]
}
WebhookUrlの形式は以下のとおりです。
対してCall third-party APIでは以下の通り分割します。
- API エンドポイント:https://prod-xx.japaneast.logic.azure.com/workflows/xxxxx/triggers/manual/paths/invoke
Call third-party APIはポートを指定できないため、:443は削除します。
- クエリパラメータはそれぞれ以下の通り設定します。
- api-version:
2016-06-01 - sp:
/triggers/manual/run%2Ftriggers%2Fmanual%2Frunは/triggers/manual/runに変えます。
- sv:
1.0 - sig:
xxxxx-xxxxx
- api-version:
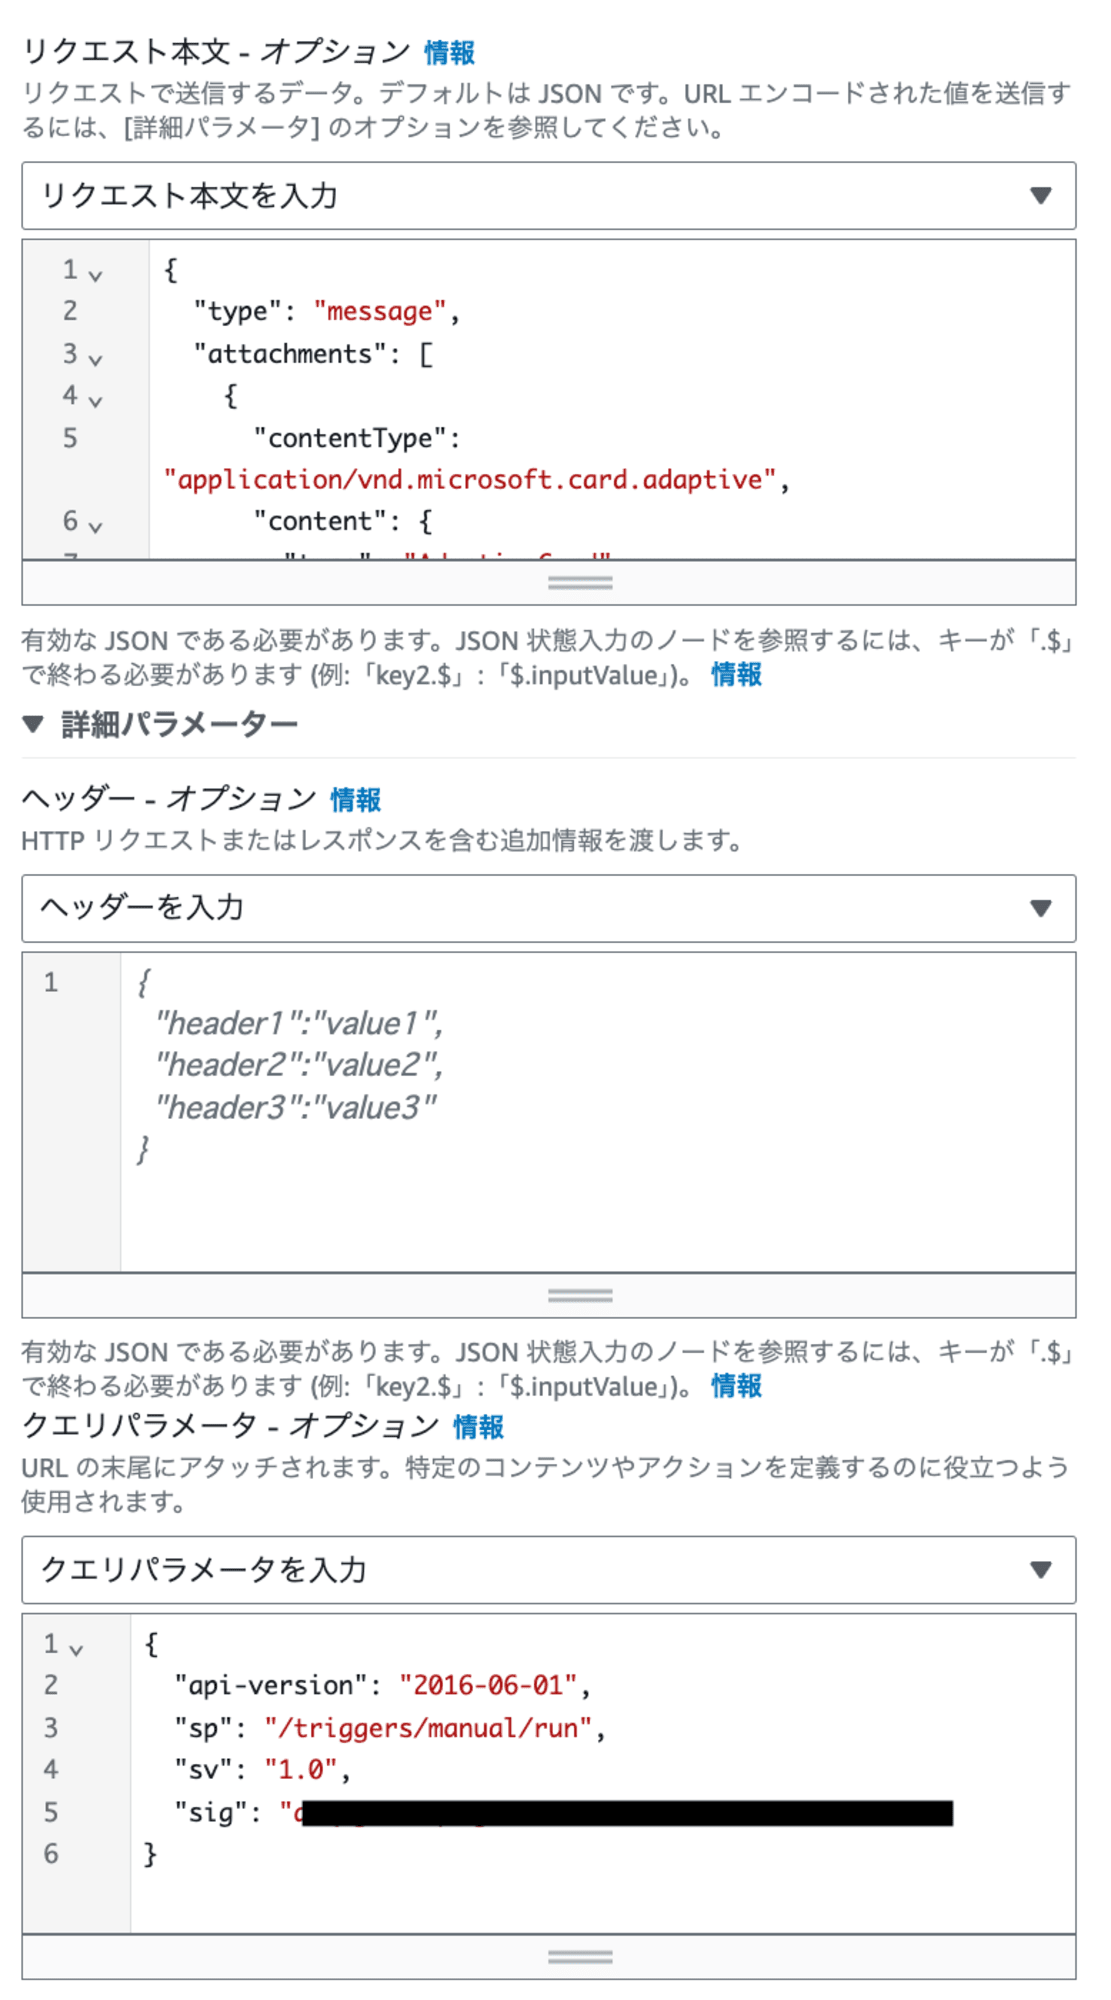
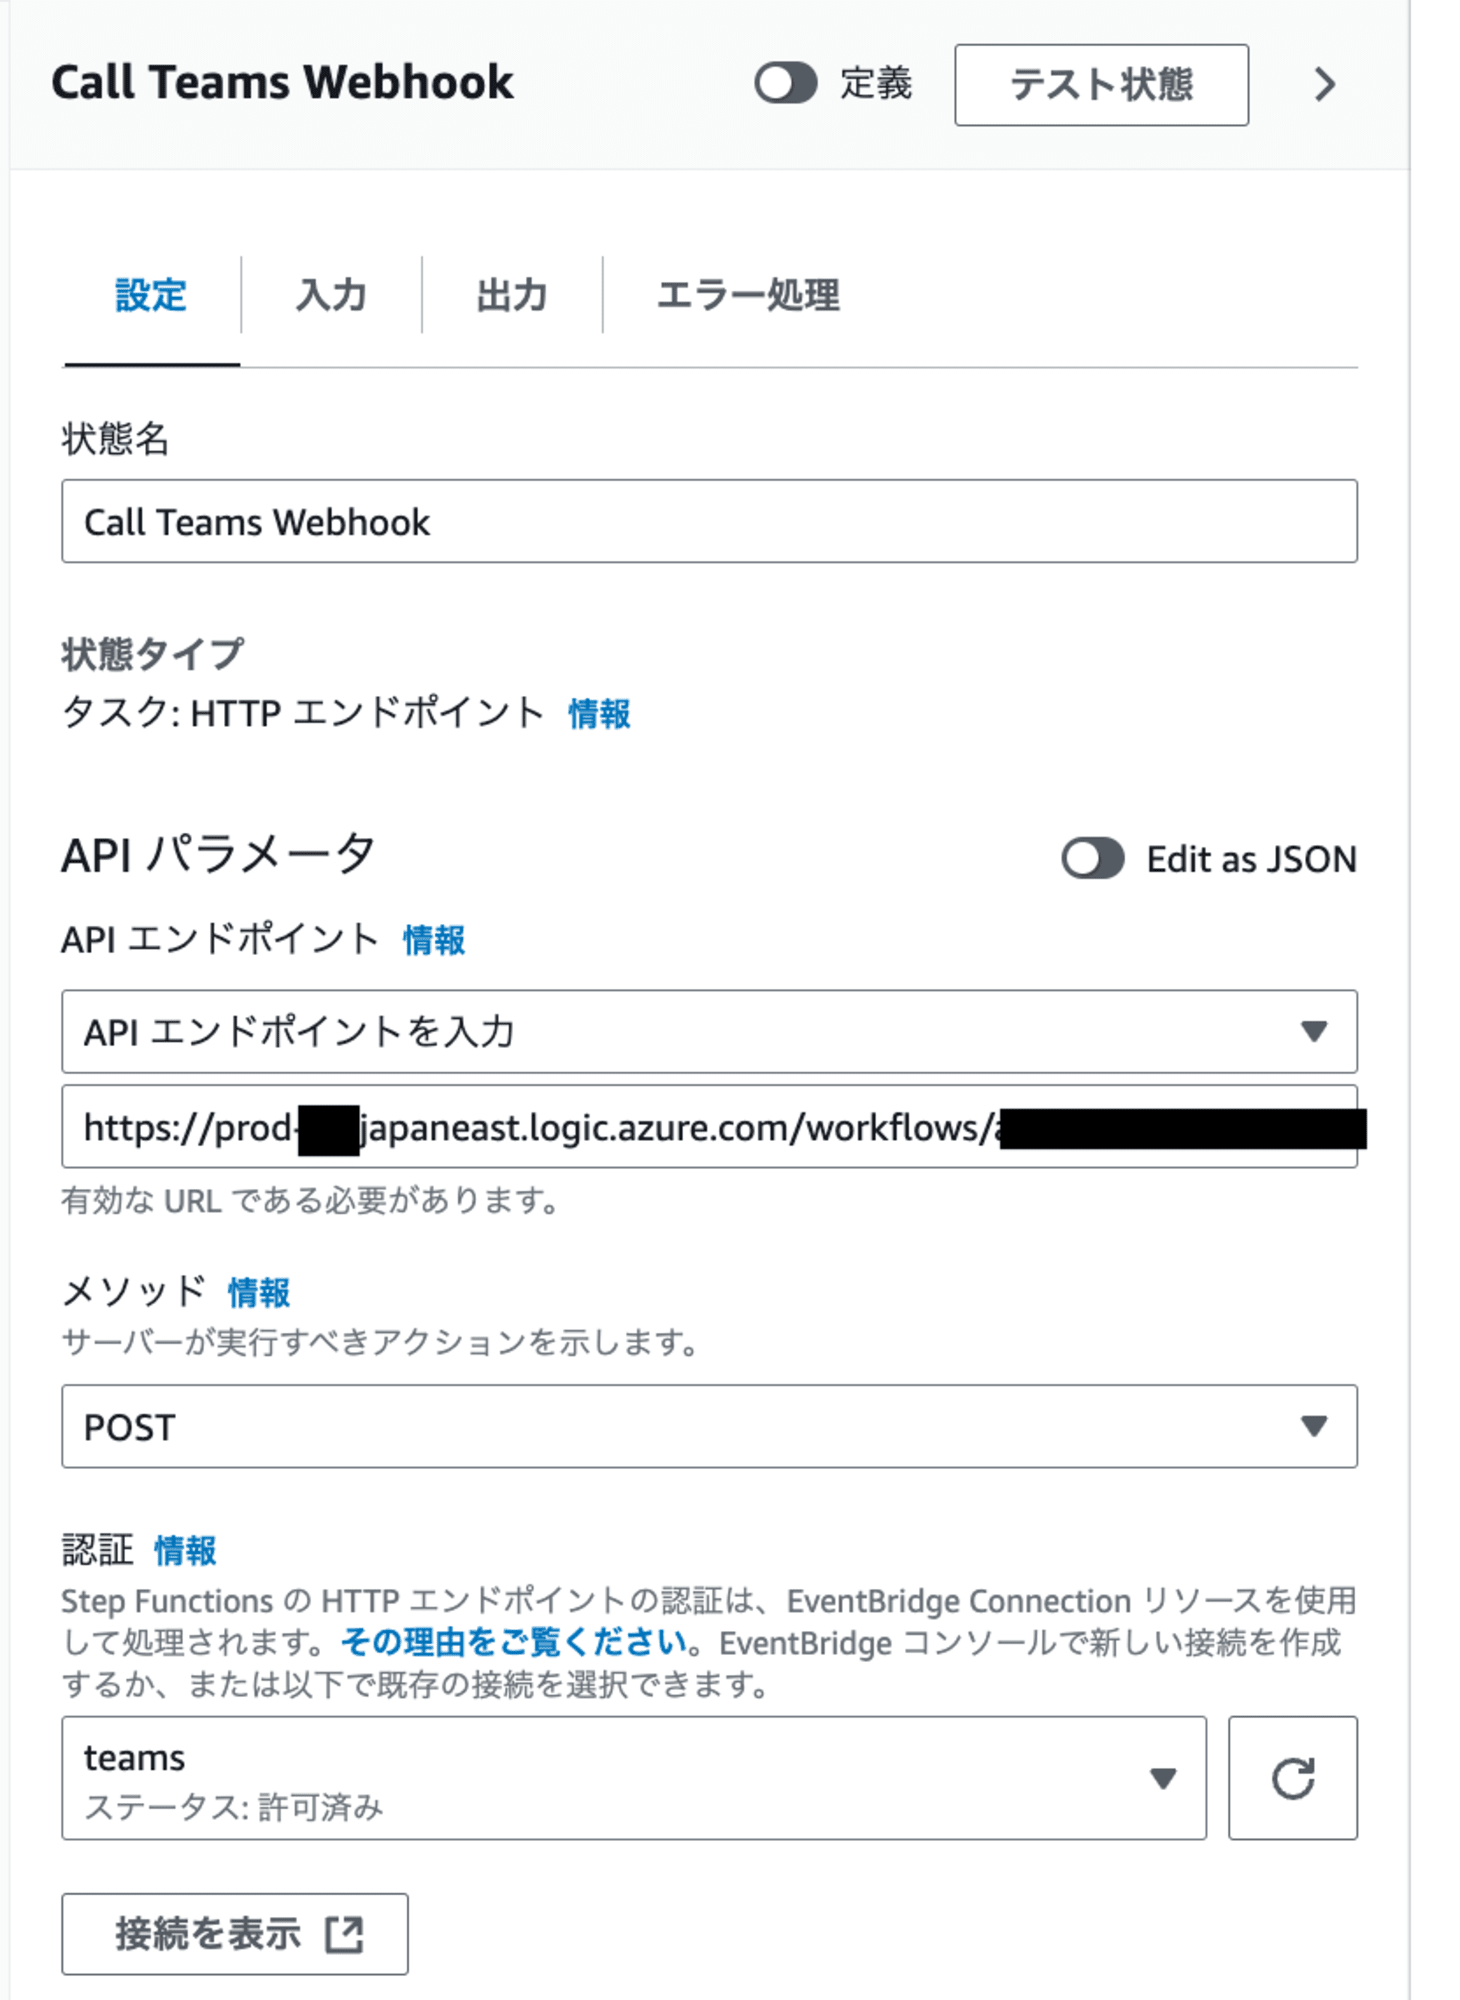
補足:WebhookUrlを柔軟に変更したい場合は、DynamoDBテーブルに新しい項目として追加することをするとよいです。
ステートマシン全体のコードは以下の通りです。
(クリックで展開)
{
  "Comment": "Teams Webhook Notification State Machine",
  "StartAt": "Get DynamoDB Data",
  "States": {
    "Get DynamoDB Data": {
      "Type": "Task",
      "Resource": "arn:aws:states:::dynamodb:getItem",
      "Parameters": {
        "TableName": "TeamsWebhookSettings",
        "Key": {
          "AccountId": {
            "S.$": "$.accountId"
          }
        }
      },
      "ResultPath": "$.dynamoData",
      "Next": "Call Teams Webhook"
    },
    "Call Teams Webhook": {
      "Type": "Task",
      "Resource": "arn:aws:states:::http:invoke",
      "Parameters": {
        "Method": "POST",
        "Authentication": {
          "ConnectionArn": "arn:aws:events:ap-northeast-1:xxxxxxxxxxxx:connection/teams/95886171-4978-49f4-93b7-b89b427ed190"
        },
        "ApiEndpoint": "https://prod-xx.japaneast.logic.azure.com/workflows/xxxxxx/triggers/manual/paths/invoke",
        "QueryParameters": {
          "api-version": "2016-06-01",
          "sp": "/triggers/manual/run",
          "sv": "1.0",
          "sig": "xxxxxx-xxxxx"
        },
        "RequestBody": {
          "type": "message",
          "attachments": [
            {
              "contentType": "application/vnd.microsoft.card.adaptive",
              "content": {
                "type": "AdaptiveCard",
                "body": [
                  {
                    "type": "TextBlock",
                    "text.$": "States.Format('<at>{}</at>', $.dynamoData.Item.MentionedName.S)",
                    "weight": "bolder",
                    "size": "medium"
                  },
                  {
                    "type": "TextBlock",
                    "text": "アラートを検知しました",
                    "size": "Large",
                    "weight": "Bolder"
                  },
                  {
                    "type": "Table",
                    "columns": [
                      {
                        "width": 1
                      },
                      {
                        "width": 2
                      }
                    ],
                    "rows": [
                      {
                        "type": "TableRow",
                        "cells": [
                          {
                            "type": "TableCell",
                            "items": [
                              {
                                "type": "TextBlock",
                                "text": "項目",
                                "weight": "Bolder"
                              }
                            ]
                          },
                          {
                            "type": "TableCell",
                            "items": [
                              {
                                "type": "TextBlock",
                                "wrap": true,
                                "text": "内容"
                              }
                            ]
                          }
                        ]
                      },
                      {
                        "type": "TableRow",
                        "cells": [
                          {
                            "type": "TableCell",
                            "items": [
                              {
                                "type": "TextBlock",
                                "text.$": "$.item",
                                "weight": "Bolder"
                              }
                            ]
                          },
                          {
                            "type": "TableCell",
                            "items": [
                              {
                                "type": "TextBlock",
                                "wrap": true,
                                "text.$": "$.content"
                              }
                            ]
                          }
                        ]
                      }
                    ]
                  }
                ],
                "$schema": "http://adaptivecards.io/schemas/adaptive-card.json",
                "version": "1.4",
                "msteams": {
                  "width": "full",
                  "entities": [
                    {
                      "type": "mention",
                      "text.$": "States.Format('<at>{}</at>', $.dynamoData.Item.MentionedName.S)",
                      "mentioned": {
                        "id.$": "$.dynamoData.Item.MentionedEmail.S",
                        "name.$": "$.dynamoData.Item.MentionedName.S"
                      }
                    }
                  ]
                }
              }
            }
          ]
        }
      },
      "End": true
    }
  }
}
ステートマシン名を記載し、作成します。
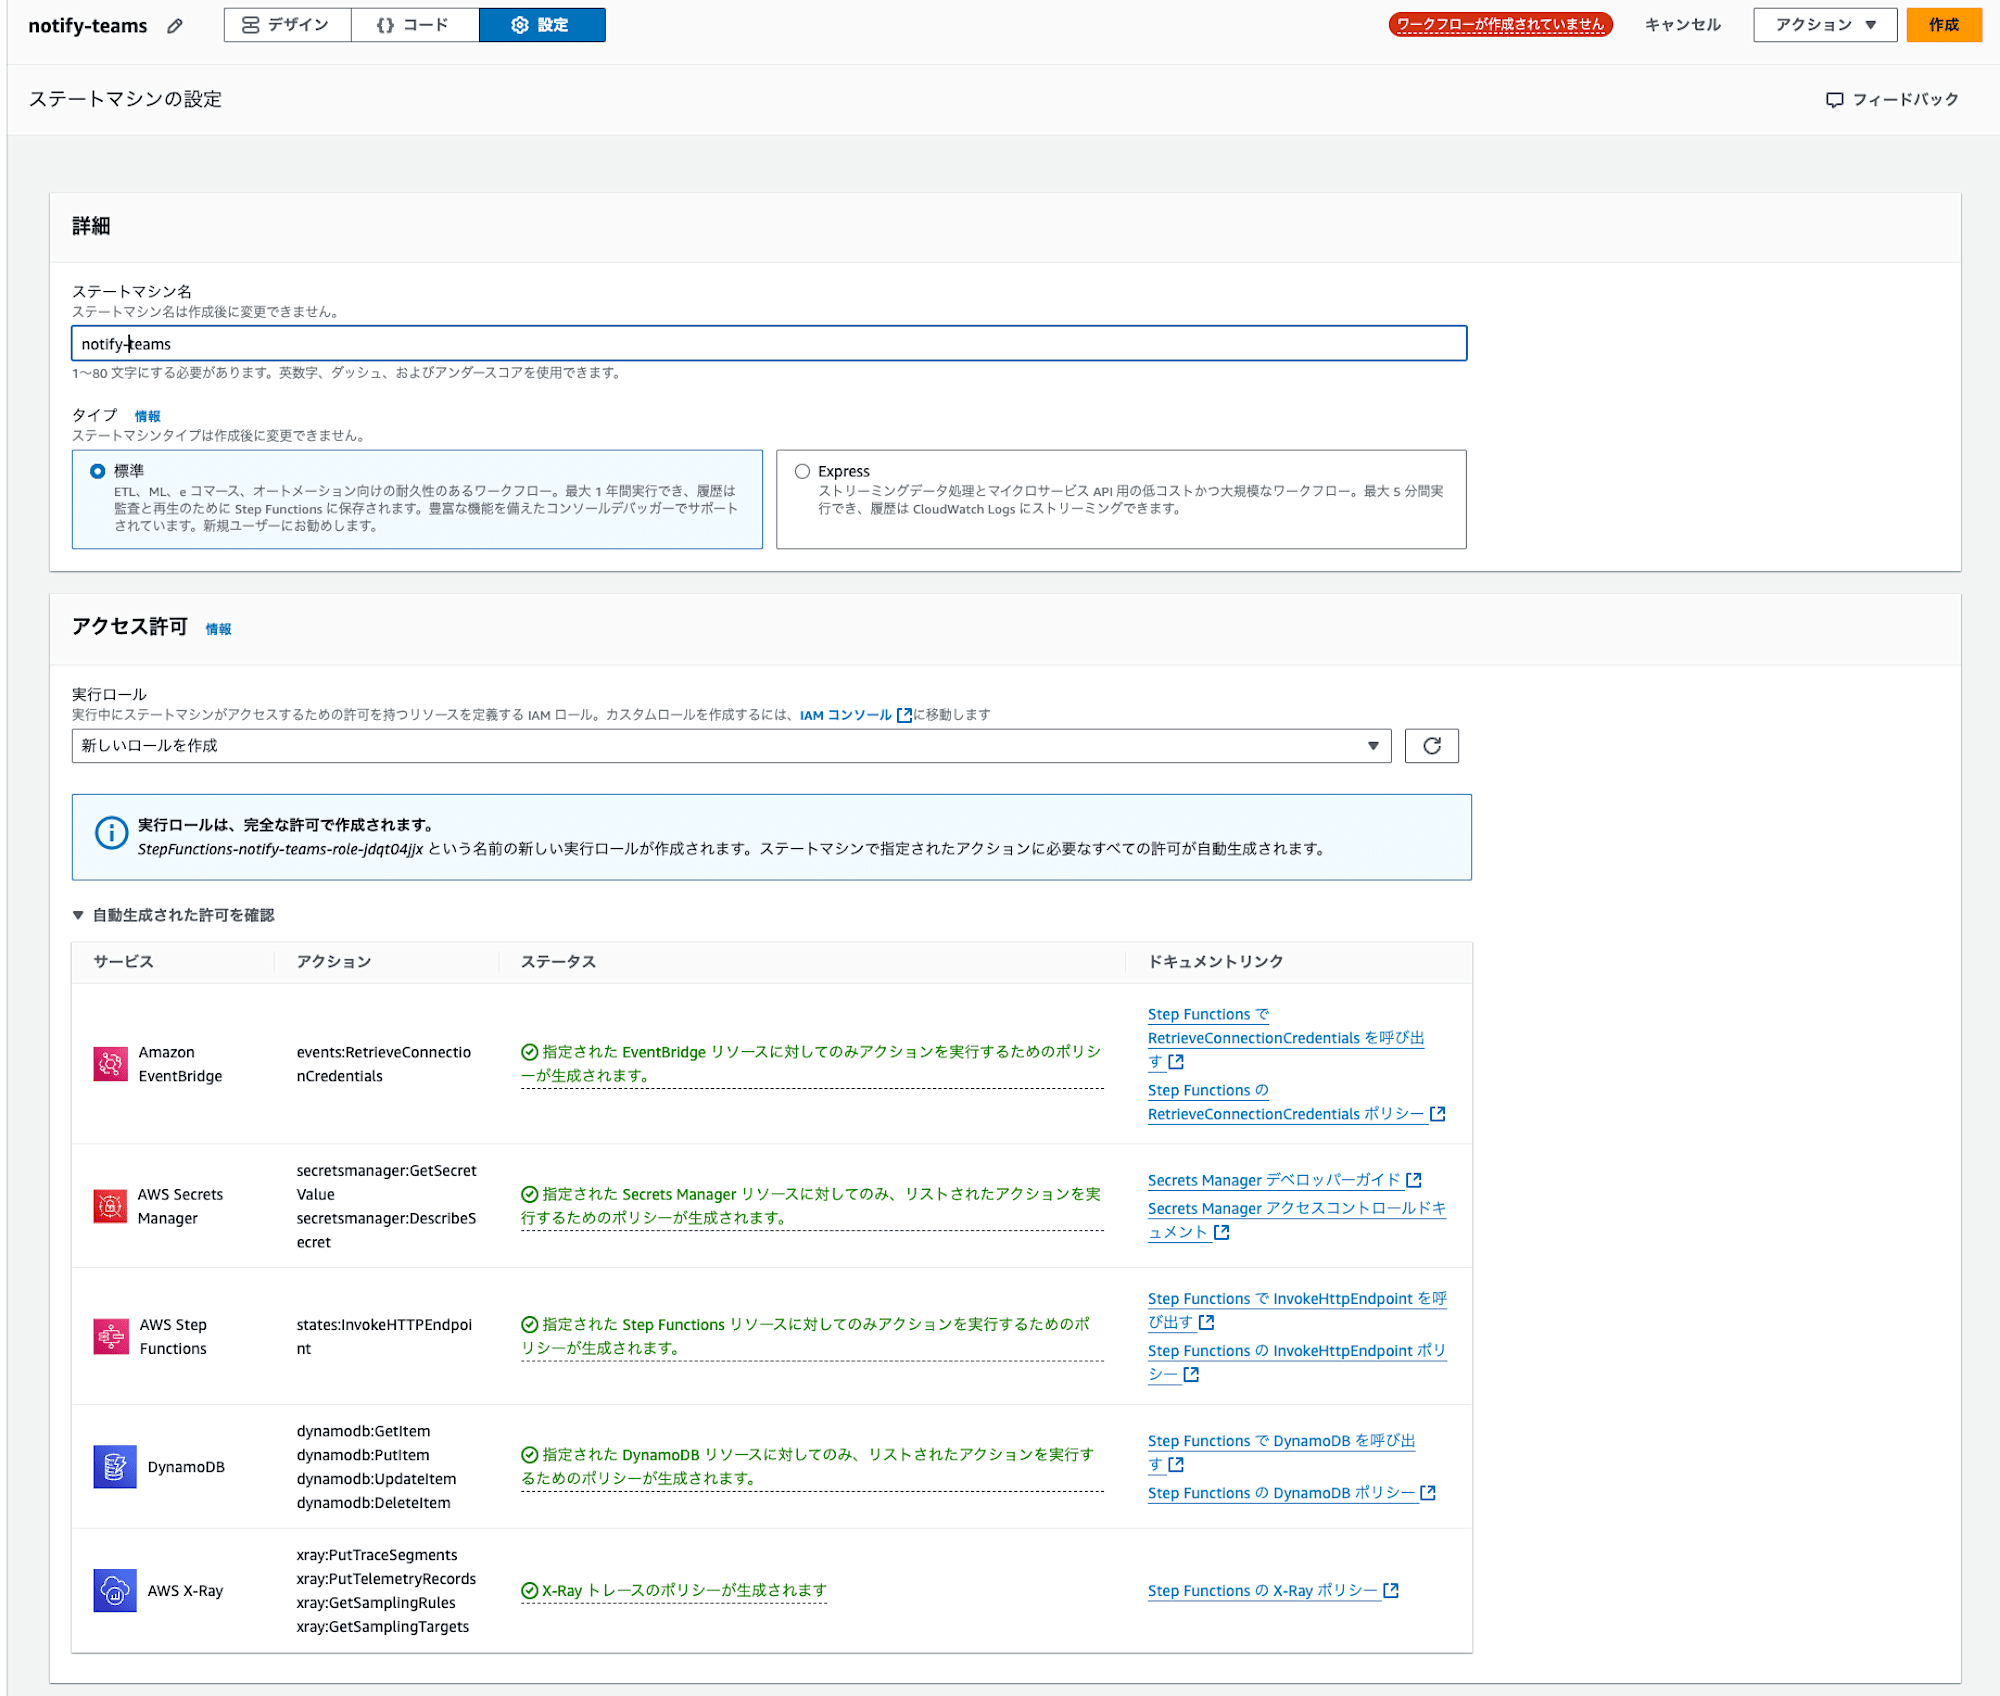
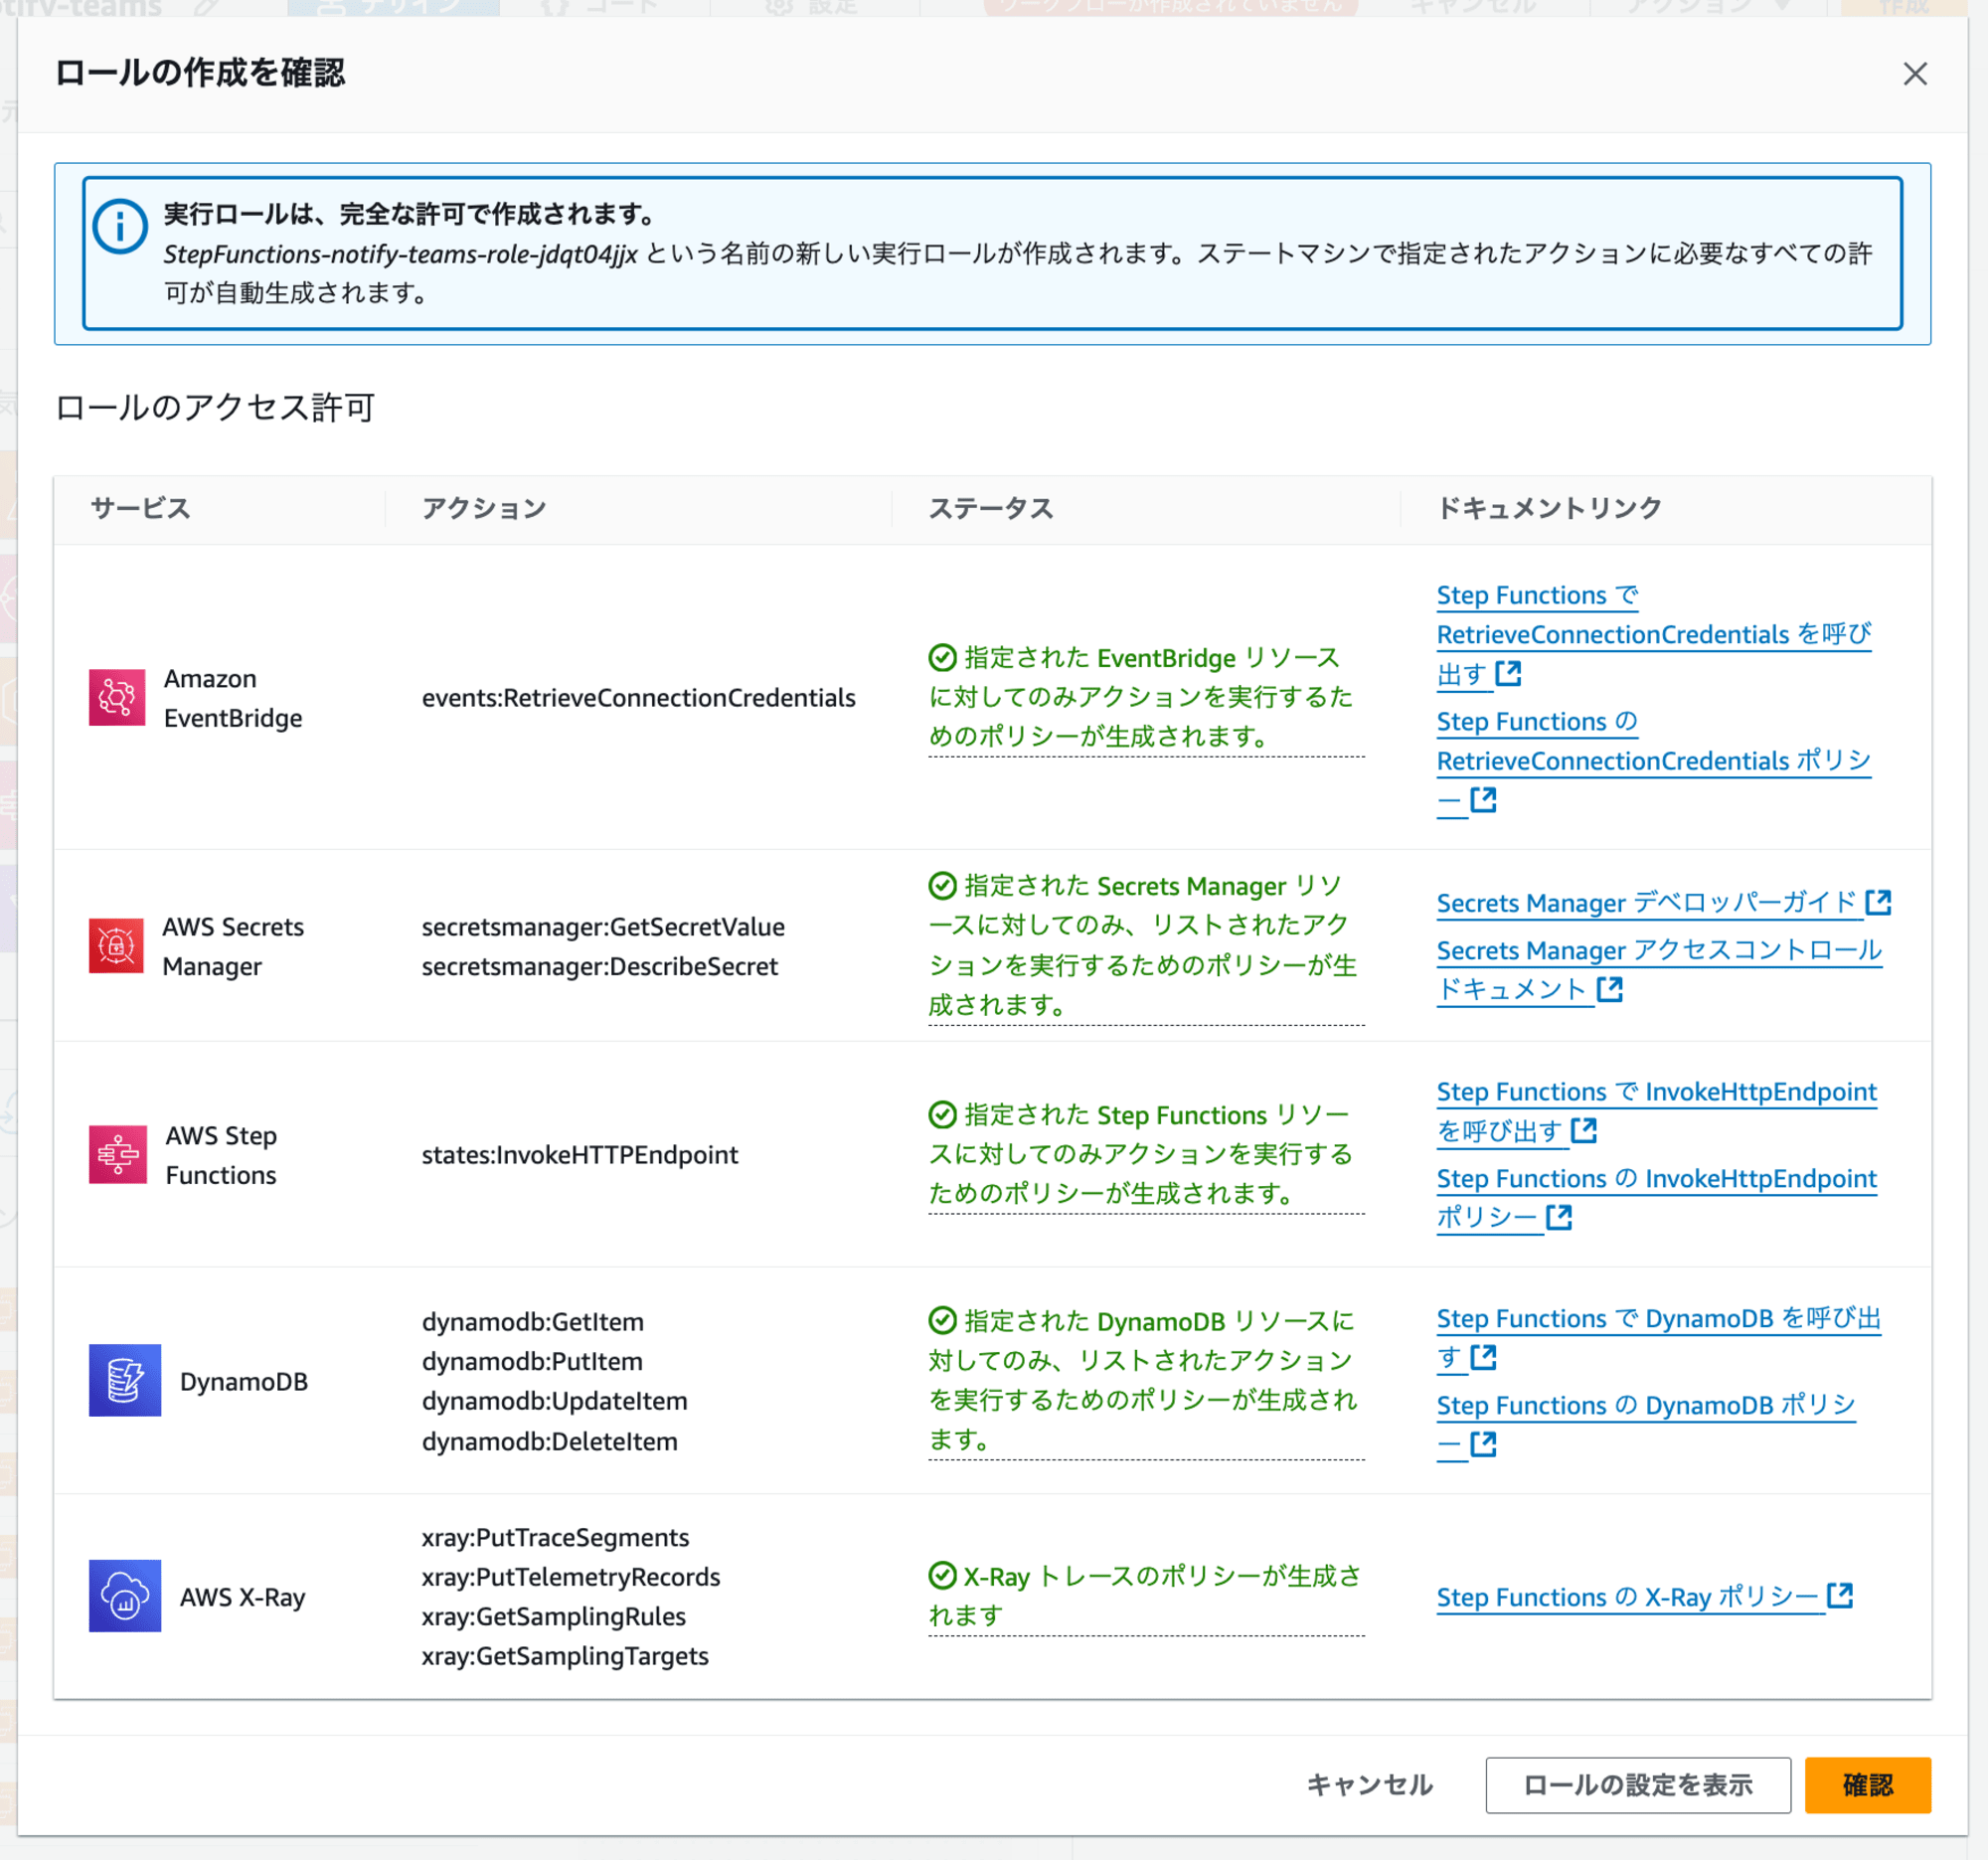
ステートマシン用のIAMロールは。IAMポリシーも含め自動で作成されます。
試してみる
以下のJSONデータを使用してステートマシンを実行します。
{
  "item": "test",
  "content": "hoge",
  "accountId": "111111111111"
}
通知されました。
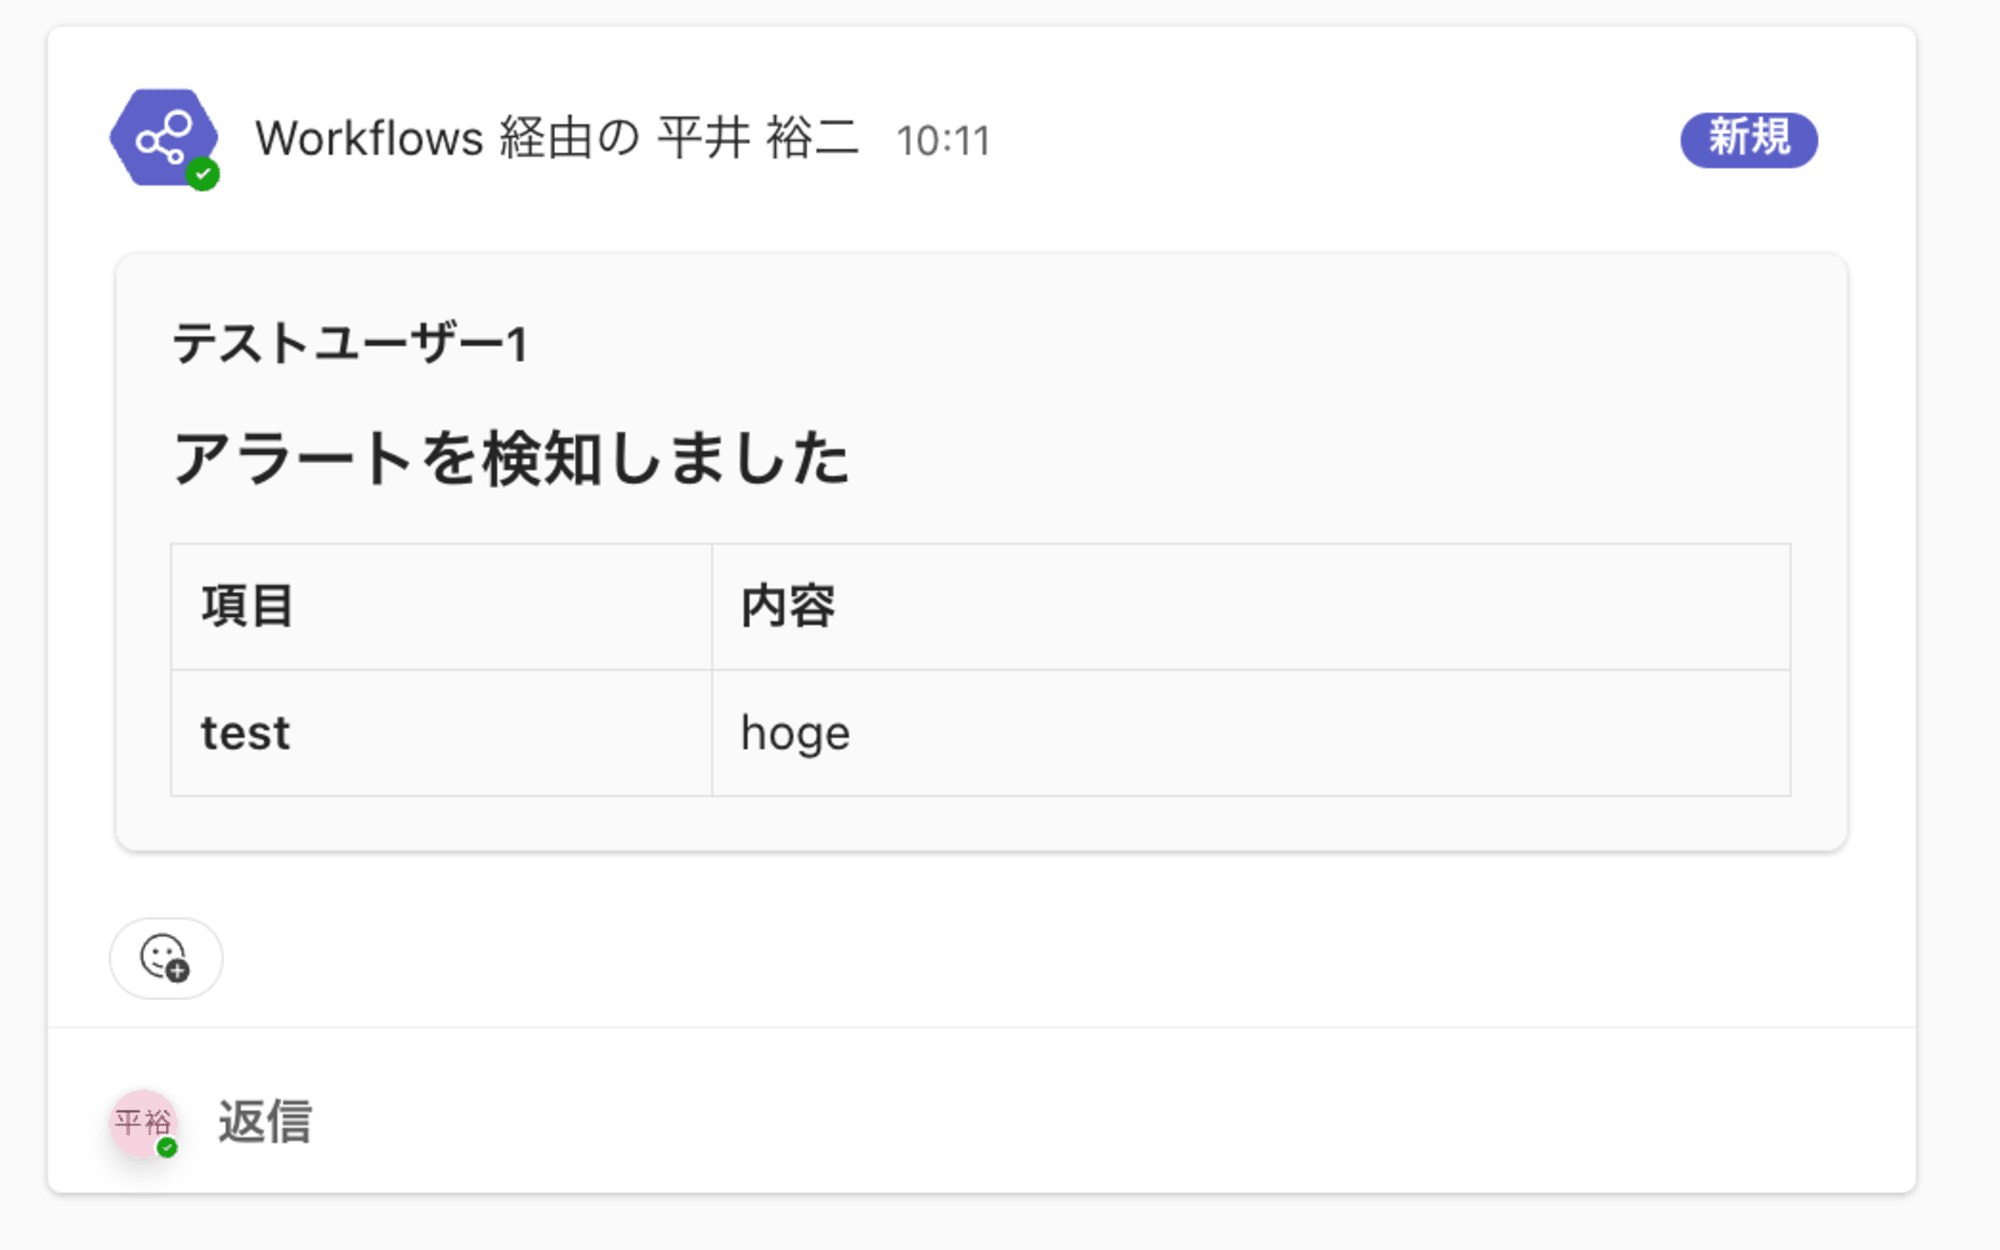
以下のように、入力JSONのアカウントIDを変更するだけで、Teams上での通知先を動的に切り替えることができます。これにより、アカウントごとに適切な担当者への通知が可能になります。
{
  "item": "test2",
  "content": "hoge2",
  "accountId": "000000000000"
}


