BlazeDSの設定とAMF通信のサンプル
この記事は公開されてから1年以上経過しています。情報が古い可能性がありますので、ご注意ください。
BlazeDSを設定して簡単なAMF通信のサンプルを作ってみました。 BlazeDSのバージョンは4.0.0でTomcatのバージョンは7.0です。 開発環境はFlex SDK 4.5.1です。
BlazeDSを以下のAdobeのサイトからダウンロードします。 http://opensource.adobe.com/wiki/display/blazeds/BlazeDS 今回はバイナリー版を使うことにします。
ダウンロードしたzipファイルを解凍するとblazeds.warというファイルがあります。 これはテンプレートになります。
Flash Builder上でTomcatプロジェクトを作成します。 ここではSampleBlazeDSというプロジェクト名にしました。 作成したプロジェクトの直下に②のwarファイルを解凍してできたフォルダの中にあるWEB-INFフォルダをコピーして上書きします。
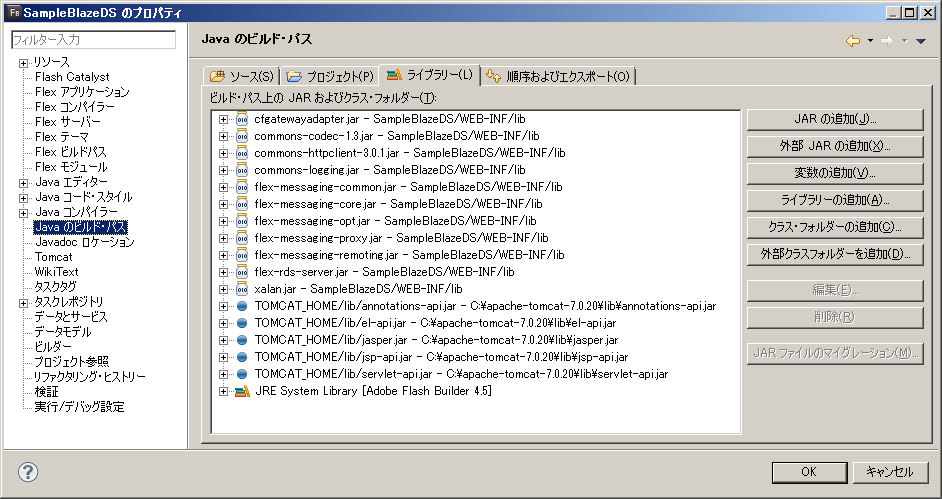
WEB-INF\lib内のjarファイルをビルドパスに追加します。
準備ができたので実装します。 まずはRemoteObjectを試してみます。
WEB-INF内\srcフォルダにJavaのクラスを作成します。
package sample;

public class SampleService {
    public String sayHello() {
        return "Hello World!";
    }
}
SampleBlazeDS\WEB-INF\flex\remoting-config.xmlを編集します。 destinationを追加しています。
<?xml version="1.0" encoding="UTF-8"?>
<service id="remoting-service"
  class="flex.messaging.services.RemotingService">

	<adapters>
		<adapter-definition id="java-object"
			class="flex.messaging.services.remoting.adapters.JavaAdapter"
			default="true"/>
	</adapters>

	<default-channels>
		<channel ref="my-amf"/>
	</default-channels>

	<destination id="sample">
		<properties>
			<source>sample.SampleService</source>
		</properties>
	</destination>
</service>
サービスはできたのでクライアント側をFlexで実装します。
<?xml version="1.0" encoding="utf-8"?>
<s:Application xmlns:fx="http://ns.adobe.com/mxml/2009"
			   xmlns:s="library://ns.adobe.com/flex/spark"
			   xmlns:mx="library://ns.adobe.com/flex/mx" minWidth="955" minHeight="600">
	<fx:Declarations>
		<s:RemoteObject id="service"
						destination="sample"
						endpoint="http://localhost:8080/SampleBlazeDS/messagebroker/amf"
						result="resultHandler(event)"
						fault="faultHandler(event)"/>
	</fx:Declarations>

	<fx:Script>
		<![CDATA[
			import mx.rpc.events.FaultEvent;
			import mx.rpc.events.ResultEvent;

			public function resultHandler(event:ResultEvent):void{
				label.text = event.result as String;
			}

			public function faultHandler(event:FaultEvent):void{
				label.text = event.toString();
			}
		]]>
	</fx:Script>

	<s:HGroup>
		<s:Button click="service.sayHello()" label="Click!"/>
		<s:Label id="label"/>
	</s:HGroup>
</s:Application>
アプリを起動してボタンを押すとHello World!とラベルに表示されます。
次にMessegingのサンプルを作ってみます。 サーバ側の設定はSampleBlazeDS\WEB-INF\flex\messaging-config.xmlを編集します。 今度はdestinationを追加するだけです。
<?xml version="1.0" encoding="UTF-8"?>
<service id="message-service"
    class="flex.messaging.services.MessageService">

    <adapters>
        <adapter-definition id="actionscript" class="flex.messaging.services.messaging.adapters.ActionScriptAdapter" default="true" />
        <!-- <adapter-definition id="jms" class="flex.messaging.services.messaging.adapters.JMSAdapter"/> -->
    </adapters>

    <default-channels>
        <channel ref="my-polling-amf"/>
    </default-channels>

    <destination id="sample2"/>
</service>
クライアント側をFlexで実装します。
<?xml version="1.0" encoding="utf-8"?>
<s:Application xmlns:fx="http://ns.adobe.com/mxml/2009"
			   xmlns:s="library://ns.adobe.com/flex/spark"
			   xmlns:mx="library://ns.adobe.com/flex/mx" minWidth="955" minHeight="600"
			   creationComplete="creationCompleteHandler(event)">

	<fx:Declarations>
		<s:Producer id="producer" destination="sample2"/>
		<s:Consumer id="consumer" destination="sample2" message="messageHandler(event)"/>
	</fx:Declarations>

	<fx:Script>
		<![CDATA[
			import mx.events.FlexEvent;
			import mx.messaging.ChannelSet;
			import mx.messaging.channels.AMFChannel;
			import mx.messaging.events.MessageEvent;
			import mx.messaging.messages.AsyncMessage;
			import mx.messaging.messages.IMessage;

			private var channelSet:ChannelSet;
			private const URL:String = "http://localhost:8080/SampleBlazeDS/messagebroker/amfpolling";

			private function creationCompleteHandler(event:FlexEvent):void{

				var channel:AMFChannel = new AMFChannel(null, URL);
				channelSet = new ChannelSet();
				channelSet.addChannel(channel);

				consumer.channelSet = channelSet;
				producer.channelSet = channelSet;

				consumer.subscribe();
			}

			private function clickHandler(event:Event):void{
				var message:IMessage = new AsyncMessage();
				message.body = "Hello World2!";
				producer.send(message);
			}

			private function messageHandler(event:MessageEvent):void{
				label.text = event.message.body as String;
			}
		]]>
	</fx:Script>

	<s:HGroup>
		<s:Button click="clickHandler(event)" label="Click2!"/>
		<s:Label id="label"/>
	</s:HGroup>
</s:Application>
アプリを2つ起動してからボタンを押して2つのアプリのラベルにHello World2!と表示されたら成功です。


