【CDK】Honoで簡単なCRUD処理のバックエンドAPIを作成してみた(Lambda + API Gateway + DynamoDB)
この記事は公開されてから1年以上経過しています。情報が古い可能性がありますので、ご注意ください。
はじめに
コンサルティング部の神野です。
最近登壇でHonoについて紹介しましたが、触りやすく素敵なフレームワークのため使うことにハマっています!今回は簡単にCRUD処理を実装できたので紹介します。
Honoの魅力については下記登壇レポートで説明しているので、興味があれば見てもらえると嬉しいです!!
構成するシステム
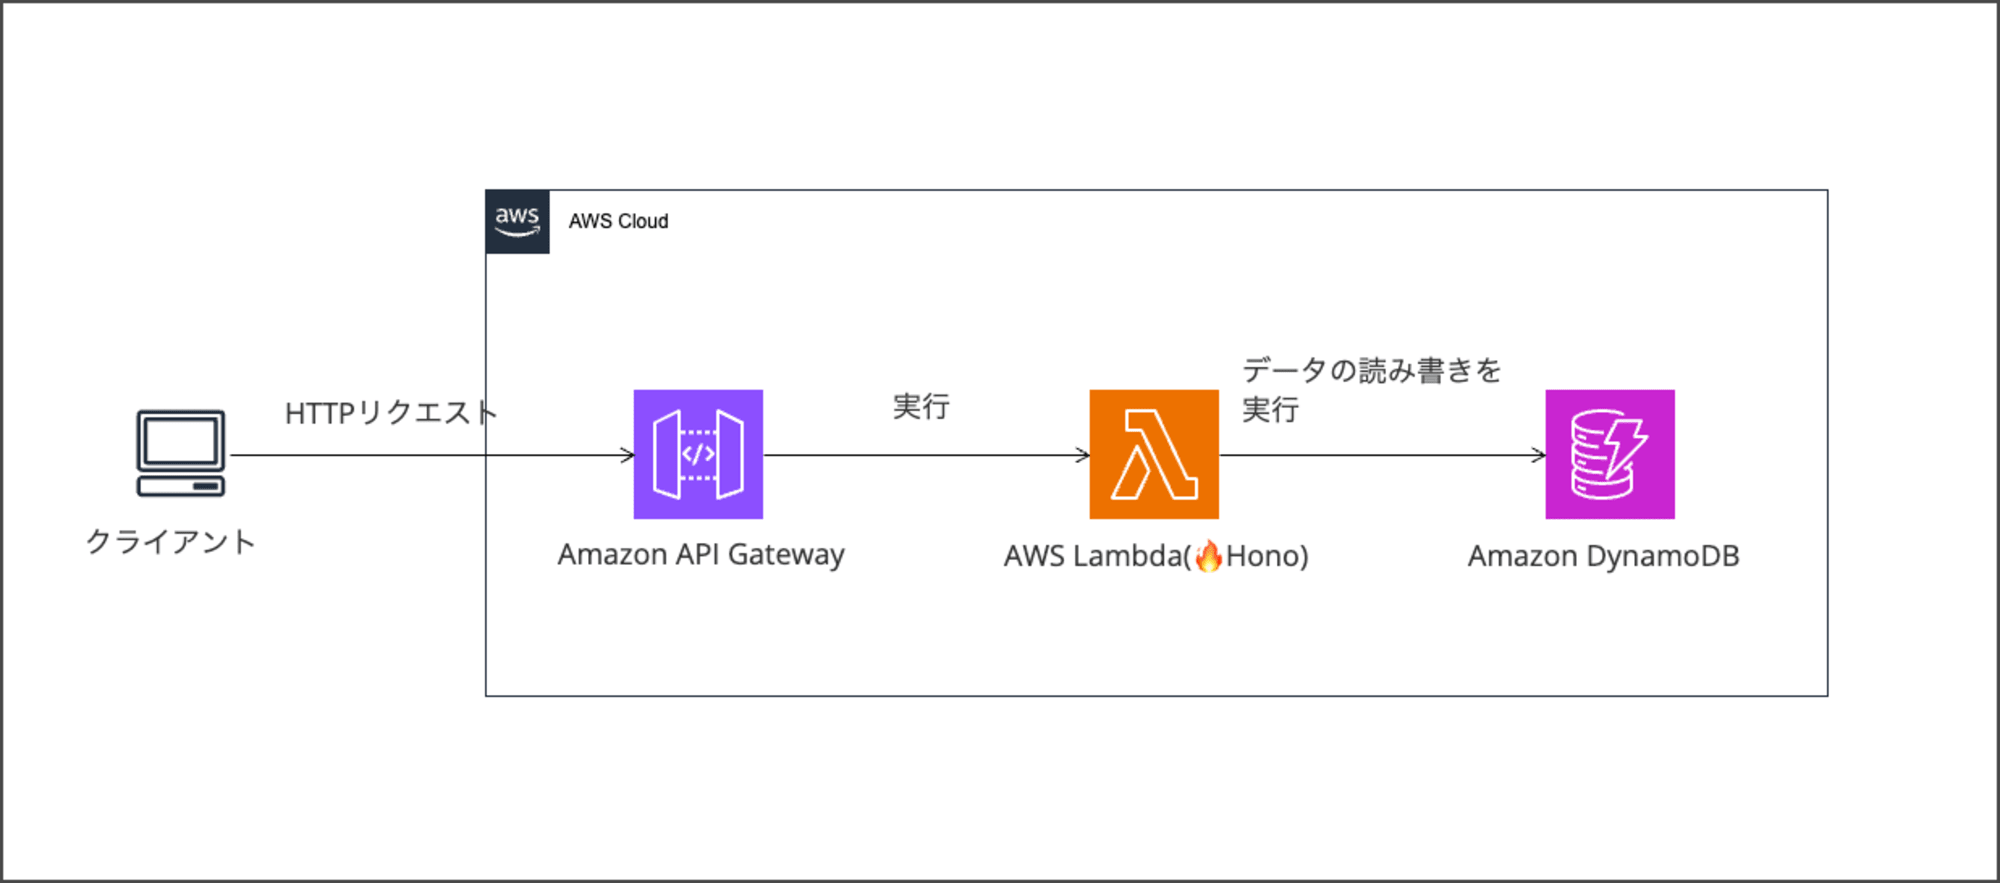
システム構成図
下記構成をCDKで構築し、Honoの実装含めて全てTypeScriptで実装します。
- Honoの実行環境はLambdaを選択
- LambdaはAPI Gateway経由で実行
- データソースとしてはDynamoDBを選択

機能
Todoアプリケーションを作成します。データソースをDynamoDBとする簡単なCRUD処理を行うバックエンドのAPIサーバーを作成していきます。
Todoテーブル
Todoテーブルとしては下記レイアウトは下記想定で実装を進めていきます。シンプルなテーブルを題材としていきます。
属性定義
| 論理名 | 物理名 | 型 | 備考 |
|---|---|---|---|
| ID | id | S | HASH(パーティションキー) |
| タイトル | title | S | |
| 完了フラグ | completed | BOOL | |
| 期日 | dueDate | S | |
| ユーザーID | userId | S | ユーザーIDで検索するためにGSIを設定 |
| 作成日 | createdAt | S | |
| 更新日 | updatedAt | S |
構築
全てのコードはgithubにアップロードしているので、必要に応じてご参照ください。
事前準備
TypeScriptの実行環境としてBun、環境構築にCDKを使って実装を進めていくので事前にライブラリをインストールしておきます。
またDynamoDBをローカルで起動するためにDockerも併せてインストールしておきます。使用したバージョンは下記となります。
- CDK・・・2.158.0
- Docker・・・27.1.1-rd
- Bun・・・1.1.26
任意のフォルダでCDKプロジェクトを作成します。
cdk init --language=typescript
作成後はプロジェクトで必要なライブラリをインストールします。
# AWS CDKとAWS SDKの関連ライブラリ
bun install @aws-sdk/client-dynamodb@3.456.0 @aws-sdk/lib-dynamodb@3.456.0

# Honoとその関連ライブラリ
bun install hono@4.6.2 @hono/zod-validator@0.2.2 zod@3.23.8

# その他の必要なライブラリ
bun install dotenv@16.4.5 uuid@10.0.0

# 開発用ライブラリ
bun install --save-dev @types/uuid@10.0.0
- @aws-sdk/client-dynamodb: 3.456.0
- @aws-sdk/lib-dynamodb: 3.456.0
- hono: 4.6.2
- @hono/zod-validator: 0.2.2
- dotenv: 16.4.5
- uuid: 10.0.0
- zod: 3.23.8
補足:Bunについて
今回はTypeScriptの実行環境として、Bunを使用しました。使用感は下記が素晴らしく採用しました
-
TypeScriptのままコードを実行できる(トランスパイルが不要!!)
実行例# example bun run --hot server.ts -
Honoの実行環境としてサポートされている
-
パッケージマネージャーとしても使用可能で、ライブラリインストールも早い
ディレクトリ構成
下記ディレクトリ構成で実装を進めていきます。
.
├── README.md                     # プロジェクトの説明文書
├── bin
│   └── hono-lambda-api-gw.ts     # CDKアプリケーションのエントリーポイント
├── cdk.json                      # CDKの設定ファイル
├── compose.yaml           # ローカル開発用のDocker設定
├── .env                          # 環境変数設定ファイル(Githubにはコミットしない)
├── lambda                        # Lambda関数のソースコード
│   ├── index.ts                  # Lambda関数のエントリーポイント
│   └── src
│       ├── api
│       │   └── todos
│       │       └── todos.ts      # Todoに関するAPI実装
│       ├── app.ts                # Honoアプリケーションの主要設定
│       └── dynamoDB
│           └── client.ts         # DynamoDBクライアントの設定
├── lib
│   └── hono-lambda-api-gw-stack.ts  # CDKスタックの定義
├── package-lock.json             # npm依存関係のロックファイル
├── package.json                  # プロジェクトの依存関係と設定
└── tsconfig.json                 # TypeScriptの設定ファイル
Hono部分
DynamoDBクライアント部分
この処理ではDynamoDBのクライアントを作成します。
- 開発環境用の設定(
devConfig)を定義し、環境変数に応じてローカルのDynamoDBを使用するか本番のAmazon DynamoDBを使用するかを切り替えています。- ローカルのDynamoDBにアクセスする場合でも認証情報を形式上だけ求められるので、ダミーの値を設定します。
createTodosTable関数でTodosテーブル、GSIを作成します。initializeDynamoDB関数で、開発環境の場合にテーブルの存在確認と必要に応じた作成を行います。
import {
  DynamoDBClient,
  ListTablesCommand,
  CreateTableCommand,
  KeyType,
  ScalarAttributeType,
  ProjectionType,
} from "@aws-sdk/client-dynamodb";
import { DynamoDBDocumentClient } from "@aws-sdk/lib-dynamodb";

// ローカルにアクセスするためだけのダミーアクセスキーを設定。
// 何も権限情報も存在しない。
const devConfig = {
  endpoint: "http://localhost:8000",
  region: "ap-northeast-1",
  credentials: {
    accessKeyId: "fakeaccesskey",
    secretAccessKey: "fakesecretaccesskey",
  },
};

const client = new DynamoDBClient(
  process.env.ENV === "development" ? devConfig : {}
);

const docClient = DynamoDBDocumentClient.from(client);

// テーブルとGSIを作成
const createTodosTable = async () => {
  const params = {
    TableName: "Todos",
    KeySchema: [{ AttributeName: "id", KeyType: KeyType.HASH }],
    AttributeDefinitions: [
      { AttributeName: "id", AttributeType: ScalarAttributeType.S },
      { AttributeName: "userId", AttributeType: ScalarAttributeType.S },
    ],
    ProvisionedThroughput: {
      ReadCapacityUnits: 5,
      WriteCapacityUnits: 5,
    },
    GlobalSecondaryIndexes: [
      {
        IndexName: "UserIdIndex",
        KeySchema: [{ AttributeName: "userId", KeyType: KeyType.HASH }],
        Projection: { ProjectionType: ProjectionType.ALL },
        ProvisionedThroughput: {
          ReadCapacityUnits: 5,
          WriteCapacityUnits: 5,
        },
      },
    ],
  };

  try {
    await client.send(new CreateTableCommand(params));
    console.log("Todos table created successfully with UserIdIndex");
  } catch (err) {
    console.log(err);
  }
};

// ローカルデータベース内にテーブル作成
const initializeDynamoDB = async () => {
  if (process.env.ENV === "development") {
    try {
      const { TableNames } = await client.send(new ListTablesCommand({}));
      if (TableNames && !TableNames.includes("Todos")) {
        await createTodosTable();
      } else if (TableNames) {
        console.log("Todos table already exists");
      } else {
        console.log("Unable to list tables, creating Todos table");
        await createTodosTable();
      }
    } catch (err) {
      console.error("Error initializing DynamoDB:", err);
    }
  }
};

// テーブル初期化を実行
initializeDynamoDB();

export { docClient };
Todo処理部分
TodoアプリケーションのCRUD操作を実装しています。
- Zodを使用してリクエストのバリデーションを行っています。
- DynamoDBのドキュメントクライアントを使用してデータの操作を行っています。
- 各エンドポイント(POST, GET, PUT, DELETE)でTodoの作成、取得、更新、削除の処理を実装しています。
CRUD処理一覧
| 操作 | HTTPメソッド | エンドポイント | 説明 | リクエストボディ | レスポンス |
|---|---|---|---|---|---|
| Create | POST | /api/todos | 新しいTodoを作成 | userId, title, completed, dueDate(optional) | 201 Created, 作成されたTodo |
| Read (All) | GET | /api/todos/user/:userId | 特定ユーザーの全Todoを取得 | - | 200 OK, Todoの配列 |
| Read (Single) | GET | /api/todos/:id | 特定のTodoを取得 | - | 200 OK, Todoオブジェクト or 404 Not Found |
| Update | PUT | /api/todos/:id | Todoを更新 | title(optional), completed(optional), dueDate(optional) | 200 OK, 更新されたTodo |
| Delete | DELETE | /api/todos/:id | Todoを削除 | - | 200 OK, 削除成功メッセージ |
import { Hono } from "hono";
import { ReturnValue } from "@aws-sdk/client-dynamodb";
import {
  PutCommand,
  GetCommand,
  QueryCommand,
  UpdateCommand,
  DeleteCommand,
} from "@aws-sdk/lib-dynamodb";
import { z } from "zod";
import { zValidator } from "@hono/zod-validator";
import { v4 as uuidv4 } from "uuid";
import { docClient } from "../../dynamoDB/client";

type ExpressionAttributeValues = { [key: string]: any };
type ExpressionAttributeNames = { [key: string]: string };

const TABLE_NAME = "Todos";
const USER_ID_INDEX = "UserIdIndex";

// カスタムZodスキーマ for YYYY-MM-DD形式の日付
const dateSchema = z.string().refine(
  (val) => {
    return /^\d{4}-\d{2}-\d{2}$/.test(val) && !isNaN(Date.parse(val));
  },
  {
    message: "Invalid date format. Use YYYY-MM-DD",
  }
);

// Zodスキーマの定義
const TodoSchema = z.object({
  userId: z.string().min(1),
  title: z.string().min(1).max(100),
  completed: z.boolean(),
  dueDate: dateSchema.optional(),
});

const TodoUpdateSchema = TodoSchema.partial().omit({ userId: true });

// 現在のUTC時刻を取得する関数
const getCurrentTimestamp = () => new Date().toISOString();

const todos = new Hono()
  .post("/", zValidator("json", TodoSchema), async (c) => {
    const validatedData = c.req.valid("json");
    const now = getCurrentTimestamp();
    const params = {
      TableName: TABLE_NAME,
      Item: {
        id: uuidv4(),
        ...validatedData,
        createdAt: now,
        updatedAt: now,
      },
    };

    try {
      await docClient.send(new PutCommand(params));
      return c.json(
        { message: "Todo created successfully", todo: params.Item },
        201
      );
    } catch (error) {
      console.log(error);
      return c.json({ error: "Failed to create todo" }, 500);
    }
  })
  .get("/user/:userId", async (c) => {
    const userId = c.req.param("userId");
    const params = {
      TableName: TABLE_NAME,
      IndexName: USER_ID_INDEX,
      KeyConditionExpression: "userId = :userId",
      ExpressionAttributeValues: {
        ":userId": userId,
      },
    };

    try {
      const data = await docClient.send(new QueryCommand(params));
      return c.json(data.Items);
    } catch (error) {
      console.log(error);
      return c.json({ error: "Failed to retrieve todos" }, 500);
    }
  })
  .get("/:id", async (c) => {
    const id = c.req.param("id");
    const params = {
      TableName: TABLE_NAME,
      Key: { id },
    };

    try {
      const data = await docClient.send(new GetCommand(params));
      if (data.Item) {
        return c.json(data.Item);
      } else {
        return c.json({ error: "Todo not found" }, 404);
      }
    } catch (error) {
      console.log(error);
      return c.json({ error: "Failed to retrieve todo" }, 500);
    }
  })
  .put("/:id", zValidator("json", TodoUpdateSchema), async (c) => {
    const id = c.req.param("id");
    const validatedData = c.req.valid("json");

    const updateExpressions: string[] = [];
    const expressionAttributeValues: ExpressionAttributeValues = {};
    const expressionAttributeNames: ExpressionAttributeNames = {};

    Object.entries(validatedData).forEach(([key, value]) => {
      updateExpressions.push(`#${key} = :${key}`);
      expressionAttributeValues[`:${key}`] = value;
      expressionAttributeNames[`#${key}`] = key;
    });

    // 更新日時を追加
    updateExpressions.push("#updatedAt = :updatedAt");
    expressionAttributeValues[":updatedAt"] = getCurrentTimestamp();
    expressionAttributeNames["#updatedAt"] = "updatedAt";

    const params = {
      TableName: TABLE_NAME,
      Key: { id },
      UpdateExpression: `set ${updateExpressions.join(", ")}`,
      ExpressionAttributeValues: expressionAttributeValues,
      ExpressionAttributeNames: expressionAttributeNames,
      ReturnValues: ReturnValue.ALL_NEW,
    };

    try {
      const data = await docClient.send(new UpdateCommand(params));
      return c.json(data.Attributes);
    } catch (error) {
      console.log(error);
      return c.json({ error: "Failed to update todo" }, 500);
    }
  })
  .delete("/:id", async (c) => {
    const id = c.req.param("id");
    const params = {
      TableName: TABLE_NAME,
      Key: { id },
    };

    try {
      await docClient.send(new DeleteCommand(params));
      return c.json({ message: "Todo deleted successfully" });
    } catch (error) {
      console.log(error);
      return c.json({ error: "Failed to delete todo" }, 500);
    }
  });

export { todos };
app.ts
サーバー起動処理部分です。Middlewareを使用して、ログとBasic認証を実装します。Honoは標準で提供されているので簡単で素晴らしいですね!!
import { Hono } from "hono";
import { logger } from "hono/logger";
import { basicAuth } from "hono/basic-auth";
import { todos } from "./api/todos/todos";

const app = new Hono();

// ログの設定
app.use("*", logger());
//Basic認証の設定
app.use(
  "*",
  basicAuth({
    username: process.env.BASIC_USERNAME ? process.env.BASIC_USERNAME : "",
    password: process.env.BASIC_PASSWORD ? process.env.BASIC_PASSWORD : "",
  })
);

app.route("/api/todos", todos);

export default app;
Middlewareで設定したログは下記のように出力されます。
<-- POST /api/todos
--> POST /api/todos 400 4ms
index.ts
Lambda関数のエントリーポイントとなるファイルです。
- HonoアプリケーションをAWS Lambda用のハンドラーでラップしています。
- これにより、HonoアプリケーションをLambda関数として実行できるようになります。
import { handle } from 'hono/aws-lambda'
import app from './src/app'

// index.ts で定義された純粋なHTTPサーバをAWS Lambda用のアダプタでラップしてハンドラとしてエクスポート
export const handler = handle(app)
package.json
サーバー起動用のコマンドを追加しておきます。設定することで簡単にbun run devでサーバーを起動できます。
{
  ///省略
  ...
  "scripts": {
		// 追加
    "dev": "ENV=development bun run lambda/src/app.ts"
  },
  ...
}
compose.yaml
DynamoDBをローカルで再現する際にコンテナを起動します。
AWS公式でDynamoDB localが提供されているので活用します。
DynamoDB localは公式が提供しているローカルで構築できるDynamoDBです。
services:
    dynamodb:
        image: amazon/dynamodb-local
        command: -jar DynamoDBLocal.jar -sharedDb -dbPath . -optimizeDbBeforeStartup
        volumes:
            - dynamodb:/home/dynamodblocal
        ports:
            - 8000:8000
volumes:
    dynamodb:
        driver: local
以上でHono処理部分の実装が完了です!!
まずはローカルで動くかどうか検証してみます。
動作確認
まずdocker composeコマンドでDynamoDB localを起動します。
docker compose up -d
その後、APIサーバを起動します。
bun run dev
Started server http://localhost:3000
これでサーバーが立ち上がったので各種リクエストを送ってみます。
# Create: 新しいTodoを作成
curl -i -X POST "http://localhost:3000/api/todos" \
  -H "Content-Type: application/json" \
  -H "Authorization: Basic <your-information>" \
  -d '{"userId": "user123", "title": "新しいタスク", "completed": false, "dueDate": "2023-12-31"}'

HTTP/1.1 201 Created
Content-Type: application/json; charset=UTF-8
Date: Sat, 21 Sep 2024 12:52:20 GMT
Content-Length: 259

{"message":"Todo created successfully","todo":{"id":"e9a90e9a-f843-4f2b-8f87-ece5c886401f","userId":"user123","title":"新しいタスク","completed":false,"dueDate":"2023-12-31","createdAt":"2024-09-21T12:52:21.909Z","updatedAt":"2024-09-21T12:52:21.909Z"}}

# Read
curl -i -X GET "http://localhost:3000/api/todos/user/user123" \
  -H "Authorization: Basic <your-information>"

HTTP/1.1 200 OK
Content-Type: application/json; charset=UTF-8
Date: Sat, 21 Sep 2024 15:17:30 GMT
Content-Length: 214

[{"createdAt":"2024-09-21T12:52:21.909Z","dueDate":"2023-12-31","id":"e9a90e9a-f843-4f2b-8f87-ece5c886401f","completed":false,"title":"新しいタスク","userId":"user123","updatedAt":"2024-09-21T12:52:21.909Z"}]

# Update
curl -i -X PUT "http://localhost:3000/api/todos/e9a90e9a-f843-4f2b-8f87-ece5c886401f" \
  -H "Content-Type: application/json" \
  -H "Authorization: Basic <your-information>" \
  -d '{"title": "更新されたタスク", "completed": true}'

HTTP/1.1 200 OK
Content-Type: application/json; charset=UTF-8
Date: Sat, 21 Sep 2024 15:21:45 GMT
Content-Length: 217

{"createdAt":"2024-09-21T12:52:21.909Z","dueDate":"2023-12-31","completed":true,"id":"e9a90e9a-f843-4f2b-8f87-ece5c886401f","title":"更新されたタスク","userId":"user123","updatedAt":"2024-09-21T15:21:46.061Z"}

# Delete
curl -i -X DELETE "http://localhost:3000/api/todos/e9a90e9a-f843-4f2b-8f87-ece5c886401f" \
  -H "Authorization: Basic <your-information>"
HTTP/1.1 200 OK
Content-Type: application/json; charset=UTF-8
Date: Sat, 21 Sep 2024 15:25:43 GMT
Content-Length: 39

{"message":"Todo deleted successfully"}
CRUD処理が適切に動いていて、いい感じですね!
後はバリデーションチェックが機能しているか、認証の失敗パターンもチェックしてみます!
# 認証エラー
curl -i -X GET "http://localhost:3000/api/todos/user/user123" \
  -H "Authorization: Basic test"
HTTP/1.1 401 Unauthorized
WWW-Authenticate: Basic realm="Secure Area"
content-type: application/octet-stream
Date: Sat, 21 Sep 2024 13:03:36 GMT
Content-Length: 12

Unauthorized

# 必須フィールドの欠落
curl -i -X POST "http://localhost:3000/api/todos" \
  -H "Content-Type: application/json" \
  -H "Authorization: Basic <your-information>" \
  -d '{"title": "新しいタスク", "completed": false}'

HTTP/1.1 400 Bad Request
Content-Type: application/json; charset=UTF-8
Date: Sat, 21 Sep 2024 13:03:01 GMT
Content-Length: 162

{"success":false,"error":{"issues":[{"code":"invalid_type","expected":"string","received":"undefined","path":["userId"],"message":"Required"}],"name":"ZodError"}}
こちらも問題なく実装できていますね!エラー時や認証失敗時のレスポンスを作り込まずともフレームワーク側で自動で返却してもらえるのは嬉しいですね!!!
一通りローカルで実装が完了したので、AWS上にデプロイしていきます。
環境構築部分
環境構築部分はCDKで実装していきます。環境変数は.envファイルをプロジェクト直下に作成し、下記を定義しておきます。
環境変数
- Basic認証のユーザー名とパスワード
- 環境名(今回なら
production)
BASIC_USERNAME=XXX
BASIC_PASSWORD=YYY
ENV=production
CDKコード
下記リソースを作成します。
- DynamoDB
- Todoテーブル
- GSI(UserIdで検索するため)
- Lambda
- Hono実行用の関数
- 環境変数からBasic認証のユーザー名、パスワードおよび環境名を設定します。
- Hono実行用の関数
- API Gateway
- Hono起動用のAPI Gateway
import * as cdk from "aws-cdk-lib";
import { NodejsFunction } from "aws-cdk-lib/aws-lambda-nodejs";
import { Construct } from "constructs";
import * as lambda from "aws-cdk-lib/aws-lambda";
import * as apigw from "aws-cdk-lib/aws-apigateway";
import * as dynamodb from "aws-cdk-lib/aws-dynamodb";
import * as dotenv from "dotenv";

dotenv.config();

export class HonoLambdaApiGwStack extends cdk.Stack {
  constructor(scope: Construct, id: string, props?: cdk.StackProps) {
    super(scope, id, props);

    // DynamoDBテーブルの作成
    const todosTable = new dynamodb.Table(this, "TodosTable", {
      tableName: "Todos",
      partitionKey: { name: "id", type: dynamodb.AttributeType.STRING },
      billingMode: dynamodb.BillingMode.PROVISIONED,
      // Sampleのため1
      readCapacity: 1,
      writeCapacity: 1,
    });

    // ユーザーIDによるグローバルセカンダリインデックスの追加
    todosTable.addGlobalSecondaryIndex({
      indexName: "UserIdIndex",
      partitionKey: { name: "userId", type: dynamodb.AttributeType.STRING },
      projectionType: dynamodb.ProjectionType.ALL,
    });

    const honoLambda = new NodejsFunction(this, "lambda", {
      entry: "lambda/index.ts",
      handler: "handler",
      runtime: lambda.Runtime.NODEJS_20_X,
      environment: {
        ENV: process.env.ENV ? process.env.ENV : "",
        BASIC_USERNAME: process.env.BASIC_USERNAME
          ? process.env.BASIC_USERNAME
          : "",
        BASIC_PASSWORD: process.env.BASIC_PASSWORD
          ? process.env.BASIC_PASSWORD
          : "",
      },
    });

    // Lambda関数にDynamoDBへのアクセス権限を付与
    todosTable.grantReadWriteData(honoLambda);

    const apiGw = new apigw.LambdaRestApi(this, "honoApi", {
      handler: honoLambda,
    });

    // API GatewayのエンドポイントURLを出力
    new cdk.CfnOutput(this, "ApiEndpoint", {
      value: apiGw.url,
      description: "API Gateway endpoint URL",
    });
  }
}
デプロイ
コードも書けたので、デプロイします。
cdk deploy

 ✅  HonoLambdaApiGwStack

✨  Deployment time: 32.9s

Outputs:
HonoLambdaApiGwStack.ApiEndpoint = https://<your-endpoint>.execute-api.ap-northeast-1.amazonaws.com/prod/
HonoLambdaApiGwStack.honoApiEndpointC6CB8CB7 = https://<your-endpoint>.execute-api.ap-northeast-1.amazonaws.com/prod/
Stack ARN:
arn:aws:cloudformation:ap-northeast-1:<your-account>:stack/HonoLambdaApiGwStack/XXX

✨  Total time: 41.9s
問題なくデプロイできたので、出力されたエンドポイントにリクエストを送ってみます。
動作確認
# Create: 新しいTodoを作成
curl -i -X POST "https://<your-endpoint>/api/todos" \
  -H "Content-Type: application/json" \
  -H "Authorization: Basic <your-information>" \
  -d '{"userId": "user123", "title": "新しいタスク", "completed": false, "dueDate": "2023-12-31"}'

# Response
HTTP/2 201
content-type: application/json; charset=UTF-8
content-length: 259
date: Sat, 21 Sep 2024 13:15:31 GMT

{"message":"Todo created successfully","todo":{"id":"7f85c404-2fb0-43a3-8827-462b15fc861d","userId":"user123","title":"新しいタスク","completed":false,"dueDate":"2023-12-31","createdAt":"2024-09-21T13:15:30.805Z","updatedAt":"2024-09-21T13:15:30.805Z"}}
AWS上にデプロイしても問題なく実行できていますね!!
おわりに
Honoの実装部分はいかがでしたでしょうか?シンプルに実装できるWebフレームワークで扱いやすいかと思います!
今回はバックエンド実装のみなので、魅力的なRPC機能の紹介もできておらず次回以降でフロントエンドとの連携部分なども紹介していきたいと思います!
最後までご覧いただきありがとうございました!


