
CloudFormationのインポート機能で既存リソースをスタックにインポートしてみる
はじめに
かつまたです。今回はCloudFormationの既存リソースのインポート機能の学習のために、CloudFormationテンプレートで管理しているS3バケットを一度スタックから削除し、再度既存リソースとしてインポートする手順を実施してみたのでご紹介します。
大まかな流れとしてはCloudFront+S3での静的サイトホスティングの構成をCloudFormationテンプレートでデプロイ、その後S3をテンプレートから削除して、再度S3バケットをCloudFormationスタックにインポートする手順を踏みました。
CloudFormationのインポート機能とは
CloudFormationのインポート機能は、既存のAWSリソースをCloudFormationスタックの管理下に置くための機能です。この機能により、手動で作成したリソースや他の方法で作成したリソースを、後からCloudFormationで管理できるようになります。
やってみる
- 最初に、スタック名とバケット名を変数に設定した後、S3+CloudFront構成全てを含むCloudFormationテンプレートをデプロイします。CloudShellで実行したため、テンプレートは適宜ローカルからCloudShellにアップロードしました。S3バケットに対して"DeletionPolicy:Retain"を設定することでテンプレートからS3バケットを削除した際でもリソースが保持されるようにします。
STACK_NAME="スタック名"
BUCKET_NAME="バケット名"

aws cloudformation create-stack \
  --stack-name ${STACK_NAME} \
  --template-body file://テンプレートファイル名 \
  --parameters ParameterKey=BucketNameParam,ParameterValue=${BUCKET_NAME} \
テンプレート例
AWSTemplateFormatVersion: '2010-09-09'
Description: 'S3 + CloudFront Static Website'

Parameters:
  BucketNameParam:
    Type: String
    Description: 'S3 Bucket Name for static website'
    Default: 'my-static-site-bucket-demo-12345'

Resources:
  StaticWebsiteBucket:
    Type: AWS::S3::Bucket
    DeletionPolicy: Retain
    UpdateReplacePolicy: Retain
    Properties:
      BucketName: !Ref BucketNameParam
      PublicAccessBlockConfiguration:
        BlockPublicAcls: true
        BlockPublicPolicy: true
        IgnorePublicAcls: true
        RestrictPublicBuckets: true
      WebsiteConfiguration:
        IndexDocument: index.html
        ErrorDocument: error.html
      Tags:
        - Key: Purpose
          Value: StaticWebsite

  CloudFrontOAC:
    Type: AWS::CloudFront::OriginAccessControl
    Properties:
      OriginAccessControlConfig:
        Name: !Sub '${AWS::StackName}-OAC'
        OriginAccessControlOriginType: s3
        SigningBehavior: always
        SigningProtocol: sigv4

  BucketPolicy:
    Type: AWS::S3::BucketPolicy
    Properties:
      Bucket: !Ref StaticWebsiteBucket
      PolicyDocument:
        Statement:
          - Sid: AllowCloudFrontServicePrincipal
            Effect: Allow
            Principal:
              Service: cloudfront.amazonaws.com
            Action: 's3:GetObject'
            Resource: !Sub '${StaticWebsiteBucket.Arn}/*'
            Condition:
              StringEquals:
                'AWS:SourceArn': !Sub 'arn:aws:cloudfront::${AWS::AccountId}:distribution/${CloudFrontDistribution}'

  CloudFrontDistribution:
    Type: AWS::CloudFront::Distribution
    Properties:
      DistributionConfig:
        Enabled: true
        Comment: !Sub 'Distribution for ${BucketNameParam}'
        DefaultRootObject: index.html
        Origins:
          - Id: S3Origin
            DomainName: !GetAtt StaticWebsiteBucket.RegionalDomainName
            S3OriginConfig:
              OriginAccessIdentity: ''
            OriginAccessControlId: !GetAtt CloudFrontOAC.Id
        DefaultCacheBehavior:
          TargetOriginId: S3Origin
          ViewerProtocolPolicy: redirect-to-https
          AllowedMethods:
            - GET
            - HEAD
            - OPTIONS
          CachedMethods:
            - GET
            - HEAD
          Compress: true
          ForwardedValues:
            QueryString: false
            Cookies:
              Forward: none
        PriceClass: PriceClass_100
        ViewerCertificate:
          CloudFrontDefaultCertificate: true
      Tags:
        - Key: Purpose
          Value: StaticWebsite
- S3バケットのリソース定義を削除したテンプレートを利用して上記で作成したスタックを更新します。この操作により、S3バケットは保持されたまま、スタック管理下から外すことが可能です。
aws cloudformation update-stack \
  --stack-name ${STACK_NAME} \
  --template-body file://テンプレートファイル名 \
  --parameters ParameterKey=BucketNameParam,ParameterValue=${BUCKET_NAME} \
テンプレート例
AWSTemplateFormatVersion: '2010-09-09'
Description: 'S3 + CloudFront Static Website'

Parameters:
  BucketNameParam:
    Type: String
    Description: 'Existing S3 Bucket Name (not managed by this stack)'
    Default: 'my-static-site-bucket-demo-12345'

Resources:
  CloudFrontOAC:
    Type: AWS::CloudFront::OriginAccessControl
    Properties:
      OriginAccessControlConfig:
        Name: !Sub '${AWS::StackName}-OAC'
        OriginAccessControlOriginType: s3
        SigningBehavior: always
        SigningProtocol: sigv4

  BucketPolicy:
    Type: AWS::S3::BucketPolicy
    Properties:
      Bucket: !Ref BucketNameParam
      PolicyDocument:
        Statement:
          - Sid: AllowCloudFrontServicePrincipal
            Effect: Allow
            Principal:
              Service: cloudfront.amazonaws.com
            Action: 's3:GetObject'
            Resource: !Sub 'arn:aws:s3:::${BucketNameParam}/*'
            Condition:
              StringEquals:
                'AWS:SourceArn': !Sub 'arn:aws:cloudfront::${AWS::AccountId}:distribution/${CloudFrontDistribution}'

  CloudFrontDistribution:
    Type: AWS::CloudFront::Distribution
    Properties:
      DistributionConfig:
        Enabled: true
        Comment: !Sub 'Distribution for ${BucketNameParam}'
        DefaultRootObject: index.html
        Origins:
          - Id: S3Origin
            DomainName: !Sub '${BucketNameParam}.s3.${AWS::Region}.amazonaws.com'
            S3OriginConfig:
              OriginAccessIdentity: ''
            OriginAccessControlId: !GetAtt CloudFrontOAC.Id
        DefaultCacheBehavior:
          TargetOriginId: S3Origin
          ViewerProtocolPolicy: redirect-to-https
          AllowedMethods:
            - GET
            - HEAD
            - OPTIONS
          CachedMethods:
            - GET
            - HEAD
          Compress: true
          ForwardedValues:
            QueryString: false
            Cookies:
              Forward: none
        PriceClass: PriceClass_100
        ViewerCertificate:
          CloudFrontDefaultCertificate: true
      Tags:
        - Key: Purpose
          Value: StaticWebsite
- ここから、既存のリソース(S3バケット)のスタックへのインポートを実施していきます。CLI操作による既存リソースのインポートでは、インポートするリソースの識別子をJSONで記述したものが必要となります。
既存リソース(S3バケット)の識別子をJSONで記述した以下ファイルを作成します。
[
  {
    "ResourceType": "AWS::S3::Bucket",
    "LogicalResourceId": "StaticWebsiteBucket",
    "ResourceIdentifier": {
      "BucketName": "s3-for-import-ks"
    }
  }
]
上記ファイルと変更後の全体リソースを含むテンプレートを用いて変更セットを作成します。
aws cloudformation create-change-set \
  --stack-name ${STACK_NAME} \
  --change-set-name import-s3-changeset \
  --change-set-type IMPORT \
  --template-body file://04-import-s3-template.yaml \
  --parameters ParameterKey=BucketNameParam,ParameterValue=${BUCKET_NAME} \
  --resources-to-import file://resources-to-import.json \
上記コマンドの詳細説明は以下のようになります。
| オプション | 説明 |
|---|---|
| --stack-name | 対象のスタック名を指定 |
| --change-set-name | 作成するチェンジセット名(任意の名前) |
| --change-set-type | 変更セットのタイプを指定 |
| --template-body | 使用するテンプレートファイルのパス |
| --parameters | テンプレートに渡すパラメータ |
| --resources-to-import | インポートする既存リソースの情報を記載したJSONファイル |
検証での変更セット作成時に生じた各種エラーは以下re:Post参考に解決しました。
変更後の全体リソースを含むテンプレート例
AWSTemplateFormatVersion: '2010-09-09'
Description: 'S3 + CloudFront Static Website '

Parameters:
  BucketNameParam:
    Type: String
    Description: 'Existing S3 Bucket Name to import'
    Default: 's3-for-import-ks'

Resources:
  # ===== 新規追加: インポートするS3バケット =====
  StaticWebsiteBucket:
    Type: AWS::S3::Bucket
    DeletionPolicy: Retain
    UpdateReplacePolicy: Retain
    Properties:
      BucketName: !Ref BucketNameParam
      PublicAccessBlockConfiguration:
        BlockPublicAcls: true
        BlockPublicPolicy: true
        IgnorePublicAcls: true
        RestrictPublicBuckets: true
      WebsiteConfiguration:
        IndexDocument: index.html
        ErrorDocument: error.html
      Tags:
        - Key: Purpose
          Value: StaticWebsite

  # ===== 既存リソース(変更なし) =====
  CloudFrontOAC:
    Type: AWS::CloudFront::OriginAccessControl
    Properties:
      OriginAccessControlConfig:
        Name: !Sub '${AWS::StackName}-OAC'
        OriginAccessControlOriginType: s3
        SigningBehavior: always
        SigningProtocol: sigv4

  BucketPolicy:
    Type: AWS::S3::BucketPolicy
    Properties:
      Bucket: !Ref BucketNameParam
      PolicyDocument:
        Statement:
          - Sid: AllowCloudFrontServicePrincipal
            Effect: Allow
            Principal:
              Service: cloudfront.amazonaws.com
            Action: 's3:GetObject'
            Resource: !Sub 'arn:aws:s3:::${BucketNameParam}/*'
            Condition:
              StringEquals:
                'AWS:SourceArn': !Sub 'arn:aws:cloudfront::${AWS::AccountId}:distribution/${CloudFrontDistribution}'

  CloudFrontDistribution:
    Type: AWS::CloudFront::Distribution
    Properties:
      DistributionConfig:
        Enabled: true
        Comment: !Sub 'Distribution for ${BucketNameParam}'
        DefaultRootObject: index.html
        Origins:
          - Id: S3Origin
            DomainName: !Sub '${BucketNameParam}.s3.${AWS::Region}.amazonaws.com'
            S3OriginConfig:
              OriginAccessIdentity: ''
            OriginAccessControlId: !GetAtt CloudFrontOAC.Id
        DefaultCacheBehavior:
          TargetOriginId: S3Origin
          ViewerProtocolPolicy: redirect-to-https
          AllowedMethods:
            - GET
            - HEAD
            - OPTIONS
          CachedMethods:
            - GET
            - HEAD
          Compress: true
          ForwardedValues:
            QueryString: false
            Cookies:
              Forward: none
        PriceClass: PriceClass_100
        ViewerCertificate:
          CloudFrontDefaultCertificate: true
- 変更セットの内容をコマンドで確認します。出力結果が以下の条件を満たしていれば変更セットの正常な作成ができているものと判断します。
StatusがCREATE_COMPLETEであることChangesに S3 バケットのインポートが含まれていることActionがImportであること
aws cloudformation describe-change-set \
  --stack-name ${STACK_NAME} \
  --change-set-name import-s3-changeset
{
    "Changes": [
        {
            "Type": "Resource",
            "ResourceChange": {
                "Action": "Import",
                "LogicalResourceId": "StaticWebsiteBucket",
                "PhysicalResourceId": "s3-for-import-ks",
                "ResourceType": "AWS::S3::Bucket",
                "Scope": [],
                "Details": []
            }
        }
    ],
    "ChangeSetName": "import-s3-changeset",
    "ChangeSetId": "arn:aws:cloudformation:ap-northeast-1:111111111111:changeSet/import-s3-changeset/1ae3edc7-9f4e-4d96-9cd7-f8b70057129d",
    "StackId": "arn:aws:cloudformation:ap-northeast-1:111111111111:stack/cfn-for-import-s3/53fcbe90-ad7f-11f0-a287-0a2119c6b4cf",
    "StackName": "cfn-for-import-s3",
    "Description": null,
    "Parameters": [
        {
            "ParameterKey": "BucketNameParam",
            "ParameterValue": "s3-for-import-ks"
        }
    ],
    "CreationTime": "2025-10-20T09:16:16.146000+00:00",
    "ExecutionStatus": "AVAILABLE",
    "Status": "CREATE_COMPLETE",
    "StatusReason": "Verify that resources and their properties defined in the template match the intended configuration of the resource import to avoid unexpected changes.",
    "NotificationARNs": [],
    "RollbackConfiguration": {},
    "Capabilities": [
        "CAPABILITY_IAM"
    ],
    "Tags": null,
    "ParentChangeSetId": null,
    "IncludeNestedStacks": false,
    "RootChangeSetId": null,
    "OnStackFailure": null,
    "ImportExistingResources": null
}
- 変更セットを実行してインポートを完了します
aws cloudformation execute-change-set \
  --stack-name ${STACK_NAME} \
  --change-set-name import-s3-changeset
-
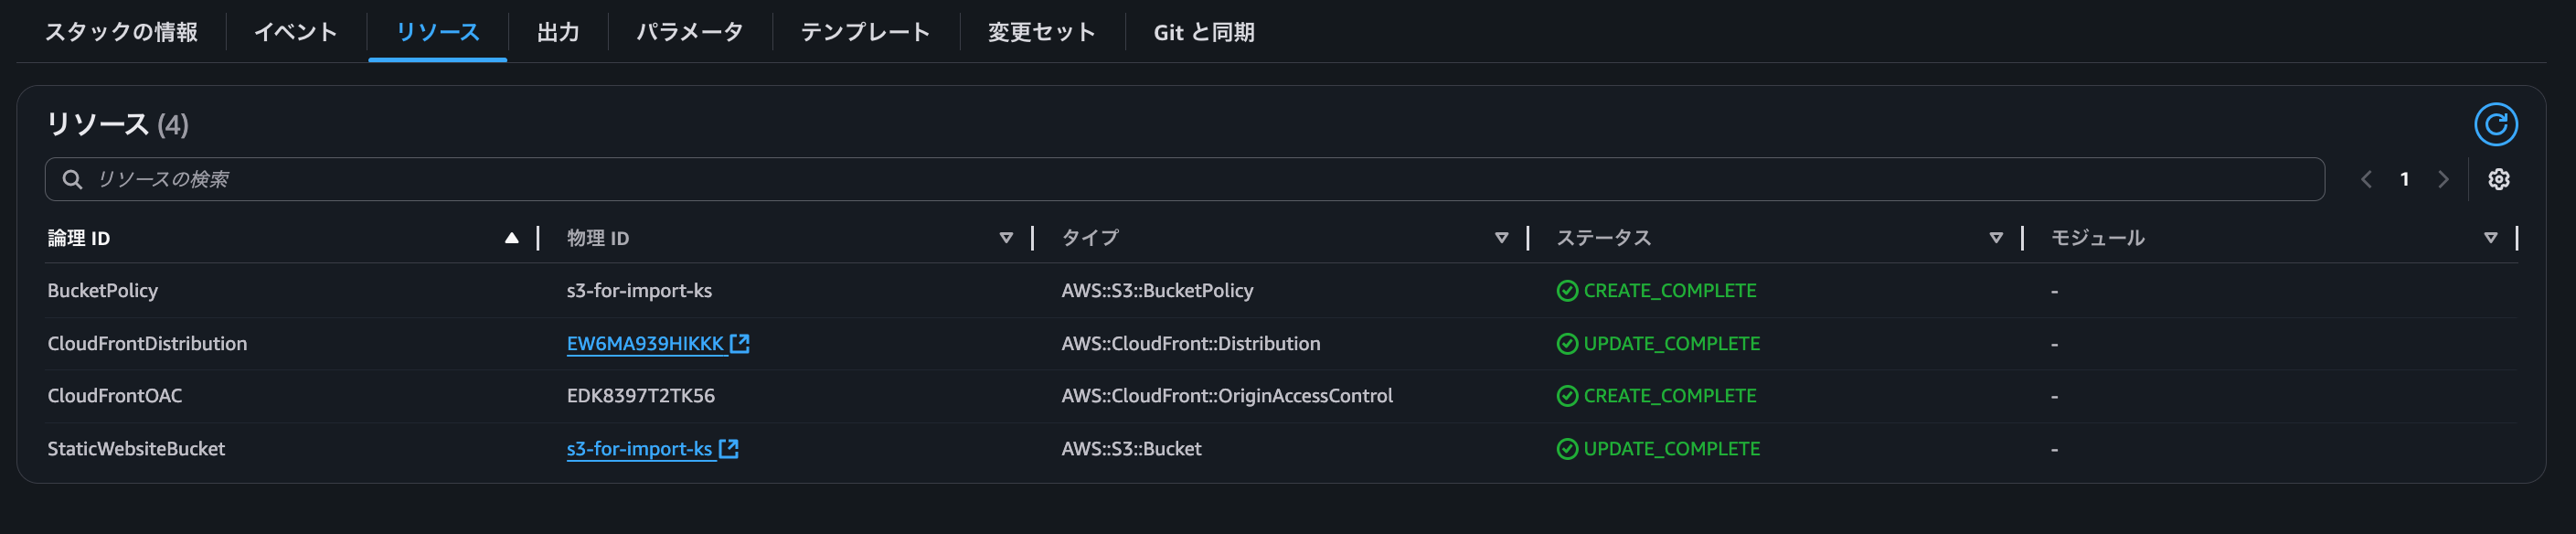
スタックリソースをコンソールでも確認できます。
-
ドリフト検出でドリフトが発生していないかについても確認してみます。
DRIFT_ID=$(aws cloudformation detect-stack-drift \
  --stack-name ${STACK_NAME} \
  --query StackDriftDetectionId \
  --output text)
上記コマンドでドリフト検出実行後、以下で結果を確認します。IN_SYNCステータスでドリフトが発生していないことを確認できます。
aws cloudformation describe-stack-drift-detection-status \
  --stack-drift-detection-id ${DRIFT_ID}

#出力例
{
    "StackId": "arn:aws:cloudformation:ap-northeast-1:11111111111:stack/cfn-for-import-s3/53fcbe90-ad7f-11f0-a287-0a2119c6b4cf",
    "StackDriftDetectionId": "391f9000-af11-11f0-9d99-0ed14d08fb7f",
    "StackDriftStatus": "IN_SYNC",
    "DetectionStatus": "DETECTION_COMPLETE",
    "DriftedStackResourceCount": 0,
    "Timestamp": "2025-10-22T06:34:55.616000+00:00"
}
おわりに
ご覧いただきありがとうございました。具体的な対応手順や仕組みを学んでみたかった既存リソースのインポート機能について学習することができました。また、変更セットについても理解が深まりました。リソースのインポート機能は既存リソースやスタックの状況に応じてそれぞれ適切な手順を踏む必要があるため、他ユースケースについても学習していきたいと思います。
アノテーション株式会社について
アノテーション株式会社はクラスメソッドグループのオペレーション専門特化企業です。サポート・運用・開発保守・情シス・バックオフィスの専門チームが、最新 IT テクノロジー、高い技術力、蓄積されたノウハウをフル活用し、お客様の課題解決を行っています。当社は様々な職種でメンバーを募集しています。「オペレーション・エクセレンス」と「らしく働く、らしく生きる」を共に実現するカルチャー・しくみ・働き方にご興味がある方は、アノテーション株式会社 採用サイトをぜひご覧ください。


