AWS Cloud9のボリュームをコマンド3行でリサイズする
この記事は公開されてから1年以上経過しています。情報が古い可能性がありますので、ご注意ください。
<div class="alert">
本記事で紹介している方法は現在利用できなくなっています。最新の方法は<a href="https://dev.classmethod.jp/articles/aws-cloud9-volume-expansion-script-amazon-2023-version/">こちらの記事</a>をご覧ください。
</div>
こんにちは、CX 事業本部 IoT 事業部の若槻です。
今回は、AWS Cloud9のボリュームをコマンド3行でリサイズする方法を共有します。
コマンド3行
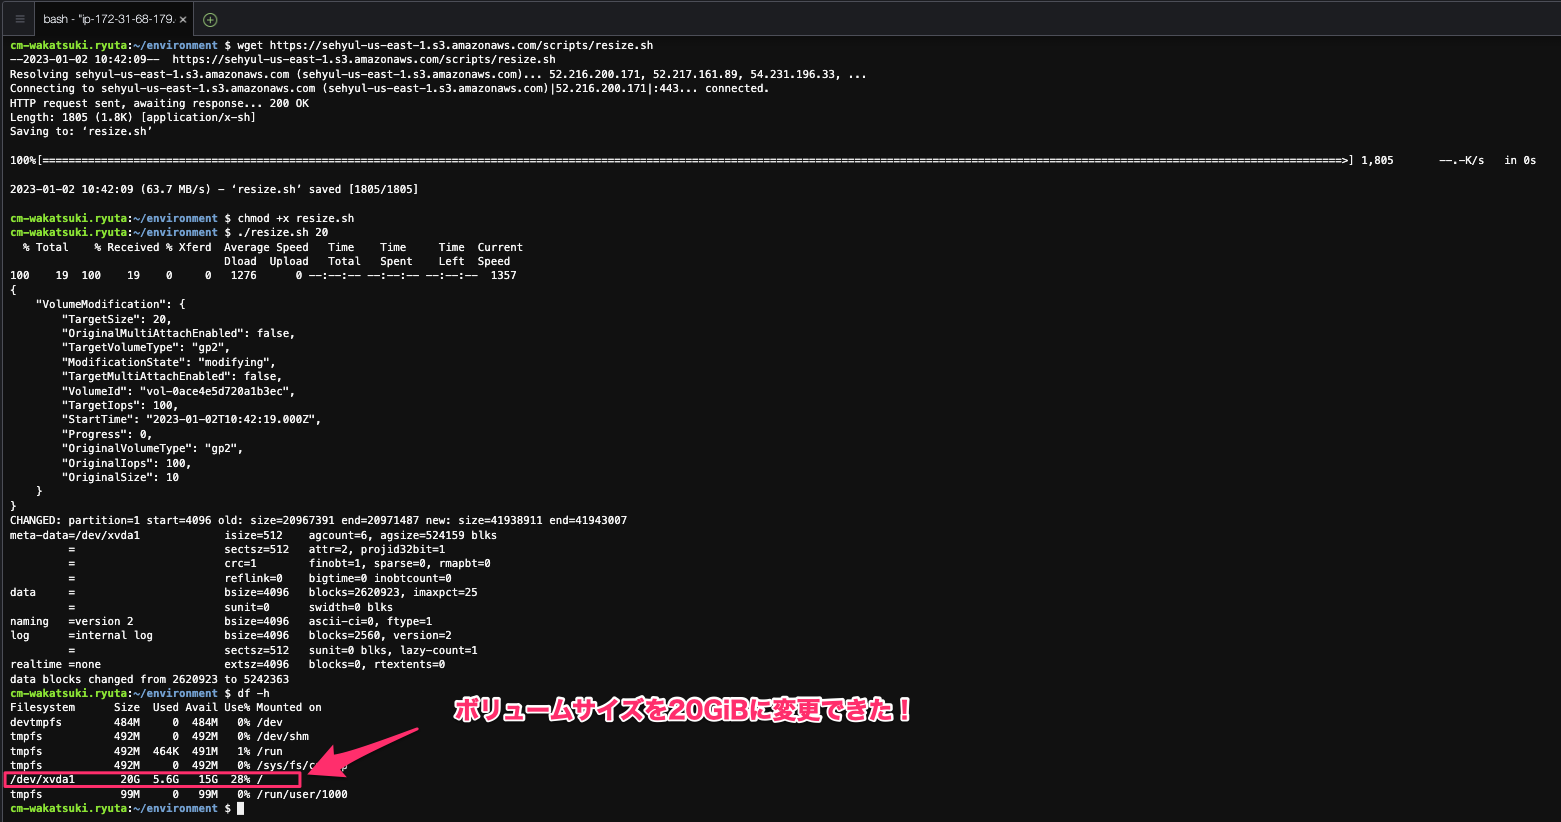
次のコマンド 3 行を実行します。
# resize.shをダウンロード
wget https://sehyul-us-east-1.s3.amazonaws.com/scripts/resize.sh

# resize.shの実行権限を付与
chmod +x resize.sh

# 引数にサイズ(GiB)を指定してresize.shを実行
./resize.sh 20
これでボリュームのリサイズは完了です。EC2 インスタンスの再起動も必要ありません。
リサイズできたらresize.shは不要なので削除してしまいましょう。
rm resize.sh
解説
Cloud9 環境の Amazon EBS ボリュームサイズは既定では10GiBとそこまで大きくありません。また実際に利用可能な領域は4.5GiBとさらに小さいサイズとなっています。
$ df -h
Filesystem      Size  Used Avail Use% Mounted on
devtmpfs        484M     0  484M   0% /dev
tmpfs           492M     0  492M   0% /dev/shm
tmpfs           492M  464K  491M   1% /run
tmpfs           492M     0  492M   0% /sys/fs/cgroup
/dev/xvda1       10G  5.6G  4.5G  56% /
tmpfs            99M     0   99M   0% /run/user/1000
そのためボリュームサイズを変更しない場合は、docker pullコマンドの実行など大きな領域が必要な作業をしようとするとすぐにボリュームが足りなくなってしまいます。(下記はcdk deployコマンド実行がボリュームが不足で失敗した様子)
$ cdk deploy
Sending build context to Docker daemon  3.584kB
Step 1/9 : ARG IMAGE=public.ecr.aws/sam/build-python3.7
Step 2/9 : FROM $IMAGE
latest: Pulling from sam/build-python3.7
efc762b80116: Pull complete
62e22187db87: Pull complete
7c832bf83ae9: Pull complete
b04e4edc100c: Pull complete
77ee7133aa06: Extracting [==================================================>]  186.3MB/186.3MB
7e5657e1bdb8: Download complete
26c1a2aed590: Download complete
ef394bd73a62: Download complete
00e7eb792594: Download complete
failed to register layer: Error processing tar file(exit status 1): mkdir /usr/src/kernels/4.14.299-152.520.amzn1.x86_64/drivers/iio/common/ms_sensors: no space left on device
そんな折に下記の公式 Workshop のハンズオン手順内で、先に紹介したコマンド 3 行によるボリュームサイズの拡張方法がありました。
AWS がホスティングしている S3 Bucket(sehyul-us-east-1.s3.amazonaws.com)からダウンロードされるresize.shの内容は次のようになります。aws ec2 modify-volumeコマンドでリサイズをし、リサイズが反映されるまで待機するというものです。
#!/bin/bash

# Specify the desired volume size in GiB as a command line argument. If not specified, default to 20 GiB.
SIZE=${1:-20}

# Get the ID of the environment host Amazon EC2 instance.
INSTANCEID=$(curl http://169.254.169.254/latest/meta-data/instance-id)
REGION=$(curl -s http://169.254.169.254/latest/meta-data/placement/availability-zone | sed 's/\(.*\)[a-z]/\1/')

# Get the ID of the Amazon EBS volume associated with the instance.
VOLUMEID=$(aws ec2 describe-instances \
  --instance-id $INSTANCEID \
  --query "Reservations[0].Instances[0].BlockDeviceMappings[0].Ebs.VolumeId" \
  --output text \
  --region $REGION)

# Resize the EBS volume.
aws ec2 modify-volume --volume-id $VOLUMEID --size $SIZE

# Wait for the resize to finish.
while [ \
  "$(aws ec2 describe-volumes-modifications \
    --volume-id $VOLUMEID \
    --filters Name=modification-state,Values="optimizing","completed" \
    --query "length(VolumesModifications)"\
    --output text)" != "1" ]; do
sleep 1
done

#Check if we're on an NVMe filesystem
if [[ -e "/dev/xvda" && $(readlink -f /dev/xvda) = "/dev/xvda" ]]
then
  # Rewrite the partition table so that the partition takes up all the space that it can.
  sudo growpart /dev/xvda 1

  # Expand the size of the file system.
  # Check if we're on AL2
  STR=$(cat /etc/os-release)
  SUB="VERSION_ID=\"2\""
  if [[ "$STR" == *"$SUB"* ]]
  then
    sudo xfs_growfs -d /
  else
    sudo resize2fs /dev/xvda1
  fi

else
  # Rewrite the partition table so that the partition takes up all the space that it can.
  sudo growpart /dev/nvme0n1 1

  # Expand the size of the file system.
  # Check if we're on AL2
  STR=$(cat /etc/os-release)
  SUB="VERSION_ID=\"2\""
  if [[ "$STR" == *"$SUB"* ]]
  then
    sudo xfs_growfs -d /
  else
    sudo resize2fs /dev/nvme0n1p1
  fi
fi
このシェルスクリプトはドキュメントで紹介されているものと全く同じものとなります。
しかしシェルスクリプトの作成をwgetによるダウンロードで行っている分、本記事で紹介した方法の方が手っ取り早いですね。
おわりに
AWS Cloud9 のボリュームをコマンド 3 行でリサイズする方法でした。
公式 Workshop 内の手順をありがたく使わさせてもらいました。Workshop を受講する際に Cloud9 環境はよく使用するので、今後重宝しそうです。
参考
以上