CloudWatch Agent が複数設定ファイルの利用が可能になりました
この記事は公開されてから1年以上経過しています。情報が古い可能性がありますので、ご注意ください。
こんにちは。園部です。
先日、「Amazon CloudWatch エージェントが Procstat プラグインおよび複数の設定ファイルのサポートを追加」が リリースされました。今回は、後者の「複数の設定ファイルのサポート」部分について、やってみます。 「Procstat プラグイン」についても、次回書きたいと思います。
複数の設定ファイル利用とは?
複数の設定ファイルを使用するようにCloudWatchエージェントを設定できます。たとえば、インフラストラクチャ内のすべてのサーバーから常に収集する一連のメトリックとログを収集する共通の構成ファイルを使用できます。その後、特定のアプリケーションから、または特定の状況でメトリックを収集する追加の構成ファイルを使用できます。
(公式ドキュメントを自動翻訳した結果)
やってみる
今回、以下のケースで実施します。
2種類のEC2サーバがある環境で、1つのサーバには、「Linux共通項目」の設定を適用し
| 設定ファイル名 | 用途 | 取得項目 |
|
AmazonCloudWatch-linux
|
Linux共通項目 | CPU、Memory、ログなど |
| web-config | WEB専用項目 | アクセスログ |
1. Systems Manager によるCloudWatch Agent インストールとLinux共通項目の設定作成
弊社ブログで、紹介されている手順を参考に、Systems Manager から2台に対して、CloudWatch Agentをインストールします。
- CloudWatch に、CWAgentメトリクス、CloudWatch Logs にデータ集まっていることを確認します。
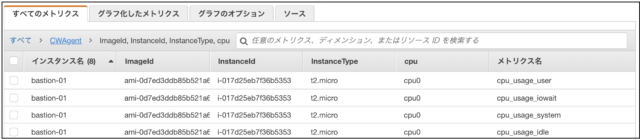
- Systems Manager パラメータストア に作成した「Linux共通項目」の設定ファイルが作成されます。
    {
    "logs": {
        "logs_collected": {
            "files": {
                "collect_list": [
                    {
                        "file_path": "/var/log/messages",
                        "log_group_name": "messages",
                        "log_stream_name": "{instance_id}"
                    }
                ]
            }
        }
    },
    "metrics": {
        "append_dimensions": {
            "AutoScalingGroupName": "${aws:AutoScalingGroupName}",
            "ImageId": "${aws:ImageId}",
            "InstanceId": "${aws:InstanceId}",
            "InstanceType": "${aws:InstanceType}"
        },
        "metrics_collected": {
            "cpu": {
                "measurement": [
                    "cpu_usage_idle",
                    "cpu_usage_iowait",
                    "cpu_usage_user",
                    "cpu_usage_system"
                ],
                "metrics_collection_interval": 60,
                "resources": [
                    "*"
                ],
                "totalcpu": false
            },
            "disk": {
                "measurement": [
                    "used_percent",
                    "inodes_free"
                ],
                "metrics_collection_interval": 60,
                "resources": [
                    "*"
                ]
            },
            "diskio": {
                "measurement": [
                    "io_time",
                    "write_bytes",
                    "read_bytes",
                    "writes",
                    "reads"
                ],
                "metrics_collection_interval": 60,
                "resources": [
                    "*"
                ]
            },
            "mem": {
                "measurement": [
                    "mem_used_percent"
                ],
                "metrics_collection_interval": 60
            },
            "netstat": {
                "measurement": [
                    "tcp_established",
                    "tcp_time_wait"
                ],
                "metrics_collection_interval": 60
            },
            "swap": {
                "measurement": [
                    "swap_used_percent"
                ],
                "metrics_collection_interval": 60
            }
        }
    }
}
2. WEB専用項目の設定ファイル作成
Systems Manager パラメータストアに、WEB専用項目の設定ファイルを作成します。
{
    "logs": {
        "logs_collected": {
            "files": {
                "collect_list": [
                    {
                        "file_path": "/var/log/httpd/access_log",
                        "log_group_name": "accesslog",
                        "log_stream_name": "{instance_id}"
                    }
                ]
            }
        }
    }
}
3. WEBサーバへ、WEB専用項目の設定ファイルを追加
WEBサーバへログインし、以下のコマンドを実行します。
$ sudo /opt/aws/amazon-cloudwatch-agent/bin/amazon-cloudwatch-agent-ctl -a append-config -m ec2 -c ssm:web-config -s

/opt/aws/amazon-cloudwatch-agent/bin/config-downloader --output-dir /opt/aws/amazon-cloudwatch-agent/etc/amazon-cloudwatch-agent.d --download-source ssm:web-config --mode ec2 --config /opt/aws/amazon-cloudwatch-agent/etc/common-config.toml --multi-config append
Region: ap-northeast-1
credsConfig: map[]
Successfully fetched the config and saved in /opt/aws/amazon-cloudwatch-agent/etc/amazon-cloudwatch-agent.d/ssm_web-config.tmp
Start configuration validation...
/opt/aws/amazon-cloudwatch-agent/bin/config-translator --input /opt/aws/amazon-cloudwatch-agent/etc/amazon-cloudwatch-agent.json --input-dir /opt/aws/amazon-cloudwatch-agent/etc/amazon-cloudwatch-agent.d --output /opt/aws/amazon-cloudwatch-agent/etc/amazon-cloudwatch-agent.toml --mode ec2 --config /opt/aws/amazon-cloudwatch-agent/etc/common-config.toml --multi-config append
/opt/aws/amazon-cloudwatch-agent/etc/amazon-cloudwatch-agent.json does not exist or cannot read. Skipping it.
Valid Json input schema.
No csm configuration found.
Configuration validation first phase succeeded
/opt/aws/amazon-cloudwatch-agent/bin/amazon-cloudwatch-agent -schematest -config /opt/aws/amazon-cloudwatch-agent/etc/amazon-cloudwatch-agent.toml
Configuration validation second phase succeeded
Configuration validation succeeded
Redirecting to /bin/systemctl stop amazon-cloudwatch-agent.service
Redirecting to /bin/systemctl restart amazon-cloudwatch-agent.service
4. 結果確認
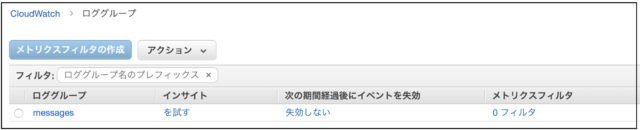
CloudWatch Logs にデータ集まっていることが確認出来ました。

5. 参考
5-1. CloudWatch Agent に関するコマンド
今回利用した「append-config」以外にも「fetch-config」や「remove-config」もあるため、設定ファイルの追加や削除も可能です。
$ sudo /opt/aws/amazon-cloudwatch-agent/bin/amazon-cloudwatch-agent-ctl
Invalid action:


        usage: amazon-cloudwatch-agent-ctl -a stop|start|status|fetch-config|append-config|remove-config [-m ec2|onPremise|auto] [-c default|ssm:|file:] [-s]

        e.g.
        1. apply a SSM parameter store config on EC2 instance and restart the agent afterwards:
            amazon-cloudwatch-agent-ctl -a fetch-config -m ec2 -c ssm:AmazonCloudWatch-Config.json -s
        2. append a local json config file on onPremise host and restart the agent afterwards:
            amazon-cloudwatch-agent-ctl -a append-config -m onPremise -c file:/tmp/config.json -s
        3. query agent status:
            amazon-cloudwatch-agent-ctl -a status

        -a: action
            stop:                                   stop the agent process.
            start:                                  start the agent process.
            status:                                 get the status of the agent process.
            fetch-config:                           use this json config as the agent's only configuration.
            append-config:                          append json config with the existing json configs if any.
            remove-config:                          remove json config based on the location (ssm parameter store name, file name)

        -m: mode
            ec2:                                    indicate this is on ec2 host.
            onPremise:                              indicate this is on onPremise host.
            auto:                                   use ec2 metadata to determine the environment, may not be accurate if ec2 metadata is not available for some reason on EC2.

        -c: configuration
            default:                                default configuration for quick trial.
            ssm::             ssm parameter store name
            file::                       file path on the host

        -s: optionally restart after configuring the agent configuration
            this parameter is used for 'fetch-config', 'append-config', 'remove-config' action only.
5-2. 現在設定されているファイルを確認する。
このサーバには、どんな設定が適用されているのかを確認したい場合、サーバ内で以下の場所を確認することで可能です。 (もっと、良い方法があるかもしれません。)
$ ls -l /etc/amazon/amazon-cloudwatch-agent/amazon-cloudwatch-agent.d
合計 8
-rwxr-xr-x 1 root root 1419  1月 28 15:59 ssm_AmazonCloudWatch-linux
-rwxr-xr-x 1 root root  230  1月 29 01:28 ssm_web-config
まとめ
今回のケースでは、わかりやすい(私が学習しやすい)パターンとしているため、 そもそもWEBサーバ用に別で、Linux共通項目も含めた内容で、最初から作成すればいいんじゃない?という疑問もあるかと思います。 (ごもっともです。)
ただ、調査などで一時的に適用したい設定や(多様な役割のサーバ群が増え、取得項目が異なる場合)設定をパーツ化して管理するという点では 有効な方法ではないかと思います。


