Control & Script Network Traffic with mitmproxy
この記事は公開されてから1年以上経過しています。情報が古い可能性がありますので、ご注意ください。
mitmproxy is an open-source interactive HTTPS proxy designed for API debugging, security testing, and traffic manipulation. It allows developers and testers to inspect, modify, and replay requests, making it essential for API development, mobile app testing, and performance monitoring.
Why Choose mitmproxy Over Charles Proxy?
When it comes to intercepting and debugging network traffic, Charles Proxy is often the first tool that comes to mind. It’s a solid option, but is it the best choice for everyone?
Let's weigh the pros and cons of mitmproxy and decide whether to start with it or use it as a replacement for Charles Proxy.
Free and Open Source
Unlike Charles Proxy, which requires a $50 per-user license, mitmproxy is completely free. Best of all, it offers a robust set of tools and features that not only match Charles but, in some cases, go even further—so you don’t have to worry about missing out on essential functionality.
CLI and Automation Powerhouse
Charles is primarily a GUI-based tool, which is great for beginners but lacks automation capabilities. mitmproxy, on the other hand, comes with:
- mitmproxy (interactive CLI mode)
- mitmdump (headless CLI mode for automation)
- mitmweb (web-based UI)
Advanced Scripting with Python
One of mitmproxy’s biggest advantages is its Python-based scripting support. You can write scripts to:
- Modify API responses on the fly.
- Automate request manipulation.
- Simulate various server behaviors for testing.
In general, the ability to modify traffic with Python in mitmproxy is incredibly powerful, especially for testing scenarios or cases where you need to tweak requests and responses to fit various needs. While Charles Proxy does provide some ways to modify parameters and request bodies, it lacks flexibility. Some modifications may be difficult or even impossible to achieve through its GUI-based approach.
I personally use mitmproxy to support testing and debugging while implementing new features in my projects. It has become an essential tool in my workflow, making API testing, request manipulation, and debugging much more efficient.
So, let’s dive in! I’ll walk you through how you can install, set up, and integrate mitmproxy into your testing suite—turning it into a powerful asset for your development needs.
Getting Started
Step 1: Install mitmproxy
On Linux/macOS, if you have Homebrew installed—a fantastic package manager that makes installing software effortless—you’re all set. I highly recommend having it installed before proceeding.
Once Homebrew is ready, simply run:
brew install mitmproxy
Alternatively, you can use pip or apt if preferred:
pip install mitmproxy       # Using pip
sudo apt install mitmproxy  # On Debian-based systems
Step 2: Start mitmproxy
You can run mitmproxy in different modes depending on your needs:
Interactive mode (CLI UI):
mitmproxy
Web UI mode (Browser-based):
mitmweb
Headless mode (For automation & scripting):
mitmdump
I suggest starting with mitmweb since it provides a web-based GUI that's much easier to interact with. It's simpler and more beginner-friendly.

Now that the proxy is running on port 8080 and the web GUI is available at localhost:8081 (opened by default), take a moment to explore the interface. We'll come back to it later.
Step 3: Configure Proxy Settings
To capture traffic, you need to route your system or device traffic through mitmproxy.
On Your Computer (macOS/Linux/Windows)
- Open System Settings > Network > Proxy Settings.
- Set the HTTP and HTTPS proxy to:
- Host:
127.0.0.1 - Port:
8080
- Host:
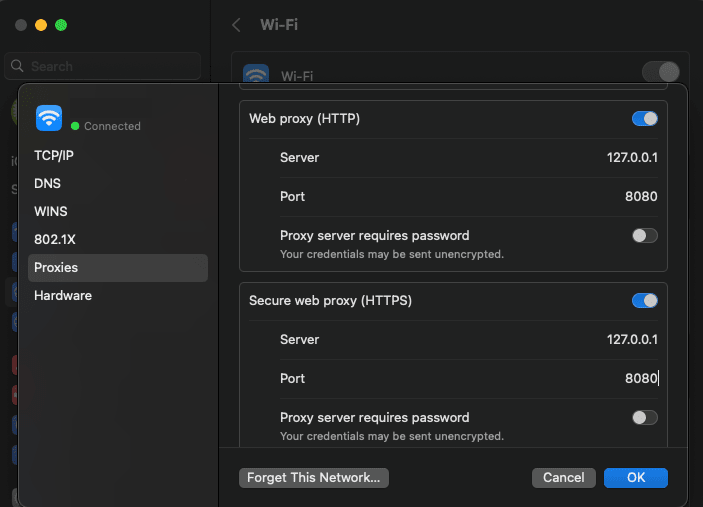
On a Mobile Device (iOS/Android)
- Ensure your mobile device is connected to the same Wi-Fi network as the computer running mitmproxy.
- Open Wi-Fi settings > Configure Proxy.
- Set the following:
- Proxy: Manual
- Server: Run the command below on your computer to find its local IP address:
Enter this IP as the server address (make sure both devices are on the same network).
ipconfig getifaddr en0
- Port:
8080
Step 4: Install mitmproxy’s CA Certificate (For HTTPS Traffic)
By default, mitmproxy can intercept HTTP traffic, but HTTPS requires a trusted certificate.
On Your Computer
- Open a browser and go to:
http://mitm.it
- Download and install the certificate for your OS.
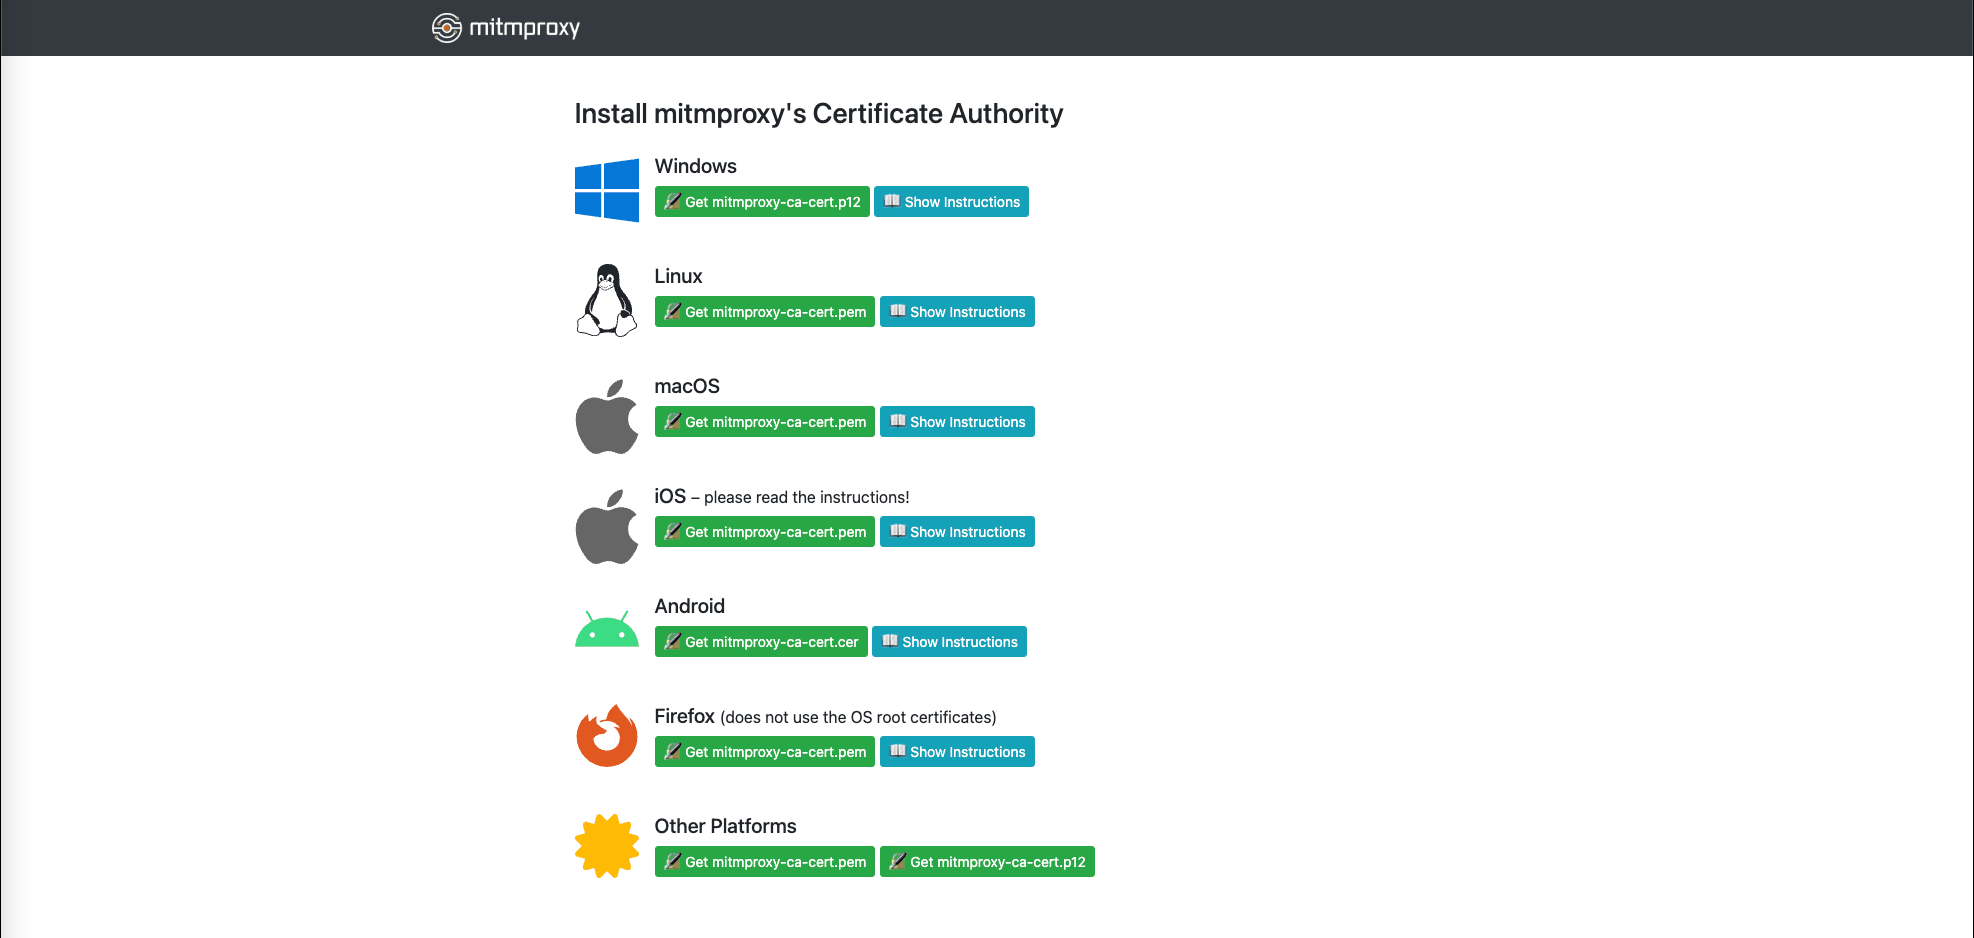
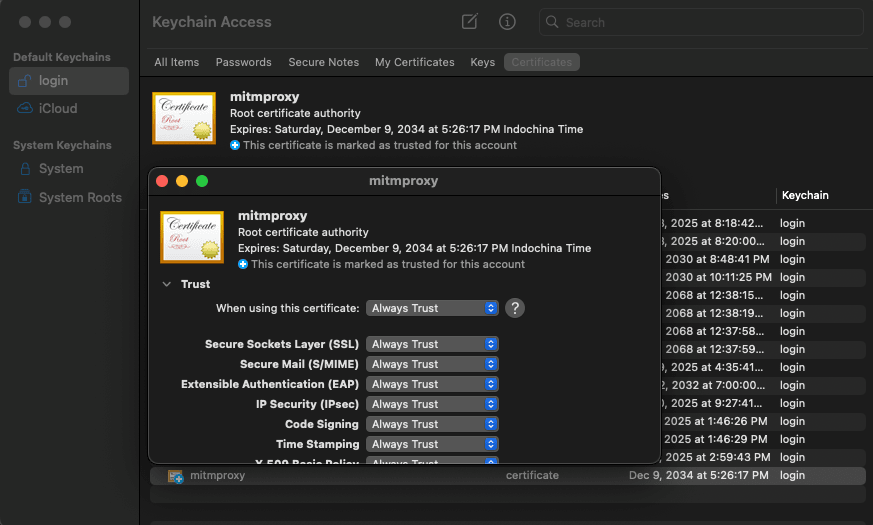
For macOS, after downloading and opening the certificate, the Keychain Access window will appear. Simply select the mitmproxy certificate, then set its trust settings to Always Trust.
On iOS/Android:
- Open http://mitm.it in the device’s browser.
- Download the certificate and install it.
- On iOS, go to Settings > General > About > Certificate Trust Settings and enable trust for mitmproxy.
Note: On iOS, don’t forget to enable trust for the mitmproxy certificate, as it’s not enabled by default after installation.
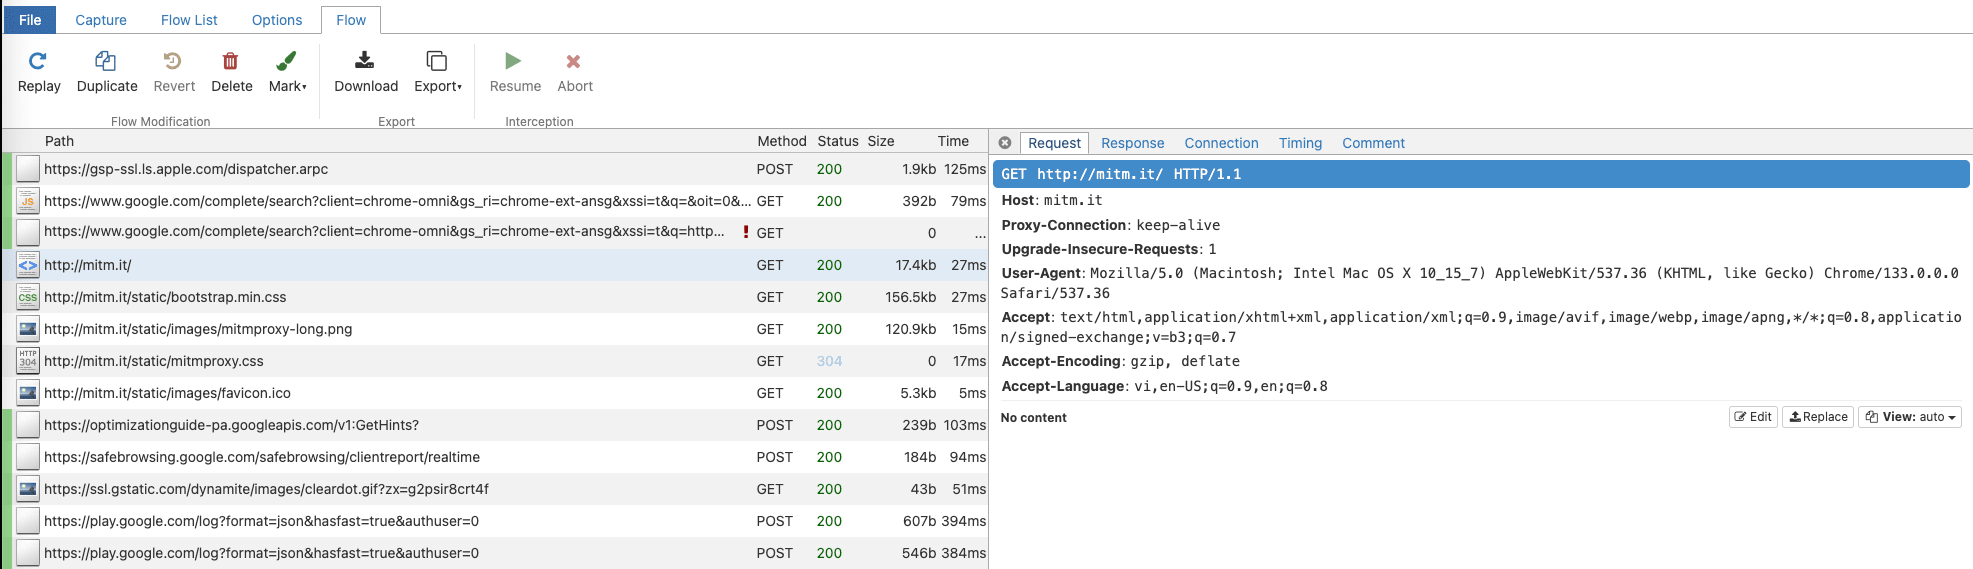
Step 5: Running mitmproxy with a Python Script
I mentioned that mitmproxy truly shines when you extend its interception capabilities with scripting—using Python in this case. So, let’s jump right in with a simple demonstration!
Writing the mitmproxy Script
Create a Python script, modify_todo.py, with the following content:
from mitmproxy import http
import json

def response(flow: http.HTTPFlow) -> None:
    if "jsonplaceholder.typicode.com/todos/1" in flow.request.pretty_url:
        data = json.loads(flow.response.text)
        data["title"] = "Modified by mitmproxy"
        data["completed"] = True
        data["intercepted_by"] = "mitmproxy"
        flow.response.text = json.dumps(data, indent=2)
Running mitmproxy
To run the script, use the following command:
mitmproxy -s modify_todo.py
Or if you prefer a web interface:
mitmweb -s modify_todo.py
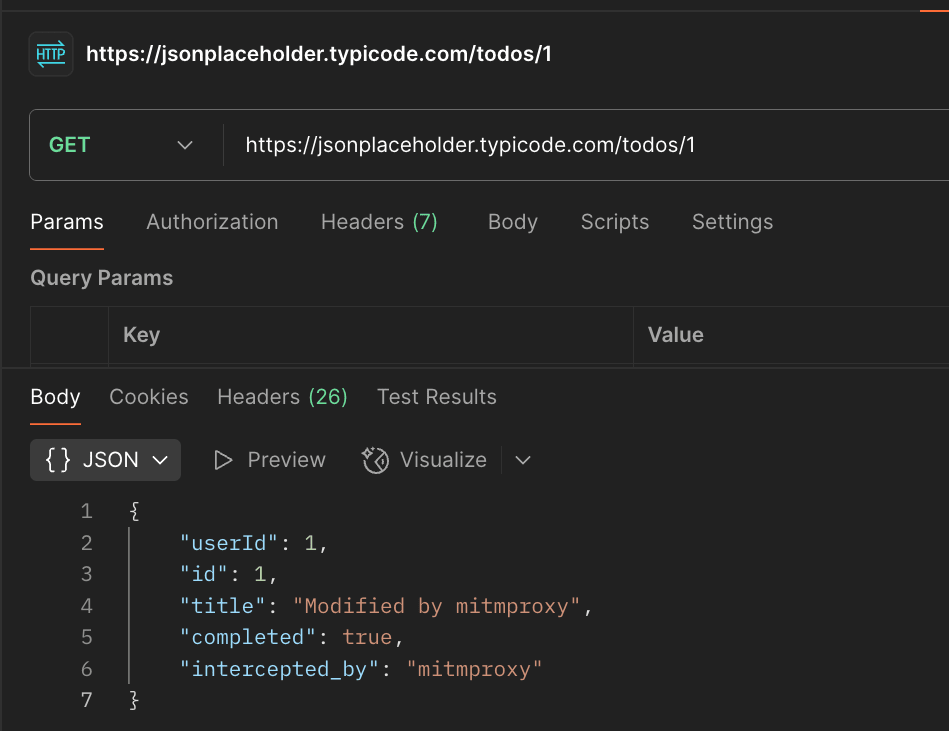
Testing the Modification
Open a browser console or terminal and run the following fetch request:
fetch('https://jsonplaceholder.typicode.com/todos/1')
   .then(response => response.json())
   .then(json => console.log(json));
Expected Output
Before modification:
{
  "userId": 1,
  "id": 1,
  "title": "delectus aut autem",
  "completed": false
}
After modification by mitmproxy:
{
  "userId": 1,
  "id": 1,
  "title": "Modified by mitmproxy",
  "completed": true,
  "intercepted_by": "mitmproxy"
}
Conclusion
mitmproxy is not only a powerful tool for modifying responses but also unlocks countless possibilities for customization. With Python, you can unleash your creativity—not just by altering responses, but also by modifying headers, redirecting requests, logging data, introducing random outages, and more. This flexibility makes it a valuable tool for testing, analysis, and exploration in unique and unexpected ways.
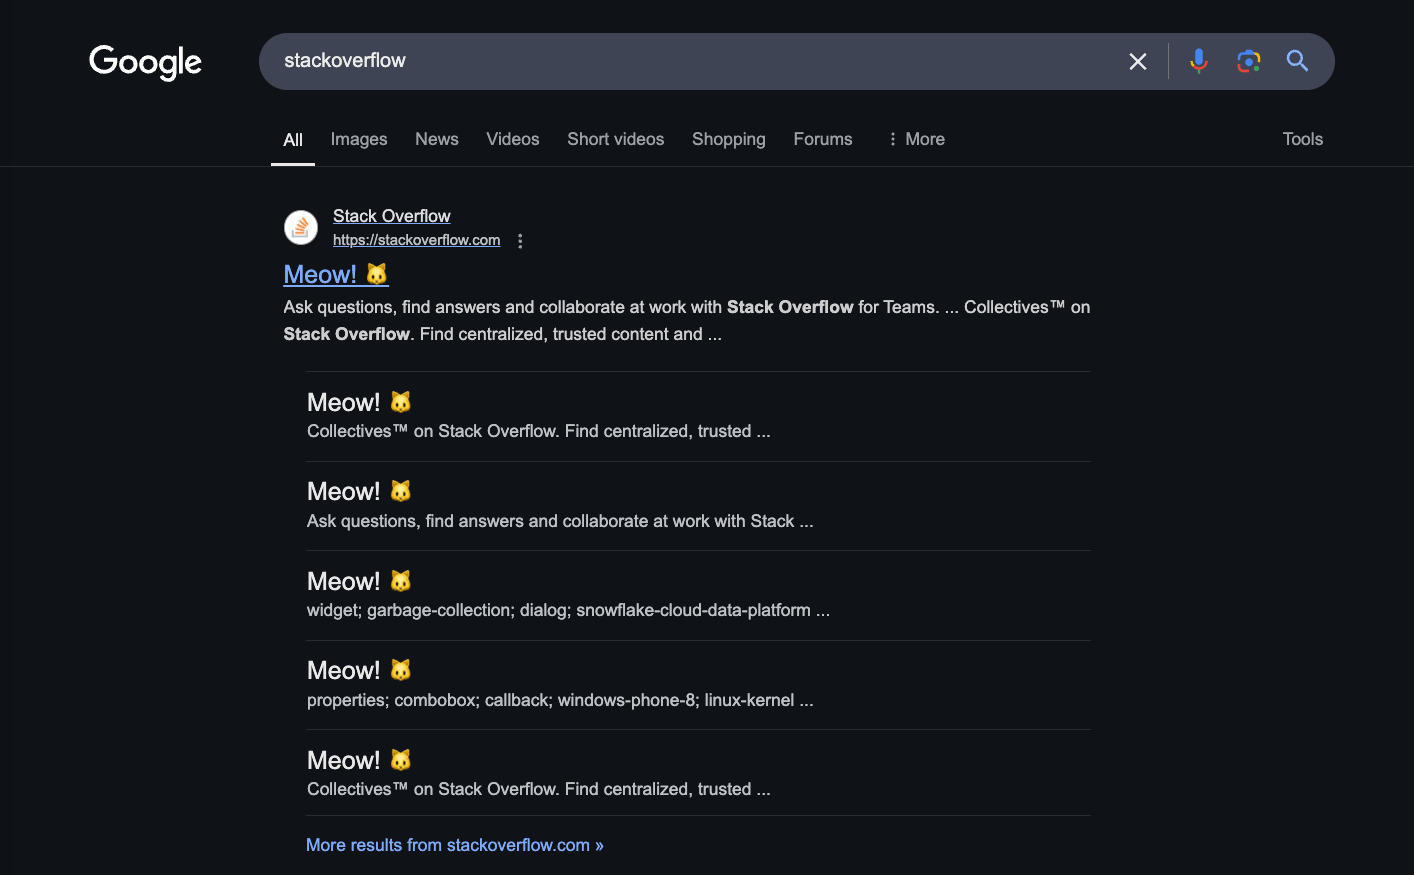
For the meantime, let’s be mindless—no technical deep dives, no serious hacking—just pure, unfiltered fun. Using mitmproxy, we’re going to replace all of your Google Search results with Meow Meow Meow for titles, and every single link? A cat picture. 🐱✨
from mitmproxy import http
import re

CAT_IMAGE_URL = "https://cataas.com/cat"
MEOW_TEXT = "Meow! 🐱"

def response(flow: http.HTTPFlow) -> None:
    if "www.google.com/search" in flow.request.url:
        # Replace search result titles
        flow.response.text = re.sub(r'(<h3[^>]*>).*?(</h3>)', rf'\1{MEOW_TEXT}\2', flow.response.text)

        # Replace URLs with a cat image
        flow.response.text = re.sub(r'href="https://[^"]+"', f'href="{CAT_IMAGE_URL}"', flow.response.text)
Imagine someone urgently searching “how to fix a broken laptop”, only to find an endless stream of meows and cat images. Chaos. Confusion. Perfection.
Because who needs real information when you can have cats, cats, and more cats?