
編集中のファイルに応じて指定のURLをブラウザで開くVS Code拡張機能を作る
この記事は公開されてから1年以上経過しています。情報が古い可能性がありますので、ご注意ください。
こんにちは、CX事業本部 IoT事業部の若槻です。
今回は、編集中のファイルに応じて指定のURLをブラウザで開くVS Code拡張機能を作ってみました。
ユースケースはかなりエッジケースとなりますが、VS Code拡張機能開発の参考までに。
やってみた
プロジェクト作成
generator-codeをグローバルインストールして、yoで使えるようにします。
$ npm install -g generator-code
yoを実行してVS Code拡張用のプロジェクトを作成します。
$ npx yo code

     _-----_     ╭──────────────────────────╮
    |       |    │   Welcome to the Visual  │
    |--(o)--|    │   Studio Code Extension  │
   `---------´   │        generator!        │
    ( _´U`_ )    ╰──────────────────────────╯
    /___A___\   /
     |  ~  |
   __'.___.'__
 ´   `  |° ´ Y `

? What type of extension do you want to create? New Extension (TypeScript)
? What's the name of your extension? vs-devio-opener
? What's the identifier of your extension? vs-devio-opener
? What's the description of your extension?
? Initialize a git repository? Yes
? Bundle the source code with webpack? Yes
? Which package manager to use? npm
変なおじさんが出てきていくつかオプションを聞かれます。今回は上記のようにしました。
実行を完了すると、指定したエクステンション名(vs-devio-opener)のプロジェクトディレクトリが作成できました。

拡張機能のデバッグ方法
拡張機能のデバッグ方法を確認してみます。
まず初期化後に既定で作成されたファイル内容を見てみます。
extension.tsでは、拡張機能で実際に実行される処理を記述します。実行するとHello World from vs-devio-opener!というメッセージを表示する処理をvs-devio-opener.helloWorldというコマンドとして登録していますね。
// The module 'vscode' contains the VS Code extensibility API
// Import the module and reference it with the alias vscode in your code below
import * as vscode from 'vscode';

// This method is called when your extension is activated
// Your extension is activated the very first time the command is executed
export function activate(context: vscode.ExtensionContext) {
  // Use the console to output diagnostic information (console.log) and errors (console.error)
  // This line of code will only be executed once when your extension is activated
  console.log(
    'Congratulations, your extension "vs-devio-opener" is now active!'
  );

  // The command has been defined in the package.json file
  // Now provide the implementation of the command with registerCommand
  // The commandId parameter must match the command field in package.json
  let disposable = vscode.commands.registerCommand(
    'vs-devio-opener.helloWorld',
    () => {
      // The code you place here will be executed every time your command is executed
      // Display a message box to the user
      vscode.window.showInformationMessage('Hello World from vs-devio-opener!');
    }
  );

  context.subscriptions.push(disposable);
}

// This method is called when your extension is deactivated
export function deactivate() {}
package.jsonでは、extension.tsで登録したコマンドをHello Worldというタイトルで実行できるようにしています。
{
  "activationEvents": [
    "onCommand:vs-devio-opener.helloWorld"
  ],
  "main": "./dist/extension.js",
  "contributes": {
    "commands": [
      {
        "command": "vs-devio-opener.helloWorld",
        "title": "Hello World"
      }
    ]
  },
}
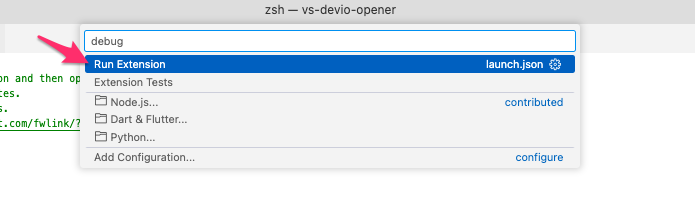
上述の拡張機能をデバッグ実行してみます。
VS Codeのデバッガーで[Run Extension]をクリック。

Command Paletteで[Run Extension]を選択。
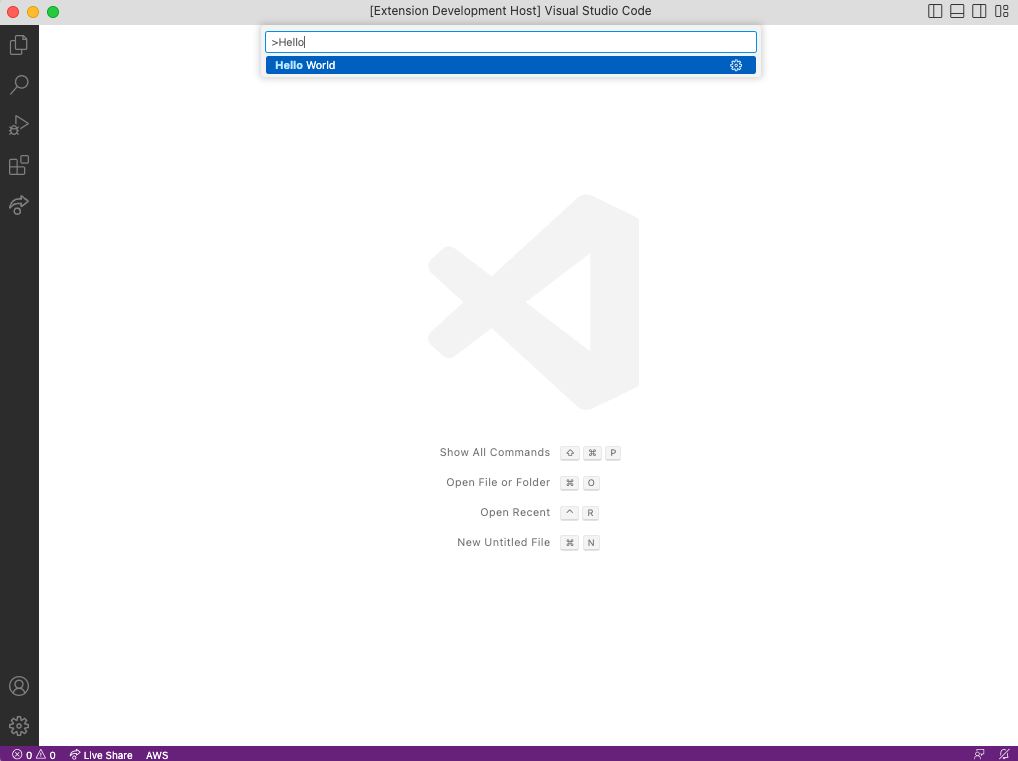
すると別ウィンドウが開くので、Command PaletteでHello Worldを実行します。
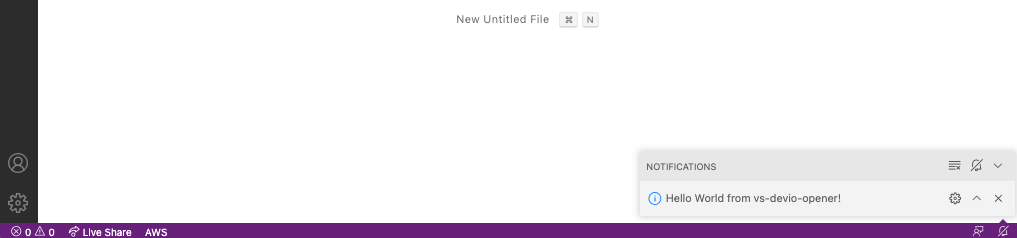
通知欄にメッセージが表示されました。デバッグで動かせましたね。
実装
今回の目的の機能を実装していきます。
必要なモジュールをインストールします。
npm i open
extension.tsを修正します。編集中のファイルと同じパスにあるconfig.jsonから取得したスラッグを使用して記事URLを開く処理を記載します。
import * as vscode from 'vscode';
import * as open from 'open';
import * as fs from 'fs';

export function activate(context: vscode.ExtensionContext) {
  var disposable = vscode.commands.registerCommand(
    'vscode-context.openDevio',
    () => {
      const currentFilePath = vscode.window.activeTextEditor?.document.fileName;

      if (currentFilePath) {
        const splitted = currentFilePath?.split('/');
        splitted.pop();
        splitted.push('config.json');
        const joined = splitted.join('/');

        const config = JSON.parse(fs.readFileSync(joined, 'utf8'));
        const postName = config.postName;
        const url = `https://dev.classmethod.jp/articles/${postName}`;
        vscode.window.showInformationMessage(url);

        open(url);
      }
    }
  );

  context.subscriptions.push(disposable);
}
package.jsonを修正します。コマンドを実行するための項目をコンテキストメニューに追加します。"when": "editorFocus"によりエディターにフォーカスが当たっている時にのみコンテキストメニューに追加されます。
  "activationEvents": [
    "onCommand:vscode-context.openDevio"
  ],
  "main": "./dist/extension.js",
  "contributes": {
    "commands": [
      {
        "command": "vscode-context.openDevio",
        "title": "Open DevIO"
      }
    ],
    "menus": {
      "editor/context": [
        {
          "when": "editorFocus",
          "command": "vscode-context.openDevio",
          "group": "myGroup@1"
        }
      ]
    }
  }
}
デバッガーで動かして問題なければ実装は完了です。
VS Code拡張として利用する
実装した拡張機能を実際にVS Codeで利用してみます。
次のコマンドを実行します。
npx vsce package
するとプロジェクトフォルダ内にvsixファイルが生成されます。
$ ls vs-devio-opener-0.0.1.vsix
vs-devio-opener-0.0.1.vsix
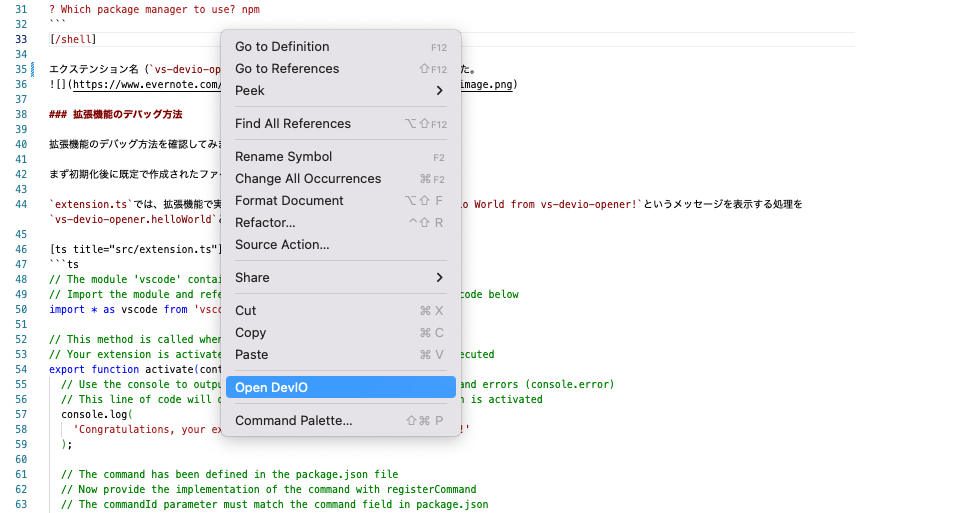
[install from VSIX]で生成したvsixファイルを読み込みます。

これによりファイルエディターがアクティブ時にコンテキストメニューにコマンドが追加されるようになりました。
ちなみに同パスに下記のファイルが作成済みの場合。
{
  "postName": "create-a-vs-code-extension-that-opens-a-specified-url-in-a-browser-according-to-the-file-being-edited",
  "title": "編集中のファイルに応じて指定のURLをブラウザで開くVS Code拡張機能を作る",
  "createdAt": "2022/11/11T22:57:17",
  "updatedAt": "2022/11/11T22:57:17"
}
コマンドを実行すると、`https://dev.classmethod.jp/articles/create-a-vs-code-extension-that-opens-a-specified-url-in-a-browser-according-to-the-file-being-edited/`が自動で開かれました。

これで期待通りのVS Code拡張を作ることができました!
参考
- Vscode拡張機能を開発してみた
- VSCode Extensions(拡張機能) 自作入門 〜VSCodeにおみくじ機能を追加する〜 - Qiita
- [TypeScript] Axiosのtry/catchでの例外オブジェクトを型付けする | DevelopersIO
以上