dbt Core でローカルから BigQuery を操作するためのセットアップ方法
この記事は公開されてから1年以上経過しています。情報が古い可能性がありますので、ご注意ください。
Google Cloud データエンジニアのはんざわです。
先日、dbt Core に触れる機会があり、その際のセットアップ方法を簡単に紹介したいと思います。
前提
- 実行環境は macOS 13.5.2
- パッケージマネージャーに Homebrew を使用
- uv で Python のバージョンとパッケージを管理
検証
まずは、必要なパッケージをインストールします。
必要なパッケージをインストール
brew update
brew install uv
Google Cloud への認証
次に以下のコマンドを実行し、BigQuery にクエリが発行可能なユーザーアカウントでログインします。
gcloud auth application-default login
uv 環境の準備
次に、Python 環境を準備します。
今回の検証では、仮想環境に venv を使用します。
# 作業ディレクトリを作成
cd
mkdir dbt_test && cd dbt_test

# uv 環境の準備
uv init
uv venv

# 仮想環境をアクティベート
. .venv/bin/activate
dbt パッケージをインストール
次に dbt-core と dbt-bigquery をインストールします。uv add でパッケージを追加します。
uv add dbt-core
uv add dbt-bigquery

# 確認
dbt --version
Core:
  - installed: 1.8.3
  - latest:    1.8.3 - Up to date!

Plugins:
  - bigquery: 1.8.2 - Up to date!
正常にインストールされていることが確認できました。
これらライブラリの最新のバージョンは以下のリンクから確認してください。
dbt のプロジェクトを作成
次に上記のドキュメントを参考に dbt init コマンドでプロジェクトを作成します。
test_project という名前でプロジェクトを作成しました。
dbt init test_project
上記のコマンドを実行すると対話形式でプロフィールのセットアップが始まります。
Running with dbt=1.8.3

Your new dbt project "test_project" was created!

For more information on how to configure the profiles.yml file,
please consult the dbt documentation here:

  https://docs.getdbt.com/docs/configure-your-profile

One more thing:

Need help? Don't hesitate to reach out to us via GitHub issues or on Slack:

  https://community.getdbt.com/

Happy modeling!

Setting up your profile.
データベースには BigQuery を使用するので1を選択します。
Which database would you like to use?
[1] bigquery

(Don't see the one you want? https://docs.getdbt.com/docs/available-adapters)

Enter a number: 1
Google Cloud への認証はサービスアカウントではなく、oauth で認証するので1を選択します。
[1] oauth
[2] service_account
Desired authentication method option (enter a number): 1
最後に Google Cloud のプロジェクト ID やデータセット名、スレッド数、クエリのタイムアウト時間、クエリを発行するロケーションを設定します。
設定内容は以下の通りです。
project (GCP project id): [プロジェクトID]
dataset (the name of your dbt dataset): dbt_dataset
threads (1 or more): 1
job_execution_timeout_seconds [300]:
[1] US
[2] EU
Desired location option (enter a number): 1
以下のメッセージの通り、これらの設定内容は、ホームディレクトリ配下の .dbt/profiles.yml に保存されており、編集することで設定を変えることも可能です。
Profile test_project written to /Users/[ユーザーディレクトリ]/.dbt/profiles.yml using target's profile_template.yml and your supplied values. Run 'dbt debug' to validate the connection.
接続の確認
次に dbt debug コマンドでこれまでの設定に問題がないか確認します。
cd test_project
dbt debug
All checks passed! と表示されたら設定完了です!
Running with dbt=1.8.3
dbt version: 1.8.3
python version: 3.12.0
python path: /Users/[ユーザーディレクトリ]/.pyenv/versions/3.12.0/envs/python312/bin/python3.12
os info: macOS-13.5.2-arm64-arm-64bit
Using profiles dir at /Users/[ユーザーディレクトリ]/.dbt
Using profiles.yml file at /Users/[ユーザーディレクトリ]/.dbt/profiles.yml
Using dbt_project.yml file at /Users/[ユーザーディレクトリ]/python3_venv/test_project/dbt_project.yml
adapter type: bigquery
adapter version: 1.8.2
Configuration:
  profiles.yml file [OK found and valid]
  dbt_project.yml file [OK found and valid]
Required dependencies:
  - git [OK found]

Connection:
  method: oauth
  database: [プロジェクトID]
  execution_project: [プロジェクトID]
  schema: dbt_dataset
  location: US
  priority: interactive
  maximum_bytes_billed: None
  impersonate_service_account: None
  job_retry_deadline_seconds: None
  job_retries: 1
  job_creation_timeout_seconds: None
  job_execution_timeout_seconds: 300
  timeout_seconds: 300
  client_id: None
  token_uri: None
  dataproc_region: None
  dataproc_cluster_name: None
  gcs_bucket: None
  dataproc_batch: None
Registered adapter: bigquery=1.8.2
  Connection test: [OK connection ok]

All checks passed!
実行してみる
最後に最初から登録されているサンプルのクエリを実行してみます。
dbt run コマンドで test_project/dbt_project.yml に登録されているクエリを実行することが可能です。
dbt run
以下のログのように正常に実行されました。
Running with dbt=1.8.3
Registered adapter: bigquery=1.8.2
Unable to do partial parsing because saved manifest not found. Starting full parse.
Found 2 models, 4 data tests, 471 macros

Concurrency: 1 threads (target='dev')

1 of 2 START sql table model dbt_dataset.my_first_dbt_model .................... [RUN]
1 of 2 OK created sql table model dbt_dataset.my_first_dbt_model ............... [CREATE TABLE (2.0 rows, 0 processed) in 3.46s]
2 of 2 START sql view model dbt_dataset.my_second_dbt_model .................... [RUN]
2 of 2 OK created sql view model dbt_dataset.my_second_dbt_model ............... [CREATE VIEW (0 processed) in 1.60s]

Finished running 1 table model, 1 view model in 0 hours 0 minutes and 6.97 seconds (6.97s).
Completed successfully

Done. PASS=2 WARN=0 ERROR=0 SKIP=0 TOTAL=2
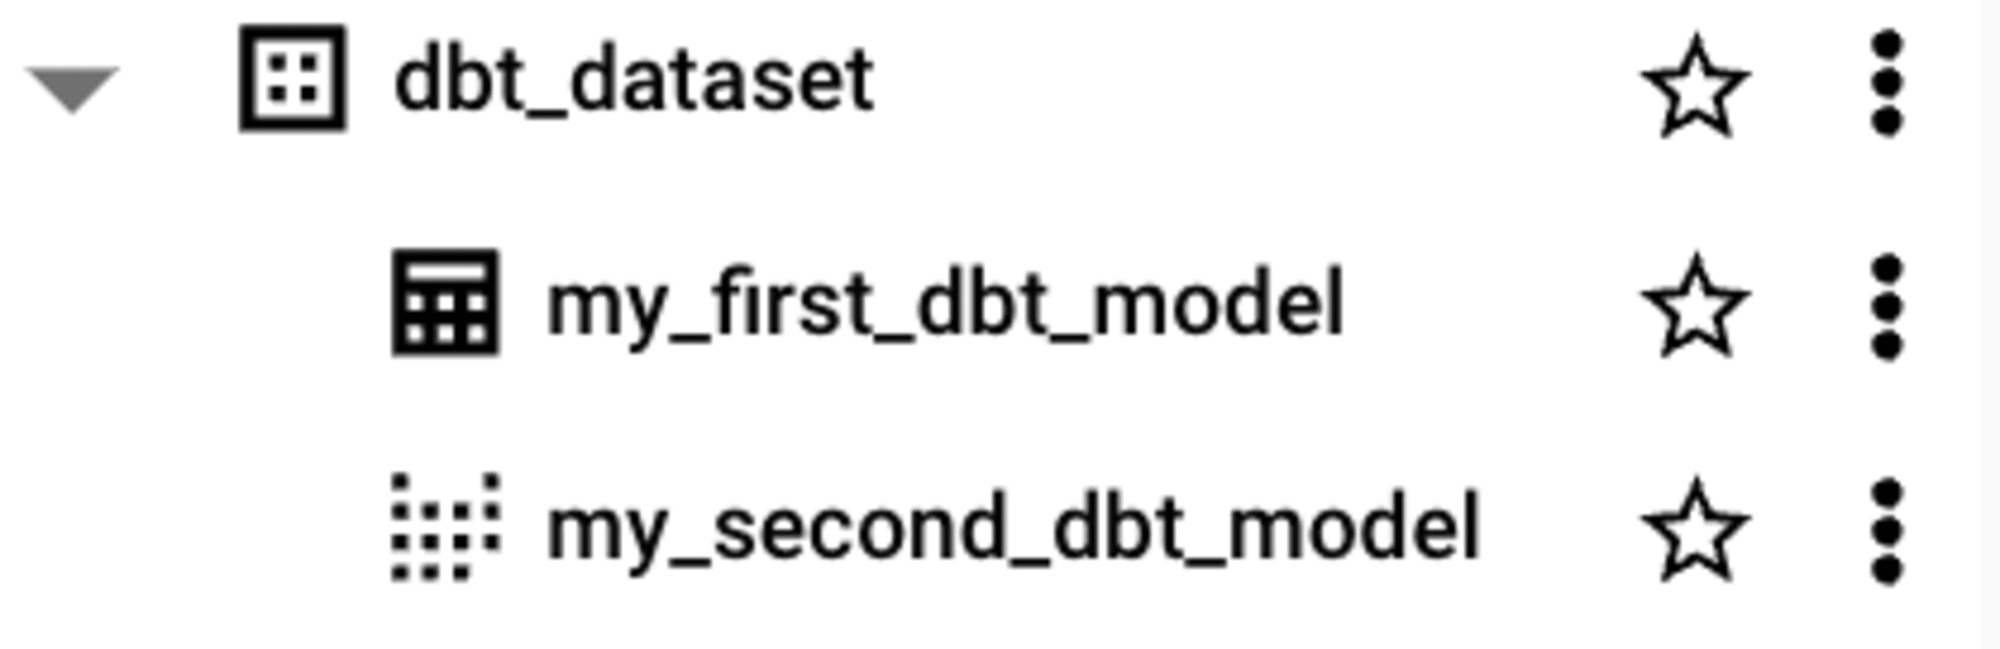
BigQuery に反映されているか確認してみます。
以下のキャプチャのように dbt_dataset のデータセット配下にサンプル用のテーブルとビューが作成されていました。
まとめ
今回のブログではローカルから dbt Core で BigQuery を操作してみました。
次回は、自分で作成したクエリを登録して実行したりしてみたいと思います。
それではまた!