Trainiumを使って学習した大規模言語モデルをECS on EC2でInferentiaにデプロイしてみた
この記事は公開されてから1年以上経過しています。情報が古い可能性がありますので、ご注意ください。
こんちには。
データ事業本部 インテグレーション部 機械学習チームの中村( @nokomoro3 )です。
以下でParallelClusterで構築したTrainiumクラスタを使って、LLMを学習しました。
ので今回はこちらの続きとして、学習したモデルをInferentiaにデプロイしていきたいと思います。
なお前回同様本ブログを執筆するにあたり、KARAKURI社様のこの記事を参考にしております。ありがとうございます。
デプロイ構成
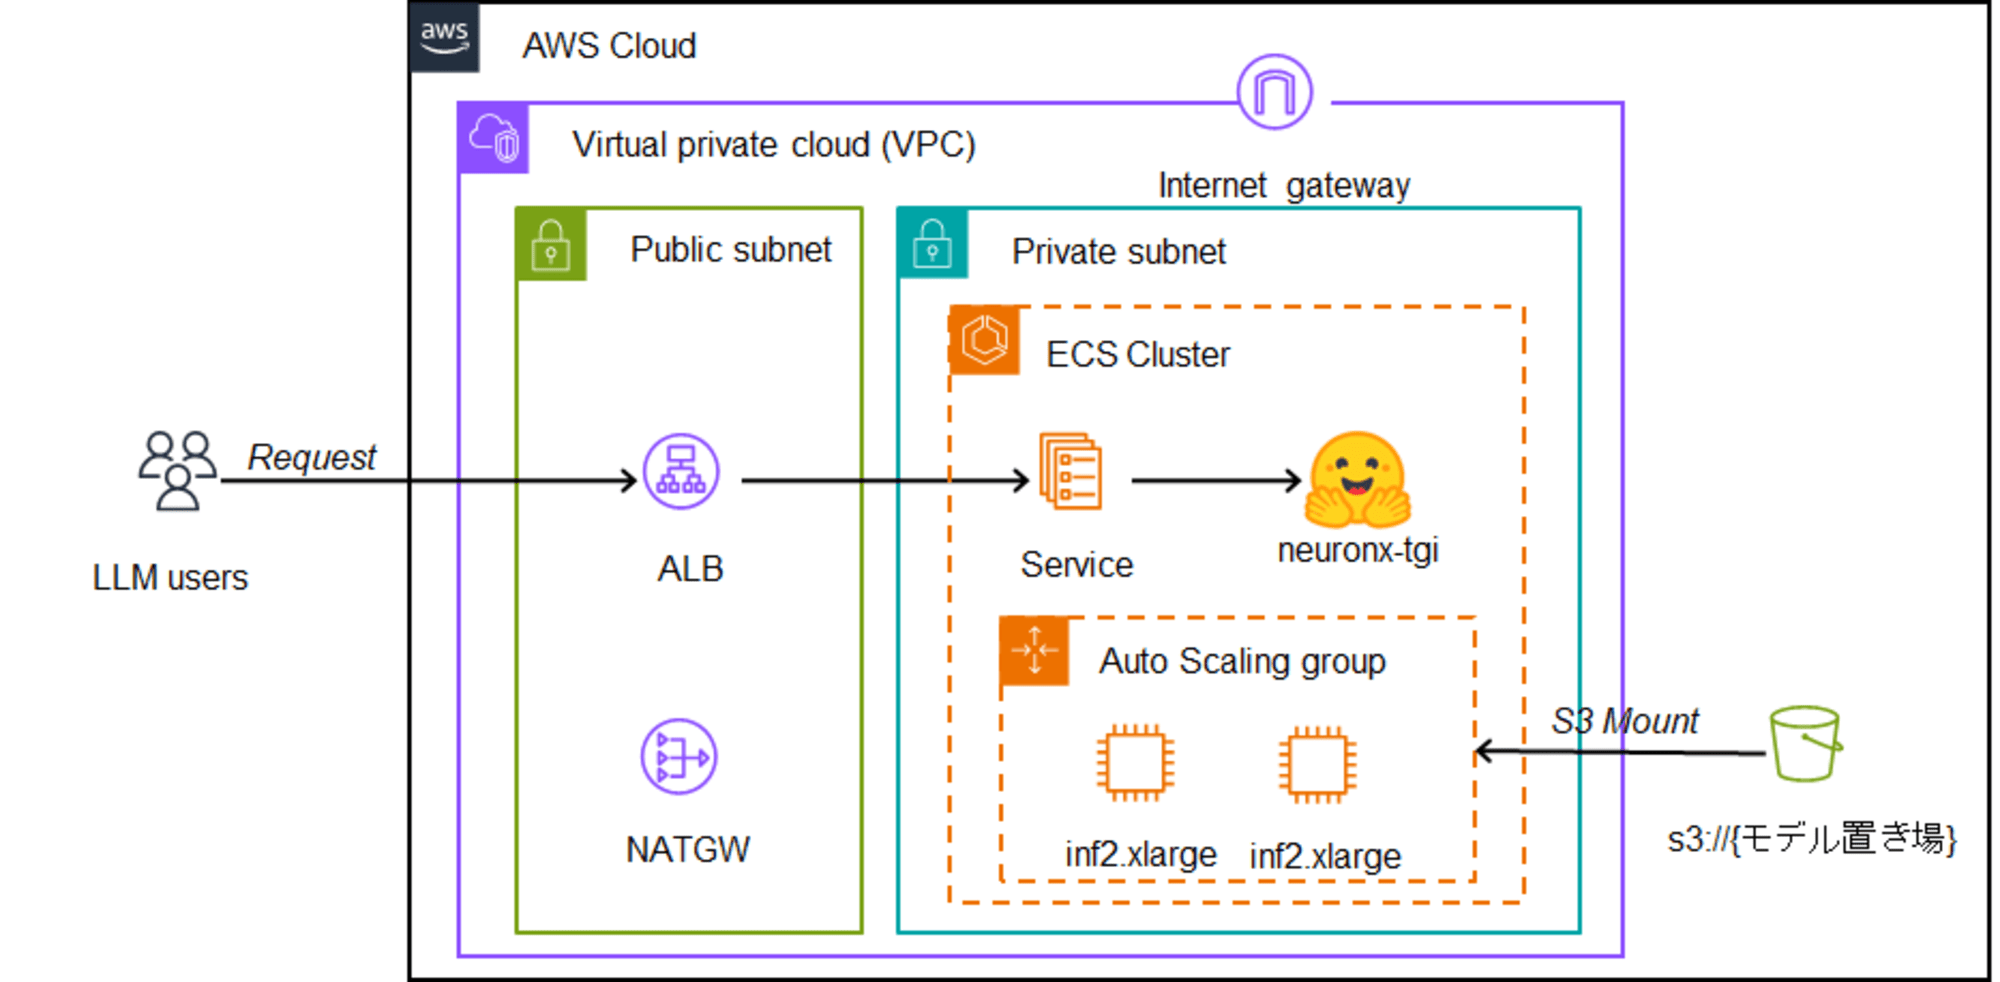
以下のような形でECS on EC2でInferentiaを構成し、コンテナとしてNeuronに対応したTGIをデプロイすることでLLMを使えるようにします。

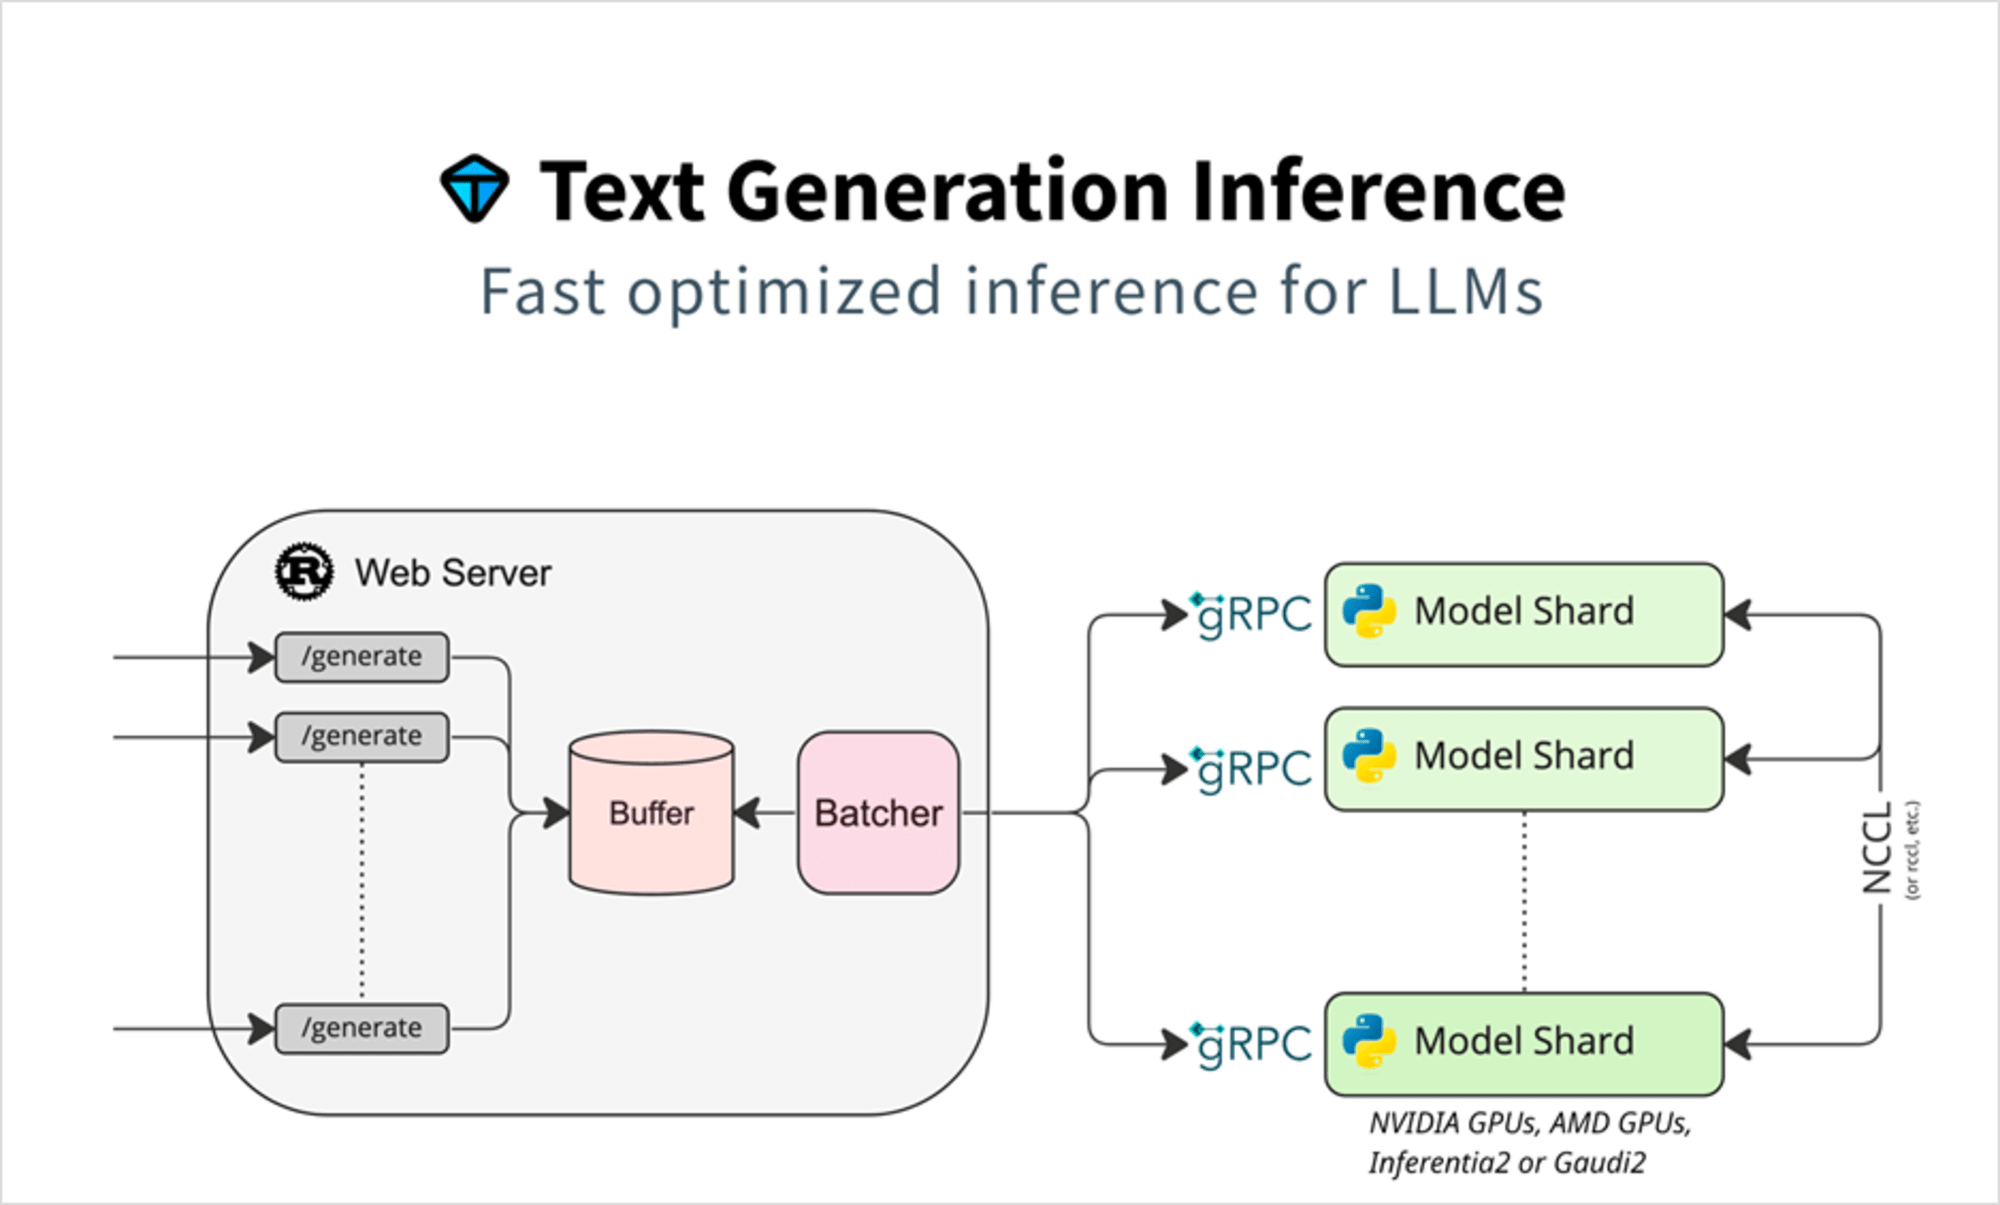
TGIはHuggingfaceが提供しているツールキットで、こちらをデプロイすることで統一的なインターフェースでLLMにリクエストすることができます。
(TGI自体はそれ以外にもLLM推論を最適化するための工夫が多数含まれています。)

TGIの詳細については以下も参照ください。
インフラデプロイ
最初に結論なのですが、以下のようなterraformのコードでデプロイをします。
variable "resource_prefix" {
  type = string
}

variable "vpc_id" {
  type = string
}

variable "model_name" {
  type = string
}

variable "default_security_group_id" {
  type = string
}

variable "private_subnet_id" {
  type = string
}

variable "public_subnet_ids" {
  type = list(string)
}

variable "bucket_name" {
  type = string
}

# プロバイダーの設定
provider "aws" {
  region = "us-east-1" # 使用するリージョンに変更してください

  # 共通タグ
  default_tags {
    tags = {
      Name = "${var.resource_prefix}"
    }
  }
}

data "aws_ssm_parameter" "ecs_optimized_ami" {
  name = "/aws/service/ecs/optimized-ami/amazon-linux-2023/neuron/recommended/image_id"
}

#----------------------------------------------
# セキュリティグループ
#----------------------------------------------

# ECSセキュリティグループ
resource "aws_security_group" "ecs" {
  name   = "${var.resource_prefix}-ecs"
  vpc_id = var.vpc_id

  # 全てのアウトバウンドトラフィックを許可
  egress {
    protocol    = -1
    cidr_blocks = ["0.0.0.0/0"]
    from_port   = 0
    to_port     = 0
  }
}

# ALBのセキュリティグループ
resource "aws_security_group" "alb" {
  name   = "${var.resource_prefix}-alb"
  vpc_id = var.vpc_id

  # 全てのアウトバウンドトラフィックを許可
  egress {
    protocol    = -1
    cidr_blocks = ["0.0.0.0/0"]
    from_port   = 0
    to_port     = 0
  }

  # 80番のCIDRにアクセス許可
  ingress {
    protocol    = "tcp"
    from_port   = 80
    to_port     = 80
    cidr_blocks = ["0.0.0.0/0"]
  }
}

#----------------------------------------------
# IAM
#----------------------------------------------

# ECSタスク実行ロール
resource "aws_iam_role" "ecs_task_execution_role" {
  name = "${var.resource_prefix}-ecs-task-execution-role"

  assume_role_policy = jsonencode({
    Version = "2012-10-17"
    Statement = [
      {
        Action = "sts:AssumeRole"
        Effect = "Allow"
        Principal = {
          Service = "ecs-tasks.amazonaws.com"
        }
      }
    ]
  })
}

resource "aws_iam_role_policy_attachments_exclusive" "ecs_task_execution_role" {
  role_name = aws_iam_role.ecs_task_execution_role.name
  policy_arns = [
    "arn:aws:iam::aws:policy/service-role/AmazonECSTaskExecutionRolePolicy",
  ]
}

#----------------------------------------------
# ECS
#----------------------------------------------

# ECSクラスター
resource "aws_ecs_cluster" "this" {
  name = var.resource_prefix

  setting {
    name  = "containerInsights"
    value = "enabled"
  }
}

# ECSタスク定義
resource "aws_ecs_task_definition" "this" {
  family                   = var.resource_prefix
  requires_compatibilities = ["EC2"]
  network_mode             = "bridge" # FARGATEの場合かならずawsvpc
  ipc_mode                 = "host"   # GPU利用の共有メモリアクセスのため

  # コンテナエージェントとDockerデーモン用のロール
  execution_role_arn = aws_iam_role.ecs_task_execution_role.arn

  container_definitions = jsonencode([
    {
      # user = "root"

      name  = "tgi"
      image = "ghcr.io/huggingface/neuronx-tgi:0.0.23"

      essential         = true # このコンテナが必須であるフラグ
      privileged        = true # コンテナに特権モードを付与
      memoryReservation = 1024

      command = [
        "--port", "8080",
        "--model-id", var.model_name,
        "--max-batch-size", "1",
        "--max-input-length", "3164",
        "--max-total-tokens", "4096"
      ]

      mountPoints = [
        {
          containerPath = "/s3"
          readOnly      = true
          sourceVolume  = "s3"
        }
      ]

      # hostPort未指定で動的ポートマッピングが可能
      portMappings = [
        {
          containerPort = 8080
          protocol      = "tcp"
          appProtocol   = "http"
        }
      ]

      logConfiguration = {
        logDriver = "awslogs"
        options = {
          "awslogs-group"         = "/ecs/${var.resource_prefix}"
          "awslogs-region"        = "us-east-1"
          "awslogs-stream-prefix" = "ecs"
        }
      }
    }
  ])

  volume {
    name      = "s3"
    host_path = "/s3"
  }
}

# ECSサービス
resource "aws_ecs_service" "this" {
  name                              = var.resource_prefix
  cluster                           = aws_ecs_cluster.this.id
  task_definition                   = aws_ecs_task_definition.this.arn
  desired_count                     = 1
  launch_type                       = "EC2"
  health_check_grace_period_seconds = 3000 # 50分の猶予期間

  load_balancer {
    target_group_arn = aws_lb_target_group.this.arn
    container_name   = "tgi" # タスク定義のコンテナ名
    container_port   = 8080  # タスク定義のポート
  }
}

resource "aws_cloudwatch_log_group" "ecs" {
  name              = "/ecs/${var.resource_prefix}"
  retention_in_days = 30
}

#----------------------------------------------
# EC2
#----------------------------------------------

# ECSインスタンスロール
resource "aws_iam_role" "ecs_instance_role" {
  name = "${var.resource_prefix}-ecs-instance-role"

  assume_role_policy = jsonencode({
    Version = "2012-10-17"
    Statement = [
      {
        Action = "sts:AssumeRole"
        Effect = "Allow"
        Principal = {
          Service = "ec2.amazonaws.com"
        }
      }
    ]
  })
}

resource "aws_iam_role_policy_attachments_exclusive" "ecs_instance_role" {
  role_name = aws_iam_role.ecs_instance_role.name
  policy_arns = [
    "arn:aws:iam::aws:policy/service-role/AmazonEC2ContainerServiceforEC2Role",
    "arn:aws:iam::aws:policy/CloudWatchLogsFullAccess",
    "arn:aws:iam::aws:policy/AmazonS3FullAccess"
  ]
}

# インスタンスプロファイル
resource "aws_iam_instance_profile" "this" {
  name = "${var.resource_prefix}-ecs-instance-profile"
  role = aws_iam_role.ecs_instance_role.name
}

# 起動テンプレート
resource "aws_launch_template" "this" {
  name = var.resource_prefix

  # ECS最適化AMI
  image_id = data.aws_ssm_parameter.ecs_optimized_ami.value

  instance_type = "inf2.xlarge"

  vpc_security_group_ids = [
    var.default_security_group_id,
    aws_security_group.ecs.id
  ]

  iam_instance_profile {
    name = aws_iam_instance_profile.this.name
  }

  block_device_mappings {
    device_name = "/dev/xvda"

    ebs {
      volume_size = 500
      volume_type = "gp3"
    }
  }

  user_data = base64encode(<<-EOT
    #!/bin/bash
    echo ECS_CLUSTER=${aws_ecs_cluster.this.name} >> /etc/ecs/ecs.config
    sudo yum install -y https://s3.amazonaws.com/mountpoint-s3-release/latest/x86_64/mount-s3.rpm
    sudo mkdir /s3
    sudo mount-s3 --allow-other ${var.bucket_name} /s3
  EOT
  )
}

# Auto Scaling Group
resource "aws_autoscaling_group" "this" {
  name             = var.resource_prefix
  desired_capacity = 1
  max_size         = 1
  min_size         = 1

  vpc_zone_identifier = [
    var.private_subnet_id
  ]

  launch_template {
    id      = aws_launch_template.this.id
    version = "$Latest"
  }

  tag {
    key                 = "Name"
    value               = var.resource_prefix
    propagate_at_launch = true
  }

  depends_on = [
    aws_ecs_cluster.this
  ]

  timeouts {
    delete = "15m"
  }
}

#----------------------------------------------
# ALB
#----------------------------------------------

# ロードバランサ
resource "aws_lb" "this" {
  name               = var.resource_prefix
  internal           = false
  load_balancer_type = "application"
  security_groups = [
    var.default_security_group_id,
    aws_security_group.alb.id
  ]
  subnets = var.public_subnet_ids
}

# リスナー
resource "aws_lb_listener" "this" {
  load_balancer_arn = aws_lb.this.arn
  port              = "80"
  protocol          = "HTTP"

  default_action {
    type             = "forward"
    target_group_arn = aws_lb_target_group.this.arn
  }
}

# ターゲットグループ
resource "aws_lb_target_group" "this" {
  name        = var.resource_prefix
  port        = 8080 # コンテナのポート
  protocol    = "HTTP"
  target_type = "instance"
  vpc_id      = var.vpc_id

  health_check {
    path                = "/health" # ヘルスチェックパス
    healthy_threshold   = 2
    unhealthy_threshold = 2
    # interval            = 5  # 秒単位
    # timeout             = 3  # 秒単位
  }
}

output "dns_name" {
  value = aws_lb.this.dns_name
}
実行前に dev.tfvars などで変数を定義します。
resource_prefix           = "{任意だが前回と同様のprefixでも良い}"
default_security_group_id = "{前回作成したセキュリティグループID}"
private_subnet_id         = "前回作成したPrivateSubnetId"
public_subnet_ids = [
  "前回作成したPublicSubnetId1",
  "前回作成したPublicSubnetId2",
]
vpc_id      = "前回作成したVPCID"
bucket_name = "{前回作成したバケット名}"
model_name  = "/s3/models/tanuki-8b-sft"
ほとんどのリソースは前回記事で作成したものなので、もしお手元で試されていたらなられたらそちらに沿って記述ください。
terraformのコードについてはいくつかポイントがあるので、メモも兼ねて紹介いたします。
S3にあるモデルを読み込む
まず、起動テンプレートの以下の部分でS3バケットをEC2の /s3 にマウントしています。
# 起動テンプレート
resource "aws_launch_template" "this" {

  user_data = base64encode(<<-EOT
    #!/bin/bash
    echo ECS_CLUSTER=${aws_ecs_cluster.this.name} >> /etc/ecs/ecs.config
    sudo yum install -y https://s3.amazonaws.com/mountpoint-s3-release/latest/x86_64/mount-s3.rpm
    sudo mkdir /s3
    sudo mount-s3 --allow-other ${var.bucket_name} /s3
  EOT
  )

}
そしてタスク定義側で、 /s3 をコンテナ内でみえるようにマッピングを追加しています。
# ECSタスク定義
resource "aws_ecs_task_definition" "this" {
  container_definitions = jsonencode([
    {
      name  = "tgi"
      image = "ghcr.io/huggingface/neuronx-tgi:0.0.23"

      command = [
        "--port", "8080",
        "--model-id", var.model_name,
        "--max-batch-size", "1",
        "--max-input-length", "3164",
        "--max-total-tokens", "4096"
      ]

      mountPoints = [
        {
          containerPath = "/s3"
          readOnly      = true
          sourceVolume  = "s3"
        }
      ]
    }
  ])

  volume {
    name      = "s3"
    host_path = "/s3"
  }
}
volume にホスト側のパスを記載し、 mountPoints にマッピングを追加しています。
また command にも var.model_name として /s3/models/tanuki-8b-sft が与えられ、これがTGIコンテナのサーバーにより読み込まれます。
IAMロールについて
ECS on EC2では3つのロールが使えますが、今回はタスクロールは使わずに、インスタンスロールにまとめて権限を与える設定にしています。
# ECSインスタンスロール
resource "aws_iam_role" "ecs_instance_role" {
  name = "${var.resource_prefix}-ecs-instance-role"

  assume_role_policy = jsonencode({
    Version = "2012-10-17"
    Statement = [
      {
        Action = "sts:AssumeRole"
        Effect = "Allow"
        Principal = {
          Service = "ec2.amazonaws.com"
        }
      }
    ]
  })
}

resource "aws_iam_role_policy_attachments_exclusive" "ecs_instance_role" {
  role_name = aws_iam_role.ecs_instance_role.name
  policy_arns = [
    "arn:aws:iam::aws:policy/service-role/AmazonEC2ContainerServiceforEC2Role",
    "arn:aws:iam::aws:policy/CloudWatchLogsFullAccess",
    "arn:aws:iam::aws:policy/AmazonS3FullAccess"
  ]
}
タスク実行ロールはいつものやつにしています。
# ECSタスク実行ロール
resource "aws_iam_role" "ecs_task_execution_role" {
  name = "${var.resource_prefix}-ecs-task-execution-role"

  assume_role_policy = jsonencode({
    Version = "2012-10-17"
    Statement = [
      {
        Action = "sts:AssumeRole"
        Effect = "Allow"
        Principal = {
          Service = "ecs-tasks.amazonaws.com"
        }
      }
    ]
  })
}

resource "aws_iam_role_policy_attachments_exclusive" "ecs_task_execution_role" {
  role_name = aws_iam_role.ecs_task_execution_role.name
  policy_arns = [
    "arn:aws:iam::aws:policy/service-role/AmazonECSTaskExecutionRolePolicy",
  ]
}
ECSクラスタとEC2の紐づけ
EC2の起動テンプレートのユーザデータに以下のように /etc/ecs/ecs.config へのクラスタ名の書き込みを追加することで、クラスタに参加させることができます。
# 起動テンプレート
resource "aws_launch_template" "this" {

  user_data = base64encode(<<-EOT
    #!/bin/bash
    echo ECS_CLUSTER=${aws_ecs_cluster.this.name} >> /etc/ecs/ecs.config
    sudo yum install -y https://s3.amazonaws.com/mountpoint-s3-release/latest/x86_64/mount-s3.rpm
    sudo mkdir /s3
    sudo mount-s3 --allow-other ${var.bucket_name} /s3
  EOT
  )

}
起動テンプレートは上記で依存関係を持つようになりますが、これとは別にAuto Scaling Groupが必要で、明示的にECSクラスタと関連付けをしないので、 depnends_on を以下のように追加します。
resource "aws_autoscaling_group" "this" {

  launch_template {
    id      = aws_launch_template.this.id
    version = "$Latest"
  }

  depends_on = [
    aws_ecs_cluster.this
  ]

}
ロードバランサーとの接続
ECSサービスの load_balancer に aws_lb_target を追加することで、ALBへのリクエストがECSサービスに繋がります。
# ECSサービス
resource "aws_ecs_service" "this" {

  load_balancer {
    target_group_arn = aws_lb_target_group.this.arn
    container_name   = "tgi" # タスク定義のコンテナ名
    container_port   = 8080  # タスク定義のポート
  }

}
デプロイ
通常通り以下を実行すればOKです。
terraform init
terraform apply -var-file=dev.tfvars
出力されるDNS名は控えておきます。
動作確認
TGIでデプロイしておくと、OpenAIのライブラリでOpenAIモデルと同様な感じでリクエストをすることができます。
まずは環境変数を設定します。
import os

os.environ["OPENAI_BASE_URL"] = "http://{控えていたDNS名}/v1"
os.environ["OPENAI_API_KEY"] = "dummy"
API_KEYはダミーで大丈夫です。またURLはDNS名に加えて /v1 が付与されるのでご注意ください。
最後に以下のようにリクエストします。
from openai import OpenAI

client = OpenAI()

stream = client.chat.completions.create(
    model="hogehoge",
    messages=[
        {"role": "system", "content": "あなたは親切なアシスタントです。" },
        {"role": "user", "content": "こんにちは。食堂のメニューを考えてください。"}
    ],
    max_tokens=1024,
    temperature=0.3,
    top_p=0.3,
    stream=True
)

for chunk in stream:
    print(chunk.choices[0].delta.content or "", end="")
# 食堂のメニューを考える際には、以下のポイントを考慮するとよいでしょう。
#
#
# 1. ターゲットとなるお客様: 学生向け、会社員向け、家族連れ、高齢者など
#
# 2. 予算: 価格帯
#
# 3. 食材: 仕入れ先、季節、地域の特産品など
#
# 4. 調理方法: 簡単に作れるもの、手間がかかるもの、調理時間
#
# ...以降略...
まとめ
いかがでしたでしょうか。Inferentiaを使った推論を今回は扱いました。
本ブログがご参考になれば幸いです。


