AWS DevOps Agent で、EKS の Pod クラッシュを調査させてみた
こんにちは。諦めの悪さはCrashLoopBackOff
オペレーション部のかわいです。
今回は、AWS DevOps Agent について書きます。
このサービスは AWS re:Invent 2025 で発表された Frontier Agents の一角で、インシデントの自動調査とか根本原因特定、緩和策提案を行う、いわば AI オンコールエンジニアです。まだプレビュー版なので、無償で利用できます(バージニアリージョンのみ)。
発表から3ヶ月ほど経過しましたが、筆者はちゃんと触れてなかったので、今回備忘録がてらに簡易的な検証結果を記事にしてみました。
本記事では、EKS クラスタ上で意図的に Pod クラッシュを発生させ、DevOps Agent がどこまで根本原因を特定できるかを検証してみました。
設定は CLI 経由でいろいろできそうだったので、コマンドを叩いていけばほぼ検証環境を作成できるようになってます。
書いてあること/やってみたこと
- AWS DevOps Agent の EKS 連携(EKS Access Setup)方法
- 意図的に OOMKill を発生させるシナリオで、DevOps Agent がどこまで原因を特定できるか
- (極小コストで検証してみました)
AWS DevOps Agent とは
耳タコだと思いますが、
AWS DevOps Agent はアラートやインシデントの通知を受け取ると、以下のプロセスを自律的に実行します。
情報収集: CloudWatch メトリクス/ログ、コードリポジトリ、CI/CD パイプラインのテレメトリを収集
トポロジ構築: アプリケーションの依存関係グラフを自動生成
根本原因分析: 相関分析により原因を特定
緩和策提案: 具体的な対処手順を提示
EKS 環境では、Kubernetes API 経由で Pod の状態、ログ、クラスタイベントを取得し、CloudWatch Container Insights のメトリクスと組み合わせることで障害原因を分析できます。
個人的にも注目しているサービスで、GA 後もどこまで Kiro や Q Developer などと連携してくるのか、どこまでできるようになるのか楽しみです。
検証環境
| 項目 | 内容 |
|---|---|
| EKS バージョン | v1.35 |
| ノードタイプ | t3.medium × 1(コスト節約のため最小構成) |
| アプリケーション | polinux/stress(OOMKill 用) |
| DevOps Agent | プレビュー版 |
| リージョン | us-east-1 |
コスト感
※検証は2時間程度で実施しました
| リソース | 想定コスト |
|---|---|
| EKS クラスタ | $0.1/時間 × 2時間 = $0.2 |
| EC2 ノード(t3.medium) | $0.0416/時間 × 2時間 = $0.08 |
| CloudWatch Container Insights | ~$0.5(ログ/メトリクス) |
| DevOps Agent | 無料(プレビュー期間中) |
| 合計 | 今回 $1以内 に収まりました✌️ |
事前準備
今回環境準備は AWS CloudShell 上で実施しました。
CloudShell の下準備
デフォルトでインストールされていないので、eksctl と DevOps Agent CLI モデルのみ追加インストールを行います。
eksctl と DevOps Agent CLI モデルのインストール
CloudShell を起動したら、以下を実行します。
# eksctl のインストール
curl --silent --location "https://github.com/weaveworks/eksctl/releases/latest/download/eksctl_$(uname -s)_amd64.tar.gz" | tar xz -C /tmp
sudo mv /tmp/eksctl /usr/local/bin/
eksctl version  # 以下のようにバージョンが表示されれば OK
# 0.224.0  # 例

# DevOps Agent CLI サービスモデルの追加
# サービス定義を手動登録することで `aws devopsagent` コマンドが使えるようになる。
curl -o devopsagent.json https://d1co8nkiwcta1g.cloudfront.net/devopsagent.json
aws configure add-model \
  --service-model "file://${PWD}/devopsagent.json" \
  --service-name devopsagent
セットアップ手順
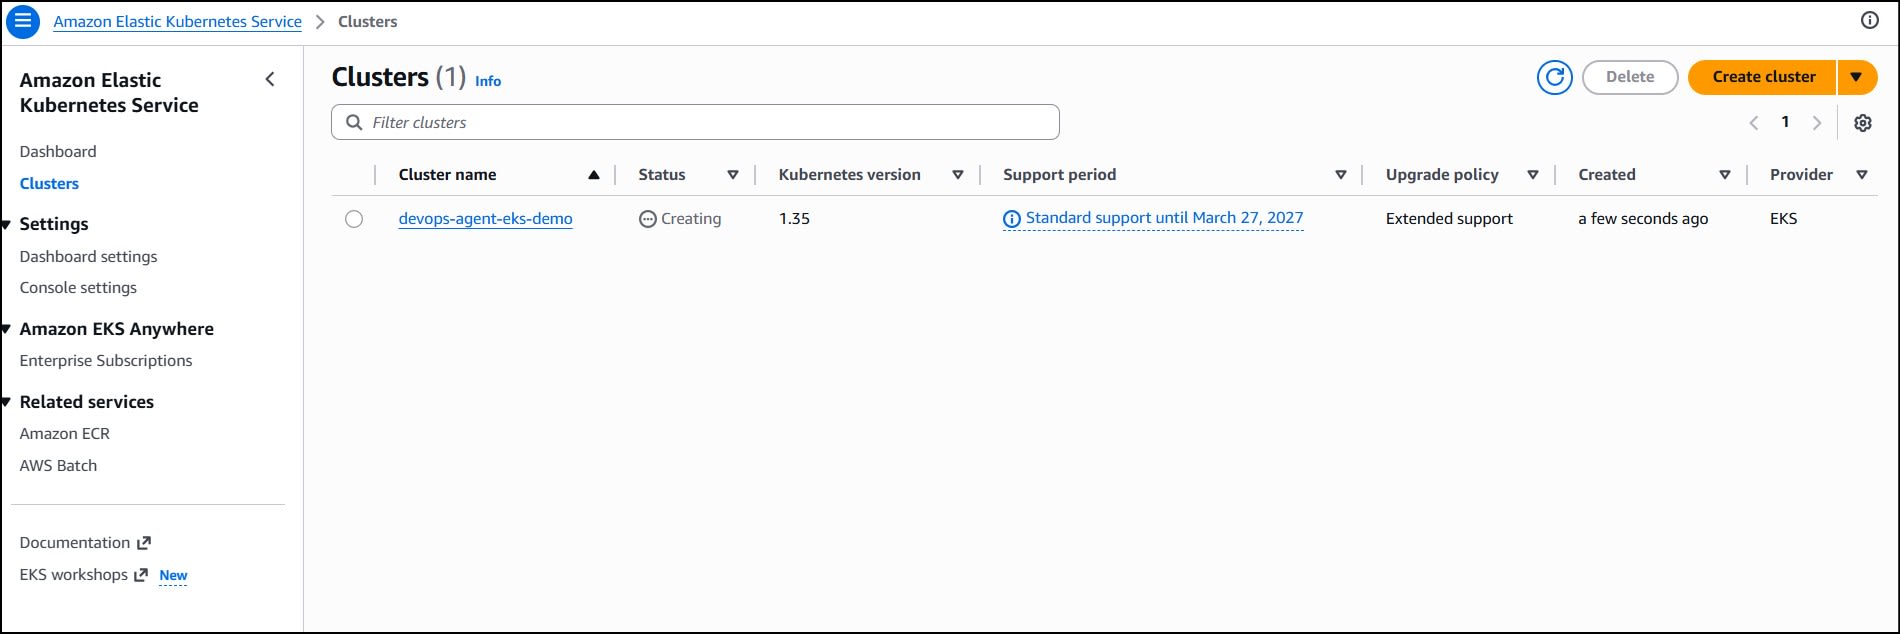
1. EKS クラスタ作成
CloudShell 上で以下を実行します。
eksctl create cluster \
  --name devops-agent-eks-demo \
  --region us-east-1 \
  --version 1.35 \
  --nodegroup-name demo-nodes \
  --node-type t3.medium \
  --nodes 1 \
  --nodes-min 1 \
  --nodes-max 1 \
  --managed
#出力結果例
2026-03-06 04:45:28 [ℹ]  eksctl version 0.224.0
2026-03-06 04:45:28 [ℹ]  using region us-east-1
2026-03-06 04:45:28 [ℹ]  setting availability zones to [us-east-1a us-east-1b]
2026-03-06 04:45:28 [ℹ]  subnets for us-east-1a - public:192.168.0.0/19 private:192.168.64.0/19
2026-03-06 04:45:28 [ℹ]  subnets for us-east-1b - public:192.168.32.0/19 private:192.168.96.0/19
2026-03-06 04:45:28 [ℹ]  nodegroup "demo-nodes" will use "" [AmazonLinux2023/1.35]
2026-03-06 04:45:28 [!]  Auto Mode will be enabled by default in an upcoming release of eksctl. This means managed node groups and managed networking add-ons will no longer be created by default. To maintain current behavior, explicitly set 'autoModeConfig.enabled: false' in your cluster configuration. Learn more: https://eksctl.io/usage/auto-mode/
2026-03-06 04:45:28 [ℹ]  using Kubernetes version 1.35
2026-03-06 04:45:28 [ℹ]  creating EKS cluster "devops-agent-eks-demo" in "us-east-1" region with managed nodes
2026-03-06 04:45:28 [ℹ]  will create 2 separate CloudFormation stacks for cluster itself and the initial managed nodegroup
2026-03-06 04:45:28 [ℹ]  if you encounter any issues, check CloudFormation console or try 'eksctl utils describe-stacks --region=us-east-1 --cluster=devops-agent-eks-demo'
2026-03-06 04:45:28 [ℹ]  Kubernetes API endpoint access will use default of {publicAccess=true, privateAccess=false} for cluster "devops-agent-eks-demo" in "us-east-1"
2026-03-06 04:45:28 [ℹ]  CloudWatch logging will not be enabled for cluster "devops-agent-eks-demo" in "us-east-1"
2026-03-06 04:45:28 [ℹ]  you can enable it with 'eksctl utils update-cluster-logging --enable-types={SPECIFY-YOUR-LOG-TYPES-HERE (e.g. all)} --region=us-east-1 --cluster=devops-agent-eks-demo'
2026-03-06 04:45:28 [ℹ]  default addons vpc-cni, kube-proxy, coredns, metrics-server were not specified, will install them as EKS addons
2026-03-06 04:45:28 [ℹ]
2 sequential tasks: { create cluster control plane "devops-agent-eks-demo",
    2 sequential sub-tasks: {
        2 sequential sub-tasks: {
            1 task: { create addons },
            wait for control plane to become ready,
        },
        create managed nodegroup "demo-nodes",
    }
}
2026-03-06 04:45:28 [ℹ]  building cluster stack "eksctl-devops-agent-eks-demo-cluster"
2026-03-06 04:45:28 [ℹ]  deploying stack "eksctl-devops-agent-eks-demo-cluster"
...
2026-03-06 04:59:35 [✔]  EKS cluster "devops-agent-eks-demo" in "us-east-1" region is ready
※クラスタ作成には約10-15分ほどかかるので待機。
作成完了後、CloudShell で kubectl の設定を更新します。
aws eks update-kubeconfig \
  --region us-east-1 \
  --name devops-agent-eks-demo

Added new context arn:aws:eks:us-east-1:xxxxxxxxxxxx:cluster/devops-agent-eks-demo to /home/cloudshell-user/.kube/config

# ノードが Ready になっていることを確認
~ $ kubectl get nodes
NAME                            STATUS   ROLES    AGE   VERSION
ip-xxx-xxx-xx-xx.ec2.internal   Ready    <none>   10m   v1.35.0-eks-efcacff
2. IAM ロールの作成
DevOps Agent が AWS リソースを調査するための IAM ロールを作成します。CloudShell でそのまま実行できるようにファイルを作成します。
まず自分のアカウント ID を変数に格納します。
ACCOUNT_ID=$(aws sts get-caller-identity --query Account --output text)
echo $ACCOUNT_ID  # 12桁の数字が表示されれば OK
トラストポリシーファイルの作成とロール作成
# トラストポリシーファイルを作成
cat > ~/trust-policy.json << EOF
{
  "Version": "2012-10-17",
  "Statement": [
    {
      "Effect": "Allow",
      "Principal": {
        "Service": "aidevops.amazonaws.com"
      },
      "Action": "sts:AssumeRole",
      "Condition": {
        "StringEquals": {
          "aws:SourceAccount": "${ACCOUNT_ID}"
        },
        "ArnLike": {
          "aws:SourceArn": "arn:aws:aidevops:us-east-1:${ACCOUNT_ID}:agentspace/*"
        }
      }
    }
  ]
}
EOF

# 確認
~ $ cat ~/trust-policy.json
{
  "Version": "2012-10-17",
  "Statement": [
    {
      "Effect": "Allow",
      "Principal": {
        "Service": "aidevops.amazonaws.com"
      },
      "Action": "sts:AssumeRole",
      "Condition": {
        "StringEquals": {
          "aws:SourceAccount": "xxxxxxxxxxxx"
        },
        "ArnLike": {
          "aws:SourceArn": "arn:aws:aidevops:us-east-1:xxxxxxxxxxxx:agentspace/*"
        }
      }
    }
  ]
}

# ロールを作成
aws iam create-role \
  --role-name DevOpsAgentRole-AgentSpace \
  --assume-role-policy-document file://~/trust-policy.json

# AWS 管理ポリシーをアタッチ(CloudWatch 等、基本的な権限)
aws iam attach-role-policy \
  --role-name DevOpsAgentRole-AgentSpace \
  --policy-arn arn:aws:iam::aws:policy/AIOpsAssistantPolicy
EKS Kubernetes API アクセス等の拡張権限を追加
※ cat コマンドを使うとインデントの関係で JSON が崩れてしまったので、今回は Python スクリプトで確実にファイルを作成します。
python3 -c "
import json, pathlib
policy = {
  'Version': '2012-10-17',
  'Statement': [
    {
      'Sid': 'AllowExpandedAIOpsAssistantPolicy',
      'Effect': 'Allow',
      'Action': [
        'eks:AccessKubernetesApi',
        'aidevops:*',
        'synthetics:GetCanaryRuns',
        'route53:GetHealthCheckStatus',
        'resource-explorer-2:Search'
      ],
      'Resource': ['*']
    }
  ]
}
pathlib.Path('/tmp/inline-policy.json').write_text(json.dumps(policy))
print('OK')
"

aws iam put-role-policy \
  --role-name DevOpsAgentRole-AgentSpace \
  --policy-name ExpandedAIOpsPolicy \
  --policy-document file:///tmp/inline-policy.json

# ロール ARN を変数に格納(以降の手順で使用)
ROLE_ARN=$(aws iam get-role \
  --role-name DevOpsAgentRole-AgentSpace \
  --query 'Role.Arn' \
  --output text)
echo $ROLE_ARN
arn:aws:iam::xxxxxxxxxxxx:role/DevOpsAgentRole-AgentSpace
※$ROLE_ARN / $NODE_ROLE は CloudShell のセッション内でのみ有効な変数です。セッションが切れた場合は以下で再取得してください。
ROLE_ARN=$(aws iam get-role --role-name DevOpsAgentRole-AgentSpace --query 'Role.Arn' --output text)
NODE_ROLE=$(aws eks describe-nodegroup --cluster-name devops-agent-eks-demo --nodegroup-name demo-nodes --region us-east-1 --query 'nodegroup.nodeRole' --output text)
3. Agent Space の作成
AWS マネジメントコンソールから DevOps Agent コンソールを開き、Agent Space を作成します。
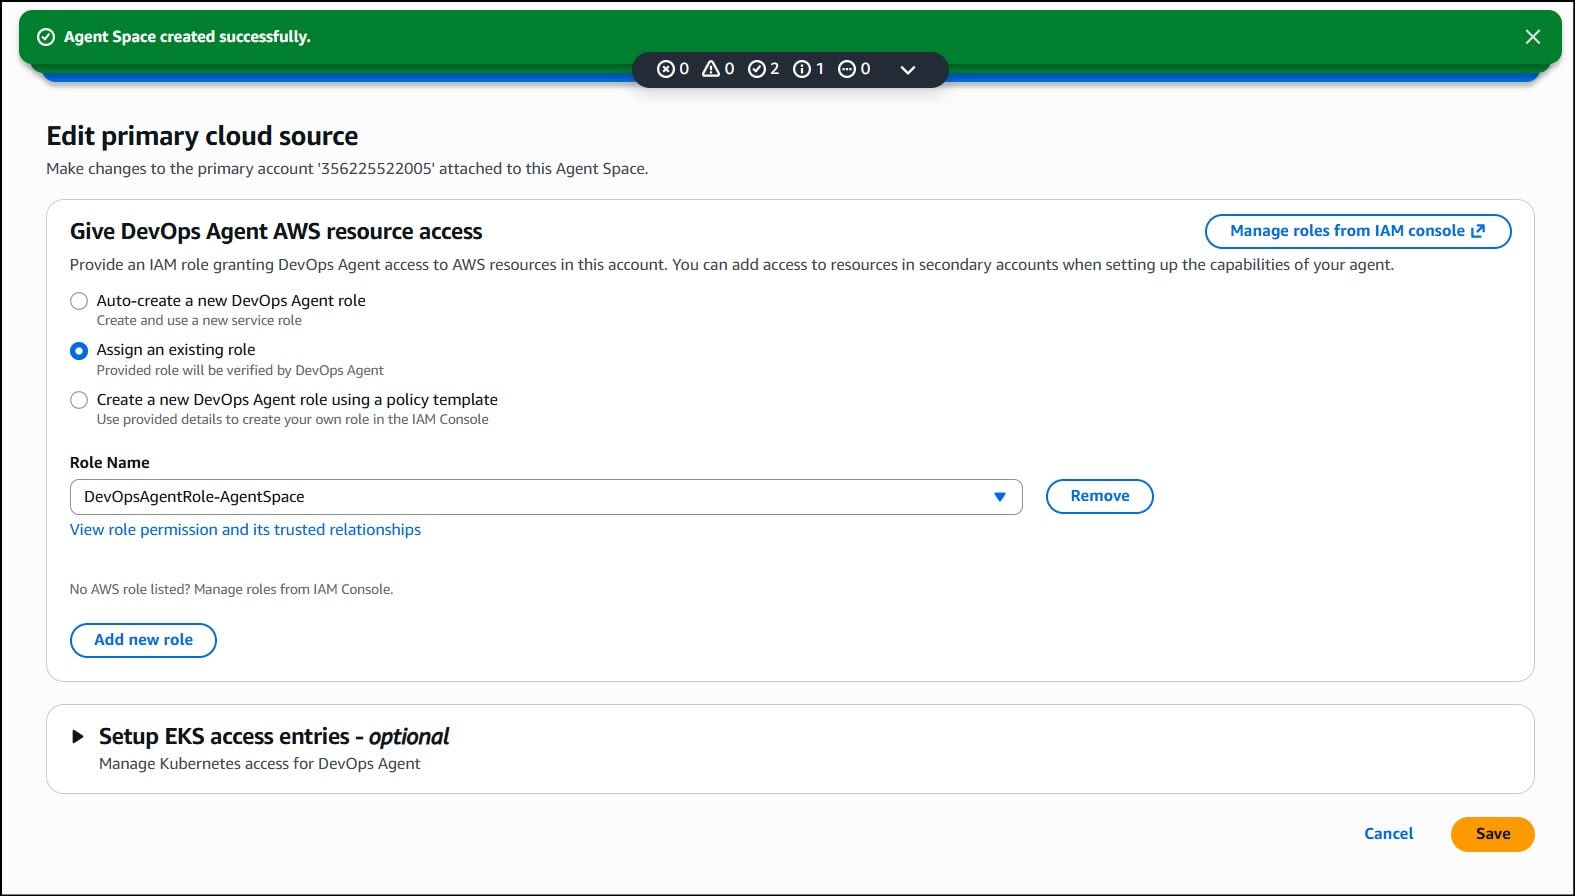
- AWS DevOps Agent コンソールを開く(us-east-1 リージョン)
- 「Create Agent Space」 をクリック
- 名前に
eks-demo-space、説明(任意)にEKS demo for DevOps Agentを入力 - 先ほど作成した IAM ロールの ARN を指定
- Web App を有効化
4. EKS Access Entry の設定
CloudShell に戻り、以下を実行します。
DevOps Agent の IAM ロールを EKS クラスタに読み取り専用で登録します。
# Access Entry を作成(IAM ロールに Kubernetes API アクセス権限を付与)
aws eks create-access-entry \
  --cluster-name devops-agent-eks-demo \
  --principal-arn $ROLE_ARN \
  --type STANDARD \
  --region us-east-1

  {
    "accessEntry": {
        "clusterName": "devops-agent-eks-demo",
        "principalArn": "arn:aws:iam::xxxxxxxxxxxx:role/DevOpsAgentRole-AgentSpace",
        "kubernetesGroups": [],
        "accessEntryArn": "arn:aws:eks:us-east-1:xxxxxxxxxxxx:access-entry/devops-agent-eks-demo/role/xxxxxxxxxxxx/DevOpsAgentRole-AgentSpace/xxxxxxxx-xxxx-xxxx-xxxx-xxxxxxxxxxxx",
        "createdAt": "2026-03-06T05:17:02.976000+00:00",
        "modifiedAt": "2026-03-06T05:17:02.976000+00:00",
        "tags": {},
        "username": "arn:aws:sts::xxxxxxxxxxxx:assumed-role/DevOpsAgentRole-AgentSpace/{{SessionName}}",
        "type": "STANDARD"
    }
}

# 最小権限の読み取り専用ポリシーを関連付け
aws eks associate-access-policy \
  --cluster-name devops-agent-eks-demo \
  --principal-arn $ROLE_ARN \
  --policy-arn arn:aws:eks::aws:cluster-access-policy/AmazonEKSAdminViewPolicy \
  --access-scope type=cluster \
  --region us-east-1

  {
    "clusterName": "devops-agent-eks-demo",
    "principalArn": "arn:aws:iam::xxxxxxxxxxxx:role/DevOpsAgentRole-AgentSpace",
    "associatedAccessPolicy": {
        "policyArn": "arn:aws:eks::aws:cluster-access-policy/AmazonEKSAdminViewPolicy",
        "accessScope": {
            "type": "cluster",
            "namespaces": []
        },
        "associatedAt": "2026-03-06T05:17:18.972000+00:00",
        "modifiedAt": "2026-03-06T05:17:18.972000+00:00"
    }
}
5. DevOps Agent コンソールで EKS Capability を有効化
- DevOps Agent コンソール → 作成した Agent Space を選択
- Capabilities → Cloud → Primary Source → Edit をクリック
- 表示されたロール ARN が手順 2 と一致していることを確認
- Save をクリック
これでセットアップは完了です。
6. CloudWatch Container Insights の有効化
DevOps Agent から EKS のメトリクスを取得するため、 Container Insights を使用します。CloudShell で以下を実行します。
# Container Insights を有効化(Pod のメトリクスを CloudWatch に送信)
aws eks create-addon \
  --cluster-name devops-agent-eks-demo \
  --addon-name amazon-cloudwatch-observability \
  --region us-east-1

  {
    "addon": {
        "addonName": "amazon-cloudwatch-observability",
        "clusterName": "devops-agent-eks-demo",
        "status": "CREATING",
        "addonVersion": "v4.10.1-eksbuild.1",
        "health": {
            "issues": []
        },
        "addonArn": "arn:aws:eks:us-east-1:xxxxxxxxxxxx:addon/devops-agent-eks-demo/amazon-cloudwatch-observability/xxxxxxxx-xxxx-xxxx-xxxx-xxxxxxxxxxxx",
        "createdAt": "2026-03-06T05:20:40.126000+00:00",
        "modifiedAt": "2026-03-06T05:20:40.141000+00:00",
        "tags": {},
        "namespaceConfig": {
            "namespace": "amazon-cloudwatch"
        }
    }
}
7. ノード IAM ロールへの CloudWatch 権限追加
Container Insights からメトリクスを CloudWatch に送信するために、ノードの IAM ロールに CloudWatchAgentServerPolicy を付与します。
# ノードグループの IAM ロール名を取得
NODE_ROLE=$(aws eks describe-nodegroup \
  --cluster-name devops-agent-eks-demo \
  --nodegroup-name demo-nodes \
  --region us-east-1 \
  --query 'nodegroup.nodeRole' \
  --output text)

# CloudWatchAgentServerPolicy をアタッチ
aws iam attach-role-policy \
  --role-name $(basename $NODE_ROLE) \
  --policy-arn arn:aws:iam::aws:policy/CloudWatchAgentServerPolicy

# Container Insights の DaemonSet を再起動してメトリクス送信を開始
kubectl rollout restart daemonset -n amazon-cloudwatch
8. CloudWatch アラームの作成
Pod の再起動を検知する CloudWatch アラームを作成します。
今回このアラームは自動トリガではなく、調査を開始するタイミングの判断材料として使用しています。
# OOMKill 検知用アラーム
# ※ 今回は ClusterName のみで絞ることで、クラスタ全体の再起動増加を検知
# oom-demo 専用にしたい場合は --dimensions に PodName=oom-demo を追加する
aws cloudwatch put-metric-alarm \
  --alarm-name "EKS-OOMKill-Demo" \
  --alarm-description "OOMKill detection for DevOps Agent demo" \
  --namespace ContainerInsights \
  --metric-name pod_number_of_container_restarts \
  --dimensions Name=ClusterName,Value=devops-agent-eks-demo \
  --statistic Sum \
  --period 60 \
  --threshold 2 \
  --comparison-operator GreaterThanOrEqualToThreshold \
  --evaluation-periods 1 \
  --region us-east-1
ここまでで、下準備はすべて完了です。
検証シナリオ_OOMKill(メモリ超過による強制終了)
シナリオの概要
Pod のメモリ制限を意図的に低く設定し、アプリケーションがメモリを超過消費すると OOMKill(Exit Code 137)が発生します。
アプリケーションのデプロイ
以下の Deployment をデプロイします。メモリ上限を 64Mi に制限しつつ、意図的に大量のメモリを確保するアプリケーションです。
【流れ】
Pod起動 → stress が 200MiB 確保を試みる
→ Kubernetes の memory limit (64MiB) を超過
→ OOM Killer が発動
→ コンテナが強制終了(OOMKilled)
→ CrashLoopBackOff に陥る
# CloudShell 上でYAMLファイルを作成してデプロイ
cat > ~/oom-demo.yaml << 'EOF'
apiVersion: apps/v1
kind: Deployment
metadata:
  name: oom-demo
  labels:
    app: oom-demo
    devopsagent: "true"
spec:
  replicas: 1
  selector:
    matchLabels:
      app: oom-demo
  template:
    metadata:
      labels:
        app: oom-demo
    spec:
      containers:
      - name: oom-demo
        image: polinux/stress
        command: ["stress"]
        args: ["--vm", "1", "--vm-bytes", "200M", "--vm-hang", "1"]
        resources:
          requests:
            memory: "64Mi"
            cpu: "100m"
          limits:
            memory: "64Mi"
            cpu: "200m"
EOF

kubectl apply -f ~/oom-demo.yaml
deployment.apps/oom-demo created
- 状態の確認
# Pod の状態を確認
kubectl get pods -w
# STATUS が OOMKilled → CrashLoopBackOff に遷移する様子が確認できる
NAME                        READY   STATUS             RESTARTS     AGE
oom-demo-xxxxxxxxxx-xxxxx     0/1     OOMKilled          2 (15s ago)   19s
oom-demo-xxxxxxxxxx-xxxxx     0/1     CrashLoopBackOff   2 (28s ago)   47s
oom-demo-xxxxxxxxxx-xxxxx     0/1     OOMKilled          3 (29s ago)   48s
# Ctrl + C でキャンセル

# Pod の詳細を確認
kubectl describe pod -l app=oom-demo
# 以下のような出力が得られる:
# Last State: Terminated
#   Reason: OOMKilled
#   Exit Code: 137

# 例
~ $ kubectl describe pod -l app=oom-demo | grep OOMKilled -C5
...
    State:          Terminated
      Reason:       OOMKilled
      Exit Code:    137
      Started:      Fri, 06 Mar 2026 05:27:52 +0000
      Finished:     Fri, 06 Mar 2026 05:27:52 +0000
    Last State:     Terminated
      Reason:       OOMKilled
      Exit Code:    137
      Started:      Fri, 06 Mar 2026 05:27:02 +0000
      Finished:     Fri, 06 Mar 2026 05:27:02 +0000
    Ready:          False
    Restart Count:  4
CloudWatch アラームの確認と調査のトリガ
CloudWatch アラームの状態確認
Pod が OOMKill を繰り返していることを CloudWatch から確認します。
aws cloudwatch describe-alarms \
  --alarm-names "EKS-OOMKill-Demo" \
  --region us-east-1 \
  --query 'MetricAlarms[0].StateValue' \
  --output text

# ALARM と表示されれば OK
DevOps Agent で調査を開始
-
DevOps Agent コンソール → 作成した Agent Space を選択
-
右上の 「Operator access」 をクリックして Web App を開く
-
「インシデントレスポンス」 タブを選択
-
テキストエリアに調査内容を入力し、「調査を開始」 をクリック
-
ダイアログが開くので、以下のような内容を入力し 「調査を開始中...」 をクリックします。
| 項目 | 入力内容 |
|---|---|
| 調査の詳細 | EKS上のPod(oom-demo)でOOMKillが繰り返し発生しています。原因と対処法を調査してください。 |
| 調査の出発点 | CloudWatchアラーム'EKS-OOMKill-Demo'がALARM状態です。Podの再起動回数が閾値を超えています。 |
| インシデントの日付と時刻 | 現在時刻のままでOK |
| 調査に名前を付ける | 任意(例:OOMKill-Investigation) |
| 優先度 | HIGH |
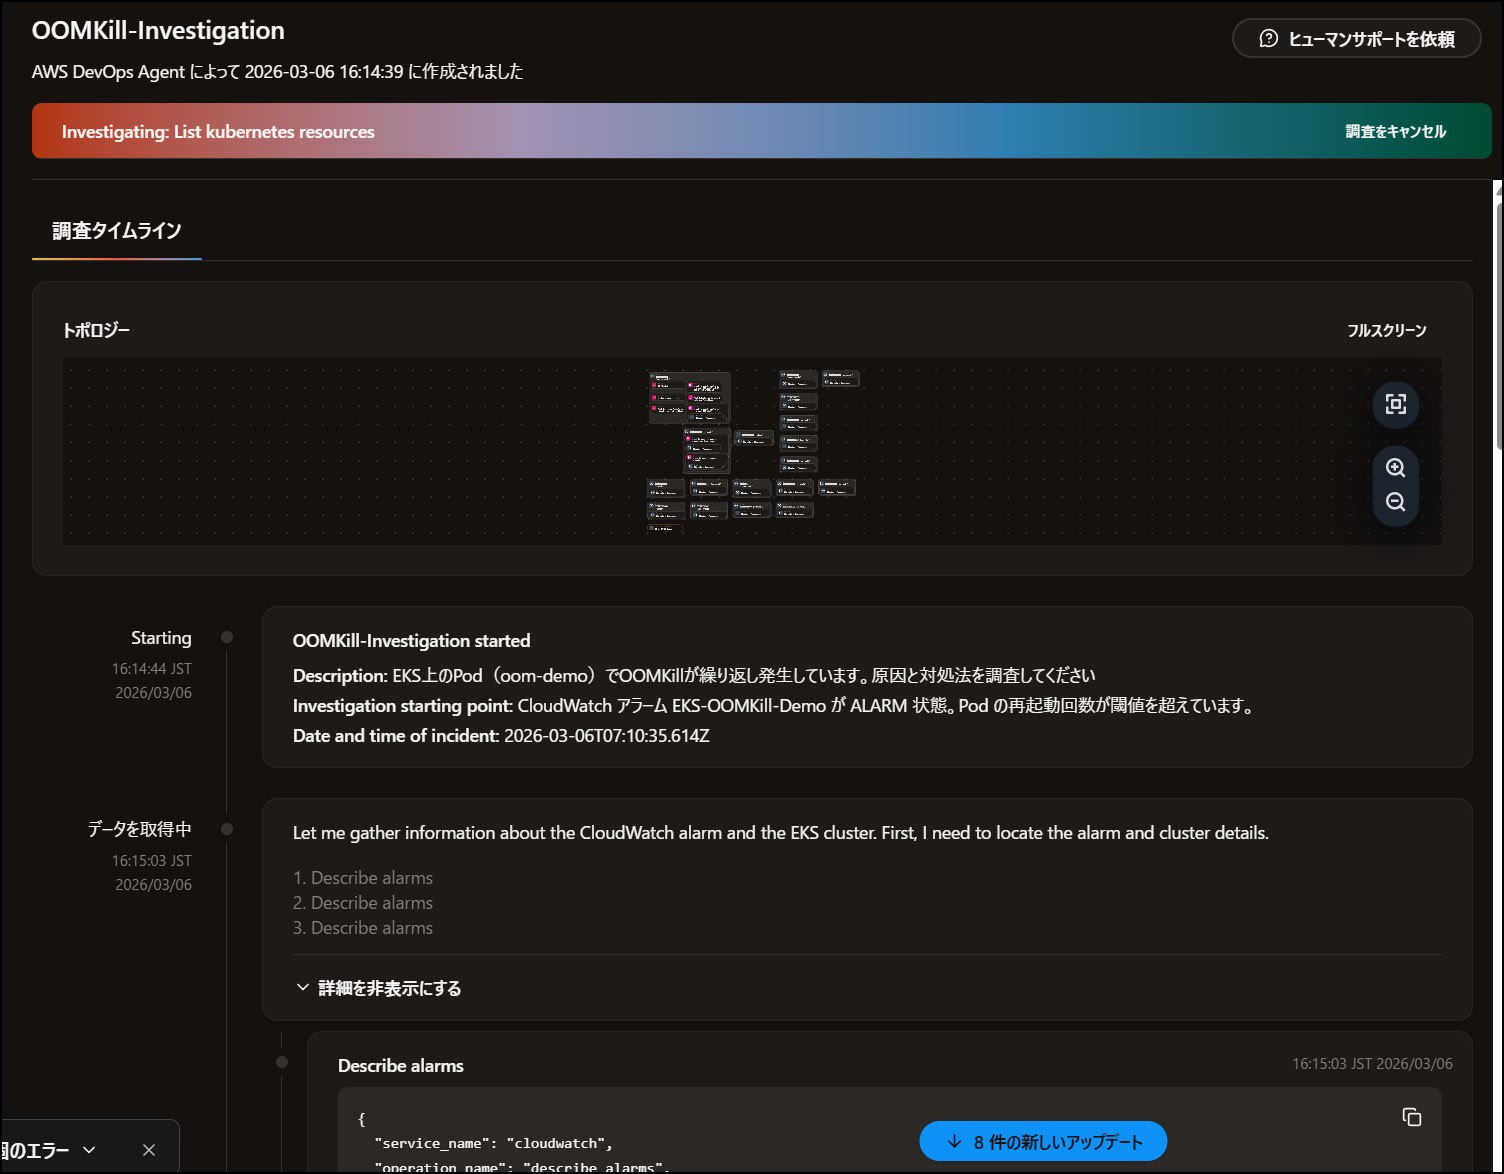
DevOps Agent による調査結果
▼調査は16:14:44に開始したので、2分かからず(16:16:21終了)に原因調査までが完了しました。簡易的な内容とはいえ早い。
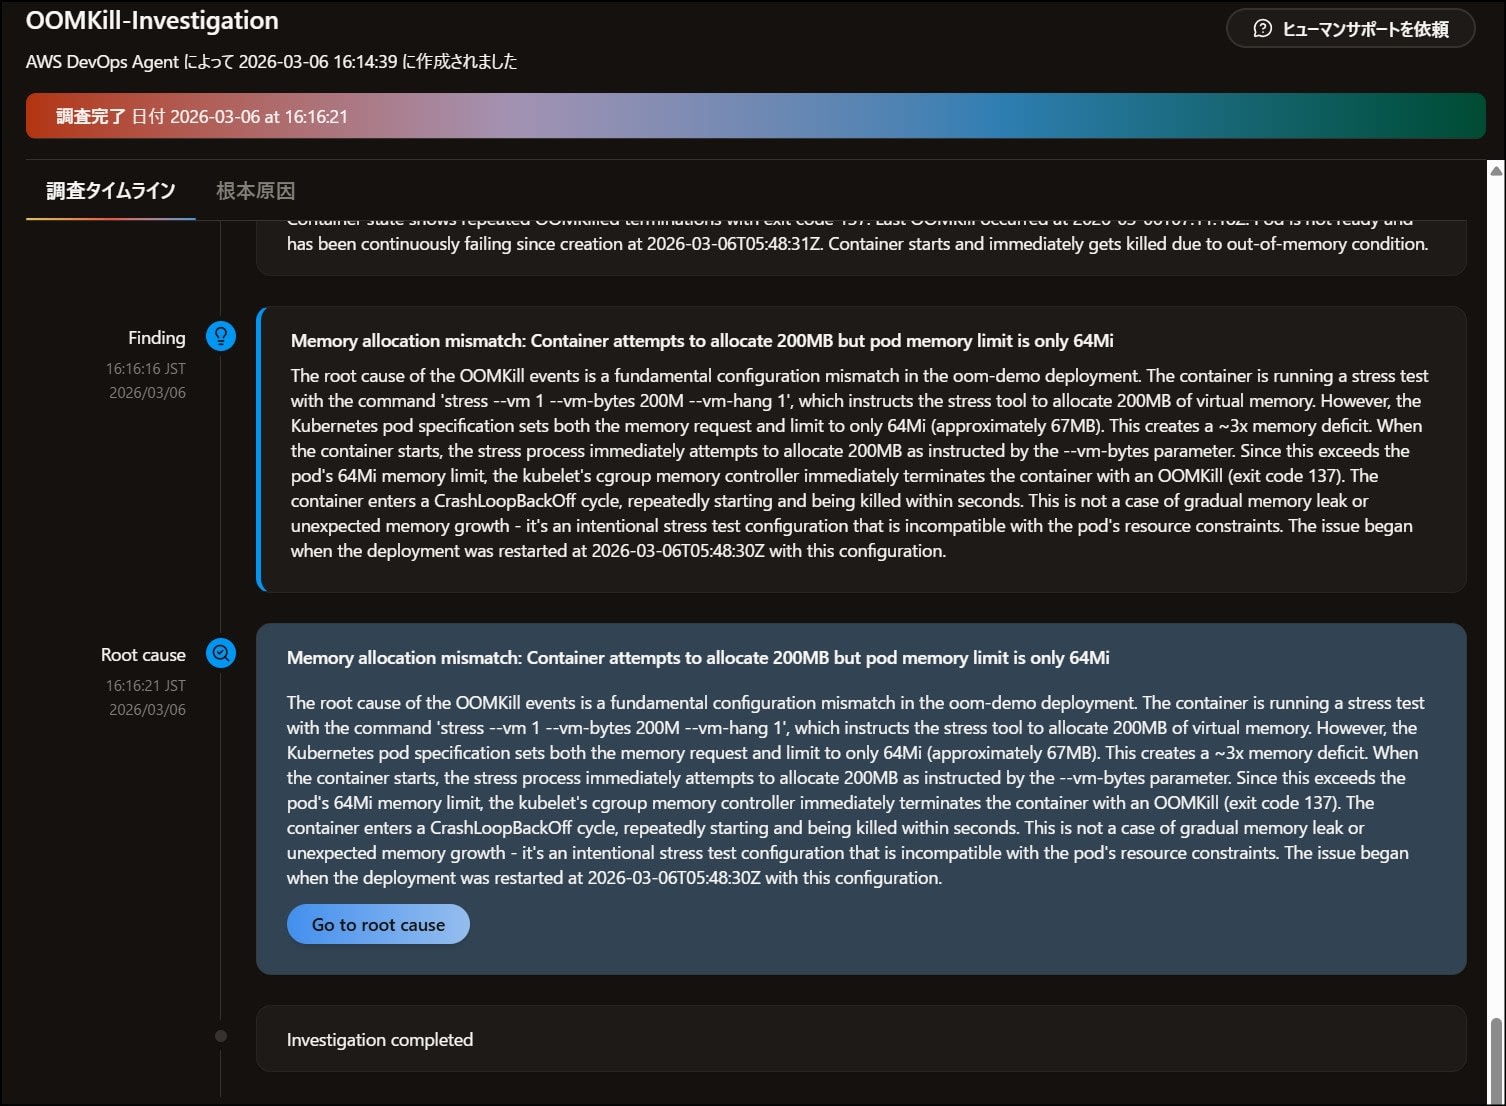
DevOps Agent の根本原因分析(原文)
Memory allocation mismatch: Container attempts to allocate 200MB but pod memory limit is only 64Mi
The root cause of the OOMKill events is a fundamental configuration mismatch in the oom-demo deployment. The container is running a stress test with the command
stress --vm 1 --vm-bytes 200M --vm-hang 1, which instructs the stress tool to allocate 200MB of virtual memory. However, the Kubernetes pod specification sets both the memory request and limit to only 64Mi (approximately 67MB). This creates a ~3x memory deficit. When the container starts, the stress process immediately attempts to allocate 200MB as instructed by the --vm-bytes parameter. Since this exceeds the pod's 64Mi memory limit, the kubelet's cgroup memory controller immediately terminates the container with an OOMKill (exit code 137). The container enters a CrashLoopBackOff cycle, repeatedly starting and being killed within seconds. This is not a case of gradual memory leak or unexpected memory growth - it's an intentional stress test configuration that is incompatible with the pod's resource constraints. The issue began when the deployment was restarted at 2026-03-06T05:48:30Z with this configuration.
上記からも以下の点を暴いています。
- コンテナが確保しようとしているメモリは200MB
- Pod に許可されているメモリ上限は64Mi
- 起動と同時に上限を超えるため、OS が即座に強制終了(OOMKill) → 再起動 → また即終了のループに陥っている
つまり、「徐々にメモリが増えたのではなく、起動した瞬間から設定値が矛盾していた」 という点を正確に見抜いています。
DevOps Agent の緩和計画(原文)
「緩和計画」も確認してみます。
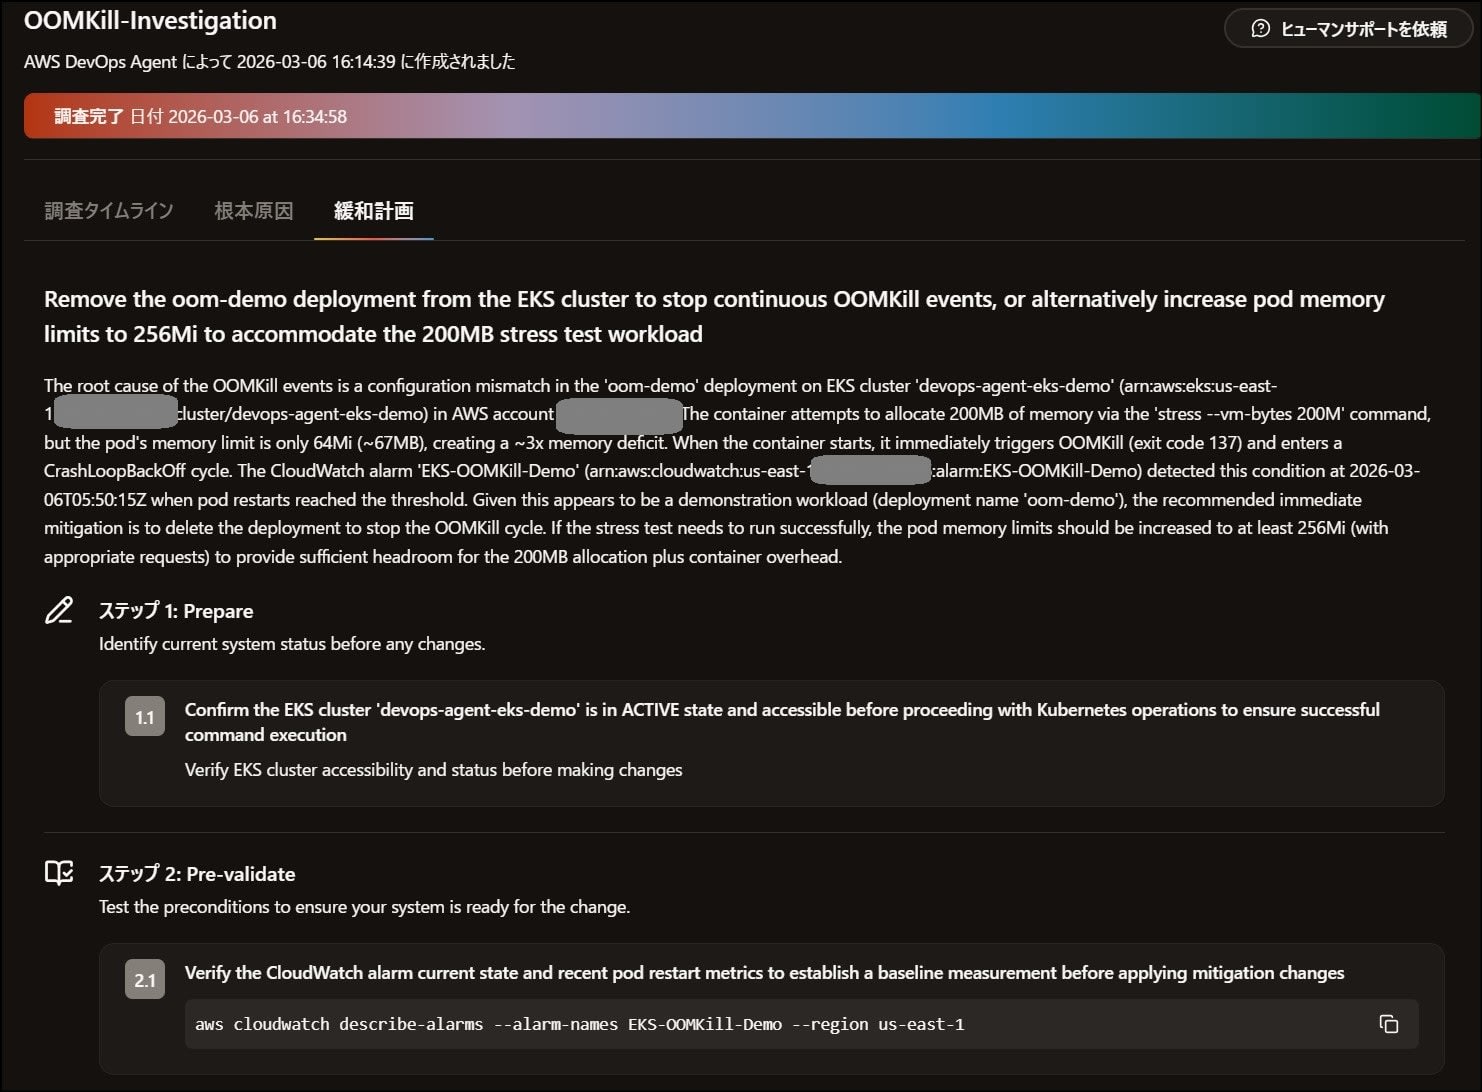
Remove the oom-demo deployment from the EKS cluster to stop continuous OOMKill events, or alternatively increase pod memory limits to 256Mi to accommodate the 200MB stress test workload.
The CloudWatch alarm 'EKS-OOMKill-Demo' detected this condition at 2026-03-06T05:50:15Z when pod restarts reached the threshold.
↓ 概要が提示された後、以下のような感じで対応手順が表示されます。
ステップ 1: Prepare — 変更前にシステム状態を確認
- EKS クラスタが ACTIVE 状態でアクセス可能であることを確認
ステップ 2: Pre-validate — 変更前の事前検証
- CloudWatch アラームの現在の状態とメトリクスを確認してベースラインを記録
kubectl get deployment oom-demo -o yamlで現在の Deployment マニフェストを保存(ロールバック用)
ステップ 3: Apply — 変更の実行(2案を提示)
- 案A(推奨):
kubectl delete deployment oom-demoで Deployment を削除して OOMKill を即時停止 - 案B(継続が必要な場合):
kubectl set resources deployment oom-demo --limits=memory=256Mi --requests=memory=256Miでメモリ制限を引き上げ
ステップ 4: Post-validate — 変更後の確認
kubectl get podsで CrashLoopBackOff 状態の Pod がなくなったことを確認- CloudWatch アラームが OK 状態に戻ったことを 3 ~ 5 分監視して確認
ロールバック手順も提示されており、削除した Deployment を元のマニフェストから復元する方法が記載されていました。Webhook を連携して自動調査させておけば、人間が確認した際にはこれらの情報が既に挙がってきているイメージです。DevOps Agent がフル活用できるようになれば、今後人間が承認するだけでトラブルシュート可能になる未来が見えてきましたね。
振り返りとまとめ的な
AWS DevOps Agent の EKS 連携を通じて、Kubernetes 障害シナリオにおける原因を調査できました。
- OOMKill シナリオで、Pod ログ・Kubernetes Events・CloudWatch メトリクスを横断した根本原因の特定に成功
- 「調査と提案は任せる、実行は人間が判断する」という役割分担が EKS 環境でも明確に機能した
- 今回は手動調査。自動トリガには別途 Webhook 発行が必要。
EKS を運用している方は、まず CloudWatch Container Insights を有効化し、主要なメトリクスにアラームを設定しておくことで、DevOps Agent による自動調査の恩恵を受けやすくなります。
お片付け
検証後は、CloudShell から以下でリソースの削除を実行可能です。
- デプロイしたアプリケーションを削除
kubectl delete deployment oom-demo
- EKS クラスタの削除
※ eksctl が CloudFormation スタックごと削除するため、ノード IAM ロールも自動的に消える
  eksctl delete cluster \
    --name devops-agent-eks-demo \
    --region us-east-1
- DevOps Agent 用 IAM ロールのポリシーデタッチ・削除
aws iam detach-role-policy \
   --role-name DevOpsAgentRole-AgentSpace \
   --policy-arn arn:aws:iam::aws:policy/AIOpsAssistantPolicy

  aws iam delete-role-policy \
    --role-name DevOpsAgentRole-AgentSpace \
    --policy-name ExpandedAIOpsPolicy

  aws iam delete-role --role-name DevOpsAgentRole-AgentSpace
- CloudWatch アラーム削除
aws cloudwatch delete-alarms \
  --alarm-names "EKS-OOMKill-Demo"
あと、ワーカーノード作成時に NAT Gateway が作成されるので、これも削除が必要です。
参考リンク